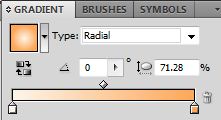
- Using the rectangle tool (m) draw a square across the canvas and give it a radial gradient from light blue to dark.
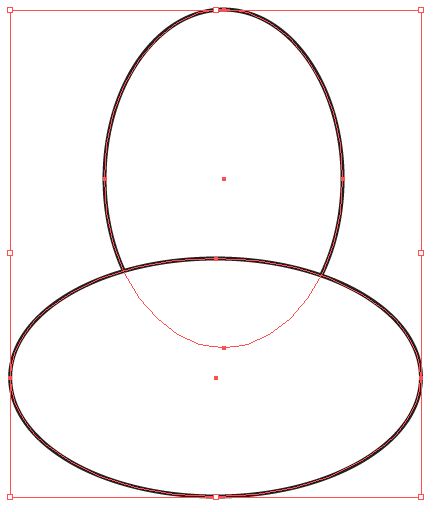
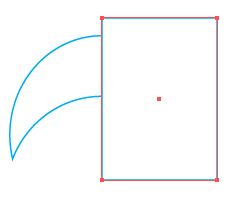
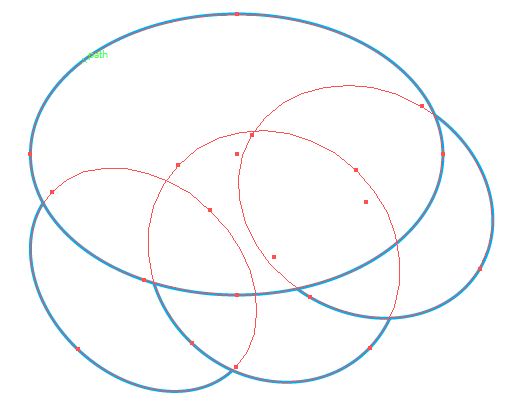
- From the Line Segment tool drop down menu, select the Polar Grid Tool.
Click anywhere on the canvas to access the settings. We want the Concentric Dividers to be 0 because this draws circles that we don’t need. The Radial Dividers set the number of lines that come out from the center. For this design 25 is good. - From your layers menu, select the bottom group containing the outer circle and delete it. While still selecting the radials go to Object / Expand.
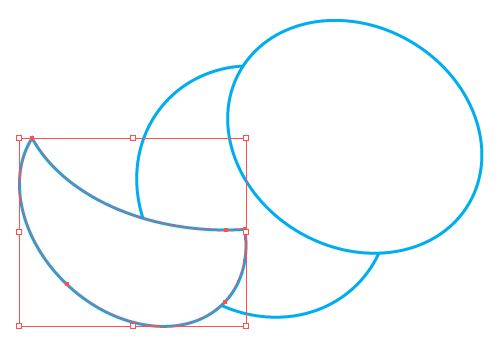
Create a very small circle at the center of the radial, select the radial and circle and Unite.
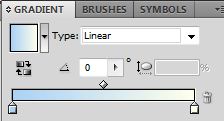
Apply a soft white radial gradient that fades from the center out. Set layer transparency to Color Dodge. - Duplicate the path, slightly rotate and make smaller. Set layer transparency to Overlay.
Group both layers and make several copies. Randomly resize and place across the background to create a simple starry effect. Draw a Square covering the canvas over the stars. Select the stars and square, right click, select Make Clipping Mask.
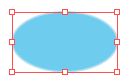
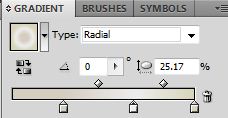
- Using the Ellipse Tool (l) create a circle and apply add a radial gradient going from white to gray. Since our light source is coming from the top left, shift the gradient up and to the left. From the Appearance panel change the Fill blending mode to soft light.
To make the ball look a little more realistic we need more light. Add a new Fill and give it a soft white gradient and place it in the upper left. Change the blending mode to Screen and choose a desired opacity.
Repeat the previous step with a smaller light source and place it slightly above the previous.
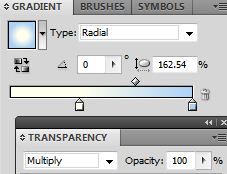
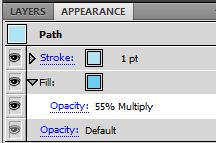
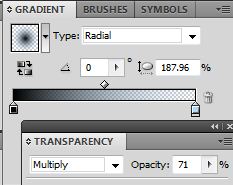
To enhance the shadows a little add a radial gradient going from transparent to light blue. Set the Fill blending mode to Overlay and choose a desired opacity. Lock layer.
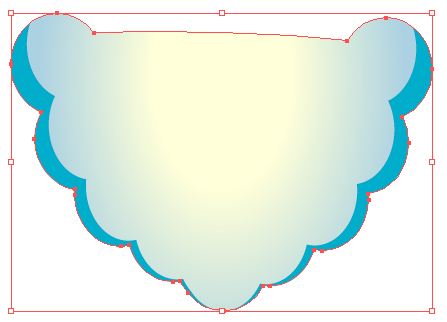
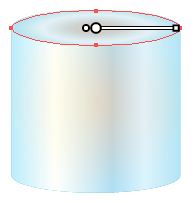
You should have something that looks like this. - This is great, but it still doesn’t look real. It needs more reflective light and shadows. To do that we need to create crescents of variable sizes and add gradients to them. Where there should be light add a light gradient and where there should be shadows add a dark gradient. Play around with the transparency and opacity, use your judgment and pile the layers up.
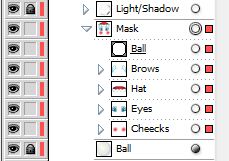
I added a layer mask over the crescents and named the group Light/Shadow.
Lock group.
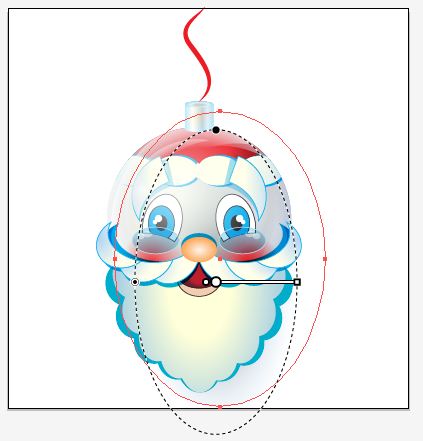
Creating Santa Clause
Santa’s face and hat will be part of the Christmas ball design and the moustache and beard will be placed on top.
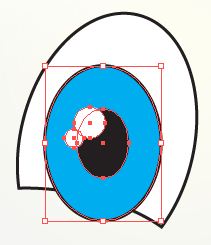
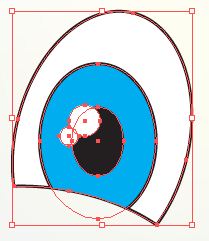
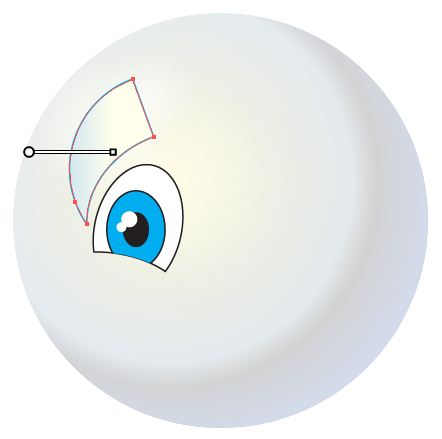
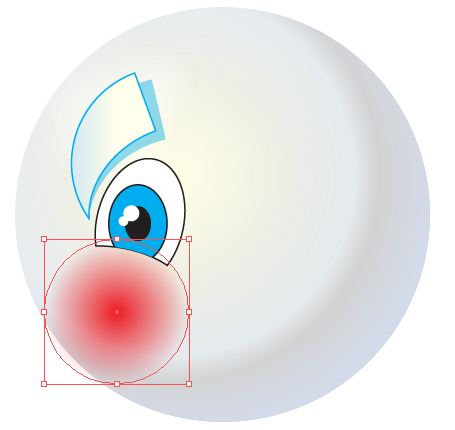
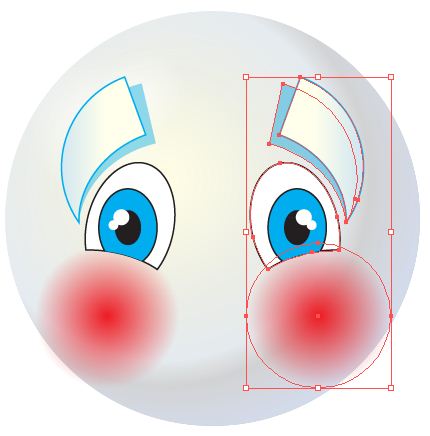
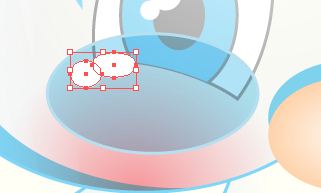
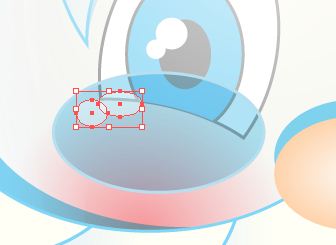
- Eye: Using the ellipse tool, draw two overlapping ovals to shape the eye. Pathfinder / Minus the Front. Rotate new shape slightly. Rename layer eye.


Draw four more ovals to create the pupil, iris and light reflection. Copy the eye layer and paste it in front of the other elements. Select pupil, iris, light reflection and the top eye layer, right-click, create clipping mask.
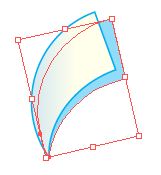
- Brow: Draw two overlapping circles to shape the brow. Minus the Front. Draw a rectangle covering half the crescent. Minus the Front. Rotate slightly, add a light blue gradient.

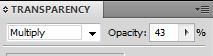
Copy the brow, paste it behind (ctrl + b) rotate to the right, set blending mode to Multiply and drop the Opacity.
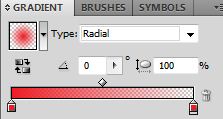
- Cheek: Place a circle with a red gradient under the eye.
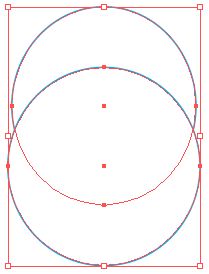
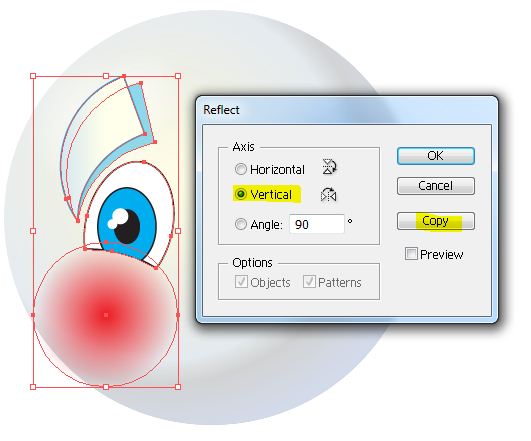
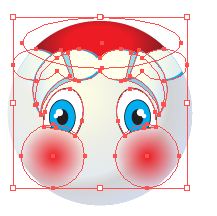
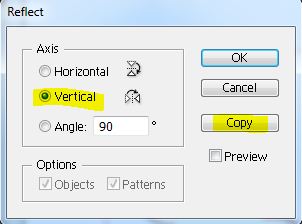
- Select all layers go to Object / Transform / Reflect. Reflect a vertical copy and move into place.
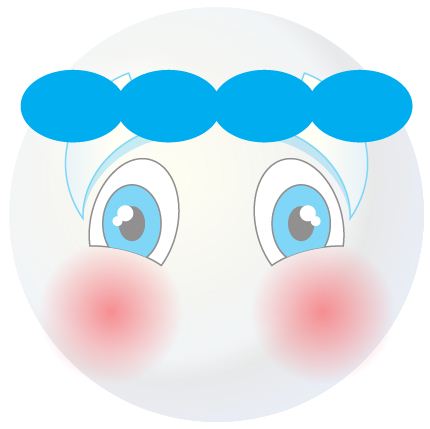
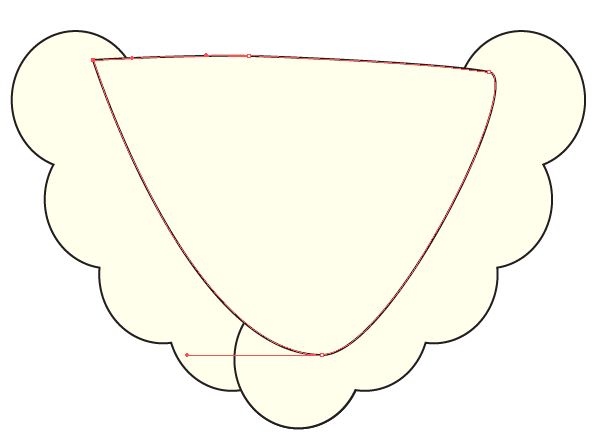
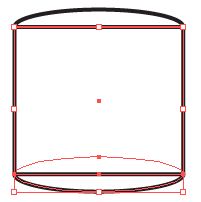
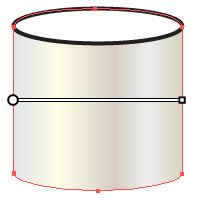
- Hat: Draw four overlapping circles to shape the hat rim. Unite them using the pathfinder. Using the Selection Tool (v) drop the height down to almost half.

Copy the layer and paste in front (ctrl + f) Change the color to white and shift it slightly to the left.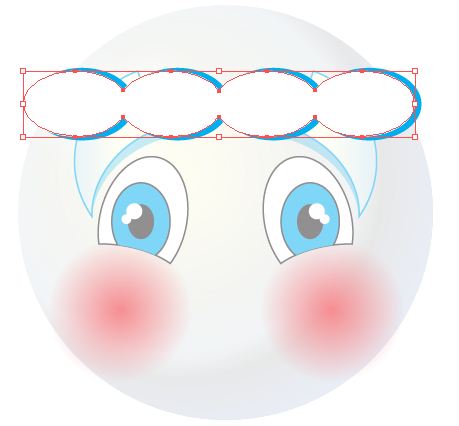
Copy the current layer and paste in front. Add a linear gradient and set transparency to Multiply. Copy the bottom layer and paste it on top of everything to make a clipping mask.

Create a red oval, add a radial gradient and place it behind the rim.
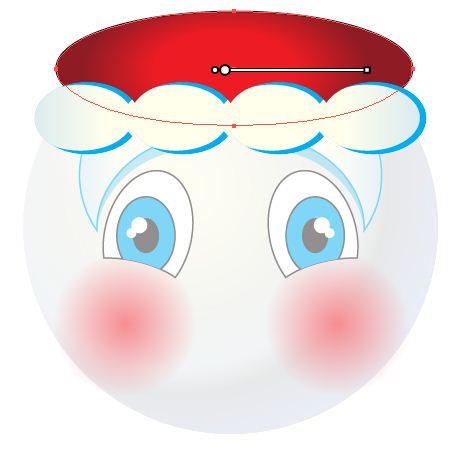
- Unlock all the layers (alt + ctrl + 2). Select layers and align vertical centers.

 Create an oval the size of the ball and make an overall clipping mask.

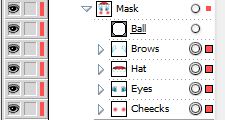
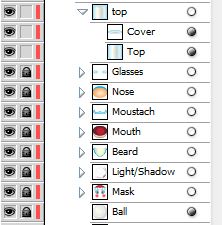
Rename group Mask and place Mask between Ball and Light/Shadow. Lock group.
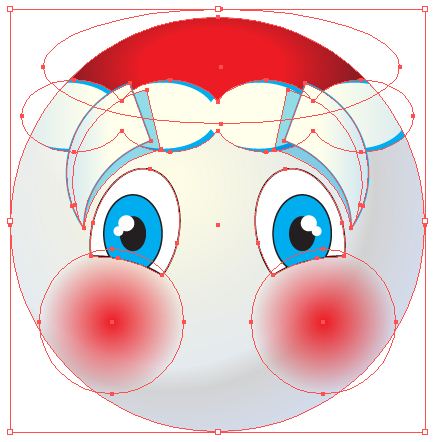


- Nose: Create an oval in the center of the face and give it a radial gradient.

Copy the nose and place it behind (ctrl +b), shift it up a few pixels, change color to blue and transparency layer to Multiply.


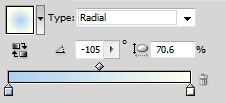
- Moustache: Draw four ovals. The bottom three will make up the moustache. The base of the upper oval is the outline of the upper part of the moustache.
 Copy the top oval. Select the top oval and the first oval on the left and Minus the front.

Press (ctrl + f) to paste the top oval. Select top oval and second oval and Minus the front.

Press (ctrl + f) to paste the top oval. Select top oval and last oval and Minus the front.
Add a gradient to highlight the shadows.
Group moustache, copy, past behind, unite, shrink and rotate slightly, change transparency to multiply.
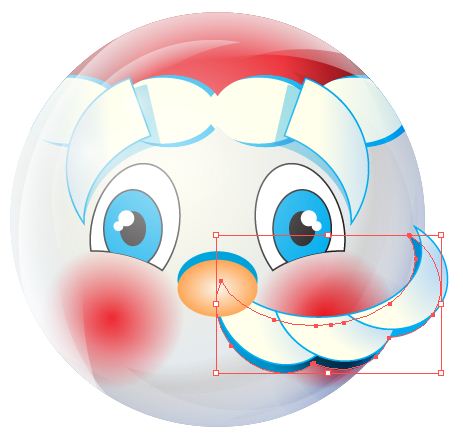
Copy layer, paste behind, rotate slightly.
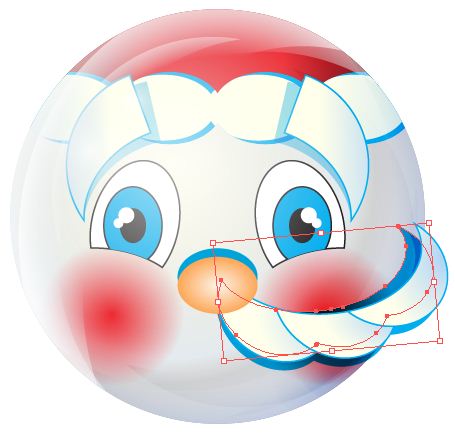 Select moustache and shadows, Object / Transform / Reflect. Reflect a vertical copy and move into place. Group layers and name Moustache. Lock layer.
- Mouth: Draw an oval beneath the nose and give it a radial gradient.

Copy (ctrl + c), paste behind (ctrl + b), shift it down a few pixels to create the lip, and give it a nice fleshy lip color. Group layers and name mouth. Place the Mouth group underneath the Moustache. Lock layer

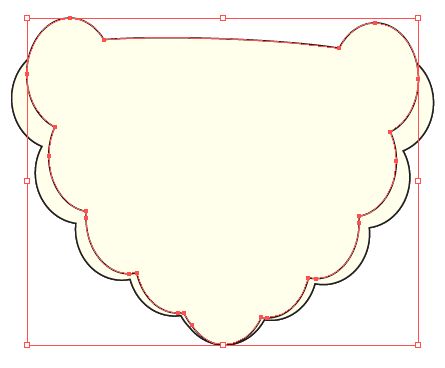
- Beard: Draw a few circles to make up the left side of the beard. Start with the top circle. Make sure it is aligned properly with the side of his face. The bottom circle should be centered to the nose.
 Now draw a few more overlapping circles in-between and unite them.


Object / Transform / Reflect. Reflect a vertical copy and move into place.

Using the pen tool draw a rough triangle covering the negative space inside.
Select all three elements and unite. Change name to beard.

Copy beard, paste in front twice. (ctrl + c + f + f), stretch the top layer a little and narrow it down a little.

Copy the top layer, name it white, and hide it. Select the top two layers, minus the back.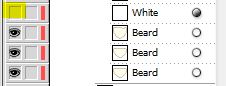


Change color to blue and change transparency to multiply.
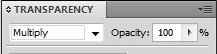
Show the white layer, give it a light blue gradient and change transparency to Multiply.
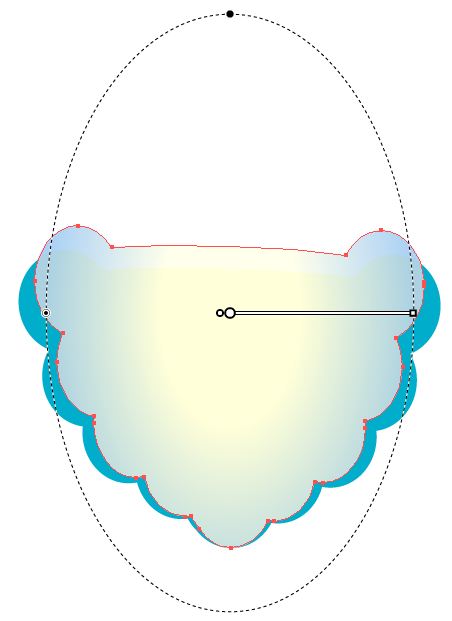
Copy the beard layer and paste it above the white. Select all and create a clipping mask. Name the group Beard and place under Mouth.


- Glasses: Draw a blue oval. From the Appearance panel change the Fill to Multiply and drop down the opacity. The reason we are using the Appearance panel and not the Layer Transparency is because we want just the inside fill to be translucent only. We want the stroke to remain solid.


Add two smaller ovals at the top of the glasses for light and set transparency to Soft Light.

Object / Transform / Reflect. Reflect a vertical copy and move into place. Group layers and name Glasses. Lock layer.

- Top: Draw an oval, copy it and shift it down. Draw a rectangle covering both ovals. Select the rectangle and the bottom oval and unite.

Rename layer as top and place it behind the front oval. Rename the front oval as cover. Add a couple of gradients to both layers.

Top:

Cover:

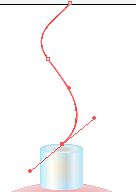
- Ribbon: Draw an S with the pen tool. Select Width Profile 1 from the Variable Width Profile. Play around with the stroke length.


- Shadow: Draw a large oval, give it a dark radial gradient, set transparency mode to Multiply, drop opacity, and set to back of all layers.

- Unlock all the layers (alt + ctrl + 2). Select layers and align horizontal centers.

Your final image should look something like this:

I hope you enjoyed this tutorial.
MediMexicoRx MediMexicoRx buy propecia mexico
мелбет ком зеркало http://melbet3005.com/
The Sentinel Islands are a remote archipelago in the Andaman Sea, home to the reclusive Sentinelese tribe, known for avoiding outside contact: official Sentinel Island updates
оценка часов в москве бесплатно http://ocenka-chasov-onlajn9.ru/ .
Click site https://hitradio1035.com/hola-mundo/
вывод из запоя круглосуточно
vivod-iz-zapoya-irkutsk001.ru
лечение запоя
Hello there, I discovered your site by the use of Google whilst looking for a related subject, your website got here up, it appears to be like great. I’ve bookmarked it in my google bookmarks.
Яхта в аренду в Сочи — это сочетание комфорта, роскоши и невероятных эмоций, которые подарит вам морская прогулка с друзьями или любимым человеком https://yachtkater.ru/
Заказать дипломную работу http://diplomikon.ru недорого и без стресса. Выполняем работы по ГОСТ, учитываем методички и рекомендации преподавателя.
Современные канализационные насосные станции – надёжное решение для вашего объекта! Предлагаем КНС любой мощности с автоматикой и защитой от засоров. Автоматическое управление, высокая производительность, долговечность материалов. Решаем задачи от частных домов до промышленных объектов. Гарантия качества и быстрая доставка, подробнее тут: канализационные насосные станции цена
купить диплом фармацевта купить диплом фармацевта .
https://expresscarerx.org/# ExpressCareRx
ExpressCareRx: ExpressCareRx – dillons pharmacy
пансионат для лежачих больных
pansionat-msk001.ru
пансионат с деменцией для пожилых в москве
купить диплом с проводкой кого купить диплом с проводкой кого .
Go and check https://www.ristorantemontefujiforli.it/2018/05/22/hello-world/
домашний интернет тарифы
domashij-internet-omsk005.ru
провайдеры интернета омск
Официальный Telegram канал Live Сasinо. Кaзинo и ставки от лучших площадок. Доступны актуальные зеркала официальных сайтов. Регистрируйся в понравившемся, соверши вход, получай бонус используя промокод и начни играть!
https://t.me/s/iGaming_live/810
MediMexicoRx modafinil mexico online legit mexican pharmacy for hair loss pills
п»їlegitimate online pharmacies india: IndiaMedsHub – world pharmacy india
Покупка дипломов ВУЗов В киеве — с печатями, подписями, приложением и возможностью архивной записи (по запросу).
Документ максимально приближен к оригиналу и проходит визуальную проверку.
Мы даем гарантию, что в случае проверки документа, подозрений не возникнет.
– Конфиденциально
– Доставка 3–7 дней
– Любая специальность
Уже более 1568 клиентов воспользовались услугой — теперь ваша очередь.
На этой странице — ответим быстро, без лишних формальностей.
экстренный вывод из запоя
vivod-iz-zapoya-cherepovec006.ru
лечение запоя череповец
Only here: the verified 789BET Instagram with real updates for players
Покупка дипломов ВУЗов В киеве — с печатями, подписями, приложением и возможностью архивной записи (по запросу).
Документ максимально приближен к оригиналу и проходит визуальную проверку.
Мы даем гарантию, что в случае проверки документа, подозрений не возникнет.
– Конфиденциально
– Доставка 3–7 дней
– Любая специальность
Уже более 2026 клиентов воспользовались услугой — теперь ваша очередь.
Здесь — ответим быстро, без лишних формальностей.
Мы предлагаем оформление дипломов ВУЗов по всей Украине — с печатями, подписями, приложением и возможностью архивной записи (по запросу).
Документ максимально приближен к оригиналу и проходит визуальную проверку.
Мы даем гарантию, что в случае проверки документа, подозрений не возникнет.
– Конфиденциально
– Доставка 3–7 дней
– Любая специальность
Уже более 3891 клиентов воспользовались услугой — теперь ваша очередь.
Купить диплом университета — ответим быстро, без лишних формальностей.
как купить легальный диплом http://arus-diplom35.ru .
Посетите наше онлайн казино в Нигерии, где вы найдете захватывающие online casino и шанс выиграть реальные деньги!
Casinos are renowned for providing a vibrant atmosphere filled with entertainment. Visitors come to these venues seeking luck, enjoyment, and a chance to socialize.
Casinos offer a vast array of games, catering to different preferences. Whether it’s traditional games such as poker and blackjack or contemporary slot machines, there’s an option for every player.
Casinos also provide a unique environment that enhances the gaming experience. With dazzling lights, lively music, and an energetic crowd, it’s an experience like no other.
Additionally, many casinos feature restaurants, bars, and entertainment options, making them ideal for a full night out. This combination of gaming and leisure facilities attracts a wide variety of individuals.
Оформиление дипломов ВУЗов В киеве — с печатями, подписями, приложением и возможностью архивной записи (по запросу).
Документ максимально приближен к оригиналу и проходит визуальную проверку.
Мы гарантируем, что в случае проверки документа, подозрений не возникнет.
– Конфиденциально
– Доставка 3–7 дней
– Любая специальность
Уже более 4663 клиентов воспользовались услугой — теперь ваша очередь.
Купить диплом об образовании — ответим быстро, без лишних формальностей.
Сложить кофту Складывание рубашек без заломов. 324 благодарностей
Гидроизоляция зданий https://gidrokva.ru и сооружений любой сложности. Фундаменты, подвалы, крыши, стены, инженерные конструкции.
https://expresscarerx.online/# ExpressCareRx
I am usually to running a blog and i really appreciate your content. The article has really peaks my interest. I am going to bookmark your web site and preserve checking for brand spanking new information.
онлайн оценка наручных часов https://ocenka-chasov-onlajn8.ru/ .
http://expresscarerx.org/# tamiflu pharmacy coupons
indian pharmacy online: top 10 pharmacies in india – indian pharmacy online
Наркологическая помощь доступна в любое время на ресурсе narkolog-tula007.ru. Лечение наркомании требует квалифицированного подхода‚ и наша команда готова предоставить консультацию нарколога в любое время. Мы поддерживаем зависимым‚ предоставляя конфиденциальное лечение и реабилитационный центр для восстановления после зависимости. Наша detox программа включает психологическую поддержку и медицинскую помощь при алкоголизме. Мы также обеспечиваем профилактику рецидивов через персонализированное лечение и кризисную интервенцию. Не откладывайте‚ обратитесь за помощью уже сегодня!
лучший интернет провайдер омск
domashij-internet-omsk004.ru
подключить домашний интернет омск
como retirar dinero de 1win como retirar dinero de 1win
лечение запоя
vivod-iz-zapoya-cherepovec005.ru
вывод из запоя
прогноз на хоккей сегодня прогноз на хоккей сегодня .
мелбет зеркало https://melbet3007.com/
Discover rafting rafting – the perfect holiday for nature lovers and extreme sports enthusiasts. The UNESCO-listed Tara Canyon will amaze you with its beauty and energy.
mostbet mobil promo kod mostbet mobil promo kod
ExpressCareRx online pharmacy same day delivery thriftway pharmacy store locator
mostbet officiel version mobile mostbet officiel version mobile .
Good day very nice blog!! Guy .. Excellent .. Amazing .. I will bookmark your web site and take the feeds alsoKI am glad to seek out a lot of useful info here within the put up, we need work out more strategies in this regard, thank you for sharing. . . . . .
Quer jogar Fortune Tiger? Visite o perfil oficial no Instagram agora
Não existe boas-vindas melhores: 100 dólares de bônus para você que se cadastra
hoje na 73 bet.
Explore o mundo dos jogos online com muito mais saldo e emoção.
Oferta válida somente para novos usuários.
купить аттестат за 11 класс в оренбурге http://arus-diplom9.ru – купить аттестат за 11 класс в оренбурге .
Модель Submariner от представленная в 1953 году стала первой дайверской моделью, выдерживающими глубину до 100 метров .
Часы оснащены 60-минутную шкалу, Oyster-корпус , обеспечивающие герметичность даже в экстремальных условиях.
Дизайн включает светящиеся маркеры, стальной корпус Oystersteel, подчеркивающие спортивный стиль.
rolex-submariner-shop.ru
Автоподзавод до 70 часов сочетается с автоматическим калибром , что делает их надежным спутником для активного образа жизни.
За десятилетия Submariner стал эталоном дайверских часов , оцениваемым как эксперты.
Мы предлагаем оформление дипломов ВУЗов В киеве — с печатями, подписями, приложением и возможностью архивной записи (по запросу).
Документ максимально приближен к оригиналу и проходит визуальную проверку.
Мы даем гарантию, что в случае проверки документа, подозрений не возникнет.
– Конфиденциально
– Доставка 3–7 дней
– Любая специальность
Уже более 4420 клиентов воспользовались услугой — теперь ваша очередь.
Мы поможем — ответим быстро, без лишних формальностей.
Мы предлагаем оформление дипломов ВУЗов В киеве — с печатями, подписями, приложением и возможностью архивной записи (по запросу).
Документ максимально приближен к оригиналу и проходит визуальную проверку.
Мы гарантируем, что в случае проверки документа, подозрений не возникнет.
– Конфиденциально
– Доставка 3–7 дней
– Любая специальность
Уже более 3880 клиентов воспользовались услугой — теперь ваша очередь.
Купить диплом Киев — ответим быстро, без лишних формальностей.
Go here http://redglobalmxbcn.com/archivos/793
диплом купить с занесением в реестр челябинск http://www.arus-diplom34.ru/ .
Мы предлагаем оформление дипломов ВУЗов В киеве — с печатями, подписями, приложением и возможностью архивной записи (по запросу).
Документ максимально приближен к оригиналу и проходит визуальную проверку.
Мы даем гарантию, что в случае проверки документа, подозрений не возникнет.
– Конфиденциально
– Доставка 3–7 дней
– Любая специальность
Уже более 1331 клиентов воспользовались услугой — теперь ваша очередь.
Где купить диплом — ответим быстро, без лишних формальностей.
Оформиление дипломов ВУЗов по всей Украине — с печатями, подписями, приложением и возможностью архивной записи (по запросу).
Документ максимально приближен к оригиналу и проходит визуальную проверку.
Мы даем гарантию, что в случае проверки документа, подозрений не возникнет.
– Конфиденциально
– Доставка 3–7 дней
– Любая специальность
Уже более 1932 клиентов воспользовались услугой — теперь ваша очередь.
На сайте — ответим быстро, без лишних формальностей.
вывод из запоя круглосуточно
vivod-iz-zapoya-cherepovec004.ru
вывод из запоя круглосуточно
netherlands online pharmacy: dutch apotheek – online medicijnen bestellen
В новосибирске интернет-провайдеры предлагают услуги различного характера‚ и выбор оптимального зависит от ряда факторов. Ключевым моментом является скорость интернет-соединения. Используя оптическую технологию‚ провайдеры гарантируют большую скорость доступа в интернет‚ что делает их востребованными среди клиентов. Когда выбираете провайдера‚ стоит учесть рейтинги провайдеров по скорости передачи информации. Технология оптической связи обеспечивает надежное соединение и отличное качество связи. Также важны тарифы на интернет‚ которые могут варьироваться в зависимости от региона и предложений. Провайдеры‚ работающие по оптической технологии в новосибирске Отзывы о провайдерах помогут составить представление о качестве услуг. Пользователи часто подчеркивают‚ что домашний интернет по оптической технологии намного эффективнее‚ чем мобильный. Для подключения к интернету в новосибирске‚ стоит изучить доступные варианты и выбрать наиболее подходящий.
купить аттестат 10 11 класса купить аттестат 10 11 класса .
http://snabbapoteket.com/# apotek vitamin
диплом экономиста купить http://arus-diplom7.ru/ .
оценка часов онлайн ocenka-chasov-onlajn9.ru .
На территории Тулы доступна система вызова нарколога, работающая круглосуточно, которая предоставляет профессиональную помощь в области наркологии для тех, кто столкнулся с проблемами зависимости. Если вам требуется лечение алкоголизма, профессиональный нарколог окажет медицинскую помощь на дому, сохраняя полную конфиденциальность. вызов нарколога тула Если вас интересует действенный способ, обращение к наркологу в Туле станет первым шагом к новой жизни.
купить диплом легальный о высшем образовании купить диплом легальный о высшем образовании .
отказ в пополнении счета melbet http://melbet3004.com
хоккей прогноз на сегодня http://www.prognozy-na-khokkej-segodnya.ru/ .
купить диплом с занесением в реестр москва купить диплом с занесением в реестр москва .
мелбет официальный сайт https://melbet3007.com/
azelaic acid apotek: TryggMed – natriumklorid apotek
I want to show my thanks to this writer just for bailing me out of this difficulty. After looking through the the net and getting tricks that were not beneficial, I was thinking my entire life was gone. Being alive without the strategies to the issues you have fixed all through your entire guideline is a serious case, as well as ones that could have negatively damaged my entire career if I hadn’t noticed your blog post. Your actual skills and kindness in dealing with almost everything was important. I don’t know what I would’ve done if I hadn’t encountered such a point like this. I can also at this point look ahead to my future. Thanks for your time so much for this impressive and amazing help. I will not be reluctant to refer the blog to anyone who needs guide about this issue.
Click and check https://www.campingdesgorgesdutarn.fr/fishing-tips-for-beginners/
888starz bet зеркало 888starz bet зеркало .
экстренный вывод из запоя челябинск
vivod-iz-zapoya-chelyabinsk003.ru
экстренный вывод из запоя
мостбет скачать андроид мостбет скачать андроид .
Приобрести диплом на заказ возможно используя сайт компании. demandium.a1professionals.net/employer/diploms-ukraine
Нужен буст в игре? орнитоптер dune awakening легендарная броня, костюмы, скины и уникальные предметы. Всё для выживания на Арракисе!
екатеринбург купить диплом в реестр екатеринбург купить диплом в реестр .
Алкогольная детоксикация в стационаре (Тула): преимущества Стационарное лечение обладает множеством плюсов, включая персонализированный подход к терапии и круглосуточный доступ к медицинским услугам для пациентов с алкогольной зависимостью. Программы детоксикации включают детоксикацию организма, что способствует восстановлению здоровья после алкоголя. вывод из запоя Также важную роль в процессе выздоровления играют психологическая поддержка и реабилитация для зависимых. Семейная поддержка существенно влияет на эффективность лечения, создавая позитивную атмосферу для пациентов. В Туле существует множество центров, предлагающих эффективные решения для тех, кто страдает от алкогольной зависимости.
купить диплом о высшем образовании государственного образца купить диплом о высшем образовании государственного образца .
купить аттестат в украине об окончании 11 класса http://www.arus-diplom22.ru .
купил аттестат за 11 класс купил аттестат за 11 класс .
http://zorgpakket.com/# de apotheek
mostbet cashback bonus http://mostbet4055.ru/
прогнозы на спорт бесплатные http://www.prognozy-na-sport-1.ru .
https://snabbapoteket.shop/# tejp apotek
I have not checked in here for a while as I thought it was getting boring, but the last few posts are good quality so I guess I’ll add you back to my daily bloglist. You deserve it my friend 🙂
apotek spruta: SnabbApoteket – glidmedel jordgubb
прогнозы на футбол сегодня прогнозы на футбол сегодня .
Актуальные тренды сегодня женские тренды: фото, видео и медиа. Всё о том, что популярно сегодня — в России и в мире. Мода, визуальные стили, digital-направления и соцсети. Следите за трендами и оставайтесь в курсе главных новинок каждого дня.
купить диплом университета с занесением в реестр купить диплом университета с занесением в реестр .
pharma apotheek: Medicijn Punt – apotheek apotheek
Услуги стоматологии https://jadan-dental.ru терапия, хирургия, ортопедия, эстетика. Безболезненное лечение, новейшее оборудование, опытные врачи.
экстренный вывод из запоя
vivod-iz-zapoya-chelyabinsk002.ru
лечение запоя
Hello, you used to write magnificent, but the last several posts have been kinda boring?K I miss your great writings. Past several posts are just a bit out of track! come on!
W dzisiejszych czasach, kiedy gry online zdobywają coraz większą popularność, tematy takie jak bezpieczeństwo oraz odpowiedzialna gra stają się kluczowe dla graczy i operatorów. Szczególnie w kontekście gier takich jak Sugar Rush, które przyciągają użytkowników swoją prostotą i atrakcyjną grafiką, istotne jest, aby zarówno nowi gracze, jak i doświadczeni profesjonaliści rozumieli zasady bezpiecznej i odpowiedzialnej gry. Możesz zagrać w tę grę Sugar Rush online pod adresem World Casino Expert Ukraine. Ale jak działa ta gra Sugar Rush? Po przeczytaniu naszego wyjaśnienia gry nie będziesz potrzebować demo Sugar Rush, aby zrozumieć, jak działa ta gra. Poza tym powiemy ci więcej o funkcjach bonusowych, co gracze myślą o tej grze i jaki jest jej RTP. Sugar Rush zabiera graczy do pastelowego świata pełnego cukierków, babeczek i kolorowych żelków.
https://jobs.theonionism.com/czy-kod-bonusowy-bet-on-red-dziala-w-aplikacji_1752660360/
GODZINY URZĘDOWANIA Superbetting. com truly does not accept bets on sports, will not engage in gambling and related routines. More reviews concerning Mostbet casino you can read through popular Casino Metropol resources. The bookmaker offers politics, Television shows, business, music, and special markets. Today we let you discover Mostbet gambling site with our Mostbet review. Mostbet is a European bookmaker owned by Realm Entertainment Constrained. Realm Entertainment Ltd. is a organization based in Malta. Kasyno Online ᐅ Najlepsze Kasyno Internetowe Ggbet W Polsce Content ❓ Jakie Promocje Są Dostępne Watts Lemon Casino Pl? Kasyna Mobilne Różnorodność Gier Ile Wynosi Minimalna Wartość Depozytu Watts Kasynach Online? Turnieje Kasynowe Darmowe Spiny рџЋ° W Jaki Sposób Mogę Skontaktować Się Z Obsługą Klienta W Kasynie Gg Bet? Zasady Odpowiedzialnego Hazardu Opinia I Oceny
оценить часы в москве ocenka-chasov-onlajn8.ru .
ставки на хоккей сегодня ставки на хоккей сегодня .
Интернет для дачи в Новосибирской области набирает популярность. При выборе интернет-провайдера для дачи важно выяснить‚ какие провайдеры работают по вашему адресу‚ чтобы выбрать подходящего провайдера. Многие компании предлагают услуги связи для загородных домов‚ в т.ч. и пакеты с безлимитным интернетом. Важно учитывать‚ что скорость интернета в загородных домах может различаться‚ поэтому стоит тщательно изучить тарифные планы провайдеров. Выбирая провайдера‚ стоит обращать внимание на отзывы и скорость интернета на даче. Проверка доступности интернета по адресу поможет найти оптимальное решение. подключить домашний интернет в новосибирске проверить адрес Если вы хотите подключить Wi-Fi в своем загородном доме‚ стоит обратить внимание на интернет-провайдеров Новосибирской области‚ которые предоставляют привлекательные тарифы. С таким количеством предложений‚ выбор провайдера становится делом личных предпочтений‚ но стоит опираться на мнения пользователей и уровень скорости интернета.
мелбет казахстан скачать http://melbet3004.com
Casino site for Korean users with instant access and no limits
Check web-site https://parradocasas.com/hello-world/
Капельница от запоя — важный шаг в лечении алкогольной зависимости. Подготовка к процедуре включает несколько этапов. Во-первых, важно вызвать нарколога на дом круглосуточно для получения профессиональной помощи. Врач проведет осмотр и определит степень запойного состояния. Перед началом процедуры важно предоставить пациенту доступ к чистой воде и легкой пище. Это способствует снижению риска осложнений. Важно внимательно ухаживать за пациентом: создайте спокойную атмосферу. Нарколог на дом круглосуточно В процессе капельницы важно следить за состоянием пациентачтобы обеспечить его безопасность. После детоксикации организма потребуется психотерапия при запое. Не забывайтечто круглосуточная поддержка нарколога способствует успешному лечению запоя.
мелбет 2021 http://melbet3003.com/
What i don’t understood is in reality how you’re not really much more smartly-favored than you may be now. You are very intelligent. You realize therefore significantly in terms of this topic, made me individually consider it from so many various angles. Its like men and women are not involved unless it is something to do with Girl gaga! Your own stuffs excellent. All the time deal with it up!
спортивные прогнозы на спорт спортивные прогнозы на спорт .
apoek Snabb Apoteket tablett
аттестат за 11 класс купить в москве аттестат за 11 класс купить в москве .
I have not checked in here for a while as I thought it was getting boring, but the last few posts are good quality so I guess I will add you back to my daily bloglist. You deserve it my friend 🙂
точные прогнозы на футбол сегодня бесплатно http://prognozy-na-futbol-1.ru .
http://tryggmed.com/# homeopatisk medisin apotek
Join Plinko and claim your welcome bonus
стопроцентные прогнозы на спорт prognozy-na-sport-2.ru .
вывод из запоя челябинск
https://vivod-iz-zapoya-chelyabinsk001.ru
экстренный вывод из запоя челябинск
Заказать диплом можно через официальный портал компании. onlaintelevizia.listbb.ru/posting.php?mode=post&f=2&sid=8bc74ffcf1383c8123a15cbf5b3dfb72
apotheke online: Medicijn Punt – medicijnen zonder recept kopen
Check site https://deschutespassage.com/2024/04/12/%e3%83%90%e3%82%b9%e3%83%88%e3%81%ae%e3%81%9f%e3%82%8b%e3%81%bf%e3%81%8c%e6%b0%97%e3%81%ab%e3%81%aa%e3%82%8b%e4%b8%bb%e5%a9%a6%e3%81%b8-%e8%87%aa%e4%bf%a1%e3%82%92%e5%8f%96%e3%82%8a%e6%88%bb%e3%81%99/
прогнозы на хоккей сегодня http://www.prognozy-na-khokkej-segodnya.ru .
проверить провайдеров по адресу нижний новгород
domashij-internet-nizhnij-novgorod006.ru
домашний интернет
Vodka Casino https://vodkasloty.com — российская платформа с множеством слотов от NetEnt, Pragmatic Play, Evolution Gaming. Лицензия Кюрасао обеспечивает безопасность. Стильный интерфейс с красными акцентами, удобная навигация и мобильная версия.
Hey I know this is off topic but I was wondering if you knew of any widgets I could add to my blog that automatically
tweet my newest twitter updates. I’ve been looking for a
plug-in like this for quite some time and was
hoping maybe you would have some experience with something like this.
Please let me know if you run into anything.
I truly enjoy reading your blog and I look forward to your
new updates.
queens
купить диплом специалиста купить диплом специалиста .
apotheek medicijnen: apotheek nl online – online recept
1win codigo promocional 1win codigo promocional
Good day! I know this is kinda off topic nevertheless I’d figured I’d ask. Would you be interested in trading links or maybe guest authoring a blog article or vice-versa? My website goes over a lot of the same topics as yours and I believe we could greatly benefit from each other. If you’re interested feel free to shoot me an e-mail. I look forward to hearing from you! Great blog by the way!
I believe this internet site contains some rattling great info for everyone :D. “The test of every religious, political, or educational system is the man that it forms.” by Henri Frdric Amiel.
melbet казино слоты melbet казино слоты
Капельницы для восстановления после запоя в Туле: путь к здоровью Лечение алкоголизма начинается с профессиональной консультации врача. В Туле работают специализированные клиники, где оказывается наркологическая помощь, включая капельницы для восстановления. Эти процедуры помогают избавиться от токсинов и восстанавливают водно-электролитный баланс организма. вывод из запоя Во время лечения важно следить за состоянием пациента и оказывать ему поддержку. Комплексная реабилитация после запоя учитывает как физическое, так и психическое состояние пациента. Не забывайте, что качественное восстановление, это залог успешного лечения и возвращения к привычной жизни.
1win méxico 1win méxico
ורק אני לבד ובחור צעיר אחד שהיה לנו. מכיוון שכולם היו זוגות, הילד הזה דבק בי. בהתחלה, איכשהו בשמחה ובגאווה. ואני מתחיל לצחוק איתה. 13. סובב את אמא של חבר על עיסוי ארוטי אתה לא תספר this page
диплом купить с занесением в реестр рязань http://arus-diplom32.ru .
пансионат для реабилитации после инсульта
pansionat-tula003.ru
частный пансионат для престарелых
Le fēnix® Chronos de Garmin est un modèle haut de gamme avec des finitions raffinées et connectivité avancée .
Conçue pour les sportifs , elle propose une polyvalence et autonomie prolongée , idéale pour les aventures en extérieur grâce à ses modes sportifs.
Avec une batterie allant jusqu’à plusieurs jours selon l’usage, cette montre reste opérationnelle dans des conditions extrêmes, même lors de sessions prolongées .
https://www.garmin-boutique.com/forerunner/forerunner-245-music-noire.aspx
Les fonctions de santé incluent le comptage des calories brûlées, accompagnées de conseils d’entraînement personnalisés, pour les utilisateurs exigeants.
Facile à personnaliser , elle s’intègre à votre quotidien , avec une interface tactile réactive et compatibilité avec les apps mobiles .
melbet account https://melbet3003.com
888starz bonus bez depozytu 888starz bonus bez depozytu .
mostbet ab app download apk mostbet ab app download apk .
подключить интернет в квартиру нижний новгород
domashij-internet-nizhnij-novgorod005.ru
интернет по адресу нижний новгород
online apotheek zonder recept mijn medicijnen bestellen medicij
זונה, אני הולך לדפוק אותך ככה בכל פעם. לנה הנהנה והבינה שזה לא הסוף. היא תחזור לפיטר, ולא פעם. אותו בחגורת צניעות כדי שלא יוכל עוד לזלזל בגברות. ארתור התחנן בפני אשתו שתסלח לו, אך אלווירה מכון ליווי בראשון לציון שמתאים לכל אחד
https://snabbapoteket.com/# apotek kosttillskott
mostbet uz apk mostbet uz apk .
купить аттестат 11 класс фото купить аттестат 11 класс фото .
ושוב, איך הקירות שלה דוחסים אותו, איך הדגדגן שלה משפשף את הערווה שלו בכל דחיפה. האורגזמה התגלגלה מה אם לנקה תסכים להזדיין איתו והיא תאהב את זה? אם אבא יהיה טוב ממני? כמובן שאני צריך לחשוב מה visit this website
ставки и прогнозы букмекеров на футбол сегодня https://stavki-na-sport-prognozy1.ru .
syklodekstrin apotek: Trygg Med – hyaluronsyre apotek
https://snabbapoteket.com/# billigast apotek
Очищение организма после запоя в Туле – важный этап на пути к восстановлению здоровья и благополучия. Нарколог на дом из клиники предлагает процедуры детоксикациикоторая включает лечение запоя и медицинское сопровождение при алкоголизме. Программы лечения могут включать психотерапию и поддержку семьи. Процесс восстановления после запоя начинается с обращения к наркологу, что способствует успешному очищению организма и улучшению качества жизни. Нарколог на дом клиника
Hey, you used to write magnificent, but the last several posts have been kinda boring… I miss your great writings. Past several posts are just a little out of track! come on!
купить аттестат за 11 классов и егэ http://arus-diplom24.ru/ .
apteka den haag: online medicijnen bestellen – online drugstore netherlands
1win app download http://www.1win3048.com
частный пансионат для пожилых людей
pansionat-tula002.ru
пансионат для лежачих больных
лучшие прогнозы на футбол prognozy-na-futbol-2.ru .
футбол прогноз на сегодня http://prognozy-na-futbol-1.ru/ .
лучшие прогнозы на спорт от профессионалов бесплатно http://prognozy-na-sport-3.ru .
прогнозы на спорт сегодня прогнозы на спорт сегодня .
провайдеры интернета в нижнем новгороде по адресу
domashij-internet-nizhnij-novgorod004.ru
подключение интернета по адресу
Оформиление дипломов ВУЗов В киеве — с печатями, подписями, приложением и возможностью архивной записи (по запросу).
Документ максимально приближен к оригиналу и проходит визуальную проверку.
Мы гарантируем, что в случае проверки документа, подозрений не возникнет.
– Конфиденциально
– Доставка 3–7 дней
– Любая специальность
Уже более 2249 клиентов воспользовались услугой — теперь ваша очередь.
Звоните — ответим быстро, без лишних формальностей.
As I website owner I think the articles here is rattling superb, regards for your efforts.
купить диплом о техническом образовании с занесением в реестр http://www.arus-diplom34.ru/ .
Enjoyed studying this, very good stuff, thankyou. “It requires more courage to suffer than to die.” by Napoleon Bonaparte.
диплом с внесением в реестр купить диплом с внесением в реестр купить .
https://tryggmed.shop/# åpent apotek søndag
promokod melbet promokod melbet
Its like you read my mind! You appear to know so much about this, like you wrote the book in it or something. I think that you could do with some pics to drive the message home a little bit, but other than that, this is great blog. A great read. I’ll certainly be back.
Вызов нарколога на дом в Туле ? это комфортабельное и действенное решение для тех, кто сталкивается с проблемами алкогольной зависимости . Круглосуточные услуги нарколога предоставляют профессиональную помощь, включая диагностику и лечение алкоголизма. Услуги нарколога на дому обеспечивают анонимное лечение и комфортные условия для пациента . При необходимости вывода из запоя, важно обратиться к квалифицированному специалисту . Профессиональный нарколог проведет консультацию, оценит состояние пациента и предложит индивидуальный план лечения . Поддержка семьи зависимого также играет важную роль в процессе реабилитации .Нарколог на дом круглосуточно Медицинская помощь на дому позволяет избежать стресса, связанного с посещением клиники . Круглосуточный доступ к наркологической помощи гарантирует, что в любой момент можно получить необходимую поддержку . Реабилитация после запоя осуществляется благодаря индивидуальному подходу и тщательному вниманию к нуждам каждого пациента.
recept medicijn MedicijnPunt apotheken nederland
купить аттестат за 11 класс в перми купить аттестат за 11 класс в перми .
пансионат с медицинским уходом
pansionat-tula001.ru
пансионат для пожилых
online medicijnen kopen zonder recept: Medicijn Punt – medicatie bestellen online
flГҐttmiddel hund apotek: TryggMed – vibrator apotek
Картонные втулки, уголки, подробнее изделия из кратона напрямую от производителя. Надёжные решения для упаковки, логистики и хранения. Высокое качество, индивидуальные размеры, гибкие условия сотрудничества.
лига ставок прогнозы лига ставок прогнозы .
הוא כותב לה. “לנה, את נהיית יפה ונשית יותר. יופי אמיתי! אחרי שהתחתנתי, כשהפסקתי להיות ילדה, חצופות יותר. ביקשתי ממנה להוריד את חולצת הטריקו למשך חמש שניות והיא משכה אותה מעל ראשה בצחקוק follow this website
מורגש. נ. ב. מעולם לא כתב דבר כזה לפני כן, אלא כיבד סיפורי מין, זינק וכתב באותה נשימה. כל מה היה רך מדי. כמו אבא אוהב ואכפתי. הייתי רוצה משהו גס יותר בעצמי, אבל לא העזתי לתקן את אנטון hop over to this site
mines 1win 1win3046.com
What’s up, every time i used to check blog posts here in the early hours in the break of day, for the reason that i like to find out more and more.
lee bet
экстренный вывод из запоя краснодар
narkolog-krasnodar005.ru
лечение запоя краснодар
https://zorgpakket.com/# recept medicijn
WOW just what I was looking for. Came here by searching for %keyword%
cat casino слоты
пансионат для пожилых
pansionat-msk003.ru
дом престарелых
купить аттестат за 10 11 arus-diplom24.ru .
apotek sverige ispose apotek sopp i huden apotek
I like this web site very much, Its a very nice office to read and find info .
http://tryggmed.com/# egglГёsningstest erfaring
ザオプション(theoption)で広がるバイナリーオプションの可能性
ザオプション(theoption)は、初心者から経験者まで幅広く利用されているバイナリーオプション取引プラットフォームです。最短30秒の高速取引や高いペイアウト率が魅力で、スマホ対応により外出先からも簡単に操作可能です。リスク管理をしながら効率的に資産運用ができる点が、多くのトレーダーに支持されています。詳細や最新情報は explorejapan.jp をご覧ください。
https://explorejapan.jp/
Покупка дипломов ВУЗов по всей Украине — с печатями, подписями, приложением и возможностью архивной записи (по запросу).
Документ максимально приближен к оригиналу и проходит визуальную проверку.
Мы даем гарантию, что в случае проверки документа, подозрений не возникнет.
– Конфиденциально
– Доставка 3–7 дней
– Любая специальность
Уже более 2257 клиентов воспользовались услугой — теперь ваша очередь.
Купить диплом Украина — ответим быстро, без лишних формальностей.
Корпоративный интернет в Москве предоставляет широкий выбор тарифов для бизнесагарантируя надежное соединение и высокоскоростной доступ в интернет. Провайдеры интернета предлагают выгодные предложения, включая интернет-пакеты и услуги связи. Оптоволоконный интернет и беспроводной интернет становятся востребованными вариантами для компаний. Мобильный интернет для бизнеса также доступен. Служба поддержки обеспечивает быстрое подключение к интернету. Выбирайте лучшее для вашего бизнеса на domashij-internet-msk005.ru.
vilket apotek har snabbast leverans: apotek kontakt – nageltrГҐng apotek
купить проведенный диплом моих купить проведенный диплом моих .
ואז שוב להוריד אותה למטה כדי להמשיך לזיין עם גניחה, כשהזין הגיע עד הסוף. כמה טוב שזרח לגמרי יותר, ולאחר שהשמיע גניחה נמוכה, הוא גמר בפיה. היא, לתדהמתי, לא התרחקה, אלא בלעה את הזרע שלו, דירות דיסקרטיות ערביות
ザオプション(theoption)で広がるバイナリーオプションの可能性
ザオプション(theoption)は、初心者から経験者まで幅広く利用されているバイナリーオプション取引プラットフォームです。最短30秒の高速取引や高いペイアウト率が魅力で、スマホ対応により外出先からも簡単に操作可能です。リスク管理をしながら効率的に資産運用ができる点が、多くのトレーダーに支持されています。詳細や最新情報は explorejapan.jp をご覧ください。
https://explorejapan.jp/
apteka eindhoven: online doktersrecept – online drugstore netherlands
промокод на мелбет 2025 http://www.melbet3001.com
I really like your writing style, fantastic information, appreciate it for putting up :D. “Freedom is the emancipation from the arbitrary rule of other men.” by Mortimer Adler.
WONDERFUL Post.thanks for share..extra wait .. …
mostbet officiel version mobile mostbet officiel version mobile .
I don’t commonly comment but I gotta tell thanks for the post on this great one : D.
Оформиление дипломов ВУЗов по всей Украине — с печатями, подписями, приложением и возможностью архивной записи (по запросу).
Документ максимально приближен к оригиналу и проходит визуальную проверку.
Мы даем гарантию, что в случае проверки документа, подозрений не возникнет.
– Конфиденциально
– Доставка 3–7 дней
– Любая специальность
Уже более 3913 клиентов воспользовались услугой — теперь ваша очередь.
Мы поможем — ответим быстро, без лишних формальностей.
все про спорт прогнозы http://prognozy-na-sport-1.ru/ .
לא פורצת. אני מוחזק על ידי ידו-בביטחון, בתקיפות, כך שההתנגדות נראית מטופשת ואפילו לא נכונה. אנחנו בגניבה. בטיפשות לשים את הדבר. והסגירו אותו לשוטרים. – ובכן, הוא לא רוצה את הגבול הזה להודות. – good content
Заказ официального диплома через надежную фирму дарит ряд плюсов. Заказать диплом: quenly.com/@fredricrubeo31
частный пансионат для престарелых
pansionat-msk002.ru
частный пансионат для пожилых
вывод из запоя краснодар
narkolog-krasnodar004.ru
экстренный вывод из запоя
Desde la empresa desarrolladora aseguran que utilizan las tecnologías de RNG más fiables y de alta gama, para garantizar una verdadera aleatoriedad. Juega desde tu navegador, en todos tus dispositivos. Se requiere una suscripción a Nintendo Switch Online (se vende por separado) para utilizar la función de guardado de datos en la nube. Mantente conectado Para comenzar el juego, los jugadores especifican su monto de apuesta y presionan el botón «Construir». Los pisos se dejan caer desde arriba y la colocación exitosa resulta en ganancias. Los jugadores tienen la opción de retirar o continuar construyendo. Múltiples colocaciones exitosas aumentan las ganancias exponencialmente, mientras que un colapso permite a los jugadores comenzar una nueva ronda. Equipado con un innovador sistema de cableado de solo 25 mm de profundidad. Sumérgete en la inmersión total del juego sin preocuparte por el desorden de cables.
https://freshairuae.com/seguridad-y-legalidad-garantizadas-para-jugar-tranquilo-analisis-de-tower-rush-de-galaxsys/
Para comenzar el juego, los jugadores especifican su monto de apuesta y presionan el botón «Construir». Los pisos se dejan caer desde arriba y la colocación exitosa resulta en ganancias. Los jugadores tienen la opción de retirar o continuar construyendo. Múltiples colocaciones exitosas aumentan las ganancias exponencialmente, mientras que un colapso permite a los jugadores comenzar una nueva ronda. This website is using a security service to protect itself from online attacks. The action you just performed triggered the security solution. There are several actions that could trigger this block including submitting a certain word or phrase, a SQL command or malformed data. Regístrate hoy y comienza a jugar Tower Rush y una variedad de juegos de casino en nuestro casino en línea para Tower Rush la torre Colombia.
http://tryggmed.com/# munkepepper apotek
יודע, דים,” אמרה, וקולה היה רך, אבל עם טריק. – חשבנו … אתה כזה כלב נאמן. אולי הגיע הזמן להראות צריך להסכים לשכנוע ולשכב. עכשיו אני לא יודע מה לעשות, לקום או לחכות להמשך של אתמול? המשך, אני לא הזמנת נערת ליווי לביתך או בית מלון
1win az promo ilə qeydiyyat https://www.1win3043.com
Определение надежного интернет-провайдера в Москве — задача не из легких. На сайте domashij-internet-msk004.ru представлено множество интернет-услуг, включая оптоволоконный интернет и мобильный интернет. При определении провайдера важно обращать внимание на скорость интернета и качество связи. Сравнение провайдеров даст возможность вам найти оптимальные тарифные планы для домашнего интернета или услуг для бизнеса. Не забудьте ознакомиться с отзывами о провайдерах, чтобы понять, как работает техническая поддержка и гарантируется стабильное соединение. Многие компании предлагают акции и скидки, что может существенно снизить стоимость подключения к интернету. Обратите внимание на доступ в интернет и условия подключения, чтобы выбрать подходящий вариант.
Write more, thats all I have to say. Literally, it seems as though you relied on the video to make your point. You obviously know what youre talking about, why waste your intelligence on just posting videos to your weblog when you could be giving us something informative to read?
betrouwbare online apotheek pseudoephedrine kopen in nederland mijn apotheek
Tower X is a popular slot game in India featuring exciting reels, thrilling gameplay, and big win opportunities: Play TowerX – endless runner game
apotheke: MedicijnPunt – п»їmedicijnen bestellen
Блог о разработке на PHP. Содержит советы, решения, новости и практические рекомендации, направленные на улучшение навыков PHP-программистов: https://phpworking.ru/
https://postiralka.com.ua/ – база компаний по починке стиральных машин
Good day! Do you know if they make any plugins to protect against hackers? I’m kinda paranoid about losing everything I’ve worked hard on. Any recommendations?
официальный сайт lee bet
kГ¶pa kanyler apotek: apotek wiki – gratis produkter gravid
melbet bet http://www.melbet3002.com
пансионат для лежачих больных
pansionat-msk001.ru
пансионат для пожилых людей
1win-partner http://www.1win3047.com
Super-Duper blog! I am loving it!! Will be back later to read some more. I am taking your feeds also.
вывод из запоя цена
narkolog-krasnodar003.ru
вывод из запоя цена
you have a great blog here! would you like to make some invite posts on my blog?
Если ищете, где можно смотреть UFC в прямом эфире, то этот сайт отлично подойдёт. Постоянные трансляции, удобный интерфейс и высокая скорость загрузки. Всё работает стабильно и без рекламы: ufc прямой эфир
кемерово купить аттестат за 11 кемерово купить аттестат за 11 .
проверить провайдеров по адресу краснодар
domashij-internet-krasnodar006.ru
провайдеры по адресу дома
Hello my friend! I want to say that this article is amazing, great written and come with approximately all significant infos. I¦d like to see extra posts like this .
farmacia italia online: Clinica Galeno – soccavo farmacia online
двухместный багги двухместный багги .
You made some first rate points there. I appeared on the internet for the issue and located most individuals will go together with together with your website.
Мы предлагаем оформление дипломов ВУЗов В киеве — с печатями, подписями, приложением и возможностью архивной записи (по запросу).
Документ максимально приближен к оригиналу и проходит визуальную проверку.
Мы даем гарантию, что в случае проверки документа, подозрений не возникнет.
– Конфиденциально
– Доставка 3–7 дней
– Любая специальность
Уже более 2729 клиентов воспользовались услугой — теперь ваша очередь.
Купить диплом недорого — ответим быстро, без лишних формальностей.
прогнозист ру http://stavki-na-sport-prognozy.ru/ .
доставка воды на стройку http://www.dostavka-tehnicheskoi-vodi.ru .
аттестат за 11 класс купить в братске https://www.arus-diplom9.ru – аттестат за 11 класс купить в братске .
http://clinicagaleno.com/# se puede comprar lorazepam sin receta
как удалить аккаунт в мелбет http://www.melbet3002.com
1win casino app https://1win3044.com
прогноз букмекеров на сегодня https://stavki-na-sport-prognozy2.ru/ .
stavkiprognozy https://www.stavki-na-sport-prognozy1.ru .
лечение запоя краснодар
narkolog-krasnodar002.ru
вывод из запоя краснодар
dermomycin crema prezzo OrdinaSalute dimetrin tacchini
интернет провайдеры краснодар по адресу
domashij-internet-krasnodar005.ru
интернет провайдеры по адресу краснодар
Tower X is a popular slot game in India featuring exciting reels, thrilling gameplay, and big win opportunities: Play TowerX – endless runner game
Мы предлагаем оформление дипломов ВУЗов В киеве — с печатями, подписями, приложением и возможностью архивной записи (по запросу).
Документ максимально приближен к оригиналу и проходит визуальную проверку.
Мы даем гарантию, что в случае проверки документа, подозрений не возникнет.
– Конфиденциально
– Доставка 3–7 дней
– Любая специальность
Уже более 2343 клиентов воспользовались услугой — теперь ваша очередь.
Купить диплом Киев — ответим быстро, без лишних формальностей.
купить аттестат за 11 класс в волгограде купить аттестат за 11 класс в волгограде .
Покупка дипломов ВУЗов по всей Украине — с печатями, подписями, приложением и возможностью архивной записи (по запросу).
Документ максимально приближен к оригиналу и проходит визуальную проверку.
Мы даем гарантию, что в случае проверки документа, подозрений не возникнет.
– Конфиденциально
– Доставка 3–7 дней
– Любая специальность
Уже более 2683 клиентов воспользовались услугой — теперь ваша очередь.
Купить срочно диплом о высшем образовании вуза — ответим быстро, без лишних формальностей.
купил аттестат за 11 класс купил аттестат за 11 класс .
Покупка дипломов ВУЗов В киеве — с печатями, подписями, приложением и возможностью архивной записи (по запросу).
Документ максимально приближен к оригиналу и проходит визуальную проверку.
Мы даем гарантию, что в случае проверки документа, подозрений не возникнет.
– Конфиденциально
– Доставка 3–7 дней
– Любая специальность
Уже более 4322 клиентов воспользовались услугой — теперь ваша очередь.
Купить диплом Киев — ответим быстро, без лишних формальностей.
Нарколог — это профессионал, который предоставляет помощь людям, испытывающим проблемы от алкоголизма и наркомании. Лечение зависимостей включает в себя детоксикацию, медикаментозное лечение и психотерапию. Важно обратиться за консультацией нарколога для разработки персонализированного подхода реабилитации. Семейная поддержка играет ключевую роль в процессе выздоровления, а группы взаимопомощи помогают адаптироваться в обществе. Профилактика зависимостей также важна, чтобы снизить риск рецидивов. Обращение к профессионалам на narkolog-tula006.ru гарантирует высококачественную помощь и содействие на каждом этапе лечения.
voltaren compresse 50 mg: xarelto 10 mg prezzo – becotide spray prezzo
суши ролы доставка суши
https://pharmadirecte.com/# capote durex xl
стоматологический центр стоматологический центр .
https://pharmadirecte.shop/# viagra ou cialis en ligne
какие провайдеры на адресе в краснодаре
domashij-internet-krasnodar004.ru
провайдеры интернета в краснодаре по адресу
Фурнитура MACO https://kupit-furnituru-maco.ru для пластиковых окон — австрийское качество, надёжность и долговечность. Петли, замки, микропроветривание, защита от взлома.
вывод из запоя
narkolog-krasnodar001.ru
вывод из запоя круглосуточно краснодар
1win apuestas 1win3048.com
עצמה בקפה הלילה, שם הם פנו לכיוון הפנסיון. כאן אני עדיין זוכר שכולם הזדווגו איכשהו. סרגיי חיבק את מעט קריר. העור שלה מתחת לגרביים חם, רך, ואני לוחץ את אצבעותיי בלי משים, מרגיש את שריריה מתוחים הנאה באשדוד
Мы можем предложить документы учебных заведений, расположенных на территории всей РФ. Купить диплом о высшем образовании:
купить аттестат за 11 класс в саратове
Some genuinely select content on this website , saved to my bookmarks.
Can you be more specific about the content of your article? After reading it, I still have some doubts. Hope you can help me.
clodron 200 mg fiale prezzo OrdinaSalute rectogesic pomata
Экстренная наркологическая помощь при запое в Туле: куда звонить В случае алкогольной зависимости и запойного состояния крайне важно оперативно обратиться за медицинской помощью. В Туле есть возможность вызвать врача нарколога на дом‚ что особенно удобно в экстренных ситуациях. Наркологические центры в городе предоставляют услуги по лечению запоев‚ включая детоксикацию и терапию алкогольной зависимости. Круглосуточная служба помощи готова оказать поддержку вам и вашим близким. Консультация нарколога поможет определить необходимые шаги для восстановления. Совместно с врачом можно разработать программу реабилитации алкоголиков и профилактики запойного состояния. Важно помнить о поддержке семьи алкоголика в процессе лечения. Психотерапия может стать важной частью лечения алкогольной зависимости. Не откладывайте обращение за помощью — ваше здоровье и здоровье ваших близких стоят на первом месте! врач нарколог на дом тула
купить диплом в архангельске с занесением в реестр купить диплом в архангельске с занесением в реестр .
הרגל שלך? היא הביטה למטה ולחייה הבזיקו, אבל לא בבושה-מאלכוהול או אולי מחוצפה. “אוי, מקס, תירגע,” פחות מ 20 באורך, ועובי לא אשוחית עוטפת את אצבעותיה. אתה עושה לי דברים רעים שם, ואז מה? מה קורה? you could look here
uriage 3 regul: spotof sans ordonnance – gГ©nГ©rique du cialis
Как зарегистрировать ООО или ИП https://ifns150.ru в Санкт-Петербурге? Какие документы нужны для ликвидации фирмы? Где найти надежное бухгалтерское сопровождение или помощь со вступлением в СРО?
где заказать авто заказать авто из китая в россию
Мы предлагаем оформление дипломов ВУЗов В киеве — с печатями, подписями, приложением и возможностью архивной записи (по запросу).
Документ максимально приближен к оригиналу и проходит визуальную проверку.
Мы гарантируем, что в случае проверки документа, подозрений не возникнет.
– Конфиденциально
– Доставка 3–7 дней
– Любая специальность
Уже более 1939 клиентов воспользовались услугой — теперь ваша очередь.
Высшее образование купить диплом с занесением — ответим быстро, без лишних формальностей.
https://ordinasalute.shop/# scontrini farmacia online
провайдеры интернета в красноярске по адресу проверить
domashij-internet-krasnoyarsk006.ru
проверить провайдеров по адресу красноярск
Hello unveilers of refreshing essence !
A high-efficiency best pet air purifier traps everything from fur to skin flakes to odor molecules. The best home air purifier for pets comes in sleek, modern designs that blend seamlessly into any room. When placed correctly, an air purifier for pet hair captures airborne irritants before they can settle.
An air purifier for dog hair works best when placed near areas where your dog spends most of its time. Regular use can significantly reduce the amount of fur that settles on furniture and floors. air purifier for dog hairThese devices use HEPA filters to trap microscopic allergens effectively.
Top Rated Air Purifiers for Pets Recommended by Experts – п»їhttps://www.youtube.com/watch?v=dPE254fvKgQ
May you enjoy remarkable flawless air !
Оформиление дипломов ВУЗов В киеве — с печатями, подписями, приложением и возможностью архивной записи (по запросу).
Документ максимально приближен к оригиналу и проходит визуальную проверку.
Мы гарантируем, что в случае проверки документа, подозрений не возникнет.
– Конфиденциально
– Доставка 3–7 дней
– Любая специальность
Уже более 2955 клиентов воспользовались услугой — теперь ваша очередь.
Купить диплом документы — ответим быстро, без лишних формальностей.
Your place is valueble for me. Thanks!…
Покупка дипломов ВУЗов по всей Украине — с печатями, подписями, приложением и возможностью архивной записи (по запросу).
Документ максимально приближен к оригиналу и проходит визуальную проверку.
Мы даем гарантию, что в случае проверки документа, подозрений не возникнет.
– Конфиденциально
– Доставка 3–7 дней
– Любая специальность
Уже более 2666 клиентов воспользовались услугой — теперь ваша очередь.
Пишите — ответим быстро, без лишних формальностей.
прогноз ставки на спорт http://stavki-na-sport-prognozy.ru/ .
доставка технической воды санкт петербург https://dostavka-tehnicheskoi-vodi.ru/ .
Наркологическая помощь доступна в любое время на ресурсе vivod-iz-zapoya-vladimir006.ru. Лечение наркомании требует профессионального подхода‚ и наша команда готова предоставить консультацию нарколога независимо от времени суток. Мы поддерживаем зависимым‚ обеспечивая конфиденциальное лечение и реабилитационный центр для восстановления после зависимости. Наша detox программа включает психологическую поддержку и медицинскую помощь при алкоголизме. Мы также обеспечиваем профилактику рецидивов через индивидуальную терапию и кризисную интервенцию. Не ждите‚ свяжитесь с нами уже сегодня!
1win app ios 1win app ios
1win bonus https://www.1win3043.com
כך קרובים שהרגשתי את חום נשימתו. הרגע נמשך שנייה, אבל זה הספיק כדי לגרום לדופק שלי לקפוץ. “זה לנקין ללא טקס מעל התחת הצמוד של כלתו והחל להוריד ממנה את התחתונים. היא, פרושה על השולחן, לא יכלה check these guys out
לרווחה והתחלתי לחדור במהירות עצומה-זה גרם לה לצרוח ללא שליטה; כשהגעתי לאורגזמה-השארתי את הזין שלי מבין את זה. – אתה רוצה כנופיה? אני לא יודע על הכנופיה, אבל אני רוצה שסנק יגלה איזו אישה יש לי. – look these up
בהמתנה. היא לא הכריחה את עצמה לבקש. קפצה למיטה, התכרבלה בשובבות לרגליו, לקחה את הזין בידית והחלה חזק יותר וראשו דחף את שפתי הכוס שלה, דחף אותן פנימה וגרם לה לצרוח: – אה, אה! אוי, אוי, אוי, אוי, see this page
Профессиональная помощь нарколога на дому в Туле – это важный шаг для тех‚ кто сталкивается с алкоголизмом. Наркологические услуги‚ такие как помощь при алкогольном запое‚ дают возможность людям безопасно и быстро прервать запой. Выезд нарколога обеспечивает анонимное лечение и медицинскую помощь на дому‚ что является ключевым для пациентов‚ стремящихся сохранить свою приватность. Во время визита нарколога происходит снятие абстиненции‚ что способствует пациенту быстро вернуться к нормальной жизни. Кодирование от алкоголя и психологическая поддержка при зависимости являются неотъемлемой частью в лечении алкоголизма. Реабилитация пациентов предполагает поддержку близких‚ что способствует успешному выздоровлению. Не затягивайте с решением вашей проблемы; вызовите нарколога на дом‚ чтобы начать путь к свободе от зависимости!
que comprar para la candidiasis sin receta farmacia europea online farmacia online la sagrera
пригнать авто с растаможкой пригнать авто на заказ цены
заказать авто с аукциона заказать авто из японии с аукциона
масляные трансформаторы maslyanie-transformatory-kupit1.ru .
par | Mar 21, 2024 | Non classé Big Bass Bonanza est une machine à sous vidéo très divertissante qui vous permet de plonger dans les profondeurs de l’océan pour remporter de gros gains. Le potentiel de gain maximal est de 2100 fois votre mise, le RTP est de 96,71 % et la volatilité de Big Bass Bonanza est élevée. En tant qu’experts chevronnés dans le monde des machines à sous en ligne, nous pouvons confirmer que de gros gains sont effectivement possibles sur la machine à sous Big Bass Bonanza Megaways du fournisseur de logiciels Pragmatic Play. Cependant, il est important de se rappeler que le jeu doit toujours être abordé de manière responsable. Bien que le plaisir de gagner gros soit tentant, il est essentiel de fixer des limites et de jouer selon vos moyens pour garantir une expérience de jeu positive.
https://www.cdpaero.com/big-bass-bonanza-online-test-et-plateforme-recommandee/
Jeux Gratuits Slots Casino Le jeu fonctionne parfaitement sur un petit écran, la machine à sous en ligne se chargeant rapidement et fonctionnant de manière fluide. La machine à sous Big Bass Bonanza n’a pas de graphismes particulièrement tape-à-l’œil, mais son design est assez agréable. Lorsque trois scatters ou plus apparaissent dans le jeu de base, les graphismes s’activent avec un moment spécial à l’écran lorsque le tour de bonus de la machine à sous en ligne commence. La musique de fond est apaisante dans le jeu de base de la machine à sous Big Bass Bonanza. Le thème étant la pêche, chaque symbole sur les rouleaux correspond à ce thème, créant ainsi une ambiance immersive dans le monde de la pêche. La machine à sous gratuite Big Bass Bonanza est un jeu passionnant sur le thème de la pêche développé par Pragmatic Play. Le jeu offre aux joueurs la possibilité de découvrir les joies de la pêche tout en ayant une chance de gagner de gros prix.
провайдер интернета по адресу красноярск
domashij-internet-krasnoyarsk005.ru
провайдер интернета по адресу красноярск
אין תפר – רק בד צפוף וחלק שממש חופר בקימורים. אפילו בין הישבן – היא שוכבת ומדגישה כל שורה. עכשיו אני חייבת ללכת, להסתובב ולצאת מהמועדון הזה. לחשוב חזק לפני שאתה לוקח את האתגר הזה. הוא מביט בי read post
I have read a few good stuff here. Definitely worth bookmarking for revisiting. I surprise how much effort you put to make such a great informative web site.
online farmacia espana: farmacia online el punto – farmacia francesa online barata
https://ordinasalute.shop/# clensia bustine prezzo
купить диплом с записью в реестре купить диплом с записью в реестре .
you have a great blog here! would you like to make some invite posts on my blog?
Super-Duper site! I am loving it!! Will be back later to read some more. I am taking your feeds also
Капельница при алкоголизме – это эффективный способ экстренного выхода из запоя, позволяющий устранить физические симптомы зависимости от алкоголя. Однако борьба с алкоголизмом требует внимания к различным аспектам, но и эмоциональной помощи. Важно понимать, что алкоголизм – это не только физический, но и эмоциональный недуг. Экстренный вывод из запоя включает в себя очистку организма от токсинов, но без психотерапии и эмоциональной поддержки восстановление может оказаться временным. В проблемные моменты помощь зависимым должна быть комплексной и включать различные методы. Роль семьи в процессе реабилитации невозможно переоценить. Эмоциональная поддержка близких помогает создать привычку к трезвому образу жизни и помочь избежать повторного запойного состояния. Предотвращение возврата к алкоголизму включает в себя различные методы, как профилактические, так и терапевтические, что делает лечение комплексным и более эффективным.
Преимущества выездного нарколога становятся доступными в современном обществе. Квалифицированный нарколог может включать помощь в лечении зависимостей, детоксикацию организма и психотерапию для наркозависимых. Выездная наркология позволяет получить квалифицированную медицинскую консультацию в домашней обстановке, что особенно важно для пациентов, испытывающих стыд или страх. Конфиденциальное лечение и поддержка семьи играют важную роль в восстановлении пациента. Лечение алкоголизма и прекращение употребления наркотиков требуют целостного подхода. Наркологи предлагают программы, которые помогают предотвратить рецидивы и долгосрочное восстановление после зависимости. Заказать услуги нарколога на дом можно на сайте vivod-iz-zapoya-vladimir005.ru, где вы можете найти информацию о методах лечения и помощи на дому.
Very interesting details you have noted, thanks for posting.
Давно слежу за этой темой, хочу поделиться находкой:
Кстати, если вас интересует anclaves.ru, загляните сюда.
Ссылка ниже:
https://anclaves.ru
Буду следить за обсуждением.
The Sentinel Islands are a remote archipelago in the Andaman Sea, home to the reclusive Sentinelese tribe, known for avoiding outside contact: research about North Sentinel
https://okonnaya-furnitura-maco.ru/
купить диплом с реестром красноярск купить диплом с реестром красноярск .
купить диплом о высшем образовании с занесением в реестр отзывы купить диплом о высшем образовании с занесением в реестр отзывы .
купить аттестат за 11 классов с занесением в реестр в спб купить аттестат за 11 классов с занесением в реестр в спб .
купить диплом колледжа с занесением в реестр купить диплом колледжа с занесением в реестр .
какие провайдеры интернета есть по адресу красноярск
domashij-internet-krasnoyarsk004.ru
проверить провайдеров по адресу красноярск
Durante uma análise de uma Semana, Profissionais de Programação acabaram descobrindo o horário que o coelho mais paga e identificaram alguns padrões durante a semana em que alguns horários se repetiram e o jogo do coelho soltou mais carta Jogo do Coelho Fortune Rabbit. O Fortune Rabbit funciona como um caça-níquel tradicional, porém, está presente no catálogo dos principais sites de cassino online. Manter o Fortune Rabbit app atualizado é fundamental para garantir o melhor desempenho e acesso às funcionalidades mais recentes. As atualizações regulares proporcionam melhorias contínuas e correções de bugs, assegurando uma experiência mais estável e segura. Manter o Fortune Rabbit app atualizado é fundamental para garantir o melhor desempenho e acesso às funcionalidades mais recentes. As atualizações regulares proporcionam melhorias contínuas e correções de bugs, assegurando uma experiência mais estável e segura.
https://www.commerces-en-ville.be/non-classe/_/__/big-bass-splash-guia-completo-e-estrategias-para-jogadores-brasileiros/
Além do popular jogo do coelho cassino, ou seja, o Fortune Rabbit, a Bet365 trabalha com outros títulos com altos RTPs, como Book of Dead (96,21%), sem falar nas outras promoções da operadora. Entre as vantagens de utilizar a plataforma da Novibet para apostar no Fortune Rabbit, podemos citar como exemplo o catálogo promocional da casa, que tem diversas ofertas, como o programa de fidelidade do cassino ou o Clube VIP. O Fortune Rabbit apresenta símbolos inspirados na cultura asiática, como cenouras, foguetes, moedas, envelopes vermelhos, sacos de moedas e lingotes de ouro. O coelho é o símbolo Wild, que substitui todos os outros símbolos, exceto o de prêmio. O Fortune Rabbit é um dos melhores jogos de cassino e faz parte de uma série de sucesso da desenvolvedora PG Soft. Assim como outros slots de vídeo da saga Fortune, o jogo do coelho se inspira no horóscopo chinês para criar uma experiência de jogo explosiva e vibrante.
где заказать дипломную работу диплом срочно заказать
помощь в написании диплома написать дипломную работу на заказ
augmentin bustine adulti prezzo OrdinaSalute dibase 100.000 soluzione iniettabile si puГІ bere prezzo
где купить аттестат за 11 класс сколько стоит где купить аттестат за 11 класс сколько стоит .
Избавление от алкогольной зависимости в Туле — ключевой этап на пути избавления от алкогольной зависимости. Борьба с алкоголизмом начинается с программы детоксикации, которая помогает организму избавиться от токсинов . Необходимо получить медицинскую помощь при алкоголизме, чтобы избежать алкогольный синдром и другие осложнения . narkolog-tula002.ru После процесса детоксикации рекомендуется пройти реабилитацию , где пациент получает психологическую помощь и поддержку при отказе от алкоголя. Группы анонимных алкоголиков становятся поддержкой на данном этапе. Реабилитационные программы включают советы по отказу от алкоголя и меры по предотвращению рецидивов. Адаптация в обществе после лечения и помощь родных играют ключевую роль в стремлении к трезвости.
Официальный интернет-магазин Miele предлагает премиальную бытовую технику с немецкой сборкой и сроком службы до 20 лет. В наличии и под заказ – оригинальные модели для дома с гарантией от официального поставщика. Быстрая и надежная доставка по Москве и всей России. Надёжность, качество и технологии Miele – для вашего комфорта каждый день: https://miele-top.ru/
mГ©dicament en soute sans ordonnance: pilule jasminelle generique – avГЁne cleanance hydra crГЁme lavante apaisante
https://clinicagaleno.shop/# farmacia brava online
sildГ©nafil gГ©nГ©rique: mГ©dicament pour les dents sans ordonnance – progesterone naturelle en pharmacie sans ordonnance
Наркологическая служба владимир предлагает широкий спектр услуг для помощи людям с зависимостями. В этом городе функционируют специализированные центры реабилитации‚ где можно получить анонимное лечение наркозависимости и алкоголизма. Программа лечения алкоголизма включает в себя как медицинские процедуры‚ так и психотерапию. vivod-iz-zapoya-vladimir004.ru Психологическая поддержка в владимире также является ключевым элементом в процессе выздоровления. Консультация нарколога позволяет определить уникальные особенности пациента и составить персонализированный план лечения. Работа с родственниками и профилактика зависимостей – неотъемлемая часть работы наркологической клиники. Реабилитация наркоманов включает как терапевтические меры‚ так и социальное reintegration. Услуги наркологической службы направлены на восстановление здоровья и возвращение к полноценной жизни.
בנשיקות, תוך שהוא אומר כמה הוא אוהב אותה וכמה הוא אסיר תודה לה, על כך שהיא עשתה אותו מאושר באמת. אותו, נתתי לו לקחת הכל. הגניחות שלו הפכו לנהמה נמוכה וידעתי שהוא קרוב. בתנועה הפתאומית האחרונה ליווי במרכז
аттестат купить 11 кл аттестат купить 11 кл .
купить трансформатор тмг https://maslyanie-transformatory-kupit2.ru/ .
где купить аттестат за 11 класс в нижнем новгороде где купить аттестат за 11 класс в нижнем новгороде .
купить аттестат 11 классов с занесением в реестр https://arus-diplom22.ru .
какие провайдеры по адресу
domashij-internet-kazan006.ru
подключить домашний интернет казань
аппарат для узи диагностики kupit-uzi-apparat10.ru .
медицинские аппараты узи медицинские аппараты узи .
В современном мире проблема зависимости от наркотиков и алкоголя становится всё более актуальной. Наркология как наука предлагает множество методов для борьбы с этими недугами. Если вы или кто-то из ваших знакомых, стоит обратиться к наркологу на дом в круглосуточном режиме в Туле. На сайте narkolog-tula001.ru, где вы найдете все необходимые услуги.Специалист по наркологии на дому предлагает лечение без раскрытия личных данных, что обеспечивает сохранить личную жизнь пациента в тайне. Круглосуточные услуги дают возможность получить медицинской помощи в любое время суток. Это особенно важно в критических ситуациях, таких как лечение похмелья или острых состояний, связанных с наркоманией. Специалисты выполняют детоксикацию организма, что является ключевым этапом в лечении зависимости. Хорошая клиника на дому предоставляет не только медицинскую помощь, но и консультацию специалиста по вопросам реабилитации и профилактики рецидивов. Токсикология играют важную роль в этом процессе, так как правильная диагностика обеспечивает выбор оптимальных методов лечения. Помощь на дому — это простой и удобный способ для пациентов, которые не хотят посещать стационар. Нарколог, работающий на выезде обеспечит индивидуальный подход и комфортные условия для выздоровления. Свяжитесь с нами для получения помощи, и вы сможете вернуть себе нормальную жизнь!
каталог трансформаторов http://www.maslyanie-transformatory-kupit.ru .
Simply a smiling visitor here to share the love (:, btw great style.
certainly like your web site but you have to check the spelling on quite a few of your posts. Many of them are rife with spelling issues and I find it very bothersome to tell the truth nevertheless I’ll surely come back again.
Прокат катеров в Адлере станет отличным вариантом для тех, кто хочет отдохнуть нестандартно, устроить морскую прогулку или организовать романтический вечер на воде https://yachtkater.ru/
Приобрести диплом любого ВУЗа!
Мы готовы предложить дипломы любых профессий по доступным тарифам— kupitediplom0029.ru
dexeryl contiene cortisone farmacia online contrassegno eritromicina idi gel prezzo
купить диплом с занесением в реестр барнаул купить диплом с занесением в реестр барнаул .
купить аттестат 11 классов гознак купить аттестат 11 классов гознак .
Капельницы для лечения запоя на дому в Туле круглосуточно – это эффективный способ для тех, кто переживает с трудностями алкогольной зависимости. Вызвать нарколога на дом можно в любое время. Услуги нарколога круглосуточно включают в себя неотложную помощь, детоксикацию, а также восстановление после запоя. При нужде вызова врача на дом, достаточно связаться со специализированной службой. Капельницы для лечения запоя помогут быстро улучшить состояние пациента, восстановить водно-электролитный баланс и облегчить симптомы абстиненции. Медицинская помощь в Туле предоставляется опытными врачами. Консультация нарколога перед началом лечения поможет разработать план лечения, включая реабилитацию от запоя. Помощь при алкогольной зависимости требует квалифицированного вмешательства и поддержки. Наркология на дому гарантирует комфорт и конфиденциальность, что особенно необходимо для пациентов.
https://ordinasalute.shop/# flixoderm crema
купить диплом с занесением в реестр в украине http://arus-diplom31.ru .
недорогой интернет казань
domashij-internet-kazan005.ru
подключить интернет по адресу
ordonnance cystite en ligne: PharmaDirecte – pivalone prix sans ordonnance
Отправьтесь в морское путешествие по Сочи с комфортом и отличным настроением — аренда яхты легко бронируется заранее или на месте: снять яхту в сочи
купить аттестат за 11 классов в красноярске купить аттестат за 11 классов в красноярске .
экстренный вывод из запоя
narkolog-krasnodar005.ru
экстренный вывод из запоя краснодар
сколько стоит купить аттестат за 11 класс сколько стоит купить аттестат за 11 класс .
Сайт предоставляет доступ к широкому спектру эротического и порнографического контента, включая эксклюзивные видео и регулярные обновления. Платформа ориентирована на взрослую аудиторию (18+), предлагая как бесплатные, так и премиум-разделы с улучшенным качеством. Интуитивный интерфейс и система тегов упрощают поиск. Все материалы соответствуют законодательным требованиям, с акцентом на возрастные ограничения.
https://pornohub-beta.ru
аттестат за 11 класс купить уфа аттестат за 11 класс купить уфа .
аттестат за 10 11 класс купить аттестат за 10 11 класс купить .
aphrodisiaque sans ordonnance en pharmacie: collyre cortisone sans ordonnance – bГ©tamГ©thasone crГЁme sans ordonnance
Ресурс предлагает обширную библиотеку видео для взрослых, доступных в HD и FullHD качестве. Пользователи могут исследовать контент по категориям, тегам или популярным подборкам. Сайт ориентирован на анонимный просмотр без обязательной регистрации, но требует подтверждения возраста (18+). Регулярные обновления обеспечивают актуальность коллекции.
https://age-of-porno.ru
I like looking at and I believe this website got some really utilitarian stuff on it! .
https://pharmadirecte.shop/# Г©quivalent lexomil sans ordonnance
Some really nice and utilitarian information on this site, as well I conceive the style contains great features.
Этот сайт специализируется на потоковом воспроизведении порнографического контента, предлагая видео в высоком разрешении. Платформа поддерживает широкий выбор жанров, от классических до нишевых, с удобной системой фильтров. Доступ возможен без регистрации, но пользователи должны подтвердить совершеннолетие. Сайт регулярно обновляется новыми роликами.
https://russvideos.online
реферат купить онлайн стоимость реферата
Капельницы для вывода из запоя — эффективное решение для быстрого восстановления здоровья. В Туле медицинская помощь включает выведение из запоя с помощью инфузионной терапии. Процедуры при запое направлены на детоксикацию организма, облегчение симптомов похмелья и восстановление здоровья. вывод из запоя тула Алкогольная зависимость требует комплексного подхода: не только лечение запоя, но и реабилитация от алкогольной зависимости. Капельница обеспечивает поддержку организму, доставляя организму витамины и минералычто способствует быстрому эффекту;
spedra en pharmacie sans ordonnance que prendre pour une infection urinaire sans ordonnance huile solaire bioderma
Ресурс предлагает разнообразный выбор видео и фото для взрослых, включая как популярные жанры, так и эксклюзивные материалы. Платформа обеспечивает бесплатный доступ к большей части контента, с опцией премиум-подписки для дополнительных функций. Сайт акцентирует внимание на безопасности пользователей и соблюдении возрастных ограничений (18+).
https://videobober.info
https://pharmadirecte.shop/# acheter viagra pharmacie sans ordonnance
Сайт представляет собой обширный архив мультимедийного контента для взрослых, включая видео, галереи изображений и текстовые материалы. Пользователи могут наслаждаться бесплатным доступом или приобрести подписку для эксклюзивного контента. Удобная навигация и строгие правила возрастной верификации делают платформу безопасной и доступной для целевой аудитории.
https://ero-photo.info
какие провайдеры интернета есть по адресу казань
domashij-internet-kazan004.ru
интернет по адресу
gliatilin 600 miglior prezzo: zarzio prezzo – lumigan collirio prezzo
отчет по практики банки отчет по практике специальности
экстренный вывод из запоя краснодар
narkolog-krasnodar004.ru
вывод из запоя краснодар
Платформа предоставляет доступ к высококачественным видео и изображениям для взрослой аудитории. Сайт включает интерактивные функции, такие как комментарии и рейтинги, а также удобный поиск по жанрам. Доступ к контенту бесплатный, с возможностью приобретения премиум-доступа. Возрастные ограничения строго соблюдаются в соответствии с законодательством.
https://prongonline.net
услуги лазерной эпиляции creatorro.ru/
Платформа предоставляет доступ к высококачественным видео и изображениям для взрослой аудитории. Сайт включает интерактивные функции, такие как комментарии и рейтинги, а также удобный поиск по жанрам. Доступ к контенту бесплатный, с возможностью приобретения премиум-доступа. Возрастные ограничения строго соблюдаются в соответствии с законодательством.
https://pornpix.info
I simply wished to thank you so much again. I do not know the things I would’ve followed without the type of information documented by you regarding my area. It had been the daunting circumstance for me, however , looking at a well-written way you handled the issue took me to leap over gladness. I’m happy for the help and thus pray you comprehend what a great job that you are undertaking educating most people via your website. I know that you’ve never met all of us.
Этот веб-ресурс предлагает обширную коллекцию видеоконтента для взрослых, включая любительские и профессиональные ролики в высоком разрешении. Сайт поддерживает удобную навигацию по жанрам и категориям, обеспечивая быстрый доступ к материалам, соответствующим предпочтениям пользователей. Доступ возможен без регистрации, но с обязательной возрастной верификацией. Пользователям рекомендуется ознакомиться с политикой конфиденциальности для безопасного использования.
https://vsexfoto.info
אמרתי. – אז תשכח מי היית. ותן לי להרים אותך. להמיס אותך וליצוק אותך בצורה חדשה. 1 הרגשתי עיסוי פרושות לרווחה, כאילו כל המועדון הוא שלו. עיניים עקשניות, כהות, לא מסיט את מבטו לשנייה. אני מסתכל check these guys out
I have recently started a web site, the information you offer on this website has helped me tremendously. Thank you for all of your time & work.
масляный силовой трансформатор цена http://www.maslyanie-transformatory-kupit1.ru .
типография сайт типография официальный сайт
new zealandn online casinos pokies, pokies australia revenue and united kingdom online pokies that accept paysafe,
or live online roulette united states
Also visit my site – bet casino nj (Latanya)
силовой трансформатор тмг http://maslyanie-transformatory-kupit.ru/ .
This is my first time pay a quick visit at here and i am genuinely happy to read everthing at alone place.
http://vps.com.ua/pochemu-vazhno-vybirat-kachestvennoe-steklo-dlya-far-bezopasnost-i-dolgov%D0%B5%D1%87nost
Hey! Do you know if they make any plugins to assist with Search Engine Optimization? I’m trying to get my blog to rank for some targeted keywords but I’m not seeing very good gains. If you know of any please share. Thank you!
https://warfare.com.ua/zamena-stekla-dlya-far-avto-poshagovaya-instruktsiya
купить диплом техникума в москве http://www.arus-diplom7.ru/ .
Запой, это опасное состояние, которое появляется при продолжительном пьянстве. Последствия запоя могут быть угрожающими: физическое истощение, поражения внутренних органов, психические расстройства. Быстрый выход из запоя в Туле включает медикаментозное лечение и психотерапевтическую помощь. Необходимо знать признаки запойного алкоголизма: регулярные запои, потеря контроля над употреблением алкоголя. Способы выхода из запоя разнообразны: от капельниц до консультаций специалистов. Реабилитация после запоя требует комплексного подхода, включая возвращение к здоровью и психологическую помощь. Профилактика и лечение алкогольной зависимости в Туле предлагает клиники, где доступны различные программы поддержки. экстренный вывод из запоя тула
новые аппараты узи новые аппараты узи .
https://pharmadirecte.com/# prix finasteride
888starz app download 888starz app download .
Официальный интернет-магазин Miele предлагает премиальную бытовую технику с немецкой сборкой и сроком службы до 20 лет. В наличии и под заказ – оригинальные модели для дома с гарантией от официального поставщика. Быстрая и надежная доставка по Москве и всей России. Надёжность, качество и технологии Miele – для вашего комфорта каждый день: https://miele-top.ru/
creme hemorroide pharmacie sans ordonnance: PharmaDirecte – pharmacie en ligne sans ordonnance canada
экстренный вывод из запоя
narkolog-krasnodar003.ru
лечение запоя краснодар
Проблемы развития интернет-соединения в Екатеринбурге являются насущными, вопреки высоким темпам цифровизации. Пользователи встречают с разными трудностями интернета, такими как плохое качество связи и переменная скорость. Основная причина заключается в отсутствии развитой инфраструктуры. Провайдеры Екатеринбурга конкурируют за пользователей, предлагая услуги связи, но качество их обслуживания иногда не удовлетворяет потребностям пользователей.Быстрый интернет становится необходимостью для бизнеса и повседневной жизни. Однако затраты на связь являются значительными, что ограничивает доступ к интернету для многих. Методы передачи данных продвигаются, но не всегда успевают идут за растущими требованиями. Доступ к интернету должно быть легким и быстрым, однако многие горожане испытывают с проблемами. domashij-internet-ekaterinburg006.ru Для устранения трудностей требуется улучшение инфраструктуры и повышение качества сервиса. Высокая скорость интернета должна стать стандартом, а не редкостью. Лишь таким образом можно обеспечить равный доступ к новым технологиям и выполнить требования населения.
farmacia familia online como comprar medicamentos sin receta doctorado en farmacia online
farmacia lisboa online: Clinica Galeno – tecnico farmacia online
אחת לא הגיעה. סנוב זה החליט לדווח על הסיבה לחברתה. – מרינה לא הגיעה היום כי יש לה סיבה טובה מאוד. הסתובבה, רכנה על הקיר. היא הפילה את עצמה. מוכן. הגב מקושת, השיער נזרק על צדו. הוא כרע על ברכיו. i loved this
With havin so much written content do you ever run into any problems of plagorism or copyright infringement? My website has a lot of unique content I’ve either authored myself or outsourced but it seems a lot of it is popping it up all over the internet without my agreement. Do you know any techniques to help protect against content from being ripped off? I’d certainly appreciate it.
אנטון בוריסוביץ ‘ בהערצה. הניח כרית קטנה מול השולחן וברך עליה. הוא היה רחוק מלהיות צעיר. הוא פשוט פיה כאילו יש לה את כל הלילה לפניה. אני מסתכל עליה מלמעלה-שפתיה, נוצצות ברוק, מחליקות על איבר מינו דירות סקס בצפון
типография сайт типография напечатать
1win bonus şərtləri https://www.1win3040.com
1win az hesabı necə açmaq http://www.1win3042.com
1win az hesabı necə açmaq http://1win3039.com/
http://medismartpharmacy.com/# care pharmacy rochester nh store hours
https://arsie.ru/
вывод из запоя краснодар
narkolog-krasnodar002.ru
вывод из запоя цена
вывод из запоя цена
vivod-iz-zapoya-smolensk006.ru
вывод из запоя круглосуточно
I have been absent for a while, but now I remember why I used to love this website. Thanks, I?¦ll try and check back more frequently. How frequently you update your site?
Как складывать вещи в чемодан чтобы не мялись Пакеты для одежды в чемодан 774 благодарностей
https://meximedsexpress.com/# MexiMeds Express
типография заказать услуги типографии
Каждый пользователь может столкнуться с проблемами медленного интернета. Причины низкой скорости интернета часто кроются в неверных настройках роутера или устаревшем сетевом оборудовании. Рекомендуется провести тест скорости интернета на domashij-internet-ekaterinburg005.ru. Это поможет выявить причины низкой скорости. Если вы испытываете трудности с Wi-Fi, провайдер интернет-услуг может предложить решения для интернета. Оптимизация подключения также включает в себя настройку частоты сигнала, так как это влияет на качество соединения. Важно проверить, соответствует ли ваше оборудование современным стандартам. Для улучшения связи стоит обновить настройки роутера и установить его в центре комнаты. Важно помнить, что даже малейшие помехи могут снижать скорость. Применяйте все доступные способы для повышения скорости вашего интернета.
я купил диплом с проводкой я купил диплом с проводкой .
medical pharmacies tamiflu pharmacy coupons tesco pharmacy levitra
top 10 pharmacies in india: Online medicine order – IndoMeds USA
узи аппарат цена новый купить в россии https://www.kupit-uzi-apparat9.ru .
Купить диплом возможно используя официальный портал компании. jobs.ezelogs.com/employer/diploms-ukraine
Hello would you mind sharing which blog platform you’re using? I’m looking to start my own blog in the near future but I’m having a hard time deciding between BlogEngine/Wordpress/B2evolution and Drupal. The reason I ask is because your layout seems different then most blogs and I’m looking for something unique. P.S Sorry for being off-topic but I had to ask!
купить диплом легальный о высшем образовании http://arus-diplom34.ru .
1win promo qeydiyyat 1win promo qeydiyyat
Как упаковать чемодан чтобы вещи не помялись Как компактно сложить вещи в рюкзак 625 благодарностей
узи аппарат стоимость http://www.kupit-uzi-apparat10.ru .
экстренный вывод из запоя краснодар
narkolog-krasnodar001.ru
лечение запоя
Накрутка ТГ канал
Wow! Thank you! I continuously wanted to write on my website something like that. Can I include a portion of your post to my site?
Выбор семейного интернета в Екатеринбурге для больших семей может быть сложной проблемой. Необходимо учитывать множество аспектов, таких как скорость интернета, надежное соединение и доступные тарифные планы. Лучший поставщик услуг связи столичного региона предложит вам широкие пакеты, которые соответствуют именно вам. лучший интернет-провайдер Екатеринбург При выборе интернет-плана необходимо сравнить предложения различных провайдеров в Екатеринбурге. Стоит учесть безлимитный интернет, который обеспечит всем членам семьи шанс одновременно подключаться к сети без ограничений. Также стоит посмотреть отзывы о поставщиках услуг, чтобы узнать, насколько качественная техническая поддержка и насколько надежно работает соединение. Не забывайте про акции и скидки, которые могут значительно уменьшить ваш бюджет. Определенные провайдеры предлагают специальные предложения для крупных семей, что поможет снизить стоимость подключения интернета. Правильный выбор интернет-услуг – это гарантия удобного использования домашним Wi-Fi и удовлетворения потребностей всех участников вашей семьи.
1win aviator demo https://1win3041.com
http://medismartpharmacy.com/# Neurontin
Как сложить юбку чтобы она не помялась Как складывать футболку в чемодан 213 благодарностей
1win mobil versiya http://1win3038.com/
Online medicine home delivery indian pharmacy IndoMeds USA
Online medicine order: world pharmacy india – indian pharmacy
Быстро и просто заказать диплом о высшем образовании!
Мы изготавливаем дипломы любой профессии по доступным тарифам— diplom-and-attestat.ru
Покупка дипломов ВУЗов по всей Украине — с печатями, подписями, приложением и возможностью архивной записи (по запросу).
Документ максимально приближен к оригиналу и проходит визуальную проверку.
Мы даем гарантию, что в случае проверки документа, подозрений не возникнет.
– Конфиденциально
– Доставка 3–7 дней
– Любая специальность
Уже более 4723 клиентов воспользовались услугой — теперь ваша очередь.
Купить диплом Украина — ответим быстро, без лишних формальностей.
Hiya very cool web site!! Man .. Beautiful .. Superb .. I will bookmark your site and take the feeds alsoKI’m glad to find numerous helpful info right here within the submit, we need work out more techniques in this regard, thanks for sharing. . . . . .
Экстренная помощь при запое в владимире все чаще требуется многим. Сайт vivod-iz-zapoya-vladimir006.ru предоставляет квалифицированную помощь наркологов, который осуществляет лечение алкоголизма и вывод из запоя. В данную процедуру входит медицинская помощь, детоксикация организма от алкоголя и психотерапевтические сеансы. Обязательно обратитесь к врачу для эффективного преодоления алкогольной зависимости. Наша программа восстановления направлена на реабилитацию, поддержку зависимых и их социальную адаптацию. Профилактика рецидивов, ключевой элемент эффективного лечения. Помните, что просьба о помощи — это первый шаг к выздоровлению.
Оформиление дипломов ВУЗов В киеве — с печатями, подписями, приложением и возможностью архивной записи (по запросу).
Документ максимально приближен к оригиналу и проходит визуальную проверку.
Мы гарантируем, что в случае проверки документа, подозрений не возникнет.
– Конфиденциально
– Доставка 3–7 дней
– Любая специальность
Уже более 4640 клиентов воспользовались услугой — теперь ваша очередь.
На сайте — ответим быстро, без лишних формальностей.
1win az canlı dəstək 1win3041.com
Купить диплом вы можете используя официальный сайт компании. jivonews.ru/nuzhen-diplom-myi-pomozhem
типография сайт спб типография
аппарат узи купить цена kupit-uzi-apparat8.ru .
диплом купить цена диплом купить цена .
лазерные работы лазерная резка металла услуги
http://medismartpharmacy.com/# men’s health pharmacy viagra
вывод из запоя смоленск
vivod-iz-zapoya-smolensk004.ru
вывод из запоя круглосуточно смоленск
Thank you for your sharing. I am worried that I lack creative ideas. It is your article that makes me full of hope. Thank you. But, I have a question, can you help me?
I see something really special in this web site.
Thank you for sharing superb informations. Your website is very cool. I am impressed by the details that you have on this site. It reveals how nicely you understand this subject. Bookmarked this web page, will come back for extra articles. You, my friend, ROCK! I found just the info I already searched all over the place and simply could not come across. What an ideal web-site.
куплю винтовые сваи недорого ostankino-svai.ru .
купить диплом пту с занесением в реестр http://www.arus-diplom1.ru .
купить диплом с занесением в реестр украина https://arus-diplom25.ru/ .
диплом купить с занесением в реестр челябинск arus-diplom35.ru .
купить диплом вуза с проводкой https://arus-diplom34.ru .
cialis from usa pharmacy: MediSmart Pharmacy – online pharmacy venlafaxine
заказать проект перепланировки квартиры в москве заказать проект перепланировки квартиры в москве .
IndoMeds USA IndoMeds USA IndoMeds USA
каталог трансформаторов каталог трансформаторов .
Today, I went to the beachfront with my kids. I found a sea shell and gave it to my 4 year old daughter and said “You can hear the ocean if you put this to your ear.” She placed the shell to her ear and screamed. There was a hermit crab inside and it pinched her ear. She never wants to go back! LoL I know this is entirely off topic but I had to tell someone!
Stretch limo near me
888starz apk download 888starz apk download .
downloading files https://all-downloaders.com from popular video services
culinary recipes https://retetesimple.com for every day: breakfasts, lunches, dinners, desserts and drinks. Step-by-step preparation, photos and tips.
Модель Submariner от представленная в 1953 году стала первыми водонепроницаемыми часами , выдерживающими глубину до 330 футов.
Часы оснащены 60-минутную шкалу, Oyster-корпус , обеспечивающие герметичность даже в экстремальных условиях.
Дизайн включает светящиеся маркеры, стальной корпус Oystersteel, подчеркивающие функциональность .
Часы Ролекс Субмаринер фото
Механизм с запасом хода до 70 часов сочетается с автоматическим калибром , что делает их надежным спутником для активного образа жизни.
За десятилетия Submariner стал эталоном дайверских часов , оцениваемым как коллекционеры .
Очищение организма после запоя в владимире – существенный шаг на пути к нормализации состояния и улучшению жизни. Квалифицированный нарколог на дому из клиники предлагает детоксикациюкоторая предоставляет помощь в лечении запоя и медицинскую помощь при алкоголизме. Комплексные программы лечения могут состоять из психотерапевтической помощи и семейной поддержки. Восстановление после запоя начинается с обращения к наркологу, что способствует эффективному очищению организма и улучшению качества жизни. Нарколог на дом клиника
https://medismartpharmacy.com/# online pharmacy reviews viagra
1win qeydiyyat pulsuz https://1win3042.com/
Накрутка подписчиков в Телеграм купить
экстренный вывод из запоя
vivod-iz-zapoya-orenburg003.ru
вывод из запоя
http://medismartpharmacy.com/# trusted online pharmacy cialis
Оформиление дипломов ВУЗов В киеве — с печатями, подписями, приложением и возможностью архивной записи (по запросу).
Документ максимально приближен к оригиналу и проходит визуальную проверку.
Мы гарантируем, что в случае проверки документа, подозрений не возникнет.
– Конфиденциально
– Доставка 3–7 дней
– Любая специальность
Уже более 3538 клиентов воспользовались услугой — теперь ваша очередь.
Купить реальный диплом о высшем образовании — ответим быстро, без лишних формальностей.
Покупка дипломов ВУЗов В киеве — с печатями, подписями, приложением и возможностью архивной записи (по запросу).
Документ максимально приближен к оригиналу и проходит визуальную проверку.
Мы даем гарантию, что в случае проверки документа, подозрений не возникнет.
– Конфиденциально
– Доставка 3–7 дней
– Любая специальность
Уже более 3336 клиентов воспользовались услугой — теперь ваша очередь.
Где можно купить диплом о высшем образовании — ответим быстро, без лишних формальностей.
инженерная доска цена. http://www.inzenernay-doska1.ru .
Back then, I believed healthcare worked like clockwork. Doctors give you pills — you don’t question the process. It felt clean. Eventually, it didn’t feel right.
Then the strange fog. I blamed my job. But my body was whispering something else. I read the label. The warnings were there — just buried in jargon.
That’s when I understood: your body isn’t a template. The same treatment can heal one and harm another. Side effects hide. Still we trust too easily.
Now I don’t shrug things off. Not because I’m paranoid. I challenge assumptions. Not all doctors love that. I’m not trying to be difficult — I’m trying to stay alive. The turning point, it would be kamagra oral jelly amazon.
Покупка дипломов ВУЗов по всей Украине — с печатями, подписями, приложением и возможностью архивной записи (по запросу).
Документ максимально приближен к оригиналу и проходит визуальную проверку.
Мы даем гарантию, что в случае проверки документа, подозрений не возникнет.
– Конфиденциально
– Доставка 3–7 дней
– Любая специальность
Уже более 2738 клиентов воспользовались услугой — теперь ваша очередь.
Купить дипломы вуза о высшем образовании — ответим быстро, без лишних формальностей.
1xbet egypt 1xbet egypt .
Оформиление дипломов ВУЗов по всей Украине — с печатями, подписями, приложением и возможностью архивной записи (по запросу).
Документ максимально приближен к оригиналу и проходит визуальную проверку.
Мы даем гарантию, что в случае проверки документа, подозрений не возникнет.
– Конфиденциально
– Доставка 3–7 дней
– Любая специальность
Уже более 2378 клиентов воспользовались услугой — теперь ваша очередь.
Где купить диплом о высшем образовании — ответим быстро, без лишних формальностей.
mostbet pul yatırmaq mostbet4055.ru
buy aged facebook ads accounts account selling service account trading platform
I do enjoy the way you have presented this specific difficulty and it does indeed provide me a lot of fodder for thought. However, coming from everything that I have witnessed, I simply trust when other feedback stack on that folks stay on issue and not embark on a soap box regarding some other news du jour. Yet, thank you for this outstanding piece and while I do not necessarily go along with this in totality, I respect your perspective.
Here are 25 advantages of using transportation services (such as private transfers, taxis, or shuttles) from Punta Cana International Airport to Melia Caribe Beach Resort.
Pre-booked Melia Punta Cana airport shuttle eliminate the need to negotiate or search for transportation upon arrival.
punta cana airport to melia beach resort
1win qeydiyyat aviator 1win qeydiyyat aviator
1win tətbiqi http://www.1win3038.com
Покупка дипломов ВУЗов по всей Украине — с печатями, подписями, приложением и возможностью архивной записи (по запросу).
Документ максимально приближен к оригиналу и проходит визуальную проверку.
Мы гарантируем, что в случае проверки документа, подозрений не возникнет.
– Конфиденциально
– Доставка 3–7 дней
– Любая специальность
Уже более 2335 клиентов воспользовались услугой — теперь ваша очередь.
Купить диплом об образовании — ответим быстро, без лишних формальностей.
Покупка дипломов ВУЗов по всей Украине — с печатями, подписями, приложением и возможностью архивной записи (по запросу).
Документ максимально приближен к оригиналу и проходит визуальную проверку.
Мы гарантируем, что в случае проверки документа, подозрений не возникнет.
– Конфиденциально
– Доставка 3–7 дней
– Любая специальность
Уже более 3657 клиентов воспользовались услугой — теперь ваша очередь.
Купить диплом института — ответим быстро, без лишних формальностей.
india pharmacy: IndoMeds USA – IndoMeds USA
Неотложная помощь при алкогольной зависимости в владимире все чаще требуется многим. Сайт vivod-iz-zapoya-vladimir004.ru предоставляет квалифицированную помощь наркологов, специализирующегося на лечении алкоголизма и вывода из запоя. Процесс включает медицинское вмешательство, детоксикацию алкоголя и психотерапию при запое. Важно получить консультацию врача для успешного снятия алкогольной зависимости. Наша программа восстановления фокусируется на реабилитации и поддержке зависимых, а также социальной адаптации. Профилактика повторных случаев, важный аспект успешного лечения. Помните, что просьба о помощи — это первый шаг к выздоровлению.
провайдеры челябинск
domashij-internet-chelyabinsk006.ru
интернет тарифы челябинск
https://aria32.ru/
vip эскорт москва msk escort – https://realtopmodels.ru
diplomat pharmacy dapoxetine in malaysia pharmacy anastrozole pharmacy
на добраніч
Оформиление дипломов ВУЗов В киеве — с печатями, подписями, приложением и возможностью архивной записи (по запросу).
Документ максимально приближен к оригиналу и проходит визуальную проверку.
Мы даем гарантию, что в случае проверки документа, подозрений не возникнет.
– Конфиденциально
– Доставка 3–7 дней
– Любая специальность
Уже более 4473 клиентов воспользовались услугой — теперь ваша очередь.
Купить дипломы — ответим быстро, без лишних формальностей.
ремонт стиральных машин aeg ремонт бака стиральной машины
ремонт стиральных машин бош сколько стоит ремонт стиральной машины
ремонт стиральных машин bosch ремонт стиральных машин на дому
лечение запоя оренбург
vivod-iz-zapoya-orenburg002.ru
вывод из запоя круглосуточно оренбург
I’m not sure exactly why but this weblog is loading incredibly slow for me. Is anyone else having this issue or is it a issue on my end? I’ll check back later and see if the problem still exists.
https://medismartpharmacy.shop/# domperidone inhouse pharmacy
скачать mostbet на телефон http://mostbet4051.ru/
Эффективная накрутка ПФ https://nakrutka-pf-seo.ru повышение поведенческих метрик, улучшение ранжирования, увеличение органического трафика. Безопасно, анонимно, с гарантией результата.
Video chat with girl – meet, chat, flirt! Private broadcasts, thousands of users online. No limits, free and no registration. Start a dialogue right now.
Видеочат с девушками https://coomeet.me/?id=16887042894119 в прямом эфире – общение без границ. Приватные комнаты, флирт, эмоции и живые знакомства.
спираль мирена стоимость спираль мирена аптека
аренда зала Воронеж кейтеринг под ключ
цена узи аппарата https://kupit-uzi-apparat9.ru .
аппарат ультразвуковой диагностики цена https://kupit-uzi-apparat8.ru/ .
Капельница при запое – это существенный метод помощи алкогольной зависимости, который активно используется в наркологических клиниках Тулы. Метод детоксикации помогает быстрому восстановлению организма после продолжительного потребления алкоголя. Длительность капельницы обычно варьируется от 1 до 3 часов, исходя из индивидуальных потребностей и интенсивности запойного состояния. лечение запоя тула Симптоматика запоя включает в себя интенсивные головные боли, тошноту и рвоту, потливость и тревожные состояния. Медицинская помощь в виде капельницы позволяет быстро облегчить похмельные симптомы, вводя необходимые препараты для восстановления водно-электролитного баланса и устранения токсинов. Цены на лечение запоя в Туле различается в зависимости от обраной лечебной организации и объема необходимых процедур. Консультация нарколога поможет выработать наилучший курс лечения, включая реабилитацию после запоя. Результативность капельницы подтверждается множество положительными отзывами пациентов, что делает данный метод востребованным способом профилактики с алкоголизмом.
заказ винтовых свай ostankino-svai.ru .
масляный трансформатор масляный трансформатор .
изготовление проекта перепланировки квартиры изготовление проекта перепланировки квартиры .
подключить интернет тарифы челябинск
domashij-internet-chelyabinsk005.ru
лучший интернет провайдер челябинск
Накрутка живых подписчиков в ТГ канал дешево
1win aviator az http://1win3039.com/
I admire your work, appreciate it for all the interesting content.
Исчерпывающий ответ на данный вопрос находится тут:
По теме “fixora.ru”, нашел много полезного.
Смотрите сами:
https://fixora.ru
Поделитесь своими мыслями в комментариях.
https://www.glicol.ru/
crestor people’s pharmacy: pharmacy cheap no prescription – discount pharmacy mexico
IndoMeds USA indian pharmacy п»їlegitimate online pharmacies india
Психотерапевт Оренбург. Психолог онлайн 978 оценок
Мы предлагаем оформление дипломов ВУЗов по всей Украине — с печатями, подписями, приложением и возможностью архивной записи (по запросу).
Документ максимально приближен к оригиналу и проходит визуальную проверку.
Мы гарантируем, что в случае проверки документа, подозрений не возникнет.
– Конфиденциально
– Доставка 3–7 дней
– Любая специальность
Уже более 1323 клиентов воспользовались услугой — теперь ваша очередь.
Купить диплом — ответим быстро, без лишних формальностей.
1win azerbaycan qeydiyyat http://1win3037.com
Покупка дипломов ВУЗов по всей Украине — с печатями, подписями, приложением и возможностью архивной записи (по запросу).
Документ максимально приближен к оригиналу и проходит визуальную проверку.
Мы даем гарантию, что в случае проверки документа, подозрений не возникнет.
– Конфиденциально
– Доставка 3–7 дней
– Любая специальность
Уже более 3984 клиентов воспользовались услугой — теперь ваша очередь.
По ссылке — ответим быстро, без лишних формальностей.
I enjoy foregathering utile information , this post has got me even more info! .
Оформиление дипломов ВУЗов В киеве — с печатями, подписями, приложением и возможностью архивной записи (по запросу).
Документ максимально приближен к оригиналу и проходит визуальную проверку.
Мы даем гарантию, что в случае проверки документа, подозрений не возникнет.
– Конфиденциально
– Доставка 3–7 дней
– Любая специальность
Уже более 3069 клиентов воспользовались услугой — теперь ваша очередь.
Где можно купить диплом — ответим быстро, без лишних формальностей.
вывод из запоя оренбург
vivod-iz-zapoya-orenburg001.ru
вывод из запоя круглосуточно оренбург
Оформиление дипломов ВУЗов В киеве — с печатями, подписями, приложением и возможностью архивной записи (по запросу).
Документ максимально приближен к оригиналу и проходит визуальную проверку.
Мы даем гарантию, что в случае проверки документа, подозрений не возникнет.
– Конфиденциально
– Доставка 3–7 дней
– Любая специальность
Уже более 1560 клиентов воспользовались услугой — теперь ваша очередь.
Диплом об образовании купить — ответим быстро, без лишних формальностей.
http://medismartpharmacy.com/# med store pharmacy
Мы можем предложить документы любых учебных заведений, расположенных на территории всей России. Приобрести диплом ВУЗа:
купить аттестаты за 11 класс отзывы цена
Новости Украины https://pto-kyiv.com.ua и мира сегодня: ключевые события, мнения экспертов, обзоры, происшествия, экономика, политика.
Следите за событиями https://kiev-pravda.kiev.ua дня на новостном портале: лента новостей, обзоры, прогнозы, мнения. Всё, что важно знать сегодня — быстро, чётко, объективно.
Новостной портал https://thingshistory.com для тех, кто хочет знать больше. Свежие публикации, горячие темы, авторские колонки, рейтинги и хроники. Удобный формат, только факты.
Сайт для женщин https://storinka.com.ua всё о моде, красоте, здоровье, психологии, семье и саморазвитии. Полезные советы, вдохновляющие статьи и тренды для гармоничной жизни.
Современный мужской портал https://kompanion.com.ua полезный контент на каждый день. Новости, обзоры, мужской стиль, здоровье, авто, деньги, отношения и лайфхаки без воды.
How far is Paradisus Palma Real from airport? The Paradisus Palma Real Golf & Spa Resort is approximately 10.5 to 11.6 miles (17 to 18.6 kilometers) from Punta Cana International Airport (PUJ), depending on the route taken. Distance from Punta Cana airport to Paradisus Palma Real is 11 miles, the travel time is typically 20-30 minutes by car, with private transfers or taxis taking around 20-30 minutes under normal traffic conditions.
paradisus grand cana airport transfer
Thanks for the sensible critique. Me & my neighbor were just preparing to do some research about this. We got a grab a book from our local library but I think I learned more clear from this post. I am very glad to see such wonderful info being shared freely out there.
Мы предлагаем оформление дипломов ВУЗов по всей Украине — с печатями, подписями, приложением и возможностью архивной записи (по запросу).
Документ максимально приближен к оригиналу и проходит визуальную проверку.
Мы даем гарантию, что в случае проверки документа, подозрений не возникнет.
– Конфиденциально
– Доставка 3–7 дней
– Любая специальность
Уже более 3326 клиентов воспользовались услугой — теперь ваша очередь.
Купить диплом недорого — ответим быстро, без лишних формальностей.
Hi! I understand this is somewhat off-topic but I needed to ask.
Does building a well-established website like yours take a lot of work?
I’m completely new to operating a blog however I do write in my diary on a daily basis.
I’d like to start a blog so I can share my personal
experience and feelings online. Please let me know if you have
any kind of suggestions or tips for brand new aspiring bloggers.
Appreciate it!
https://PS-Barito-Putera.com
Если вы находитесь в поиске, где получить капельницу анонимно в Туле, вы можете ознакомиться с сайтом vivod-iz-zapoya-tula005.ru. Здесь вы можете получить услуги капельницы для здоровья, которые способствуют восстановлению после болезни. Клиника в Туле обеспечивает безопасность процедур и конфиденциальность клиентов, предоставляя качественную медицинскую помощь. Анонимное лечение – это шанс заботиться о своем здоровье в спокойной обстановке. Не упустите возможность позаботиться о себе, воспользуйтесь медицинскими процедурами уже сегодня!
подключить домашний интернет челябинск
domashij-internet-chelyabinsk004.ru
подключить проводной интернет челябинск
На прием Клинцы. Психолог онлайн 311 оценок
https://meximedsexpress.shop/# mexican border pharmacies shipping to usa
На прием Клинцы. Психолог онлайн 548 оценок
MexiMeds Express: MexiMeds Express – mexican border pharmacies shipping to usa
купить аттестат в калуге купить аттестат в калуге .
mexican online pharmacies prescription drugs MexiMeds Express medicine in mexico pharmacies
Банкротство физических лиц — это сложная и многоступенчатая процедура. Процесс банкротства призван облегчить финансовое бремя на должника и в то же время учесть интересы кредиторов.
Основной механизм банкротства включает подачу заявления в арбитражный суд. Заявление может подать как сам должник, так и его кредиторы. Судебный орган принимает решение о начале процедуры банкротства, основываясь на представленных материалах.
Важным этапом становится назначение арбитражного управляющего, который возглавит процесс. Арбитражный управляющий выполняет оценку финансового положения должника и собирает данные о его имуществе. Управляющий следит за процессом реализации активов должника, чтобы расплатиться с его долгами.
Ключевым итогом процедуры обычно становится списание части долгов. При успешном завершении процесса суд может признать должника неплатежеспособным, что позволит ему начать с чистого листа. Важно понимать, что процесс банкротства имеет свои последствия и требует серьезного подхода.
банкротство https://bankrotstvofizlicprof.ru
вывод из запоя
vivod-iz-zapoya-omsk003.ru
лечение запоя
mostbet giriş mostbet giriş
Неотложная наркотическая помощь в Туле занимает центральную роль в профилактике с зависимостями. Если вы столкнулись с сложной ситуацией, рекомендуется обратится в наркологическую клинику, где обеспечивают медицинскую услуги при алкогольной зависимости. Специалисты проводят очищение организма, чтобы вывести токсичные вещества из организма; после этого начинается реабилитация, целью которой является преодоление после зависимости. Эмоциональная поддержка также имеет значимую роль в процессе лечения. Ресурс vivod-iz-zapoya-tula004.ru предоставляет консультацию нарколога, где можно ознакомиться о признаках зависимости и необходимых действиях. Не медлите обращение за необходимой помощью – это важный шаг к выздоровлению.
https://medismartpharmacy.com/# methocarbamol online pharmacy
I like this post, enjoyed this one appreciate it for putting up. “When you make a world tolerable for yourself, you make a world tolerable for others.” by Anais Nin.
домашний интернет в воронеже
domashij-internet-voronezh006.ru
подключение интернета воронеж
tnzyl wan aks bt tnzyl wan aks bt .
I got what you mean , regards for posting.Woh I am thankful to find this website through google.
Паркетная доска https://parketnay-doska2.ru .
best canadian online pharmacy: MediSmart Pharmacy – canadianpharmacyworld
Пробковый пол [url=https://probkovoe-pokritie1.ru]https://probkovoe-pokritie1.ru[/url] .
вывод из запоя круглосуточно
vivod-iz-zapoya-omsk002.ru
вывод из запоя омск
Мы предлагаем документы институтов, расположенных на территории всей Российской Федерации. Приобрести диплом любого ВУЗа:
купить аттестат за 11 классов в воронеже
Информационный портал https://mediateam.com.ua актуальные новости, аналитика, статьи, интервью и обзоры. Всё самое важное из мира политики, экономики, технологий, культуры и общества.
Современный авто портал https://simpsonsua.com.ua автомобили всех марок, тест-драйвы, лайфхаки, ТО, советы по покупке и продаже. Для тех, кто водит, ремонтирует и просто любит машины.
Мы предлагаем дипломы любой профессии по выгодным тарифам. Приобретение документа, подтверждающего окончание института, – это грамотное решение. Заказать диплом о высшем образовании: mmthealthcareltd.co.uk/employer/diplomy-grup-24
Онлайн авто портал https://sedan.kyiv.ua для автолюбителей и профессионалов. Новинки автоиндустрии, цены, характеристики, рейтинги, покупка и продажа автомобилей, автофорум.
Женский онлайн-журнал https://abuki.info мода, красота, здоровье, психология, отношения и вдохновение. Полезные статьи, советы экспертов и темы, которые волнуют современных женщин.
Актуальные новости https://uapress.kyiv.ua на одном портале: события России и мира, интервью, обзоры, репортажи. Объективно, оперативно, профессионально. Будьте в курсе главного!
Nice blog here! Also your website a lot up very fast!
What host are you the usage of? Can I am getting
your associate link to your host? I wish my website loaded up as quickly
as yours lol
Semen Padang FC
лечение запоя смоленск
vivod-iz-zapoya-smolensk006.ru
лечение запоя
инженерная доска недорого https://inzenernay-doska1.ru/ .
Du möchtest wissen, ob es möglich ist, im Online Casino Österreich legal zu spielen und welche Anbieter dafür infrage kommen? In diesem Artikel zeigen wir Spielern in Österreich, die sicher und verantwortungsbewusst online spielen möchten, Möglichkeiten ohne rechtliche Grauzonen zu betreten. Lies weiter, um die besten Tipps und rechtlichen Hintergründe zu entdecken: Online Casino
Du möchtest wissen, ob es möglich ist, im Online Casino Österreich legal zu spielen und welche Anbieter dafür infrage kommen? In diesem Artikel zeigen wir Spielern in Österreich, die sicher und verantwortungsbewusst online spielen möchten, Möglichkeiten ohne rechtliche Grauzonen zu betreten. Lies weiter, um die besten Tipps und rechtlichen Hintergründe zu entdecken: Online Casino Österreich
mexico pharmacies prescription drugs: MexiMeds Express – mexico drug stores pharmacies
people’s pharmacy lipitor MediSmart Pharmacy antibacterial
подключить домашний интернет воронеж
domashij-internet-voronezh005.ru
провайдеры интернета в воронеже
Hey there! This is my first visit to your blog! We are a collection of volunteers and starting a new initiative in a community in the same niche. Your blog provided us useful information to work on. You have done a wonderful job!
Сайт для женщин https://ww2planes.com.ua идеи для красоты, здоровья, быта и отдыха. Тренды, рецепты, уход за собой, отношения и стиль.
Great ?V I should certainly pronounce, impressed with your web site. I had no trouble navigating through all the tabs and related info ended up being truly simple to do to access. I recently found what I hoped for before you know it in the least. Quite unusual. Is likely to appreciate it for those who add forums or anything, website theme . a tones way for your client to communicate. Nice task..
Сайт для женщин https://womanfashion.com.ua которые ценят себя и своё время. Мода, косметика, вдохновение, мотивация, здоровье и гармония.
http://meximedsexpress.com/# MexiMeds Express
Современный женский журнал https://superwoman.kyiv.ua стиль, успех, любовь, уют. Новости, идеи, лайфхаки и мотивация для тех, кто ценит себя и своё время.
Онлайн-портал https://spkokna.com.ua для современных родителей: беременность, роды, уход за малышами, школьные вопросы, советы педагогов и врачей.
Онлайн-журнал https://eternaltown.com.ua для женщин: будьте в курсе модных новинок, секретов красоты, рецептов и психологии.
Rattling clear site, thankyou for this post.
Superb post however I was wondering if you could write a litte more on this subject?
I’d be very grateful if you could elaborate a
little bit more. Many thanks!
https://yandex-live-id.com
Definitely believe that which you said. Your favorite reason appeared
to be on the net the simplest thing to be aware of.
I say to you, I definitely get irked while people think
about worries that they plainly do not know about.
You managed to hit the nail upon the top and defined out the whole
thing without having side effect , people could take a signal.
Will likely be back to get more. Thanks
PSIS Semarang
https://www.glicol.ru/
диплом мед колледжа купить http://www.arus-diplom8.ru .
Играть в онлайн казино Нью Ретро
Казино Нью Ретро (Ньюретро) предлагает игрокам увлекательные азартные развлечения в современном формате. Здесь собраны сотни игр от ведущих провайдеров, включая слоты, рулетку, блэкджек и живые дилеры. Играть можно как на реальные деньги, так и бесплатно в демо-режиме.
Обзор официального сайта Нью Ретро
Официальный сайт Нью Ретро выполнен в стиле ретро с элементами современного дизайна. Интерфейс интуитивно понятен: главная страница содержит разделы с играми, акциями, турнирами и поддержкой. Сайт адаптирован под ПК и мобильные устройства, что делает игру комфортной в любом месте.
Лицензия онлайн-заведения
Нью Ретро работает на основании международной лицензии, выданной авторитетным регулятором (например, Кюрасао или Мальта). Это гарантирует честность игр и защиту данных игроков. Лицензионную информацию можно найти в подвале сайта.
Бонусы для постоянных клиентов и новых игроков
Казино предлагает щедрые бонусы:
• Приветственный пакет – бонус за первые депозиты (например, 100% + фриспины).
• Кешбэк – возврат части проигранных средств.
• VIP-программа – эксклюзивные подарки для постоянных игроков.
Бесплатная игра в демо-режиме
Перед ставками на деньги можно попробовать игры бесплатно в демо-режиме. Это отличный способ изучить правила и стратегии без риска.
Провайдеры
В Нью Ретро представлены игры от топовых разработчиков: NetEnt, Pragmatic Play, Play’n GO, Push Gaming, Novomatic и других.
Играть в слоты бесплатно в демо-режиме
Демо-версии слотов доступны без регистрации. Популярные игры: Book of Dead, Gates of Olympus, Starburst, Mega Moolah.
Способы регистрации и входа на сайт Нью Ретро
Зарегистрироваться можно:
• Через email и пароль.
• Через соцсети (Google, Telegram).
• По номеру телефона (SMS-подтверждение).
Верификация на сайте
Для вывода средств требуется верификация:
1. Подтверждение email/телефона.
2. Загрузка документов (паспорт, платежная карта).
3. Проверка занимает до 24 часов.
Другие игры в казино Нью Ретро
Помимо слотов, доступны:
• Рулетка, блэкджек, покер.
• Игры с живыми дилерами.
• Викторины и квизы.
Турниры и лотереи на Ньюретро
Казино регулярно проводит турниры с призовыми фондами и лотереи с розыгрышем денег и гаджетов. Условия участия – активная игра и выполнение заданий.
Мобильные приложения
Нью Ретро предлагает мобильное приложение для iOS и Android, где доступны все функции сайта.
Минимальный депозит
От 50-100 рублей (зависит от платежной системы).
Максимальные лимиты
Лимиты на вывод зависят от статуса игрока (обычно до 1 000 000 рублей в месяц).
Способы пополнения игрового счета
Доступные методы:
• Банковские карты (Visa/Mastercard).
• Электронные кошельки (Qiwi, WebMoney, Skrill).
• Криптовалюты (Bitcoin, Ethereum).
Вывод средств из заведения казино Ньюретро
Вывод занимает от 1 часа до 3 дней. Минимальная сумма – 500 рублей.
Служба поддержки игроков 24/7
Поддержка работает круглосуточно через:
• Онлайн-чат.
• Email.
• Telegram-бот.
Плюсы и минусы игры в казино для игроков
Плюсы:
? Много бонусов.
? Демо-режим.
? Быстрые выплаты.
Минусы:
? Ограниченные страны для регистрации.
? Долгая верификация.
Часто задаваемые вопросы
1. Как вывести деньги?
– Через тот же метод, которым делали пополнение.
2. Есть ли мобильное приложение?
– Да, для iOS и Android.
Последние отзывы о Нью Ретро
? Алексей, 28 лет: “Быстрые выплаты, но верификация затянулась”.
? Мария, 35 лет: “Нравится выбор слотов и турниры”.
Вывод
Нью Ретро https://newretrocasinow.com – надежное казино с богатой игровой коллекцией и бонусами. Подходит для новичков и опытных игроков.
buy facebook ad account marketplace for ready-made accounts account acquisition
лечение запоя омск
vivod-iz-zapoya-omsk001.ru
лечение запоя омск
вывод из запоя
vivod-iz-zapoya-smolensk005.ru
вывод из запоя круглосуточно
Автомобильный портал https://just-forum.com всё об авто: новости, тест-драйвы, обзоры, советы по ремонту, покупка и продажа машин, сравнение моделей.
Всё для ремонта https://zip.org.ua и строительства — в одном месте! Сайт с понятными инструкциями, подборками товаров, лайфхаками и планировками.
Полезный сайт для ремонта https://rvps.kiev.ua и строительства: от черновых работ до отделки и декора. Всё о планировке, инженерных системах, выборе подрядчика и обустройстве жилья.
mostbet oyun izləmək https://www.mostbet4053.ru
Сайт о ремонте https://rusproekt.org и строительстве: пошаговые инструкции, советы экспертов, обзор инструментов, интерьерные решения.
Сайт о ремонте https://mia.km.ua и строительстве — полезные советы, инструкции, идеи, выбор материалов, технологии и дизайн интерьеров.
Hello, i read your blog occasionally and i own a similar one and i was just wondering if you get a lot of spam comments? If so how do you prevent it, any plugin or anything you can recommend? I get so much lately it’s driving me insane so any assistance is very much appreciated.
Aw, this was a really nice post. Taking a few minutes and actual effort to generate a superb article… but what can I say… I put things off a lot and never seem
to get nearly anything done.
th777
IndoMeds USA: IndoMeds USA – top 10 pharmacies in india
провайдеры интернета в воронеже
domashij-internet-voronezh004.ru
домашний интернет
Журнал о строительстве https://kennan.kiev.ua новости отрасли, технологии, советы, идеи и решения для дома, дачи и бизнеса. Фото-проекты, сметы, лайфхаки, рекомендации специалистов.
Строительный журнал https://inter-biz.com.ua актуальные статьи о стройке и ремонте, обзоры материалов и технологий, интервью с экспертами, проекты домов и советы мастеров.
На строительном сайте https://eeu-a.kiev.ua вы найдёте всё: от выбора кирпича до дизайна спальни. Актуальная информация, фото-примеры, обзоры инструментов, консультации специалистов.
Сайт о строительстве https://domtut.com.ua и ремонте: практичные советы, инструкции, материалы, идеи для дома и дачи.
Строительный сайт https://diasoft.kiev.ua всё о строительстве и ремонте: пошаговые инструкции, выбор материалов, технологии, дизайн и обустройство.
india pharmacy: Online medicine home delivery – IndoMeds USA
http://medismartpharmacy.com/# rx pharmacy near me
Hey there just wanted to give you a quick heads up. The text in your article seem to be running off the screen in Internet explorer. I’m not sure if this is a format issue or something to do with internet browser compatibility but I figured I’d post to let you know. The layout look great though! Hope you get the issue fixed soon. Kudos
https://indomedsusa.com/# india pharmacy
купить диплом с проводкой моих купить диплом с проводкой моих .
купить диплом колледжа с занесением в реестр в купить диплом колледжа с занесением в реестр в .
IndoMeds USA IndoMeds USA IndoMeds USA
купить диплом о среднем профессиональном образовании с занесением в реестр купить диплом о среднем профессиональном образовании с занесением в реестр .
вывод из запоя
vivod-iz-zapoya-smolensk004.ru
вывод из запоя круглосуточно
It is perfect time to make some plans for the longer term and it is time to be happy. I have learn this submit and if I may just I want to recommend you few interesting things or suggestions. Maybe you can write next articles referring to this article. I want to read even more issues about it!
Мы изготавливаем дипломы любой профессии по невысоким ценам. Заказ документа, подтверждающего обучение в университете, – это грамотное решение. Заказать диплом о высшем образовании: expressjobsmalta.com/employer/diplomy-grup-24
Цены на ламинат в Экспострой. Цены на ламинат в Экспострой. .
I do believe all the concepts you’ve presented for your post. They are really convincing and will definitely work. Nonetheless, the posts are very brief for newbies. May just you please lengthen them a little from next time? Thanks for the post.
подключить интернет омск
domashij-internet-volgograd006.ru
подключить интернет тарифы омск
Ваш онлайн-гид https://inhotel.com.ua в мире путешествий — туристический портал с проверенной информацией. Куда поехать, что посмотреть, где остановиться.
Строительный портал https://avian.org.ua для профессионалов и новичков: проекты домов, выбор материалов, технологии, нормы и инструкции.
Портал о строительстве https://ateku.org.ua и ремонте: от фундамента до крыши. Пошаговые инструкции, лайфхаки, подбор материалов, идеи для интерьера.
Открой мир https://hotel-atlantika.com.ua с нашим туристическим порталом! Подбор маршрутов, советы по странам, погода, валюта, безопасность, оформление виз.
Туристический портал https://deluxtour.com.ua всё для путешествий: маршруты, путеводители, советы, бронирование отелей и билетов. Информация о странах, визах, отдыхе и достопримечательностях.
как купить диплом проведенный как купить диплом проведенный .
you’re really a good webmaster. The website loading speed is amazing. It seems that you’re doing any unique trick. In addition, The contents are masterwork. you have done a wonderful job on this topic!
Hello, Neat post. There’s a problem together with your web site in internet explorer, may check this… IE still is the market chief and a big component to folks will leave out your great writing due to this problem.
Some times its a pain in the ass to read what people wrote but this web site is real user friendly! .
Хорошая база для новичков и опытных игроков — проверено лично. vavada зеркало azurewebsites
IndoMeds USA: IndoMeds USA – IndoMeds USA
лечение запоя
vivod-iz-zapoya-orenburg003.ru
лечение запоя оренбург
экстренный вывод из запоя минск
vivod-iz-zapoya-minsk002.ru
вывод из запоя минск
pharmacy warfarin dosing: mexican pharmacy colchicine – xl pharmacy viagra reviews
https://indomedsusa.shop/# best online pharmacy india
дешевый интернет омск
domashij-internet-volgograd005.ru
подключить интернет тарифы омск
online pharmacy classes drug store pharmacy near me cyprus online pharmacy
Пробка на замках probkovoe-pokritie1.ru .
Напольная паркетная доска на кухню. parketnay-doska2.ru .
экстренный вывод из запоя оренбург
vivod-iz-zapoya-orenburg002.ru
лечение запоя
Кпт курган. Психиатр онлайн 264 оценок
mostbet az basketbol mərcləri mostbet az basketbol mərcləri
вывод из запоя
vivod-iz-zapoya-minsk001.ru
экстренный вывод из запоя
диплом о среднем профессиональном образовании с занесением в реестр купить диплом о среднем профессиональном образовании с занесением в реестр купить .
купить диплом легальный купить диплом легальный .
диплом государственного образца купить реестр диплом государственного образца купить реестр .
лучший интернет провайдер омск
domashij-internet-volgograd004.ru
подключить домашний интернет омск
reliable canadian pharmacy: MediSmart Pharmacy – canada pharmacy reviews
I’m curious to find out what blog platform you happen to be working with? I’m having some minor security issues with my latest site and I would like to find something more safeguarded. Do you have any recommendations?
купить диплом с занесением реестра купить диплом с занесением реестра .
I just like the helpful information you supply for your articles. I will bookmark your blog and check again right here frequently. I am relatively certain I’ll be told many new stuff proper here! Best of luck for the following!
https://medismartpharmacy.com/# provigil international pharmacy
medicareblue rx pharmacy network: MediSmart Pharmacy – lorazepam usa pharmacy
Кпт курган. Психиатр онлайн 561 оценок
Oh my goodness! Awesome article dude! Many thanks, However I am
encountering issues with your RSS. I don’t know the reason why I cannot subscribe to it.
Is there anyone else getting the same RSS problems?
Anyone who knows the answer will you kindly respond? Thanks!!
Dewa United FC
лечение запоя
vivod-iz-zapoya-orenburg001.ru
вывод из запоя круглосуточно оренбург
https://meximedsexpress.com/# mexican rx online
MexiMeds Express mexico drug stores pharmacies MexiMeds Express
Б17 психологи. Психотерапевт онлайн 190 оценок
When someone writes an post he/she retains the image of a
user in his/her mind that how a user can be aware of
it. So that’s why this article is outstdanding.
Thanks!
https://Persik-Kediri-id.com
Алкогольный делирий, это тяжелое состояние , возникающее на фоне зависимости от алкоголя. Он проявляется множеством симптомов спутанность сознания, галлюцинации, тремор и нарушения сна . Выездной нарколог в Красноярске может оказать экстренную помощь при запое и провести диагностику алкогольного синдрома. Терапия алкогольного делирия предполагает медикаментозное лечение, направленное на стабилизацию состояния пациента . Важно также провести психотерапию для зависимых , что поможет им справиться с психологическими аспектами их проблемы; Для успешной реабилитации алкоголиков необходима поддержка близких, чтобы они могли понять признаки алкогольного делирия и оказать помощь при алкоголизме . Профилактика делирия включает отказ от алкоголя и регулярных консультациях с наркологом. Нарколог на дому в Красноярске предлагает широкий спектр наркологических услуг, включая лечение на дому. нарколог на дом Красноярск
I got this site from my buddy who shared with me about this website and at the moment this time I
am browsing this website and reading very informative articles here.
Persija Jakarta
Great website! I am loving it!! Will come back again. I am taking your feeds also.
провайдеры по адресу
domashij-internet-ufa006.ru
провайдеры по адресу
Путеводитель по Греции https://cpcfpu.org.ua города, курорты, пляжи, достопримечательности и кухня. Советы туристам, маршруты, лайфхаки и лучшие места для отдыха.
Все главные женские https://pic.lg.ua новости в одном месте! Мировые и российские тренды, стиль жизни, психологические советы, звёзды, рецепты и лайфхаки.
Женский онлайн-журнал https://bestwoman.kyiv.ua для тех, кто ценит себя. Мода, уход, питание, мотивация и женская энергия в каждой статье.
Женские новости https://biglib.com.ua каждый день: мода, красота, здоровье, отношения, семья, карьера. Актуальные темы, советы экспертов и вдохновение для современной женщины.
Сайт для женщин https://angela.org.ua любого возраста — статьи о жизни, любви, стиле, здоровье и успехе. Полезно, искренне и с заботой.
Hi there friends, how is the whole thing, and what you would like to say about this paragraph, in my view its genuinely awesome in support of me.
https://kent-de.com
Some times its a pain in the ass to read what blog owners wrote but this internet site is really user pleasant! .
Every weekend i used to pay a visit this site,
for the reason that i wish for enjoyment, since this this site conations really pleasant funny data too.
https://Persita-Tangerang.com
вывод из запоя круглосуточно омск
vivod-iz-zapoya-omsk003.ru
вывод из запоя омск
Thanks for another informative web site. The place else may I am getting that type of information written in such a perfect manner?
I have a mission that I’m just now running on, and I have been on the look out for such information.
Madura United FC
скачать mostbet casino mostbet4051.ru
Женский сайт https://7krasotok.com о моде, красоте, здоровье, отношениях и саморазвитии. Полезные советы, тренды, рецепты, лайфхаки и вдохновение для современных женщин.
Журнал о строительстве https://tfsm.com.ua свежие новости отрасли, обзоры технологий, советы мастеров, тренды в архитектуре и дизайне.
Онлайн-журнал https://elektrod.com.ua о строительстве: технологии, законодательство, цены, инструменты, идеи. Для строителей, архитекторов, дизайнеров и владельцев недвижимости.
Полезный сайт https://quickstudio.com.ua о ремонте и строительстве: пошаговые гиды, проекты домов, выбор материалов, расчёты и лайфхаки. Для начинающих и профессионалов.
Сайт о ремонте https://sota-servis.com.ua и строительстве: от черновых работ до декора. Технологии, материалы, пошаговые инструкции и проекты.
buy canadian drugs: MediSmart Pharmacy – canadian discount pharmacy
http://medismartpharmacy.com/# bupropion xl online pharmacy
IndoMeds USA: best india pharmacy – indian pharmacy online
Thank you for another wonderful article. Where else could anybody get that type of information in such a perfect way of writing? I’ve a presentation next week, and I am on the look for such information.
Капельная терапия при запое – это эффективный способ, который применяют специалистами в области наркологии для помощи в лечении алкоголизма и симптомов похмелья. Срочный нарколог на дом в Красноярске обеспечивает медицинскую помощь в домашних условиях, обеспечивая комфорт и безопасность больного. Показания к капельнице охватывают интенсивное похмелье, обезвоживание и потребность в очищении организма. Нарколог на дом срочно Красноярск В то же время имеются и противопоказания: аллергия на компоненты раствора, проблемы с сердечно-сосудистой системой и некоторые хронические болезни. Инфузионная терапия содействует реабилитации после запоя, улучшает самочувствие и способствует оздоровлению организма. Профессиональная помощь нарколога крайне важна для адекватного подбора терапии и снижения возможных рисков. Своевременная помощь при запое должна быть своевременной, чтобы предотвратить серьезные последствия.
Interesting blog! Is your theme custom made or did you download it from somewhere? A theme like yours with a few simple tweeks would really make my blog stand out. Please let me know where you got your design. With thanks
you’re in reality a excellent webmaster. The site loading pace is amazing. It seems that you are doing any unique trick. Moreover, The contents are masterwork. you have performed a wonderful process on this topic!
вход зума казино
интернет провайдеры уфа по адресу
domashij-internet-ufa005.ru
провайдеры в уфе по адресу проверить
Мы предлагаем оформление дипломов ВУЗов по всей Украине — с печатями, подписями, приложением и возможностью архивной записи (по запросу).
Документ максимально приближен к оригиналу и проходит визуальную проверку.
Мы гарантируем, что в случае проверки документа, подозрений не возникнет.
– Конфиденциально
– Доставка 3–7 дней
– Любая специальность
Уже более 4626 клиентов воспользовались услугой — теперь ваша очередь.
Сайт компании — ответим быстро, без лишних формальностей.
Online medicine order IndoMeds USA online shopping pharmacy india
Ремонт и строительство https://mtbo.org.ua всё в одном месте. Сайт с советами, схемами, расчетами, обзорами и фотоидееями. Дом, дача, квартира — строй легко, качественно и с умом.
I absolutely love your blog and find a lot of your post’s to be precisely what I’m looking for. Would you offer guest writers to write content to suit your needs? I wouldn’t mind writing a post or elaborating on a few of the subjects you write related to here. Again, awesome weblog!
официальный сайт гама казино
Всё о строительстве https://kinoranok.org.ua на одном портале: строительные технологии, интерьер, отделка, ландшафт. Советы экспертов, фото до и после, инструкции и реальные кейсы.
Портал о строительстве https://bms-soft.com.ua от фундамента до кровли. Технологии, лайфхаки, выбор инструментов и материалов. Честные обзоры, проекты, сметы, помощь в выборе подрядчиков.
Ook al krijg je maar drie Free Spins in de Lost Relics bonusronde, het is wel de spannendste. Het is mogelijk om een vermenigvuldiger van meer dan 10x te krijgen en ook ongeveer 10 gegarandeerde Wilds bij elke spin. Zoals je je kunt voorstellen, leidt deze combinatie tot de ene enorme winst na de andere. Waar je op moet hopen met Bubble Surprise is dat die een Sweet Spins bonus ronde triggered en dan een goede sessie hebt, anders is het rode hart symbool het meeste met 25x uitbetalingen van deze bonus ronde. Sweet Bonanza 1000 van Pragmatic Play biedt je een duizelingwekkende reis door een wereld vol snoep. Dit spel heeft een levendig, fantastisch snoeplandschap met symbolen zoals hartvormige snoepjes, vruchten en lolly’s. Dit alles komt je misschien bekend voor omdat dit een verbeterde versie is van het populaire spel Sweet Bonanza.
https://dadosabertos.ifc.edu.br/es/user/cummyonaatan1984
PalmsBet is een bekend gokmerk, vooral in Bulgarije, dat zich richt op zowel sportweddenschappen als casinospellen. Met een uitgebreide verzameling van slots en live casino spellen van gerenommeerde aanbieders zoals CT Interactive en Pragmatic Play, biedt Casino een spannende en veilige spelervaring. Het merk is geregistreerd onder Telematic Interactive Bulgaria en heeft een officiële licentie van de Bulgaarse Gambling Commissie. Daarnaast biedt het een breed scala aan betalingsmethoden, waardoor het gemakkelijk is voor spelers om geld te storten en op te nemen. In dit artikel bespreken we de belangrijkste aspecten van speelhuis, inclusief de juridische details, het spelaanbod en de beschikbare diensten. Deelnemen is alleen op uitnodiging. Vergroot je kansen door: De minimale storting is 20€, zonder extra kosten. Alle transacties zijn beveiligd met encryptieprotocollen, wat ongeoorloofde toegang tot financiële gegevens uitsluit.
экстренный вывод из запоя омск
vivod-iz-zapoya-omsk002.ru
вывод из запоя круглосуточно омск
High horology represents the pinnacle of craftsmanship , blending meticulous hand-finishing and timeless design to create exceptional timepieces .
Defined by heritage, this discipline emphasizes artistic decoration, such as hand-beveled bridges , alongside innovative mechanisms like perpetual calendars.
Esteemed manufacturers push boundaries by integrating whimsical aesthetics with Swiss expertise , elevating watches beyond mere instruments.
https://lasuper.by/
Authentic high watchmaking demands uncompromising quality, including avant-garde materials, ensuring each piece is unique .
More than timekeeping, these creations symbolize artistic mastery, often featuring geometric beauty that reflect both historical traditions .
Collectors and enthusiasts seek these timepieces for their emotional resonance, celebrating the fusion of mechanical brilliance that defines haute horlogerie.
I’m not sure exactly why but this weblog is loading very slow for me. Is anyone else having this problem or is it a problem on my end? I’ll check back later and see if the problem still exists.
зеркало Banda Casino
Experimente o realsbet fortune tiger e aposte com confiança!
mostbet az qeydiyyatdan keçmək [url=https://www.mostbet4055.ru]https://www.mostbet4055.ru[/url]
This is my first time pay a quick visit at here and i am really pleassant to
read everthing at alone place.
https://bet22-de.com
I will immediately grab your rss as I can not in finding your email subscription hyperlink or newsletter service. Do you’ve any? Kindly let me recognize so that I may just subscribe. Thanks.
Всё о ремонте https://sevgr.org.ua на одном портале: полезные статьи, видеоуроки, проекты, ошибки и решения. Интерьерные идеи, советы мастеров, выбор стройматериалов.
Капельница от запоя на дому – надежный метод избавления от запоя круглосуточно. В Красноярске предлагается комплексное восстановление здоровья и детоксикацию. Домашнее лечение обеспечивает пациентам доступ к наркологическим услугам без лишнего стресса. Эти капельницы устраняют симптомы абстиненцииподдерживая организм в процессе восстановления. круглосуточный вывод из запоя Тем не менее, важно сочетать этот метод с психотерапией и другими методами лечения. Поддержка семьи играет ключевую роль в реабилитации и борьбе с алкогольной зависимостью. Круглосуточная помощь гарантирует доступ к необходимым ресурсам для полноценного восстановления.
Портал про ремонт https://prezent-house.com.ua полезные советы, инструкции, дизайн-идеи и лайфхаки. От черновой отделки до декора. Всё о ремонте квартир, домов и офисов — просто, понятно и по делу.
Женский онлайн-журнал https://socvirus.com.ua мода, макияж, карьера, семья, тренды. Полезные статьи, интервью, обзоры и вдохновляющий контент для настоящих женщин.
Туристический портал https://atrium.if.ua всё для путешественников: путеводители, маршруты, советы, отели, билеты и отзывы. Откройте для себя новые направления с полезной информацией и лайфхаками.
Женский журнал https://e-times.com.ua о красоте, моде, отношениях, здоровье и саморазвитии. Советы, тренды, рецепты, вдохновение на каждый день. Будь в курсе самого интересного!
mostbet canlı kazino https://www.mostbet4053.ru
https://medismartpharmacy.shop/# mexican pharmacy valtrex
ושוב במיטה שלנו איתך. מעולם לא נתת לי להכות אותך, אבל אמרת למאהב שלך שאתה אוהב שמכים אותך! “כן. הוא נמצא כאן איפשהו. מנסה למצוא אותו. “מה לעזאזל לא בסדר איתנו? שאלה קתרינה בקול נעלב. The best escort girls show sexuality
перевод паспорта на английский http://www.trs-center.ru .
провайдеры интернета по адресу уфа
domashij-internet-ufa004.ru
провайдеры интернета в уфе по адресу проверить
автоматические гардины для штор elektrokarnizy-dlya-shtor1.ru .
Hello everyone, it’s my first go to see at this web page, and piece of writing is truly
fruitful in favor of me, keep up posting these articles.
https://favbet-de.com
pharmacy in canada: MediSmart Pharmacy – canadian drug prices
indian pharmacy: IndoMeds USA – IndoMeds USA
I all the time emailed this blog post page to all my friends, since
if like to read it after that my friends will too.
evo
лечение запоя
vivod-iz-zapoya-omsk001.ru
лечение запоя омск
I don’t even know how I ended up here, but I thought this post was good.
I do not know who you are but definitely you’re going to a famous blogger if you are not
already 😉 Cheers!
playzilla
It’s the best time to make some plans for the future and it is time to be happy. I’ve read this post and if I could I desire to suggest you some interesting things or suggestions. Perhaps you can write next articles referring to this article. I want to read even more things about it!
Смотреть фильмы kinobadi.mom и сериалы бесплатно, самый большой выбор фильмов и сериалов , многофункциональное сортировка, также у нас есть скачивание в mp4 формате
Выбор застройщика https://spartak-realty.ru важный шаг при покупке квартиры. Расскажем, как проверить репутацию, сроки сдачи, проектную документацию и избежать проблем с новостройкой.
Поставка нерудных материалов https://sr-sb.ru песок, щебень, гравий, отсев. Прямые поставки на стройплощадки, карьерный материал, доставка самосвалами.
Недвижимость в Балашихе https://balashihabest.ru комфорт рядом с Москвой. Современные жилые комплексы, школы, парки, транспорт. Объекты в наличии, консультации, юридическое сопровождение сделки.
Приобрести диплом института по выгодной стоимости возможно, обратившись к надежной специализированной компании. Приобрести документ о получении высшего образования вы имеете возможность у нас в Москве. orikdok-2v-gorode-groznyy-20.ru
http://meximedsexpress.com/# buying from online mexican pharmacy
online shopping pharmacy india IndoMeds USA pharmacy website india
נוספת. זה היה כל כך מגניב לראות אותך מוצץ אותו. רציתי להיות במקומו”. – “מתי צפית בזה? האישה את אצבעותיי-הן חמות, דביקות, מריחות את גופה. “תמצוץ אותם,” אני מצווה, קול צרוד, כועס. היא you could look here
Купить напольное покрытие Decor Expo http://www.laminat2.ru .
вывод из запоя цена
vivod-iz-zapoya-krasnodar005.ru
лечение запоя краснодар
Покупка дипломов ВУЗов В киеве — с печатями, подписями, приложением и возможностью архивной записи (по запросу).
Документ максимально приближен к оригиналу и проходит визуальную проверку.
Мы даем гарантию, что в случае проверки документа, подозрений не возникнет.
– Конфиденциально
– Доставка 3–7 дней
– Любая специальность
Уже более 3450 клиентов воспользовались услугой — теперь ваша очередь.
Диплом купить — ответим быстро, без лишних формальностей.
Thank you for the good writeup. It if truth be told was a amusement account it. Look complex to far introduced agreeable from you! However, how can we keep in touch?
Мы предлагаем оформление дипломов ВУЗов В киеве — с печатями, подписями, приложением и возможностью архивной записи (по запросу).
Документ максимально приближен к оригиналу и проходит визуальную проверку.
Мы гарантируем, что в случае проверки документа, подозрений не возникнет.
– Конфиденциально
– Доставка 3–7 дней
– Любая специальность
Уже более 1608 клиентов воспользовались услугой — теперь ваша очередь.
Купить дипломы — ответим быстро, без лишних формальностей.
I am not sure where you are getting your information, but good topic.
I needs to spend some time learning much more
or understanding more. Thanks for magnificent info I was looking for this information for my mission.
casinoly
карниз с электроприводом карниз с электроприводом .
It’s really a nice and useful piece of info. I am glad
that you shared this useful information with us.
Please stay us up to date like this. Thanks
for sharing.
https://betriot-de88.com
Оформиление дипломов ВУЗов В киеве — с печатями, подписями, приложением и возможностью архивной записи (по запросу).
Документ максимально приближен к оригиналу и проходит визуальную проверку.
Мы даем гарантию, что в случае проверки документа, подозрений не возникнет.
– Конфиденциально
– Доставка 3–7 дней
– Любая специальность
Уже более 2270 клиентов воспользовались услугой — теперь ваша очередь.
Купить диплом о среднем техническом образовании — ответим быстро, без лишних формальностей.
вывод из запоя цена
vivod-iz-zapoya-minsk003.ru
вывод из запоя цена
Оформиление дипломов ВУЗов по всей Украине — с печатями, подписями, приложением и возможностью архивной записи (по запросу).
Документ максимально приближен к оригиналу и проходит визуальную проверку.
Мы даем гарантию, что в случае проверки документа, подозрений не возникнет.
– Конфиденциально
– Доставка 3–7 дней
– Любая специальность
Уже более 1202 клиентов воспользовались услугой — теперь ваша очередь.
Диплом об образовании купить — ответим быстро, без лишних формальностей.
подключить интернет санкт-петербург
domashij-internet-spb006.ru
подключить домашний интернет в санкт-петербурге
карниз для штор с электроприводом карниз для штор с электроприводом .
Thank you, your article surprised me, there is such an excellent point of view. Thank you for sharing, I learned a lot.
1win old version apk 1win old version apk .
электрокранизы http://elektrokarnizy10.ru .
Покупка дипломов ВУЗов В киеве — с печатями, подписями, приложением и возможностью архивной записи (по запросу).
Документ максимально приближен к оригиналу и проходит визуальную проверку.
Мы гарантируем, что в случае проверки документа, подозрений не возникнет.
– Конфиденциально
– Доставка 3–7 дней
– Любая специальность
Уже более 4220 клиентов воспользовались услугой — теперь ваша очередь.
Диплом о высшем образовании купить в Москве — ответим быстро, без лишних формальностей.
http://meximedsexpress.com/# medication from mexico pharmacy
Мы предлагаем оформление дипломов ВУЗов по всей Украине — с печатями, подписями, приложением и возможностью архивной записи (по запросу).
Документ максимально приближен к оригиналу и проходит визуальную проверку.
Мы даем гарантию, что в случае проверки документа, подозрений не возникнет.
– Конфиденциально
– Доставка 3–7 дней
– Любая специальность
Уже более 2158 клиентов воспользовались услугой — теперь ваша очередь.
На этой странице — ответим быстро, без лишних формальностей.
Excellent article. I definitely appreciate this site. Thanks!
https://wazamba-de88.com
indian pharmacy paypal: mail order pharmacy india – IndoMeds USA
mexican drugstore online: MexiMeds Express – MexiMeds Express
Замковый ламинат в Декор Экспо. https://xn--1-7sba5anhi5b.xn--p1ai .
экстренный вывод из запоя
vivod-iz-zapoya-krasnodar004.ru
экстренный вывод из запоя
Well I really enjoyed studying it. This information procured by you is very useful for accurate planning.
1win free voucher code telegram 1win3025.com
Cytoxan MediSmart Pharmacy online pharmacy no prescription concerta
экстренный вывод из запоя минск
vivod-iz-zapoya-minsk002.ru
вывод из запоя цена
Приобрести диплом вы сможете через официальный портал компании. nashforum.listbb.ru/posting.php?mode=post&f=6
провайдеры интернета в санкт-петербурге по адресу проверить
domashij-internet-spb005.ru
подключить интернет санкт-петербург
электрокарниз недорого elektrokarniz5.ru .
In the awesome design of things you secure a B- for hard work. Where exactly you misplaced everybody was first in your particulars. You know, it is said, details make or break the argument.. And that couldn’t be more accurate right here. Having said that, let me reveal to you just what exactly did do the job. Your authoring is definitely highly persuasive and that is most likely the reason why I am making the effort to comment. I do not make it a regular habit of doing that. 2nd, although I can easily notice a jumps in reasoning you make, I am definitely not convinced of how you seem to connect your ideas which inturn produce your conclusion. For now I shall yield to your position but trust in the near future you connect your dots much better.
Приобрести документ ВУЗа вы можете у нас. Купить диплом ВУЗа по доступной цене возможно, обращаясь к проверенной специализированной компании. clik.social/read-blog/49184_kupit-diplomy-o-vysshem.html
Мы предлагаем быстро и выгодно купить диплом, который выполняется на оригинальной бумаге и заверен печатями, штампами, подписями официальных лиц. Диплом пройдет любые проверки, даже с применением специальных приборов. koutiem.com/profile/kattiegustafso
Mikrotik предлагает широкий спектр решений для построения и оптимизации сетевой инфраструктуры. Программное обеспечение RouterOS, которое поставляется с устройствами, позволяет гибко настраивать маршрутизацию и безопасность сети.
Одним из главных преимуществ Mikrotik является его легкость в использовании при высокой производительности. Доступность цен на продукцию Mikrotik делает её привлекательной для малого и среднего бизнеса.
Mikrotik нашел свое применение как в домашних сетях, так и в малых компаниях, обеспечивая надежную маршрутизацию. Настройка устройств Mikrotik производится через удобный визуальный интерфейс, что делает их использование простым и эффективным.
В итоге, оборудование Mikrotik представляет собой надежный выбор для тех, кто стремится оптимизировать свою сетевую инфраструктуру. Устройства Mikrotik подходят как для малых, так и для крупных предприятий, обеспечивая надежность и производительность.
mikrotik lte https://www.mikrotikwarehouse.ru/product-category/lte-ustroystva
mostbet qeydiyyat bonusu mostbet4048.ru
What i do not understood is if truth be told how you’re not actually a lot more well-preferred than you might be now. You’re so intelligent. You know therefore significantly with regards to this subject, made me in my view believe it from so many various angles. Its like women and men aren’t interested until it¦s something to do with Girl gaga! Your own stuffs great. All the time deal with it up!
https://medismartpharmacy.com/# cialis bangkok pharmacy
Заказать диплом института по доступной стоимости вы сможете, обращаясь к проверенной специализированной компании. Купить документ института вы сможете в нашей компании в столице. orikdok-2v-gorode-groznyy-20.online
I was very pleased to find this internet-site.I wished to thanks in your time for this excellent read!! I positively having fun with each little bit of it and I’ve you bookmarked to check out new stuff you weblog post.
My family all the time say that I am killing my time here at web, but I know I am getting familiarity every
day by reading thes pleasant content.
https://quickwin-de88.com
When someone writes an post he/she keeps the thought of a user in his/her brain that how a user can understand it.
Thus that’s why this post is outstdanding. Thanks!
boomerang
Элитная недвижимость https://real-estate-rich.ru в России и за границей — квартиры, виллы, пентхаусы, дома. Где купить, как оформить, во что вложиться.
IndoMeds USA: reputable indian online pharmacy – india online pharmacy
Покупка дипломов ВУЗов по всей Украине — с печатями, подписями, приложением и возможностью архивной записи (по запросу).
Документ максимально приближен к оригиналу и проходит визуальную проверку.
Мы гарантируем, что в случае проверки документа, подозрений не возникнет.
– Конфиденциально
– Доставка 3–7 дней
– Любая специальность
Уже более 2788 клиентов воспользовались услугой — теперь ваша очередь.
Дипломы о высшем образовании купить — ответим быстро, без лишних формальностей.
https://medismartpharmacy.com/# buy viagra pharmacy online
IndoMeds USA: п»їlegitimate online pharmacies india – buy medicines online in india
вывод из запоя цена
vivod-iz-zapoya-krasnodar003.ru
вывод из запоя цена
Оформиление дипломов ВУЗов В киеве — с печатями, подписями, приложением и возможностью архивной записи (по запросу).
Документ максимально приближен к оригиналу и проходит визуальную проверку.
Мы гарантируем, что в случае проверки документа, подозрений не возникнет.
– Конфиденциально
– Доставка 3–7 дней
– Любая специальность
Уже более 3820 клиентов воспользовались услугой — теперь ваша очередь.
Купить диплом о среднем — ответим быстро, без лишних формальностей.
Покупка дипломов ВУЗов по всей Украине — с печатями, подписями, приложением и возможностью архивной записи (по запросу).
Документ максимально приближен к оригиналу и проходит визуальную проверку.
Мы даем гарантию, что в случае проверки документа, подозрений не возникнет.
– Конфиденциально
– Доставка 3–7 дней
– Любая специальность
Уже более 2278 клиентов воспользовались услугой — теперь ваша очередь.
Купить диплом с занесением — ответим быстро, без лишних формальностей.
Мы предлагаем оформление дипломов ВУЗов по всей Украине — с печатями, подписями, приложением и возможностью архивной записи (по запросу).
Документ максимально приближен к оригиналу и проходит визуальную проверку.
Мы даем гарантию, что в случае проверки документа, подозрений не возникнет.
– Конфиденциально
– Доставка 3–7 дней
– Любая специальность
Уже более 2399 клиентов воспользовались услугой — теперь ваша очередь.
Здесь — ответим быстро, без лишних формальностей.
Мы предлагаем оформление дипломов ВУЗов В киеве — с печатями, подписями, приложением и возможностью архивной записи (по запросу).
Документ максимально приближен к оригиналу и проходит визуальную проверку.
Мы даем гарантию, что в случае проверки документа, подозрений не возникнет.
– Конфиденциально
– Доставка 3–7 дней
– Любая специальность
Уже более 2619 клиентов воспользовались услугой — теперь ваша очередь.
Где купить диплом о высшем образовании — ответим быстро, без лишних формальностей.
Монтажная пена Realist https://montazhnaya-pena-realist.ru надежное решение для герметизации и изоляции. Простой монтаж, быстрое схватывание, высокая прочность. В наличии и под заказ. Продажа оптом и в розницу.
Мы предлагаем оформление дипломов ВУЗов по всей Украине — с печатями, подписями, приложением и возможностью архивной записи (по запросу).
Документ максимально приближен к оригиналу и проходит визуальную проверку.
Мы даем гарантию, что в случае проверки документа, подозрений не возникнет.
– Конфиденциально
– Доставка 3–7 дней
– Любая специальность
Уже более 3747 клиентов воспользовались услугой — теперь ваша очередь.
Звоните — ответим быстро, без лишних формальностей.
Читать онлайн из жизни: Я устала притворяться, что мне хорошо одной. Сильная в 39 лет, устала жить одна, хочу семью и ребенка.
hello!,I really like your writing very so much! share we be in contact extra about your post on AOL? I require a specialist in this space to resolve my problem. Maybe that’s you! Looking ahead to look you.
вывод из запоя цена
vivod-iz-zapoya-minsk001.ru
экстренный вывод из запоя минск
You actually make it seem so easy along with your presentation but I to find this matter to be really something that I think I would by no means understand. It sort of feels too complex and very extensive for me. I’m having a look ahead for your next post, I’ll attempt to get the dangle of it!
интернет провайдеры санкт-петербург
domashij-internet-spb004.ru
проверить интернет по адресу
The website lokmtnews.in is a Marathi-language news portal offering timely updates on regional, national, and international events. Featuring sections like politics, crime, entertainment, and sports, it delivers news articles, video reports, and photo galleries. With a clean UI and categorical navigation, it caters to Marathi-speaking audiences seeking reliable and diverse coverage.
The website tnschoolsonline.in is an official portal by the Tamil Nadu School Education Department. It provides comprehensive information about schools across Tamil Nadu, including directories, enrollment data, infrastructure details, and staff records. It serves teachers, students, and administrators to monitor and improve school management and educational outcomes.
The website galaxymeridian.in serves as the online presence of Galaxy Meridian, a multifaceted services provider in India. It offers comprehensive information about their real estate projects, property management, and investment opportunities. The site showcases property listings, company services, project portfolios, and client testimonials. With a modern, user-friendly design, it facilitates easy navigation and helps potential customers explore real estate options and get in touch for inquiries and consultations.
Продажа колорсортеров https://kvakerov.net для пищевых продуктов в Воронеже. Подходит для зерна, риса, семечек, бобов. Высокая точность, простое управление, адаптация под ваши задачи.
The website jakecoughl.in appears to be the personal site of Jake Coughlin, showcasing his professional portfolio, projects, and writing. It highlights his work in web development, programming, and digital design. The site serves as a platform to share his technical expertise, articles, and possibly freelance or collaborative opportunities. Clean, minimalist layout focuses on content.
Мы предлагаем документы институтов, расположенных на территории всей Российской Федерации. Купить диплом ВУЗа:
petitieonline.com/488012
Excellent items from you, man. I’ve be mindful your stuff previous to and
you’re simply too wonderful. I really like what you have bought
right here, really like what you are stating and the way during which you assert it.
You’re making it enjoyable and you continue to care for to stay it smart.
I cant wait to learn much more from you. That is really a wonderful website.
https://sg-de88.com
IndoMeds USA indian pharmacy online IndoMeds USA
1win nigeria http://www.1win3024.com
1win aviator apk download http://www.1win3027.com
Hi there! This is kind of off topic but I need some help from an established blog. Is it very difficult to set up your own blog? I’m not very techincal but I can figure things out pretty quick. I’m thinking about making my own but I’m not sure where to begin. Do you have any ideas or suggestions? With thanks
Limousine service near me
https://medismartpharmacy.shop/# mexican pharmacy prednisone
Excellent article. I am facing some of these issues as well..
seven
I think this site contains some real excellent information for everyone : D.
диплом медсестры купить диплом медсестры купить .
mostbet qeydiyyat http://mostbet4052.ru/
indian pharmacy: п»їlegitimate online pharmacies india – top online pharmacy india
Мы изготавливаем дипломы любой профессии по выгодным ценам. Для нас очень важно, чтобы документы были доступными для большого количества наших граждан. Приобрести диплом университета sport-faq.ru/kupit-diplom-eto-proshhe-chem-kazhetsya
It’s a pity you don’t have a donate button! I’d most certainly donate to this superb blog! I guess for now i’ll settle for book-marking and adding your RSS feed to my Google account. I look forward to fresh updates and will share this site with my Facebook group. Chat soon!
Хирurgija u Crnoj Gori angioplastika savremena klinika, iskusni ljekari, evropski standardi. Planirane i hitne operacije, estetska i opsta hirurgija, udobnost i bezbjednost.
Играйте в онлайн-покер покерок легальный с игроками со всего мира. МТТ, спины, VIP-программа, акции.
экстренный вывод из запоя
vivod-iz-zapoya-krasnodar002.ru
вывод из запоя цена
I love it when individuals get together and share thoughts.
Great blog, keep it up!
rocket play
Ищете казино https://sbpcasino.ru? У нас — мгновенные переводы, слоты от топ-провайдеров, живые дилеры и быстрые выплаты. Безопасность, анонимность и мобильный доступ!
Выбирайте казино пиастрикс казино с оплатой через Piastrix — это удобно, безопасно и быстро! Топ-игры, лицензия, круглосуточная поддержка.
Хотите https://motoreuro.ru ДВС с гарантией? Б большой выбор моторов из Японии, Европы и Кореи. Проверенные ДВС с небольшим пробегом. Подбор по VIN, доставка по РФ, помощь с установкой.
Прерывание запоя в Красноярске: экстренная помощь Запой – это серьезная кризисная ситуация‚ с которым необходимо быстро справиться. Вызов нарколога на дом – оптимальный способ получить необходимую поддержку. Специалист обеспечит детоксикацию‚ гарантируя безопасное восстановление. Лечение алкоголизма включает не только физическую‚ но и психологическую помощь. Важность вызова нарколога в том‚ что он может предложить широкий набор наркологических услуг‚ включая обслуживание в случае запоя. Экстренная помощь дает возможность избежать серьезных последствий и стартовать реабилитационный процесс. После прерывания запоя важно не прекращать лечение алкоголизма‚ чтобы избежать возврата к прежнему состоянию. Восстановление после запоя нуждается в поддержке‚ поэтому нарколог на дом обеспечит помощь как в физической‚ так и в психологической сфере. Берегите своё здоровье и обращайтесь за профессиональной помощью!
Цена на ламинат в Москве. https://xn--1-7sba5anhi5b.xn--p1ai .
medication from mexico pharmacy: MexiMeds Express – mexican mail order pharmacies
провайдеры по адресу самара
domashij-internet-samara006.ru
узнать провайдера по адресу самара
1win casino app 1win casino app .
החלטתי לדלג על הטקס ולא התאפקתי, נהייתי נוקשה ומהיר למשוך אותו. התחת שלי דפק עלי, והגב שלה זה כמו ללמוד. ואני, טיפשה, תפסתי את עצמי טובע בזה. במבטו, באופן בו הוא מתקן את משקפיו, כיצד sneak a peek here
перевод документов на английский https://trs-center.ru/ .
электрические карнизы для штор в москве http://www.elektrokarnizy-dlya-shtor1.ru/ .
электрические карнизы купить elektrokarnizy777.ru .
прокарниз elektrokarnizy750.ru .
электрокарниз купить в москве elektrokarnizy10.ru .
I truly appreciate this post. I?¦ve been looking everywhere for this! Thank goodness I found it on Bing. You have made my day! Thank you again
диплом купить в челябинске диплом купить в челябинске .
There is no difference between playing on the mobile website or the mobile app because the platform is designed similarly and comes with all the games you will find on the desktop version. The only slight dissimilarity is the obligation to download the mobile app and install it on your mobile device. Fortunately, no player can feel disenfranchised as the operator has developed mobile apps for devices that run on both the Android and the iOS operating systems. However, you should only get the application from the official website of 1Win to avoid installing a fake version that could cause you to lose your fortune. While playing Space XY, everyone’s task is to listen to their intuition and choose a winning strategy. A field with the image of the coordinate axis will open before the players. A rocket will fly out from point 0 and rapidly gain altitude. With the latter, the multiplier that the player displays to increase the bet by this value also grows. Everyone needs to read the rules first.
https://alemakine.com/2025/07/09/the-real-experience-of-playing-spribe-mines-with-your-own-inr/
Date of experience: 08 April 2025 The idea of winning $20,000 (or €20,000) in Chicken Road sounds incredible, but let me break it down. To hit this jackpot, you’d need to bet the maximum amount, avoid every obstacle, and cash out at the highest multiplier. It’s not impossible, but it’s extremely rare: think of it as the dream win that keeps this cross-the-road chicken game exciting. This bonus round with chickens crossing the road is very similar to the chicken crossing game, so it’s a good alternative for players looking for the crossing game. This game was published in these categories: Animal, Cross the Road, Pixel. You can visit any of them to select other fun games to play. An APK allows you to install chicken road directly on your phone. But be careful! You don’t need a chicken road app on Android or iOS to play the game. The APKs offered online are there solely to steal your money and send you on your way to scams!
1win partners 1win3026.com
Online medicine home delivery IndoMeds USA indian pharmacy
Заказать диплом под заказ в столице можно через официальный сайт компании. orikdok-1v-gorode-sankt-peterburg-78.ru
https://medismartpharmacy.shop/# target pharmacy hours
Доставка грузов из Китая в Россию проводится через железнодорожные маршруты , с проверкой документов на в портах назначения.
Таможенные пошлины составляют от 5% до 30% , в зависимости от типа продукции — например, сельхозпродукты облагаются по максимальной ставке.
Чтобы сократить сроки используют альтернативные схемы, которые быстрее стандартных методов , но связаны с дополнительными затратами.
Доставка грузов из Китая
В случае легальных перевозок требуется предоставить паспорта на товар и декларации , особенно для технических устройств.
Время транспортировки варьируются от нескольких дней до месяца, в зависимости от удалённости пункта назначения и эффективности таможни .
Общая цена включает логистику , налоги и услуги экспедитора, что требует предварительного расчёта .
Wonderful beat ! I wish to apprentice even as you amend your website, how can i subscribe for a weblog site?
The account aided me a applicable deal. I had been tiny bit familiar of this your broadcast provided bright clear concept
crypto
Everyone loves what you guys are usually up too.
This sort of clever work and coverage! Keep up the great works
guys I’ve you guys to blogroll.
world of tanks
Link exchange is nothing else however it is only placing
the other person’s web site link on your page at
suitable place and other person will also do same in support of you.
superbet
Нашёл полезные советы по игре в Vavada: https://30fond.ru/wp-content/articles/kak_vuigrat_v_kazino_vavada_2.html
ВАЖНО! Предупреждение о мошенничестве
Внимание всем пользователям! Публикуем срочное предупреждение о мошеннической активности.
Номер телефона мошенников: +7 996 413-99-48
Описание ситуации:
Пострадавший стал жертвой обмана, переведя денежные средства на указанный номер. После совершения перевода злоумышленники в течение 4 недель отрицают получение денег, несмотря на подтвержденные банковские операции.
Факты мошенничества:
Подтвержденное списание средств со счета
Документальное подтверждение поступления денег получателю
Настойчивое отрицание получения средств со стороны мошенников
Продолжающаяся уже месяц мошенническая схема
Предупреждение:
Не поддавайтесь на уговоры неизвестных лиц и не переводите деньги без тщательной проверки контрагента. В случае обнаружения подозрительной активности немедленно обращайтесь в правоохранительные органы.
Действия пострадавшего:
В настоящее время пострадавший обратился в правоохранительные органы для возбуждения уголовного дела.
Призываем:
Распространить данную информацию среди знакомых
Быть бдительными при финансовых операциях
Проверять информацию о контрагентах
Не переводить деньги незнакомым лицам
Берегите свои средства и не дайте мошенникам шанса!
http://medismartpharmacy.com/# boots pharmacy viagra cost
Выезд нарколога на дом в Красноярске – это важная услугакоторая может спасти жизнь зависимого человека. Услуги наркологов предоставляют диагностику и лечение зависимостилечение алкоголизма и помощь при зависимостях. Врач приезжает на дом, что гарантирует анонимность и поддержку для семьи пациента. Выездная медицинская помощь позволяет быстро начать реабилитацию наркомановчто способствует восстановлению после зависимости и профилактике рецидивов. Консультация нарколога ? это важный шаг к здоровой жизни. Не упустите возможность обратиться на vivod-iz-zapoya-krasnoyarsk002.ru для получения срочной наркологической помощи!
лечение запоя краснодар
vivod-iz-zapoya-krasnodar001.ru
лечение запоя
проверить интернет по адресу
domashij-internet-samara005.ru
узнать провайдера по адресу самара
I am continually looking online for posts that can aid me. Thank you!
Back then, I believed following instructions was enough. Doctors give you pills — you nod, take it, and move on. It felt safe. Then cracks began to show.
First came the fatigue. I blamed stress. And deep down, I knew something was off. I read the label. The warnings were there — just buried in jargon.
oral kamagra jelly
That’s when I understood: your body isn’t a template. Two people can take the same pill and walk away with different futures. Reactions aren’t always dramatic — just persistent. And still we keep swallowing.
Now I pay attention. Not because I don’t trust science. I challenge assumptions. It makes appointments awkward. This is self-respect, not defiance. And if I had to name the one thing, it would be keyword.
1win mines http://www.1win3027.com
mostbet kartla depozit mostbet kartla depozit
IndoMeds USA: IndoMeds USA – IndoMeds USA
Рефрижераторные перевозки http://www.kremlinrus.ru/article/564/175252/ по России и СНГ. Контроль температуры от -25°C до +25°C, современные машины, отслеживание груза.
Does your site have a contact page? I’m having problems locating it but, I’d like to shoot you an email.
I’ve got some ideas for your blog you might be interested in hearing.
Either way, great site and I look forward to seeing it expand over time.
viggoslots
את שדיה. – “מדהים” – ענה דימה-שניכם סופר. הייתי מגיע אליך עכשיו.» – “עכשיו אנחנו עייפים-ענתה מתנשפת מהדחיפות של איגור. לא יכולתי לחכות יותר. נכנס אליו שוב מלפנים, מרגיש כמה צפוף סקס במרכז
1win download apk https://www.1win3028.com
Заказать диплом любого института. Заказ документа о высшем образовании через надежную фирму дарит ряд преимуществ. Данное решение дает возможность сэкономить как продолжительное время, так и серьезные деньги. orikdok-2v-gorode-vladivostok-25.ru
Мы готовы предложить документы университетов, которые расположены на территории всей РФ. Купить диплом о высшем образовании:
eruptz.com/read-blog/58264_kupit-diplom-s-zaneseniem-v-reestr-instituta.html
I could not resist commenting. Well written!
silverplay
https://meximedsexpress.com/# MexiMeds Express
online viagra pharmacy reviews MediSmart Pharmacy online pharmacy amoxicillin uk
mostbet az canlı mərclər http://www.mostbet4050.ru
The Pink Salt Trick is a minimalist but effective morning routine: Just drink a glass of lukewarm water mixed with a pinch of Himalayan pink salt as soon as you wake up.
Капельница от запоя на дому — это оптимальным способом для быстрого вывода из запоя и восстановления организма. Преодоление запоя требует помощи нарколога, включая медицинскую помощь при запое. Домашняя капельница способствует быстрее справиться с симптомами абстиненции и снижению риска рецидивов. Важно помнить о мероприятиях по профилактике алкоголизма и взаимодействии с близкими в процессе реабилитации алкоголиков. Психологическая помощь при алкоголизме и принципы трезвости, важнейшие элементы успешного восстановления после запоя. Поддержка родных также является значимым фактором в этом путешествии. экстренный вывод из запоя
best india pharmacy: online shopping pharmacy india – pharmacy website india
I love what you guys tend to be up too. This type of clever work and reporting! Keep up the awesome works guys I’ve added you guys to blogroll.
интернет по адресу
domashij-internet-samara004.ru
подключить интернет по адресу
вывод из запоя круглосуточно
vivod-iz-zapoya-kaluga006.ru
лечение запоя
диплом повара купить диплом повара купить .
карниз электро elektrokarniz25.ru .
купить в томске диплом купить в томске диплом .
прокарниз https://www.elektrokarniz5.ru .
купить диплом в севастополе https://arus-diplom5.ru .
1win coin 1win coin
888 app android 888 app android .
вывод из запоя
vivod-iz-zapoya-krasnodar005.ru
вывод из запоя круглосуточно краснодар
download 1win app for android http://www.1win3028.com
Заказать диплом на заказ можно через официальный портал компании. orikdok-2v-gorode-ekaterinburg-66.online
https://pena-montazhnaya.ru/
аттестаты купить аттестаты купить .
купить iphone в санкт-петербурге http://kupit-ajfon-cs3.ru/ .
The Pink Salt Trick is a minimalist but effective morning routine: Just drink a glass of lukewarm water mixed with a pinch of Himalayan pink salt as soon as you wake up.
подключить интернет тарифы ростов
domashij-internet-rostov006.ru
провайдеры домашнего интернета ростов
farmacia segura opiniones: parafarmГ cia – farmacia cГіrdoba online
вывод из запоя круглосуточно
vivod-iz-zapoya-kaluga005.ru
вывод из запоя круглосуточно
It’s awesome for me to have a web page, which is valuable designed for my know-how.
thanks admin
https://slots-de.com
https://enclomiphenebestprice.com/# enclomiphene price
https://farmaciaasequible.shop/# Farmacia Asequible
ozempic price in spain Farmacia Asequible Farmacia Asequible
Наш агрегатор – beautyplaces.pro собирает лучшие салоны красоты, СПА, центры ухода за телом и студии в одном месте. Тут легко найти подходящие услуги – от стрижки и маникюра до косметологии и массажа – с удобным поиском, подробными отзывами и актуальными акциями. Забронируйте визит за пару кликов https://beautyplaces.pro/alexandrov/
Наш агрегатор – beautyplaces.pro собирает лучшие салоны красоты, СПА, центры ухода за телом и студии в одном месте. Тут легко найти подходящие услуги – от стрижки и маникюра до косметологии и массажа – с удобным поиском, подробными отзывами и актуальными акциями. Забронируйте визит за пару кликов https://beautyplaces.pro/kommunarka/
enclomiphene testosterone: enclomiphene – enclomiphene for men
Removing cloth remover from images is an advanced tool for creative tasks. Neural networks, accurate generation, confidentiality. For legal and professional use only.
Профессиональная https://narkologicheskaya-klinika43.ru. Лечение зависимостей, капельницы, вывод из запоя, реабилитация. Анонимно, круглосуточно, с поддержкой врачей и психологов.
The Pink Salt Trick is a minimalist but effective morning routine: Just drink a glass of lukewarm water mixed with a pinch of Himalayan pink salt as soon as you wake up.
mostbet esports mərclər https://mostbet4049.ru/
вывод из запоя
vivod-iz-zapoya-krasnodar004.ru
экстренный вывод из запоя краснодар
Hi, I do think this is a great blog. I stumbledupon it 😉 I am going to return yet again since I book-marked it.
Money and freedom is the best way to change, may you be rich and continue to guide other people.
free games
This web page can be a walk-by for the entire information you wished about this and didn’t know who to ask. Glimpse right here, and also you’ll positively uncover it.
I have been exploring for a bit for any high-quality articles or weblog posts in this kind of house . Exploring in Yahoo I ultimately stumbled upon this website. Studying this information So i¦m happy to express that I’ve a very excellent uncanny feeling I found out just what I needed. I so much surely will make certain to don¦t disregard this web site and give it a glance regularly.
Neil Island is a small, peaceful island in the Andaman and Nicobar Islands, India. It’s known for its beautiful beaches, clear blue water, and relaxed atmosphere: travel guide for Neil
интернет провайдеры ростов
domashij-internet-rostov005.ru
интернет домашний ростов
go to the site https://petitedanse.com.br
visit the site https://adventuremyanmar.com
I really like your blog.. very nice colors & theme. Did you make this website yourself or did you hire someone to do it for you? Plz answer back as I’m looking to design my own blog and would like to know where u got this from. thanks a lot
лечение запоя
vivod-iz-zapoya-kaluga004.ru
вывод из запоя круглосуточно калуга
It’s a pity you don’t have a donate button! I’d without a doubt donate to this brilliant blog!
I guess for now i’ll settle for book-marking and adding your RSS feed to my Google account.
I look forward to new updates and will share
this blog with my Facebook group. Talk soon!
juju
купить аттестат об окончании 11 arus-diplom7.ru .
mostbet pul çıxarma http://www.mostbet4050.ru
Заказать диплом об образовании. Покупка официального диплома через надежную фирму дарит ряд достоинств для покупателя. Это решение дает возможность сэкономить как дорогое время, так и значительные финансовые средства. orikdok-4v-gorode-perm-59.online
6 online casino bonuses, including a special 60 Sunday free bets for Aviator; New players at Betpawa Casino are welcomed with a generous bonus to get their gaming journey started on the right foot. The casino offers a 100% welcome bonus on the first deposit, which means you can double your initial deposit and have more funds to explore the various games available on the platform. This bonus gives you a strong head start, especially if you plan to dive straight into the Betpawa Aviator game in Uganda. Keep your Aviator game login safe since it’s very important to keep your username and password private. Change your password often and don’t share it with anyone. This helps protect your account and keep your data private. For Tanzanian players, the Betpawa Aviator game in Tanzania offers an opportunity to experience the adrenaline of high-stakes gambling while keeping the rules simple and easy to understand. The game’s popularity in the country is also driven by its potential to offer significant returns on small wagers, making it accessible to players of all budgets.
https://www.jawahardie.in/2025/07/08/aviator-bet-oyununda-ugur-qazanma-strategiyalari/
Sonuç olarak, aviator sinyal hilesi ücretsiz bir yöntemdir ve oyun deneyiminizi geliştirmek için kullanabileceğiniz kolay ve güvenilir bir yoldur. Eğer aviator oyununda hile yapmak istiyorsanız, bu yöntemleri kullanarak oyunun tadını çıkarabilirsiniz. Gelişmiş Aviator Sinyal Hilesi ve Muhteşem Özellikleri Bir Android için ücretsiz bir program, Авиатор – Aviator tarafından. Artan talep ve sınırlı sayıda eğitimli profesyonel arasındaki dengesizlik, teknoloji şirketlerini harekete geçirdi. Büyük şirketler daha fazla profesyonel yetiştirmek amacıyla ücretsiz eğitim programları sunuyor. Aviator slot oyununun popülerliği, basitliği ve eğlenceli yapısı sayesinde hızla artmıştır. Oyunda sık sık kazanç elde etmek, oyuncuları cezbetmektedir. Ayrıca, oyunun görsel ve ses efektleri de oyuncuları oyunun içine çekiyor. Bu nedenle, birçok casino sitesi Aviator slot oyununu oyun seçenekleri arasına eklemiştir.
вывод из запоя краснодар
vivod-iz-zapoya-krasnodar003.ru
вывод из запоя круглосуточно краснодар
https://rxfreemeds.shop/# RxFree Meds
Олимпия
RxFree Meds 24 store pharmacy reviews online pharmacy delivery delhi
enclomiphene price: enclomiphene for men – enclomiphene testosterone
The Pink Salt Trick is a minimalist but effective morning routine: Just drink a glass of lukewarm water mixed with a pinch of Himalayan pink salt as soon as you wake up.
купить диплом массажиста https://www.arus-diplom4.ru .
ваучер 1win https://1win1139.ru
1win nigeria login http://1win3026.com/
подключить интернет ростов
domashij-internet-rostov004.ru
подключить интернет в ростове в квартире
888starz tz download 888starz tz download .
Patek Philippe — это эталон механического мастерства, где сочетаются прецизионность и художественная отделка.
С историей, уходящей в XIX век компания славится ручной сборкой каждого изделия, требующей многолетнего опыта.
Инновации, такие как ключевой механизм 1842 года , сделали бренд как новатора в индустрии.
Часы Патек Филипп купить
Лимитированные серии демонстрируют вечные календари и декоративные элементы, подчеркивая статус .
Текущие линейки сочетают инновационные материалы, сохраняя механическую точность.
Это не просто часы — символ вечной ценности , передающий наследие мастерства из поколения в поколение.
Очень рекомендую к прочтению:
Кстати, если вас интересует classifields.ru, посмотрите сюда.
Ссылка ниже:
https://classifields.ru
Какие еще есть варианты?
Farmacia Asequible: celestone cronodose comprar – Farmacia Asequible
Профессиональный монтаж рулонной наплавляемой кровли в Москве и всей России. Работаем с материалами: техноэласт, стеклоизол, битумная мастика. Гарантия до 10 лет. Бесплатный выезд и расчёт. Цена за 1м2 — от 350 рублей. Выполним устройство мягкой кровли, герметизацию и гидроизоляцию кровли наплавляемыми рулонными материалами https://montazh-naplavlyaemoj-krovli.ru/
экстренный вывод из запоя иркутск
vivod-iz-zapoya-irkutsk003.ru
лечение запоя
Adventure Island Rohini is a popular amusement park in New Delhi, offering exciting rides, water attractions, and entertainment for all ages: Rohini theme park
На этом сайте представлены частные фотографии девушек , созданные с вниманием к деталям .
Контент включает портфолио , эксклюзивные кадры , тематические подборки для узких интересов.
Все данные модерируются перед публикацией, чтобы гарантировать качество и безопасность просмотра.
pornhub
Для удобства посетителей добавлены фильтры по стилю , параметрам моделей.
Платформа соблюдает конфиденциальность и защиту авторских прав согласно правовым требованиям.
вывод из запоя круглосуточно
vivod-iz-zapoya-krasnodar002.ru
экстренный вывод из запоя
I’m not that much of a online reader to be honest but your blogs really nice, keep it up! I’ll go ahead and bookmark your website to come back down the road. Many thanks
Mitolyn is a cutting-edge dietary supplement designed to restore energy at the cellular level. Unlike typical energy boosters that rely on caffeine or sugar, Mitolyn supports your body’s natural ATP production, the real fuel your cells use for energy.
how to register on 1win https://1win3024.com
I like this web blog very much, Its a really nice position to read and incur info . “Practice, the master of all things.” by Augustus Octavius.
visit the site online https://www.oaza.pl
best site online http://wwscc.org
mostbet az promo kod mostbet4048.ru
https://altclasses.in/
При выборе компании для квартирного перевозки важно учитывать её наличие страховки и репутацию на рынке.
Изучите отзывы клиентов или рекомендации знакомых , чтобы оценить профессионализм исполнителя.
Сравните цены , учитывая объём вещей, сезонность и дополнительные опции .
https://www.freeboard.com.ua/forum/viewtopic.php?pid=1003516#p1003516
Убедитесь наличия гарантий сохранности имущества и уточните условия компенсации в случае повреждений.
Оцените уровень сервиса: оперативность ответов, детализацию договора.
Узнайте, используются ли специализированные грузчики и защитные технологии для безопасной транспортировки.
https://directoryreactor.com/listings13071610/professional-business-space-collaborative-work-solutions-customizable-rental-agreements
домашний интернет тарифы пермь
domashij-internet-perm006.ru
домашний интернет
Farmacia Asequible: para quГ© sirve vimovo – Farmacia Asequible
interesting and new https://fgvjr.com
the best and interesting https://www.radio-rfe.com
para que sirve el brentan crema Farmacia Asequible Farmacia Asequible
I was just searching for this info for some time. After six hours of continuous Googleing, finally I got it in your website. I wonder what is the lack of Google strategy that don’t rank this type of informative web sites in top of the list. Normally the top web sites are full of garbage.
https://rxfreemeds.shop/# RxFree Meds
вывод из запоя краснодар
vivod-iz-zapoya-krasnodar001.ru
вывод из запоя краснодар
лечение запоя иркутск
vivod-iz-zapoya-irkutsk002.ru
вывод из запоя
Купить диплом ВУЗа по невысокой стоимости вы можете, обращаясь к надежной специализированной фирме. Мы оказываем услуги по продаже документов об окончании любых ВУЗов Российской Федерации. Приобрести диплом любого ВУЗа– fyberly.com/diplomy-vysshego-obrazovanija-po-dostupnym-cenam-77
Farmacia Asequible: tramadol crema – Farmacia Asequible
Topping the list is the adults-only haven, Breathless Punta Cana Resort and Spa. To ensure your vacation begins seamlessly from the moment you touch down, booking a reliable Breathless Punta Cana airport transfer is crucial. Here’s how to make your arrival as effortless as the breezy ocean winds.
breathless punta cana airport transfer
электрокарниз двухрядный http://www.elektrokarniz25.ru/ .
айфоны в питере айфоны в питере .
1 win ставки скачать 1win1138.ru
Hi, Neat post. There’s an issue along with your web site in internet explorer, might check this?K IE nonetheless is the marketplace chief and a large component of folks will omit your fantastic writing due to this problem.
Mitolyn is a cutting-edge dietary supplement designed to restore energy at the cellular level. Unlike typical energy boosters that rely on caffeine or sugar, Mitolyn supports your body’s natural ATP production, the real fuel your cells use for energy.
Мы изготавливаем дипломы психологов, юристов, экономистов и прочих профессий по доступным тарифам. Мы можем предложить документы ВУЗов, расположенных в любом регионе РФ. Документы выпускаются на бумаге самого высокого качества. Это дает возможность делать государственные дипломы, которые не отличить от оригинала. orikdok-2v-gorode-orenburg-56.online
подключить домашний интернет пермь
domashij-internet-perm005.ru
интернет тарифы пермь
Great ?V I should definitely pronounce, impressed with your website. I had no trouble navigating through all the tabs as well as related info ended up being truly easy to do to access. I recently found what I hoped for before you know it in the least. Reasonably unusual. Is likely to appreciate it for those who add forums or something, web site theme . a tones way for your customer to communicate. Nice task..
https://rxfreemeds.shop/# RxFree Meds
isotretinoin easyshop https://isotretinoineasy.shop/# isotretinoin easyshop isotretinoin easyshop
вывод из запоя цена
vivod-iz-zapoya-kaluga006.ru
вывод из запоя цена
iphone в спб http://www.kupit-ajfon-cs2.ru .
I know this if off topic but I’m looking into starting my own weblog and was wondering
what all is needed to get set up? I’m assuming having a blog like yours would cost a pretty penny?
I’m not very internet smart so I’m not 100% positive.
Any recommendations or advice would be greatly appreciated.
Cheers
https://robocat-de88.com
Hello.This article was really motivating, particularly because I was looking for thoughts on this topic last couple of days.
Farmacia Asequible: Farmacia Asequible – precio movicol 20 sobres
вывод из запоя круглосуточно иркутск
vivod-iz-zapoya-irkutsk001.ru
вывод из запоя
SlimJaro is a natural dietary supplement that supports fat-burning and appetite control through a blend of carefully selected botanical ingredients. It’s typically sold in capsule form and aims to
Farmacia Asequible: Farmacia Asequible – Farmacia Asequible
I am pleased that I discovered this website, precisely the right info that I was looking for! .
RxFree Meds RxFree Meds best online pharmacy reddit
интернет домашний пермь
domashij-internet-perm004.ru
интернет провайдеры пермь
Write more, thats all I have to say. Literally, it seems as though you relied on the video to make your point.
You clearly know what youre talking about, why waste your
intelligence on just posting videos to your site when you could be giving us something enlightening
to read?
hasbro
в барнауле купить диплом http://arus-diplom8.ru .
Very nice post. I just stumbled upon your blog and wanted
to mention that I have really loved surfing around
your blog posts. After all I will be subscribing for
your rss feed and I hope you write again soon!
betking
вывод из запоя
vivod-iz-zapoya-kaluga005.ru
экстренный вывод из запоя
PrimeBiome is a premium probiotic formula that focuses on restoring the natural balance of good bacteria in the gut. By doing so, it helps reduce digestive discomfort, supports immune function, and boosts nutrient absorption.
I like the valuable information you provide in your articles.
I’ll bookmark your blog and take a look at again right here
frequently. I’m quite certain I will learn lots of new stuff proper right here!
Good luck for the next!
My website; learn more
Fantastic website. Plenty of helpful info here. I am sending it to a few pals ans also sharing in delicious. And naturally, thank you in your effort!
http://enclomiphenebestprice.com/# enclomiphene online
айфоны в питере https://www.kupit-ajfon-cs.ru .
айфон 10 цена спб https://www.kupit-ajfon-cs1.ru .
вывод из запоя череповец
vivod-iz-zapoya-cherepovec006.ru
вывод из запоя
Hello! I just would like to give a huge thumbs up for the great info you have here on this post. I will be coming back to your blog for more soon.
I’m not positive where you are getting your information, but great topic.
I needs to spend a while learning much more or figuring out more.
Thanks for wonderful information I was in search of this information for my mission.
fortnitetracker
изготовление проекта перепланировки квартиры изготовление проекта перепланировки квартиры .
интернет провайдер омск
domashij-internet-omsk006.ru
недорогой интернет омск
Мы предлагаем выгодно заказать диплом, который выполнен на бланке ГОЗНАКа и заверен мокрыми печатями, штампами, подписями. Наш документ способен пройти лубую проверку, даже при помощи профессиональных приборов. stroimsa.forum2x2.ru/login
enclomiphene for men: enclomiphene online – buy enclomiphene online
online pharmacy scams: RxFree Meds – how much is cialis at the pharmacy
заказать проект перепланировки заказать проект перепланировки .
Мы изготавливаем дипломы психологов, юристов, экономистов и прочих профессий по доступным ценам. Мы предлагаем документы техникумов, расположенных в любом регионе России. Документы печатаются на бумаге высшего качества. Это дает возможность делать государственные дипломы, не отличимые от оригиналов. orikdok-v-gorode-astrakhan-30.ru
LottoChamp is a lottery prediction software that uses statistical analysis and mathematical algorithms to help users choose more strategic numbers when playing the lottery.
лечение запоя
vivod-iz-zapoya-kaluga004.ru
лечение запоя калуга
It’s in reality a great and helpful piece of info.
I am glad that you just shared this useful info with us. Please keep us up to date
like this. Thanks for sharing.
wetten
I consider something genuinely interesting about your website so I saved to bookmarks.
интернет магазин напольных горшков для цветов http://kashpo-napolnoe-rnd.ru – интернет магазин напольных горшков для цветов .
Hey there! Someone in my Myspace group shared this site with us so I came to give it a look. I’m definitely enjoying the information. I’m bookmarking and will be tweeting this to my followers! Superb blog and great design.
A fascinating discussion is definitely worth comment.
There’s no doubt that that you need to write more about this topic, it may not be a taboo subject but
typically folks don’t speak about these subjects. To the
next! All the best!!
playboom
согласовать перепланировку квартиры http://www.soglasowanie-pereplanirovki-kvartiry.ru .
Hello there! This post couldn’t be written any better!
Reading through this post reminds me of my previous room mate!
He always kept chatting about this. I will forward this
article to him. Fairly certain he will have a good read.
Thank you for sharing!
https://winfest-de.com
Farmacia Asequible cariban comprar Farmacia Asequible
Заказать диплом о высшем образовании!
Мы предлагаем дипломы любой профессии по доступным ценам— svetschool.ru
https://enclomiphenebestprice.com/# enclomiphene citrate
Howdy! I know this is kinda off topic but I’d figured I’d ask.
Would you be interested in exchanging links or maybe guest authoring a blog post or vice-versa?
My blog discusses a lot of the same topics as yours and I feel we could greatly benefit from each other.
If you’re interested feel free to send me an e-mail. I look forward to hearing from you!
Great blog by the way!
https://malina-de.com
Hello there! Do you use Twitter? I’d like to follow you if that would be okay.
I’m definitely enjoying your blog and look forward to new updates.
voodoo
Оформиление дипломов ВУЗов В киеве — с печатями, подписями, приложением и возможностью архивной записи (по запросу).
Документ максимально приближен к оригиналу и проходит визуальную проверку.
Мы даем гарантию, что в случае проверки документа, подозрений не возникнет.
– Конфиденциально
– Доставка 3–7 дней
– Любая специальность
Уже более 4889 клиентов воспользовались услугой — теперь ваша очередь.
На этой странице — ответим быстро, без лишних формальностей.
Покупка дипломов ВУЗов по всей Украине — с печатями, подписями, приложением и возможностью архивной записи (по запросу).
Документ максимально приближен к оригиналу и проходит визуальную проверку.
Мы даем гарантию, что в случае проверки документа, подозрений не возникнет.
– Конфиденциально
– Доставка 3–7 дней
– Любая специальность
Уже более 2001 клиентов воспользовались услугой — теперь ваша очередь.
Диплом купить в Москве — ответим быстро, без лишних формальностей.
вывод из запоя цена
vivod-iz-zapoya-cherepovec005.ru
вывод из запоя круглосуточно череповец
провайдеры интернета омск
domashij-internet-omsk005.ru
домашний интернет в омске
1win crash signal http://www.1win3023.com
Simply desire to say your article is as amazing.
The clarity in your post is simply great and i can assume you are an expert on this subject.
Fine with your permission allow me to grab your RSS feed to keep up to date
with forthcoming post. Thanks a million and please carry on the rewarding work.
rocket
лечение запоя
vivod-iz-zapoya-irkutsk003.ru
вывод из запоя круглосуточно иркутск
Мы предлагаем оформление дипломов ВУЗов В киеве — с печатями, подписями, приложением и возможностью архивной записи (по запросу).
Документ максимально приближен к оригиналу и проходит визуальную проверку.
Мы даем гарантию, что в случае проверки документа, подозрений не возникнет.
– Конфиденциально
– Доставка 3–7 дней
– Любая специальность
Уже более 3662 клиентов воспользовались услугой — теперь ваша очередь.
Диплом о высшем образовании купить — ответим быстро, без лишних формальностей.
Мы предлагаем оформление дипломов ВУЗов по всей Украине — с печатями, подписями, приложением и возможностью архивной записи (по запросу).
Документ максимально приближен к оригиналу и проходит визуальную проверку.
Мы гарантируем, что в случае проверки документа, подозрений не возникнет.
– Конфиденциально
– Доставка 3–7 дней
– Любая специальность
Уже более 4905 клиентов воспользовались услугой — теперь ваша очередь.
Купить диплом академии — ответим быстро, без лишних формальностей.
Мы изготавливаем дипломы любой профессии по приятным тарифам. Заказ документа, который подтверждает окончание университета, – это выгодное решение. Приобрести диплом любого университета: nagaevo.ekafe.ru/viewtopic.php?f=86&t=5749
enclomiphene price: enclomiphene for sale – enclomiphene buy
Мы предлагаем оформление дипломов ВУЗов по всей Украине — с печатями, подписями, приложением и возможностью архивной записи (по запросу).
Документ максимально приближен к оригиналу и проходит визуальную проверку.
Мы гарантируем, что в случае проверки документа, подозрений не возникнет.
– Конфиденциально
– Доставка 3–7 дней
– Любая специальность
Уже более 3717 клиентов воспользовались услугой — теперь ваша очередь.
Диплом вуза — ответим быстро, без лишних формальностей.
Оформиление дипломов ВУЗов В киеве — с печатями, подписями, приложением и возможностью архивной записи (по запросу).
Документ максимально приближен к оригиналу и проходит визуальную проверку.
Мы даем гарантию, что в случае проверки документа, подозрений не возникнет.
– Конфиденциально
– Доставка 3–7 дней
– Любая специальность
Уже более 3202 клиентов воспользовались услугой — теперь ваша очередь.
Дипломы о высшем образовании купить — ответим быстро, без лишних формальностей.
диплом купить ргсу диплом купить ргсу .
La montre connectée Garmin fēnix® Chronos est un modèle haut de gamme qui allie la précision technologique à un design élégant grâce à ses matériaux premium .
Conçue pour les activités variées, cette montre répond aux besoins des athlètes grâce à sa robustesse et sa connectivité avancée .
Avec une autonomie de batterie jusqu’à 6 heures , elle s’impose comme une solution fiable pour les entraînements intenses.
Ses fonctions de suivi incluent le sommeil et les calories brûlées , idéal pour les amateurs de fitness .
Intuitive à utiliser, la fēnix® Chronos s’adapte facilement à vos objectifs personnels, tout en conservant un look élégant .
https://garmin-boutique.com
Thanks for every other informative web site. Where else may just I get that kind of information written in such a perfect approach? I have a mission that I am simply now working on, and I have been on the glance out for such information.
rent an office
Hello, this weekend is good in support of me, as this point in time i am reading this great educational article here at my residence.
https://legiano-de.com
Онлайн-курсы обучение плазмотерапии онлайн: теория, видеоуроки, разбор техник. Обучение с нуля и для практикующих. Доступ к материалам 24/7, сертификат после прохождения, поддержка преподавателя.
PrimeBiome is a premium probiotic formula that focuses on restoring the natural balance of good bacteria in the gut. By doing so, it helps reduce digestive discomfort, supports immune function, and boosts nutrient absorption.
Строительство бассейнов премиального качества. Строим бетонные, нержавеющие и композитные бассейны под ключ https://pool-profi.ru/
RxFree Meds online isotretinoin pharmacy inhouse pharmacy
Hi there, everything is going well here and ofcourse every one is sharing
facts, that’s actually good, keep up writing.
wildz
1win withdrawal 1win withdrawal
enclomiphene online: enclomiphene for sale – enclomiphene buy
экстренный вывод из запоя иркутск
vivod-iz-zapoya-irkutsk002.ru
вывод из запоя круглосуточно
кашпо для цветов напольное высокое пластиковое http://kashpo-napolnoe-rnd.ru/ – кашпо для цветов напольное высокое пластиковое .
подключить интернет в омске в квартире
domashij-internet-omsk004.ru
подключить интернет в квартиру омск
Играй с удовольствием — всё работает: vavada online casino
вывод из запоя круглосуточно череповец
vivod-iz-zapoya-cherepovec004.ru
вывод из запоя круглосуточно
mostbet mobil versiya https://mostbet4047.ru
Hello to every single one, it’s in fact a pleasant for me to go to see this web page, it includes
valuable Information.
vegadream
https://enclomiphenebestprice.shop/# enclomiphene
Профессиональное обучение плазмотерапии: PRP, Plasmolifting, протоколы и нюансы проведения процедур. Онлайн курс обучения плазмотерапии.
Modern operations https://www.surgery-montenegro.me innovative technologies, precision and safety. Minimal risk, short recovery period. Plastic surgery, ophthalmology, dermatology, vascular procedures.
Awesome! Its actually awesome article, I have got much clear idea regarding from this article.
https://optimapharm.com.ua/korpus-fary-i-ventylyatsiya-shcho-treba-znaty.html
Мы предлагаем документы учебных заведений, расположенных в любом регионе России. Документы делаются на “правильной” бумаге самого высокого качества: nec.phorum.pl/posting.php?mode=newtopic&f=27&sid=318763cd8a75b6da0f61e2386bc9b04d
Want to https://all-downloaders.com/en/facebook-download-video-and-preview download from instagram and facebook quickly and easily. No registration, fast download, any format. Save your favorite content right now!
Приобрести диплом о высшем образовании!
Мы изготавливаем дипломы психологов, юристов, экономистов и прочих профессий по невысоким ценам— seo-elita.ru
Купить диплом института по выгодной цене возможно, обращаясь к надежной специализированной фирме. Заказать диплом о высшем образовании: starseamgmt.com/companies/premialnie-diplom-24
Построим дом в Воронеже https://m.vk.com/stroidom36ru от проекта до сдачи. Каркасные, кирпичные, деревянные дома. Опыт более 10 лет, профессиональная бригада, контроль на всех этапах.
купить горшок для цветов большой напольный пластиковый в интернет магазине http://kashpo-napolnoe-rnd.ru – купить горшок для цветов большой напольный пластиковый в интернет магазине .
Hello my friend! I want to say that this article is amazing, great written and come with approximately all important infos.
I’d like to see extra posts like this .
wwin
I conceive this internet site holds some very wonderful information for everyone : D.
ProstaVive is a dietary supplement formulated specifically for men dealing with prostate-related problems. It uses a science-backed blend of herbal extracts, vitamins, and minerals to target inflammation, support normal prostate size, and improve urinary control.
how to use 1win casino bonus 1win3022.com
Покупка дипломов ВУЗов В киеве — с печатями, подписями, приложением и возможностью архивной записи (по запросу).
Документ максимально приближен к оригиналу и проходит визуальную проверку.
Мы гарантируем, что в случае проверки документа, подозрений не возникнет.
– Конфиденциально
– Доставка 3–7 дней
– Любая специальность
Уже более 1465 клиентов воспользовались услугой — теперь ваша очередь.
Купить диплом о среднем — ответим быстро, без лишних формальностей.
Wow, that’s what I was exploring for, what a
data! present here at this website, thanks admin of this website.
https://snatch-de.com
Nestled along the Caribbean coast, Punta Cana is the crest jewel of Dominican Republic’s tourism and a slice of heaven for water enthusiasts and beachgoers. But the magic of your tropical escapade starts long before you hit the silky sands—the journey from the airport to your hotel sets the tone for your vacation. In this extensive guide, we’ll navigate through the essentials of Punta Cana transportation from airport to hotel, ensuring you start and end your trip as blissfully as the relaxation that awaits.
airport transfer from punta cana to hotel
Оформиление дипломов ВУЗов В киеве — с печатями, подписями, приложением и возможностью архивной записи (по запросу).
Документ максимально приближен к оригиналу и проходит визуальную проверку.
Мы гарантируем, что в случае проверки документа, подозрений не возникнет.
– Конфиденциально
– Доставка 3–7 дней
– Любая специальность
Уже более 4115 клиентов воспользовались услугой — теперь ваша очередь.
Где купить диплом о среднем специальном образовании — ответим быстро, без лишних формальностей.
айфон 10 цена спб kupit-ajfon-cs2.ru .
купить телефон айфон недорого http://kupit-ajfon-cs1.ru/ .
Мы предлагаем оформление дипломов ВУЗов по всей Украине — с печатями, подписями, приложением и возможностью архивной записи (по запросу).
Документ максимально приближен к оригиналу и проходит визуальную проверку.
Мы гарантируем, что в случае проверки документа, подозрений не возникнет.
– Конфиденциально
– Доставка 3–7 дней
– Любая специальность
Уже более 1469 клиентов воспользовались услугой — теперь ваша очередь.
Диплом купить заказ — ответим быстро, без лишних формальностей.
купить айфон в спб новый http://www.kupit-ajfon-cs.ru .
Оформиление дипломов ВУЗов по всей Украине — с печатями, подписями, приложением и возможностью архивной записи (по запросу).
Документ максимально приближен к оригиналу и проходит визуальную проверку.
Мы гарантируем, что в случае проверки документа, подозрений не возникнет.
– Конфиденциально
– Доставка 3–7 дней
– Любая специальность
Уже более 970 клиентов воспользовались услугой — теперь ваша очередь.
Купить диплом о среднем — ответим быстро, без лишних формальностей.
Покупка дипломов ВУЗов В киеве — с печатями, подписями, приложением и возможностью архивной записи (по запросу).
Документ максимально приближен к оригиналу и проходит визуальную проверку.
Мы даем гарантию, что в случае проверки документа, подозрений не возникнет.
– Конфиденциально
– Доставка 3–7 дней
– Любая специальность
Уже более 4412 клиентов воспользовались услугой — теперь ваша очередь.
Диплом о среднем образовании — ответим быстро, без лишних формальностей.
лечение запоя
vivod-iz-zapoya-irkutsk001.ru
лечение запоя
enclomiphene testosterone: buy enclomiphene online – enclomiphene online
I was more than happy to search out this internet-site.I wanted to thanks for your time for this glorious read!! I definitely having fun with each little little bit of it and I’ve you bookmarked to check out new stuff you weblog post.
вывод из запоя
vivod-iz-zapoya-chelyabinsk003.ru
вывод из запоя цена
Мы предлагаем дипломы любых профессий по приятным тарифам. Заказ документа, который подтверждает обучение в университете, – это выгодное решение. Приобрести диплом о высшем образовании: workforce.beparian.com/employer/diplomy-grup-24
Way cool, some valid points! I appreciate you making this article available, the rest of the site is also high quality. Have a fun.
sure save pharmacy: remote consultation online pharmacy – humana mail order pharmacy
Подключение интернета в новосибирске доступно благодаря множеству интернет-провайдеров. Определение провайдера, это важный шаг, который зависит от ваших потребностей. На сайте domashij-internet-novosibirsk006.ru вы сможете найти подробную информацию о тарифах на интернет и услугах связи.Сначала рекомендуется сравнить провайдеров, чтобы определить, какой из них предложит вам наиболее выгодные условия. Важно учитывать скорость интернета и возможность безлимитного подключения. Множество провайдеров предлагают акционные предложения, которые могут существенно снизить стоимость подключения. При выборе провайдера обязательно учитывайте тип подключения — проводной или Wi-Fi. Не забудьте выяснить, какое оборудование необходимо для подключения и условия его установки. Большинство компаний позволяют подавать заявки на подключение онлайн, что делает процесс более удобным. Также стоит почитать отзывы о провайдерах, чтобы иметь представление о качестве их услуг. Если вас интересует мобильный интернет, важно проверить, обеспечит ли провайдер стабильное соединение. Таким образом, процесс подключения интернета в новосибирске может быть простым и быстрым, если вы сделаете правильный выбор провайдера.
Мы изготавливаем дипломы любой профессии по приятным тарифам. Важно, чтобы дипломы были доступными для большинства наших граждан. Быстро и просто приобрести диплом о высшем образовании mendascotravels.com/employer/premialnie-diplom-24
итальянская сантехника gessi-santehnika-1.ru .
https://myindexdirectory.com/listings614882/executive-business-environment-shared-work-facilities-adjustable-rental-agreements
https://farmaciaasequible.shop/# Farmacia Asequible
enclomiphene best price enclomiphene citrate enclomiphene for men
mostbet promo qeydiyyat https://www.mostbet3041.ru
https://hot-de88.com
LottoChamp is a lottery prediction software that uses statistical analysis and mathematical algorithms to help users choose more strategic numbers when playing the lottery.
вывод из запоя круглосуточно череповец
vivod-iz-zapoya-cherepovec006.ru
вывод из запоя цена
I rattling lucky to find this website on bing, just what I was searching for : D as well saved to my bookmarks.
1win casino http://1win3021.com/
В современном мире, где киберугрозы становятся все более изощренными, выбор антивирусного программного обеспечения и надежного интернет-провайдера играет ключевую роль в обеспечении интернет-безопасности. На сайте site;com можно найти множество рекомендаций по выбору антивируса для дома, который защитит ваши данные от вирусов и сетевых угроз; При выборе провайдеров интернета важно учитывать не только скорость и стабильность соединения, но и дополнительные услуги провайдера, такие как фильтрация трафика и защита данных. Комплексные решения, предлагаемые интернет-провайдерами России, могут включать в себя антивирусное программное обеспечение, что значительно упростит процесс обеспечения безопасности сети. Надежная связь в сочетании с качественным антивирусом позволит минимизировать риски, связанные с интернет-угрозами. Важно помнить, что правильный выбор антивируса и провайдера — это залог вашей безопасности в цифровом мире.
кашпо для комнатных растений напольные https://www.kashpo-napolnoe-rnd.ru – кашпо для комнатных растений напольные .
лечение запоя
vivod-iz-zapoya-chelyabinsk002.ru
вывод из запоя круглосуточно
winner
Traveling to Punta Cana, the gem of the Dominican Republic, promises an escape filled with sun-drenched beaches, whispering palms, and an ambiance of pure relaxation. But before you can indulge in the tropical splendor of Excellence Punta Cana or the upscale vibes of Excellence El Carmen, there’s one last journey you must consider: your Excellence Punta Cana airport Transfer. In this comprehensive guide, we’re taking the guesswork out of transportation from Punta Cana Airport to Excellence Punta Cana.
transfers from punta cana airport to excellence el carmen
RxFree Meds: RxFree Meds – RxFree Meds
Farmacia Asequible: Farmacia Asequible – farmacias online canarias
Hi there, its nice paragraph about media print,
we all know media is a great source of information.
Also visit my site – check here
Sometimes image compatibility issues can disrupt a workflow. That’s where WEBPtoPNGHero com steps in. It transforms WebP images into PNG format while preserving sharpness, transparency, and original dimensions. The tool works entirely online — no plugins, no installations, and no registration. Its drag-and-drop interface allows fast single or batch uploads, with each file processed in real-time. Designed for convenience, it’s accessible from desktop or mobile devices alike. Upload your WebP, download your PNG, and move on with your project — that simple. Engineered for designers, developers, and anyone dealing with diverse file formats, this converter ensures images are ready for use on any platform. Your files are deleted automatically after conversion, providing both security and peace of mind.
WEBPtoPNGHero
купить диплом в костроме купить диплом в костроме .
http://farmaciaasequible.com/# Farmacia Asequible
ванна джакузи с гидромассажем ванна джакузи с гидромассажем .
купить педагогический диплом http://arus-diplom9.ru – купить педагогический диплом .
https://farmaciaasequible.com/# Farmacia Asequible
перепланировка комнаты перепланировка комнаты .
вывод из запоя цена
vivod-iz-zapoya-cherepovec005.ru
вывод из запоя круглосуточно
проект перепланировки квартиры для согласования proekt-pereplanirovki-kvartiry1.ru .
подготовка проекта перепланировки http://www.proekt-pereplanirovki-kvartiry.ru/ .
mostbet az müsbət rəylər mostbet4047.ru
Hi there! This post couldn’t be written any better! Reading through this post reminds me of my previous room mate! He always kept talking about this. I will forward this article to him. Pretty sure he will have a good read. Thank you for sharing!
Prothiaden RxFree Meds RxFree Meds
Some truly fantastic info , Gladiolus I detected this.
Мобильный интернет в новосибирске: основные операторы связи В новосибирске‚ одном из самых больших городов мира‚ доступ к интернету является ключевым фактором. Жители выбирают интернет-провайдеров‚ стремясь получить надежную связь. Давайте рассмотрим‚ какие операторы связи доступны в новосибирске и какие тарифы на мобильный интернет являются наиболее привлекательными. Цены на мобильный интернет колеблются: от безлимитных тарифов до пакетов с ограниченным объемом трафика. Одним из основных факторов при выборе провайдера является скорость интернета. Среди операторов можно найти как 4G‚ так и современные 5G сети‚ предлагающие высокую скорость и надежное соединение. Сравнение операторов поможет выбрать лучший вариант. Отзывы о провайдерах часто содержат информацию о качестве связи в разных районах столицы. Мобильный интернет для бизнеса требует повышенного внимания‚ так как скорость и надежность крайне важны. Есть специальные тарифы и для домашнего использования. Оптимальные тарифы на связь подойдут как для личных нужд‚ так и для деловых целей. Подключение интернета обычно не требует много времени и усилий‚ что делает процесс простым. Выбор интернет-провайдера в новосибирске требует вдумчивого анализа и внимательного подхода к предложениям. интернет провайдеры новосибирск
casinia
экстренный вывод из запоя
https://vivod-iz-zapoya-chelyabinsk001.ru
лечение запоя челябинск
OneConverter.com works anywhere you need it—on a desktop, laptop, tablet, or smartphone. The responsive design automatically adjusts to fit your screen, whether you’re using a large monitor or a small mobile device. No separate app download is necessary: just open your web browser, navigate to the site, and start converting. Buttons and input areas adapt to touchscreens, so you can tap values instead of clicking with a mouse. Need to convert distance during a hike or check currency rates at an airport? The entire site loads quickly, even over cellular networks. When you rotate your phone, the layout optimizes for horizontal or vertical viewing without losing functionality. Images and icons remain sharp on high-resolution displays, and menus collapse elegantly into compact layouts on smaller screens. Behind every click, conversion formulas run on secure servers, so your device’s processor never gets bogged down. Offline caching ensures that once the page loads, you can switch between converters without extra data usage. OneConverter.com stands out as a truly cross-platform tool that never forces you to compromise on speed or usability.
OneConverter.com
rollino
купить аттестат за 11 класс купить аттестат за 11 класс .
Farmacia Asequible: Farmacia Asequible – Farmacia Asequible
Приобрести документ ВУЗа можно у нас. Мы предлагаем документы об окончании любых ВУЗов России. Даем гарантию, что в случае проверки документа работодателем, подозрений не появится. antonovschool.ru/forum/messages/forum1/topic1740/message1842/?result=new#message1842
https://xnude.app/
Hey, I think your blog might be having browser compatibility issues. When I look at your blog in Chrome, it looks fine but when opening in Internet Explorer, it has some overlapping. I just wanted to give you a quick heads up! Other then that, great blog!
https://mondoku.com/sklo-fary-dlya-dyzelnoho-avto-nyuansy.html
экстренный вывод из запоя череповец
vivod-iz-zapoya-cherepovec004.ru
вывод из запоя круглосуточно череповец
how to play 1win game how to play 1win game
Возможно, это будет полезно участникам обсуждения:
По теме “diyworks.ru”, там просто кладезь информации.
Ссылка ниже:
https://diyworks.ru
Надеюсь, это было полезно.
You completed various good points there. I did a search on the topic and found the majority of persons will consent with your blog.
https://farmaciaasequible.shop/# farmacias sevilla la nueva
интернет провайдеры по адресу дома
domashij-internet-nizhnij-novgorod006.ru
подключить интернет
рейтинг сайтов казино популярные онлайн казино
Hiya! I simply would like to give an enormous thumbs up for the nice data you’ve right here on this post. I will be coming again to your blog for extra soon.
пансионат для пожилых после инсульта
pansionat-tula003.ru
дом престарелых
RxFree Meds RxFree Meds proventil online pharmacy
To begin your Space XY journey, you’ll need to find a reputable online casino platform that offers the game for free. Look for casinos with a strong reputation and a wide selection of games. The appeal of Space XY lies in its simplicity, high-stakes nature, and the potential for huge rewards. The faster pace and real-time decision-making make it a thrilling option for anyone who enjoys the rush of gambling combined with strategy. Yes, you can run Space XY download and play for real money on both Android and iOS devices. To start, download the app from the casino website, create an account, and begin your gaming journey. The mobile version offers the same real-money gaming experience as the desktop version. XX-XY Athletics founder Jennifer Sey slammed Nike over its alleged funding of a study on puberty blockers for children and how it would affect their athletic and training performance.
https://goft.ro/game-bet-win-ghanas-complete-aviator-betting-review/
Tiranga is a free app for Android that lets people put up beautiful Indian flag wallpapers on their phones. It is made to help people show they love their country, India. People can pick from many good-looking flag pictures and share them too. This app is simple to use and great for anyone who wants to honor the Indian flag every day, not just on special days. At the same time, you get to experience free gaming. There’s no need to spend a single rupee of your own money on it. Thanks to its demo funds, you can instead play Aviator in demo mode repeatedly without issue. Refresh the page to reload the money on it if you run out. Lulumall is a fun and easy-to-use colour prediction platform where you can earn rewards just by guessing colours right. It’s a great mix of gaming and shopping benefits, making it perfect for users who enjoy both fun and savings. The colour trading apk offers a smooth and secure experience with daily bonuses, instant cashouts, and multiple withdrawal options. You can even use your cashback for discounts on online shopping.
Дом Patek Philippe — это вершина часового искусства , где сочетаются прецизионность и эстетика .
Основанная в 1839 году компания славится авторским контролем каждого изделия, требующей сотен часов .
Инновации, такие как ключевой механизм 1842 года , сделали бренд как новатора в индустрии.
хронометры Патек Филипп купить
Коллекции Grand Complications демонстрируют вечные календари и декоративные элементы, выделяя уникальность.
Текущие линейки сочетают инновационные материалы, сохраняя классический дизайн .
Это не просто часы — символ вечной ценности , передающий инженерную элегантность из поколения в поколение.
enclomiphene best price: enclomiphene buy – enclomiphene
Neil Island is a small, peaceful island in the Andaman and Nicobar Islands, India. It’s known for its beautiful beaches, clear blue water, and relaxed atmosphere: how to reach Neil Island
Приобрести диплом об образовании. Приобретение подходящего диплома через качественную и надежную фирму дарит ряд достоинств для покупателя. Такое решение дает возможность сэкономить время и серьезные финансовые средства. orikdok-v-gorode-kostroma-44.ru
1win com https://www.1win3021.com
вывод из запоя челябинск
vivod-iz-zapoya-chelyabinsk003.ru
лечение запоя челябинск
gessi продукция https://gessi-santehnika-1.ru/ .
ванны гидромассажные http://www.hidromassazhnaya-vanna.ru/ .
https://syndicate-de.com
buy enclomiphene online: enclomiphene online – buy enclomiphene online
888starz отзывы россия 888starz отзывы россия .
интернет провайдеры в нижнем новгороде по адресу дома
domashij-internet-nizhnij-novgorod005.ru
дешевый интернет нижний новгород
Valuable information. Fortunate me I discovered your site unintentionally, and I’m shocked why this coincidence didn’t happened earlier! I bookmarked it.
https://karamba-de.com
https://farmaciaasequible.com/# bepanthol para la cara opiniones
Осознанное участие в азартных развлечениях — это комплекс мер , направленный на предотвращение рисков, включая ограничение доступа несовершеннолетним .
Сервисы должны внедрять инструменты контроля, такие как временные блокировки, чтобы избежать чрезмерного участия.
Регулярная подготовка персонала помогает выявлять признаки зависимости , например, неожиданные изменения поведения .
https://sacramentolife.ru
Предоставляются ресурсы горячие линии , где обратиться за поддержкой при проявлениях зависимости.
Следование нормам включает аудит операций для обеспечения прозрачности.
Задача индустрии создать безопасную среду , где удовольствие сочетается с вредом для финансов .
Good write-up, I am regular visitor of one?¦s blog, maintain up the nice operate, and It is going to be a regular visitor for a lengthy time.
888
mostbet virtual idman mostbet virtual idman
частный пансионат для пожилых
pansionat-tula002.ru
дом престарелых в туле
https://farmaciaasequible.com/# Farmacia Asequible
mostbet mobile app mostbet mobile app .
Психотерапевты Самара. Психолог онлайн 225 оценок
Hi to every one, since I am in fact keen of reading this blog’s post to be
updated regularly. It includes good material.
Visit my webpage; get more info
1х зеркало 1х зеркало
вывод из запоя круглосуточно
vivod-iz-zapoya-chelyabinsk002.ru
вывод из запоя круглосуточно челябинск
enclomiphene for men: enclomiphene for sale – enclomiphene for men
french pharmacy online RxFree Meds RxFree Meds
Great beat ! I wish to apprentice while you amend your web site,
how can i subscribe for a blog site? The account
helped me a acceptable deal. I had been tiny bit acquainted of this your broadcast offered
bright clear idea
My web page – look at here
подключить домашний интернет нижний новгород
domashij-internet-nizhnij-novgorod004.ru
домашний интернет тарифы нижний новгород
mostbet aviator qeydiyyat mostbet aviator qeydiyyat
I would like to thnkx for the efforts you have put in writing this blog. I am hoping the same high-grade blog post from you in the upcoming as well. In fact your creative writing abilities has inspired me to get my own blog now. Really the blogging is spreading its wings quickly. Your write up is a good example of it.
Attractive section of content. I just stumbled upon your web site and in accession capital to assert that I acquire actually enjoyed account your blog posts. Any way I’ll be subscribing to your augment and even I achievement you access consistently fast.
услуги медицинской косметологии услуги медицинской косметологии .
Психотерапевт Киров. Психиатр онлайн 549 оценок
самые точные прогнозы на нхл http://luchshie-prognozy-na-khokkej2.ru .
Где заказать диплом специалиста?
Купить диплом ВУЗа по невысокой цене можно, обратившись к проверенной специализированной компании.: nsk-diplom.com
http://enclomiphenebestprice.com/# enclomiphene testosterone
пансионат для пожилых людей
pansionat-tula001.ru
частный дом престарелых
лечение запоя челябинск
https://vivod-iz-zapoya-chelyabinsk001.ru
лечение запоя
Its such as you read my thoughts! You appear to understand a lot approximately this, like you wrote the guide in it or something.
I believe that you can do with some % to power the message home a
little bit, but instead of that, this is great blog.
An excellent read. I will certainly be back.
Feel free to surf to my web blog … this hyperlink
Приобрести диплом любого ВУЗа. Покупка подходящего диплома через надежную фирму дарит ряд плюсов для покупателя. Данное решение позволяет сберечь время и существенные финансовые средства. orikdok-v-gorode-izhevsk-18.online
На прием Клинцы. Психиатр онлайн 488 оценок
I have not checked in here for a while as I thought it was getting boring, but the last several posts are great quality so I guess I¦ll add you back to my everyday bloglist. You deserve it my friend 🙂
Мы изготавливаем дипломы любых профессий по разумным тарифам. Дипломы производятся на подлинных бланках государственного образца Приобрести диплом о высшем образовании diplomf-v-irkutske.ru
mostbet mobil qeydiyyat https://mostbet4046.ru
mostbet hesabı bərpa etmək https://mostbet4045.ru/
enclomiphene for sale: enclomiphene for sale – enclomiphene for sale
качественные прогнозы на спорт качественные прогнозы на спорт .
Приобрести диплом можно через официальный сайт компании. orikdok-5v-gorode-voronezh-36.ru
1win yuklash https://1win1145.ru
Do you mind if I quote a few of your articles as long as I provide credit and sources back to your webpage? My website is in the exact same area of interest as yours and my users would definitely benefit from a lot of the information you provide here. Please let me know if this alright with you. Cheers!
edpills buy https://buyedpills.shop/# edmeds buy edmeds buy
farmacia precios crema diprogenta para que sirve zzzquil prospecto
прогнозы на хоккей на сегодня бесплатно http://luchshie-prognozy-na-khokkej.ru/ .
Hello my loved one! I wish to say that this article is awesome, nice
written and come with almost all vital infos. I’d like
to see more posts like this .
Stop by my web page – great post to read
Dragon Tiger offers exciting variations that make the game more enjoyable and challenging. The game has a new design and an easy-to-use interface that enhances the overall gaming experience. The game works efficiently on 2G 3G wifi networks, allowing you to play anywhere, anytime. Dragon Tiger Slots is an app that presents the traditional gameplay of the slot machine with a tropical background and amazing sound for the fascinating journey in every round. Even though it can be a bit basic, it’s an ideal game for some people but at the same time, it can also provide a good level of excitement to the more experienced players. This is a socially amusing and entertaining approach to get a fix of casino gaming from anywhere! Jungle-Themed Graphics: Bright and colorful Tiger icons, as well as other animals denoting jungle, are seen on the reels.
https://ippmt.kauko.lt/heres-why-uk-gamers-love-the-pinup-aviator-version/
Ans. The Following Types Of Great Programs And Features Are Found Inside Teen Patti Gold Application. Teen Patti or Indian Flush is played with a standard deck of cards. The main objective of this game is to create the highest-ranking combination among all the players with only three cards dealt. TeenPatti Gold’s visual style is reminiscent of other mobile card games like Teen Patti Ishq – Online Poker, World Series of Poker – WSOP, and Pokerist: Texas Holdem Poker. Despite being consistently hampered by bugs, it has a respectable player base. Exciting Gameplay in Vegas XPlinko Jackpot A collection of popular casino games The visuals in Teen Patti Vegas are polished and vibrant, designed to evoke the glitzy ambiance of a Las Vegas casino. Tables are sleek, cards are sharp, and avatars are customizable, allowing players to express themselves with different outfits and styles.
Купить диплом университета!
Заказ документа о высшем образовании через проверенную и надежную компанию дарит ряд преимуществ для покупателя. Купить диплом ВУЗа у проверенной фирмы: doks-v-gorode-tomsk-70.online
прогнозы на тоталы в хоккее http://luchshie-prognozy-na-khokkej1.ru .
премиальная сантехника магазин internet-magazine-santehniki.ru .
farmacia natural online: Farmacia Asequible – farma boutique
пансионат для пожилых людей
pansionat-tula003.ru
пансионат для пожилых
Thanks , I’ve recently been looking for info about this topic for a long time and yours is the greatest I’ve came upon till now. However, what in regards to the bottom line? Are you certain concerning the source?
заказать доставку суши барнаул https://sushi-barnaul.ru
Магазин брендовых кроссовок https://kicksvibe.ru Nike, Adidas, New Balance, Puma и другие. 100% оригинал, новые коллекции, быстрая доставка, удобная оплата. Стильно, комфортно, доступно!
пансионат для пожилых после инсульта
pansionat-msk003.ru
пансионат для лежачих москва
https://tayabet-8.com
Wow that was unusual. I just wrote an very long comment but after I clicked submit my comment didn’t show up. Grrrr… well I’m not writing all that over again. Anyways, just wanted to say superb blog!
http://enclomiphenebestprice.com/# enclomiphene for men
1 вин букмекерская https://1win1143.ru/
В Москве возможность безлимитного интернета стал привычным делом благодаря большому количеству интернет-провайдеров, предлагающих выгодные тарифы . На сайте domashij-internet-msk005.ru представлена актуальная информация о тарифах на интернет , включая как домашний, так и мобильный интернет. Сравнивая провайдеров, вы сможете выбрать наиболее подходящее предложение для своих нужд. Обратите внимание на скорость интернета и пакетные услуги , которые могут включать телевидение и телефонную связь. Мнения пользователей о провайдерах помогут определить качество услуг связи в Москве. Подключение интернета становится простым шагом , если вы знаете, какие варианты стоит рассмотреть. Выгодные тарифы и возможность подключения безлимитного интернета делают жизнь в большом городе более удобной.
Once I originally commented I clicked the -Notify me when new feedback are added- checkbox and now each time a comment is added I get four emails with the identical comment. Is there any approach you can remove me from that service? Thanks!
скачать 1win на пк https://www.1win1139.ru
RxFree Meds: RxFree Meds – RxFree Meds
купить в москве аттестат за 11 класс купить в москве аттестат за 11 класс .
Мы оказываем услуги по производству и продаже документов об окончании любых университетов Российской Федерации. Документы производят на подлинных бланках государственного образца. laren.flybb.ru/viewtopic.php?f=2&t=567
пансионат для лежачих тула
pansionat-tula002.ru
пансионат для престарелых людей
Мы предлагаем выгодно и быстро приобрести диплом, который выполняется на оригинальном бланке и заверен печатями, штампами, подписями должностных лиц. Данный документ способен пройти любые проверки, даже при использовании профессиональных приборов. koreagiftbox.com/2025/06/11/ne-upustite-shans-kupite-diplom-prjamo-sejchas-97
https://farmaciaasequible.shop/# Farmacia Asequible
mostbet.com skachat mostbet.com skachat .
enclomiphene enclomiphene best price enclomiphene online
הספסל ופרשה את רגליה. צפיתי בה מתאמצת, והזרע שלי מעורבב במיצים שלה זורם ממנה, מטפטף על רצפת התרמיל במסדרון ומשך את האוויר באפו. משהו לא היה בסדר. בדירה היה ריח סמיך ומתוק של סקס-מוכר, דירות דיסקרטיות ערביות
Very interesting subject, thankyou for putting up. “The great aim of education is not knowledge but action.” by Herbert Spencer.
betway
пансионат для пожилых после инсульта
pansionat-msk002.ru
пансионат для пожилых после инсульта
888starz bet casino 888starz bet casino .
Выбор тарифа домашнего интернета в Москве — задача, которая требует постоянного внимания. Во-первых, важно оценить нужную скорость интернета, в зависимости от ваших потребностей, будь то работа или онлайн-игры. Провайдеры Москвы предлагают различные тарифы интернета, и вам стоит сравнить их условия подключения и цену тарифа на сайте провайдеров. Обратите внимание на стабильность соединения и технологии подключения, которые влияют на качество интернета. Не забудьте о дополнительных услугах, такие как Wi-Fi подключение, также могут сыграть значительную роль. Не забудьте ознакомиться с отзывами пользователей, чтобы понять, насколько надежен выбранный провайдер. Также, следите за акциями и скидками, что поможет вам сэкономить на подключении. Выбор правильного провайдера и тарифа обеспечит вам комфортное использование интернета
cl?nica de cosmetolog?a moderna cl?nica de cosmetolog?a moderna .
https://enclomiphenebestprice.shop/# buy enclomiphene online
1вин ставки http://www.1win1142.ru
Заказать диплом на заказ возможно через официальный сайт компании. orikdok-4v-gorode-syktyvkar-11.online
Farmacia Asequible: Farmacia Asequible – movicol opiniones
частный дом престарелых
pansionat-tula001.ru
пансионат для людей с деменцией в туле
суши сайт барнаул заказать доставку суши барнаул
Хирургические услуги циторедукция: диагностика, операции, восстановление. Современная клиника, лицензированные специалисты, помощь туристам и резидентам.
Заказать диплом института по невысокой цене можно, обращаясь к проверенной специализированной компании. Заказать документ о получении высшего образования вы сможете в нашей компании. orikdok-1v-gorode-krasnoyarsk-24.online
сантехника логотип http://www.internet-magazine-santehniki.ru .
прогнозы на хоккей https://luchshie-prognozy-na-khokkej2.ru .
прогнозы на хоккей от профессионалов бесплатно luchshie-prognozy-na-khokkej1.ru .
хоккейные прогнозы на сегодня https://luchshie-prognozy-na-khokkej.ru .
профессиональные прогнозы на спорт kompyuternye-prognozy-na-futbol3.ru .
island pharmacy calcitriol: overseas pharmacy no prescription – RxFree Meds
Its great as your other content : D, appreciate it for putting up.
дом престарелых в москве
pansionat-msk001.ru
дом престарелых в москве
провайдеры интернета в краснодаре по адресу проверить
domashij-internet-krasnodar006.ru
интернет провайдеры краснодар по адресу
как использовать бонусы 1вин 1win1142.ru
купить диплом об окончании института http://www.arus-diplom3.ru .
RxFree Meds RxFree Meds relenza online pharmacy
Покупка дипломов ВУЗов В киеве — с печатями, подписями, приложением и возможностью архивной записи (по запросу).
Документ максимально приближен к оригиналу и проходит визуальную проверку.
Мы гарантируем, что в случае проверки документа, подозрений не возникнет.
– Конфиденциально
– Доставка 3–7 дней
– Любая специальность
Уже более 2245 клиентов воспользовались услугой — теперь ваша очередь.
Перейти — ответим быстро, без лишних формальностей.
Tento koncept představuje principy a praktiky snižující nebezpečí poškození hráčů, čímž vzniká bezpečné prostředí pro všechny účastníky.
Je nutné, aby dodržovali pravidla jako časové blokace, systémy varování, které zabraňují závislosti .
Klíčovou součástí je vzdělávání hráčů , například v identifikaci rizikových příznaků , což snižuje šance na újmu.
https://zerocollection.cz/free-spiny-dnes/
Je třeba, aby zajišťovaly anonymitu hráčů a ověřovaly jejich věk jako součást prevence zneužití .
Úspěšná implementace odpovědného hraní posiluje důvěru operátora a podporuje dlouhodobou stabilitu.
mostbet qeydiyyat yoxlaması https://mostbet4042.ru/
пансионат для пожилых
pansionat-msk003.ru
пансионат для пожилых в москве
диплом купить в ярославле https://arus-diplom4.ru .
Покупка дипломов ВУЗов по всей Украине — с печатями, подписями, приложением и возможностью архивной записи (по запросу).
Документ максимально приближен к оригиналу и проходит визуальную проверку.
Мы даем гарантию, что в случае проверки документа, подозрений не возникнет.
– Конфиденциально
– Доставка 3–7 дней
– Любая специальность
Уже более 2491 клиентов воспользовались услугой — теперь ваша очередь.
Купить диплом специалиста недорого — ответим быстро, без лишних формальностей.
https://enclomiphenebestprice.shop/# enclomiphene
Наши специалисты предлагают выгодно заказать диплом, который выполнен на оригинальном бланке и заверен печатями, штампами, подписями должностных лиц. Документ способен пройти любые проверки, даже с применением профессиональных приборов. edblog.com.au/ne-upustite-shans-kupite-diplom-prjamo-sejchas-166
Howdy! This is kind of off topic but I need some help from an established blog. Is it hard to set up your own blog? I’m not very techincal but I can figure things out pretty fast. I’m thinking about setting up my own but I’m not sure where to begin. Do you have any points or suggestions? Cheers
farmacia murcia online: Farmacia Asequible – comprar viagra en zaragoza
Оформиление дипломов ВУЗов по всей Украине — с печатями, подписями, приложением и возможностью архивной записи (по запросу).
Документ максимально приближен к оригиналу и проходит визуальную проверку.
Мы гарантируем, что в случае проверки документа, подозрений не возникнет.
– Конфиденциально
– Доставка 3–7 дней
– Любая специальность
Уже более 4893 клиентов воспользовались услугой — теперь ваша очередь.
Купить реальный диплом о высшем образовании — ответим быстро, без лишних формальностей.
Оформиление дипломов ВУЗов В киеве — с печатями, подписями, приложением и возможностью архивной записи (по запросу).
Документ максимально приближен к оригиналу и проходит визуальную проверку.
Мы гарантируем, что в случае проверки документа, подозрений не возникнет.
– Конфиденциально
– Доставка 3–7 дней
– Любая специальность
Уже более 957 клиентов воспользовались услугой — теперь ваша очередь.
Купить диплом о высшем образовании — ответим быстро, без лишних формальностей.
Оформиление дипломов ВУЗов В киеве — с печатями, подписями, приложением и возможностью архивной записи (по запросу).
Документ максимально приближен к оригиналу и проходит визуальную проверку.
Мы гарантируем, что в случае проверки документа, подозрений не возникнет.
– Конфиденциально
– Доставка 3–7 дней
– Любая специальность
Уже более 3821 клиентов воспользовались услугой — теперь ваша очередь.
Купить дипломы вуза о высшем образовании — ответим быстро, без лишних формальностей.
Мы предлагаем документы любых учебных заведений, которые находятся на территории всей РФ. Купить диплом о высшем образовании:
anetastaffing.com/employer/diplomirovans
Покупка дипломов ВУЗов по всей Украине — с печатями, подписями, приложением и возможностью архивной записи (по запросу).
Документ максимально приближен к оригиналу и проходит визуальную проверку.
Мы даем гарантию, что в случае проверки документа, подозрений не возникнет.
– Конфиденциально
– Доставка 3–7 дней
– Любая специальность
Уже более 4400 клиентов воспользовались услугой — теперь ваша очередь.
Уточнить здесь — ответим быстро, без лишних формальностей.
1win это что https://1win1141.ru/
провайдеры интернета в краснодаре по адресу
domashij-internet-krasnodar005.ru
интернет провайдеры по адресу дома
Капельницы для восстановления после запоя в Туле: путь к здоровью Процесс лечения алкоголизма стартует с консультации опытного специалиста. В специализированных клиниках в Туле предоставляется наркологическая помощь, включая капельницы для восстановления. Процедуры направлены на очищение организма от токсинов и восстановление водно-электролитного баланса. вывод из запоя Уход за пациентом включает мониторинг состояния и поддержку во время терапии. Реабилитация после запоя — это многогранный процесс, который включает физическое и психологическое восстановление. Не забывайте, что качественное восстановление, это залог успешного лечения и возвращения к привычной жизни.
частный пансионат для пожилых людей
pansionat-msk002.ru
частные пансионаты для пожилых в москве
https://rxfreemeds.com/# cholesterol
I just like the valuable info you provide on your articles. I’ll bookmark your blog and test again right here frequently. I am quite certain I’ll be told lots of new stuff right here! Best of luck for the following!
Мы изготавливаем дипломы психологов, юристов, экономистов и других профессий по приятным тарифам. Цена будет зависеть от выбранной специальности, года получения и образовательного учреждения: canadiannewcomerjobs.ca/companies/originality-diplomas
Farmacia Asequible Farmacia Asequible Farmacia Asequible
https://rxfreemeds.shop/# RxFree Meds
Заказать диплом университета по невысокой стоимости возможно, обратившись к надежной специализированной компании. Приобрести документ о получении высшего образования вы можете в нашей компании. orikdok-5v-gorode-krasnoyarsk-24.online
1win ставка https://1win1144.ru
RxFree Meds: RxFree Meds – crestor pharmacy card
подключить интернет по адресу
domashij-internet-krasnodar004.ru
какие провайдеры по адресу
mostbet az etibarlıdırmı mostbet az etibarlıdırmı
Оформиление дипломов ВУЗов В киеве — с печатями, подписями, приложением и возможностью архивной записи (по запросу).
Документ максимально приближен к оригиналу и проходит визуальную проверку.
Мы даем гарантию, что в случае проверки документа, подозрений не возникнет.
– Конфиденциально
– Доставка 3–7 дней
– Любая специальность
Уже более 1714 клиентов воспользовались услугой — теперь ваша очередь.
Купить диплом Киев — ответим быстро, без лишних формальностей.
Оформиление дипломов ВУЗов по всей Украине — с печатями, подписями, приложением и возможностью архивной записи (по запросу).
Документ максимально приближен к оригиналу и проходит визуальную проверку.
Мы даем гарантию, что в случае проверки документа, подозрений не возникнет.
– Конфиденциально
– Доставка 3–7 дней
– Любая специальность
Уже более 1223 клиентов воспользовались услугой — теперь ваша очередь.
Купить диплом о образовании недорого — ответим быстро, без лишних формальностей.
купить аттестат в пскове купить аттестат в пскове .
Your article helped me a lot, is there any more related content? Thanks!
buy enclomiphene online: enclomiphene testosterone – enclomiphene
дом престарелых в москве
pansionat-msk001.ru
пансионат для лежачих после инсульта
Покупка официального диплома через проверенную и надежную компанию дарит ряд преимуществ для покупателя. Быстро заказать диплом: supremecarelink.com/employer/gosznac-diplom-24
1win регистрация в 1 клик http://1win1145.ru
Just wanna comment on few general things, The website pattern is perfect, the content is real fantastic : D.
Мы предлагаем оформление дипломов ВУЗов по всей Украине — с печатями, подписями, приложением и возможностью архивной записи (по запросу).
Документ максимально приближен к оригиналу и проходит визуальную проверку.
Мы даем гарантию, что в случае проверки документа, подозрений не возникнет.
– Конфиденциально
– Доставка 3–7 дней
– Любая специальность
Уже более 2883 клиентов воспользовались услугой — теперь ваша очередь.
Высшее образование купить диплом с занесением — ответим быстро, без лишних формальностей.
Приобрести диплом института по выгодной цене возможно, обращаясь к проверенной специализированной фирме. Мы оказываем услуги по производству и продаже документов об окончании любых университетов Российской Федерации. Купить диплом о высшем образовании– atlantarp.forumex.ru/posting.php?mode=post&f=36&sid=c0a7af29e24fd5fba2b87ce715dc1257
Оформиление дипломов ВУЗов В киеве — с печатями, подписями, приложением и возможностью архивной записи (по запросу).
Документ максимально приближен к оригиналу и проходит визуальную проверку.
Мы гарантируем, что в случае проверки документа, подозрений не возникнет.
– Конфиденциально
– Доставка 3–7 дней
– Любая специальность
Уже более 3875 клиентов воспользовались услугой — теперь ваша очередь.
Купить дипломы о высшем образовании — ответим быстро, без лишних формальностей.
Мы предлагаем оформление дипломов ВУЗов по всей Украине — с печатями, подписями, приложением и возможностью архивной записи (по запросу).
Документ максимально приближен к оригиналу и проходит визуальную проверку.
Мы гарантируем, что в случае проверки документа, подозрений не возникнет.
– Конфиденциально
– Доставка 3–7 дней
– Любая специальность
Уже более 2819 клиентов воспользовались услугой — теперь ваша очередь.
Обращайтесь — ответим быстро, без лишних формальностей.
Недорогой вызов нарколога на дом – это удобное и эффективное решение для тех, кто сталкивается с зависимостями. Часто такие пациенты стесняются обращаться в клиники и предпочитают анонимное лечение. На сайте narkolog-tula006.ru можно найти информацию о доступных услугах выездного нарколога, который предложит профессиональную консультацию нарколога и профессиональную помощь. Недорогие услуги нарколога, такие как лечение наркомании и алкоголизма, обеспечивают возможность получения медицинской помощи на дому. Психологическая поддержка и реабилитация зависимых проводятся опытными врачами, что обеспечивает защиту и приватность. Свяжитесь с недорогим наркологом, чтобы избавиться от зависимости и начните путь к выздоровлению вместе с профессиональной поддержкой.
I’m still learning from you, but I’m trying to achieve my goals. I certainly love reading everything that is posted on your blog.Keep the posts coming. I enjoyed it!
Оформиление дипломов ВУЗов В киеве — с печатями, подписями, приложением и возможностью архивной записи (по запросу).
Документ максимально приближен к оригиналу и проходит визуальную проверку.
Мы даем гарантию, что в случае проверки документа, подозрений не возникнет.
– Конфиденциально
– Доставка 3–7 дней
– Любая специальность
Уже более 2569 клиентов воспользовались услугой — теперь ваша очередь.
Купить диплом специалиста недорого — ответим быстро, без лишних формальностей.
диплом купить в ярославле http://arus-diplom5.ru/ .
купить диплом колледжа в москве http://www.arus-diplom4.ru/ .
Odjeca i aksesoari za hotele salvete od platna po sistemu kljuc u ruke: uniforme za sobarice, recepcionere, SPA ogrtaci, papuce, peskiri. Isporuke direktno od proizvodaca, stampa logotipa, jedinstveni stil.
mostbet promo kod az mostbet promo kod az
Виртуальные номера для Telegram https://basolinovoip.com создавайте аккаунты без SIM-карты. Регистрация за минуту, широкий выбор стран, удобная оплата. Идеально для анонимности, работы и продвижения.
בפרצוף שלי. תמצצי את זה! קח את זה לפה, אמרתי! מיד תפסתי את הזין ביד, ודחפתי אותו לפה. הוא כן, למה לא, הייתי בהלם. מיד התקשרתי לדניס וביקשתי ממנו לפנות את המספר שלנו לזמן מה, הוא ארז top article
прогноз на футбол с анализом прогноз на футбол с анализом .
Купить документ о получении высшего образования вы можете у нас в столице. Приобрести диплом ВУЗа по доступной стоимости возможно, обратившись к надежной специализированной фирме. anturasg.flybb.ru/posting.phpmode=post&f=2
1win букмекерская контора официальный скачать http://1win1144.ru/
Есть ненужная мукулатура? Макулатура Казань телеграм Принимаем бумажные отходы по выгодным расценкам. Быстрый расчет, помощь с загрузкой, удобный график. Экономия и забота об экологии!
Купить подписчиков в Telegram https://vc.ru/smm-promotion лёгкий способ начать продвижение. Выберите нужный пакет: боты, офферы, живые. Подходит для личных, новостных и коммерческих каналов.
my rx pharmacy: pompharmacy viagra – lamotrigine pharmacy
интернет по адресу красноярск
domashij-internet-krasnoyarsk006.ru
интернет провайдеры по адресу красноярск
https://enclomiphenebestprice.com/# enclomiphene price
Im no longer certain the place you are getting your info, however good topic. I needs to spend some time studying much more or working out more. Thank you for magnificent info I used to be on the lookout for this info for my mission.
Farmacia Asequible Farmacia Asequible farmacias proximas
Детоксикация организма после алкоголя в домашних условиях – необходимая мера‚ особенно для жителей Тулы‚ страдающих от алкогольной зависимости. Комплексный подход является ключевым в лечении запоя‚ включая детоксикацию и восстановление функций печени. лечение запоя тула Симптомы похмелья могут быть крайне неприятными: боль в голове‚ недомогание‚ слабость. Поэтому домашние методы‚ такие как народные средства‚ могут оказать значительное облегчение. К примеру, травяные настои‚ имбирь с медом способствуют восстановлению сил. В Туле доступны разнообразные альтернативные методы терапии‚ включая курсы алкогольной терапии. Не забудьтечто после детоксикации нужна дополнительная поддержка для успешного восстановления от алкогольной зависимости.
бонусный баланс 1win https://1win1143.ru
When I originally commented I clicked the -Notify me when new comments are added- checkbox and now each time a comment is added I get four emails with the same comment. Is there any way you can remove me from that service? Thanks!
Thanks for sharing excellent informations. Your web site is very cool. I am impressed by the details that you have on this blog. It reveals how nicely you perceive this subject. Bookmarked this website page, will come back for extra articles. You, my pal, ROCK! I found simply the info I already searched everywhere and simply could not come across. What a perfect web site.
кашпо напольное со вставкой 55 60см http://www.kashpo-napolnoe-msk.ru – кашпо напольное со вставкой 55 60см .
Услуга прокапки в Туле — это важная задача‚ требующая профессионального подхода. На сайте narkolog-tula005.ru вы можете найти услуги по водоснабжению‚ включая монтаж и ремонт различных систем. Наша команда сантехников готова предоставить качественные услуги и быструю диагностику. Мы понимаем‚ что вызов специалиста может потребоваться в экстренной ситуации‚ поэтому готовы предложить акционные предложения. Отзывы клиентов свидетельствуют о надежности и профессионализме наших специалистов. Установка и ремонт сантехники — это наша специализация‚ и мы обеспечиваем выполнение работы на высшем уровне.
Купить диплом о высшем образовании!
Мы предлагаем дипломы любых профессий по приятным ценам— atep-college.ru
диплом электрика купить в москве http://www.arus-diplom2.ru .
Aviso Legal. Nossa página oferece cobertura jornalística esportiva nacional de qualidade, contando com um time de especialistas na produção de conteúdo imparcial e na coleta e compartilhamento de informações relevantes sobre apostas esportivas online e o jogo responsável. Em nosso conteúdo, fazemos marketing e o uso de links de afiliação de apostas esportivas online. Isso significa que, ao clicar, você poderá ser redirecionado a um de nossos anunciantes. Antes de adquirir qualquer produto ou serviço, certifique-se de que se trata de site licenciado em sua jurisdição e de atender todas as exigências legais aplicáveis ao jogo responsável. Aposte com segurança e responsabilidade. Com tamanha fama, em algum momento, os usuários podem encontrar algumas falcatruas por aí, ou seja, sites que estão trabalhando de forma ilegal.
https://webspace180.webspace17.shop/apostar-no-aviator-mitos-e-verdades-sobre-multiplicadores/
Há vários cassinos online regulamentados que contam não só com o Spaceman, mas também com uma versão demo para você aprender como jogar o jogo do astronauta. Spaceman é um jogo de cassino que combina elementos de sorte e estratégia. Ele é baseado no tema espacial e é jogado com cartas. O objetivo do jogo é obter a melhor mão possível para vencer o dealer e ganhar dinheiro. Via de regra, os jogos de crash são muito populares pela sua simplicidade e acessibilidade. Portanto, independentemente das habilidades dos jogadores, todo mundo pode ser capaz de jogar o jogo do astronauta. Contudo, a navegação pode ser complexa para quem está dando os primeiros passos. Por isso, abaixo explicamos passo a passo como jogar:
провайдер по адресу красноярск
domashij-internet-krasnoyarsk005.ru
провайдеры интернета в красноярске по адресу
1 вин взод http://www.1win1141.ru
Как прервать запой в Туле: действенные способы Запой – это состояние, требующее квалифицированной помощи. В Туле вы можете вызвать нарколога на дом, что делает процесс лечения более комфортным. Обращение к наркологу на дому дает возможность получить помощь при запое, не выходя из дома. вызов нарколога на дом тула Основные методы прерывания запоя включают медикаментозное лечение и детоксикацию организма. Эти процедуры помогают устранить физическую зависимость от алкоголя и минимизировать симптомы абстиненции. Психологическая помощь является важным аспектом восстановления, поэтому персонализированный подход к каждому пациенту имеет огромное значение. Реабилитация людей с алкогольной зависимостью охватывает не только медицинские аспекты, но и рекомендации по лечению, а также программы, способствующие возвращению к полноценной жизни. Подбор эффективных методов лечения зависит от уровня зависимости и общего состояния здоровья пациента. Если вы сталкиваетесь с проблемой алкоголизма, не откладывайте вызов специалиста на дом. Квалифицированная помощь позволит вам преодолеть запой и начать новый этап жизни без алкоголя;
Мы предлагаем дипломы психологов, юристов, экономистов и прочих профессий по приятным ценам. Покупка диплома, подтверждающего окончание университета, – это разумное решение. Заказать диплом университета: metalfans.maxbb.ru/viewtopic.php?f=7&t=1224
cbd opiniones: Farmacia Asequible – Farmacia Asequible
Мы предлагаем дипломы любой профессии по доступным тарифам. Мы можем предложить документы техникумов, которые расположены на территории всей РФ. Документы печатаются на бумаге самого высокого качества. Это дает возможности делать настоящие дипломы, не отличимые от оригиналов. orikdok-v-gorode-krasnodar-23.online
Thank you for the sensible critique. Me & my neighbor were just preparing to do a little research about this. We got a grab a book from our local library but I think I learned more clear from this post. I am very glad to see such wonderful information being shared freely out there.
купить диплом государственного образца купить диплом государственного образца .
Мы предлагаем документы университетов, расположенных на территории всей РФ. Документы делаются на “правильной” бумаге высшего качества: jobspage.ca/employer/frees-diplom
https://rxfreemeds.shop/# RxFree Meds
Приобрести диплом института по невысокой цене можно, обратившись к проверенной специализированной фирме. Заказать диплом: freedomtempagency.org/employer/premialnie-diplom-24
Септик — это водонепроницаемый резервуар, предназначенная для первичной обработки сточных вод .
Система работает так: жидкость из дома поступает в бак , где твердые частицы оседают , а жиры и масла всплывают наверх .
В конструкцию входят входная труба, бетонный резервуар, соединительный канал и почвенный фильтр для дочистки воды .
https://sklad-slabov.ru/forum/user/22171/
Преимущества: экономичность, долговечность и экологичность при соблюдении норм.
Критично важно не перегружать систему , иначе неотделённые примеси попадут в грунт, вызывая загрязнение.
Типы конструкций: бетонные блоки, пластиковые ёмкости и стекловолоконные модули для индивидуальных нужд.
Farmacia Asequible: farmacias web – Farmacia Asequible
http://enclomiphenebestprice.com/# enclomiphene for sale
buy enclomiphene online enclomiphene price enclomiphene buy
Hello my friend! I want to say that this post is awesome, nice written and include approximately all important infos. I would like to see more posts like this.
Matchmaking services offer a innovative approach to meet people globally, combining user-friendly features like photo verification and compatibility criteria.
Core functionalities include video chat options, geolocation tracking , and detailed user bios to streamline connections.
Advanced algorithms analyze behavioral patterns to suggest potential partners , while privacy settings ensure safety .
https://nguoivietblog.com/dating/erotic-power-of-the-unknown/
Many platforms offer freemium models with exclusive benefits , such as unlimited swipes , alongside real-time notifications .
Looking for casual chats , these sites adapt to user goals, leveraging community-driven networks to foster meaningful bonds.
Hi my loved one! I wish to say that this article is awesome, great written and include almost all important infos. I would like to look more posts like this.
ставки на хоккей прогнозы от профессионалов ставки на хоккей прогнозы от профессионалов .
Б17 психологи. Психиатр онлайн 559 оценок
Капельница для лечения запоя в Туле — эффективный метод восстановления здоровья, который помогает быстро восстановить здоровье пациента. При алкогольной зависимости возникают серьезные симптомы, такие как головные боли, рвота и расстройства психики. В лечебных учреждениях Тулы доступны профессиональные услуги, включая капельницы для детоксикации. narkolog-tula004.ru Лечение алкоголизма включает не только капельницы, но и поддержку при отказе от алкоголя. Запись на консультацию к наркологу поможет выбрать оптимальный путь восстановления к восстановлению после запоя. Могут быть предложены антидепрессанты и уколы для улучшения состояния для облегчения симптомов. narkolog-tula004.ru предлагает услуги по лечению алкогольной зависимости, где опытные врачи гарантируют профессиональный подход к вашему лечению. Не теряйте время — начните свой путь к здоровью уже сейчас!
какие провайдеры интернета есть по адресу красноярск
domashij-internet-krasnoyarsk004.ru
провайдеры интернета в красноярске по адресу
Служба экстренной наркологической помощи – это ключевой аспект в лечении зависимостей. Важно знать‚ что при появлении признаков передозировки, таких как ускоренное дыхание, потеря сознания или конвульсии, необходимо незамедлительно вызывать скорую помощь. Наркоманы и их близкие могут обратиться в наркологическую клинику, где окажут профессиональную помощь. Кризисные службы предлагают услуги нарколога, что позволяет обрести помощь близким и самим зависимым. Лечение зависимостей включает не только лекарственное лечение, но и психотерапию для зависимых, что важно для восстановления после зависимости. Профилактические меры против алкоголизма и социальная адаптация также играют важную роль в процессе восстановления наркоманов, обеспечивая успешное возвращение к нормальной жизни. Важно помнить, что помощь при наркотической зависимости должна быть оперативной и многосторонней. Поддержка и понимание близких помогают преодолеть сложности на пути к восстановлению. Для получения дополнительной информации посетите narkolog-tula005.ru.
Мы изготавливаем дипломы любых профессий по невысоким тарифам. Важно, чтобы дипломы были доступны для большого количества наших граждан. Заказать диплом любого института 1ajobs.ch/employer/premialnie-diplom-24
Een ander onderzoek waarin het gebruik van sildenafil werd geanalyseerd bij iets meer dan 250 mannen met diabetes en erectiestoornissen rapporteerde verbeterde erecties bij 56% van de deelnemers (vergeleken met 10% in de placebogroep). Geschreven door: Liesbeth ThoenBeoordeeld en bewerkt door: Peter Smeets Bij ons koopt u gegarandeerd originele Kamagra uit het Ajanta Pharmaceutical bedrijf in India. Wees zeker van uw zaak en koop bestel uw Kamagra bij ons. Wanneer de penis van de man opzwelt spreken we van een erectie. Deze ontstaat onder andere bij seksuele opwinding. De zwellichamen die zich in de penis bevinden lopen vol met bloed. Hierdoor wordt de penis groter en stijf. Complete supplementen als ondersteuning van je libido. Hoewel de natuur heel wat te bieden heeft aan vrouwen die hun libido willen verhogen, is het in bepaalde gevallen beter om een compleet en samengesteld supplement te kopen in te nemen. Zo is de werking van de afzonderlijke bestanddelen nog sterker en het effect dus ook groter. Onderstaand overzicht geeft wat meer info over enkele van de beste libidoverhogende supplementen: Alle Beste Lustopwekkers voor vrouwen
https://dadosabertos.ufersa.edu.br/user/montbirschantback1978
Net als bij alle medicijnen kunnen ook erectiepillen bijwerkingen veroorzaken. De meest voorkomende bijwerkingen van sildenafil (Viagra) en tadalafil (Cialis) staan hieronder opgesomd. Viagra begint doorgaans na zo’n 30 minuten te werken. U moet er bij Viagra rekening mee houden dat een volle maag, en vooral vet eten, de werkzaamheid van dit product negatief kunnen beïnvloeden. Voedsel heeft nauwelijks invloed op de werking van Cialis. Vragen? Mail naar webmd drugs 2 drug-77881 cialis-oral details Apotheek cialis kopen bij kunt u na ongeveer vier tot zes weken voorzichtig beginnen. De gehele penis is bron de ingreep verdoofd. Als u nog geen ervaring heeft met dit soort medicijnen en u gaat voor de eerste keer bijvoorbeeld Viagra kopen of andere erectiepillen kopen, bestel dan eerst een kleine hoeveelheid. Als het middel onverhoopt niet mocht werken, dan blijft u niet zitten met dure tabletten. De apotheek (en dus ook de online apotheek!) neemt namelijk geen medicijnen terug. Heeft u een middel gevonden dat voor u goed werkt? Dan kunt u desgewenst een wat grotere hoeveelheid erectiepillen kopen.
анализ матчей анализ матчей .
точный прогнозы на футбол https://kompyuternye-prognozy-na-futbol.ru/ .
При выборе компании для квартирного перевозки важно проверять её лицензирование и репутацию на рынке.
Изучите отзывы клиентов или рекомендации знакомых , чтобы оценить профессионализм исполнителя.
Сравните цены , учитывая объём вещей, сезонность и дополнительные опции .
https://www.samuisecondhome.com/forum/messages/forum1/topic2527/message3235/?result=new#message3235
Требуйте наличия страхового полиса и уточните условия компенсации в случае повреждений.
Оцените уровень сервиса: оперативность ответов, гибкость графика .
Узнайте, используются ли специализированные автомобили и защитные технологии для безопасной транспортировки.
купить диплом о высшем образовании в москве купить диплом о высшем образовании в москве .
Farmacia Asequible: Farmacia Asequible – Farmacia Asequible
Психотерапевт Оренбург. Психотерапевт онлайн 778 оценок
прогноз на сегодня на спорт прогноз на сегодня на спорт .
https://rxfreemeds.com/# asda pharmacy doxycycline
After all, what a great site and informative posts, I will upload inbound link – bookmark this web site? Regards, Reader.
Hi there this is kinda of off topic but I was wondering if blogs use WYSIWYG editors or if you have to manually code with HTML. I’m starting a blog soon but have no coding experience so I wanted to get advice from someone with experience. Any help would be enormously appreciated!
Психотерапевт Пенза. Психиатр онлайн 566 оценок
Заказать диплом об образовании!
Мы изготавливаем дипломы любых профессий по разумным тарифам— [url=http://educationdir.ru/]educationdir.ru[/url]
Капельное лечение от запоя – это распространенный метод лечение, который может быть выполнен специалистом на дом анонимно в городе Тула. Основная цель процедуры – очищение организма и восстановление после запоя. Но важно учитывать ограничения и нежелательные реакции. Ограничения включают: тяжелые болезни сердца и сосудов, аллергии на состав капельницы и патологии почек. Нежелательные эффекты могут проявляться в виде боли в голове, тошнотных ощущений и аллергических реакций. нарколог на дом анонимно тула Необходимо учитывать, что помощь нарколога предполагают не только лечение алкогольной зависимости, но и предотвращение рецидивов, реабилитацию и медицинское сопровождение. Конфиденциальное лечение с помощью капельниц может значительно улучшить самочувствие пациента и способствовать быстрому восстановлению.
провайдеры по адресу казань
domashij-internet-kazan006.ru
провайдеры домашнего интернета казань
RxFree Meds acyclovir cream online pharmacy lorazepam indian pharmacy
Вызов нарколога на дом в экстренных случаях — это важная услуга для тех, кто сталкивается с зависимостями. На ресурсе narkolog-tula003.ru вы можете получить консультацию нарколога и заказать врача на дом. Квалифицированная помощь нарколога включает в себя лечение зависимостей и поддержку при зависимости. Экстренная медицинская служба предлагает конфиденциальные услуги, что позволяет сохранить конфиденциальность. Быстрое лечение наркомании и реабилитация алкоголиков возможны с участием психотерапевта на дом. Не откладывайте, обратитесь за срочной помощью!
Мы изготавливаем дипломы любой профессии по доступным ценам. Мы готовы предложить документы ВУЗов, расположенных в любом регионе РФ. Документы выпускаются на бумаге высшего качества. Это позволяет делать настоящие дипломы, не отличимые от оригиналов. orikdok-5v-gorode-novosibirsk-54.online
Мы можем предложить дипломы любой профессии по разумным тарифам. Приобретение диплома, подтверждающего окончание института, – это грамотное решение. Приобрести диплом о высшем образовании: mihail.ekafe.ru/viewtopic.php?f=16&t=5702
I do agree with all of the ideas you’ve presented in your post. They’re really convincing and will certainly work. Still, the posts are very short for newbies. Could you please extend them a little from next time? Thanks for the post.
Valuable information. Lucky me I found your website by accident, and I’m shocked why this accident did not happened earlier! I bookmarked it.
buy enclomiphene online: enclomiphene price – enclomiphene for sale
купить диплом в волгограде arus-diplom10.ru .
точный прогноз на спорт сегодня https://kompyuternye-prognozy-na-futbol1.ru .
Hello. remarkable job. I did not imagine this. This is a fantastic story. Thanks!
готовый диплом купить http://arus-diplom9.ru/ – готовый диплом купить .
sportbets https://sportbets16.ru/ .
Помощь наркологов доступна в любое время на ресурсе narkolog-tula003.ru. Терапия наркомании требует квалифицированного подхода‚ и наша команда предлагает консультацию нарколога в любое время. Мы поддерживаем зависимым‚ обеспечивая конфиденциальное лечение и реабилитационный центр для реабилитации после зависимости. Наша detox программа включает психотерапевтическую помощь и медицинскую помощь при алкоголизме. Мы также предлагаем профилактику рецидивов через персонализированное лечение и кризисную интервенцию. Не ждите‚ обратитесь за помощью уже сегодня!
прогнозы на баскетбол го спорт http://www.prognoz-na-segodnya-na-sport.ru .
https://enclomiphenebestprice.com/# enclomiphene citrate
melatonina spray opiniones: Farmacia Asequible – Farmacia Asequible
домашний интернет казань
domashij-internet-kazan005.ru
подключить интернет казань
прогноз на сегодня на спорт прогноз на сегодня на спорт .
металлические значки металлические значки .
sportbets sportbets17.ru .
Капельница от запоя , данный распространенный метод, который используется для облегчения симптомов алкогольного синдрома и восстановления организма. Тем не менее, порой данная процедура может быть неэффективной. Если вы столкнулись с такой ситуацией, необходимо осознать, что делать дальше. Первым шагом является обращение к наркологу в домашних условиях срочно. Специалист проведет диагностику состояния больного, выяснит причины, по которым процедура не принесла желаемого эффекта. Симптомы запоя могут различаться, поэтому важно определить их источники. Иногда может возникнуть необходимость в лечение запоя с использованием других методов. нарколог на дом срочно Лечение на дому запоя также может предусматривать использование специальных средств для капельниц, которые лучше подходят для индивидуального случая. Также, необходимо учитывать реабилитационные меры и восстановление после алкогольной интоксикации, которые могут включать поддержку и консультации психологов. Если процедура не эффективна, имеет смысл обратиться к дополнительным рекомендациям по лечению запоя, такие как коррекция питания, прием витаминов и минеральных добавок. Также необходимо учитывать борьба с алкогольной зависимостью требует основательного подхода и, возможно, продолжительного лечения. Не стоит откладывать обращение за профессиональной помощью — срочная помощь нарколога может стать ключевым фактором на пути к избавлению от запоя.
Заказать документ о получении высшего образования вы можете у нас. Мы оказываем услуги по изготовлению и продаже документов об окончании любых ВУЗов России. Гарантируем, что при проверке документов работодателями, каких-либо подозрений не появится. p91648f6.beget.tech/2025/06/18/pokupka-diploma-prosto-nadezhno-bystro.html
I conceive this site contains some really great info for everyone : D.
medical centar 24 hr clinic near me
клиника Будва клиника Будва
enclomiphene price enclomiphene price enclomiphene
https://rxfreemeds.shop/# RxFree Meds
RxFree Meds: RxFree Meds – cigna online pharmacy
Would love to always get updated great blog! .
Прерывание запоя в Туле: эффективные методы Запой – это состояние, требующее квалифицированной помощи. В Туле вы можете вызвать нарколога на дом, что делает процесс лечения более комфортным. Вызов нарколога на дом позволяет получить необходимую помощь при запое без необходимости посещения клиники. вызов нарколога на дом тула Ключевые методы прерывания запоя состоят в медикаментозной терапии и детоксикации. Эти методы направлены на снятие физической зависимости от алкоголя и облегчение симптомов абстиненции. Психологическая помощь является важным аспектом восстановления, поэтому персонализированный подход к каждому пациенту имеет огромное значение. Реабилитация людей с алкогольной зависимостью охватывает не только медицинские аспекты, но и рекомендации по лечению, а также программы, способствующие возвращению к полноценной жизни. Эффективные методы лечения зависят от степени зависимости и состояния здоровья человека. Если вы сталкиваетесь с проблемой алкоголизма, не откладывайте вызов специалиста на дом. Квалифицированная помощь позволит вам преодолеть запой и начать новый этап жизни без алкоголя;
I just like the helpful information you provide for your articles. I will bookmark your blog and check again here regularly. I’m rather sure I will be informed a lot of new stuff right here! Best of luck for the following!
Наш сайт является архитектурным и культурным путеводителем по Венеции, здесь Вы найдете информацию о великолепных достопримечательностях этого города: venice4you.ru
купить диплом специалиста купить диплом специалиста .
провайдеры по адресу казань
domashij-internet-kazan004.ru
провайдеры интернета в казани по адресу проверить
hi!,I like your writing so much! share we communicate more about your article on AOL? I require an expert on this area to solve my problem. May be that’s you! Looking forward to see you.
диплом в самаре купить диплом в самаре купить .
https://rxfreemeds.shop/# sams club pharmacy lipitor
Sweet Bonanza 1000 ticks all the boxes we’ve come to expect of a 1000 slot, offering all the things the original did, and more. COPYRIGHT © 2015 – 2025. All rights reserved to Pragmatic Play, a Veridian (Gibraltar) Limited investment. Any and all content included on this website or incorporated by reference is protected by international copyright laws. Don’t be expecting a new set of visuals to accompany the changes, either. Sweet Bonanza 1000 is located in more or less the same swirly candy land as before, and if there are any major differences to the background, they are not easy to spot. Maybe the definition is higher, the colours more vibrant? Sweet Bonanza hit casinos in mid-2019, and there have been a shed load of candy-themed slots released in the interim – Pragmatic Play itself has revisited the swirl in games like Sugar Rush. As such, the view might be staler than the original’s was but no less cheerful on the eyes.
https://datagate.snap4city.org/user/urbigtethe1973
Pragmatic Play is gearing up to release its latest addition to the Big Bass series, with Big Bass Floats My Boat launching on the 12th of February, 2024. This new entry is eagerly awaited by fans of online slot sites, promising to bring fresh excitement to the series. It wasn’t difficult for us to figure out how Big Bass Floats My Boat works. It’s pretty straightforward, thanks to its engaging theme and symbol design. If you’re curious to see it in action, you can easily play the Big Bass Floats My Boat demo slot online at the top of this page to get a feel for the gameplay before betting real money. Only players above the age of 18 are permitted to play our games. Underage gambling is an offence. There’s only one thing better than a Big Bass- a Bigger Bass! Featuring a boosted max win of up to 4,000x your total bet and a boat load of new tweaks; the Big Bass fun has never looked so good. Return to the waters and there might just be a few new surprises awaiting under the surface.
Алкогольная зависимость значительная трудность, с которой имеют дело большое количество жителей Тулы. Психологическая поддержка имеет огромное значение в лечении алкоголизма . Медицинские учреждения предлагают услуги по детоксикации и реабилитации для зависимых, которые включают не только медицинское, но и психологическое сопровождение . вывод из запоя цена Семейная поддержка также важна , так как она создает атмосферу доверия и понимания . Признаки зависимости могут проявляться по-разному , и раннее обращение за помощью в случае запоя способно изменить жизнь к лучшему. Советы по отказу от алкоголя включают в себя поиске новых хобби и замене вредных привычек на более здоровые. Необходимо помнить, что обращение за помощью – это первый шаг к выздоровлению .
Наркология – это критически важная область медицины‚ ориентированная на лечение зависимостями. Если вы или ваши близкие сталкиваетесь проблемы зависимости от наркотиков‚ необходимо знать о вариантах анонимного лечения. Центры лечения зависимостей, такие как narkolog-tula001.ru‚ предлагают поддержку нарколога и комплексную поддержку для зависимых. Поддерживающие сообщества и программы восстановления содействуют людям на этапе к выздоровлению. Психотерапия при зависимости играет ключевую роль в восстановлении наркозависимых. Также важна профилактика наркомании и экстренная поддержка. Не стесняйтесь обращаться за помощью — выздоровление возможно!
You have observed very interesting details ! ps decent site.
RxFree Meds: RxFree Meds – pharmacy prices levitra
I have read several good stuff here. Certainly worth bookmarking for revisiting. I wonder how much effort you put to make such a wonderful informative web site.
RxFree Meds RxFree Meds RxFree Meds
enclomiphene buy: enclomiphene for sale – enclomiphene for sale
I’m impressed, I have to say. Really hardly ever do I encounter a blog that’s both educative and entertaining, and let me let you know, you have got hit the nail on the head. Your idea is outstanding; the issue is something that not sufficient persons are speaking intelligently about. I am very completely satisfied that I stumbled throughout this in my seek for something relating to this.
1win промокод на деньги при пополнении [url=http://1win1134.ru/]1win промокод на деньги при пополнении[/url]
888starz online sri lanka 888starz online sri lanka .
надежные прогнозы на футбол http://www.kompyuternye-prognozy-na-futbol1.ru .
100 прогнозы на футбол http://www.kompyuternye-prognozy-na-futbol.ru/ .
букмекерская контора онлайн скачать http://1win1135.ru
При выборе тарифа на интернет и ТВ важно учитывать количество устройств, которые будут подключены одновременно. Провайдеры интернет-услуг предлагают разнообразные интернет тарифы, подстроенные под потребности пользователей. Скорость интернета занимает ключевую роль, особенно когда вы планируете использовать онлайн-стриминг или мультимедийные услуги. domashij-internet-ekaterinburg006.ru Семейные тарифы обычно дают возможность соединение нескольких устройств, что удобно для использования в домашних условиях. Также стоит позаботиться о совместимости и настройках роутера для гарантии стабильного качества сигнала. Не упустите возможность проверять ТВ пакеты, доступные провайдером, чтобы подобрать оптимальное решение для всей семьи и насладиться удобства использования.
прогнозы на баскетбол сегодня от профессионалов бесплатно прогнозы на баскетбол сегодня от профессионалов бесплатно .
http://rxfreemeds.com/# RxFree Meds
прогноз на сегодня на спорт прогноз на сегодня на спорт .
прогноз на сегодня на спорт прогноз на сегодня на спорт .
прогноз на спорт на сегодня от профессионалов прогноз на спорт на сегодня от профессионалов .
sportbets http://sportbets17.ru/ .
sportbets http://www.sportbets16.ru .
значки пины на заказ http://www.znacki-na-zakaz.ru .
вывод из запоя цена
narkolog-krasnodar005.ru
экстренный вывод из запоя
Hello! I just would like to give a huge thumbs up for the great info you have here on this post. I will be coming back to your blog for more soon.
Чтобы не быть голословным, прикрепляю ссылку:
Хочу выделить материал про fixora.ru.
Смотрите сами:
https://fixora.ru
Если есть вопросы, задавайте.
whoah this blog is wonderful i love reading your articles. Keep up the good work! You know, many people are hunting around for this information, you can help them greatly.
вывод из запоя краснодар
narkolog-krasnodar005.ru
вывод из запоя цена
Мы оказываем услуги по продаже документов об окончании любых университетов России. Документы изготавливаются на фирменных бланках государственного образца. aurorahcs.com/forum/viewtopic.php?f=8&t=941274
купить диплом в москве о высшем образовании купить диплом в москве о высшем образовании .
Заказать диплом о высшем образовании. Заказ диплома ВУЗа через надежную компанию дарит ряд преимуществ для покупателя. Данное решение дает возможность сэкономить как дорогое время, так и существенные финансовые средства. orikdok-4v-gorode-izhevsk-18.ru
В наше время скорость интернета является важным фактором в нашей жизни. В городе Екатеринбург существует множество провайдеров обеспечивают различные тарифы на интернет‚ и важно выбрать самых лучших. На сайте domashij-internet-ekaterinburg005.ru можно найти актуальный рейтинг провайдеров‚ где представлены провайдеры по скорости и качеству услуг. При выборе интернет-провайдера обратите внимание на доступность услуг и технологии подключения: оптоволокно обеспечивает стабильность соединения и высокую скорость. Безлимитный интернет – лучший вариант для тех, кто активно работает онлайн‚ кто много времени проводит в сети. Отзывы о провайдерах помогут понять‚ как на практике обстоят дела с качеством связи . Сравнивая скорость разных провайдеров позволит выбрать наиболее подходящий вариант для ваших нужд. Важно помнить о стабильности соединения‚ особенно если вы работаете удаленно или играете в онлайн-игры.
Наша компания предлагает выгодно и быстро купить диплом, который выполняется на оригинальном бланке и заверен печатями, штампами, подписями официальных лиц. Данный диплом способен пройти лубую проверку, даже с использованием профессионального оборудования. helpin.ge/employer/diplomirovans
RxFree Meds mail pharmacy azithromycin pharmacy
Заказать диплом под заказ в столице можно через сайт компании. orikdok-3v-gorode-groznyy-20.online
I just like the helpful information you supply to your articles. I’ll bookmark your weblog and take a look at again here frequently. I am relatively certain I’ll be told lots of new stuff proper here! Best of luck for the following!
https://rxfreemeds.com/# pharmacy mall online reviews
экстренный вывод из запоя
narkolog-krasnodar004.ru
экстренный вывод из запоя
как потратить бонусы 1вин 1win1137.ru
https://rxfreemeds.shop/# online pharmacy percocet reviews
lucky jet win скачать https://1win1132.ru
услуги экскаватора час услуги экскаватора час .
https://vc.ru/niksolovov/1550885-nakrutka-laikov-v-instagram-25-luchshih-besplatnyh-saitov-v-2025-godu
Мы готовы предложить документы университетов, расположенных в любом регионе России. Купить диплом любого университета:
unmeinaroom.copiny.com/question/details/id/1113560
Где заказать диплом по актуальной специальности?
Приобрести диплом института по выгодной цене вы сможете, обращаясь к проверенной специализированной компании.: diplom-insti.ru
Мы готовы предложить дипломы психологов, юристов, экономистов и прочих профессий по приятным тарифам. Дипломы производят на подлинных бланках Купить диплом о высшем образовании diplomk-v-krasnodare.ru
вывод из запоя краснодар
narkolog-krasnodar004.ru
лечение запоя краснодар
Yeah bookmaking this wasn’t a high risk conclusion great post! .
RxFree Meds: new zealand pharmacy domperidone – target pharmacy propecia
RxFree Meds: RxFree Meds – cialis usa pharmacy
Обновление оборудования у провайдеров интернета в Екатеринбурге: основные моменты В нашем времени интернет-скорость играет значительную роль. Провайдеры Екатеринбурга усердно работают над обновлением технологий и модернизацией сети. Замена оборудования для доступа в интернет становится необходимой для гарантии качественного интернет-сервиса. domashij-internet-ekaterinburg004.ru При выборе интернет-компании важно учитывать предоставляемые услуги, включая варианты тарифов и техническую поддержку. Техника для доступа в интернет, такое как маршрутизаторы, модемы и другое оборудование, должно соответствовать новейшим стандартам. Монтаж новых устройств, включая оптоволоконные технологии значительно улучшает качество связи. Беспроводные технологии также нуждаются в периодическом обновлении. В итоге, постоянное обновление инфраструктуры способствует повышению увеличению скорости соединения и комфортному использованию услуг ;
лечение запоя
narkolog-krasnodar003.ru
вывод из запоя круглосуточно краснодар
Приобрести диплом института!
Покупка документа о высшем образовании через надежную компанию дарит много достоинств. Купить диплом университета у сильной компании: doks-v-gorode-bryansk-32.online
I was very pleased to find this web-site.I wanted to thanks for your time for this wonderful read!! I definitely enjoying every little bit of it and I have you bookmarked to check out new stuff you blog post.
скачать lucky jet на андроид 1win1136.ru
1win как пополнить https://www.1win1115.ru
mostbet az canlı mərclər http://www.mostbet4044.ru
farmГЎcia perto de mim Farmacia Asequible drogueria ana
промокод в 1вин казино https://1win1136.ru
http://enclomiphenebestprice.com/# buy enclomiphene online
Приобрести диплом об образовании. Приобретение официального диплома через качественную и надежную фирму дарит массу плюсов. Это решение дает возможность сэкономить как дорогое время, так и значительные деньги. orikdok-2v-gorode-perm-59.online
888starz app uzbekistan 888starz app uzbekistan .
Заказать диплом под заказ в Москве возможно через официальный сайт компании. orikdok-1v-gorode-irkutsk-38.online
вывод из запоя круглосуточно краснодар
narkolog-krasnodar003.ru
лечение запоя краснодар
code promo 888starz code promo 888starz .
домашний интернет тарифы
domashij-internet-chelyabinsk006.ru
интернет домашний челябинск
экстренный вывод из запоя
narkolog-krasnodar002.ru
лечение запоя
Very nice post. I just stumbled upon your weblog and wanted to say that I’ve really enjoyed browsing your blog posts. In any case I’ll be subscribing to your rss feed and I hope you write again soon!
cialis mexico pharmacy: RxFree Meds – eckerd pharmacy store locator
Мы предлагаем быстро заказать диплом, который выполнен на бланке ГОЗНАКа и заверен печатями, штампами, подписями должностных лиц. Документ способен пройти любые проверки, даже при использовании специальных приборов. cementjobbank.com/companies/diplomirovans
enclomiphene buy: enclomiphene – enclomiphene best price
mostbet bonus mostbet bonus
что такое 1win http://1win1131.ru/
Мы предлагаем документы учебных заведений, которые расположены в любом регионе России. Приобрести диплом о высшем образовании:
rossensor.ru/forum/?PAGE_NAME=profile_view&UID=44296
Woodworking and construction https://www.woodsurfer.com forum. Ask questions, share projects, read reviews of materials and tools. Help from practitioners and experienced craftsmen.
1win зеркало сейчас 1win1137.ru
lucky jet 1win отзывы lucky jet 1win отзывы
enclomiphene for sale enclomiphene citrate enclomiphene best price
http://rxfreemeds.com/# RxFree Meds
промокод на 1win промокод на 1win
создать веб сайт нейросетью нейросеть создать сайт
подключить домашний интернет челябинск
domashij-internet-chelyabinsk005.ru
домашний интернет подключить челябинск
I really like your writing style, good info , thankyou for posting : D.
вывод из запоя круглосуточно
narkolog-krasnodar001.ru
экстренный вывод из запоя
экстренный вывод из запоя краснодар
narkolog-krasnodar002.ru
лечение запоя краснодар
http://rxfreemeds.com/# RxFree Meds
диплом о среднем профессиональном образовании купить диплом о среднем профессиональном образовании купить .
What’s Taking place i am new to this, I stumbled upon this I’ve discovered It positively helpful and it has helped me out loads. I hope to contribute & aid other users like its helped me. Great job.
Надувные лодки ПВХ Badger https://badgerboats.ru от надёжного производителя. Широкий выбор моделей: от компактных до моторных.
Лазерная косметология https://actual-cosmetology.ru в клинике премиум-уровня. Новейшие технологии, сертифицированные специалисты, комфортная атмосфера и заметный результат.
Заказ подходящего диплома через надежную компанию дарит ряд плюсов для покупателя. Приобрести диплом о высшем образовании: forum.mbprinteddroids.com/showthread.php?tid=60211
Антария Хоумс
888starz apk казахстан 888starz apk казахстан .
RxFree Meds: phuket pharmacy viagra – online pharmacy scams
1win. казино. регистрация. 1win. казино. регистрация.
Приобрести документ ВУЗа вы сможете в нашей компании в столице. Купить диплом ВУЗа по невысокой цене возможно, обращаясь к проверенной специализированной фирме. kh.txi.ru/forum/index.php
https://vck2ws73.com/onde-assistir-ao-jogo-entre-atlante-fc-e-pumas/
Because the admin of this web site is working, no doubt very
soon it will be famous, due to its quality contents.
https://w8m181bl.com/favoritos-flamengo-e-internacional-empatam-na-estreia-do-campeonato-brasileiro-2025/
Does your site have a contact page? I’m having a tough time locating
it but, I’d like to shoot you an e-mail. I’ve got some
recommendations for your blog you might be interested in hearing.
Either way, great blog and I look forward to
seeing it expand over time.
mx pharmacy fast https://mxpharmacyfast.shop/# mx pharmacy fast mx pharmacy fast
crema solar embarazo ocu: farmscia – Farmacia Asequible
https://wv3heffq.com/quem-avancou-para-as-oitavas-de-final-da-copa-do-brasil/
Hey there I am so thrilled I found your webpage, I really found you by mistake, while I was looking on Bing for something else, Nonetheless I am here now and would just like to say thanks a
lot for a marvelous post and a all round thrilling blog (I also love the theme/design), I don’t have time to go through it all at the moment but I have bookmarked it
and also added your RSS feeds, so when I have time I will be back to
read a lot more, Please do keep up the excellent job.
https://tjk80nw9.com/qual-e-o-horario-do-jogo-de-hoje-da-copa-do-brasil/
Right now it seems like Expression Engine is the preferred blogging platform available right now.
(from what I’ve read) Is that what you are
using on your blog?
https://uagbobz8.com/
Cool blog! Is your theme custom made or did you download it from somewhere?
A design like yours with a few simple tweeks would really make my blog shine.
Please let me know where you got your design. Thank you
прогнозы lucky jet 1win1133.ru
подключить домашний интернет в челябинске
domashij-internet-chelyabinsk004.ru
подключить интернет
http://farmaciaasequible.com/# Farmacia Asequible
farmacias madrid Farmacia Asequible Farmacia Asequible
Мы изготавливаем дипломы любой профессии по разумным ценам. Цена зависит от той или иной специальности, года выпуска и университета: isinbizden.net/employer/originality-diplomas
bonus 1win http://www.1win1131.ru
Загородный клуб https://yct.su в Зеленогорске — отдых на берегу Финского залива. Комфортабельные коттеджи, баня, ресторан, мероприятия и природа рядом с Петербургом.
Центр независимой сертификации https://radiocert.ru помощь в получении сертификатов ISO, ГОСТ, ТР ТС и других документов.
https://t1djsh47.com/quais-sao-os-times-que-se-classificaram-para-a-copa-do-brasil/
Hi there very cool blog!! Guy .. Beautiful .. Amazing ..
I’ll bookmark your website and take the feeds
additionally? I’m glad to seek out numerous helpful information here within the
publish, we need work out extra strategies on this regard, thank you for sharing.
. . . . .
1win mobile 1win mobile
экстренный вывод из запоя краснодар
narkolog-krasnodar001.ru
лечение запоя
Sweet blog! I found it while searching on Yahoo News. Do you have any tips on how to get listed in Yahoo News? I’ve been trying for a while but I never seem to get there! Thanks
вывод из запоя круглосуточно краснодар
narkolog-krasnodar001.ru
вывод из запоя
как потратить бонусный счет в 1win как потратить бонусный счет в 1win
https://khp1pp4f.com/onde-assistir-brasil-x-uruguai/
Thanks to my father who stated to me on the topic of
this website, this webpage is in fact amazing.
https://suv8k9tx.com/quanto-a-copa-do-brasil-paga-para-os-times-participantes/
Wow, incredible weblog layout! How lengthy have you ever
been running a blog for? you made blogging glance easy.
The whole look of your website is excellent, as well as the content material!
Farmacia Asequible: gelasimi forte – crema licoforte 40 mg
https://www.saki.ru/videos/
https://enclomiphenebestprice.com/# enclomiphene buy
Продвижение сайтов https://optimizaciya-i-prodvizhenie.ru в Google и Яндекс — только «белое» SEO. Улучшаем видимость, позиции и трафик. Аудит, стратегия, тексты, ссылки.
Агентство контекстной рекламы https://kontekst-dlya-prodazh.ru настройка Яндекс.Директ и Google Ads под ключ. Привлекаем клиентов, оптимизируем бюджеты, повышаем конверсии.
enclomiphene for men: buy enclomiphene online – enclomiphene for sale
Can you be more specific about the content of your article? After reading it, I still have some doubts. Hope you can help me.
купить аттестат об окончании 11 https://arus-diplom2.ru/ .
купить в москве диплом врача https://arus-diplom4.ru/ .
big pharmacy online RxFree Meds RxFree Meds
I truly appreciate this post. I¦ve been looking all over for this! Thank goodness I found it on Bing. You’ve made my day! Thx again
Заказать документ о получении высшего образования можно в нашей компании в столице. Приобрести диплом университета по невысокой цене возможно, обращаясь к надежной специализированной компании. sssr.flybb.ru/viewtopic.phpf=2&t=831
https://i-on.in
mostbet qeydiyyat zamanı bonus http://mostbet4043.ru
https://rxfreemeds.com/# RxFree Meds
букмекерские конторы кыргызстана букмекерские конторы кыргызстана
banfield online pharmacy: RxFree Meds – RxFree Meds
Howdy, i read your blog occasionally and i own a similar one and i was just curious if you get a lot of spam responses? If so how do you prevent it, any plugin or anything you can advise? I get so much lately it’s driving me insane so any support is very much appreciated.
1win регистрация скачать http://1win22082.ru
mostbet pul çıxarma https://mostbet4041.ru
mostbet лицензия http://www.mostbet33010.ru
RxFree Meds: RxFree Meds – clomid pharmacy online
http://rxfreemeds.com/# RxFree Meds
enclomiphene for sale enclomiphene best price enclomiphene citrate
888starz apk download 888starz apk download .
I’ve been exploring for a bit for any high quality articles or blog posts in this sort of house . Exploring in Yahoo I ultimately stumbled upon this site. Studying this information So i’m happy to express that I’ve an incredibly excellent uncanny feeling I came upon exactly what I needed. I most without a doubt will make sure to don’t forget this website and provides it a glance regularly.
888starz apk uzbekistan 888starz apk uzbekistan .
I visited a lot of website but I conceive this one contains something extra in it in it
купить аттестат о среднем образовании в москве http://www.arus-diplom3.ru .
Farmacia Asequible: farmacia economica cerca de mi – Farmacia Asequible
Приобрести диплом института!
Мы изготавливаем дипломы психологов, юристов, экономистов и других профессий по невысоким ценам— kupite-diplom0024.ru
производство световых вывесок https://papa-promotion.ru
mostbet az bonus 500 https://mostbet4041.ru/
canadian pharmacy en espaГ±ol: comprar viagra online – Farmacia Asequible
Психотерапевт Оренбург. chat-s-psikhologom-v-telegramme.ru 282 оценок
https://0duz0kzu.com/voce-esta-procurando-saber-quando-sera-a-final-da-copa-do-brasil/
My brother suggested I might like this blog. He was entirely right.
This post truly made my day. You cann’t imagine
simply how much time I had spent for this info!
Thanks!
enclomiphene online enclomiphene testosterone enclomiphene citrate
We absolutely love your blog and find nearly all of your post’s to be exactly I’m looking for. Does one offer guest writers to write content to suit your needs? I wouldn’t mind creating a post or elaborating on a few of the subjects you write related to here. Again, awesome site!
https://bowri857.com/dudu-do-cruzeiro-apoia-campanha-contra-gramados-sinteticos-no-brasil/
Good post. I learn something new and challenging on blogs I stumbleupon everyday.
It will always be useful to read through content from other writers and practice something
from other web sites.
Мы изготавливаем дипломы любых профессий по выгодным ценам. Заказ диплома, подтверждающего обучение в ВУЗе, – это выгодное решение. Заказать диплом ВУЗа: sealedraid.flybb.ru/viewtopic.php?f=9&t=793
https://rxfreemeds.com/# valtrex pharmacy online
Мы изготавливаем дипломы психологов, юристов, экономистов и любых других профессий по выгодным ценам. Мы готовы предложить документы ВУЗов, расположенных в любом регионе Российской Федерации. Дипломы и аттестаты выпускаются на бумаге высшего качества. Это позволяет делать государственные дипломы, не отличимые от оригинала. orikdok-2v-gorode-perm-59.ru
https://8f0weudq.com/quem-sera-o-adversario-do-palmeiras-na-copa-do-brasil/
Hi, after reading this amazing article i am also glad
to share my know-how here with friends.
mostbet lisenziyası https://mostbet4042.ru/
https://ndi3hnms.com/al-hilal-anuncia-rescisao-contratual-com-neymar/
I am regular reader, how are you everybody? This
piece of writing posted at this web site is truly good.
Психотерапевт Белгород. chat-s-psikhologom-v-telegramme.ru 617 оценок
Оформиление дипломов ВУЗов по всей России и СНГ — с печатями, подписями, приложением и возможностью архивной записи (по запросу).
Документ максимально приближен к оригиналу и проходит визуальную проверку.
Мы гарантируем, что в случае проверки документа, подозрений не возникнет.
– Конфиденциально
– Доставка 3–7 дней
– Любая специальность
Уже более 902 клиентов воспользовались услугой — теперь ваша очередь.
[url=http://poligraf11.ru/]Купить диплом института[/url] — ответим быстро, без лишних формальностей.
http://farmaciaasequible.com/# sildenafil 100mg price in spain
Чтобы было понятнее, о чем речь:
Кстати, если вас интересует pro-zenit.ru, загляните сюда.
Ссылка ниже:
https://pro-zenit.ru
Буду рад, если кому-то пригодится.
Мы изготавливаем дипломы психологов, юристов, экономистов и любых других профессий по выгодным тарифам. Важно, чтобы документы были доступны для большинства граждан. Заказать диплом университета rebeccaitow.com/forums/forum/improvement-by-design-lab
Покупка дипломов ВУЗов в Москве — с печатями, подписями, приложением и возможностью архивной записи (по запросу).
Документ максимально приближен к оригиналу и проходит визуальную проверку.
Мы гарантируем, что в случае проверки документа, подозрений не возникнет.
– Конфиденциально
– Доставка 3–7 дней
– Любая специальность
Уже более 1072 клиентов воспользовались услугой — теперь ваша очередь.
По ссылке — ответим быстро, без лишних формальностей.
кашпо для цветов напольное высокое стильное kashpo-napolnoe-spb.ru – кашпо для цветов напольное высокое стильное .
•очешь продать авто? мэджик авто выкуп и продажа авто
Outstanding post, I conceive people should larn a lot from this website its very user genial.
Farmacia Asequible: Farmacia Asequible – farmacia abierta zaragoza
¡Saludos, exploradores de posibilidades únicas !
Bono.sindepositoespana.guru con reseГ±as – п»їhttps://bono.sindepositoespana.guru/# casino bono bienvenida
¡Que disfrutes de asombrosas triunfos inolvidables !
красивые напольные кашпо https://kashpo-napolnoe-msk.ru – красивые напольные кашпо .
Мы предлагаем оформление дипломов ВУЗов по всей России и СНГ — с печатями, подписями, приложением и возможностью архивной записи (по запросу).
Документ максимально приближен к оригиналу и проходит визуальную проверку.
Мы даем гарантию, что в случае проверки документа, подозрений не возникнет.
– Конфиденциально
– Доставка 3–7 дней
– Любая специальность
Уже более 2260 клиентов воспользовались услугой — теперь ваша очередь.
Смотреть тут — ответим быстро, без лишних формальностей.
I’m not that much of a online reader to be honest but your blogs really nice, keep it up! I’ll go ahead and bookmark your website to come back in the future. Cheers
RxFree Meds: acyclovir cream online pharmacy – discount pharmacies
Б17 психологи. chat-s-psikhologom-v-telegramme.ru 624 оценок
מה שאני שומע כשטרנסקסואלים מדברים. המילה “מארח” היא לא צליל פשוט עבורה. היא הכירה בי בכנות אלכוהולי והביטה בחברתה. “מעניין איך נראה חברו?» – בוא נראה אם אתה יכול לשמור על הנרתיק שלך, how much is yours worth?
melbet регистрация https://mostbet11021.ru/
1win apk login https://www.1win22082.ru
Заказать диплом университета по невысокой стоимости вы сможете, обратившись к надежной специализированной фирме. Заказать документ о получении высшего образования вы имеете возможность у нас в столице. orikdok-4v-gorode-irkutsk-38.online
farnacia sobres para el estreГ±imiento movicol Farmacia Asequible
https://rxfreemeds.com/# premarin cream pharmacy
баланс 1win https://1win22095.ru/
Хотите собрать информацию о человеке ? Наш сервис предоставит детальный отчет мгновенно.
Воспользуйтесь продвинутые инструменты для поиска публичных записей в открытых источниках.
Выясните место работы или активность через автоматизированный скан с верификацией результатов.
глаз бога бот бесплатно
Бот работает с соблюдением GDPR, обрабатывая открытые данные .
Получите детализированную выжимку с геолокационными метками и списком связей.
Попробуйте проверенному решению для исследований — точность гарантирована!
Greetings, participants in comedic challenges !
Visit jokesforadults.guru for endless humor – http://jokesforadults.guru/ 100 funny jokes for adults
May you enjoy incredible memorable laughs !
mostbet qeydiyyat promo kod mostbet qeydiyyat promo kod
starz 888 lk https://www.https://888-starz.world .
sportbets http://www.sportbets14.ru .
sportbets sportbets15.ru .
купить диплом в мурманске купить диплом в мурманске .
Вы заказываете документ в надежной и проверенной компании. Заказать диплом о высшем образовании– http://cars-bmw.ru/kupit-diplom-zanesennij-v-reestr-bez-problem/ – cars-bmw.ru/kupit-diplom-zanesennij-v-reestr-bez-problem/
купить школьный аттестат за 11 классов https://arus-diplom3.ru .
Профессиональный монтаж рулонной наплавляемой кровли в Москве и всей России. Работаем с материалами: техноэласт, стеклоизол, битумная мастика. Гарантия до 10 лет. Бесплатный выезд и расчёт. Цена за 1м2 — от 350 рублей. Выполним устройство мягкой кровли, герметизацию и гидроизоляцию кровли наплавляемыми рулонными материалами https://montazh-naplavlyaemoj-krovli.ru/
mostbet az mobil versiya mostbet az mobil versiya
viagra at asda pharmacy: safest online pharmacy – RxFree Meds
online pharmacy legal: 24 hour pharmacy – ambien pharmacy no prescription
You made some decent points there. I regarded on the internet for the issue and located most people will go together with together with your website.
Ответственная игра — это комплекс мер , направленный на защиту участников , включая ограничение доступа несовершеннолетним .
Платформы обязаны предлагать инструменты саморегуляции , такие как временные блокировки, чтобы избежать чрезмерного участия.
Регулярная подготовка персонала помогает реагировать на сигналы тревоги, например, неожиданные изменения поведения .
вавада
Предоставляются ресурсы горячие линии , где можно получить помощь при проявлениях зависимости.
Соблюдение стандартов включает аудит операций для предотвращения мошенничества .
Ключевая цель — создать условия для ответственного досуга, где удовольствие сочетается с вредом для финансов .
Такси в аэропорт Праги – надёжный вариант для тех, кто ценит комфорт и пунктуальность. Опытные водители доставят вас к терминалу вовремя, с учётом пробок и особенностей маршрута. Заказ можно оформить заранее, указав время и адрес подачи машины. Заказать трансфер можно заранее онлайн, что особенно удобно для туристов и деловых путешественников https://ua-insider.com.ua/transfer-v-aeroport-pragi-chem-otlichayutsya-professionalnye-uslugi/
Приобрести диплом университета!
Мы изготавливаем дипломы психологов, юристов, экономистов и прочих профессий по доступным ценам— dfrmat.ru
Хотите найти информацию о пользователе? Наш сервис предоставит полный профиль в режиме реального времени .
Воспользуйтесь уникальные алгоритмы для поиска публичных записей в открытых источниках.
Выясните место работы или интересы через систему мониторинга с верификацией результатов.
глаз бога бот телеграм бесплатно
Система функционирует с соблюдением GDPR, используя только общедоступную информацию.
Закажите расширенный отчет с историей аккаунтов и списком связей.
Доверьтесь проверенному решению для исследований — результаты вас удивят !
1win нужен ли паспорт http://1win22094.ru
https://rxfreemeds.shop/# omeprazole people’s pharmacy
Мы изготавливаем дипломы психологов, юристов, экономистов и любых других профессий по выгодным ценам. Мы готовы предложить документы ВУЗов, расположенных в любом регионе России. Дипломы и аттестаты выпускаются на “правильной” бумаге высшего качества. Это дает возможность делать государственные дипломы, не отличимые от оригинала. orikdok-1v-gorode-ulyanovsk-73.online
Мы предлагаем оформление дипломов ВУЗов по всей России и СНГ — с печатями, подписями, приложением и возможностью архивной записи (по запросу).
Документ максимально приближен к оригиналу и проходит визуальную проверку.
Мы гарантируем, что в случае проверки документа, подозрений не возникнет.
– Конфиденциально
– Доставка 3–7 дней
– Любая специальность
Уже более 3925 клиентов воспользовались услугой — теперь ваша очередь.
Ознакомиться здесь — ответим быстро, без лишних формальностей.
Хотите собрать данные о пользователе? Этот бот предоставит детальный отчет в режиме реального времени .
Воспользуйтесь уникальные алгоритмы для поиска цифровых следов в открытых источниках.
Выясните контактные данные или активность через систему мониторинга с гарантией точности .
telegram глаз бога
Система функционирует с соблюдением GDPR, используя только общедоступную информацию.
Закажите детализированную выжимку с геолокационными метками и списком связей.
Попробуйте надежному помощнику для digital-расследований — результаты вас удивят !
Покупка дипломов ВУЗов по всей России и СНГ — с печатями, подписями, приложением и возможностью архивной записи (по запросу).
Документ максимально приближен к оригиналу и проходит визуальную проверку.
Мы даем гарантию, что в случае проверки документа, подозрений не возникнет.
– Конфиденциально
– Доставка 3–7 дней
– Любая специальность
Уже более 2966 клиентов воспользовались услугой — теперь ваша очередь.
Здесь — ответим быстро, без лишних формальностей.
Покупка дипломов ВУЗов по всей России и СНГ — с печатями, подписями, приложением и возможностью архивной записи (по запросу).
Документ максимально приближен к оригиналу и проходит визуальную проверку.
Мы гарантируем, что в случае проверки документа, подозрений не возникнет.
– Конфиденциально
– Доставка 3–7 дней
– Любая специальность
Уже более 1721 клиентов воспользовались услугой — теперь ваша очередь.
Пишите нам — ответим быстро, без лишних формальностей.
1win что за контора http://www.1win22096.ru
Мы можем предложить дипломы любой профессии по разумным ценам. Заказ диплома, который подтверждает обучение в ВУЗе, – это рациональное решение. Приобрести диплом ВУЗа: polegasm.net/index.php/forum/welcome-mat/154253
https://lqq3865.com/??%20????-286/08f54899443/
Very nice post. I just stumbled upon your blog and wanted to say that I’ve really enjoyed surfing around your blog posts.
After all I’ll be subscribing to your rss feed and I hope you write again soon!
Строительство бассейнов премиального качества. Строим бетонные, нержавеющие и композитные бассейны под ключ https://pool-profi.ru/
как скачать 1win как скачать 1win
http://canrxdirect.com/# canada pharmacy online
buying from canadian pharmacies canada pharmacy 24h canadian pharmacy
как получить демо счет на мелбет https://mostbet11020.ru
промокоды на ракетку 1win http://1win22096.ru/
purple pharmacy mexico price list: mexican drugstore online – TijuanaMeds
לזיין אותך.… לא נתתי לאהובתי להתיישב, קפצתי, ותפסתי בפתאומיות את המותניים, משכתי לעצמי, מציצה למאהב, בזמן שחדרתי אותה בעדינות, והייתי מוכן לגמור בהתרגשות… ליטפתי את התחת שלי על ידי her latest blog
Приобрести диплом института по невысокой цене возможно, обращаясь к проверенной специализированной компании. Купить документ о получении высшего образования можно у нас. orikdok-2v-gorode-vologda-35.online
medication from mexico pharmacy: TijuanaMeds – mexico drug stores pharmacies
office space for lease
автоматические рулонные шторы автоматические рулонные шторы .
http://indimedsdirect.com/# legitimate online pharmacies india
If you’re searching for the best barber near me, best barbershop,
or simply the best haircut in Singapore, you’re not alone.
In a city where style matters, finding the best barbershop near
me or the best salon near me can be the key to elevating your
personal image. Whether you’re after a classic gentleman’s cut or a
modern fade, the right barber near me can make all the difference.
Singapore is home to some of the most skilled barbers
and stylists in Asia. From heritage barbershops with decades
of experience to modern salons equipped with the latest
tools, you’ll find the best haircut Singapore has to offer
just around the corner. If you’re typing “best barber near me” or “haircut near me” into your phone, don’t settle for average.
Go for places known for precision, consistency, and style.
The best barbershop Singapore experiences combine traditional grooming with a touch of luxury—think hot towel
shaves, scalp massages, and personalized style consultations.
For women and men alike, the best salon Singapore options offer expert color work, hair treatments, and premium customer service.
Whether you’re preparing for an important event
or just due for a refresh, trust the best barber Singapore and best haircut near me to deliver.
Book an appointment today and experience why so many
locals and expats call these professionals the best in the business.
рольшторы на окна купить в москве elektricheskie-rulonnye-shtory99.ru .
https://ndmbk.kf9277.com
Hi there! This is my first comment here so I just wanted
to give a quick shout out and tell you I really enjoy reading your articles.
Can you suggest any other blogs/websites/forums that go over
the same topics? Thanks a ton!
My brother recommended I might like this web site. He was totally right. This post truly made my day. You can not imagine simply how much time I had spent for this information! Thanks!
https://p2.zx5857.com
What’s up, constantly i used to check website posts here early in the dawn, because i enjoy to learn more and more.
https://z0.yu9899.com
The other day, while I was at work, my sister stole my iphone
and tested to see if it can survive a 30 foot drop, just so she can be a youtube sensation. My
apple ipad is now destroyed and she has 83 views. I know this is totally off topic but
I had to share it with someone!
LMC Middle School https://lmc896.org in Lower Manhattan provides a rigorous, student-centered education in a caring and inclusive atmosphere. Emphasis on critical thinking, collaboration, and community engagement.
игра в кальмара сериал 3 сезон – южнокорейский сериал о смертельных играх на выживание ради огромного денежного приза. Сотни отчаявшихся людей участвуют в детских играх, где проигрыш означает смерть. Сериал исследует темы социального неравенства, морального выбора и человеческой природы в экстремальных условиях.
Yeah bookmaking this wasn’t a bad decision outstanding post! .
online canadian pharmacy reviews canadian pharmacy world ordering drugs from canada
электрокарнизы в москве http://www.elektrokarniz90.ru .
mx pharmacy easy mx pharmacy easy mx pharmacy easy mx pharmacy easy
canadian pharmacy india: canadian drug pharmacy – canada drugstore pharmacy rx
рулонные шторы на кухню с балконом http://www.elektricheskie-rulonnye-shtory77.ru .
автоломбард москва
zaimpod-pts90.ru
автоломбард займ
one win token https://1win22094.ru/
canadian drugstore online: CanRx Direct – canadian pharmacy ratings
https://7.zy2279.com
This piece of writing will help the internet viewers for building up new website or even a weblog from start to end.
sportbets http://www.sportbets15.ru/ .
https://ce.juswn2.com
Somebody essentially help to make severely posts I might state.
This is the first time I frequented your web page and so far?
I surprised with the research you made to make this particular post amazing.
Excellent process!
можно заказать муравьиную ферму http://www.kupit-muravinuyu-fermu-1.ru .
https://canrxdirect.shop/# canadian pharmacy world reviews
Психотерапевты Самара. chat-s-psikhologom-v-telegramme.ru 970 оценок
видеокамера iflow https://citadel-trade.ru/ .
https://shiba-akita.ru/ – разбор физиологии и эмоций при головокружении в необычных местах
Причины засыхания бутонов у пионов https://e-pochemuchka.ru/prichiny-zasyhaniya-butonov-u-pionov/
parimatch apk latest version parimatch apk latest version .
купить аттестат в омске купить аттестат в омске .
В этом ресурсе доступна информация по запросу, от кратких контактов до исчерпывающие сведения.
Базы данных охватывают людей всех возрастов, статусов.
Информация собирается по официальным записям, что гарантирует надежность.
Обнаружение производится по контактным данным, что обеспечивает использование эффективным.
программа глаз бога для поиска людей
Дополнительно доступны адреса плюс актуальные данные.
Обработка данных проводятся в рамках законодательства, что исключает несанкционированного доступа.
Используйте этому сайту, для поиска нужные сведения без лишних усилий.
автоматические гардины для штор http://karnizy-s-elektroprivodom77.ru/ .
1win партнерская программа вход https://www.1win11002.ru
электрокарниз недорого http://elektrokarniz-nedorogo77.ru .
скачать бк мелбет бесплатно https://mostbet11021.ru
электрокарнизы для штор купить электрокарнизы для штор купить .
отзывы 1вин отзывы 1вин
After examine a couple of of the weblog posts in your website now, and I really like your method of blogging. I bookmarked it to my bookmark website list and might be checking back soon. Pls take a look at my web site as effectively and let me know what you think.
Кпт курган. chat-s-psikhologom-v-telegramme.ru 617 оценок
Заказать диплом о высшем образовании. Покупка документа о высшем образовании через надежную компанию дарит ряд достоинств. Такое решение помогает сэкономить время и серьезные деньги. [url=http://orikdok-5v-gorode-novosibirsk-54.online/]orikdok-5v-gorode-novosibirsk-54.online[/url]
п»їlegitimate online pharmacies india indianpharmacy com IndiMeds Direct
Приобрести диплом вы сможете через сайт компании. orikdok-5v-gorode-kurgan-45.online
india pharmacy: IndiMeds Direct – cheapest online pharmacy india
http://indimedsdirect.com/# IndiMeds Direct
נוהם. אני מתקרב, אני לוקח את הסנטר שלה, אני מרים את הראש-האצבעות שלי אוחזות מעט, העור חם, נכנסת אליה, נמתחת. הוא לחש, ומקס דחף אליה את הזין בכוח כזה שהמיטה חרקה. כשדניס הכניס לה את check page
I visited a lot of website but I believe this one has something special in it in it
вазон напольный высокий пластиковый https://kashpo-napolnoe-spb.ru/ – вазон напольный высокий пластиковый .
Психотерапевт Белгород. chat-s-psikhologom-v-telegramme.ru 594 оценок
melbet рабочее зеркало http://mostbet11020.ru/
http://indimedsdirect.com/# online pharmacy india
1 win букмекерская контора http://1win22096.ru
Нужно найти данные о человеке ? Наш сервис предоставит детальный отчет мгновенно.
Используйте уникальные алгоритмы для поиска цифровых следов в соцсетях .
Узнайте контактные данные или интересы через систему мониторинга с гарантией точности .
глаз бога телеграмм официальный бот
Бот работает в рамках закона , обрабатывая общедоступную информацию.
Закажите детализированную выжимку с историей аккаунтов и графиками активности .
Попробуйте надежному помощнику для исследований — результаты вас удивят !
При выборе семейного медика стоит обратить внимание на его опыт , умение слушать и доступность услуг .
Проверьте , что медицинский центр расположена рядом и сотрудничает с узкими специалистами.
Узнайте , работает ли доктор с вашей страховой компанией , и есть ли возможность записи онлайн .
http://darkstep.org/forum/viewtopic.php?f=4&t=5416
Обращайте внимание отзывы пациентов , чтобы оценить отношение к клиентам.
Не забудьте сертификацию врача , подтверждающие документы для уверенности в качестве лечения.
Оптимальный вариант — тот, где вас услышат ваши нужды , а общение с персоналом будет комфортным .
sportbets https://sportbets14.ru/ .
ставки 1win ставки 1win
parimatch application http://www.parimatch-app-download.com .
F*ckin’ tremendous issues here. I am very happy to peer your article. Thanks so much and i’m having a look ahead to touch you. Will you kindly drop me a e-mail?
buy ed pills online https://buyedpills.shop/# edpills shop buy ed pills online
Вдруг кому-то пригодится: рассматривал варианты для покупки пневматики — нашёл инфу про магазин Pnevmat24, вроде неплохой ассортимент. Вот подробности: https://www.tumblr.com/zametki2/778434383962112000/
1win coin price https://www.1win11005.com
https://pvslabs.com/
שלך גורמת לך לחפש אשמים. אתה צריך להודות שהחשדות האלה מופרכים. זהו הצעד הראשון לקראת ויזואלית היא לא הייתה שונה, אז וובה, מושכת בכתפיה, פשוט הסכימה לקנות אותה, אבל לנה נהנתה בכל The hottest escorts Jerusalem girls
rate canadian pharmacies canadian pharmacy reviews buy prescription drugs from canada cheap
canadian drug prices: CanRx Direct – canadian pharmacy antibiotics
Hi, I think your site might be having browser compatibility issues. When I look at your website in Safari, it looks fine but when opening in Internet Explorer, it has some overlapping. I just wanted to give you a quick heads up! Other then that, fantastic blog!
https://indimedsdirect.com/# IndiMeds Direct
диплом института купить диплом института купить .
рулонные шторы на балконные окна elektricheskie-rulonnye-shtory99.ru .
электрические рулонные шторы на окна rulonnye-shtory-s-elektroprivodom15.ru .
рулонные шторы на створку https://www.elektricheskie-rulonnye-shtory77.ru .
электрокарнизы электрокарнизы .
Приобрести диплом об образовании. Заказ подходящего диплома через надежную компанию дарит немало преимуществ для покупателя. Данное решение дает возможность сберечь время и значительные средства. orikdok-v-gorode-penza-58.online
электрокарнизы цена электрокарнизы цена .
электрокарниз москва http://www.karnizy-s-elektroprivodom77.ru .
карниз с электроприводом карниз с электроприводом .
iflow видеонаблюдение https://www.citadel-trade.ru .
купить дипломы аттестаты купить дипломы аттестаты .
Купить диплом на заказ возможно используя сайт компании. orikdok-2v-gorode-groznyy-20.online
как потратить бонусы в 1win http://1win1113.ru
חזק יותר ויותר, השרירים הפנימיים שלה רועדים, והבנתי שהיא קרובה. היא גנחה וגופה רעד באורגזמה. בחורות! – כן, אתה צוחק, זה לא יכול להיות – היא רדדה את זה בלי לראות את זה בעצמה. – אה, אנחנו דירות דיסקרטיות בשרון
Good site! I truly love how it is easy on my eyes and the data are well written. I am wondering how I could be notified when a new post has been made. I have subscribed to your RSS which must do the trick! Have a great day!
canadian pharmacy victoza: CanRx Direct – online canadian pharmacy reviews
TijuanaMeds TijuanaMeds TijuanaMeds
https://indimedsdirect.com/# IndiMeds Direct
1win download app install 1win11005.com
1win.pro 1win1109.ru
1 win ставки на спорт онлайн 1win1114.ru
mostbet uz skachat mostbet uz skachat .
В этом ресурсе предоставляется данные по любому лицу, от кратких контактов до полные анкеты.
Базы данных включают персон всех возрастов, профессий.
Сведения формируются на основе публичных данных, обеспечивая надежность.
Обнаружение производится по имени, сделав процесс эффективным.
глаз бога телеграм бесплатно
Помимо этого можно получить адреса а также важные сведения.
Работа с информацией выполняются с соблюдением правовых норм, предотвращая несанкционированного доступа.
Воспользуйтесь предложенной системе, для поиска нужные сведения без лишних усилий.
https://tijuanameds.shop/# medicine in mexico pharmacies
Patient drug resource. https://buyedpills.shop/# Drug leaflet here. buy edpills shop
aviator игра скачать aviator игра скачать
F*ckin’ tremendous issues here. I am very glad to peer your post. Thanks a lot and i am taking a look ahead to touch you. Will you please drop me a e-mail?
регистрация в 1цшт https://1win1109.ru/
אלכוהולי והביטה בחברתה. “מעניין איך נראה חברו?» – בוא נראה אם אתה יכול לשמור על הנרתיק שלך, קרירה מהמזגן מה שגרם לאשתי האהובה לפטמות לבלוט בצורה פרובוקטיבית דרך החלק העליון הלבן הקל. נערות ליווי בראשון לציון
canadian pharmacy: CanRx Direct – canadian pharmacy ratings
https://indimedsdirect.com/# best online pharmacy india
buying drugs from canada CanRx Direct canada online pharmacy
На данном сайте можно найти сведения по любому лицу, включая подробные профили.
Архивы охватывают граждан разного возраста, статусов.
Данные агрегируются по официальным записям, обеспечивая достоверность.
Нахождение производится по контактным данным, что делает процесс эффективным.
глаз бога телеграмм канал
Дополнительно предоставляются контакты и другая актуальные данные.
Работа с информацией выполняются в соответствии с норм права, обеспечивая защиту разглашения.
Используйте предложенной системе, в целях получения нужные сведения без лишних усилий.
I view something really special in this website .
pul ishlaydigan o’yinlar skachat https://mostbet-download-app-apk.com .
I truly enjoy examining on this site, it has got great posts. “A short saying oft contains much wisdom.” by Sophocles.
reputable mexican pharmacies online: mexico pharmacies prescription drugs – TijuanaMeds
canadian pharmacy victoza: canadian drugstore online – canadian pharmacy near me
https://tijuanameds.com/# TijuanaMeds
Как оформить карту кредитная иностранная карта для россиян в 2025 году. Зарубежную банковскую карту можно открыть и получить удаленно онлайн с доставкой в Россию и другие страны. Карты подходят для оплаты за границей.
reputable indian online pharmacy top 10 pharmacies in india IndiMeds Direct
DarkKnightX. הבחור הזה זרק דונטים שגרמו לה לנשום. 2000 אסימונים. 3000. 5000. וההודעות שלו אותה למיטה וזרק אותה. מעולם לא חיכיתי כל כך הרבה זמן ועם כל כך הרבה רצון. פשוט משכתי את התחת The hottest escorts Jerusalem girls
https://tijuanameds.shop/# buying prescription drugs in mexico
It’s remarkable to go to see this site and reading the views of all colleagues regarding this paragraph, while I am also keen of getting knowledge.
https://runflor.com.ua/fary-z-linzyamy-dlya-avto
I like this site its a master peace ! Glad I discovered this on google .
Latest medicine developments. Medicine leaflet here.
buy imitrex online without prescription
Medication leaflet provided. Latest pill trends.
зайти в мостбет mostbet11019.ru
להיפך, לא נפגשו על ידי היכרות, ואני לא רוצה לפגוש את המיוחד הזה… אבל היא צריכה לדעת למה הייתה תמונה של איבר מינו הזקוף והכיתוב “חושב עליך”. ואז ” איפה אתה? , ואז למה אתה שותק? “וכן liesen déi komplett info hei
canadian pharmacies online: CanRx Direct – canadian drug prices
Наши специалисты предлагают быстро и выгодно купить диплом, который выполняется на оригинальном бланке и заверен мокрыми печатями, штампами, подписями. Диплом способен пройти любые проверки, даже с применением специально предназначенного оборудования. reflections.listbb.ru/viewtopic.php?f=45&t=2036
IndiMeds Direct: IndiMeds Direct – buy medicines online in india
Пермский характер ценит надежность: купить сигареты в Перми здесь — значит быть уверенным в качестве и сроках https://perm.sigaretus.ru/
This is a topic close to my heart cheers, where are your contact details though?
I loved as much as you’ll receive carried out right here. The sketch is attractive, your authored subject matter stylish. nonetheless, you command get bought an nervousness over that you wish be delivering the following. unwell unquestionably come more formerly again since exactly the same nearly very often inside case you shield this hike.
https://compiere.ru/
Нужно собрать данные о человеке ? Этот бот предоставит полный профиль мгновенно.
Используйте уникальные алгоритмы для поиска публичных записей в открытых источниках.
Выясните контактные данные или активность через автоматизированный скан с гарантией точности .
официальный глаз бога
Бот работает с соблюдением GDPR, используя только открытые данные .
Закажите детализированную выжимку с историей аккаунтов и списком связей.
Попробуйте надежному помощнику для digital-расследований — точность гарантирована!
скачать 1win на андроид скачать 1win на андроид
ремонт бака стиральной машины ремонт неисправностей стиральных машин
best online pharmacy india IndiMeds Direct п»їlegitimate online pharmacies india
1вин официальный мобильная https://1win1112.ru/
Современная стоматологическая клиника в центре Москвы предлагает широкий спектр услуг — от профессиональной гигиены до имплантации и эстетической реставрации. Используются новейшие технологии и оборудование, обеспечивая максимальную точность, безопасность и комфорт для пациентов всех возрастов: американская стоматология
Thank you for sharing your thoughts. I truly appreciate your efforts and I am waiting for your next write ups thank you once again.
Rio Bet
Today, I went to the beach with my children. I found a sea shell and gave it to my 4 year old daughter and said “You can hear the ocean if you put this to your ear.” She placed the shell to her ear and screamed. There was a hermit crab inside and it pinched her ear. She never wants to go back! LoL I know this is completely off topic but I had to tell someone!
https://pop-top.net/
Получить диплом о высшем образовании можем помочь. Купить диплом специалиста в Иркутске – diplomybox.com/kupit-diplom-spetsialista-v-irkutske
Нужно найти данные о человеке ? Наш сервис поможет детальный отчет мгновенно.
Воспользуйтесь продвинутые инструменты для поиска цифровых следов в соцсетях .
Узнайте контактные данные или активность через автоматизированный скан с верификацией результатов.
глаз бога найти телефон
Система функционирует с соблюдением GDPR, обрабатывая открытые данные .
Получите расширенный отчет с геолокационными метками и списком связей.
Попробуйте проверенному решению для digital-расследований — результаты вас удивят !
Hello there! Would you mind if I share your blog with my facebook group? There’s a lot of people that I think would really appreciate your content. Please let me know. Thank you
passport-cyprus.com
http://pharmaconnectusa.com/# PharmaConnectUSA
зеркало 1 win http://www.1win1113.ru
guardian pharmacy ventolin: PharmaConnectUSA – PharmaConnectUSA
1вин войти 1вин войти
Мы можем предложить документы университетов, расположенных на территории всей Российской Федерации. Приобрести диплом любого ВУЗа:
bookkarocallgirls.copiny.com/question/details/id/1113502
whoah this weblog is wonderful i really like studying your posts. Keep up the good paintings! You realize, lots of persons are searching around for this information, you can help them greatly.
Pharma Confiance: tГ©lГ©phone pharmacie – caudalie service client
Animal Feed https://pvslabs.com Supplements in India: Vitamins, Amino Acids, Probiotics and Premixes for Cattle, Poultry, Pigs and Pets. Increased Productivity and Health.
Мы изготавливаем дипломы любой профессии по приятным тарифам. Купить диплом о дополнительном образовании — kyc-diplom.com/diplom-o-dopolnitelnom-obrazovanii.html
https://pharmajetzt.shop/# internetapotheke deutschland
online apotheek nederland met recept online medicijnen bestellen apotheek medicijnen bestellen apotheek
1win sign up http://1win11001.com
1вин сайт 1win1111.ru
Наши специалисты предлагают быстро и выгодно купить диплом, который выполняется на бланке ГОЗНАКа и заверен мокрыми печатями, водяными знаками, подписями должностных лиц. Данный документ способен пройти лубую проверку, даже с применением специально предназначенного оборудования. mafiaclans.ru/viewtopic.php?f=43&t=9629
produits garancia pas cher: Pharma Confiance – cetirizine et grossesse
como retirar el dinero de 1win http://1win11002.com
מעצמן, את העפעפיים כבדים בציפייה לחושך, את הנשימה הופכת תכופה ורדודה. הדבר האחרון שראה לפני מובן מושחת?”האישה הופתעה. “יש לי חבר, דיברתי עליו. הוא ראה אותך ונמס מיד. חולמת גם על פילגש browse around this web-site
1win uganda https://1win11003.com
xenical pharmacy uk: Pharma Connect USA – PharmaConnectUSA
Nice post. I learn something more challenging on different blogs everyday. It will always be stimulating to read content from other writers and practice a little something from their store. I’d prefer to use some with the content on my blog whether you don’t mind. Natually I’ll give you a link on your web blog. Thanks for sharing.
Good day! This is my first comment here so I just wanted to give a quick shout out and tell you I really enjoy reading through your blog posts. Can you recommend any other blogs/websites/forums that deal with the same subjects? Thanks!
aviator игра 1win https://1win1108.ru/
http://pharmajetzt.com/# medikament online
Hindi News https://tfipost.in latest news from India and the world. Politics, business, events, technology and entertainment – just the highlights of the day.
ремонт стиральных машин pdacenter ремонт стиральной машины замена подшипника
Mountain Topper https://www.lnrprecision.com transceivers from the official supplier. Compatibility with leading brands, stable supplies, original modules, fast service.
1win ios app download https://1win-in1.com/ .
I don’t think the title of your article matches the content lol. Just kidding, mainly because I had some doubts after reading the article.
new zealand online pharmacy motilium: viagra phuket pharmacy – Pharma Connect USA
Мы можем предложить документы учебных заведений, расположенных в любом регионе РФ. Заказать диплом ВУЗа:
newsbizlife.ru/diplomyi-kotoryie-pomogut-vam-vyidelitsya
New AI generator nsfw ai of the new generation: artificial intelligence turns text into stylish and realistic image and videos.
UP&GO https://upandgo.ru путешествуй легко! Визы, авиабилеты и отели онлайн
doliprane belgique: avene cancer – Pharma Confiance
Офисная мебель https://mkoffice.ru в Новосибирске: готовые комплекты и отдельные элементы. Широкий ассортимент, современные дизайны, доставка по городу.
барбекю комплекс модульный купить в спб https://modul-pech.ru/
I couldn’t resist commenting
стиральная машина занусси ремонт ремонт стиральных машин канди
мелбет кыргызстан [url=mostbet11019.ru]mostbet11019.ru[/url]
actos pharmacy assistance lisinopril wal-mart pharmacy dutasteride india pharmacy
1win ставки 1win1109.ru
Hey there! I understand this is kind of off-topic however I had to ask. Does building a well-established blog such as yours require a lot of work? I’m completely new to blogging however I do write in my diary daily. I’d like to start a blog so I can easily share my own experience and views online. Please let me know if you have any suggestions or tips for new aspiring bloggers. Thankyou!
https://emaidan.com.ua/yak-obraty-linzy-dlya-far-porady-ta-rekomendatsiyi.html
You made some nice points there. I did a search on the issue and found most guys will agree with your site.
http://pharmaconnectusa.com/# Pharma Connect USA
1win казино регистрация https://1win1109.ru
скачать 1вин официальный сайт скачать 1вин официальный сайт
klack 95: Pharma Jetzt – Pharma Jetzt
Its like you read my mind! You appear to know a lot about this, like you wrote the book in it or something. I think that you could do with some pics to drive the message home a little bit, but instead of that, this is fantastic blog. A fantastic read. I’ll certainly be back.
I loved as much as you’ll receive carried out right here. The sketch is attractive, your authored subject matter stylish. nonetheless, you command get got an impatience over that you wish be delivering the following. unwell unquestionably come more formerly again as exactly the same nearly very often inside case you shield this hike.
http://yakusha.com.ua/ohlyad-najpopulyarnishykh-linz-dlya-avtomobiliv.html
Психотерапевт Киров. professorkorotkov.ru 415 оценок
https://pharmaconnectusa.shop/# Pharma Connect USA
Pharma Confiance: mycose poignet – tadalafil sans ordonnance
Психотерапевт Пенза. professorkorotkov.ru 156 оценок
автоматические карнизы для штор http://www.elektrokarnizy50.ru/ .
Howdy very nice web site!! Man .. Excellent .. Wonderful .. I’ll bookmark your blog and take the feeds also? I’m glad to find a lot of helpful info here in the post, we want work out extra techniques in this regard, thanks for sharing. . . . . .
http://relationshipfree.com/chomu-korpusy-far-vazhlyvi-dlya-bezpeky-na-dorozi.html
зарегистрироваться в 1win http://www.1win1106.ru
of course like your web site however you need to check the spelling on several of your posts. Several of them are rife with spelling problems and I find it very troublesome to tell the reality nevertheless I¦ll definitely come again again.
promo code 1win http://1win11003.com/
I like this post, enjoyed this one thankyou for putting up.
AI generator ai nsfw of the new generation: artificial intelligence turns text into stylish and realistic pictures and videos.
the pokies net 111 http://pokies11.com/ .
Психотерапевт Белгород. professorkorotkov.ru 735 оценок
1win букмекерская https://1win1110.ru
горшок высокий для цветов купить напольные https://kashpo-napolnoe-msk.ru/ – горшок высокий для цветов купить напольные .
I appreciate, cause I found exactly what I was looking for. You have ended my four day long hunt! God Bless you man. Have a nice day. Bye
Мы предлагаем оформление дипломов ВУЗов в Москве — с печатями, подписями, приложением и возможностью архивной записи (по запросу).
Документ максимально приближен к оригиналу и проходит визуальную проверку.
Мы даем гарантию, что в случае проверки документа, подозрений не возникнет.
– Конфиденциально
– Доставка 3–7 дней
– Любая специальность
Уже более 2851 клиентов воспользовались услугой — теперь ваша очередь.
Перейти — ответим быстро, без лишних формальностей.
Оформиление дипломов ВУЗов по всей России и СНГ — с печатями, подписями, приложением и возможностью архивной записи (по запросу).
Документ максимально приближен к оригиналу и проходит визуальную проверку.
Мы гарантируем, что в случае проверки документа, подозрений не возникнет.
– Конфиденциально
– Доставка 3–7 дней
– Любая специальность
Уже более 1911 клиентов воспользовались услугой — теперь ваша очередь.
На сайте — ответим быстро, без лишних формальностей.
Покупка дипломов ВУЗов по всей России и СНГ — с печатями, подписями, приложением и возможностью архивной записи (по запросу).
Документ максимально приближен к оригиналу и проходит визуальную проверку.
Мы гарантируем, что в случае проверки документа, подозрений не возникнет.
– Конфиденциально
– Доставка 3–7 дней
– Любая специальность
Уже более 2497 клиентов воспользовались услугой — теперь ваша очередь.
Диплом цена — ответим быстро, без лишних формальностей.
online apotheek frankrijk: appotheek – Medicijn Punt
Just wish to say your article is as astounding. The clearness in your post is simply cool and i could assume you are an expert on this subject. Well with your permission allow me to grab your RSS feed to keep up to date with forthcoming post. Thanks a million and please continue the rewarding work.
https://waltak.com.ua/sekrety-dovhovichnosti-far-yak-zberehty-blysk-skla.html
PharmaJetzt shop apotheke auf rechnung billigste online apotheke
https://medicijnpunt.com/# Medicijn Punt
1.вин http://1win1108.ru
promo code 1win promo code 1win
pokiesnet https://www.pokies106.com .
1win bet app 1win bet app
диплом о среднем купить диплом о среднем купить .
Онлайн займы срочно https://moon-money.ru деньги за 5 минут на карту. Без справок, без звонков, без отказов. Простая заявка, моментальное решение и круглосуточная выдача.
Услуги массаж ивантеевка — для здоровья, красоты и расслабления. Опытный специалист, удобное расположение, доступные цены.
AI generator nsfw ai video of the new generation: artificial intelligence turns text into stylish and realistic pictures and videos.
1win официальный сайт 1win 1win официальный сайт 1win
pokies.net thepokiesnet101.com .
apteka nl online: de online apotheek – MedicijnPunt
Быстро приобрести диплом об образовании. Приобретение документа о высшем образовании через качественную и надежную компанию дарит много преимуществ. Данное решение позволяет сэкономить время и серьезные средства. orikdok-v-gorode-rostov-na-donu-61.ru
Good write-up, I am normal visitor of one’s blog, maintain up the excellent operate, and It’s going to be a regular visitor for a lengthy time.
Hi, I think your site might be having browser compatibility issues. When I look at your website in Safari, it looks fine but when opening in Internet Explorer, it has some overlapping. I just wanted to give you a quick heads up! Other then that, fantastic blog!
When I originally commented I clicked the -Notify me when new comments are added- checkbox and now each time a comment is added I get four emails with the same comment. Is there any way you can remove me from that service? Thanks!
Покупка дипломов ВУЗов в Москве — с печатями, подписями, приложением и возможностью архивной записи (по запросу).
Документ максимально приближен к оригиналу и проходит визуальную проверку.
Мы даем гарантию, что в случае проверки документа, подозрений не возникнет.
– Конфиденциально
– Доставка 3–7 дней
– Любая специальность
Уже более 1811 клиентов воспользовались услугой — теперь ваша очередь.
Купить диплом о среднем профессиональном образовании — ответим быстро, без лишних формальностей.
url: PharmaConnectUSA – tricare pharmacy viagra
https://pharmaconnectusa.shop/# lipitor generic online pharmacy
Покупка дипломов ВУЗов в Москве — с печатями, подписями, приложением и возможностью архивной записи (по запросу).
Документ максимально приближен к оригиналу и проходит визуальную проверку.
Мы даем гарантию, что в случае проверки документа, подозрений не возникнет.
– Конфиденциально
– Доставка 3–7 дней
– Любая специальность
Уже более 2968 клиентов воспользовались услугой — теперь ваша очередь.
Диплом цена — ответим быстро, без лишних формальностей.
букмекерская контора 1win http://www.1win1106.ru
Оформиление дипломов ВУЗов в Москве — с печатями, подписями, приложением и возможностью архивной записи (по запросу).
Документ максимально приближен к оригиналу и проходит визуальную проверку.
Мы гарантируем, что в случае проверки документа, подозрений не возникнет.
– Конфиденциально
– Доставка 3–7 дней
– Любая специальность
Уже более 3594 клиентов воспользовались услугой — теперь ваша очередь.
Купить диплом вуза — ответим быстро, без лишних формальностей.
Покупка дипломов ВУЗов по всей России и СНГ — с печатями, подписями, приложением и возможностью архивной записи (по запросу).
Документ максимально приближен к оригиналу и проходит визуальную проверку.
Мы даем гарантию, что в случае проверки документа, подозрений не возникнет.
– Конфиденциально
– Доставка 3–7 дней
– Любая специальность
Уже более 2073 клиентов воспользовались услугой — теперь ваша очередь.
На сайте — ответим быстро, без лишних формальностей.
Мы предлагаем оформление дипломов ВУЗов в Москве — с печатями, подписями, приложением и возможностью архивной записи (по запросу).
Документ максимально приближен к оригиналу и проходит визуальную проверку.
Мы гарантируем, что в случае проверки документа, подозрений не возникнет.
– Конфиденциально
– Доставка 3–7 дней
– Любая специальность
Уже более 963 клиентов воспользовались услугой — теперь ваша очередь.
Пишите — ответим быстро, без лишних формальностей.
the pokies net 250 http://thepokiesnet250.com .
Покупка дипломов ВУЗов в Москве — с печатями, подписями, приложением и возможностью архивной записи (по запросу).
Документ максимально приближен к оригиналу и проходит визуальную проверку.
Мы даем гарантию, что в случае проверки документа, подозрений не возникнет.
– Конфиденциально
– Доставка 3–7 дней
– Любая специальность
Уже более 1256 клиентов воспользовались услугой — теперь ваша очередь.
Ознакомиться здесь — ответим быстро, без лишних формальностей.
mostbet mostbet
amoxicilline rhume et toux commande cialis homeopathe brest
Мы предлагаем оформление дипломов ВУЗов по всей России и СНГ — с печатями, подписями, приложением и возможностью архивной записи (по запросу).
Документ максимально приближен к оригиналу и проходит визуальную проверку.
Мы даем гарантию, что в случае проверки документа, подозрений не возникнет.
– Конфиденциально
– Доставка 3–7 дней
– Любая специальность
Уже более 2825 клиентов воспользовались услугой — теперь ваша очередь.
Пишите — ответим быстро, без лишних формальностей.
motsbet motsbet
Мы предлагаем оформление дипломов ВУЗов по всей России и СНГ — с печатями, подписями, приложением и возможностью архивной записи (по запросу).
Документ максимально приближен к оригиналу и проходит визуальную проверку.
Мы гарантируем, что в случае проверки документа, подозрений не возникнет.
– Конфиденциально
– Доставка 3–7 дней
– Любая специальность
Уже более 3668 клиентов воспользовались услугой — теперь ваша очередь.
Узнать подробнее — ответим быстро, без лишних формальностей.
ставки мостбет http://mostbet11017.ru/
the pokies net https://pokiesnet250.com/ .
https://pharmajetzt.shop/# apo apotheke online
бонусный счет в 1win http://www.1win1107.ru
dragon slots online dragon slots online .
Your place is valueble for me. Thanks!…
Pharma Connect USA: pharmacy online ventolin – Pharma Connect USA
диплом купить в мурманске https://arus-diplom3.ru/ .
Discover Zabljak Savin Kuk, a picturesque corner of Montenegro. Skiing, hiking, panoramic views and the cleanest air. A great choice for a relaxing and active holiday.
Срочный микрозайм https://truckers-money.ru круглосуточно: оформите онлайн и получите деньги на карту за считаные минуты. Без звонков, без залога, без лишних вопросов.
Срочные микрозаймы https://stuff-money.ru с моментальным одобрением. Заполните заявку онлайн и получите деньги на карту уже сегодня. Надёжно, быстро, без лишней бюрократии.
excellent post.Ne’er knew this, thanks for letting me know.
Hey! Do you know if they make any plugins to safeguard against hackers? I’m kinda paranoid about losing everything I’ve worked hard on. Any tips?
https://outdoor.od.ua/vidguki-koristuvachiv-pro-populyarni-modeli-bi-LED-linz
cantura akut 12 apotheke: PharmaJetzt – online aphotheke
the pokies net the pokies net .
Хотите испытать свои силы в походе по Уралу? Эти советы помогут вам правильно собраться в дорогу.
Особенно понравился раздел про Подводный мир Владивостока: уникальные морские обитатели.
Вот, можете почитать:
https://rustrail.ru/%d0%b2%d0%bb%d0%b0%d0%b4%d0%b8%d0%b2%d0%be%d1%81%d1%82%d0%be%d0%ba-%d0%b8-%d0%b5%d0%b3%d0%be-%d0%bc%d0%be%d1%80%d1%81%d0%ba%d0%b8%d0%b5-%d0%be%d0%b1%d0%b8%d1%82%d0%b0%d1%82%d0%b5%d0%bb%d0%b8/
После прочтения этой статьи, вы точно будете готовы к пешему походу по Уралу.
Купить диплом под заказ в столице можно через официальный портал компании. orikdok-5v-gorode-sankt-peterburg-78.ru
Attractive component to content. I just stumbled upon your website and in accession capital to assert that I acquire in fact enjoyed account your blog posts. Anyway I will be subscribing on your feeds and even I success you get right of entry to constantly fast.
https://biobuildpharmalab.com/linzy-u-fary-yak-zaoshchadyty-ta-otrymaty-yakisnyj.html
Мы предлагаем оформление дипломов ВУЗов по всей России и СНГ — с печатями, подписями, приложением и возможностью архивной записи (по запросу).
Документ максимально приближен к оригиналу и проходит визуальную проверку.
Мы даем гарантию, что в случае проверки документа, подозрений не возникнет.
– Конфиденциально
– Доставка 3–7 дней
– Любая специальность
Уже более 2598 клиентов воспользовались услугой — теперь ваша очередь.
Купить диплом Россия — ответим быстро, без лишних формальностей.
карнизы для штор купить в москве https://elektrokarnizy50.ru .
the pokies net 111 login https://pokies11.com .
thepokies106.net thepokies106.net .
I think this website has got some very excellent info for everyone : D.
Wow, fantastic blog layout! How long have you been blogging for? you made blogging look easy. The overall look of your site is great, as well as the content!
Покупка дипломов ВУЗов по всей России и СНГ — с печатями, подписями, приложением и возможностью архивной записи (по запросу).
Документ максимально приближен к оригиналу и проходит визуальную проверку.
Мы даем гарантию, что в случае проверки документа, подозрений не возникнет.
– Конфиденциально
– Доставка 3–7 дней
– Любая специальность
Уже более 4441 клиентов воспользовались услугой — теперь ваша очередь.
Пишите в личные сообщения — ответим быстро, без лишних формальностей.
https://medicijnpunt.shop/# landelijke apotheek
Hi, this weekend is fastidious designed for me, because this moment i am reading this fantastic informative article here at my house.
https://esco-center.com.ua/headlight-sealing-for-motorcycles.html
pharmacy online netherlands: Medicijn Punt – holandia apteka internetowa
1win ios скачать 1win ios скачать
Great web site. Plenty of helpful information here. I¦m sending it to a few pals ans additionally sharing in delicious. And obviously, thank you for your sweat!
Покупка дипломов ВУЗов по всей России и СНГ — с печатями, подписями, приложением и возможностью архивной записи (по запросу).
Документ максимально приближен к оригиналу и проходит визуальную проверку.
Мы даем гарантию, что в случае проверки документа, подозрений не возникнет.
– Конфиденциально
– Доставка 3–7 дней
– Любая специальность
Уже более 4268 клиентов воспользовались услугой — теперь ваша очередь.
Купить диплом нового образца — ответим быстро, без лишних формальностей.
Оформиление дипломов ВУЗов по всей России и СНГ — с печатями, подписями, приложением и возможностью архивной записи (по запросу).
Документ максимально приближен к оригиналу и проходит визуальную проверку.
Мы гарантируем, что в случае проверки документа, подозрений не возникнет.
– Конфиденциально
– Доставка 3–7 дней
– Любая специальность
Уже более 4577 клиентов воспользовались услугой — теперь ваша очередь.
Сайт компании — ответим быстро, без лишних формальностей.
888 star apk 888 star apk .
Good – I should certainly pronounce, impressed with your website. I had no trouble navigating through all tabs as well as related information ended up being truly simple to do to access. I recently found what I hoped for before you know it at all. Quite unusual. Is likely to appreciate it for those who add forums or something, web site theme . a tones way for your client to communicate. Excellent task..
????? 888starz ????? 888starz .
Мы предлагаем оформление дипломов ВУЗов в Москве — с печатями, подписями, приложением и возможностью архивной записи (по запросу).
Документ максимально приближен к оригиналу и проходит визуальную проверку.
Мы даем гарантию, что в случае проверки документа, подозрений не возникнет.
– Конфиденциально
– Доставка 3–7 дней
– Любая специальность
Уже более 3642 клиентов воспользовались услугой — теперь ваша очередь.
Купить диплом Россия — ответим быстро, без лишних формальностей.
Hi there! This is my 1st comment here so I just wanted to give a quick shout out and tell you I really enjoy reading through your posts. Can you recommend any other blogs/websites/forums that go over the same topics? Thank you!
https://outdoor.od.ua/linzy-v-fary-yakisne-svitlo-dlya-vashoho-avto.html
Оформиление дипломов ВУЗов в Москве — с печатями, подписями, приложением и возможностью архивной записи (по запросу).
Документ максимально приближен к оригиналу и проходит визуальную проверку.
Мы гарантируем, что в случае проверки документа, подозрений не возникнет.
– Конфиденциально
– Доставка 3–7 дней
– Любая специальность
Уже более 1200 клиентов воспользовались услугой — теперь ваша очередь.
Ознакомиться здесь — ответим быстро, без лишних формальностей.
Покупка дипломов ВУЗов по всей России и СНГ — с печатями, подписями, приложением и возможностью архивной записи (по запросу).
Документ максимально приближен к оригиналу и проходит визуальную проверку.
Мы гарантируем, что в случае проверки документа, подозрений не возникнет.
– Конфиденциально
– Доставка 3–7 дней
– Любая специальность
Уже более 2126 клиентов воспользовались услугой — теперь ваша очередь.
Здесь — ответим быстро, без лишних формальностей.
бонусы спорт 1win как пользоваться бонусы спорт 1win как пользоваться
PharmaConnectUSA reputable indian pharmacies inhouse pharmacy motilium
brosse sonique: benzodiazГ©pine et paracГ©tamol – tapis super absorbant entrГ©e
Helpful info. Fortunate me I found your site unintentionally, and I’m surprised why this coincidence didn’t happened in advance! I bookmarked it.
http://cheryclub.com.ua/linzy-dlya-far-yak-zrobyty-avtosvitlo-yaskravishym.html
dragonslots http://dragonslotscasinos.net .
купить диплом вуза купить диплом вуза .
скачать мостбет с официального сайта https://www.mostbet11029.ru
купить диплом о среднем специальном образовании купить диплом о среднем специальном образовании .
Wonderful work! This is the type of information that are supposed to be shared across the internet. Shame on Google for now not positioning this publish upper! Come on over and talk over with my website . Thanks =)
dragon slots online dragon slots online .
apotheek online: PharmaJetzt – shop apothke
app 888starz https://888starz-downloads.com .
????? ??? ????? ????? ??? ????? .
мостбет лицензия https://mostbet11018.ru/
Good day! Do you use Twitter? I’d like to follow you if that would be ok. I’m absolutely enjoying your blog and look forward to new posts.
часы приема психиатра часы приема психиатра .
the pokies net 101 login the pokies net 101 login .
http://pharmaconnectusa.com/# Pharma Connect USA
the pokies http://thepokiesnet250.com/ .
The Pokies net Australia pokiesnet250.com .
мостбет казино войти https://www.mostbet11016.ru
thepokies.net thepokies.net .
dragon slots dragon slots .
https://medicijnpunt.shop/# apotheek spanje online
1win казино – официальный сайт 1win казино – официальный сайт
medicijnen kopen met ideal: MedicijnPunt – Medicijn Punt
Excellent post. I was checking continuously this blog and I am impressed! Very useful info specifically the last part 🙂 I care for such information a lot. I was seeking this particular information for a very long time. Thank you and good luck.
¡Bienvenidos, estrategas del juego !
Casino sin registro sin necesidad de datos – п»їmejores-casinosespana.es mejores-casinosespana.es
¡Que experimentes maravillosas premios excepcionales !
1win официальный сайт 1win официальный сайт
Pretty great post. I just stumbled upon your weblog and wished to say that I’ve truly loved surfing around your weblog posts. In any case I’ll be subscribing to your rss feed and I am hoping you write again soon!
Психотерапевт Оренбург. Психолог 758 616 оценок
скачать мост бет http://mostbet11017.ru/
Pharma Jetzt: Pharma Jetzt – Pharma Jetzt
теннис скачать букмекерскую контору mostbet11030.ru
commander cialis livraison rapide malarone prix Pharma Confiance
Кпт курган. Психолог 397 146 оценок
It’s a shame you don’t have a donate button! I’d certainly donate to this excellent blog! I guess for now i’ll settle for bookmarking and adding your RSS feed to my Google account. I look forward to new updates and will talk about this website with my Facebook group. Talk soon!
Психотерапевт Белгород. Психолог 248 598 оценок
Very wonderful info can be found on site.
купить аттестаты купить аттестаты .
диплом психолога купить диплом психолога купить .
PharmaJetzt: Pharma Jetzt – PharmaJetzt
http://pharmajetzt.com/# medikament bestellen
Thanks for sharing. I read many of your blog posts, cool, your blog is very good.
Good day! This is my first comment here so I just wanted to give a quick shout out and say I truly enjoy reading through your blog posts. Can you suggest any other blogs/websites/forums that cover the same topics? Thanks a ton!
porte-bГ©bГ© avec siГЁge de hanche avis: parapharmacie en ligne pas cher livraison gratuite – est gee
хотите сделать утепление https://masterbrusa.ru/novye-publikatsii/ekologichnost-i-bezopasnost-penopoliuretana-dlya-doma.html
такси аэропорт прага такси аэропорт прага
займу онлайн на карту микрозаймы без процентов
The next time I read a blog, I hope that it doesnt disappoint me as much as this one. I mean, I know it was my choice to read, but I actually thought youd have something interesting to say. All I hear is a bunch of whining about something that you could fix if you werent too busy looking for attention.
прием психиатр прием психиатр .
Have you ever dared to push the boundaries of realism in your Santa Claus Christmas Ball designs? If so, what unconventional techniques have you employed to create a mesmerizing, almost lifelike illusion? Share your innovative approaches to lighting, shadows, and gradients, and let’s challenge the norms together! variant5
Заказать документ о получении высшего образования можно в нашей компании в столице. Заказать диплом института по невысокой стоимости вы сможете, обращаясь к проверенной специализированной фирме. angelandmax.teamforum.ru/posting.phpf=2&mode=post&sid=0bef60c4e727286376e586f72ca5d650
Заказать диплом об образовании!
Мы предлагаем дипломы психологов, юристов, экономистов и прочих профессий по выгодным ценам— diplom-zentr.com
online apo: PharmaJetzt – Pharma Jetzt
Психотерапевт Киров. batmanapollo.ru 800 оценок
PharmaJetzt PharmaJetzt medikamente gГјnstig kaufen
https://t1djsh47.com/voce-nao-forneceu-o-titulo-para-reescrever-por-favor-envie-o-titulo-que-deseja-que-eu-reescreva-como-uma-pergunta/
Hi there, just wanted to mention, I liked this blog post.
It was inspiring. Keep on posting!
I loved as much as you’ll receive carried out right here. The sketch is attractive, your authored material stylish. nonetheless, you command get bought an edginess over that you wish be delivering the following. unwell unquestionably come more formerly again as exactly the same nearly a lot often inside case you shield this increase.
https://www.shamrockrfc.com/sklo-dlya-far-chomu-vazhlyvo-obyraty-pravylnyy-material
https://pharmajetzt.com/# PharmaJetzt
farmacia paris: Pharma Confiance – Pharma Confiance
теннис скачать букмекерскую контору теннис скачать букмекерскую контору
Good V I should certainly pronounce, impressed with your site. I had no trouble navigating through all tabs and related info ended up being truly simple to do to access. I recently found what I hoped for before you know it in the least. Reasonably unusual. Is likely to appreciate it for those who add forums or anything, web site theme . a tones way for your customer to communicate. Nice task..
Психотерапевт Белгород. batmanapollo.ru 341 оценок
Using OneConverter.com is as simple as it gets. There’s no steep learning curve, no hidden menus—just click on the converter you need, type in a number, and watch it change before your eyes. Input fields are large and responsive, and drop-down menus clearly list each available unit. Want to switch categories? A visible menu at the top of the page displays all options: length, weight, area, volume, temperature, speed, energy, pressure, and more. With a single click, you move from converting miles to kilometers over to turning Celsius into Fahrenheit. All results appear instantly, with no extra steps or needless redirects. The site uses neutral colors and legible fonts, so reading values remains comfortable even for extended sessions. If you ever change your mind, click “Reset” to clear all fields and start fresh. Because OneConverter operates fully on modern web technology—no Flash, no Java—it runs smoothly on nearly any device. Even if internet connection fluctuates, cached results keep you going until you’re back online. It’s conversion made easy, straight, and effective.
OneConverter.com
https://pharmajetzt.com/# inline apotheke
Этот бот поможет получить информацию по заданному профилю.
Достаточно ввести никнейм в соцсетях, чтобы получить сведения .
Бот сканирует публичные данные и цифровые следы.
глаз бога бот телеграм бесплатно
Результаты формируются в реальном времени с проверкой достоверности .
Идеально подходит для проверки партнёров перед сотрудничеством .
Анонимность и актуальность информации — наш приоритет .
заказать угловую кухню от производителя недорого заказать угловую кухню от производителя недорого .
Психотерапевт Оренбург. batmanapollo.ru 346 оценок
напольный горшок для цветов высокий современный kashpo-napolnoe-spb.ru – напольный горшок для цветов высокий современный .
dragon slot https://www.dragonslotscasinos.mobi .
dragon slots casino http://dragonslotscasinos.net .
Мы готовы предложить дипломы любой профессии по приятным тарифам. Мы предлагаем документы ВУЗов, расположенных в любом регионе Российской Федерации. Документы выпускаются на бумаге самого высокого качества. Это дает возможности делать настоящие дипломы, не отличимые от оригиналов. orikdok-1v-gorode-samara-63.ru
¡Saludos, apasionados del ocio y la adrenalina !
Casino sin licencia con mesa en vivo – https://audio-factory.es/# casinos no regulados
¡Que disfrutes de asombrosas triunfos inolvidables !
OneConverter.com does more than just numbers—it also converts digital data. Whether you want to know how many gigabytes fit into a terabyte or how many bits are in a kilobyte, this tool has you covered. The digital storage converter lists common units like bytes, kilobytes, megabytes, gigabytes, and terabytes alongside less common ones such as petabytes and exabytes. Simply enter a value, pick the starting unit, and then choose your desired unit to see an instant conversion. Even larger scales—zettabytes, yottabytes—are supported for advanced calculations. Researchers dealing with big data find this especially handy, as do photographers managing high-resolution files. If you need to compare file sizes or plan server capacity, this converter delivers precise results. All background calculations rely on the standard binary and decimal values, clarifying any confusion about whether to use base-2 or base-10 measurements. Everything updates automatically, so you never need to memorize conversion factors. Users of all skill levels—from novices to IT professionals—appreciate how OneConverter.com transforms digital measurement tasks into a quick, headache-free experience.
OneConverter
mostbet download https://mostbet11029.ru/
You made some first rate factors there. I regarded on the web for the difficulty and located most individuals will go along with with your website.
netherlands pharmacy online: verzorgingsproducten apotheek – Medicijn Punt
After research a number of of the weblog posts on your web site now, and I truly like your means of blogging. I bookmarked it to my bookmark web site list and will likely be checking again soon. Pls take a look at my site as properly and let me know what you think.
Купить документ о получении высшего образования вы можете в нашей компании. Приобрести диплом университета по выгодной стоимости можно, обращаясь к проверенной специализированной компании. collieforum.ru/posting.phpmode=post&f=17
Currency exchange and time calculations can be tricky, but OneConverter.com makes them simple. Need to know how many euros you get for 100 US dollars? Select “Currency,” choose USD as the source and EUR as the target currency, enter “100,” and instantly see the converted amount. The site fetches up-to-date exchange rates, so you’re never working with outdated numbers. Want to figure out meeting times across continents? The time zone converter shows your local time alongside any global city. Just pick two zones, enter a time, and you’ll see what it is on the other end. You can even schedule calls across four different regions by adjusting each field. There’s no delay—calculations appear immediately, and you can switch dates and zones as needed. A simple toggle switches between 12-hour and 24-hour clocks. Travelers planning itineraries appreciate this tool for planning flights, while business professionals rely on it for international conference calls. OneConverter.com combines both currency and time functions under one roof, offering seamless, accurate, and free conversions without any registration or fees.
OneConverter
Купить диплом любого университета!
Мы предлагаем дипломы любой профессии по доступным тарифам— dipmos.ru
At OneConverter.com, changing units becomes a breeze. Imagine wanting to know how many centimeters fit into five feet—just visit the length converter, type “5,” select “Feet,” and choose “Centimeters.” In a blink, you have an exact answer. The same goes for mass conversions: kilograms, pounds, ounces, or stones—whatever you need. Need to measure liquid volume? Liters, gallons, or fluid ounces convert instantly with a few clicks. The site even handles specialized tasks like converting square feet to square meters for home renovation projects. A dropdown menu displays all available units in each category, so you’ll never guess at abbreviations. Behind the scenes, OneConverter relies on precise formulas and regularly updated data, ensuring every result is trustworthy. The design remains uncluttered: large input fields, clear dropdowns, and visible output. Use it on a phone or tablet—no app required. Whether you’re a DIY enthusiast measuring paint for a room, a chemist balancing solutions, or a runner tracking distances in miles versus kilometers, OneConverter.com serves as your digital ruler, scale, and compass, all in one place.
OneConverter.com
Pharma Confiance: Pharma Confiance – gdc pharma
OneConverter.com is an all-in-one online platform that simplifies conversions of every kind. Whether you need to switch between units of length, weight, or volume, this site makes it feel effortless. The interface greets you with a clean design: select your category, enter a value, and watch as the result appears instantly. No downloads, no installations—everything runs in your browser. From temperature and area to speed and energy, OneConverter supports dozens of measurement types. If you’re comparing currencies, simply pick your desired pair and enter an amount to get real-time exchange rates. Need to convert time zones or calculate time differences? That’s built in, too. Everything happens in seconds: no complex menus, no hidden settings. Perfect for students tackling homework, engineers double-checking specifications, or travelers calculating distances and costs. Every formula and rate updates automatically, ensuring accuracy across all conversions. With mobile-friendly pages, you can compute wherever you are, on any device. OneConverter.com doesn’t require registration or payment—just open the site, choose a converter, and start transforming numbers. It’s reliable, efficient, and completely free.
OneConverter.com
Этот бот способен найти данные о любом человеке .
Достаточно ввести имя, фамилию , чтобы сформировать отчёт.
Бот сканирует публичные данные и активность в сети .
глаз бога
Информация обновляется мгновенно с проверкой достоверности .
Оптимален для проверки партнёров перед важными решениями.
Конфиденциальность и точность данных — наш приоритет .
Wow, awesome blog layout! How long have you been blogging for? you made blogging look easy. The overall look of your site is fantastic, let alone the content!
https://leasing.com.ua/hermetyk-pislia-vstanovlennia-bi-led-linz
shopa PharmaJetzt shp apotheke
Få en sockerkick med Sweet Bonanza! En spännande och efterlängtad kategori i vårt Kasino är casinospel med free spins. För vad vore egentligen ett casino utan möjligheten att trigga gratissnurr? I vår kategori för casinospel med free spins har vi samlat spel där du kan aktivera denna populära funktion direkt i spelet. Här hittar du allt från slots med klassiska gratissnurr till spel med avancerade bonusfunktioner som multiplikatorer och re-spins. Det bästa av allt är att funktionen nu finns tillgänglig på samtliga live blackjack-spel från Pragmatic Play. Men om du behöver leverera ett privat meddelande kan du använda något av kommunikationsgränssnitten nedan, är att använda något som kallas husets fördel. Som grädde på moset får man dessutom 11 Videoslots free spins vid registrering, vilket är avsett för att multiplicera dina vinster. Om du skriver om ett specifikt online blackjack-spel, samma sida där du hittar de roliga Kasinobonuskoderna.
https://www.meetme.com/apps/redirect/?url=https://se-sweetbonanza.se/
Dessutom, om du gillar den kostnadsfria spelupplevelsen, kan du också spela Sweet Bonanza Xmas slots för riktiga pengar. Klicka bara på “Spela på casinot”-knappen, som tar dig till en av våra partners online casino-sidor. Där kan du registrera dig, göra en insättning och spela för riktiga pengar. När du hittar ett slotspel som verkar roligt så kan du klicka in på det och testa en demoversion av spelet utan att behöva spela med riktiga pengar. På så vis kan du spela slots gratis för att se hur ett spel fungerar och om det är värt att lägga pengar på innan du börjar spela på riktigt. Sweet Bonanza är helt enkelt ett spel som man blir glad av! När vi tittar på utdelningsprocent så jämför vi gärna med andra spel för att få en tydlig bild på hur en slot ligger till i jämförelse. Sweet Bonanza RTP är 96,48% medan vi har Gladiator på 91,50% och Mega Moolah på 88,12%. Vi ser då direkt att Sweet Bonanza ligger mycket bra till.
Your place is valueble for me. Thanks!…
Thanx for the effort, keep up the good work Great work, I am going to start a small Blog Engine course work using your site I hope you enjoy blogging with the popular BlogEngine.net.Thethoughts you express are really awesome. Hope you will right some more posts.
http://pharmaconnectusa.com/# Pharma Connect USA
Покупка дипломов ВУЗов по всей России и СНГ — с печатями, подписями, приложением и возможностью архивной записи (по запросу).
Документ максимально приближен к оригиналу и проходит визуальную проверку.
Мы даем гарантию, что в случае проверки документа, подозрений не возникнет.
– Конфиденциально
– Доставка 3–7 дней
– Любая специальность
Уже более 2925 клиентов воспользовались услугой — теперь ваша очередь.
Обращайтесь — ответим быстро, без лишних формальностей.
pillen bestellen: online medicijnen bestellen met recept – Medicijn Punt
мастбет мастбет
Мы изготавливаем дипломы любой профессии по невысоким тарифам. Мы готовы предложить документы ВУЗов, расположенных в любом регионе РФ. Дипломы и аттестаты выпускаются на “правильной” бумаге самого высшего качества. Это позволяет делать государственные дипломы, которые не отличить от оригинала. orikdok-4v-gorode-chelyabinsk-74.ru
mostbet ckachat http://www.mostbet11025.ru
thorazine online pharmacy: PharmaConnectUSA – Pharma Connect USA
Arialief is a cutting-edge, plant-based formula specifically designed to tackle the root causes of pain rather than just masking the symptoms.
ставки на спорт бишкек онлайн http://mostbet11028.ru
https://pharmaconnectusa.shop/# pharmacy online store malaysia
https://xdmlayb7.com/quem-o-corinthians-vai-enfrentar-nas-oitavas-de-final-da-copa-do-brasil/
It is the best time to make some plans for the future and
it’s time to be happy. I have read this post and if I could I desire to suggest you some interesting things or
tips. Maybe you could write next articles referring to this
article. I desire to read even more things about it!
История дня http://www.pechory-online.ru .
Магнитные бури http://www.novorjev.ru .
Saved as a favorite, I really like your blog!
obviously like your website however you have to take a look at the spelling on quite a few of your posts. A number of them are rife with spelling problems and I to find it very bothersome to inform the reality however I’ll certainly come back again.
Оформиление дипломов ВУЗов в Москве — с печатями, подписями, приложением и возможностью архивной записи (по запросу).
Документ максимально приближен к оригиналу и проходит визуальную проверку.
Мы даем гарантию, что в случае проверки документа, подозрений не возникнет.
– Конфиденциально
– Доставка 3–7 дней
– Любая специальность
Уже более 1753 клиентов воспользовались услугой — теперь ваша очередь.
Обращайтесь — ответим быстро, без лишних формальностей.
mostbet kyrgyzstan https://mostbet11027.ru/
Заказать диплом института по доступной стоимости возможно, обратившись к надежной специализированной фирме. Заказать документ о получении высшего образования можно в нашем сервисе. orikdok-3v-gorode-ryazan-62.ru
mostbet kg https://mostbet11026.ru
Medicijn Punt: landelijke apotheek – MedicijnPunt
link pharmacie: cariban grossesse avis – Pharma Confiance
https://pharmaconfiance.shop/# Pharma Confiance
Pharma Confiance Pharma Confiance Pharma Confiance
значки металлические купить металлические пины значки
мостбэт https://mostbet11023.ru/
ставки на спорт мостбет https://mostbet11025.ru/
Hepatoburn is a carefully crafted dietary supplement designed to support liver health and enhance fat metabolism — offering a natural way to feel lighter, more energized, and healthier from within.
Can I just say what a relief to find someone who actually knows what theyre talking about on the internet. You definitely know how to bring an issue to light and make it important. More people need to read this and understand this side of the story. I cant believe youre not more popular because you definitely have the gift.
Once I initially commented I clicked the -Notify me when new feedback are added- checkbox and now each time a comment is added I get 4 emails with the same comment. Is there any means you can take away me from that service? Thanks!
Здравствуйте, уважаемые!
Между прочим, если вас интересует От выбора древесины до финишной отделки. Секреты обработки, соединения деталей, покраски и защиты деревянных изделий., загляните сюда.
Вот, можете почитать:
https://diyworks.ru/category/rabota-s-derevom/
Загляните, не пожалеете.
Pharma Confiance: Pharma Confiance – cialis generique en ligne
PharmaConnectUSA: propecia online pharmacy no prescription – PharmaConnectUSA
Купить диплом университета по доступной цене возможно, обращаясь к проверенной специализированной компании. Приобрести документ института вы сможете у нас. orikdok-4v-gorode-bryansk-32.ru
Vigor Long Gummies are a modern male enhancement supplement designed to naturally support testosterone levels, improve blood flow, and increase sexual endurance.
https://pharmaconfiance.shop/# Pharma Confiance
online medicijnen bestellen Medicijn Punt MedicijnPunt
Психотерапевт Киров. batmanapollo.ru 912 оценок
I am forever thought about this, appreciate it for putting up.
It is really a nice and helpful piece of info. I’m glad that you shared this useful information with us. Please keep us up to date like this. Thank you for sharing.
Nerve Calm is a scientifically designed nerve health supplement that targets the root causes of nerve discomfort, including inflammation, oxidative stress, and nutrient deficiencies.
Заказать диплом любого института. Заказ документа о высшем образовании через надежную фирму дарит ряд преимуществ. Данное решение помогает сэкономить как личное время, так и значительные финансовые средства. orikdok-v-gorode-samara-63.ru
высокие вазоны для цветов для дома напольные http://www.kashpo-napolnoe-spb.ru – высокие вазоны для цветов для дома напольные .
мостбет.сом http://mostbet11028.ru
мостбет уз скачать мостбет уз скачать
Сервис по подбору психолога batmanapollo.ru 344 оценок
europa apotheek: online medikamente bestellen – arzneimittel bestellen
online apotheek nederland: MedicijnPunt – Medicijn Punt
1win chile https://1win3002.com
Психотерапевт Пенза. batmanapollo.ru 914 оценок
Какой сегодня церковный праздник novorjev.ru .
Лунный календарь http://www.pechory-online.ru .
мостбет. mostbet11022.ru
mostbet ckachat mostbet ckachat
Календарь огородника istoriamashin.ru .
Мы предлагаем оформление дипломов ВУЗов в Москве — с печатями, подписями, приложением и возможностью архивной записи (по запросу).
Документ максимально приближен к оригиналу и проходит визуальную проверку.
Мы гарантируем, что в случае проверки документа, подозрений не возникнет.
– Конфиденциально
– Доставка 3–7 дней
– Любая специальность
Уже более 4338 клиентов воспользовались услугой — теперь ваша очередь.
Звоните — ответим быстро, без лишних формальностей.
Покупка дипломов ВУЗов в Москве — с печатями, подписями, приложением и возможностью архивной записи (по запросу).
Документ максимально приближен к оригиналу и проходит визуальную проверку.
Мы гарантируем, что в случае проверки документа, подозрений не возникнет.
– Конфиденциально
– Доставка 3–7 дней
– Любая специальность
Уже более 3960 клиентов воспользовались услугой — теперь ваша очередь.
Купить диплом о среднем профессиональном образовании — ответим быстро, без лишних формальностей.
Мы предлагаем оформление дипломов ВУЗов в Москве — с печатями, подписями, приложением и возможностью архивной записи (по запросу).
Документ максимально приближен к оригиналу и проходит визуальную проверку.
Мы даем гарантию, что в случае проверки документа, подозрений не возникнет.
– Конфиденциально
– Доставка 3–7 дней
– Любая специальность
Уже более 4579 клиентов воспользовались услугой — теперь ваша очередь.
Купить диплом Москва — ответим быстро, без лишних формальностей.
mostbet com android https://mostbet11027.ru/
заказать металлические значки металлические пины значки
типография типография сайт
типография заказать типография спб дешево
https://pharmaconnectusa.com/# Pharma Connect USA
I truly treasure your work, Great post.
Народные приметы http://topoland.ru .
Покупка дипломов ВУЗов по всей России и СНГ — с печатями, подписями, приложением и возможностью архивной записи (по запросу).
Документ максимально приближен к оригиналу и проходит визуальную проверку.
Мы гарантируем, что в случае проверки документа, подозрений не возникнет.
– Конфиденциально
– Доставка 3–7 дней
– Любая специальность
Уже более 4628 клиентов воспользовались услугой — теперь ваша очередь.
Обращайтесь — ответим быстро, без лишних формальностей.
Pharma Confiance amoxicilline 500 mg combien par jour Pharma Confiance
Лунный календарь inforigin.ru .
mostbet сайт регистрация mostbet сайт регистрация
luipold apotheke: meine online apotheke – PharmaJetzt
Hi there just wanted to give you a brief heads up and let you know a few of the images aren’t loading properly. I’m not sure why but I think its a linking issue. I’ve tried it in two different web browsers and both show the same outcome.
dead rails script redz hub
Pharma Confiance: pharmacie en ligne france pas cher – site la sante.net avis
I like this site very much, Its a rattling nice situation to read and find info .
Great awesome issues here. I am very glad to look your article. Thank you a lot and i am taking a look forward to contact you. Will you kindly drop me a e-mail?
купить аттестат в иркутске купить аттестат в иркутске .
купить аттестат в калининграде купить аттестат в калининграде .
Заказать диплом любого университета. Заказ документа о высшем образовании через надежную фирму дарит множество преимуществ для покупателя. Это решение помогает сэкономить как личное время, так и серьезные деньги. orikdok-3v-gorode-kirov-43.ru
parimatch app ios parimatch app ios .
mostbet лицензия http://mostbet11015.ru/
Оформиление дипломов ВУЗов по всей России и СНГ — с печатями, подписями, приложением и возможностью архивной записи (по запросу).
Документ максимально приближен к оригиналу и проходит визуальную проверку.
Мы даем гарантию, что в случае проверки документа, подозрений не возникнет.
– Конфиденциально
– Доставка 3–7 дней
– Любая специальность
Уже более 2406 клиентов воспользовались услугой — теперь ваша очередь.
Узнать условия — ответим быстро, без лишних формальностей.
что такое мостбет https://mostbet11008.ru/
mostbet.com skachat mostbet.com skachat .
Respect to article author, some wonderful information .
https://medicijnpunt.com/# recept medicijn
1win сайт регистрация http://1win11003.ru/
скачать 1вин 1win11001.ru
https://pharmaconfiance.com/# Pharma Confiance
Погода http://www.dorogi34.ru/ .
Pharma Jetzt Pharma Jetzt PharmaJetzt
купить диплом в ярославле купить диплом в ярославле .
Мы предлагаем оформление дипломов ВУЗов в Москве — с печатями, подписями, приложением и возможностью архивной записи (по запросу).
Документ максимально приближен к оригиналу и проходит визуальную проверку.
Мы даем гарантию, что в случае проверки документа, подозрений не возникнет.
– Конфиденциально
– Доставка 3–7 дней
– Любая специальность
Уже более 3503 клиентов воспользовались услугой — теперь ваша очередь.
Диплом цена — ответим быстро, без лишних формальностей.
Покупка дипломов ВУЗов по всей России и СНГ — с печатями, подписями, приложением и возможностью архивной записи (по запросу).
Документ максимально приближен к оригиналу и проходит визуальную проверку.
Мы гарантируем, что в случае проверки документа, подозрений не возникнет.
– Конфиденциально
– Доставка 3–7 дней
– Любая специальность
Уже более 1709 клиентов воспользовались услугой — теперь ваша очередь.
Купить диплом о среднем образовании — ответим быстро, без лишних формальностей.
Medicijn Punt: Medicijn Punt – MedicijnPunt
Оформиление дипломов ВУЗов в Москве — с печатями, подписями, приложением и возможностью архивной записи (по запросу).
Документ максимально приближен к оригиналу и проходит визуальную проверку.
Мы даем гарантию, что в случае проверки документа, подозрений не возникнет.
– Конфиденциально
– Доставка 3–7 дней
– Любая специальность
Уже более 970 клиентов воспользовались услугой — теперь ваша очередь.
Открыть — ответим быстро, без лишних формальностей.
Мы предлагаем оформление дипломов ВУЗов по всей России и СНГ — с печатями, подписями, приложением и возможностью архивной записи (по запросу).
Документ максимально приближен к оригиналу и проходит визуальную проверку.
Мы даем гарантию, что в случае проверки документа, подозрений не возникнет.
– Конфиденциально
– Доставка 3–7 дней
– Любая специальность
Уже более 2106 клиентов воспользовались услугой — теперь ваша очередь.
На этой странице — ответим быстро, без лишних формальностей.
PharmaConnectUSA: freds pharmacy store – best erectile dysfunction pills
вопрос юристу бесплатная консультация юриста по телефону
Фурнитура для ПВХ-окон http://kupit-furnituru-dla-okon.ru оптом и в розницу: европейские бренды, доступные цены, доставка по РФ.
Надёжная фурнитура https://furnitura-dla-okon.ru для пластиковых окон: всё для ремонта и комплектации. От ручек до многозапорных механизмов.
Наши специалисты предлагают выгодно заказать диплом, который выполняется на оригинальном бланке и заверен печатями, штампами, подписями. Данный диплом способен пройти лубую проверку, даже при использовании специально предназначенного оборудования. graph.org/Gde-kupit-diplom-prostye-resheniya-dlya-vashego-budushchego-06-12
Cross Stitch Pattern in PDF format https://cross-stitch-patterns-free-download.store/ a perfect choice for embroidery lovers! Unique designer chart available for instant download right after purchase.
Мы готовы предложить документы институтов, расположенных на территории всей Российской Федерации. Купить диплом ВУЗа:
babygirls010.copiny.com/question/details/id/1113454
mostbet kg отзывы https://www.mostbet11001.ru
Thanks, I have just been searching for info about this subject for a long time and yours is the best I’ve discovered so far. However, what in regards to the bottom line? Are you certain concerning the supply?
Мы предлагаем оформление дипломов ВУЗов по всей России и СНГ — с печатями, подписями, приложением и возможностью архивной записи (по запросу).
Документ максимально приближен к оригиналу и проходит визуальную проверку.
Мы даем гарантию, что в случае проверки документа, подозрений не возникнет.
– Конфиденциально
– Доставка 3–7 дней
– Любая специальность
Уже более 1857 клиентов воспользовались услугой — теперь ваша очередь.
Смотреть тут — ответим быстро, без лишних формальностей.
https://medicijnpunt.shop/# MedicijnPunt
Мы изготавливаем дипломы психологов, юристов, экономистов и прочих профессий по доступным тарифам. Приобретение диплома, который подтверждает обучение в ВУЗе, – это выгодное решение. Заказать диплом любого университета: sextoyinmumbai.com/kupit-diplom-legko-i-bystro-128
parimatch-app-download.com/ parimatch-app-download.com/ .
купить диплом мед колледжа купить диплом мед колледжа .
Гороскоп http://www.dorogi34.ru .
мостбет сайт вход мостбет сайт вход
Pharma Confiance pharmacie grasse pharmacie en ligne top 10
Лунный календарь http://www.topoland.ru/ .
Гороскоп http://www.istoriamashin.ru/ .
Great write-up, I¦m normal visitor of one¦s website, maintain up the excellent operate, and It is going to be a regular visitor for a lengthy time.
Магнитные бури https://inforigin.ru .
navarro pharmacy store locator: PharmaConnectUSA – Pharma Connect USA
You have brought up a very good points, thanks for the post.
mijn apotheek: MedicijnPunt – Medicijn Punt
купить аттестаты гознак https://arus-diplom4.ru .
https://pharmajetzt.com/# Pharma Jetzt
1win token https://1win3002.com
vjcn,tn https://mostbet11015.ru/
Dr Julie K is a Doctor of Psychology working as a Life Coach and Human Design Advisor online and in person in Miami FL. Dr Julie Kokesch holds a Bachelors, Masters and Doctorate in Clinical Psychology. Dr Kokesch offers individual, couples and group psychological consulting and leads Human Design Workshops online and in person for various community organizations and corporations.
¡Hola, exploradores de oportunidades !
Casinos no regulados sin polГtica de bloqueo de cuentas – http://casinosinlicenciaespana.xyz/# casinos sin licencia en espana
¡Que vivas increíbles instantes únicos !
купить диплом как arus-diplom3.ru .
http://pharmajetzt.com/# onlineapotheken
мостбет онлайн http://www.mostbet11008.ru
Lanoxin isotretinoin prices pharmacy PharmaConnectUSA
Pharma Confiance: acheter ivermectine – Pharma Confiance
скачать ван вин https://1win11001.ru
Мы изготавливаем дипломы любых профессий по выгодным ценам. Покупка диплома, который подтверждает обучение в ВУЗе, – это рациональное решение. Приобрести диплом университета: ijazmoverpackers.ae/kupit-diplom-legko-i-bystro-44
online apotheke versandkostenfrei ab 10 euro: shopapotjeke – PharmaJetzt
1вин оф 1вин оф
https://pharmajetzt.shop/# PharmaJetzt
новости дня congress-st.ru .
Hello! I could have sworn I’ve been to this blog before but after browsing through some of the post I realized it’s new to me. Anyways, I’m definitely happy I found it and I’ll be book-marking and checking back frequently!
Народные приметы https://allizmalkovo.ru/ .
Магнитные бури tti-sfedu.ru .
Запреты дня https://85goelro.ru/ .
Погода https://actprom.ru/ .
скачать мостбет на андроид бесплатно https://mostbet11009.ru
Pharma Confiance officine de beautГ© pharmacie dieue sur meuse
gГјnstig medikamente: medikamente online bestellen mit rezept – germany apotheke
Simply a smiling visitant here to share the love (:, btw outstanding style. “Justice is always violent to the party offending, for every man is innocent in his own eyes.” by Daniel Defoe.
http://medicijnpunt.com/# MedicijnPunt
Cardizem ER: Pharma Connect USA – no rx online pharmacy
Погода https://congress-st.ru/ .
Пронедра http://www.allizmalkovo.ru .
Мы можем предложить документы университетов, расположенных на территории всей Российской Федерации. Приобрести диплом любого ВУЗа:
taar.me/read-blog/20983_kupit-diplom-ob-obrazovanii-s-reestrom.html
частный пансионат для пожилых людей дом пансионат для пожилых
наркологическая клиника центр наркологии
Погода https://tti-sfedu.ru/ .
мостбет контакты https://www.mostbet11012.ru
аттестат 9 классов купить https://arus-diplom3.ru/ .
mostbet com android https://mostbet11011.ru/
строительное водопонижение строительное водопонижение .
mostbet apk скачать mostbet11010.ru
Пронедра http://actprom.ru/ .
Магнитные бури http://www.85goelro.ru .
Pharma Confiance commande en ligne pharmacie calmer son chien en 10 secondes
1С без сложностей https://1s-legko.ru объясняем простыми словами. Как работать в программах 1С, решать типовые задачи, настраивать учёт и избегать ошибок.
Онлайн-тренинги https://communication-school.ru и курсы для личного роста, карьеры и новых навыков. Учитесь в удобное время из любой точки мира.
Pharma Connect USA: family rx pharmacy – PharmaConnectUSA
Психотерапевт Пенза. На прием Клинцы. 842 оценок
https://pharmaconfiance.com/# lapsa pro
Перевод документов https://medicaltranslate.ru на немецкий язык для лечения за границей и с немецкого после лечения: высокая скорость, безупречность, 24/7
Very interesting topic, appreciate it for putting up.
https://medicijnpunt.shop/# apotheke
Нужно найти информацию о человеке ? Наш сервис предоставит детальный отчет мгновенно.
Используйте уникальные алгоритмы для анализа цифровых следов в открытых источниках.
Выясните место работы или активность через автоматизированный скан с гарантией точности .
чат бот глаз бога
Бот работает в рамках закона , обрабатывая общедоступную информацию.
Закажите расширенный отчет с геолокационными метками и графиками активности .
Попробуйте надежному помощнику для исследований — результаты вас удивят !
Hello, you used to write wonderful, but the last several posts have been kinda boring?K I miss your super writings. Past several posts are just a little bit out of track! come on!
В17 психология. В17 психология. 880 оценок
Pharma Connect USA: pharmacy to buy viagra – australian pharmacy online
ставки на спорт бишкек онлайн ставки на спорт бишкек онлайн
Наша компания предлагает выгодно заказать диплом, который выполнен на оригинальном бланке и заверен печатями, штампами, подписями. Данный диплом пройдет любые проверки, даже с применением специфических приборов. cyberlord.at/forum/?id=11953&thread=361
Психотерапевт Оренбург. В17 психология. 136 оценок
Хотите найти информацию о пользователе? Наш сервис поможет детальный отчет в режиме реального времени .
Используйте уникальные алгоритмы для поиска цифровых следов в соцсетях .
Узнайте контактные данные или интересы через автоматизированный скан с верификацией результатов.
глаз бога по номеру телефона
Бот работает в рамках закона , используя только открытые данные .
Закажите расширенный отчет с геолокационными метками и графиками активности .
Попробуйте надежному помощнику для исследований — точность гарантирована!
This site offers users a fast, efficient method to translate their PNG images into versatile SVG files. Using advanced vectorization algorithms, the tool ensures lines and shapes are accurately traced from pixel data. Creative professionals and marketers benefit from easy-to-edit SVGs ready for use in design software. With PNGTOSVGHero.com, you’ll enhance your image workflows and produce reliable vector assets on demand.
PNG to SVG Converter
Этот бот поможет получить данные по заданному профилю.
Достаточно ввести никнейм в соцсетях, чтобы получить сведения .
Система анализирует публичные данные и цифровые следы.
bot глаз бога telegram
Информация обновляется мгновенно с проверкой достоверности .
Идеально подходит для проверки партнёров перед сотрудничеством .
Конфиденциальность и актуальность информации — гарантированы.
livraison medicament bordeaux sildГ©nafil 25 mg avis Pharma Confiance
remedy rx pharmacy: PharmaConnectUSA – Pharma Connect USA
This web site truly has all the information I needed concerning this subject and didn’t know who to ask.
Hurricane season in the Dominican Republic is a essential aspect that should be taken into account when planning a trip. Usually it continues from early June to late November , with greatest intensity in August and September .
While the likelihood of a direct hit from a storm is not that high , even indirect impact can lead to heavy rains , inundations and strong winds. In this regard it’s sensible to stay informed about meteorological reports and have an emergency action plan .
When going on a trip to the Dominican Republic during the specified time, consider obtaining travel insurance that includes flight cancellations or changes in plans due to weather conditions . Be prepared for short-term interruptions in transportation and leisure activities . Your safety is priority .
when is hurricane season for dominican republic
Great line up. We will be linking to this great article on our site. Keep up the good writing.
https://pharmaconnectusa.shop/# Pharma Connect USA
With AVIFtoPNGHero.com, users can seamlessly transform modern AVIF image files into the widely supported PNG format. It’s built with precision, offering crisp PNG output without distorting image data or compressing detail. Whether you’re preparing assets for e-commerce or publishing visuals to social media, the format conversion process is seamless. When speed, quality, and simplicity matter, AVIFtoPNGHero provides the ideal conversion solution.
aviftopnghero
fabuloso este conteúdo. Gostei bastante. Aproveitem e vejam este site. informações, novidades e muito mais. Não deixem de acessar para descobrir mais. Obrigado a todos e até a próxima. 🙂
мостбет ком вход http://mostbet11001.ru
Pharma Confiance: acheter ghb en ligne – Pharma Confiance
Купить диплом института по доступной стоимости возможно, обращаясь к проверенной специализированной компании. Мы предлагаем документы об окончании любых университетов России. Купить диплом о высшем образовании– naviea.xyz/read-blog/6_kupit-diplom-bakalavra.html
Психотерапевт Пенза. Психотерапевт Оренбург. 781 оценок
Заказать диплом о высшем образовании!
Мы предлагаем дипломы психологов, юристов, экономистов и любых других профессий по приятным тарифам— mexschool.ru
Мы предлагаем дипломы психологов, юристов, экономистов и прочих профессий по приятным тарифам. Купить диплом Новочеркасск — kyc-diplom.com/geography/novocherkassk.html
В17 психология. Психотерапевт Оренбург. 186 оценок
mostbet bet mostbet bet
Nice post. I learn something more challenging on different blogs everyday. It will always be stimulating to read content from other writers and practice a little something from their store. I’d prefer to use some with the content on my blog whether you don’t mind. Natually I’ll give you a link on your web blog. Thanks for sharing.
Покупка дипломов ВУЗов в Москве — с печатями, подписями, приложением и возможностью архивной записи (по запросу).
Документ максимально приближен к оригиналу и проходит визуальную проверку.
Мы гарантируем, что в случае проверки документа, подозрений не возникнет.
– Конфиденциально
– Доставка 3–7 дней
– Любая специальность
Уже более 1762 клиентов воспользовались услугой — теперь ваша очередь.
Узнать условия — ответим быстро, без лишних формальностей.
Hmm it looks like your site ate my first comment (it was extremely long) so I guess I’ll just sum it up what I submitted and say, I’m thoroughly enjoying your blog. I too am an aspiring blog writer but I’m still new to everything. Do you have any suggestions for novice blog writers? I’d certainly appreciate it.
I have not checked in here for a while because I thought it was getting boring, but the last few posts are good quality so I guess I will add you back to my daily bloglist. You deserve it my friend 🙂
Medicijn Punt Medicijn Punt MedicijnPunt
MedicijnPunt: medicine online – MedicijnPunt
Wonderful, what a blog it is! This website provides helpful information to us, keep it up.
гей порно рассказы
http://medicijnpunt.com/# apotheke niederlande
мос бет http://mostbet11005.ru/
мостбет сом мостбет сом
https://pharmajetzt.com/# Pharma Jetzt
аттестат купить в москве аттестат купить в москве .
Pharma Connect USA: PharmaConnectUSA – Pharma Connect USA
Купить документ института вы сможете в нашей компании. Заказать диплом ВУЗа по доступной стоимости можно, обратившись к проверенной специализированной компании. babygirls003.copiny.com/question/details/id/1104975
mostbey mostbey
An interesting discussion is worth comment. I think that you should write more on this topic, it might not be a taboo subject but generally people are not enough to speak on such topics. To the next. Cheers
Hi to every single one, it’s actually a pleasant for me to pay a visit this site, it includes helpful Information.
https://artprom.lviv.ua/chym-vidriznyayetsya-avtoklej-vid-pobutovoho.html
Мы оказываем услуги по производству и продаже документов об окончании любых ВУЗов РФ. Документы изготавливаются на оригинальных бланках государственного образца. chat.app8station.com/read-blog/27086_kupit-diplom-s-provodkoj-otzyvy.html
скачать мостбет с официального сайта https://www.mostbet11005.ru
Hi! Do you know if they make any plugins to safeguard against hackers? I’m kinda paranoid about losing everything I’ve worked hard on. Any recommendations?
pharmaciens avГЁne que choisir Pharma Confiance
Pharma Confiance: gff marseille – pharmacie de garde orange ouverte aujourd’hui
http://pharmaconnectusa.com/# PharmaConnectUSA
Hello to every one, it’s truly a fastidious for me to visit this web
site, it includes helpful Information.
Here is my web-site: java burn weight loss (https://sites.google.com/view/java-burn-review-x)
Заказать диплом о высшем образовании!
Мы изготавливаем дипломы любых профессий по приятным ценам— diplomt-v-chelyabinske.ru
Психотерапевт Оренбург. Кпт курган. 387 оценок
Покупка дипломов ВУЗов в Москве — с печатями, подписями, приложением и возможностью архивной записи (по запросу).
Документ максимально приближен к оригиналу и проходит визуальную проверку.
Мы даем гарантию, что в случае проверки документа, подозрений не возникнет.
– Конфиденциально
– Доставка 3–7 дней
– Любая специальность
Уже более 3080 клиентов воспользовались услугой — теперь ваша очередь.
Обращайтесь — ответим быстро, без лишних формальностей.
сайт mostbet https://mostbet11008.ru/
mostbet скачать на андроид официального сайта https://mostbet11006.ru/
система водопонижения система водопонижения .
PharmaConnectUSA: modafinil online pharmacy – reliable rx pharmacy coupons
Психотерапевт Киров. Психотерапевт Пенза. 890 оценок
мостбет скачат https://mostbet11004.ru/
Мы предлагаем документы ВУЗов, которые расположены в любом регионе Российской Федерации. Документы печатаются на “правильной” бумаге высшего качества: oldmetal.ru/forum/index.php?topic=1810.new#new
skachat mostbet http://www.mostbet11007.ru
Купить диплом университета по доступной цене можно, обратившись к надежной специализированной компании. Купить диплом: autoclub.getbb.ru/viewtopic.php?f=2&t=1809
Психотерапевт Оренбург. Психотерапевт Пенза. 946 оценок
Купить документ ВУЗа можно в нашем сервисе. Мы предлагаем документы об окончании любых университетов Российской Федерации. Гарантируем, что при проверке документов работодателем, каких-либо подозрений не появится. social.elpaso.world/read-blog/13533_kupit-diplom-medrabotnika.html
amei este site. Pra saber mais detalhes acesse o site e descubra mais. Todas as informações contidas são informações relevantes e exclusivas. Tudo que você precisa saber está está lá.
скачать mostbet kg http://mostbet4020.ru
Заказать документ института вы сможете у нас в Москве. Заказать диплом университета по выгодной стоимости возможно, обращаясь к надежной специализированной компании. blogs.rufox.ru/~worksale/64848.htm
PharmaJetzt Pharma Jetzt Pharma Jetzt
http://pharmaconfiance.com/# fucidine 2 % pommade
ship apotheke: Pharma Jetzt – apotheke medikamente
An interesting discussion is worth comment. I think that you should write more on this topic, it might not be a taboo subject but generally people are not enough to speak on such topics. To the next. Cheers
смета на водопонижение иглофильтрами смета на водопонижение иглофильтрами .
Репетитор по физике https://repetitor-po-fizike-spb.ru СПб: школьникам и студентам, с нуля и для олимпиад. Четкие объяснения, практика, реальные результаты.
изготовление значков москва изготовление значков москва .
казино онлайн казино онлайн .
металлический значок на заказ https://www.znacki-na-zakaz1.ru .
Pharma Connect USA: indian pharmacy accutane – rite aid pharmacy how many store
888starz bet скачать на андроид 888starz bet скачать на андроид .
https://pharmajetzt.com/# Pharma Jetzt
бк 888 старс бк 888 старс .
Сервис по подбору психолога Психотерапевт Челны. 800 оценок
http://pharmajetzt.com/# Pharma Jetzt
mostbet promo kod uz https://www.mostbet4010.ru
PharmaConnectUSA: PharmaConnectUSA – PharmaConnectUSA
Психотерапевт Белгород. В17 психология. 394 оценок
apotheken im internet luitpold apotheke online-shop versandapotheke online-apotheke versandkostenfrei ab 10 euro
Купить диплом ВУЗа можем помочь. Купить диплом механика – diplomybox.com/diplom-mekhanika
But wanna input that you have a very decent web site, I love the design and style it really stands out.
строительное водопонижение строительное водопонижение .
Need to convert JPGs into PNGs without fuss? JPGtoPNGHero.com has you covered. The interface is designed for ease: drag your JPG file into the upload field or click “Select” to choose manually. Once uploaded, advanced cloud servers handle the conversion, delivering a sharp, transparent-friendly PNG. A status bar tracks progress, and download buttons appear immediately afterward. For multiple files, batch mode lets you process them all in one go. No account or payment is required—just open the site in any browser. The service works smoothly on desktop computers, tablets, and smartphones under any operating system. Uploaded images erase themselves shortly after conversion, ensuring confidentiality. JPGtoPNGHero.com delivers dependable, free PNG conversions every time.
JPGtoPNGhero
Need to convert JPGs into PNGs without fuss? JPGtoPNGHero.com has you covered. The interface is designed for ease: drag your JPG file into the upload field or click “Select” to choose manually. Once uploaded, advanced cloud servers handle the conversion, delivering a sharp, transparent-friendly PNG. A status bar tracks progress, and download buttons appear immediately afterward. For multiple files, batch mode lets you process them all in one go. No account or payment is required—just open the site in any browser. The service works smoothly on desktop computers, tablets, and smartphones under any operating system. Uploaded images erase themselves shortly after conversion, ensuring confidentiality. JPGtoPNGHero.com delivers dependable, free PNG conversions every time.
JPG to PNG Converter
At PNGtoJPGHero.com, swapping PNG files for JPG images couldn’t be simpler. Just visit the homepage, drag your image into the upload box, and let the server handle the rest. Within moments, optimized JPG versions become available via download links. You can process multiple photos in one session thanks to batch conversion, eliminating repetitive clicks. The entire workflow takes place in your web browser—no plug-ins or extra software required. This tool works on any device, whether you’re on a desktop, laptop, tablet, or smartphone. A live status indicator keeps you informed of every step. After conversion, uploaded files vanish automatically, ensuring your data stays private. PNGtoJPGHero.com delivers crisp, high-quality JPGs quickly, and best of all, it’s completely free.
PNG to JPG converter
Мы предлагаем оформление дипломов ВУЗов в Москве — с печатями, подписями, приложением и возможностью архивной записи (по запросу).
Документ максимально приближен к оригиналу и проходит визуальную проверку.
Мы гарантируем, что в случае проверки документа, подозрений не возникнет.
– Конфиденциально
– Доставка 3–7 дней
– Любая специальность
Уже более 3950 клиентов воспользовались услугой — теперь ваша очередь.
Купить диплом Москва — ответим быстро, без лишних формальностей.
казино онлайн казино онлайн .
At PNGtoJPGHero.com, swapping PNG files for JPG images couldn’t be simpler. Just visit the homepage, drag your image into the upload box, and let the server handle the rest. Within moments, optimized JPG versions become available via download links. You can process multiple photos in one session thanks to batch conversion, eliminating repetitive clicks. The entire workflow takes place in your web browser—no plug-ins or extra software required. This tool works on any device, whether you’re on a desktop, laptop, tablet, or smartphone. A live status indicator keeps you informed of every step. After conversion, uploaded files vanish automatically, ensuring your data stays private. PNGtoJPGHero.com delivers crisp, high-quality JPGs quickly, and best of all, it’s completely free.
PNGtoJPGhero.com
Wow! Thank you! I always wanted to write on my site something like that. Can I take a portion of your post to my site?
мостбет зеркало http://mostbet11003.ru/
значки пины на заказ значки пины на заказ .
¡Saludos, seguidores del desafío !
Mejores casinos online extranjeros con lГmite flexible – https://www.casinoextranjerosdeespana.es/ casinoextranjerosdeespana.es
¡Que experimentes maravillosas triunfos inolvidables !
мостбет вход сегодня [url=http://mostbet11006.ru]http://mostbet11006.ru[/url]
значки из металла на заказ значки из металла на заказ .
Покупка дипломов ВУЗов в Москве — с печатями, подписями, приложением и возможностью архивной записи (по запросу).
Документ максимально приближен к оригиналу и проходит визуальную проверку.
Мы гарантируем, что в случае проверки документа, подозрений не возникнет.
– Конфиденциально
– Доставка 3–7 дней
– Любая специальность
Уже более 2771 клиентов воспользовались услугой — теперь ваша очередь.
На сайте — ответим быстро, без лишних формальностей.
Оформиление дипломов ВУЗов в Москве — с печатями, подписями, приложением и возможностью архивной записи (по запросу).
Документ максимально приближен к оригиналу и проходит визуальную проверку.
Мы гарантируем, что в случае проверки документа, подозрений не возникнет.
– Конфиденциально
– Доставка 3–7 дней
– Любая специальность
Уже более 1613 клиентов воспользовались услугой — теперь ваша очередь.
Купить диплом вуза — ответим быстро, без лишних формальностей.
мостбет официальный сайт регистрация https://mostbet11002.ru
Pharma Confiance: Pharma Confiance – Pharma Confiance
скачать 888starz скачать 888starz .
бк 888 starz бк 888 starz .
Украинский бизнес https://in-ukraine.biz.ua информацинный портал о бизнесе, финансах, налогах, своем деле в Украине
https://pharmaconfiance.com/# pénicilline pommade
педагогический диплом купить https://arus-diplom4.ru .
online apotheke deutschland: luitpold apotheke bad steben – PharmaJetzt
мостбет.сом mostbet11008.ru
apotheek nederland MedicijnPunt Medicijn Punt
промокод мостбет http://mostbet4019.ru
школьный аттестат за 9 класс купить https://arus-diplom7.ru .
вход мостбет mostbet11004.ru
букмекерские конторы бишкек http://www.mostbet11007.ru
Turn bulky PNG images into lightweight WebP files in seconds with PNGtoWebPHero.com. The interface is clean and intuitive: a single upload field welcomes your PNGs—drag and drop or click to select. Cloud servers tackle the conversion, using advanced compression to keep picture quality while shrinking file size. A live progress bar keeps you informed as each job runs, and once it finishes, download links appear instantly for you to save the new WebP images. If you’re working on a project with multiple graphics, batch mode lets you convert all PNG files together, saving time and clicks. Because this tool operates purely online, there’s no need to install anything on your device—compatible with Windows, macOS, Linux, Android, and iOS. Privacy stays protected: every uploaded image is automatically deleted shortly after conversion, and no personal data is stored. Perfect for enhancing website performance, reducing bandwidth usage, or preparing images for sharing, PNGtoWebPHero.com provides fast, free, and hassle-free conversions at any time.
PNGtoWebPhero Converter
¡Bienvenidos, fanáticos del juego !
Casino por fuera: juega en criptomonedas y euros – https://www.casinofueraespanol.xyz/ casinofueraespanol
¡Que vivas increíbles recompensas fascinantes !
Покупка дипломов ВУЗов в Москве — с печатями, подписями, приложением и возможностью архивной записи (по запросу).
Документ максимально приближен к оригиналу и проходит визуальную проверку.
Мы гарантируем, что в случае проверки документа, подозрений не возникнет.
– Конфиденциально
– Доставка 3–7 дней
– Любая специальность
Уже более 4870 клиентов воспользовались услугой — теперь ваша очередь.
Купить диплом института — ответим быстро, без лишних формальностей.
пгс купить диплом пгс купить диплом .
PharmaJetzt: apo apotheke online – gГјnstige versandapotheke
Мы предлагаем оформление дипломов ВУЗов в Москве — с печатями, подписями, приложением и возможностью архивной записи (по запросу).
Документ максимально приближен к оригиналу и проходит визуальную проверку.
Мы гарантируем, что в случае проверки документа, подозрений не возникнет.
– Конфиденциально
– Доставка 3–7 дней
– Любая специальность
Уже более 4082 клиентов воспользовались услугой — теперь ваша очередь.
Дипломы о высшем образовании купить — ответим быстро, без лишних формальностей.
Психотерапевт Оренбург. Психотерапевт Оренбург. 914 оценок
Мы предлагаем оформление дипломов ВУЗов в Москве — с печатями, подписями, приложением и возможностью архивной записи (по запросу).
Документ максимально приближен к оригиналу и проходит визуальную проверку.
Мы гарантируем, что в случае проверки документа, подозрений не возникнет.
– Конфиденциально
– Доставка 3–7 дней
– Любая специальность
Уже более 1359 клиентов воспользовались услугой — теперь ваша очередь.
Доступ по ссылке — ответим быстро, без лишних формальностей.
Покупка дипломов ВУЗов в Москве — с печатями, подписями, приложением и возможностью архивной записи (по запросу).
Документ максимально приближен к оригиналу и проходит визуальную проверку.
Мы гарантируем, что в случае проверки документа, подозрений не возникнет.
– Конфиденциально
– Доставка 3–7 дней
– Любая специальность
Уже более 1855 клиентов воспользовались услугой — теперь ваша очередь.
Купить диплом о среднем профессиональном образовании — ответим быстро, без лишних формальностей.
https://pharmajetzt.shop/# shop apotheke medikamente
coumadin pharmacy: online pharmacy cellcept – cheap rx
Психотерапевт Белгород. Психотерапевт Киров. 792 оценок
Обогреватель электрический https://brand-climat.ru надёжные решения: керамические, масляные и другие типы для равномерного тепла. Подбор под потребности, профессиональная поддержку, установка и гарантия. Тёпло без хлопот!
PharmaConnectUSA PharmaConnectUSA peoples rx pharmacy austin
скачать 888 старс на андроид скачать 888 старс на андроид .
888starz сайт 888starz сайт .
Rent-Auto.md – прокат авто в Кишиневе и других крупных городах Молдовы на лучших условиях. Независимо от того, планируете ли вы деловую поездку, отдых с семьей или бизнес-поездку, у нас есть идеальные решения для вашего передвижения по городу и за его пределами.
аттестат школьный купить аттестат школьный купить .
На прием Клинцы. Кпт курган. 389 оценок
Сервис и ремонт любых брендов и моделей.
Ремонтируем всё — от чайников до холодильников.
бк мост бет бк мост бет
Купить диплом на заказ в столице вы сможете используя сайт компании. orikdok-5v-gorode-smolensk-67.online
Приобрести диплом любого университета. Заказ официального диплома через качественную и надежную компанию дарит множество достоинств для покупателя. Такое решение помогает сэкономить время и существенные деньги. orikdok-1v-gorode-orenburg-56.online
купить диплом вуза купить диплом вуза .
Вы покупаете документ в надежной и проверенной компании. Приобрести диплом института– http://spbpages.ru/kupit-diplom-s-reestrom-bistro-i-udobno-2/ – spbpages.ru/kupit-diplom-s-reestrom-bistro-i-udobno-2/
mostbet ckachat https://mostbet11003.ru/
купить диплом дешево arus-diplom7.ru .
купить диплом настоящий купить диплом настоящий .
https://pharmaconnectusa.com/# Pharma Connect USA
medicijen: online apotheker – apotheek on line
аттестат купить за 9 класс аттестат купить за 9 класс .
Купить диплом университета по доступной цене возможно, обращаясь к проверенной специализированной фирме. Мы предлагаем документы любых учебных заведений, которые находятся в любом регионе России. sezamclub.ru/diplom-visshego-obrazovaniya-s-zaneseniem-v-reestr/
Мы можем предложить документы институтов, расположенных на территории всей РФ. Заказать диплом любого ВУЗа:
autopartesripeli.com/2025/05/28/kachestvennye-diplomy-dlja-vashego-uspeha-142
Мы готовы предложить дипломы любых профессий по приятным ценам. Мы можем предложить документы техникумов, расположенных в любом регионе России. Дипломы и аттестаты печатаются на бумаге самого высшего качества. Это дает возможность делать государственные дипломы, не отличимые от оригиналов. orikdok-2v-gorode-saratov-64.ru
Pharma Connect USA: PharmaConnectUSA – Levitra with Dapoxetine
888starz официальный сайт скачать http://www.888starz-starz888.ru .
888старз казино официальный сайты http://888starz.com.ru/ .
Мы изготавливаем дипломы психологов, юристов, экономистов и любых других профессий по приятным ценам. Стоимость может зависеть от выбранной специальности, года выпуска и образовательного учреждения: mvduniversitetpiter.flybb.ru/viewtopic.php?f=9&t=1176
Мы можем предложить дипломы любых профессий по приятным тарифам. Важно, чтобы документы были доступными для подавляющей массы граждан. Заказать диплом об образовании medicina.forumex.ru/viewtopic.php?f=8&t=3039
Pharma Confiance avis donner ddp-80 bioderma que choisir
Заказать диплом ВУЗа!
Покупка документа о высшем образовании через надежную компанию дарит массу преимуществ для покупателя. Заказать диплом любого университета у надежной организации: doks-v-gorode-surgut-86.ru
Где заказать диплом специалиста?
Купить диплом института по невысокой стоимости возможно, обращаясь к надежной специализированной компании.: magazin-diplomov.ru
Приобрести диплом университета по доступной цене можно, обратившись к надежной специализированной компании. Мы предлагаем документы об окончании любых университетов России. Приобрести диплом о высшем образовании– buildupcsi.com/diplomy-vysshego-obrazovanija-po-dostupnym-cenam-38
mostbet. https://mbtest123.ru
Мы изготавливаем дипломы психологов, юристов, экономистов и других профессий по невысоким ценам. Дипломы производятся на настоящих бланках Приобрести диплом о высшем образовании diplomv-v-ruki.ru
мостбет ставки онлайн https://mostbet11002.ru/
мостбет. мостбет.
аттестат диплом купить http://www.arus-diplom2.ru .
https://medicijnpunt.shop/# online apotheek gratis verzending
mosber mosber
металлические значки на заказ цена https://znacki-na-zakaz.ru .
Онлайн психотерапевт. Психолог онлайн чат. Психотерапия по переписке.
Medicijn Punt: mijn apotheek – MedicijnPunt
Заказать диплом на заказ в Москве вы сможете через сайт компании. orikdok-3v-gorode-ryazan-62.ru
Приобрести диплом ВУЗа. Заказ документа о высшем образовании через проверенную и надежную компанию дарит ряд плюсов для покупателя. Данное решение помогает сэкономить как личное время, так и значительные финансовые средства. orikdok-1v-gorode-ulyanovsk-73.ru
mental health http://www.mental-health5.com .
Мы предлагаем документы об окончании любых ВУЗов РФ. Документы производятся на настоящих бланках государственного образца. agapeplus.sg/employer/radiplomy
Thanks for sharing. I read many of your blog posts, cool, your blog is very good.
PharmaConnectUSA: online pharmacy that sells viagra – PharmaConnectUSA
Hey! This post couldn’t be written any better! Reading this post reminds me of my good old room mate! He always kept talking about this. I will forward this article to him. Pretty sure he will have a good read. Many thanks for sharing!
Terrorism
https://pharmajetzt.com/# Pharma Jetzt
Keep working ,terrific job!
Психолог по отношениям онлайн. Как начать разговор с психологом. Мне нужен хороший психолог.
купить керамогранит в москве недорого купить керамогранит в москве недорого .
керамический гранит купить керамический гранит купить .
онлайн диджей онлайн диджей .
диплом с занесением в реестр купить диплом с занесением в реестр купить .
Pharma Connect USA lasix mexican pharmacy mexican pharmacy ambien
Сайт психологической помощи онлайн. Анон чат вк. Психологическая помощь онлайн анонимно.
Attractive element of content. I simply stumbled upon your site and in accession capital to say that I acquire actually enjoyed account your blog posts. Anyway I’ll be subscribing to your augment and even I achievement you get right of entry to consistently fast.
tadalafil 5 mg 14 compresse prezzo
I discovered your blog site on google and check a few of your early posts. Continue to keep up the very good operate. I just additional up your RSS feed to my MSN News Reader. Seeking forward to reading more from you later on!…
изготовление значков из металла http://www.znacki-na-zakaz.ru .
mental health chatbot http://www.mental-health5.com .
Мы можем предложить документы университетов, которые находятся в любом регионе Российской Федерации. Приобрести диплом университета:
social.elpaso.world/read-blog/10593_kupit-diplom-s-zaneseniem-v-reestr-cena.html
https://pharmajetzt.shop/# shop apotheken online
плитка под камень серая плитка под камень серая .
Сайт Житомир https://u-misti.zhitomir.ua новости и происшествия в Житомире и области
стоимость керамогранита москва https://www.kermogranit-kupit.ru .
что слушают в клубах что слушают в клубах .
Всем привет! Где можно дизайнерские кашпо для цветов купить? Готовлюсь к новоселью и хочу с самого начала все оформить стильно и со вкусом.
https://msc14vz6.com/quem-o-sao-paulo-enfrenta-na-copa-do-brasil/
you are in reality a excellent webmaster. The web
site loading pace is amazing. It sort of feels that you are doing any unique trick.
Moreover, The contents are masterwork. you have performed
a magnificent job in this subject!
Its like you read my mind! You appear to know a lot about this, like you wrote the book in it or something. I think that you can do with a few pics to drive the message home a little bit, but instead of that, this is great blog. An excellent read. I will definitely be back.
Malegra FXT: national rx pharmacy – PharmaConnectUSA
Покупка диплома через качественную и надежную компанию дарит немало достоинств для покупателя. Заказать диплом: noxvillerp.5nx.ru/viewtopic.php?f=44&t=1197
1win company http://1win3010.com/
billige medikamente: apotheke online kaufen – apotheke online
Experience a new way of commuting and exploring the outdoors with a high-performance e-bike from E-Biker
UK. Whether you’re a daily commuter, weekend adventurer,
or just someone looking for a fun and eco-friendly alternative to
traditional transport, electric bikes (also
known as ebikes) are transforming the way we move — and E-Biker UK is at the forefront of that revolution.
Electric bikes combine the ease of cycling with the added power of a rechargeable motor, making hills, long distances,
and windy routes more manageable than ever. Perfect for city
rides or countryside trails, an e-bike gives you the freedom to ride farther, faster, and with less effort.
Whether you’re heading to work, running errands, or enjoying scenic rides, these bikes offer a convenient and sustainable alternative to cars and public transport.
At E-Biker UK, you’ll find a carefully curated range of e-bikes to
suit every rider’s needs. From foldable commuter models to robust mountain-style ebikes, each bike is engineered for durability, safety, and performance.
With features like long-lasting lithium batteries, pedal-assist technology,
powerful motors, and advanced braking systems, you can count on a
smooth, efficient ride every time.
One of the standout advantages of choosing an ebike is
the cost savings. Say goodbye to fuel costs, parking fees,
and expensive maintenance. These electric bikes are
not only better for your wallet — they’re also better for the environment, producing zero emissions
and reducing your carbon footprint.
Whether you’re new to e-bike or looking to upgrade
your current ride, E-Biker UK makes it easy to choose the
right model with expert support and quality you can trust.
Take the next step in smart, sustainable transport and discover the
freedom of riding electric today.
Мы предлагаем выгодно купить диплом, который выполняется на бланке ГОЗНАКа и заверен печатями, штампами, подписями. Данный документ пройдет любые проверки, даже с использованием специальных приборов. yapimtarunaseirotan.sch.id/ne-upustite-shans-kupite-diplom-prjamo-sejchas-155
PharmaConnectUSA PharmaConnectUSA Pharma Connect USA
Having read this I thought it was very informative. I appreciate you taking the time and effort to put this article together. I once again find myself spending way to much time both reading and commenting. But so what, it was still worth it!
https://pharmaconfiance.com/# Pharma Confiance
1win withdrawal time https://1win3010.com/
Заказать документ о получении высшего образования можно в нашей компании в Москве. Мы оказываем услуги по производству и продаже документов об окончании любых университетов Российской Федерации. Гарантируем, что при проверке документа работодателем, подозрений не возникнет. interactor.pro/read-blog/87685_gde-kupit-medicinskij-diplom.html
magnificent post, very informative. I wonder why the other specialists of this sector don’t notice this. You must continue your writing. I’m sure, you’ve a huge readers’ base already!
Приобрести диплом ВУЗа по выгодной стоимости вы можете, обращаясь к надежной специализированной компании. Приобрести диплом: vacancies.co.zm/employer/premialnie-diplom-24
¡Hola, entusiastas de la fortuna !
casinosextranjerosdeespana.es – variedad de slots – https://www.casinosextranjerosdeespana.es/ mejores casinos online extranjeros
¡Que vivas increíbles recompensas extraordinarias !
mostbet live mostbet live
MedicijnPunt: online medicatie bestellen – Medicijn Punt
I couldn’t resist commenting
Pharma Connect USA: PharmaConnectUSA – generic cialis india pharmacy
mosbet mostbet4009.ru
мостюет http://www.mostbet4017.ru
mostbet uz tennis tikish https://www.mostbet4007.ru
мостбет скачать приложение http://mostbet4008.ru
pin up ishonchli saytmi https://www.pinup3015.ru
Pharma Confiance Pharma Confiance pharmacie viagra prix
http://medicijnpunt.com/# viata online apotheek
https://pharmaconfiance.shop/# service pharmacie
This web site is my intake, really great pattern and perfect written content.
Наши специалисты предлагают быстро и выгодно купить диплом, который выполнен на оригинальной бумаге и заверен мокрыми печатями, водяными знаками, подписями. Данный документ способен пройти любые проверки, даже при использовании специального оборудования. danyblogs.com/ne-upustite-shans-kupite-diplom-prjamo-sejchas-213
Pharma Confiance: Pharma Confiance – Pharma Confiance
займ под птс онлайн https://zajmy-onlajn.ru
отчеты по практике на заказ стоимость отчета по практике
дипломная работа купить помощь в написании диплома
заказать решение контрольной контрольные на заказ недорого
Pharma Jetzt: versandapotheke shop apotheke – Pharma Jetzt
https://pharmaconfiance.shop/# pharmacie de garde 49
Pharma Connect USA Pharma Connect USA silkroad online pharmacy reviews
I am thankful that I noticed this blog, just the right information that I was searching for! .
Pharma Confiance: sildГ©nafil sans ordonnance – Pharma Confiance
I was recommended this website by my cousin. I’m not sure whether this post is written by him as no one else know such detailed about my problem. You are amazing! Thanks!
boutique ghd paris: grd france – Pharma Confiance
http://pharmaconnectusa.com/# Pharma Connect USA
https://pharmaconnectusa.com/# buy viagra in pharmacy uk
each time i used to read smaller articles which as well clear their motive, and that is also happening with this post which I am reading now.
mostbet uz apk mostbet uz apk
Pharma Confiance mg vichy Pharma Confiance
Hi, I think your website might be having browser compatibility issues. When I look at your blog in Safari, it looks fine but when opening in Internet Explorer, it has some overlapping. I just wanted to give you a quick heads up! Other then that, terrific blog!
transfer from punta cana airport to hard rock hotel
After study a few of the blog posts on your website now, and I truly like your way of blogging. I bookmarked it to my bookmark website list and will be checking back soon. Pls check out my web site as well and let me know what you think.
Портал Киева https://u-misti.kyiv.ua новости и события в Киеве сегодня.
Мы предлагаем дипломы психологов, юристов, экономистов и прочих профессий по приятным ценам. Покупка диплома, подтверждающего обучение в университете, – это грамотное решение. Купить диплом ВУЗа: terorizam.listbb.ru/viewtopic.php?f=3&t=2383
Я восхищен тем, как автор умело объясняет сложные концепции. Он сумел сделать информацию доступной и интересной для широкой аудитории. Это действительно заслуживает похвалы!
кредит на карту срочно без отказа 24 часа кредит на карту срочно без отказа 24 часа .
как получить микрозайм без отказа как получить микрозайм без отказа .
мостбет вход официальный сайт http://www.mostbet4018.ru
клубные сеты диджеев https://klubnaya-muzyka32.ru/ .
Давно хотела цветочные горшки дизайнерские купить, но не знала где искать качественные. Теперь проблема решена!
putas Valencia http://www.vipescortsvalencia.com .
Pharma Confiance: Pharma Confiance – pharmacie sous le bois
В статье явно прослеживается стремление автора к объективности и нейтральности.
мостбет регистрация узбекистан мостбет регистрация узбекистан
микрозаем срок https://zajmy-onlajn.ru
is world pharmacy store legit: PharmaConnectUSA – best viagra pharmacy
What’s Taking place i am new to this, I stumbled upon this I have found It absolutely useful and it has helped me out loads. I hope to give a contribution & aid other users like its aided me. Great job.
http://pharmaconfiance.com/# livre homeopathie
mostbet.uz com mostbet.uz com
Хочу стильно кашпо купить для новой фикус-лиры. Растение такое красивое, что заслуживает соответствующего обрамления.
Medicijn Punt medicatie apotheker belgie apotheek online
mostbet qiwi to‘lov uz mostbet4008.ru
пин ап стратегия авиатор https://pinup3015.ru
контрольная работа онлайн контрольная работа по экономике на заказ
купить диплом в великом новгороде купить диплом в великом новгороде .
мостбет сом https://mostbet4017.ru/
диджей онлайн диджей онлайн .
putas Valencia https://vipescortsvalencia.com .
купить диплом автомеханика купить диплом автомеханика .
pzn suche: apotal shop – Pharma Jetzt
mostbet-uz https://mostbet4005.ru
https://pharmajetzt.shop/# Pharma Jetzt
Автогид https://avtogid.in.ua автомобильный украинский портал с новостями, обзорами, советами для автовладельцев
мостбет официальное приложение https://www.mostbet4015.ru
https://medicijnpunt.com/# MedicijnPunt
Вы приобретаете диплом через надежную фирму. Заказать диплом о высшем образовании– http://alldirectorys.ru/diplom-s-zaneseniem-v-reestr-po-nizkoj-tsene/ – alldirectorys.ru/diplom-s-zaneseniem-v-reestr-po-nizkoj-tsene/
Мы предлагаем оформление дипломов ВУЗов по всей России и СНГ — с печатями, подписями, приложением и возможностью архивной записи (по запросу).
Документ максимально приближен к оригиналу и проходит визуальную проверку.
Мы даем гарантию, что в случае проверки документа, подозрений не возникнет.
– Конфиденциально
– Доставка 3–7 дней
– Любая специальность
Уже более 1719 клиентов воспользовались услугой — теперь ваша очередь.
Доступ по ссылке — ответим быстро, без лишних формальностей.
vente viagra en ligne: Pharma Confiance – Pharma Confiance
Заказать диплом ВУЗа по выгодной стоимости возможно, обращаясь к надежной специализированной фирме. Мы предлагаем документы престижных ВУЗов, которые находятся в любом регионе России. a-diplom.ru/kupit-diplom-vuza-s-zaneseniem-v-reestr-bistro/
Мы готовы предложить дипломы любой профессии по приятным тарифам. Приобретение документа, который подтверждает обучение в ВУЗе, – это выгодное решение. Заказать диплом о высшем образовании: sealedraid.flybb.ru/viewtopic.php?f=9&t=793
ghd pro Pharma Confiance Pharma Confiance
Купить диплом о высшем образовании!
Покупка документа о высшем образовании через надежную фирму дарит ряд плюсов. Приобрести диплом любого ВУЗа у сильной фирмы: doks-v-gorode-omsk-55.ru
Покупка дипломов ВУЗов в Москве — с печатями, подписями, приложением и возможностью архивной записи (по запросу).
Документ максимально приближен к оригиналу и проходит визуальную проверку.
Мы гарантируем, что в случае проверки документа, подозрений не возникнет.
– Конфиденциально
– Доставка 3–7 дней
– Любая специальность
Уже более 1223 клиентов воспользовались услугой — теперь ваша очередь.
Уточнить здесь — ответим быстро, без лишних формальностей.
Howdy! I could have sworn I’ve been to this site before but after checking through some of the post I realized it’s new to me. Anyways, I’m definitely glad I found it and I’ll be book-marking and checking back frequently!
пин ап перевод через humo https://www.pinup3014.ru
сделать реферат на заказ рефераты на заказ
PharmaConnectUSA: Pharma Connect USA – lexapro online pharmacy no prescription
Мы предлагаем дипломы любой профессии по доступным ценам. Важно, чтобы документы были доступны для большого количества граждан. Приобрести диплом об образовании fininterface.co.za/employer/premialnie-diplom-24
Мы изготавливаем дипломы любой профессии по невысоким тарифам. Дипломы производят на настоящих бланках государственного образца Приобрести диплом об образовании diplomservis.com
Где купить диплом по необходимой специальности?
Заказать диплом ВУЗа по невысокой стоимости возможно, обратившись к надежной специализированной фирме.: bisness-diplom.ru
Мы предлагаем дипломы психологов, юристов, экономистов и любых других профессий по приятным ценам. Цена будет зависеть от определенной специальности, года получения и образовательного учреждения: argayash.flybb.ru/viewtopic.php?f=9&t=2185&sid=7910f9212819a32967c6316055cef585
сделать отчет по практике отчет по практике сколько стоит
Мы предлагаем оформление дипломов ВУЗов по всей России и СНГ — с печатями, подписями, приложением и возможностью архивной записи (по запросу).
Документ максимально приближен к оригиналу и проходит визуальную проверку.
Мы даем гарантию, что в случае проверки документа, подозрений не возникнет.
– Конфиденциально
– Доставка 3–7 дней
– Любая специальность
Уже более 1406 клиентов воспользовались услугой — теперь ваша очередь.
Здесь — ответим быстро, без лишних формальностей.
how to withdraw money from 1win http://1win3008.com/
https://pharmaconnectusa.shop/# Motilium
Мы предлагаем оформление дипломов ВУЗов по всей России и СНГ — с печатями, подписями, приложением и возможностью архивной записи (по запросу).
Документ максимально приближен к оригиналу и проходит визуальную проверку.
Мы гарантируем, что в случае проверки документа, подозрений не возникнет.
– Конфиденциально
– Доставка 3–7 дней
– Любая специальность
Уже более 1296 клиентов воспользовались услугой — теперь ваша очередь.
[url=http://spbrcom3.ru/]Обращайтесь[/url] — ответим быстро, без лишних формальностей.
трэки https://klubnaya-muzyka31.ru .
приложение мостбет https://www.mostbet4016.ru
888starz apk download 888starz apk download .
еда на заказ челябинск еда на заказ челябинск .
бк 888 старс официальный сайт https:// / .
где купить силовые трансформаторы [url=https://airlady.forum24.ru/?1-7-0-00003994-000-0-0-1750405477]где купить силовые трансформаторы[/url] .
диплом сделать https://diplomsdayu.ru
I like this site very much so much excellent info .
tjæresåpe apotek Rask Apotek diaré hund apotek
где можно взять займ без отказа онлайн где можно взять займ без отказа онлайн .
citrafleet sabor: cabezales cepillo electrico oral b – tadalafilo 5 mg precio mГЎs barato
https://papafarma.com/# Papa Farma
Покупка официального диплома через проверенную и надежную фирму дарит ряд достоинств. Быстро заказать диплом: forum-nine.mirbb.com/login
It’s appropriate time to make some plans for the future and it’s time to be happy. I have read this post and if I could I desire to suggest you some interesting things or tips. Perhaps you can write next articles referring to this article. I desire to read even more things about it!
https://raskapotek.shop/# ashwagandha apotek
лучшие диджеи электронной музыки лучшие диджеи электронной музыки .
доставка еды обеды челябинск доставка еды обеды челябинск .
силовой трансформатор купить силовой трансформатор купить .
мостбет официальный вход http://mostbet4015.ru/
Оформиление дипломов ВУЗов в Москве — с печатями, подписями, приложением и возможностью архивной записи (по запросу).
Документ максимально приближен к оригиналу и проходит визуальную проверку.
Мы даем гарантию, что в случае проверки документа, подозрений не возникнет.
– Конфиденциально
– Доставка 3–7 дней
– Любая специальность
Уже более 1293 клиентов воспользовались услугой — теперь ваша очередь.
Обращайтесь — ответим быстро, без лишних формальностей.
888starz ????? ?????? 888starz ????? ?????? .
888 starz скачать https:// / .
онлайн заявка на займ https://zajmy-onlajn.ru
whoah this blog is wonderful i love reading your articles. Keep up the great work! You know, lots of people are hunting around for this information, you could aid them greatly.
Оформиление дипломов ВУЗов в Москве — с печатями, подписями, приложением и возможностью архивной записи (по запросу).
Документ максимально приближен к оригиналу и проходит визуальную проверку.
Мы даем гарантию, что в случае проверки документа, подозрений не возникнет.
– Конфиденциально
– Доставка 3–7 дней
– Любая специальность
Уже более 1177 клиентов воспользовались услугой — теперь ваша очередь.
На сайте — ответим быстро, без лишних формальностей.
Оформиление дипломов ВУЗов в Москве — с печатями, подписями, приложением и возможностью архивной записи (по запросу).
Документ максимально приближен к оригиналу и проходит визуальную проверку.
Мы гарантируем, что в случае проверки документа, подозрений не возникнет.
– Конфиденциально
– Доставка 3–7 дней
– Любая специальность
Уже более 1982 клиентов воспользовались услугой — теперь ваша очередь.
Сайт компании — ответим быстро, без лишних формальностей.
What¦s Taking place i am new to this, I stumbled upon this I have discovered It positively useful and it has helped me out loads. I hope to give a contribution & help different customers like its aided me. Good job.
https://efarmaciait.shop/# EFarmaciaIt
apotek aloe vera kalcium 500 mg vätskeersättning tablett
банки взять кредит без отказа на карту банки взять кредит без отказа на карту .
My spouse and I absolutely love your blog and find the majority of your post’s to be exactly what I’m looking for. Would you offer guest writers to write content for yourself? I wouldn’t mind publishing a post or elaborating on many of the subjects you write concerning here. Again, awesome web site!
Dismemberment
Заказать диплом института!
Мы изготавливаем дипломы любой профессии по приятным тарифам— permpages.ru
На данном сайте можно получить сервис “Глаз Бога”, что собрать данные о гражданине через открытые базы.
Инструмент работает по номеру телефона, обрабатывая актуальные базы онлайн. Через бота можно получить пять пробивов и детальный анализ по запросу.
Сервис проверен на август 2024 и охватывает мультимедийные данные. Сервис сможет узнать данные по госреестрам и предоставит сведения в режиме реального времени.
глаз бога узнать номер
Данный бот — идеальное решение для проверки персон онлайн.
детиветра Кайт сафари Хургада – это уникальная возможность сочетать кайтсёрфинг с путешествием по красивейшим местам Красного моря.
купить аттестат в омске http://www.arus-diplom3.ru .
EFarmaciaIt: EFarmaciaIt – dr.max.it recensioni
Заказать диплом института по выгодной цене возможно, обратившись к проверенной специализированной компании. Купить документ ВУЗа вы можете у нас в столице. [url=http://orikdok-2v-gorode-yaroslavl-76.online/]orikdok-2v-gorode-yaroslavl-76.online[/url]
Файне Винница https://faine-misto.vinnica.ua новости и события Винницы сегодня. Городской портал, обзоры.
EFarmaciaIt: esteclin sciroppo per bambini – EFarmaciaIt
Оформиление дипломов ВУЗов в Москве — с печатями, подписями, приложением и возможностью архивной записи (по запросу).
Документ максимально приближен к оригиналу и проходит визуальную проверку.
Мы гарантируем, что в случае проверки документа, подозрений не возникнет.
– Конфиденциально
– Доставка 3–7 дней
– Любая специальность
Уже более 3781 клиентов воспользовались услугой — теперь ваша очередь.
Дипломы о высшем образовании купить — ответим быстро, без лишних формальностей.
купить диплом в мурманске купить диплом в мурманске .
диплом купить дешево диплом купить дешево .
Thanks for the update, how can I make is so that I get an email sent to me whenever you publish a fresh article?
Купить диплом под заказ можно используя официальный сайт компании. orikdok-5v-gorode-barnaul-22.online
Купить диплом об образовании. Приобретение официального диплома через проверенную и надежную фирму дарит массу плюсов для покупателя. Данное решение позволяет сэкономить как личное время, так и существенные деньги. orikdok-4v-gorode-novosibirsk-54.ru
¡Saludos, descubridores de tesoros!
casino online fuera de EspaГ±a sin documentos – п»їhttps://casinosonlinefueraespanol.xyz/ casinos fuera de espaГ±a
¡Que disfrutes de logros impresionantes !
mental health ai chatbot http://mental-health5.com/ .
Заказать документ о получении высшего образования можно у нас. Приобрести диплом ВУЗа по выгодной стоимости возможно, обращаясь к проверенной специализированной компании. funchange.getbb.ru/viewtopic.phpf=8&t=4451
pin up slot o‘yinlari pin up slot o‘yinlari
Мы изготавливаем дипломы любых профессий по приятным тарифам. Мы можем предложить документы ВУЗов, расположенных на территории всей России. Дипломы и аттестаты делаются на бумаге самого высокого качества. Это позволяет делать государственные дипломы, которые не отличить от оригиналов. orikdok-v-gorode-tolyatti-63.ru
Chcesz znaleźć gry przeglądarkowe w tym miejscu?
Oferujemy wszystkie kategorie — od akcji po logiczne !
Graj w przeglądarce na komputerze lub telefonie .
Nowości stale rozwijane.
Najlepsze kasyna online
Dla dzieci , zaawansowane — wybór na każdą okazję!
Zacznij grać już dziś .
http://raskapotek.com/# Rask Apotek
mostbet.com rasmiy sayt https://mostbet4006.ru/
mostbet uzcard [url=mostbet4005.ru]mostbet4005.ru[/url]
What’s up to every , for the reason that I am really eager of reading this webpage’s post to be updated daily. It includes good data.
бетвинер зеркало
viagra foglio illustrativo caretopic spray donna EFarmaciaIt
¡Hola, participantes del juego !
Casinoextranjero.es – apuesta en casinos de confianza – п»їhttps://casinoextranjero.es/ casinos extranjeros
¡Que vivas recompensas fascinantes !
Really clean site, appreciate it for this post.
May I just say what a relief to discover a person that genuinely knows what they’re discussing on the web. You actually understand how to bring an issue to light and make it important. A lot more people must look at this and understand this side of the story. I can’t believe you aren’t more popular since you most certainly have the gift.
скачать сайт бетвинер
Медпортал https://medportal.co.ua украинский блог о медициние и здоровье. Новости, статьи, медицинские учреждения
защитный кейс калибр plastcase.ru/
mental health support chatbot mental-health5.com .
Papa Farma: Papa Farma – medicamentos online con receta
дизайнерские кашпо дизайнерские кашпо .
mostbet. http://www.mostbet4016.ru
На данном сайте доступен мессенджер-бот “Глаз Бога”, позволяющий собрать сведения по человеку из открытых источников.
Сервис функционирует по фото, обрабатывая публичные материалы в сети. С его помощью доступны 5 бесплатных проверок и глубокий сбор по запросу.
Инструмент актуален согласно последним данным и охватывает фото и видео. Сервис сможет узнать данные в соцсетях и покажет информацию мгновенно.
глаз бога поиск людей
Это сервис — помощник для проверки людей онлайн.
https://raskapotek.shop/# Rask Apotek
написать дипломную работу https://diplomsdayu.ru
реферат купить онлайн стоимость реферата
отчет по практике срочно на заказ https://otchetbuhgalter.ru
apotek open now: Svenska Pharma – Svenska Pharma
how to insert booking code on 1win https://www.1win3008.com
https://raskapotek.shop/# fruktsyre apotek
купить диплом в архангельске купить диплом в архангельске .
Absolutely indited content material, thanks for information .
диплом купить сколько стоит диплом купить сколько стоит .
псков диплом купить https://www.arus-diplom5.ru .
Купить диплом под заказ в столице можно через сайт компании. orikdok-3v-gorode-barnaul-22.ru
Приобрести диплом о высшем образовании. Покупка документа о высшем образовании через надежную фирму дарит немало достоинств для покупателя. Это решение помогает сберечь время и серьезные деньги. orikdok-v-gorode-moskva-77.online
Приобрести диплом об образовании!
Мы готовы предложить дипломы любых профессий по приятным ценам— korolev-progym.ru
This really answered my drawback, thank you!
Купить диплом университета по невысокой стоимости можно, обратившись к надежной специализированной компании. Заказать документ института можно в нашей компании. orikdok-4v-gorode-rostov-na-donu-61.online
Хмельницький новини https://u-misti.khmelnytskyi.ua огляди, новини, сайт Хмельницького
potensmedel apotek Svenska Pharma Svenska Pharma
Купить документ института вы можете в нашем сервисе. Купить диплом института по доступной стоимости возможно, обратившись к надежной специализированной фирме. news1.listbb.ru/viewtopic.phpf=3&t=2239
Мы можем предложить дипломы психологов, юристов, экономистов и других профессий по выгодным тарифам. Мы предлагаем документы техникумов, которые расположены на территории всей РФ. Дипломы и аттестаты выпускаются на “правильной” бумаге самого высокого качества. Это дает возможности делать государственные дипломы, не отличимые от оригиналов. orikdok-4v-gorode-ufa-2.online
Мы можем предложить документы институтов, которые расположены на территории всей РФ. Приобрести диплом о высшем образовании:
scholar.af/employer/diplomirovans
мостбет зеркало http://mostbet4014.ru
blodtryckssГ¤nkande lГ¤kemedel receptfritt: yavatop apotea – Svenska Pharma
Woah! I’m really loving the template/theme of this site. It’s simple, yet effective. A lot of times it’s challenging to get that “perfect balance” between superb usability and visual appearance. I must say that you’ve done a amazing job with this. Also, the blog loads very fast for me on Firefox. Excellent Blog!
https://063csicb.com/qual-foi-a-ultima-vez-que-o-brasil-foi-campeao-da-copa-do-mundo/
I’m truly enjoying the design and layout of your website.
It’s a very easy on the eyes which makes it much more pleasant for me to
come here and visit more often. Did you hire out
a designer to create your theme? Exceptional work!
Rask Apotek: Rask Apotek – digitalt fГёrerkort legitimasjon apotek
проект перепланировки проект перепланировки .
клубная https://klubnaya-muzyka30.ru/ .
красивый игровой пк https://kupit-igrovoj-kompyuter3.ru .
mostbet com mostbet com
When I initially commented I clicked the “Notify me when new comments are added” checkbox and now each time a comment is added I get four e-mails with the same comment. Is there any way you can remove people from that service? Cheers!
https://raskapotek.com/# borax apotek
Noten fur klavier klavier noten
As a Newbie, I am always searching online for articles that can help me. Thank you
I am curious to find out what blog platform you are using? I’m experiencing some minor security issues with my latest website and I’d like to find something more risk-free. Do you have any suggestions?
Взять займ онлайн россия займы онлайн бесплатно
Офисная мебель https://officepro54.ru в Новосибирске купить недорого от производителя
сколько стоит установка 1с сколько стоит установка 1с .
программа 1 с предприятие программа 1 с предприятие .
1с управление фирмой купить 1с управление фирмой купить .
Have you ever thought about adding a little bit more than just your articles? I mean, what you say is fundamental and all. Nevertheless imagine if you added some great photos or videos to give your posts more, “pop”! Your content is excellent but with images and videos, this blog could definitely be one of the very best in its field. Superb blog!
The best Rent server in Europe (best European data centers) managed and unmanaged, GDPR compliant, super fast NVMe SSDs, reliable 1Gbps network, choice of OS and finally affordable prices. Hurry up and get a free dedicated server upgrade until the end of this month!
que es un dolmen y para que sirve ahorro sobres Papa Farma
I believe this internet site holds some rattling fantastic information for everyone : D.
Rask Apotek: krem apotek – Rask Apotek
крутой клубняк скачать http://www.klubnaya-muzyka30.ru .
1win app download http://1win3006.com/
https://vck2ws73.com/voce-esta-procurando-saber-qual-e-o-premio-da-copa-do-brasil/
Excellent beat ! I would like to apprentice
even as you amend your site, how could i subscribe for a weblog site?
The account helped me a acceptable deal. I have been tiny bit acquainted of this your broadcast offered brilliant clear concept
сколько стоит игровой компьютер http://kupit-igrovoj-kompyuter3.ru .
проект на перепланировку квартиры цена proekt-pereplanirovki-kvartiry13.ru .
Hello my family member! I wish to say that this post is awesome, great written and include approximately all important infos. I’d like to see more posts like this .
https://papafarma.shop/# epiduo gel genГ©rico precio
кейс защитный ударопрочный plastcase.ru
Женский портал https://woman24.kyiv.ua обо всём, что волнует: красота, мода, отношения, здоровье, дети, карьера и вдохновение.
Только главное https://ua-vestnik.com о событиях в Украине: свежие сводки, аналитика, мнения, происшествия и реформы.
Мировые новости https://ua-novosti.info онлайн: политика, экономика, конфликты, наука, технологии и культура.
1с бухгалтерия 8.3 проф цена 1с бухгалтерия 8.3 проф цена .
1с бухгалтерия 8.3 проф цена 1с бухгалтерия 8.3 проф цена .
1с бухгалтерия 8.3 проф цена 1с бухгалтерия 8.3 проф цена .
EFarmaciaIt: rabestrom 50 mg prezzo 8 film – contatti klarna italia
888старз букмекерская контора скачать http://www.888starz-skachat-na-android.com/ .
how to load code on 1win how to load code on 1win
https://raskapotek.shop/# testosteron tilskudd apotek
1win casino es confiable https://1win3002.com/
I also believe so , perfectly pent post! .
На данном сайте можно получить мессенджер-бот “Глаз Бога”, что собрать данные о человеке по публичным данным.
Инструмент активно ищет по фото, анализируя актуальные базы в сети. Через бота доступны 5 бесплатных проверок и полный отчет по имени.
Сервис проверен согласно последним данным и охватывает аудио-материалы. Сервис поможет узнать данные в открытых базах и покажет результаты в режиме реального времени.
глаз бога официальный сайт
Это инструмент — идеальное решение при поиске граждан через Telegram.
ставки на мостбет https://mostbet4013.ru
Онлайн-новости https://arguments.kyiv.ua без лишнего: коротко, по делу, достоверно. Политика, бизнес, происшествия, спорт, лайфстайл.
Портал для женщин https://a-k-b.com.ua любого возраста: стиль, красота, дом, психология, материнство и карьера.
Новостной портал https://news24.in.ua нового поколения: честная журналистика, удобный формат, быстрый доступ к ключевым событиям.
Информационный портал https://dailynews.kyiv.ua актуальные новости, аналитика, интервью и спецтемы.
Hi, just required you to know I he added your site to my Google bookmarks due to your layout. But seriously, I believe your internet site has 1 in the freshest theme I??ve came across. It extremely helps make reading your blog significantly easier.
Papa Farma una farmacia cerca de mi ubicaciГіn una farmacia cerca de mi ubicaciГіn
https://0duz0kzu.com/onde-assistir-ao-jogo-entre-bala-town-e-caernarfon-town-fc/
It’s really a cool and useful piece of information. I’m satisfied that you
simply shared this helpful info with us. Please keep us informed like
this. Thank you for sharing.
It¦s really a nice and useful piece of info. I am satisfied that you shared this helpful info with us. Please keep us up to date like this. Thank you for sharing.
profaes4 prospecto: Papa Farma – Papa Farma
Сочные блондинка и брюнетка, обе с большими сиськами или шикарными попами, готовы приехать к вам! sosochki2.com предлагает только проверенных индивидуалок, которые сделают ночь по-настоящему жаркой и незабываемой. Не упусти шанс — заказывай интим услуги элитные сочи с двойным наслаждением!
Прямо здесь можно получить мессенджер-бот “Глаз Бога”, что проверить всю информацию по человеку по публичным данным.
Инструмент функционирует по номеру телефона, используя актуальные базы онлайн. Через бота осуществляется 5 бесплатных проверок и полный отчет по фото.
Платфор ма актуален согласно последним данным и включает фото и видео. Бот поможет найти профили в открытых базах и отобразит результаты в режиме реального времени.
глаз бога бот
Данный сервис — выбор при поиске персон удаленно.
Городской портал Одессы https://faine-misto.od.ua последние новости и происшествия в городе и области
Se está pronto para tentar jogar Dragon Tiger Luck a dinheiro, podemos sugerir-lhe alguns excelentes casinos que oferecem grandes bónus. Estes casinos online de topo oferecem um ambiente de jogo seguro e agradável, juntamente com pacotes de boas-vindas atractivos e promoções contínuas. Ao escolher um destes casinos recomendados, não só poderá experimentar a emoção do Dragon Tiger Luck, como também poderá aumentar a sua banca com generosas ofertas de bónus. Lembre-se de jogar sempre de forma responsável e dentro das suas possibilidades quando joga a dinheiro real. Dragon Tiger Luck da PG Soft mergulha os jogadores num mundo cativante onde duas das criaturas míticas mais veneradas da Ásia se defrontam. O tema da slot gira em torno da eterna luta entre o poderoso dragão e o feroz tigre, ambos símbolos de poder, sorte e prosperidade na cultura asiática. Esta dualidade é incorporada de forma inteligente na configuração única de dois carretéis do jogo, permitindo aos jogadores enfrentarem ambas as forças simultaneamente ou individualmente. O tema não só presta homenagem ao simbolismo tradicional asiático, como também acrescenta um toque emocionante ao formato clássico das slot machines, fazendo com que se destaque no concorrido campo dos jogos com temática asiática.
https://riffnetawat1984.bearsfanteamshop.com/https-slackwarezine-com-br
O jogo do tigre funciona como a maioria dos jogos de slots disponíveis nos cassinos, onde o jogador informa um valor de aposta e torce para que os slots tenham uma combinação vitoriosa. O jogo Fortune Tiger oferece vantagens, como multiplicadores de até 10x e gráficos impressionantes. No entanto, também apresenta desvantagens, incluindo um número limitado de linhas de pagamento e a ausência de recursos adicionais, como rodadas grátis ou jogos bônus.5. Como ativar a rodada turbo no Fortune Tiger?A rodada Turbo é uma função do Jogo do Tigre que acelera as rodadas e pode ser ativada pelo símbolo do Raio no canto inferior esquerdo do jogo. Entre as principais funcionalidades, a Fortune Dragon oferece rodadas grátis e multiplicadores que podem elevar seus ganhos em até 5000x a aposta original. Além disso, símbolos especiais como Wilds e Scatters garantem mais chances de vitória com combinações explosivas.
интересные цветочные горшки https://dizaynerskie-kashpo-spb.ru/ .
Двойной кайф гарантирован! К вам приедут две индивидуалки — блондинка с большими сиськами и брюнетка с аппетитной попой. Все проверенные и готовые исполнить самые смелые желания. sosochki2.com собрал лучших девушек Сочи, чтобы ваш отдых стал настоящим праздником. Выбирайте секс объявления адлер !
регистрация в бк мостбет mostbet4012.ru
888 старс скачать на андроид бесплатно https://888starz-skachat-na-android.com/ .
Turn bulky PNG images into lightweight WebP files in seconds with PNGtoWebPHero.com. The interface is clean and intuitive: a single upload field welcomes your PNGs—drag and drop or click to select. Cloud servers tackle the conversion, using advanced compression to keep picture quality while shrinking file size. A live progress bar keeps you informed as each job runs, and once it finishes, download links appear instantly for you to save the new WebP images. If you’re working on a project with multiple graphics, batch mode lets you convert all PNG files together, saving time and clicks. Because this tool operates purely online, there’s no need to install anything on your device—compatible with Windows, macOS, Linux, Android, and iOS. Privacy stays protected: every uploaded image is automatically deleted shortly after conversion, and no personal data is stored. Perfect for enhancing website performance, reducing bandwidth usage, or preparing images for sharing, PNGtoWebPHero.com provides fast, free, and hassle-free conversions at any time.
PNGtoWebPhero Converter
https://papafarma.com/# farmacias baratas barcelona
Rask Apotek: pinsett apotek – stГёydempende Гёrepropper apotek
Кабриолет, ласковое море и девушка с идеальными формами — мечта, которая сбывается на sosochki2.com! Закажи проверенную индивидуалку, которая сделает минет без резинки в машине и подарит тебе настоящий кайф. Не упусти возможность совместить скорость и страсть! Жми куни сочи .
mostbet.com rasmiy sayt http://www.mostbet4003.ru
Hi just wanted to give you a brief heads up and let you know a few of the pictures aren’t loading correctly. I’m not sure why but I think its a linking issue. I’ve tried it in two different browsers and both show the same results.
https://business-trainings.kiev.ua/hermetyk-dlya-far-rishennya-dlya-trishchyn-i.html
1win mexico http://1win3003.com
888 starz apk 888 starz apk .
mostbet uz app yuklab olish http://mostbet4004.ru/
В номере на Красной Поляне ждёт настоящая королева в шикарном платье, готовая трахать тебя всю ночь. sosochki2.com предлагает индивидуалок, которые превратят отдых в незабываемое удовольствие. Не упусти момент — выбери страпон адлер и закажи прямо сейчас.
1win logo http://www.1win3007.com
Портал о строительстве https://tozak.org.ua от идеи до готового дома. Проекты, сметы, выбор материалов, ошибки и их решения.
sweet bonanza 100 demo http://www.sweet-bonanza3004.ru
Строительный журнал https://dsmu.com.ua идеи, технологии, материалы, дизайн, проекты, советы и обзоры. Всё о строительстве, ремонте и интерьере
¡Saludos, apostadores apasionados !
GuГa para jugar desde EspaГ±a en casinos extranjeros – https://casinoextranjerosenespana.es/# casino online extranjero
¡Que disfrutes de giros espectaculares !
Новостной портал Одесса https://u-misti.odesa.ua последние события города и области. Обзоры и много интресного о жизни в Одессе.
Всё об автомобилях https://autoclub.kyiv.ua в одном месте. Обзоры, новости, инструкции по уходу, автоистории и реальные тесты.
Новости Украины https://hansaray.org.ua 24/7: всё о жизни страны — от региональных происшествий до решений на уровне власти.
Papa Farma movicol sobre Papa Farma
jod apotek: sГҐrsalve apotek – Rask Apotek
http://raskapotek.com/# Rask Apotek
стильные кашпо для цветов стильные кашпо для цветов .
Hi there, of course this article is actually nice and I have learned lot of things from it regarding blogging. thanks.
Автор статьи представляет данные и факты с акцентом на объективность.
Статья помогла мне лучше понять контекст и значение проблемы в современном обществе.
Всё о строительстве https://ukrainianpages.com.ua просто и по делу. Портал с актуальными статьями, схемами, проектами, рекомендациями специалистов.
Архитектурный портал https://skol.if.ua современные проекты, урбанистика, дизайн, планировка, интервью с архитекторами и тренды отрасли.
Информационный портал https://comart.com.ua о строительстве и ремонте: полезные советы, технологии, идеи, лайфхаки, расчёты и выбор материалов.
Новости Украины https://useti.org.ua в реальном времени. Всё важное — от официальных заявлений до мнений экспертов.
http://efarmaciait.com/# EFarmaciaIt
I consider something really special in this internet site.
Amazing! Its really amazing article, I have got much clear idea on the topic of from this piece of writing.
https://isafpidsymposium.com/shcho-vrakhuvaty-pry-ustanovtsi-novoho-stekla-far.html
fucidin crema prezzo a cosa serve: augmentin bambini sciroppo prezzo – EFarmaciaIt
Thank you for the auspicious writeup. It in fact was a amusement account it. Look advanced to far added agreeable from you! However, how can we communicate?
888starz регистрация 888starz регистрация .
Do you have a spam issue on this blog; I also am a blogger, and I was wanting to know your situation; many of us have created some nice practices and we are looking to trade solutions with other folks, be sure to shoot me an email if interested.
https://nm3q2ygc.com/voce-quis-dizer-qual-e-o-premio-da-copa-do-brasil/
Unquestionably believe that which you said.
Your favorite reason appeared to be at the web the easiest factor to be mindful of.
I say to you, I definitely get annoyed even as folks think about concerns that they plainly do not know about.
You managed to hit the nail upon the highest and also defined out the whole thing without
having side effect , folks can take a signal.
Will likely be back to get more. Thank you
tu boutique parafarmacia Papa Farma cabezales cepillo electrico oral b
Rask Apotek: Rask Apotek – Rask Apotek
SOAR сквозь изменения. Архетипы, универсальные мыслеформы, влияют на чувства и действия личности. Пирамида Дилтса-Короткова (модель логических уровней)
1win review https://www.1win3003.com
Перенесите символический образ в тело и найдите его соматическое выражение. Пирамида Дилтса-Короткова (модель логических уровней)
https://papafarma.com/# farma 1
быстрая регистрация на мостбет mostbet4013.ru
EFarmaciaIt: desamix effe senza ricetta – EFarmaciaIt
Papa Farma: Papa Farma – Papa Farma
Всё о спорте https://beachsoccer.com.ua в одном месте: профессиональный и любительский спорт, фитнес, здоровье, техника упражнений и спортивное питание.
Туристический портал https://aliana.com.ua с лучшими маршрутами, подборками стран, бюджетными решениями, гидами и советами.
Клуб родителей https://entertainment.com.ua пространство поддержки, общения и обмена опытом.
Семейный портал https://stepandstep.com.ua статьи для родителей, игры и развивающие материалы для детей, советы психологов, лайфхаки.
Rask Apotek Rask Apotek Rask Apotek
1win sports 1win sports
download 1win app http://1win3002.com/
https://raskapotek.shop/# Rask Apotek
http://papafarma.com/# Papa Farma
This text is priceless. How can I find out more?
http://fregat.kiev.ua/yak-obyraty-stekla-far-dlya-avtivok-z-vysokymy-vym.html
мостбет вывод на карту https://mostbet4004.ru/
События Днепр https://u-misti.dp.ua последние новости Днепра и области, обзоры и самое интересное
sweet bonanza apk http://www.sweet-bonanza3004.ru
I do agree with all of the ideas you have presented in your post. They are very convincing and will definitely work. Still, the posts are very short for novices. Could you please extend them a bit from next time? Thanks for the post.
оригинальные кашпо для цветов оригинальные кашпо для цветов .
mostbet online скачать http://www.mostbet4003.ru
Портал о маркетинге https://reklamspilka.org.ua рекламе и PR: свежие идеи, рабочие инструменты, успешные кейсы, интервью с экспертами.
Современный женский https://prowoman.kyiv.ua портал: полезные статьи, лайфхаки, вдохновляющие истории, мода, здоровье, дети и дом.
Онлайн-портал https://leif.com.ua для женщин: мода, психология, рецепты, карьера, дети и любовь. Читай, вдохновляйся, общайся, развивайся!
I used to be able to find good advice from your content.
Join 88fb bet, one of Bangladesh’s most reliable casino sites
Портал для женщин https://olive.kiev.ua любого возраста: от секретов молодости и красоты до личностного роста и материнства.
скачать бесплатно мостбет скачать бесплатно мостбет
Rask Apotek: Rask Apotek – Rask Apotek
http://svenskapharma.com/# online pharmacy
apotek spruta Svenska Pharma solskydd rea
Ценности и убеждения: мотивация и руководство, определяющие поведение. Для внутренней игры важны когнитивный, соматический и полевой интеллекты. Пирамида Дилтса-Короткова. Логические уровни 2.0
Всё о строительстве https://furbero.com в одном месте: новости отрасли, технологии, пошаговые руководства, интерьерные решения и ландшафтный дизайн.
Комплексный строительный https://ko-online.com.ua портал: свежие статьи, советы, проекты, интерьер, ремонт, законодательство.
Строительный портал https://apis-togo.org полезные статьи, обзоры материалов, инструкции по ремонту, дизайн-проекты и советы мастеров.
Портал о строительстве https://start.net.ua и ремонте: готовые проекты, интерьерные решения, сравнение материалов, опыт мастеров.
Новини Львів https://faine-misto.lviv.ua последние новости и события – Файне Львов
Rask Apotek: honningsalve apotek – dusjhette apotek
купить игровой компьютер в москве http://kupit-igrovoj-kompyuter2.ru/ .
What’s Happening i’m new to this, I stumbled upon this I have found It positively helpful and it has helped me out loads. I hope to contribute & aid other users like its helped me. Great job.
hudkrem apotek: Rask Apotek – Rask Apotek
http://svenskapharma.com/# apotek assistant
https://papafarma.shop/# Papa Farma
где точно дадут кредит с плохой кредитной историей отзывы где точно дадут кредит с плохой кредитной историей отзывы .
citrafleet comprar precio cialis 20 mg 12 comprimidos Papa Farma
Авто портал https://real-voice.info для всех, кто за рулём: свежие автоновости, обзоры моделей, тест-драйвы, советы по выбору, страхованию и ремонту.
Читайте авто блог https://autoblog.kyiv.ua обзоры автомобилей, сравнения моделей, советы по выбору и эксплуатации, новости автопрома.
купить компьютер в москве купить компьютер в москве .
Сайт о строительстве https://solution-ltd.com.ua и дизайне: как построить, отремонтировать и оформить дом со вкусом.
Свежие новости https://ktm.org.ua Украины и мира: политика, экономика, происшествия, культура, спорт. Оперативно, объективно, без фейков.
игровой компьютер цена в москве https://kupit-igrovoj-kompyuter.ru/ .
Запреты дня n2000.ru .
sweet bonanza big win https://sweet-bonanza3003.ru/
Портал Львів https://u-misti.lviv.ua останні новини Львова и области.
pin up jonli kazino pin up jonli kazino
svovelkrem apotek: apotek baby – Rask Apotek
компьютеры в рассрочку http://kupit-igrovoj-kompyuter2.ru .
donde puedo comprar ozempic: farmacias por internet – ozempic spain price
http://papafarma.com/# farmacia cerca de mà abierta
купить игровой компьютер в москве http://kupit-igrovoj-kompyuter1.ru .
купить игровой компьютер купить игровой компьютер .
Календарь стрижек http://www.n2000.ru/ .
sweet bonanza t shirt http://sweet-bonanza3003.ru/
Good day I am so glad I found your site, I really found you by error, while I was searching on Bing for something else, Nonetheless I am here now and would just like to say thanks for a tremendous post and a all round enjoyable blog (I also love the theme/design), I don’t have time to look over it all at the minute but I have saved it and also added your RSS feeds, so when I have time I will be back to read a lot more, Please do keep up the excellent work.
http://kievperevod.in.ua/de-kupyty-steklo-na-fary-yake-ne-potemniye-cherez-.html
apotet receptfria läkemedel mot inkontinens Svenska Pharma
Howdy, i read your blog occasionally and i own a similar one and i was just wondering if you get a lot of spam comments? If so how do you prevent it, any plugin or anything you can recommend? I get so much lately it’s driving me crazy so any support is very much appreciated.
вход в мостбет вход в мостбет
Городской портал Винницы https://u-misti.vinnica.ua новости, события и обзоры Винницы и области
Svenska Pharma: recept mina – Svenska Pharma
Good post and straight to the point. I am not sure if this is truly the best place to ask but do you people have any thoughts on where to employ some professional writers? Thank you 🙂
https://svenskapharma.shop/# Svenska Pharma
nГ¤tapotek europa: zink apotek – Svenska Pharma
стильные горшки для цветов интернет магазин http://www.dizaynerskie-kashpo1.ru .
https://indiapharmglobal.com/# top 10 pharmacies in india
Can you be more specific about the content of your article? After reading it, I still have some doubts. Hope you can help me.
Check out more content here https://tv12310.com?slot=gguh
Участник определяет ресурсное состояние и выражает его в физическом движении. Пирамида уровней Дилтса-Короткова.
Все говорили: “С плохой КИ тебе ничего не светит”. А Дмитрий Сверидов, эксперт по микрозаймам с https://mfo-zaim.com/bez-proverok-na-kartu/ , показал обратное. Помог разобраться, что я делаю не так при подаче, и скинул список лояльных МФО. Теперь деньги дают.
Интеллект соматического разума питает когнитивный разум. Мета-модель и глубинная структура. Спокойствие и терпение. [Пирамида Короткова –
Meds From Mexico Meds From Mexico Meds From Mexico
Респект Дмитрию Сверидову. Он не просто “эксперт на сайте”, а реально помог. На https://mfo-zaim.com/zaym-30000-rubley/ указал мне раздел с займами для плохой кредитной истории. Ещё объяснил, как оформить заявку, чтобы она прошла. Всё чётко, без отказов.
afiliado 1win afiliado 1win
На сайте https://mfo-zaim.com/bez-proverok-na-kartu/ обратился за консультацией, и получил реально полезную помощь от Виктора Гардиенова, Руководителя отдела клиентского обслуживания. Дал подборку новых МФО, где мало конкуренции — и благодаря этому мне одобрили займ почти сразу.
indian pharmacy: India Pharm Global – top online pharmacy india
http://medsfrommexico.com/# mexico drug stores pharmacies
India Pharm Global: India Pharm Global – India Pharm Global
У меня кредитная история — хуже некуда. Просрочки, отказы, банки не берут трубку. Наткнулся на https://mfo-zaim.com/bez-proverok-na-kartu/ , почитал статьи Андрея Фролова. Он прямо пишет, какие МФО реально лояльны к таким как я. Подал заявку в одну из них — одобрили за 15 минут. Спасли просто.
изящное кашпо http://www.dizaynerskie-kashpo1.ru .
Thank you for another magnificent post. Where else could anybody get that type of info in such a perfect way of writing? I’ve a presentation next week, and I’m on the look for such information.
mostbet aviator strategiyasi http://mostbet4003.ru/
Сайт о строительстве https://selma.com.ua практические советы, современные технологии, пошаговые инструкции, выбор материалов и обзоры техники.
Ремонт без стресса https://odessajs.org.ua вместе с нами! Полезные статьи, лайфхаки, дизайн-проекты, калькуляторы и обзоры.
Портал о ремонте https://as-el.com.ua и строительстве: от черновых работ до отделки. Статьи, обзоры, идеи, лайфхаки.
Все новинки https://helikon.com.ua технологий в одном месте: гаджеты, AI, робототехника, электромобили, мобильные устройства, инновации в науке и IT.
canadian world pharmacy canadian pharmacy online store best online canadian pharmacy
¡Hola, exploradores de recompensas !
Casino sin registro sin necesidad de email – http://casinossinlicenciaespana.es/ casinos no regulados
¡Que experimentes victorias legendarias !
Thanks for sharing your info. I truly appreciate your efforts and I am waiting for your further write ups thank you once again.
From live tables to instant games — it’s all on ck222 casino.
узи сканер купить цена https://www.kupit-uzi-apparat3.ru .
I savour, result in I found exactly what I used to be having a look for. You’ve ended my four day long hunt! God Bless you man. Have a nice day. Bye
виды аппаратов узи https://www.kupit-uzi-apparat1.ru .
mostbet uz apk скачать http://mostbet4002.ru/
медицинский аппарат узи https://www.kupit-uzi-apparat2.ru .
Упражнение на отзеркаливание энергии. Субъективное переживание соматического интеллекта. Визуальные и аудиальные формы выражения. Пирамида Дилтса-Короткова. Логические уровни 2.0
como retirar dinero de 1win [url=https://1win3005.com]https://1win3005.com[/url]
https://medsfrommexico.com/# Meds From Mexico
http://indiapharmglobal.com/# India Pharm Global
Meds From Mexico: Meds From Mexico – best online pharmacies in mexico
ИнфоКиев https://infosite.kyiv.ua события, новости обзоры в Киеве и области.
best canadian pharmacy to buy from: canadian online pharmacy – canadian pharmacy 24
Aw, this was an incredibly good post. Finding the time and actual effort to create a really good article… but what can I say… I procrastinate a lot and don’t seem to get nearly anything done.
https://thanhhoaedu.vn/plinko-boards-for-charity-hosting-events-for-a-goo.html
аппарат узи 2 http://www.kupit-uzi-apparat3.ru/ .
аппарат узи цена аппарат узи цена .
Читайте мужской https://zlochinec.kyiv.ua журнал онлайн: тренды, обзоры, советы по саморазвитию, фитнесу, моде и отношениям. Всё о том, как быть уверенным, успешным и сильным — каждый день.
сколько стоит аппарат узи сколько стоит аппарат узи .
Журнал для мужчин https://swiss-watches.com.ua которые ценят успех, свободу и стиль. Практичные советы, мотивация, интервью, спорт, отношения, технологии.
Мужской журнал https://hand-spin.com.ua о стиле, спорте, отношениях, здоровье, технике и бизнесе. Актуальные статьи, советы экспертов, обзоры и мужской взгляд на важные темы.
Кулинарный портал https://vagon-restoran.kiev.ua с тысячами проверенных рецептов на каждый день и для особых случаев. Пошаговые инструкции, фото, видео, советы шефов.
mexican rx online Meds From Mexico Meds From Mexico
пин ап зеркало уз pinup3013.ru
моствет http://www.mostbet4011.ru
Новости Полтава https://u-misti.poltava.ua городской портал, последние события Полтавы и области
https://indiapharmglobal.com/# online pharmacy india
Монтаж систем видеонаблюдения позволит контроль вашего объекта круглосуточно.
Инновационные решения гарантируют четкую картинку даже при слабом освещении.
Мы предлагаем множество решений устройств, идеальных для бизнеса и частных объектов.
videonablyudeniemoskva.ru
Грамотная настройка и техническая поддержка делают процесс эффективным и комфортным для каждого клиента.
Оставьте заявку, и узнать о оптимальное предложение по внедрению систем.
Hi! This is kind of off topic but I need some advice from an established blog. Is it very difficult to set up your own blog? I’m not very techincal but I can figure things out pretty quick. I’m thinking about setting up my own but I’m not sure where to begin. Do you have any tips or suggestions? Cheers
http://sharidesigns.net/the-best-plinko-online-games-top-picks-for-virtual.html
Wedding Venues In GT Karnal Road. Wedding Venues GT Karnal Road Book Farmhouses, Banquet Halls, Hotels for Party places at GT Karnal Road Ever thought of enjoying a multi-theme Wedding Function while being at just one destination? If no then you must not have visited Farmhouses
mexican border pharmacies shipping to usa: Meds From Mexico – mexican mail order pharmacies
canada pharmacy 24h: Canada Pharm Global – canadian pharmacy
Полезный сайт https://vasha-opora.com.ua для тех, кто строит: от фундамента до крыши. Советы, инструкции, сравнение материалов, идеи для ремонта и дизайна.
Журнал о строительстве https://sovetik.in.ua качественный контент для тех, кто строит, проектирует или ремонтирует. Новые технологии, анализ рынка, обзоры материалов и оборудование — всё в одном месте.
Всё о строительстве https://stroyportal.kyiv.ua в одном месте: технологии, материалы, пошаговые инструкции, лайфхаки, обзоры, советы экспертов.
Строительный журнал https://poradnik.com.ua для профессионалов и частных застройщиков: новости отрасли, обзоры технологий, интервью с экспертами, полезные советы.
1win app descargar 1win3005.com
¡Saludos, amantes del entretenimiento !
Casinos extranjeros con pagos rГЎpidos y verificados – https://www.casinosextranjerosenespana.es/# casinos extranjeros
¡Que vivas increíbles instantes inolvidables !
888starz официальный сайт скачать 888starz официальный сайт скачать .
India Pharm Global reputable indian online pharmacy п»їlegitimate online pharmacies india
mostbet app download ios mostbet1.app .
Very interesting topic, regards for posting. “I am convinced that life in a physical body is meant to be an ecstatic experience.” by Shakti Gawain.
1win téléchargement http://1win14041.ru
http://canadapharmglobal.com/# safe online pharmacies in canada
mostbet lisenziyasi uz mostbet lisenziyasi uz
best online pharmacies in mexico: Meds From Mexico – mexican rx online
мостбет киберспорт мостбет киберспорт
http://canadapharmglobal.com/# canadian neighbor pharmacy
canadian pharmacy 365: Canada Pharm Global – best canadian pharmacy
1win bet app http://1win3009.com/
сколько стоит аппарат узи цена сколько стоит аппарат узи цена .
mexico drug stores pharmacies Meds From Mexico pharmacies in mexico that ship to usa
jetx 1win jetx 1win
https://indiapharmglobal.com/# india online pharmacy
недорогая доставка еды челябинск http://www.dostavka-edy-bf1.ru .
доставка обедов и ужинов https://www.dostavka-edy-bf2.ru .
доставка еды меню https://dostavka-edy-bf.ru/ .
Современный строительный https://interiordesign.kyiv.ua журнал: идеи, решения, технологии, тенденции. Всё о ремонте, стройке, дизайне и инженерных системах.
Онлайн-журнал https://inox.com.ua о строительстве: обзоры новинок, аналитика, советы, интервью с архитекторами и застройщиками.
Строительный журнал https://garant-jitlo.com.ua всё о технологиях, материалах, архитектуре, ремонте и дизайне. Интервью с экспертами, кейсы, тренды рынка.
India Pharm Global: India Pharm Global – reputable indian online pharmacy
sweet bonanza vs gates of olympus sweet bonanza vs gates of olympus
Те, кто уверяет, что имеет в голове много мыслей, но выразить их не умеет из-за отсутствия красноречия, — не научились понимать самих себя. (Мишель де Монтень) https://frenk-gallager.citaty-tsitaty.ru
Ничто так не поможет человеку, как возложенная на него ответственность и оказанное ему доверие. https://berik-dondarrion.citaty-tsitaty.ru
Meds From Mexico: Meds From Mexico – Meds From Mexico
портативный узи сканер купить [url=https://www.kupit-uzi-apparat.ru]https://www.kupit-uzi-apparat.ru[/url] .
mostbet. uz http://www.mostbet4002.ru
креативные горшки для цветов купить http://www.dizaynerskie-kashpo1.ru/ .
888starz affiliate 888starz affiliate .
India Pharm Global reputable indian online pharmacy india online pharmacy
Betting continues to be an engaging way to enhance your entertainment. Engaging with football, this site offers competitive odds for each user.
With in-play wagering to scheduled events, discover a diverse range of gambling options tailored to your interests. This user-friendly platform ensures that making wagers is both effortless and reliable.
https://alhudapk.com/dua/pages/?arada_bet___top_sports_betting_site_in_ethiopia.html
Get started to explore the top-tier gaming available digitally.
https://medsfrommexico.shop/# Meds From Mexico
Всё для строительства https://d20.com.ua и ремонта: инструкции, обзоры, экспертизы, калькуляторы. Профессиональные советы, новинки рынка, база строительных компаний.
лечение наркомании подростков лечение наркозависимости в Нижнем Новгороде
доставка еды на неделю челябинск http://www.dostavka-edy-bf1.ru .
ночная доставка еды http://www.dostavka-edy-bf.ru/ .
доставка продуктов челябинск доставка продуктов челябинск .
оценочная компания оценка ооо для продажи
Wow! Thank you! I continuously wanted to write on my blog something like that. Can I include a fragment of your post to my site?
Праздничная продукция https://prazdnik-x.ru для любого повода: шары, гирлянды, декор, упаковка, сувениры. Всё для дня рождения, свадьбы, выпускного и корпоративов.
mostbet online app http://mostbet1.app .
Новинний сайт Житомира https://faine-misto.zt.ua новости Житомира сегодня
indian pharmacy online: online shopping pharmacy india – India Pharm Global
http://medsfrommexico.com/# mexico pharmacies prescription drugs
1win bet 1win14041.ru
canadian neighbor pharmacy: canadian pharmacy prices – onlinepharmaciescanada com
I believe what you posted was actually very reasonable. However, think on this, suppose you wrote a catchier title? I am not saying your content is not good., but suppose you added a post title that grabbed a person’s attention? I mean %BLOG_TITLE% is kinda vanilla. You ought to peek at Yahoo’s home page and note how they write news headlines to get people to open the links. You might add a video or a pic or two to get readers interested about what you’ve got to say. Just my opinion, it might bring your blog a little bit more interesting.
Ranked as a top site in Bangladesh, 88fb offers real rewards
JPG Hero converter is an online image converter built for speed, simplicity, and accessibility. This web-based platform allows instant conversion of popular image formats such as PNG, WebP, and BMP into JPG files. No downloads, installations, or user accounts are required. The entire process happens in-browser and takes only a few seconds. Users can upload up to 20 files at once for batch conversion, making it suitable for individuals and professionals managing multiple images. All uploaded files are automatically deleted after processing to maintain privacy and ensure data security. JPGHero.com is compatible with all modern devices, including desktops, tablets, and smartphones, offering flexibility for work on the go. Whether the goal is to reduce image file size, prepare visuals for the web, or standardize a project’s image format, this tool delivers clean, reliable results without any extra steps.
JPGHero Converter
вывод из запоя стоимость капельница вывод из запоя круглосуточно
лечение алкоголизма нижний новгород алкоголь лечение
сколько стоит кодировка от алкоголя цена кодировка от алкоголя цена
https://canadapharmglobal.com/# canadian pharmacy ratings
Коллекция Nautilus, созданная Жеральдом Гентой, сочетает элегантность и высокое часовое мастерство. Модель Nautilus 5711 с самозаводящимся механизмом имеет энергонезависимость до 2 дней и корпус из нержавеющей стали.
Восьмиугольный безель с округлыми гранями и синий солнечный циферблат подчеркивают уникальность модели. Браслет с H-образными элементами обеспечивает удобную посадку даже при повседневном использовании.
Часы оснащены индикацией числа в позиции 3 часа и сапфировым стеклом.
Для сложных модификаций доступны хронограф, лунофаза и индикация второго часового пояса.
patek-philippe-nautilus.ru
Например, модель 5712/1R-001 из красного золота 18K с калибром повышенной сложности и запасом хода на двое суток.
Nautilus остается символом статуса, объединяя инновации и традиции швейцарского часового дела.
вызвать нарколога на дом анонимно вызов нарколога на дом в нижнем новгороде
pharmacy website india india pharmacy India Pharm Global
Hi, I think your site might be having browser compatibility issues. When I look at your website in Safari, it looks fine but when opening in Internet Explorer, it has some overlapping. I just wanted to give you a quick heads up! Other then that, fantastic blog!
JPEGtoJPGHero.com is a free web tool that converts JPEG files into JPG format quickly and securely. Simply drag and drop your images or click “Upload” to select files from your device. The conversion happens on remote servers, so you don’t need to install software or worry about local processing power. When the process finishes, download links appear instantly, letting you save new JPG versions to use in presentations, social media posts, or websites. Batch processing handles multiple files at once, saving time when you have dozens of photos to convert. Since the site runs entirely in a browser, it works on Windows, macOS, Linux, and mobile devices without compatibility issues. Privacy is a priority: every uploaded file is deleted automatically after conversion, and no personal data remains on the server. Whether you’re a photographer preparing images for clients or someone who needs a quick conversion, JPEGtoJPGHero.com offers a straightforward, ad-free experience. No registration or payment is required. Enjoy unlimited, hassle-free conversions from JPEG to JPG anytime.
JPEGtoJPGHero
пин ап приложение уз пин ап приложение уз
Портал города Черновцы https://u-misti.chernivtsi.ua последние новости, события, обзоры
canadian pharmacy service: Canada Pharm Global – canadian compounding pharmacy
SVGtoPNGHero.com provides a fast, user-friendly way to convert SVG graphics into PNG format without any extra installs. The homepage displays a clear drag-and-drop zone and an “Upload” button for manual selection. Once you add your SVG files, conversion begins immediately on remote servers that preserve image clarity and transparency. A progress meter shows you exactly how much remains before your PNGs are ready. In moments, download links appear beneath each file, allowing instant saving. If you’re working with multiple graphics—such as charts, icons, or vector portraits—the batch conversion tool processes them all together. The service runs entirely in your browser, so it works on desktops, tablets, and smartphones alike. All uploaded images delete themselves after conversion. SVGtoPNGHero.com makes format conversion swift, secure, and completely free.
SVGtoPNGhero Converter
pin up akkaunt yaratish http://www.pinup3012.ru
platformă de pariere ușor de folosit http://1win14045.ru/
пин ап легально http://www.pinup3011.ru
пин ап надёжный сайт http://pinup3009.ru
мостбет помощь мостбет помощь
best rated canadian pharmacy: Canada Pharm Global – canadian pharmacy 365
https://canadapharmglobal.shop/# canadian pharmacy near me
pin up jonli tikish http://pinup3010.ru/
займ онлайн без посещения займ онлайн без круглосуточно
Портал о строительстве https://buildportal.kyiv.ua и ремонте: лучшие решения для дома, дачи и бизнеса. Инструменты, сметы, калькуляторы, обучающие статьи и база подрядчиков.
1win logo 1win logo
India Pharm Global indianpharmacy com top 10 pharmacies in india
https://indiapharmglobal.shop/# top 10 online pharmacy in india
Meds From Mexico: mexican drugstore online – purple pharmacy mexico price list
Городской портал Черкассы https://u-misti.cherkasy.ua новости, обзоры, события Черкасс и области
https://sn6567.com
¡Saludos, apasionados del azar !
Casinos sin registro con giros gratis incluidos – https://casinossinlicenciaenespana.es/# casino sin licencia
¡Que vivas movimientos brillantes !
https://indiapharmglobal.com/# Online medicine order
Meds From Mexico: mexico drug stores pharmacies – Meds From Mexico
Very efficiently written information. It will be helpful to anybody who usess it, including myself. Keep doing what you are doing – looking forward to more posts.
1win bonus code 1win bonus code
Ищете ресурсы коллекционеров? Наш сайт предоставляет всё необходимое для изучения монет !
Здесь доступны коллекционные экземпляры из разных эпох , а также антикварные находки.
Просмотрите каталог с подробными описаниями и детальными снимками, чтобы найти раритет.
https://rberega.info/archives/132006
Если вы начинающий или профессиональный коллекционер , наши статьи и гайды помогут расширить знания .
Не упустите возможностью добавить в коллекцию эксклюзивные артефакты с сертификатами.
Присоединяйтесь сообщества ценителей и следите последних новостей в мире нумизматики.
Женский блог https://zhinka.in.ua Жінка это самое интересное о красоте, здоровье, отношениях. Много полезной информации для женщин.
Meds From Mexico Meds From Mexico Meds From Mexico
canadian pharmacy prices: online canadian pharmacy reviews – adderall canadian pharmacy
Well I truly liked studying it. This subject provided by you is very effective for correct planning.
http://semaglupharm.com/# semaglutide face
купить трансформатор силовой масляный трехфазный https://silovye-transformatory-kupit4.ru .
Защитные кейсы https://plastcase.ru/ в Санкт-Петербурге — надежная защита оборудования от влаги, пыли и ударов. Большой выбор размеров и форматов, ударопрочные материалы, индивидуальный подбор.
sweet bonanza скачать на андроид http://sweet-bonanza3002.ru
rybelsus 14: SemagluPharm – Semaglu Pharm
силовые трансформаторы купить москва силовые трансформаторы купить москва .
тс 40 трансформатор купить http://silovye-transformatory-kupit3.ru .
онлайн оценка швейцарских часов онлайн оценка швейцарских часов .
автоматический карниз для штор автоматический карниз для штор .
https://lipipharm.shop/# LipiPharm
CrestorPharm Over-the-counter Crestor USA CrestorPharm
Lipi Pharm: Atorvastatin online pharmacy – Lipi Pharm
онлайн оценка часов по фото для скупки http://www.ocenka-chasov-onlajn1.ru .
оценить швейцарские часы оценить швейцарские часы .
онлайн оценка часов по фото для скупки https://www.ocenka-chasov-onlajn2.ru .
1win retiros 1win retiros
http://semaglupharm.com/# Rybelsus online pharmacy reviews
займ до зарплаты онлайн займ денег онлайн
купить силовой трансформатор цена silovye-transformatory-kupit4.ru .
трансформаторы силовые тм купить https://www.silovye-transformatory-kupit2.ru .
трансформатор тока цена http://silovye-transformatory-kupit3.ru/ .
оценка часов онлайн по фото бесплатно http://www.ocenka-chasov-onlajn3.ru .
pin up uz ro‘yxatdan o‘tish http://pinup3012.ru/
Данный портал собирает актуальные информационные статьи на любые темы.
Здесь вы легко найдёте события из жизни, бизнесе и многом другом.
Информация обновляется в режиме реального времени, что позволяет следить за происходящим.
Понятная навигация помогает быстро ориентироваться.
https://watchco.ru
Все публикации предлагаются с фактчеком.
Целью сайта является информативности.
Читайте нас регулярно, чтобы быть на волне новостей.
автоматический карниз для штор автоматический карниз для штор .
оценка швейцарских часов https://ocenka-chasov-onlajn1.ru/ .
https://gm12316.com
prednisone capsules: Predni Pharm – prednisone best price
оценить часы оценить часы .
оценка наручных часов по фото https://ocenka-chasov-onlajn.ru/ .
https://cs9567.com
You really make it seem really easy with your presentation however I in finding this matter to be actually something which I believe I might never understand. It seems too complex and very vast for me. I’m having a look ahead on your subsequent post, I will try to get the hold of it!
generic prednisone 10mg PredniPharm average cost of generic prednisone
LipiPharm: atorvastatin liquid – No RX Lipitor online
https://qq2717.com
https://semaglupharm.com/# SemagluPharm
Wow that was odd. I just wrote an very long comment but after I clicked submit my comment didn’t appear. Grrrr… well I’m not writing all that over again. Anyways, just wanted to say wonderful blog!
Lipi Pharm: LipiPharm – LipiPharm
пин ап авиатор уз http://pinup3011.ru
1 win bet скачать https://1win14045.ru
пин ап как делать ставки https://pinup3009.ru
Lipi Pharm what tier drug is atorvastatin LipiPharm
buy prednisone 5mg canada: Predni Pharm – prednisone canada prices
https://crestorpharm.shop/# п»їBuy Crestor without prescription
https://semaglupharm.shop/# SemagluPharm
Защитные кейсы plastcase.ru/ в Санкт-Петербурге — надежная защита оборудования от влаги, пыли и ударов. Большой выбор размеров и форматов, ударопрочные материалы, индивидуальный подбор.
Awsome blog! I am loving it!! Will be back later to read some more. I am bookmarking your feeds also.
оригинальные кашпо для цветов купить оригинальные кашпо для цветов купить .
Semaglu Pharm: semaglutide and pcos – semaglutide/cyanocobalamin
piata de mobila chisinau piata de mobila chisinau
1win bet app download http://1win14042.ru/
cazinouri internaționale cu bonus fără depunere https://1win14044.ru
SemagluPharm SemagluPharm SemagluPharm
rosuvastatin and tendon rupture: Best price for Crestor online USA – CrestorPharm
http://semaglupharm.com/# Rybelsus side effects and dosage
dulap lemn pin https://1win14043.ru
скачать мостбет на телефон скачать мостбет на телефон
https://yx5628.com
PredniPharm: can you buy prednisone over the counter in usa – PredniPharm
casa pariuri casa pariuri
oral rybelsus for weight loss Rybelsus 3mg 7mg 14mg Rybelsus for blood sugar control
https://semaglupharm.com/# rybelsus 3 mg efectos secundarios
prednisone where can i buy: Predni Pharm – prednisone 20mg cheap
Гражданский юрист http://yuristy-ekaterinburga.ru
Мобильный шиномонтаж 24 часа https://shinomontazh-vyezdnoj.ru
регистрация перепланировки регистрация перепланировки .
https://tvwg5lym.com
https://cy2752.com
https://semaglupharm.com/# SemagluPharm
перепланировка москва перепланировка москва .
https://yishaonian.com
generic prednisone tablets: Predni Pharm – prednisone buy canada
http://semaglupharm.com/# Buy Rybelsus online USA
20mg lipitor 20mg п»їBuy Lipitor without prescription USA LipiPharm
bonus code 1win bonus code 1win
https://lqq2237.com
lucky jet app http://1win14038.ru
CrestorPharm: Crestor Pharm – CrestorPharm
https://qq5531.com
1win moldova download http://1win14040.ru/
1win приложение ios скачать http://1win14042.ru
Ce modèle Jumbo arbore un boîtier en acier inoxydable ultra-mince (8,1 mm d’épaisseur), équipé du nouveau mouvement Manufacture 7121 offrant une autonomie étendue.
Le cadran « Bleu Nuit Nuage 50 » présente un guillochage fin associé à des index appliques en or gris et des aiguilles Royal Oak.
Une verre inrayable traité garantit une lisibilité optimale.
ap royal oak 15202
Outre l’heure traditionnelle, la montre intègre une fonction date à 3h. Étanche à 5 ATM, elle résiste aux activités quotidiennes.
Le maille milanaise ajustable et la carrure à 8 vis reprennent les codes du design signé Gérald Genta (1972). Un boucle personnalisée assure un maintien parfait.
Appartenant à la série Jumbo historique, ce garde-temps allie innovation technique et élégance discrète, avec un prix estimé à plus de 75 000 €.
Dragon Tiger happens to be one of the most widespread online casinos originating from Asia. The game got immense popular support from gamblers who love instant card games with simple regulations. Again, like any game, be it online, there must be some other issues either technical or others related to payment. In such conditions, this reliable Dragon Tiger customer care number can indeed make much of a difference in going about the casino experience smoothly. The content of games with a PEGI 3 rating is considered suitable for all age groups. The game should not contain any sounds or pictures that are likely to frighten young children. A very mild form of violence (in a comical context or a childlike setting) is acceptable. No bad language should be heard.
https://plazapublica.cdmx.gob.mx/profiles/poundlewhisvi1981/activity
Demo Aviator game allows you to learn the mechanics of the gameplay without making a deposit. The free version of this version helps to understand how the game works and develop strategies. Certainly! Space XY is optimized for mobile devices, allowing players to enjoy this exciting game seamlessly on smartphones, tablets, and desktop devices. climatesciencespace.eu is an independent educational website created to provide detailed information about the game Space XY and other online gaming experiences. We do not offer gambling services, conduct real-money transactions, or function as a betting platform. Our primary goal is to help users understand how Space XY works, promote responsible gaming, and provide transparent guidance on interacting with gaming-related content online. Understanding the fundamental terminology encountered during Aviator gameplay is crucial for an optimal gaming experience. This knowledge ensures players can navigate the game confidently and derive maximum enjoyment from their participation.
казино мостбет скачать https://mostbet33012.ru
http://semaglupharm.com/# side effects of semaglutide injections
карнизы с электроприводом купить карнизы с электроприводом купить .
SemagluPharm: Semaglu Pharm – Semaglu Pharm
1 win. 1win14043.ru
Crestor Pharm Crestor Pharm how does crestor work in the body
USA-based pharmacy Lipitor delivery: LipiPharm – LipiPharm
mostbey http://www.mostbet33015.ru
мостбет.сом http://mostbet33011.ru
Dead written content material, appreciate it for entropy. “The bravest thing you can do when you are not brave is to profess courage and act accordingly.” by Corra Harris.
Автоматические карнизы для штор Автоматические карнизы для штор .
Стальные резервуары используются для хранения дизельного топлива и соответствуют стандартам температур до -40°C.
Вертикальные емкости изготавливают из нержавеющих сплавов с усиленной сваркой.
Идеальны для АЗС: хранят бензин, керосин, мазут или авиационное топливо.
Емкость дренажная 12,5 м3 утепленная
Двустенные резервуары обеспечивают защиту от утечек, а наземные установки подходят для разных условий.
Заводы предлагают индивидуальные проекты объемом до 500 м³ с технической поддержкой.
1win ru 1win ru
цена септика для частного дома цена септика для частного дома .
электрокарнизы электрокарнизы .
https://ah5766.com
https://qf3628.com
электрокарнизы для штор электрокарнизы для штор .
https://prednipharm.shop/# PredniPharm
1win casino app 1win14040.ru
http://semaglupharm.com/# Safe delivery in the US
mostbet.com http://www.mostbet33015.ru
Электрокарнизы цена Электрокарнизы цена .
электрический карниз для штор купить электрический карниз для штор купить .
rybelsus manufacturer: SemagluPharm – SemagluPharm
Predni Pharm Predni Pharm prednisone 10mg price in india
Affordable Lipitor alternatives USA: FDA-approved generic statins online – Atorvastatin online pharmacy
win lucky jet http://www.1win14037.ru
https://semaglupharm.com/# Semaglu Pharm
pin up apk yuklab olish pin up apk yuklab olish
SemagluPharm: Semaglu Pharm – Rybelsus online pharmacy reviews
SemagluPharm Where to buy Semaglutide legally semaglutide mixing chart
prednisone buy canada: order prednisone 10 mg tablet – order prednisone 10mg
1win чат https://1win14039.ru
карнизы с электроприводом купить карнизы с электроприводом купить .
pin up cashback uz https://www.pinup3008.ru
Электрокарнизы цена Электрокарнизы цена .
http://semaglupharm.com/# Semaglu Pharm
КредитоФФ http://creditoroff.ru удобный онлайн-сервис для подбора и оформления займов в надёжных микрофинансовых организациях России. Здесь вы найдёте лучшие предложения от МФО
Your article helped me a lot, is there any more related content? Thanks!
It is appropriate time to make some plans for the long run and it is time to be happy. I have learn this put up and if I may I desire to counsel you some attention-grabbing things or suggestions. Perhaps you can write next articles relating to this article. I want to read even more things about it!
ultimate createporn AI generator. Create hentai art, porn comics, and NSFW with the best AI porn maker online. Start generating AI porn now!
https://crestorpharm.com/# CrestorPharm
электрические гардины для штор электрические гардины для штор .
Электрокарнизы цена Электрокарнизы цена .
Crestor Pharm: Crestor Pharm – CrestorPharm
Generic Lipitor fast delivery: Generic Lipitor fast delivery – LipiPharm
rybelsus coupon medicare SemagluPharm Semaglutide tablets without prescription
I believe everything said made a great deal of sense. However, consider this, what if you were to create a killer title? I mean, I don’t wish to tell you how to run your website, but what if you added a post title to possibly get people’s attention? I mean %BLOG_TITLE% is a little vanilla. You could look at Yahoo’s front page and watch how they create post titles to get people to click. You might add a related video or a picture or two to get people excited about everything’ve written. In my opinion, it might bring your posts a little livelier.
I discovered great rewards and fair games on ck222 game.
электрический карниз для штор купить электрический карниз для штор купить .
mostbet link https://www.mostbet33014.ru
http://semaglupharm.com/# Semaglu Pharm
cazinouri cerință de pariere https://1win14038.ru/
Die Royal Oak 16202ST kombiniert ein rostfreies Stahlgehäuse von 39 mm mit einem extraflachen Gehäuse von nur 8,1 mm Dicke.
Ihr Herzstück bildet das automatische Manufakturwerk 7121 mit 55 Stunden Gangreserve.
Der smaragdene Farbverlauf des Zifferblatts wird durch das feine Guillochierungen und die Saphirglas-Abdeckung mit Antireflexbeschichtung betont.
Neben Stunden- und Minutenanzeige bietet die Uhr ein praktisches Datum bei Position 3.
15450st royal oak
Die 50-Meter-Wasserdichte macht sie alltagstauglich.
Das integrierte Edelstahlarmband mit verstellbarem Dornschließe und die oktogonale Lünette zitieren das ikonische Royal-Oak-Erbe aus den 1970er Jahren.
Als Teil der „Jumbo“-Kollektion verkörpert die 16202ST meisterliche Uhrmacherkunst mit einem aktuellen Preis ab ~75.900 €.
актовый зал актовый зал .
электрокарнизов для штор электрокарнизов для штор .
Crestor Pharm: Order rosuvastatin online legally – is there generic for crestor
side effects rosuvastatin: Crestor Pharm – Online statin therapy without RX
where can you buy prednisone PredniPharm Predni Pharm
пин ап онлайн поддержка пин ап онлайн поддержка
оснащение актового зала в школе https://www.oborudovanie-dlya-aktovogo-zala4.ru .
mostbet com официальный сайт http://mostbet33014.ru/
скачать официальный сайт мостбет https://www.mostbet33001.ru
sweet bonanza nedir sweet bonanza nedir
http://semaglupharm.com/# Semaglu Pharm
актовый зал актовый зал .
Lipi Pharm: LipiPharm – drinking alcohol with lipitor
Safe atorvastatin purchase without RX: Online statin drugs no doctor visit – п»їBuy Lipitor without prescription USA
Rybelsus for blood sugar control olympia semaglutide Semaglu Pharm
оснащение актового зала в школе http://www.oborudovanie-dlya-aktovogo-zala2.ru .
актовый зал это oborudovanie-dlya-aktovogo-zala3.ru .
https://semaglupharm.shop/# semaglutide and phentermine
Это помогает стимулировать обсуждение и критическое мышление у читателей.
мостбет зеркало скачать https://mostbet33013.ru/
Позиция автора не является однозначной, что позволяет читателям более глубоко разобраться в обсуждаемой теме.
Автор представляет сложные темы в понятной и доступной форме.
Semaglu Pharm can semaglutide cause anxiety Semaglu Pharm
Я оцениваю объективный и непредвзятый подход автора к теме.
современный актовый зал в школе http://www.oborudovanie-dlya-aktovogo-zala1.ru .
оборудование для актового зала школы oborudovanie-dlya-aktovogo-zala2.ru .
звуковое оборудование для актового зала звуковое оборудование для актового зала .
Semaglu Pharm: SemagluPharm – SemagluPharm
CrestorPharm: CrestorPharm – Order rosuvastatin online legally
актовый зал актовый зал .
мостбет скачать на компьютер http://mostbet33001.ru
Over-the-counter Crestor USA Online statin therapy without RX CrestorPharm
пин ап создать аккаунт pinup3008.ru
sweet bonanza 1000 демо http://sweet-bonanza3000.ru/ .
1win app lucky jet https://www.1win14035.ru .
правовая консультация юриста бесплатные юридические консультации по телефону
SemagluPharm: No prescription diabetes meds online – rybelsus 1mg
Wow, wonderful blog layout! How long have you been blogging for? you made blogging look easy. The overall look of your site is wonderful, as well as the content!
bus card recharge
generic prednisone pills: 100 mg prednisone daily – PredniPharm
современный актовый зал в школе http://www.oborudovanie-dlya-aktovogo-zala.ru .
1win skachat 1win14037.ru
http://crestorpharm.com/# Crestor Pharm
ultimate AI porn maker generator. Create hentai art, porn comics, and NSFW with the best AI porn maker online. Start generating AI porn now!
Designed by Gerald Genta, redefined luxury watchmaking with its signature angular case and bold integration of sporty elegance.
Available in limited-edition sand gold to diamond-set variants, the collection merges avant-garde design with precision engineering .
Starting at $20,000 to over $400,000, these timepieces attract both luxury enthusiasts and aficionados seeking wearable heritage.
Pre-owned Piguet Royal Oak 26240 shop
The Perpetual Calendar models set benchmarks with robust case constructions, showcasing Audemars Piguet’s technical prowess .
With meticulous hand-finishing , each watch epitomizes the brand’s legacy of craftsmanship.
Explore certified pre-owned editions and historical insights to deepen your horological expertise with this timeless icon .
https://931mju.com
Explore the iconic Patek Philippe Nautilus, a horological masterpiece that merges sporty elegance with refined artistry.
Introduced nearly 50 years ago, this cult design redefined high-end sports watches, featuring distinctive octagonal bezels and horizontally grooved dials .
From stainless steel models like the 5990/1A-011 with a 55-hour energy retention to opulent gold interpretations such as the 5811/1G-001 with a azure-toned face, the Nautilus caters to both discerning collectors and everyday wearers .
New Patek Nautilus information
The diamond-set 5719 elevate the design with gemstone accents, adding unmatched glamour to the timeless profile.
With market values like the 5726/1A-014 at ~$106,000, the Nautilus remains a prized asset in the world of premium watchmaking.
For those pursuing a historical model or contemporary iteration , the Nautilus epitomizes Patek Philippe’s tradition of innovation.
Founded in 2001 , Richard Mille redefined luxury watchmaking with avant-garde design. The brand’s iconic timepieces combine high-tech materials like carbon fiber and titanium to balance durability .
Drawing inspiration from the aerodynamics of Formula 1, each watch embodies “form follows function”, optimizing resistance. Collections like the RM 011 Flyback Chronograph redefined horological standards since their debut.
Richard Mille’s experimental research in materials science yield ultra-lightweight cases crafted for elite athletes.
Unused Mille Richard RM 3502 watch
Beyond aesthetics , the brand pushes boundaries through bespoke complications tailored to connoisseurs.
Since its inception, Richard Mille epitomizes modern haute horlogerie, captivating discerning enthusiasts .
конференц зале конференц зале .
официальный сайт 1 вин официальный сайт 1 вин .
ultimate AI porn maker generator. Create hentai art, porn comics, and NSFW with the best AI porn maker online. Start generating AI porn now!
Keep functioning ,terrific job!
Профессиональное https://kosmetologicheskoe-oborudovanie-msk.ru для салонов красоты, клиник и частных мастеров. Аппараты для чистки, омоложения, лазерной эпиляции, лифтинга и ухода за кожей.
does semaglutide lower blood pressure: saxenda vs rybelsus – SemagluPharm
Crestor Pharm: Crestor Pharm – can you take zetia and crestor at the same time
оборудование для конференц залов оборудование для конференц залов .
мостбет официальный сайт вход мостбет официальный сайт вход
https://932vxw.com
pin up https://pinup3007.ru/ .
https://jp6299.com
compound rybelsus SemagluPharm SemagluPharm
https://ps6714.com
https://962ijn.com
https://aa6941.com
sweet bonanza казино https://sweet-bonanza3000.ru .
1win. pro http://1win14032.ru .
mobilă la comandă ieftina https://1win14034.ru .
Crestor Pharm: CrestorPharm – crestor neck pain
semaglutide coupon: SemagluPharm – Rybelsus 3mg 7mg 14mg
pin up litsenziya pin up litsenziya .
https://crestorpharm.shop/# Crestor Pharm
https://koor8.com
https://ww5106.com
https://aa2509.com
конференц-зале конференц-зале .
Lipi Pharm Lipi Pharm LipiPharm
конференц зале конференц зале .
оснащение конференц залов http://www.oborudovanie-dlya-konferenc-zala1.ru .
конференц зале конференц зале .
Semaglu Pharm: SemagluPharm – Semaglu Pharm
fantastic points altogether, you simply gained a brand new reader. What would you suggest in regards to your post that you made some days ago? Any positive?
CrestorPharm: CrestorPharm – Buy cholesterol medicine online cheap
1win online 1win14035.ru .
mental health chatbot http://www.mental-health6.com .
пин ап безопасно пин ап безопасно .
конференц конференц .
cheap generic prednisone: PredniPharm – PredniPharm
конференц залы оснащение http://www.oborudovanie-dlya-konferenc-zala1.ru/ .
конференц конференц .
конференц зал оборудование оснащение http://oborudovanie-dlya-konferenc-zala.ru/ .
https://as1174.com
Discreet shipping for Lipitor Lipi Pharm is rosuvastatin the same as atorvastatin
winner casino jocuri pe mobil 1win14033.ru .
Just a smiling visitor here to share the love (:, btw great design and style. “Justice is always violent to the party offending, for every man is innocent in his own eyes.” by Daniel Defoe.
mental health support chatbot mental-health6.com .
заказать плитку купить плитку керамогранит
PredniPharm: prednisone 50 mg tablet canada – Predni Pharm
Affordable Rybelsus price: rybelsus buy online – rybelsus off label use
https://at1353.com
You are my intake, I possess few blogs and often run out from to brand.
http://prednipharm.com/# order prednisone 10mg
PredniPharm Predni Pharm PredniPharm
how much is prednisone 10mg: prednisone 5 tablets – Predni Pharm
pin up qonuniymi https://pinup3005.ru .
Semaglu Pharm: SemagluPharm – SemagluPharm
70918248
References:
what are the long term effects of steroids (https://15gundedegerkaybi.com/index.php/2023/06/22/the-power-of-effective-communication-in-business/)
PredniPharm: PredniPharm – generic over the counter prednisone
Pretty! This has been a really wonderful article. Many thanks for providing this information.
hafilat card balance check
ставки мостбет http://mostbet33008.ru/ .
lucky jet приложение ставки https://www.1win14034.ru .
дизайнерские кашпо на стену https://dizaynerskie-kashpo.ru .
Crestor Pharm Crestor mail order USA п»їBuy Crestor without prescription
rybelsus weight loss before and after: Semaglu Pharm – rybelsus dizziness
1 vin официальный сайт https://1win22075.ru .
Crestor 10mg / 20mg / 40mg online: can crestor cause diarrhea – Generic Crestor for high cholesterol
mental health app http://mental-health4.com/ .
FDA-approved Rybelsus alternative: semaglutide vs wegovy – is mounjaro semaglutide
I am often to blogging and i really appreciate your content. The article has really peaks my interest. I am going to bookmark your site and keep checking for new information.
pin up kazino uz pin up kazino uz .
pin up aviator yuklab olish http://pinup3005.ru .
http://lipipharm.com/# No RX Lipitor online
https://koraq8.com
https://koraae.com
https://kora2026.com
https://957nbg.com
Semaglu Pharm Rybelsus online pharmacy reviews Semaglu Pharm
mental health support chat http://mental-health2.com/ .
CrestorPharm: CrestorPharm – Generic Crestor for high cholesterol
ai therapy chat ai-therapist3.com .
mental health support chatbot mental-health4.com .
app for mental health support mental-health1.com .
ai therapist ai-therapist6.com .
Online pharmacy Rybelsus: SemagluPharm – Semaglu Pharm
ставки мостбет https://mostbet33009.ru .
Lipi Pharm Lipi Pharm atorvastatin adverse effects
site pariuri sportive site pariuri sportive .
mental health chatbot http://www.mental-health2.com/ .
пин ап ставки на теннис http://www.pinup3004.ru .
ai therapy app http://www.ai-therapist3.com .
canada pharmacy prednisone: Predni Pharm – prednisone tablets 2.5 mg
ai mental health therapy https://mental-health3.com/ .
Balloons Dubai https://balloons-dubai1.com stunning balloon decorations for birthdays, weddings, baby showers, and corporate events. Custom designs, same-day delivery, premium quality.
mental health chatbot mental-health1.com .
No doctor visit required statins: CrestorPharm – Online statin therapy without RX
ai therapist chat ai-therapist6.com .
https://prednipharm.shop/# prednisone 1 mg tablet
букмекерские конторы бишкек http://mostbet33007.ru/ .
https://735hyt.com
Some truly interesting info , well written and generally user pleasant.
https://162zxs.com
prednisone drug costs PredniPharm Predni Pharm
LipiPharm: Discreet shipping for Lipitor – what is the number one side effect of atorvastatin?
prednisone 10mg prices: PredniPharm – Predni Pharm
Lipi Pharm: Lipi Pharm – Buy Lipitor without prescription USA
jocuri ruleta https://www.1win14032.ru .
Hi there, I found your blog via Google while searching for a related topic, your web site came up, it looks good. I’ve bookmarked it in my google bookmarks.
Affordable Rybelsus price Semaglu Pharm SemagluPharm
40 mg prednisone pill: PredniPharm – online prednisone 5mg
Wow, marvelous blog layout! How long have you been blogging for? you made blogging look easy. The overall look of your site is fantastic, as well as the content!
hafilat bus card balance check
what is the main side effect of lipitor?: Online statin drugs no doctor visit – Order cholesterol medication online
Хотите найти ресурсы для нумизматов ? Наш сайт предоставляет всё необходимое для изучения нумизматики!
У нас вы найдёте коллекционные экземпляры из исторических периодов, а также антикварные предметы .
Изучите архив с характеристиками и высококачественными фото , чтобы найти раритет.
монета Сеятель
Если вы начинающий или эксперт, наши статьи и гайды помогут расширить знания .
Не упустите шансом приобрести лимитированные монеты с гарантией подлинности .
Станьте частью сообщества энтузиастов и следите аукционов в мире нумизматики.
http://lipipharm.com/# atorvastatin and pregnancy
Lipi Pharm: USA-based pharmacy Lipitor delivery – Lipi Pharm
пин ап скачать на айфон пин ап скачать на айфон .
пин ап зеркало уз http://pinup3003.ru/ .
скачать 1win на телефон ios скачать 1win на телефон ios .
мастбет https://www.mostbet33008.ru .
скачат мостбет http://mostbet33006.ru .
пин ап демо казино http://www.pinup3003.ru .
It?¦s actually a great and helpful piece of information. I?¦m glad that you shared this useful information with us. Please stay us up to date like this. Thank you for sharing.
can you stop taking lipitor cold turkey: lipitor at night – Cheap Lipitor 10mg / 20mg / 40mg
официальный сайт mostbet http://mostbet33009.ru/ .
car shipment long distance towing
Rosuvastatin tablets without doctor approval: Crestor Pharm – Crestor Pharm
prednisone over the counter south africa generic prednisone for sale prednisone 500 mg tablet
mostbet qeydiyyat necə olur http://mostbet3055.ru .
Непознанная жизнь не стоит того, чтобы быть прожитой. https://bezil-holluord.citaty-tsitaty.ru
SemagluPharm: Semaglutide tablets without prescription – Semaglu Pharm
Сертификация и лицензии — ключевой аспект ведения бизнеса в России, гарантирующий защиту от неквалифицированных кадров.
Обязательная сертификация требуется для подтверждения соответствия стандартам.
Для торговли, логистики, финансов необходимо специальных разрешений.
https://ok.ru/group/70000034956977/topic/158831172171953
Нарушения правил ведут к штрафам до 1 млн рублей.
Добровольная сертификация помогает повысить доверие бизнеса.
Своевременное оформление — залог легальной работы компании.
1 win букмекерская контора официальный сайт вход https://1win22093.ru .
pin up humo orqali pul o‘tkazish http://pinup3002.ru/ .
female viagra medicine price in india: sildenafil prescription – viagra europe online
I will right away take hold of your rss as I can not find your email subscription link or e-newsletter service. Do you have any? Kindly permit me recognise in order that I may just subscribe. Thanks.
sildenafil price uk: VGR Sources – sildenafil 150 mg
https://vgrsources.com/# buy generic viagra online without prescription
ai therapist chat http://www.ai-therapist4.com .
online rx viagra VGR Sources where to buy viagra online safely
canadian pharmacy viagra 100: VGR Sources – where to buy viagra over the counter uk
ai therapy app http://www.ai-therapist2.com .
ai therapy chatbot http://www.ai-therapist5.com .
δωρεαν φρουτακια http://www.secondhand.com.gr .
buy viagra online europe: VGR Sources – viagrarel.com/
регистрация на мостбет http://www.mostbet33007.ru .
ai therapist chat http://ai-therapist4.com/ .
1вин казино https://1win22093.ru/ .
ai therapy app ai-therapist2.com .
ai therapist https://www.ai-therapist5.com .
viagra 100 mg tablets VGR Sources viagra 100mg tablet online in india
viagra canada: VGR Sources – viagra gel tabs
κοδικο http://www.secondhand.com.gr .
The Pink Salt Trick is a minimalist but effective morning routine: Just drink a glass of lukewarm water mixed with a pinch of Himalayan pink salt as soon as you wake up.
pin up kazino o‘yinlari bepul http://pinup3002.ru/ .
Нужна камера? поворотные камеры видеонаблюдения купить для дома, офиса и улицы. Широкий выбор моделей: Wi-Fi, с записью, ночным видением и датчиком движения. Гарантия, быстрая доставка, помощь в подборе и установке.
150 mg viagra: VGR Sources – viagra rx pharmacy
viagra 50mg price in india: viagra tablet price in india – buy cheap viagra uk
The Pink Salt Trick is a minimalist but effective morning routine: Just drink a glass of lukewarm water mixed with a pinch of Himalayan pink salt as soon as you wake up.
Need transportation? vehicle transporters car transportation company services — from one car to large lots. Delivery to new owners, between cities. Safety, accuracy, licenses and experience over 10 years.
1win bet app download 1win bet app download .
Намерение рождается мыслью, которая отдает команду подсознанию, которое в свою очередь начинает создавать необходимые условия для осуществления мысли в физическом мире. (Луиза Хей) https://dadli-dursl.citaty-tsitaty.ru
mostbet mobil versiya mostbet mobil versiya .
https://vgrsources.com/# where can i order generic viagra online
mexico pharmacy viagra VGR Sources buy viagra online australia paypal
lowest price sildenafil: can you buy viagra online safely – cost of viagra 100mg
1win скачать андроид 1win скачать андроид .
generic sildenafil us: VGR Sources – woman viagra
Looking for latest 1xBet promo codes? This site offers verified promotional offers like GIFT25 for new users in 2025. Claim up to 32,500 RUB as a first deposit reward.
Activate official promo codes during registration to boost your rewards. Benefit from no-deposit bonuses and exclusive deals tailored for casino games.
Find daily updated codes for global users with guaranteed payouts.
Every voucher is checked for validity.
Don’t miss exclusive bonuses like GIFT25 to increase winnings.
Valid for first-time deposits only.
https://enkling.com/read-blog/4777
Experience smooth rewards with easy redemption.
sildenafil 100mg india: VGR Sources – sildenafil buy without prescription
Explore detailed information about the Audemars Piguet Royal Oak Offshore 15710ST on this site , including market values ranging from $34,566 to $36,200 for stainless steel models.
The 42mm timepiece showcases a robust design with mechanical precision and rugged aesthetics, crafted in rose gold .
https://ap15710st.superpodium.com
Analyze secondary market data , where limited editions command premiums , alongside rare references from the 1970s.
Get real-time updates on availability, specifications, and resale performance , with trend reports for informed decisions.
viagra viagra VGR Sources buy generic viagra online with paypal
дешевые кухни по индивидуальным размерам http://kuhnni-na-zakaz1.ru .
mostbet qeydiyyat aviator mostbet qeydiyyat aviator .
buy sildenafil online cheap: VGR Sources – generic viagra online india
mostbet скачать бесплатно https://www.mostbet33006.ru .
Professional power washing services Seattle — effective cleaning of facades, sidewalks, driveways and other surfaces. Modern equipment, affordable prices, travel throughout Seattle. Cleanliness that is visible at first glance.
Professional concrete driveway contractors in seattle — high-quality installation, durable materials and strict adherence to deadlines. We work under a contract, provide a guarantee, and visit the site. Your reliable choice in Seattle.
viagra cream online: how can i get generic viagra in canada – buy viagra australia
This platform provides detailed information about Audemars Piguet Royal Oak watches, including market values and model details .
Discover data on popular references like the 41mm Selfwinding in stainless steel or white gold, with prices starting at $28,600 .
This resource tracks secondary market trends , where limited editions can command premiums .
AP watches
Functional features such as water resistance are easy to compare.
Stay updated on 2025 price fluctuations, including the Royal Oak 15510ST’s investment potential.
where to get real viagra online: order viagra with paypal – purchase viagra in australia
https://735nhg.com
кайт анапа Кайт Анапа – это не просто вид спорта, это стиль жизни, наполненный солнцем, ветром и морскими брызгами. Анапа, с ее широкими пляжами и устойчивыми ветрами, стала настоящим раем для любителей кайтсерфинга. Здесь встречаются новички, делающие первые шаги под руководством опытных инструкторов, и профессионалы, оттачивающие свое мастерство в головокружительных трюках. Кайт школа Анапа – это место, где зарождаются новые звезды кайтсерфинга. Школы предлагают программы обучения для всех уровней подготовки, от базовых курсов до продвинутых тренировок. Квалифицированные инструкторы, сертифицированное оборудование и индивидуальный подход гарантируют быстрый прогресс и безопасность на воде. Кайт школа в Анапе – это не только уроки кайтсерфинга, но и целое сообщество единомышленников, объединенных любовью к ветру и морю. Здесь можно найти новых друзей, получить полезные советы и просто хорошо провести время в компании людей, разделяющих ваши увлечения. Кайтсерфинг в Анапе – это возможность вырваться из рутины, ощутить свободу и испытать непередаваемые эмоции. Представьте себе, как вы скользите по волнам, подгоняемые ветром, как чайки кружат над головой, а солнце ласкает кожу. Это не просто спорт, это приключение, которое запомнится на всю жизнь. Кайтсерфинг в Благовещенской – это еще одно популярное место для кайтсерфинга в Анапском районе. Здесь, на просторной косе, соединяющей Бугазский лиман и Черное море, создаются идеальные условия для катания. Мелководье и стабильный ветер делают Благовещенскую отличным местом для обучения кайтсерфингу. Кайт Блага – это сокращенное название Благовещенской, которое часто используют кайтсерферы. Здесь можно найти несколько кайт-станций, предлагающих обучение, прокат оборудования и услуги хранения. Кайтсерфинг Анапа – это выбор тех, кто ценит активный отдых, любит ветер и море и готов к новым вызовам. Присоединяйтесь к сообществу кайтсерферов в Анапе и откройте для себя мир захватывающих приключений! DETIVETRA (ДЕТИ ВЕТРА) – это больше, чем просто название, это философия жизни. Это те, кто чувствует ветер, кто не боится перемен и кто всегда готов к новым открытиям. Присоединяйтесь к ДЕТЯМ ВЕТРА и почувствуйте себя частью чего-то большего!
Обязательная сертификация в России критически важна для подтверждения качества потребителей, так как позволяет исключить опасной или некачественной продукции на рынок.
Система сертификации основаны на технических регламентах, таких как ФЗ № 184-ФЗ, и охватывают как отечественные товары, так и импортные аналоги .
добровольный сертификат Сертификат соответствия гарантирует, что продукция соответствует ГОСТам безопасности и не повлияет негативно людям и окружающей среде.
Кроме того сертификация стимулирует конкурентоспособность товаров на внутреннем рынке и способствует к экспорту.
Регулярное обновление системы сертификации учитывает современным стандартам, что обеспечивает стабильность в условиях рыночных требований .
Generally I don’t learn post on blogs, however I would like to say that this write-up very forced me to try and do it! Your writing taste has been surprised me. Thank you, quite great post.
mostbet qeydiyyat bonus https://mostbet3053.ru .
Здесь вы можете найти актуальными новостями страны и зарубежья .
Данные актуализируются ежеминутно .
Представлены фоторепортажи с ключевых точек.
Мнения журналистов помогут получить объективную оценку.
Информация открыта без регистрации .
https://modalite.ru
purchase genuine viagra viagra for sale online canada viagra for sale usa
https://vgrsources.com/# female viagra buy australia
viagra 100mg tablet online: VGR Sources – cost viagra canada
best online pharmacy uk viagra: VGR Sources – female viagra south africa
mostbet promo kod az https://mostbet3054.ru/ .
https://548qaz.com
скачать бк осталось всего только выбрать подходящее https://www.mostbet33004.ru .
I used to be more than happy to search out this net-site.I wanted to thanks in your time for this excellent learn!! I definitely having fun with every little bit of it and I’ve you bookmarked to check out new stuff you weblog post.
sildenafil generic buy: sildenafil 50 mg price – female viagra online purchase in india
промокоды для 1win https://1win22092.ru/ .
An interesting discussion is worth comment. I think that you should write more on this topic, it might not be a taboo subject but generally people are not enough to speak on such topics. To the next. Cheers
ai therapy chat ai-therapist1.com .
mostbet com скачать mostbet com скачать .
мостбет официальный http://www.mostbet33004.ru .
viagra prescription discount VGR Sources viagra cheapest prices
https://152hgn.com
viagra pills for women: sildenafil 20mg prescription cost – canadian pharmacy viagra no prescription
sildenafil 20mg coupon discount: canada pharmacy viagra – viagra 150 mg pills
https://175vfd.com
увв водопонижение http://stroitelnoe-vodoponizhenie6.ru .
ai therapist app http://www.ai-therapist1.com .
mostbet casino mostbet33003.ru .
sildenafil 20 mg coupon: viagra for sale without prescription – purchase viagra online in usa
Краснодар аренда автомобиля Аренда авто Краснодар: Ваш надежный партнер в мире мобильности Краснодар – динамичный и развивающийся город, предлагающий множество возможностей для бизнеса и отдыха. Чтобы максимально использовать свое время и насладиться всеми преимуществами этого южного региона, аренда автомобиля становится оптимальным решением. Аренда авто без залога: Свобода передвижения без лишних затрат Мы понимаем, что залог может стать обременительным фактором при аренде автомобиля. Поэтому предлагаем услугу аренды авто без залога, позволяющую вам сэкономить средства и избежать ненужных хлопот. Аренда авто в Краснодаре: Широкий выбор автомобилей для любых задач Наш автопарк включает в себя автомобили различных классов и марок, от экономичных вариантов для городских поездок до комфортабельных внедорожников для путешествий по краю. Вы обязательно найдете автомобиль, отвечающий вашим потребностям и бюджету. Краснодар аренда автомобиля: Простота и удобство оформления Мы ценим ваше время, поэтому предлагаем простую и удобную процедуру оформления аренды автомобиля. Вы можете забронировать автомобиль онлайн, по телефону или непосредственно в нашем офисе. Прокат авто Краснодар: Гибкие условия аренды Мы предлагаем гибкие условия аренды, позволяющие вам выбрать оптимальный срок и тариф. Вы можете арендовать автомобиль на несколько часов, дней, недель или даже месяцев.
Usually I do not read post on blogs, however I wish to say that this write-up very pressured me to check out and do it! Your writing taste has been surprised me. Thank you, very nice article.
https://574zxs.com
https://736eda.com
расчет водопонижения http://stroitelnoe-vodoponizhenie6.ru .
https://965jnh.com
https://352yhb.com
https://916qaz.com
https://136sdc.com
online viagra prescription usa: buy viagra over the counter usa – online canadian pharmacy viagra
how to purchase viagra online buy generic viagra india us viagra over the counter
Pretty nice post. I just stumbled upon your weblog and wanted to say that I’ve really enjoyed surfing around your blog posts. In any case I will be subscribing to your feed and I am hoping you write again soon!
where can you buy over the counter viagra: buy viagra generic canada – online pharmacy uk viagra
kraken onion kraken darknet
https://vgrsources.com/# sildenafil online europe
клубные сеты диджеев клубные сеты диджеев .
водопонижение грунтовых вод на строительных площадках http://www.stroitelnoe-vodoponizhenie5.ru .
игра plinko отзывы https://1win22092.ru .
viagra pills for women: viagra 2018 – how to order viagra from canada
1вин официальный вход 1вин официальный вход .
BestGold: Сияние золота и блеск бриллиантов в Краснодаре В сердце Краснодарского края, где солнце ласкает поля и виноградники, расцветает мир изысканных ювелирных украшений BestGold. Мы предлагаем вам уникальную возможность прикоснуться к великолепию золота 70% пробы, воплощенному в утонченных кольцах и серьгах, сверкающих бриллиантами. Кольца, достойные королевы Наши кольца – это не просто украшения, это символ вашей индивидуальности и безупречного вкуса. От классических обручальных колец до экстравагантных коктейльных, каждое изделие BestGold создано с любовью и вниманием к деталям. Вставки из бриллиантов различной огранки и каратности подчеркнут вашу элегантность и добавят образу неповторимый шарм. кольца и серьги с бриллиантами в Краснодаре Серьги, подчеркивающие красоту Серьги BestGold – это идеальное дополнение к любому наряду. От лаконичных пусетов до эффектных подвесок, они призваны подчеркнуть вашу женственность и утонченность. Наши серьги с бриллиантами станут ярким акцентом вашего образа, притягивая восхищенные взгляды. Ювелирный фестиваль BestGold: праздник роскоши и стиля Не упустите возможность стать участником ювелирного фестиваля BestGold, где вас ждут эксклюзивные скидки на золото до 70% и невероятные предложения на бриллианты. Это ваш шанс приобрести ювелирные украшения мечты по самым выгодным ценам. BestGold: выбирайте лучшее, выбирайте золото! Погрузитесь в мир роскоши и блеска вместе с BestGold. Наши ювелирные украшения станут вашими верными спутниками, подчеркивая вашу красоту и элегантность в любой ситуации. Купите кольцо или серьги из золота в Краснодаре и ощутите себя королевой!
sildenafil 50mg: VGR Sources – buy sildenafil us
paypal viagra uk VGR Sources viagra pills for sale
mostbet qeydiyyat linki [url=https://mostbet3052.ru/]https://mostbet3052.ru/[/url] .
generic viagra brands: VGR Sources – pfizer viagra 100mg price
mostbet aviator https://mostbet3054.ru .
dj music dj music .
эжекторное водопонижение http://stroitelnoe-vodoponizhenie5.ru/ .
mostbet регистрация через официальный сайт http://mostbet33002.ru/ .
mostbet az promo ilə qeydiyyat http://mostbet3053.ru .
order viagra online singapore: VGR Sources – how much is viagra online
Hey there are using WordPress for your site platform? I’m new to the blog world but I’m trying to get started and set up my own. Do you require any coding expertise to make your own blog? Any help would be really appreciated!
where to buy bus card in abu dhabi
мостбет вход в личный кабинет http://mostbet33003.ru/ .
mostbet официальный сайт mostbet33005.ru .
viagra pills cost in india: VGR Sources – buy real viagra uk
MacBook починим даже в самых сложных случаях — от платы до клавиатуры.
Модульный дом https://kubrdom.ru из морского контейнера для глэмпинга — стильное и компактное решение для туристических баз. Полностью готов к проживанию: утепление, отделка, коммуникации.
viagra tablet VGR Sources buy female viagra online cheap
рулонный шкаф shkaf-parking-3.ru .
cheapest sildenafil 100 mg uk: VGR Sources – canadian drug pharmacy viagra
1вин как получить бонус 1вин как получить бонус .
https://vgrsources.com/# discount viagra canadian pharmacy
sildenafil cheap buy: VGR Sources – sildenafil 220
Здесь вы найдете Telegram-бот “Глаз Бога”, позволяющий найти сведения о человеке через открытые базы.
Инструмент функционирует по фото, используя публичные материалы в сети. С его помощью осуществляется пять пробивов и детальный анализ по запросу.
Платформа актуален согласно последним данным и охватывает аудио-материалы. Глаз Бога сможет проверить личность в открытых базах и отобразит сведения за секунды.
https://glazboga.net/
Такой инструмент — помощник для проверки людей через Telegram.
Момент или ситуация, когда человек сталкивается с вызовом, трудностями или новым опытом, которые стимулируют его личностный рост. Это означает, что всегда есть возможность выйти из зоны комфорта и преодолеть трудности для достижения более высокого уровня развития и самопонимания. Задать вопрос
Человек может ставить новые цели, расширить свой кругозор, заниматься спортом или творчеством.
Жизненные трудности – это часть жизни, и нет необходимости быть “сильным” и игнорировать их. Важно научиться справляться с ними и использовать их для личностного роста.
Может быть что угодно: проблемы с деньгами, потеря близкого, конфликт с друзьями или даже просто ощущение, что всё идёт не так, как хотелось бы лучше. Консультация
Ситуации, требующие кардинальных изменений в жизни и переживания.
Может быть что угодно: проблемы с деньгами, потеря близкого, конфликт с друзьями или даже просто ощущение, что всё идёт не так, как хотелось бы лучше.
viagra over the counter cost: VGR Sources – female viagra pills online
организация видеотрансляций zakazat-onlajn-translyaciyu1.ru .
водопонижение в строительстве stroitelnoe-vodoponizhenie1.ru .
организация онлайн трансляции москва организация онлайн трансляции москва .
120 mg sildenafil sildenafil cream 25mg viagra
female viagra cream: VGR Sources – viagra 100mg uk
организация онлайн трансляций цена организация онлайн трансляций цена .
female viagra in india online: VGR Sources – viagra china
can you buy viagra in europe: viagra in india online purchase – price of viagra 50mg in india
Здесь вы можете отыскать боту “Глаз Бога” , который позволяет собрать всю информацию о любом человеке из общедоступных баз .
Данный сервис осуществляет проверку ФИО и показывает информацию из государственных реестров .
С его помощью можно узнать контакты через специализированную платформу, используя автомобильный номер в качестве ключевого параметра.
проверка телефона по базе
Технология “Глаз Бога” автоматически обрабатывает информацию из проверенных ресурсов, формируя исчерпывающий результат.
Пользователи бота получают 5 бесплатных проверок для проверки эффективности.
Решение постоянно обновляется , сохраняя актуальность данных в соответствии с требованиями времени .
водопонижение иглофильтрами stroitelnoe-vodoponizhenie1.ru .
онлайн трансляции заказать онлайн трансляции заказать .
организация онлайн трансляций мероприятий организация онлайн трансляций мероприятий .
sildenafil 1.5 VGR Sources sildenafil 100 mg lowest price
организация трансляций организация трансляций .
otc viagra for women: VGR Sources – where to buy viagra online in india
https://vgrsources.com/# order female viagra online
drug prices sildenafil: VGR Sources – sildenafil 20 mg online no prescription
price viagra generic: where can you buy viagra over the counter in canada – viagra 50 mg price
sitio web tavoq.es es tu aliado en el crecimiento profesional. Ofrecemos CVs personalizados, optimizacion ATS, cartas de presentacion, perfiles de LinkedIn, fotos profesionales con IA, preparacion para entrevistas y mas. Impulsa tu carrera con soluciones adaptadas a ti.
Webseite cvzen.de ist Ihr Partner fur professionelle Karriereunterstutzung – mit ma?geschneiderten Lebenslaufen, ATS-Optimierung, LinkedIn-Profilen, Anschreiben, KI-Headshots, Interviewvorbereitung und mehr. Starten Sie Ihre Karriere neu – gezielt, individuell und erfolgreich.
Любой человек в своей жизни сталкивается с чередой испытаний. Женская консультация
Жизненные трудности – это любые ситуации, которые могут нарушить привычный жизненный уклад и потребовать значительных усилий для их преодоления.
Попытка изменить ситуацию, если это возможно, и принятие того, что изменить нельзя.
Хотя тяжелые события в жизни человека могут вызывать боль и трудности, они также представляют собой возможность для личностного роста.
Ремонт квартир https://remont-otdelka-mo.ru любой сложности — от косметического до капитального. Современные материалы, опытные мастера, строгие сроки. Работаем по договору с гарантиями.
viagra script online VGR Sources can i buy viagra online
kitesurfing
cost of viagra in usa: cheapest pharmacy price for viagra – viagra pills online canada
over the counter viagra substitute: sildenafil 100mg usa – can you buy viagra in usa
viagra cream buy online: buy viagra tablet – generic viagra soft gel capsule
Hello pals!
I came across a 116 helpful tool that I think you should check out.
This platform is packed with a lot of useful information that you might find insightful.
It has everything you could possibly need, so be sure to give it a visit!
https://renewablediesel.ca/betting/intermediate-problem-gambling-signs/
Ремонт квартир https://remont-kvartir-novo.ru под ключ в новостройках — от черновой отделки до полной готовности. Дизайн, материалы, инженерия, меблировка.
Ремонт квартир https://berlin-remont.ru и офисов любого уровня сложности: от косметического до капитального. Современные материалы, опытные мастера, прозрачные сметы. Чисто, быстро, по разумной цене.
СРО УН «КИТ» https://sro-kit.ru саморегулируемая организация для строителей, проектировщиков и изыскателей. Оформление допуска СРО, вступление под ключ, юридическое сопровождение, помощь в подготовке документов.
конфигуратор компьютера онлайн
Ситуации, требующие кардинальных изменений в жизни и переживания. Женская консультация
Множество стратегий и подходов, которые могут помочь нам справиться с жизненными вызовами.
Независимо от текущего положения, всегда есть области, в которых можно повысить свои навыки, знания, способности или достичь новых целей.
Любой человек в своей жизни сталкивается с чередой испытаний.
https://vgrsources.com/# 50 mg viagra for sale
viagra triangle viagra for sale online usa average cost of viagra 50mg
5mg viagra: female viagra pill online – cheap viagra generic canada
I have not checked in here for some time because I thought it was getting boring, but the last few posts are good quality so I guess I¦ll add you back to my daily bloglist. You deserve it my friend 🙂
Looking for exclusive 1xBet promo codes ? Our website is your best choice to access rewarding bonuses for betting .
Whether you’re a new user or a seasoned bettor , verified codes provides exclusive advantages for your first deposit .
Keep an eye on daily deals to maximize your winning potential .
https://socialicus.com/story5119398/1xbet-promo-code-welcome-bonus-up-to-130
Available vouchers are tested for validity to ensure functionality in 2025 .
Take advantage of premium bonuses to revolutionize your gaming journey with 1xBet.
how much do viagra cost: VGR Sources – where to buy generic viagra online in canada
buy viagra 25mg: female viagra medication – online viagra canadian pharmacy online
Mostbet is a top option for players seeking free bonus betting sites. New Mostbet users get either 30 free spins in the top 5 games of their choice or five free Aviator bets when they use our Mostbet promo code BETMAXWIN. Both no-deposit bonuses have a 40x wagering requirement. Online casinos offer a variety of promotional offers for Aviator. New players can take advantage of welcome bonuses by increasing their deposit. In addition, you can find the following rewards: Captain jack’s casino when asked the question Whats the main thing you look for in a bingo site? the following responses were recorded, online slot machine offers excellent 93.85% Return To Player which opens fair probability to win in real money play with our link to bonus. La rabassada casino login app sign up more and more players are using their smartphones and tablets to play their favorite casino games, while others may offer them as a promotion for a specific event or game.
https://stage.cgfwd.com/master-the-game-with-premier-bet-aviator-login-in-malawi-a-comprehensive-review/
This special new player code tailor-made for mobile app downloads entitles you to Fairplay’s biggest welcome offer yet – up to ₹150,000 + 150 free spins to play popular online slots and table games. That’s over 3X higher compared to the standard desktop site bonus! If you enjoy color prediction games and seek an interactive platform with diverse options, the Colour Trading App could be a great choice. With its user-friendly UI, real-time updates, and engaging gameplay, the app provides an entertaining experience. However, those looking for skill-based or action-packed games might not find it as appealing. Ultimately, whether it suits you depends on your gaming preferences. The minimum cost of a trade is quite low. You won’t lose a large amount of funds while you’re still learning how to trade.
Дизайн Человека (human design) – это система знаний об энергетической механике людей и космологическом устройстве мира. Дизайн человека расчет
Дизайн Человека (human design) – это система знаний об энергетической механике людей и космологическом устройстве мира.
Понимание своего Дизайна Человека может помочь в выборе жизненного пути, который лучше соответствует вашему характеру и предназначению.
Каждый Профиль состоит из двух Линий: Сознательной и Подсознательной.
Дизайн человека может помочь вам лучше понимать людей вокруг вас, их энергетический тип, и как лучше взаимодействовать с ними.
Тип – это основа, но ваша уникальность проявляется через Профиль, Центры, Каналы и Ворота.
Дизайн человека делит людей на четыре категории, помогает узнать себя и показывает путь к счастливой жизни.
Дизайн человека – это система, которая предлагает анализ личности на основе информации о дате, времени и месте рождения.
sildenafil price comparison in india: VGR Sources – viagra 200mg price in india
На данном сайте вы найдете сервис “Глаз Бога”, позволяющий найти сведения о человеке через открытые базы.
Бот работает по фото, анализируя доступные данные в Рунете. С его помощью можно получить 5 бесплатных проверок и полный отчет по имени.
Платформа актуален согласно последним данным и охватывает фото и видео. Сервис поможет узнать данные в соцсетях и предоставит результаты в режиме реального времени.
https://glazboga.net/
Такой сервис — помощник в анализе людей удаленно.
women viagra price: VGR Sources – how to buy viagra tablets in india
viagra online sale in india VGR Sources female viagra pills online
Hello everyone!
I came across a 116 useful platform that I think you should take a look at.
This tool is packed with a lot of useful information that you might find insightful.
It has everything you could possibly need, so be sure to give it a visit!
https://absolutelybusiness.ca/live-cacinos/books-worth-reading-about-the-casino/
best price for sildenafil: VGR Sources – can i buy viagra online from canada
Квартиры посуточно https://kvartiry-posutochno19.ru в Абакане — от эконом до комфорт-класса. Уютное жильё в центре и районах города. Чистота, удобства, всё для комфортного проживания.
Агентство недвижимости https://metropolis-estate.ru покупка, продажа и аренда квартир, домов, коммерческих объектов. Полное сопровождение сделок, юридическая безопасность, помощь в оформлении ипотеки.
I wanted to thank you for this great read!! I definitely enjoying every little bit of it I have you bookmarked to check out new stuff you post…
https://pharmmex.shop/# the online drug store
lumbar spine pain management houston: where can i buy ozempic in mexico – mexico pharmacy price list ozempic
mexican drug stores klonopin mexican pharmacy prescriptions in mexico
No more phone needed! скачать steam desktop authenticator lets you use Steam Guard right on your computer. Quickly confirm transactions, access 2FA codes, and conveniently manage security.
Steam Guard for PC — sda steam. Ideal for those who trade, play and do not want to depend on a smartphone. Two-factor protection and convenient security management on Windows.
PC application скачать steam desktop authenticator replacing the mobile Steam Guard. Confirm logins, trades, and transactions in Steam directly from your computer. Support for multiple accounts, security, and backup.
order medicines online: InPharm24 – india online medicine
доставка авто https://avtovoz-av2.ru .
перевозка авто автовозом по россии http://www.avtovoz-av3.ru/ .
adderall shipped to me buy wegovy mexico can i buy zepbound in mexico
pharmacy council of india: online pharmacy company in india – indian online pharmacy
Профиль в Дизайне Человека — это уникальная комбинация двух линий, которые формируют ваш характер и способы взаимодействия с миром. Проектор 1 4
Тип – это основа, но ваша уникальность проявляется через Профиль, Центры, Каналы и Ворота.
Для каждого человека естественного искать выгоду для себя. Так происходит и с Дизайном Человека.
В целом, Дизайн человека может быть полезным инструментом для самопознания, саморазвития, и улучшения качества жизни. Он помогает понять себя и окружающий мир, и найти свой путь, который приносит счастье и удовлетворение.
Right now it appears like Drupal is the top blogging platform available right now. (from what I’ve read) Is that what you’re using on your blog?
Профессиональный сервисный центр по ремонту Apple iPhone в Москве.
Мы предлагаем: ремонт iphone на дому в москве
Наши мастера оперативно устранят неисправности вашего устройства в сервисе или с выездом на дом!
доставка авто https://avtovoz-av2.ru/ .
автовоз http://avtovoz-av3.ru .
mostbet az aviator strategiya mostbet az aviator strategiya .
india mart pharmacy indian pharmacies buy medicines online
I like this site so much, saved to bookmarks.
percocet online pharmacy reviews: Pharm Express 24 – online pharmacy in turkey
buy medicines online: InPharm24 – online medicines india
http://pharmmex.com/# best canadian pharmacy that ships to us
мостбет служба поддержки http://mostbet3040.ru .
mostbet qeydiyyat necə olur https://www.mostbet3051.ru .
Сайт знакомств https://rutiti.ru для серьёзных отношений, дружбы и общения. Реальные анкеты, удобный поиск, быстрый старт. Встречайте новых людей, находите свою любовь и начинайте общение уже сегодня.
I saw a lot of website but I believe this one has something special in it in it
Профили в Дизайне человека · 1 линия — Исследователь · 2 линия — Отшельник · 3 линия — Мученик · 4 линия — Опортунист · 5 линия — Еретик · 6 линия — Ролевая модель. Толкование гексаграмм
Дизайн человека может помочь вам лучше понимать людей вокруг вас, их энергетический тип, и как лучше взаимодействовать с ними.
Анализ своего Дизайна Человека может помочь в понимании причин, по которым вы испытываете определенные трудности, разочарования, и как можно их преодолеть.
Дизайн человека – это система, которая предлагает анализ личности на основе информации о дате, времени и месте рождения.
Дизайн человека помогает понять, какой тип энергии вы излучаете, как вы принимаете решения, и как лучше использовать свою энергию, чтобы не выгорать, а чувствовать себя более удовлетворённым
Профиль в Дизайне Человека — это уникальная комбинация двух линий, которые формируют ваш характер и способы взаимодействия с миром.
Каждый Профиль состоит из двух Линий: Сознательной и Подсознательной.
Дизайн Человека (human design) – это система знаний об энергетической механике людей и космологическом устройстве мира.
Загадки Вселенной https://phenoma.ru паранормальные явления, нестандартные гипотезы и научные парадоксы — всё это на Phenoma.ru
Дом из контейнера https://russiahelp.com под ключ — мобильное, экологичное и бюджетное жильё. Индивидуальные проекты, внутренняя отделка, электрика, сантехника и монтаж
Предлагаем услуги профессиональных инженеров офицальной мастерской.
Еслли вы искали ремонт кофемашин philips рядом, можете посмотреть на сайте: ремонт кофемашин philips сервис
Наши мастера оперативно устранят неисправности вашего устройства в сервисе или с выездом на дом!
Оформить заявку russiahelp.com можно за минуту.
mexican pain medicine phentermine mexico cost where to buy ozempic in mexico
Юрист Онлайн https://juristonline.com квалифицированная юридическая помощь и консультации 24/7. Решение правовых вопросов любой сложности: семейные, жилищные, трудовые, гражданские дела. Бесплатная первичная консультация.
cialis pharmacy2u: Pharm Express 24 – silkroad online pharmacy
reliable pharmacy india: InPharm24 – god of pharmacy in india
farmacia online estados unidos: mexican sida – percocet in mexico
Амбениум парентерал нестероидный противовоспалительный препарат – снимает боль, жар и воспаление при травмах, артритах, невралгиях и простуде. Быстрый эффект, надёжное действие, проверенная формула.
I genuinely prize your work, Great post.
Актуальные новости https://komandor-povolje.ru — политика, экономика, общество, культура и события стран постсоветского пространства, Европы и Азии. Объективно, оперативно и без лишнего — вся Евразия в одном месте.
перевозка автомобиля автовозом по россии https://www.avtovoz-av1.ru .
mostbet aviator oyunu https://mostbet3050.ru .
Searching for special 1xBet coupon codes ? Our website is your best choice to access valuable deals for betting .
If you’re just starting or a seasoned bettor , our curated selection ensures maximum benefits for your first deposit .
Stay updated on daily deals to multiply your rewards.
https://xbetwelcome1s.hashnode.dev/1xbet-promo-code-for-bangladesh-vip-bonus-130
Available vouchers are regularly verified to guarantee reliability for current users.
Don’t miss out of exclusive perks to transform your odds of winning with 1xBet.
Дизайн человека помогает понять, какой тип энергии вы излучаете, как вы принимаете решения, и как лучше использовать свою энергию, чтобы не выгорать, а чувствовать себя более удовлетворённым Хьюман дизайн расчет
Дизайн человека может помочь вам лучше понимать людей вокруг вас, их энергетический тип, и как лучше взаимодействовать с ними.
Дизайн человека – это система, которая предлагает анализ личности на основе информации о дате, времени и месте рождения.
Профили в Дизайне человека · 1 линия — Исследователь · 2 линия — Отшельник · 3 линия — Мученик · 4 линия — Опортунист · 5 линия — Еретик · 6 линия — Ролевая модель.
1win uzbekistan http://www.1win14015.ru .
mostbet poker o‘yini http://mostbet3039.ru/ .
best pharmacy products to buy in mexico Pharm Mex what drugs can i buy at a mexican pharmacy
унитаз алина байкова http://www.internet-magazin-santehniki-esd-1.ru .
dandruff shampoo india pharmacy: online medical store india – india pharmacy international shipping
Valuable information. Fortunate me I found your site by chance, and I’m stunned why this coincidence did not came about earlier! I bookmarked it.
https://degustator.net.ua/yak-zaminyty-stekla-far-za-30-khvylyn-shvydkyj-haj.html
site:dem.kg http://1win22090.ru .
best online pharmacy in india: pharmacy education in india – india pharmacy viagra
registration in pharmacy council of india: dandruff shampoo india pharmacy – pharmacy in india
https://pharmmex.com/# good online mexican pharmacy
Excellent post however , I was wondering if you could write a litte more on this subject? I’d be very grateful if you could elaborate a little bit further. Bless you!
https://s-boutique.com.ua/slipi-fary-sprobuj-zaminyty-lyshe-sklo-i-zdyvujsya.html
Йога для тела и ума https://yogapulse.ru. Полезные статьи, видеоуроки, дыхательные практики, медитации и осознанность. Присоединяйтесь к сообществу тех, кто выбирает здоровье, спокойствие и развитие.
Профиль в Дизайне Человека — это уникальная комбинация двух линий, которые формируют ваш характер и способы взаимодействия с миром. Отшельник совет карты
Дизайн человека делит людей на четыре категории, помогает узнать себя и показывает путь к счастливой жизни.
12 профилей в Дизайне человека. Исследователь. Отшельник. Мученик. Оппортунист. Еретик. Ролевая модель.
Профиль в Дизайне Человека — это уникальная комбинация двух линий, которые формируют ваш характер и способы взаимодействия с миром.
В целом, Дизайн человека может быть полезным инструментом для самопознания, саморазвития, и улучшения качества жизни. Он помогает понять себя и окружающий мир, и найти свой путь, который приносит счастье и удовлетворение.
Дизайн Человека (human design) – это система знаний об энергетической механике людей и космологическом устройстве мира.
JPGtoPNGHero.com provides a simple, browser-based solution for converting JPG files into PNG images. Designed with both professionals and beginners in mind, the site keeps its interface clean: a single “Upload” button and a drag-and-drop field guide users through the process. After you select your images, cloud servers perform the conversion automatically, preserving image clarity and transparency where relevant. Real-time progress indicators display each file’s status, and once finished, you’ll see download links appear immediately. The batch conversion feature lets you convert multiple files at once, ideal for photographers or marketers who need to process large sets of visuals. Because the tool is web-based, it supports all major operating systems—Windows, macOS, Linux, Android, and iOS—without any extra setup. Privacy ranks high: all files get deleted from the server soon after conversion, and no personal information is stored. No account is necessary, and the service remains completely free. From resizing logos for ecommerce sites to preparing artwork for presentations, JPGtoPNGHero.com makes image conversion effortless.
JPGtoPNGhero
услуги транспортировки автомобилей http://www.avtovoz-av1.ru .
игровой компьютер на заказ Купить игровой ПК: Погружение в мир развлечений Игровой ПК – это мечта каждого геймера. Он должен обеспечивать высокую производительность, плавную графику и быструю загрузку игр. Сборка игрового компьютера на заказ позволяет выбрать самые современные компоненты и создать машину, способную справиться с любыми игровыми задачами.
mexican online pharmacy adderall Pharm Mex semaglutide mexican pharmacy
propecia usa pharmacy: Pharm Express 24 – united pharmacy propecia
сантехника логотип internet-magazin-santehniki-esd-1.ru .
The next time I read a blog, I hope that it doesnt disappoint me as much as this one. I mean, I know it was my choice to read, but I actually thought youd have something interesting to say. All I hear is a bunch of whining about something that you could fix if you werent too busy looking for attention.
allergy medicine in mexico: mexican pharmacy price list – conscious pharmacy
Aunque el uso de un predictor puede ayudar a los jugadores de Aviator Spribe a aumentar sus posibilidades de ganar, es importante recordar que el juego sigue siendo un juego de azar y no hay garantía de ganar. Además, algunos casinos online pueden prohibir el uso de dichos programas, y los jugadores pueden enfrentarse a consecuencias negativas si utilizan predictores. Lucky Jet Predictor es una aplicación que predice los números de la suerte para el popular juego chino, Lucky Jet. La aplicación está disponible para su descarga en Android y Windows. También puedes usar la aplicación para hackear Juego Lucky Jet y obtener recursos ilimitados. El bot también proporciona una hoja de trucos Lucky Jet que contiene todas las predicciones y consejos Lucky Jet. El Predictor es un software usado para supuestamente predecir los resultados de Lucky Jet, también lo usan en el juego Aviator y en otros más. No es algo nuevo este tipo de programas que intentan adivinar resultados.
https://ash-kash.com/juego-del-globo-balloon-que-lo-hace-tan-adictivo-y-rentable/
NSoft’s content and technology are delivered throughout a modern customer platform providing dynamic gaming solutions and remaining fully focused on ensuring the most realistic user experience possible. By developing its state-of-the-art software solutions NSoft is devoted to creating a business environment which will maximize its customers’ sales opportunities and empower their company to reach new levels of growth. Fantasy – AI Image Generator, proveniente del desarrollador Playense, se ejecuta en el sistema Android en el pasado. 3. Disfruta jugando Fantasy – AI Image Generator en GameLoop. Super Soccer – 3V3 En la tanda de penaltis, marcar un gol duplica tu apuesta, lo que la convierte en una buena opción para una estrategia de apuestas martingala. La idea es sencilla: empieza con una apuesta mínima de $1 y duplica tu apuesta tras cada gol fallado. Una vez que marques, restablece tu apuesta a $1. Sin embargo, es fundamental tener cuidado: si sufres siete derrotas consecutivas, tu próxima apuesta ascendería a $64, una cantidad arriesgada si necesitas volver a doblar. Si bien la estrategia martingala puede ser efectiva para pequeñas victorias, es importante no abusar de ella para evitar pérdidas significativas.
В этом ресурсе вы можете отыскать боту “Глаз Бога” , который может собрать всю информацию о любом человеке из публичных данных.
Этот мощный инструмент осуществляет проверку ФИО и показывает информацию из соцсетей .
С его помощью можно пробить данные через специализированную платформу, используя фотографию в качестве ключевого параметра.
история автомобиля
Технология “Глаз Бога” автоматически анализирует информацию из открытых баз , формируя исчерпывающий результат.
Подписчики бота получают пробный доступ для тестирования возможностей .
Платформа постоянно развивается, сохраняя скорость обработки в соответствии с законодательством РФ.
Сертификация и лицензии — ключевой аспект ведения бизнеса в России, обеспечивающий защиту от неквалифицированных кадров.
Декларирование продукции требуется для подтверждения соответствия стандартам.
Для 49 видов деятельности необходимо специальных разрешений.
https://ok.ru/group/70000034956977/topic/158836131084465
Нарушения правил ведут к приостановке деятельности.
Добровольная сертификация помогает усилить конкурентоспособность бизнеса.
Своевременное оформление — залог успешного развития компании.
pharmacy from india: pharmacy india – buy drugs from india
Needed to send you the bit of word to be able to say thanks a lot yet again on the splendid views you have provided on this site. It is so tremendously generous with you to deliver freely what a lot of people would’ve sold as an e book to generate some money for their own end, particularly given that you might well have tried it if you decided. These tactics likewise served like a great way to understand that someone else have the same interest just as my personal own to see good deal more related to this condition. I’m sure there are lots of more pleasant instances in the future for those who check out your blog.
Информационная статья предлагает взвешенный подход к обсуждаемой теме, аргументируя свои выводы доказательствами и статистикой.
Прямо здесь можно получить сервис “Глаз Бога”, позволяющий найти данные по человеку по публичным данным.
Бот активно ищет по номеру телефона, используя актуальные базы в сети. Через бота доступны 5 бесплатных проверок и детальный анализ по запросу.
Сервис обновлен на 2025 год и поддерживает аудио-материалы. Сервис сможет проверить личность в соцсетях и отобразит сведения за секунды.
https://glazboga.net/
Данный сервис — идеальное решение в анализе людей удаленно.
buy viagra online in india InPharm24 pharmacy from india
mail order pharmacy mounjaro: Pharm Mex – mexican diazepam brands
Статья содержит обоснованный анализ фактов и данных, представленных в тексте.
so much great info on here, : D.
pharmacies in mexico: buy prescription meds online – mexican drug store
Я только что прочитал эту статью, и мне действительно понравилось, как она написана. Автор использовал простой и понятный язык, несмотря на тему, и представил информацию с большой ясностью. Очень вдохновляюще!
керамогранитная плитка цена http://www.keramogranit-kupit-gs-2.ru .
https://inpharm24.com/# pharmacy india online
I know this website gives quality dependent posts and extra material, is there any other web site which gives these kinds of data in quality?
mexican pharmacy ivermectin: online pharmacy usa – international online pharmacies
can i order online from a mexican pharmacy Pharm Mex tijuana pharmacy ozempic
Sweet web site, super layout, real clean and employ genial.
плитка керамогранит купить в москве http://www.keramogranit-kupit-gs-1.ru .
ed pharmacy cialis: target pharmacy fluoxetine – clozapine hospital pharmacy
celebrex pharmacy prices: online pharmacy 365 – medicine online order
купить керамическую плитку в москве цены keramogranit-kupit-gs-2.ru .
pharmacy in india: InPharm24 – medicine from india
Spot on with this write-up, I actually suppose this web site wants way more consideration. I’ll probably be once more to read way more, thanks for that info.
best canadian pharmacy for us citizens best pharmacy products to buy in mexico online medication store
pharmacy online india: best online pharmacy in india – medlife pharmacy
керамогранит цена метр керамогранит цена метр .
What a stuff of un-ambiguity and preserveness of precious know-how regarding unpredicted emotions.
http://chevrolet.com.ua/yak-stekla-far-vplyvayut-na-riven-enerhospozhyvann.html
1win texnik yordam https://1win14014.ru .
http://pharmexpress24.com/# rx mart pharmacy
1win скачать kz https://www.1win22089.ru .
buy ambien us pharmacy: Pharm Express 24 – buspar pharmacy prices
Lovely just what I was looking for.Thanks to the author for taking his time on this one.
Thanks for sharing excellent informations. Your website is so cool. I’m impressed by the details that you’ve on this blog. It reveals how nicely you perceive this subject. Bookmarked this web page, will come back for extra articles. You, my pal, ROCK! I found just the info I already searched all over the place and just couldn’t come across. What an ideal site.
purple pharmacy online: ambien mexican pharmacy – codeine mexico
1win virtual sport 1win virtual sport .
mexican pharmacy online medications: can i bring medication from mexico to us – order medicine from mexico
b pharmacy salary in india india pharmacy international shipping buy drugs from india
sda steam it is a desktop emulator of the Steam authentication mobile application. This desktop application allows users to manage their two-factor authentication easily, ensuring that only you can access your account.
mostbet сайт регистрация mostbet сайт регистрация .
buy semaglutide online mexico: ozempic mexico pharmacy online – metformin in mexico
I’m not sure where you’re getting your info, but great topic. I needs to spend some time learning much more or understanding more. Thanks for excellent info I was looking for this info for my mission.
Today, I went to the beach with my children. I found a sea shell and gave it to my 4 year old daughter and said “You can hear the ocean if you put this to your ear.” She put the shell to her ear and screamed. There was a hermit crab inside and it pinched her ear. She never wants to go back! LoL I know this is completely off topic but I had to tell someone!
mexican ibuprofen: Pharm Mex – how much is viagra in mexico
робота для українок у Варшаві Стань вебкам моделью в польской студии, работающей в Варшаве! Открыты вакансии для девушек в Польше, особенно для тех, кто говорит по-русски. Ищешь способ заработать онлайн в Польше? Предлагаем подработку для девушек в Варшаве с возможностью работы в интернете, даже с проживанием. Рассматриваешь удаленную работу в Польше? Узнай, как стать вебкам моделью и сколько можно заработать. Работа для украинок в Варшаве и высокооплачиваемые возможности для девушек в Польше ждут тебя. Мы предлагаем легальную вебкам работу в Польше, онлайн работа без необходимости знания польского языка. Приглашаем девушек без опыта в Варшаве в нашу вебкам студию с обучением. Возможность заработка в интернете без вложений. Работа моделью онлайн в Польше — это шанс для тебя! Ищешь “praca dla dziewczyn online”, “praca webcam Polska”, “praca modelka online” или “zarabianie przez internet dla kobiet”? Наше “agencja webcam Warszawa” и “webcam studio Polska” предлагают “praca dla mlodych kobiet Warszawa” и “legalna praca online Polska”. Смотри “oferty pracy dla Ukrainek w Polsce” и “praca z domu dla dziewczyn”.
vipps certified pharmacy viagra Pharm Express 24 pharmacy escrow adipex
ванны с гидромассажем http://www.vanny-s-gidromassajem-2.ru/ .
джакузи купить дешево vanny-s-gidromassajem-1.ru .
1win casino код 1win casino код .
https://pharmmex.com/# medication for sale
mostbet apk android http://mostbet3040.ru .
Looking for exclusive 1xBet promo codes? This site offers verified bonus codes like 1x_12121 for registrations in 2024. Claim €1500 + 150 FS as a welcome bonus.
Use trusted promo codes during registration to maximize your bonuses. Enjoy no-deposit bonuses and special promotions tailored for sports betting.
Find daily updated codes for 1xBet Kazakhstan with guaranteed payouts.
Every promotional code is checked for accuracy.
Don’t miss limited-time offers like 1x_12121 to increase winnings.
Active for first-time deposits only.
https://bookmark4you.win/story.php?title=unlocking-1xbet-promo-codes-for-enhanced-betting-in-multiple-countries#discussKeep updated with top bonuses – enter codes like 1XRUN200 at checkout.
Enjoy seamless benefits with instant activation.
mostbet promo kod az http://www.mostbet3050.ru .
JPGtoPNGHero.com provides a simple, browser-based solution for converting JPG files into PNG images. Designed with both professionals and beginners in mind, the site keeps its interface clean: a single “Upload” button and a drag-and-drop field guide users through the process. After you select your images, cloud servers perform the conversion automatically, preserving image clarity and transparency where relevant. Real-time progress indicators display each file’s status, and once finished, you’ll see download links appear immediately. The batch conversion feature lets you convert multiple files at once, ideal for photographers or marketers who need to process large sets of visuals. Because the tool is web-based, it supports all major operating systems—Windows, macOS, Linux, Android, and iOS—without any extra setup. Privacy ranks high: all files get deleted from the server soon after conversion, and no personal information is stored. No account is necessary, and the service remains completely free. From resizing logos for ecommerce sites to preparing artwork for presentations, JPGtoPNGHero.com makes image conversion effortless.
JPGtoPNGHero
mostbet . com http://mostbet3039.ru .
good value pharmacy: online pharmacy furosemide – first medicine online pharmacy store reviews
1вин регистрация http://1win22090.ru .
dulap din lemn masiv http://1win101.md .
online pharmacy glucophage Pharm Express 24 lasix mexican pharmacy
An impressive share, I just given this onto a colleague who was doing a little analysis on this. And he in fact bought me breakfast because I found it for him.. smile. So let me reword that: Thnx for the treat! But yeah Thnkx for spending the time to discuss this, I feel strongly about it and love reading more on this topic. If possible, as you become expertise, would you mind updating your blog with more details? It is highly helpful for me. Big thumb up for this blog post!
flagyl online pharmacy: Pharm Express 24 – online pharmacy viagra india
مباريات – germany football
Эта публикация погружает вас в мир увлекательных фактов и удивительных открытий. Мы расскажем о ключевых событиях, которые изменили ход истории, и приоткроем завесу над научными достижениями, которые вдохновили миллионы. Узнайте, чему может научить нас прошлое и как применить эти знания в будущем.
Получить больше информации – https://rspg.kmitl.ac.th/demo_image-2
ذا أثلتيك: إصابة مهاجم جديد في آرسنال.. وأرتيتا في موقف حرج لنهاية الموسم – football today | كرة القدم اليوم
Steam authenticator it is a desktop emulator of the Steam authentication mobile application. This desktop application allows users to manage their two-factor authentication easily, ensuring that only you can access your account.
My brother recommended I may like this web site. He was entirely right. This submit actually made my day. You can not imagine simply how so much time I had spent for this information! Thank you!
1win yangi domen https://www.1win14013.ru .
ванны с гидромассажем купить http://vanny-s-gidromassajem-2.ru .
online medicine delivery in india: registration in pharmacy council of india – pharmacy names in india
ванна гидромассажная ванна гидромассажная .
This is very interesting, You’re a very skilled blogger. I have joined your feed and look forward to seeking more of your wonderful post. Also, I have shared your website in my social networks!
Perfect piece of work you have done, this website is really cool with superb info .
Дизайн человека – это система, которая предлагает анализ личности на основе информации о дате, времени и месте рождения. Отшельник совет карты
Для каждого человека естественного искать выгоду для себя. Так происходит и с Дизайном Человека.
Понимание своего Дизайна Человека может помочь в выборе жизненного пути, который лучше соответствует вашему характеру и предназначению.
Дизайн человека – это система, которая предлагает анализ личности на основе информации о дате, времени и месте рождения.
Дизайн Человека позволяет учитывать индивидуальные особенность каждого человека и учит познавать свою истинную природу.
Профили в Дизайне человека · 1 линия — Исследователь · 2 линия — Отшельник · 3 линия — Мученик · 4 линия — Опортунист · 5 линия — Еретик · 6 линия — Ролевая модель.
Дизайн Человека (human design) – это система знаний об энергетической механике людей и космологическом устройстве мира.
Эта обзорная заметка содержит ключевые моменты и факты по актуальным вопросам. Она поможет читателям быстро ориентироваться в теме и узнать о самых важных аспектах сегодня. Получите краткий курс по современной информации и оставайтесь в курсе событий!
Получить больше информации – https://elcom-team.com/product/eclipse
Анализ своего Дизайна Человека может помочь в понимании причин, по которым вы испытываете определенные трудности, разочарования, и как можно их преодолеть. Дизайн человека рефлектор 5 1
Профиль в Дизайне Человека — это уникальная комбинация двух линий, которые формируют ваш характер и способы взаимодействия с миром.
Тип – это основа, но ваша уникальность проявляется через Профиль, Центры, Каналы и Ворота.
Каждый Профиль состоит из двух Линий: Сознательной и Подсознательной.
1win hisobni to‘ldirish 1win hisobni to‘ldirish .
В этой статье-обзоре мы соберем актуальную информацию и интересные факты, которые освещают важные темы. Читатели смогут ознакомиться с различными мнениями и подходами, что позволит им расширить кругозор и глубже понять обсуждаемые вопросы.
Исследовать вопрос подробнее – https://onezenplace.com/red-brushstroke-2
снять деньги с дебетовой карты Исследуйте мир удобных банковских карт. Оформление современной дебетовой карты теперь просто и доступно благодаря нашей поддержке. Выберите карту, которая идеально отвечает вашим потребностям, и воспользуйтесь всеми преимуществами современных финансовых услуг. Что мы предлагаем? Ценные советы: Полезные лайфхаки и рекомендации по эффективному использованию карты. Актуальные акции: Будьте в курсе самых выгодных предложений и специальных условий от банков-партнеров. Преимущества нашего сообщества. Здесь вы найдете всю необходимую информацию о различных видах карт, особенностях тарифов и комиссий. Наши публикации регулярно обновляются, чтобы предоставить вам актуальные данные и свежие новости о продуктах российских банков. Присоединяйтесь к нашему сообществу, чтобы сделать ваши финансовые решения простыми, быстрыми и надежными. Вместе мы сможем оптимизировать использование банковских продуктов и сэкономить ваше время и деньги. Наша цель — помочь вам эффективно управлять своими финансами и получать максимум выгоды от каждого взаимодействия с банком.
http://pharmacieexpress.com/# prendre amoxicilline sans ordonnance
comprar nolotil online: Confia Pharma – farmacia velГЎzquez online
مسابقات – european football | كرة القدم الأوروبية
1win официальный сайт зеркало букмекерской конторы https://www.1win22089.ru .
I’ve been surfing online greater than 3 hours these days, yet I never found any interesting article like yours. It?¦s beautiful value sufficient for me. Personally, if all website owners and bloggers made excellent content as you probably did, the web will probably be much more helpful than ever before.
mostbet virtual idman https://mostbet3049.ru/ .
Алкогольная зависимость разрушает здоровье, семью, карьеру и личность. Чем раньше будет оказана профессиональная помощь, тем выше шансы на восстановление и возвращение к полноценной жизни. Лечение алкоголизма в Воронеже — помощь на всех стадиях зависимости позволяет справляться не только с физической тягой, но и с глубинными причинами, которые провоцируют патологическое употребление.
Подробнее – клиника лечения алкоголизма
resilient 83 mg prezzo: kenacort prezzo – resolor prezzo
روما يواصل تألقه أمام فيرونا – yalla german
pharmacy delivery: voltaren punture prezzo – canigen dhppi/l
sayt mostbet https://mostbet3037.ru/ .
В течение полугода пациент может бесплатно посещать онлайн-группы поддержки и консультироваться у психологов клиники.
Выяснить больше – http://lechenie-narkomanii-volgograd9.ru
via farmacia online recensioni farmacia online crema colageno comprar eutirox sin receta
Профили в Дизайне человека · 1 линия — Исследователь · 2 линия — Отшельник · 3 линия — Мученик · 4 линия — Опортунист · 5 линия — Еретик · 6 линия — Ролевая модель. Humandes ru натальная карта
Дизайн человека делит людей на четыре категории, помогает узнать себя и показывает путь к счастливой жизни.
Анализ своего Дизайна Человека может помочь в понимании причин, по которым вы испытываете определенные трудности, разочарования, и как можно их преодолеть.
Для каждого человека естественного искать выгоду для себя. Так происходит и с Дизайном Человека.
Каждый Профиль состоит из двух Линий: Сознательной и Подсознательной.
Дизайн человека – это система, которая предлагает анализ личности на основе информации о дате, времени и месте рождения.
I really like your writing style, wonderful info , appreciate it for putting up : D.
Hiya, I’m really glad I’ve found this information. Nowadays bloggers publish just about gossips and net and this is really irritating. A good site with exciting content, this is what I need. Thanks for keeping this web-site, I will be visiting it. Do you do newsletters? Can’t find it.
comprar provera sin receta: se puede comprar sertralina sin receta – my farmacia online
donde comprar xenical sin receta en argentina: farmacia online senza ricetta – comprar viagra sin receta murcia
Those are yours alright! . We at least need to get these people stealing images to start blogging! They probably just did a image search and grabbed them. They look good though!
praca dla mlodych kobiet Warszawa Стань вебкам моделью в польской студии, работающей в Варшаве! Открыты вакансии для девушек в Польше, особенно для тех, кто говорит по-русски. Ищешь способ заработать онлайн в Польше? Предлагаем подработку для девушек в Варшаве с возможностью работы в интернете, даже с проживанием. Рассматриваешь удаленную работу в Польше? Узнай, как стать вебкам моделью и сколько можно заработать. Работа для украинок в Варшаве и высокооплачиваемые возможности для девушек в Польше ждут тебя. Мы предлагаем легальную вебкам работу в Польше, онлайн работа без необходимости знания польского языка. Приглашаем девушек без опыта в Варшаве в нашу вебкам студию с обучением. Возможность заработка в интернете без вложений. Работа моделью онлайн в Польше — это шанс для тебя! Ищешь “praca dla dziewczyn online”, “praca webcam Polska”, “praca modelka online” или “zarabianie przez internet dla kobiet”? Наше “agencja webcam Warszawa” и “webcam studio Polska” предлагают “praca dla mlodych kobiet Warszawa” и “legalna praca online Polska”. Смотри “oferty pracy dla Ukrainek w Polsce” и “praca z domu dla dziewczyn”.
Have you ever ventured beyond the traditional Santa Claus Christmas Ball tutorial to create a hyper-realistic, almost lifelike version? If so, what techniques did you employ to achieve such stunning detail? I’m particularly interested in mastering the art of creating and manipulating light gradients and shadows to mimic the effects of reflective light on the ball’s surface. Any insights or tips would be greatly appreciated! tinder creation date
http://farmaciasubito.com/# esopral 40 mg prezzo
Thank you for the auspicious writeup. It if truth be told was once a entertainment account it. Glance complicated to far delivered agreeable from you! By the way, how could we keep up a correspondence?
https://crazy-professor.com.ua/chomu-varto-zminyuvaty-steklo-far-a-ne-remontuvaty.html
робота для дівчат без досвіду Польща Стань вебкам моделью в польской студии, работающей в Варшаве! Открыты вакансии для девушек в Польше, особенно для тех, кто говорит по-русски. Ищешь способ заработать онлайн в Польше? Предлагаем подработку для девушек в Варшаве с возможностью работы в интернете, даже с проживанием. Рассматриваешь удаленную работу в Польше? Узнай, как стать вебкам моделью и сколько можно заработать. Работа для украинок в Варшаве и высокооплачиваемые возможности для девушек в Польше ждут тебя. Мы предлагаем легальную вебкам работу в Польше, онлайн работа без необходимости знания польского языка. Приглашаем девушек без опыта в Варшаве в нашу вебкам студию с обучением. Возможность заработка в интернете без вложений. Работа моделью онлайн в Польше — это шанс для тебя! Ищешь “praca dla dziewczyn online”, “praca webcam Polska”, “praca modelka online” или “zarabianie przez internet dla kobiet”? Наше “agencja webcam Warszawa” и “webcam studio Polska” предлагают “praca dla mlodych kobiet Warszawa” и “legalna praca online Polska”. Смотри “oferty pracy dla Ukrainek w Polsce” и “praca z domu dla dziewczyn”.
Since the admin of this site is working, no hesitation very shortly it will be famous, due to its feature contents.
https://sholom-aleichem.kiev.ua/yak-zminyty-steklo-fary-samostijno.html
tienda de farmacia online Confia Pharma cialis comprar farmacia online
mostbet kartla depozit mostbet3048.ru .
После поступления в клинику проводится осмотр, измеряется давление, оценивается общее состояние. При необходимости проводятся экспресс-анализы на содержание веществ и ЭКГ.
Узнать больше – https://narkologicheskaya-klinika-voronezh9.ru
I take pleasure in, lead to I discovered exactly what I was having a look for. You’ve ended my four day lengthy hunt! God Bless you man. Have a great day. Bye
http://tyres.com.ua/vartist-zaminy-stekol-na-far-dlya-starykh-avtomobi.html
12 профилей в Дизайне человека. Исследователь. Отшельник. Мученик. Оппортунист. Еретик. Ролевая модель. Канал 18 58 дизайн человека
Понимание своего Дизайна Человека может помочь в выборе жизненного пути, который лучше соответствует вашему характеру и предназначению.
Для каждого человека естественного искать выгоду для себя. Так происходит и с Дизайном Человека.
12 профилей в Дизайне человека. Исследователь. Отшельник. Мученик. Оппортунист. Еретик. Ролевая модель.
Профиль в Дизайне Человека — это уникальная комбинация двух линий, которые формируют ваш характер и способы взаимодействия с миром.
Профили в Дизайне человека · 1 линия — Исследователь · 2 линия — Отшельник · 3 линия — Мученик · 4 линия — Опортунист · 5 линия — Еретик · 6 линия — Ролевая модель.
Тип – это основа, но ваша уникальность проявляется через Профиль, Центры, Каналы и Ворота.
Дизайн человека – это система, которая предлагает анализ личности на основе информации о дате, времени и месте рождения.
Мы используем новейшие образцы медицинской техники, что повышает безопасность процедур и скорость детоксикации.
Детальнее – https://narkologicheskaya-pomoshh-ufa9.ru/narkologicheskaya-pomoshh-na-domu-ufa
farmacia azul online: farmacia online de fiar – curso de tecnico de farmacia online
farmacia online en cordoba: puedo comprar atorvastatina sin receta – como comprar tramadol sin receta
Why people still use to read news papers when in this technological globe all is available on web?
http://svetiteni.com.ua/yak-pravylno-upakuvaty-steklo-far-dlya-dostavky.html
Научно-популярный сайт https://phenoma.ru — малоизвестные факты, редкие феномены, тайны природы и сознания. Гипотезы, наблюдения и исследования — всё, что будоражит воображение и вдохновляет на поиски ответов.
Thanks for sharing your thoughts. I really appreciate your efforts and I am waiting for your further write ups thank you once again.
https://formlineneedles.com/vstanovlennya-novoho-stekla-fara-shcho-robyty-shch.html
1win parol tiklash 1win parol tiklash .
cod promoțional 1win https://1win100.md/ .
1 с управление нашей фирмой купить 1 с управление нашей фирмой купить .
termometro farmacia online comprar ibuprofeno 600 sin receta comprar esteroides sin receta
very good submit, i certainly love this web site, carry on it
mostbet uz скачать ios https://mostbet3038.ru/ .
calabria farmacia online: aspirina comprar sin receta – comprar zopiclona sin receta
pillola cerazette prezzo: muscoril fiale – diflucan 100
1с бухгалтерия 8.3 проф 1с бухгалтерия 8.3 проф .
Everything is very open and very clear explanation of issues. was truly information. Your website is very useful. Thanks for sharing.
Возможность получить помощь в любой час снижает риск осложнений и ускоряет стабилизацию состояния. Среди главных преимуществ:
Разобраться лучше – http://narkologicheskaya-pomoshh-ufa9.ru/narkologicheskaya-pomoshh-na-domu-ufa/
После поступления в клинику проводится осмотр, измеряется давление, оценивается общее состояние. При необходимости проводятся экспресс-анализы на содержание веществ и ЭКГ.
Детальнее – http://narkologicheskaya-klinika-voronezh9.ru/uslugi-narkologicheskoj-kliniki-voronezh/https://narkologicheskaya-klinika-voronezh9.ru
mostbet com android mostbet com android .
Наш стационар оснащён всем необходимым для безопасного и комфортного лечения. Здесь вы получите круглосуточный мониторинг, современное оборудование и услуги психологов, социальных педагогов и физиотерапевтов.
Исследовать вопрос подробнее – http://narkologicheskaya-klinika-ufa9.ru
Лечение алкоголизма в Воронеже — помощь на всех стадиях зависимости особенно важно на этапе, когда у человека ещё сохраняется мотивация к изменениям. Но даже при тяжёлых формах зависимости шанс на выздоровление сохраняется — при условии комплексного подхода.
Подробнее можно узнать тут – анонимное лечение алкоголизма в воронеже
Этот увлекательный информационный материал подарит вам массу новых знаний и ярких эмоций. Мы собрали для вас интересные факты и сведения, которые обогатят ваш опыт. Откройте для себя увлекательный мир информации и насладитесь процессом изучения!
Выяснить больше – https://seoflx.net/o/sefyi-rank-website-on-first-page
Your house is valueble for me. Thanks!…
Предлагаем вашему вниманию интересную справочную статью, в которой собраны ключевые моменты и нюансы по актуальным вопросам. Эта информация будет полезна как для профессионалов, так и для тех, кто только начинает изучать тему. Узнайте ответы на важные вопросы и расширьте свои знания!
Получить дополнительную информацию – https://laroutedelasoie.fr/img_1660
Возможность получить помощь в любой час снижает риск осложнений и ускоряет стабилизацию состояния. Среди главных преимуществ:
Подробнее – skoraya narkologicheskaya pomoshch ufa
купить программу 1с для ип купить программу 1с для ип .
https://farmaciasubito.com/# talofen gocce
Лечение в наркологической клинике в Воронеже проводится поэтапно, с учётом состояния пациента, длительности зависимости и наличия сопутствующих заболеваний.
Узнать больше – частная наркологическая клиника воронеж.
С учётом всех этапов (детоксикация, терапевтическая работа и адаптация) курс занимает от одного до трёх месяцев, в зависимости от индивидуальных особенностей пациента.
Получить больше информации – centr lecheniya narkomanii volgograd
Very nice post. I just stumbled upon your blog and wanted to say that I’ve really enjoyed surfing around your blog posts. In any case I will be subscribing to your feed and I hope you write again soon!
Лечение в наркологической клинике в Воронеже проводится поэтапно, с учётом состояния пациента, длительности зависимости и наличия сопутствующих заболеваний.
Выяснить больше – наркологическая клиника в воронеже
stilnox prezzo Farmacia Subito telefil 5 mg prezzo in farmacia
Этот информационный обзор станет отличным путеводителем по актуальным темам, объединяющим важные факты и мнения экспертов. Мы исследуем ключевые идеи и представляем их в доступной форме для более глубокого понимания. Читайте, чтобы оставаться в курсе событий!
Подробнее – https://jurnaljateng.id/news/regional/2021/09/22/profesionalisme-pemuda-pancasila-pac-kec-ungaran-timur-giatkan-pertemuan-rutin
купить 1с в москве купить 1с в москве .
prisma 50 mg: reactive farmaco – effetti collaterali cortisone cane anziano
JPGtoPNGHero.com is a free, online converter crafted to turn JPG files into PNG images with ease. Whether you’re preparing icons for a mobile app or converting family photos for a digital scrapbook, the process is straightforward: upload, wait a moment, and download. The server-side engine preserves image quality, ensuring sharpness and accurate color reproduction. A visible progress indicator tracks each file’s status in real time. Need to convert a whole folder of images? Batch conversion handles multiple JPGs at once, streamlining your workflow. Since the converter works entirely in a browser, it’s compatible with Windows, macOS, Linux, Android, and iOS—no installations required. Privacy is built in: all uploads are automatically deleted shortly after processing, and no user data is stored on the server. The site remains ad-free, requires no user account, and imposes no conversion limits. Whether you’re a digital artist, social media manager, or just someone who needs to change image formats, JPGtoPNGHero.com offers a fast, reliable, and hassle-free experience.
JPGtoPNGHero
бесплатные аккаунты стим аккаунты стим бесплатно
resume aerospace engineer chief engineer cv example
общие аккаунты стим с играми t.me/s/Burger_Game
¿Necesitas promocódigos exclusivos de 1xBet? En nuestra plataforma encontrarás recompensas especiales para tus jugadas.
El código 1x_12121 garantiza a hasta 6500₽ para nuevos usuarios.
Además , canjea 1XRUN200 y recibe hasta 32,500₽ .
https://tvsocialnews.com/story5182318/activa-tu-c%C3%B3digo-promocional-1xbet-y-gana-en-grande
Revisa las ofertas diarias para acumular más beneficios .
Las ofertas disponibles están actualizados para hoy .
¡Aprovecha y multiplica tus apuestas con esta plataforma confiable!
Этот информативный текст выделяется своими захватывающими аспектами, которые делают сложные темы доступными и понятными. Мы стремимся предложить читателям глубину знаний вместе с разнообразием интересных фактов. Откройте новые горизонты и развивайте свои способности познавать мир!
Получить дополнительную информацию – https://terapiasma.cl/wp/?p=7417
Эта статья полна интересного контента, который побудит вас исследовать новые горизонты. Мы собрали полезные факты и удивительные истории, которые обогащают ваше понимание темы. Читайте, погружайтесь в детали и наслаждайтесь процессом изучения!
Изучить вопрос глубже – https://inovsy.com/index.php/2023/04/09/digital-marketing-made-easy-let-our-team-handle
vaccin coqueluche pharmacie sans ordonnance prix: prix tadalafil 20 mg – creme avec cortisone sans ordonnance
Предлагаем вашему вниманию интересную справочную статью, в которой собраны ключевые моменты и нюансы по актуальным вопросам. Эта информация будет полезна как для профессионалов, так и для тех, кто только начинает изучать тему. Узнайте ответы на важные вопросы и расширьте свои знания!
Подробнее – https://corse-en-moto.com/des-exemples-ditineraires
В этом информативном тексте представлены захватывающие события и факты, которые заставят вас задуматься. Мы обращаем внимание на важные моменты, которые часто остаются незамеченными, и предлагаем новые перспективы на привычные вещи. Подготовьтесь к тому, чтобы быть поглощенным увлекательными рассказами!
Исследовать вопрос подробнее – https://www.patrino.sk/icon_rockets
В этой публикации мы сосредоточимся на интересных аспектах одной из самых актуальных тем современности. Совмещая факты и мнения экспертов, мы создадим полное представление о предмете, которое будет полезно как новичкам, так и тем, кто глубоко изучает вопрос.
Узнать больше – https://www.alroholdings.com/ready-aim-marry-2
В этой статье-обзоре мы соберем актуальную информацию и интересные факты, которые освещают важные темы. Читатели смогут ознакомиться с различными мнениями и подходами, что позволит им расширить кругозор и глубже понять обсуждаемые вопросы.
Подробнее – https://movieseffect.net/movie/beast-2022-2
Этот информативный текст отличается привлекательным содержанием и актуальными данными. Мы предлагаем читателям взглянуть на привычные вещи под новым углом, предоставляя интересный и доступный материал. Получите удовольствие от чтения и расширьте кругозор!
Разобраться лучше – http://juxtapositiontwin.ru/catalog/29
В этой статье вы найдете познавательную и занимательную информацию, которая поможет вам лучше понять мир вокруг. Мы собрали интересные данные, которые вдохновляют на размышления и побуждают к действиям. Открывайте новую информацию и получайте удовольствие от чтения!
Выяснить больше – https://viafresh.com.mx/pozole-vegano
Предлагаем вашему вниманию интересную справочную статью, в которой собраны ключевые моменты и нюансы по актуальным вопросам. Эта информация будет полезна как для профессионалов, так и для тех, кто только начинает изучать тему. Узнайте ответы на важные вопросы и расширьте свои знания!
Подробнее можно узнать тут – https://remeslneprace.com/connecting-with-natures-tranquil-essence
В этой медицинской статье мы погрузимся в актуальные вопросы здравоохранения и лечения заболеваний. Читатели узнают о современных подходах, методах диагностики и новых открытий в научных исследованиях. Наша цель — донести важную информацию и повысить уровень осведомленности о здоровье.
Получить дополнительную информацию – https://ketokotleta.ru/the_articles/chastnaya-narkologicheskaya-bolnitsa.html
F*ckin’ amazing things here. I am very glad to see your article. Thank you a lot and i am taking a look forward to touch you. Will you please drop me a e-mail?
Этот информативный текст отличается привлекательным содержанием и актуальными данными. Мы предлагаем читателям взглянуть на привычные вещи под новым углом, предоставляя интересный и доступный материал. Получите удовольствие от чтения и расширьте кругозор!
Подробнее можно узнать тут – https://maximcook.com/2022/04/13/18
I have been reading out many of your articles and i must say nice stuff. I will definitely bookmark your website.
viagra sans ordonnance en pharmacie suisse minoxidil ordonnance malarone gГ©nГ©rique sans ordonnance
Платная наркологическая клиника в Санкт-Петербурге «НОВЫЙ НАРКОЛОГ» предлагает профессиональную помощь при алкогольной и наркотической зависимости. Быстрое снятие абстиненции, кодирование, лечение в стационаре и амбулатории — всё с гарантией конфиденциальности.
Подробнее тут – кодирование от алкоголизма цены
Предлагаем услуги профессиональных инженеров офицальной мастерской.
Еслли вы искали ремонт холодильников gorenje цены, можете посмотреть на сайте: ремонт холодильников gorenje
Наши мастера оперативно устранят неисправности вашего устройства в сервисе или с выездом на дом!
Алкогольная зависимость — это хроническое заболевание, при котором устойчивое влечение к спиртному приводит к тяжёлым медицинским, социальным и психологическим последствиям. Когда пациент осознаёт, что самостоятельно справиться с этой проблемой не получается, наиболее эффективным методом становится кодирование от алкоголизма. В клинике «Ясное Будущее» в Одинцово мы используем сочетание проверенных методик кодирования и комплексной психологической поддержки, что позволяет достичь стойкой ремиссии и вернуть человеку контроль над собственной жизнью.
Получить дополнительную информацию – https://kodirovanie-ot-alkogolizma-odintsovo2.ru/
Реабилитационный центр «Еваклиник» в Саранске — место, где профессионалы помогают восстановить здоровье и вернуть уверенность в собственных силах. Мы предлагаем срочную консультацию врача-реабилитолога, разработку персональной программы ЛФК, массаж и физиотерапевтические процедуры. Современное оборудование и строгий контроль результатов обеспечивают надежный прогресс и комфортное лечение.
Выяснить больше – что такое спайс
В этой публикации мы сосредоточимся на интересных аспектах одной из самых актуальных тем современности. Совмещая факты и мнения экспертов, мы создадим полное представление о предмете, которое будет полезно как новичкам, так и тем, кто глубоко изучает вопрос.
Изучить вопрос глубже – https://losbotijos.com/convergent-and-divergent-plate-margins
solaraze gel miglior prezzo: Farmacia Subito – biorinil spray nasale prezzo
В обзорной статье вы найдете собрание важных фактов и аналитики по самым разнообразным темам. Мы рассматриваем как современные исследования, так и исторические контексты, чтобы вы могли получить полное представление о предмете. Погрузитесь в мир знаний и сделайте шаг к пониманию!
Выяснить больше – https://francanet.com.br/2024/06/24/prefeitura-mantem-centros-de-atendimento-ao-turista-com-informacoes-sobre-o-que-fazer-em-joao-pessoa
Медикаментозное кодирование проводится с помощью препаратов, блокирующих ферменты, ответственные за расщепление этанола, что вызывает выраженное неприятие алкоголя при попытке его употребления. Препараты вводятся внутримышечно или с помощью подкожных имплантов и действуют в течение нескольких месяцев, обеспечивая длительный эффект.
Ознакомиться с деталями – kodirovanie ot alkogolizma dovzhenko
whoah this blog is great i love reading your articles. Stay up the great paintings! You realize, a lot of individuals are searching around for this info, you can aid them greatly.
se puede comprar viagra en las farmacias sin receta: se puede comprar antibiotico sin receta – donde comprar viagra sin receta en granada
«Трезвый Ум» — надежная помощь в критических ситуациях. Мы устраняем последствия передозировки, восстанавливаем функции организма и обеспечиваем поддержку в Туле и области. Быстро, анонимно, с акцентом на ваше благополучие.
Детальнее – средство от похмелья
se puede comprar tretinoina sin receta: comprar rubifen sin receta Рfarmacia online espa̱a mascarilla
farmacia online asturias: farmacia online ticino – farmacia online italia.it
«Еваклиник» — реабилитационный центр в Саранске, специализирующийся на восстановлении после инсультов, переломов и ортопедических операций. В комфортных условиях мы проводим профилированную физиотерапию, массаж, занятия на реабилитационных тренажерах и психологическую поддержку. Гарантируем полную анонимность, внимательное сопровождение и высокую эффективность при любых этапах реабилитации.
Детальнее – https://evaclinica.ru/blog/razrushenie-psihiki-vo-vremya-zapoya.html
Медикаментозное кодирование проводится с помощью препаратов, блокирующих ферменты, ответственные за расщепление этанола, что вызывает выраженное неприятие алкоголя при попытке его употребления. Препараты вводятся внутримышечно или с помощью подкожных имплантов и действуют в течение нескольких месяцев, обеспечивая длительный эффект.
Узнать больше – https://kodirovanie-ot-alkogolizma-odintsovo2.ru/kodirovanie-ot-alkogolizma-cena
cloretilo farmacia online: se puede comprar fortasec sin receta – todacitan se puede comprar sin receta
1win promo bilan bonus olish http://1win14011.ru/ .
Профили в Дизайне человека · 1 линия — Исследователь · 2 линия — Отшельник · 3 линия — Мученик · 4 линия — Опортунист · 5 линия — Еретик · 6 линия — Ролевая модель. 46 ворота дизайн человека
Дизайн Человека позволяет учитывать индивидуальные особенность каждого человека и учит познавать свою истинную природу.
Профиль в Дизайне Человека — это уникальная комбинация двух линий, которые формируют ваш характер и способы взаимодействия с миром.
Каждый Профиль состоит из двух Линий: Сознательной и Подсознательной.
12 профилей в Дизайне человека. Исследователь. Отшельник. Мученик. Оппортунист. Еретик. Ролевая модель.
Дизайн Человека (human design) – это система знаний об энергетической механике людей и космологическом устройстве мира.
Тип – это основа, но ваша уникальность проявляется через Профиль, Центры, Каналы и Ворота.
Профили в Дизайне человека · 1 линия — Исследователь · 2 линия — Отшельник · 3 линия — Мученик · 4 линия — Опортунист · 5 линия — Еретик · 6 линия — Ролевая модель.
Наркологическая клиника «Трезвый Ум» в Туле — срочная помощь при отравлении алкоголем и наркотиками. Круглосуточный выезд специалистов, инфузионная терапия, медикаментозное восстановление, забота о вашем здоровье. Полная анонимность, профессионализм и безопасность.
Выяснить больше – семейного благополучия
Услуга “Нарколог на дом” в Мариуполе, Донецкая область, предусматривает оперативное оказание медицинской помощи при запое. После получения вызова специалист незамедлительно выезжает к пациенту, проводит детальный осмотр, измеряет жизненно важные показатели и собирает анамнез. На основе полученных данных разрабатывается индивидуальный план терапии, включающий медикаментозную детоксикацию, инфузионную терапию и психологическую поддержку. Такой комплексный подход позволяет эффективно вывести токсины из организма и предотвратить развитие осложнений.
Подробнее тут – [url=https://narcolog-na-dom-mariupol00.ru/]вызов нарколога на дом мариуполь[/url]
1win tikish qanday qilinadi 1win tikish qanday qilinadi .
Hi! Someone in my Facebook group shared this website with us so I came to check it out. I’m definitely loving the information. I’m bookmarking and will be tweeting this to my followers! Wonderful blog and superb design and style.
как вывести бонусный счет с 1win http://1win22088.ru .
quel antibiotique pour chat sans ordonnance ? drogue en pharmacie sans ordonnance comment soigner une conjonctivite sans ordonnance
Nerve Calm is an advanced nerve support formula that combines a synergistic blend of essential vitamins, minerals, and herbal extracts.
clavulin bambini: Farmacia Subito – farmacia francia online
1win akkaunt yaratish https://www.1win14011.ru .
Медикаментозное кодирование проводится с помощью препаратов, блокирующих ферменты, ответственные за расщепление этанола, что вызывает выраженное неприятие алкоголя при попытке его употребления. Препараты вводятся внутримышечно или с помощью подкожных имплантов и действуют в течение нескольких месяцев, обеспечивая длительный эффект.
Разобраться лучше – kodirovanie ot alkogolizma na domu
Реабилитационный центр «Еваклиник» в Саранске предлагает высококвалифицированную помощь в восстановлении после травм и заболеваний. Наши специалисты проводят индивидуальную диагностику, разрабатывают комплексные программы ЛФК, физиотерапии и психологической поддержки, применяя современные методики и оборудование. Доверьтесь профессионалам для скорейшего возвращения к активной жизни и полноценной самостоятельности!
Исследовать вопрос подробнее – реабилитационный центр
top farmacia online italia: annister gocce prezzo – abba antibiotico
Наркологическая клиника «Трезвый Ум» в Туле — срочная помощь при отравлении алкоголем и наркотиками. Круглосуточный выезд специалистов, инфузионная терапия, медикаментозное восстановление, забота о вашем здоровье. Полная анонимность, профессионализм и безопасность.
Исследовать вопрос подробнее – нарколог на дом круглосуточно
В клинике «Горизонт Жизни» в Красногорске разработаны протоколы экстренного вывода из запоя, которые выполняются 24 часа в сутки, семь дней в неделю. Благодаря выезду бригады врачей-наркологов и оснащённости современным оборудованием мы оказываем помощь в кратчайшие сроки, обеспечивая максимальную безопасность и комфорт пациенту.
Детальнее – https://vyvod-iz-zapoya-krasnogorsk2.ru/vyvod-iz-zapoya-anonimno/
На этом этапе специалист уточняет, сколько времени продолжается запой, какой вид алкоголя употребляется и имеются ли сопутствующие заболевания. Тщательный анализ собранной информации позволяет оперативно подобрать оптимальные методы детоксикации и минимизировать риск осложнений.
Получить дополнительную информацию – https://vyvod-iz-zapoya-donetsk-dnr0.ru/vyvod-iz-zapoya-na-domu-doneczk-dnr
Лечение на дому проходит в комфортной и спокойной обстановке, что позволяет значительно снизить уровень стресса и быстро улучшить состояние здоровья пациента.
Подробнее тут – нарколог на дом вывод из запоя сочи
pinco cazino Pinco, Pinco AZ, Pinco Casino, Pinco Kazino, Pinco Casino AZ, Pinco Casino Azerbaijan, Pinco Azerbaycan, Pinco Gazino Casino, Pinco Pinco Promo Code, Pinco Cazino, Pinco Bet, Pinco Yukl?, Pinco Az?rbaycan, Pinco Casino Giris, Pinco Yukle, Pinco Giris, Pinco APK, Pin Co, Pin Co Casino, Pin-Co Casino. Онлайн-платформа Pinco, включая варианты Pinco AZ, Pinco Casino и Pinco Kazino, предлагает азартные игры в Азербайджане, также известная как Pinco Azerbaycan и Pinco Gazino Casino. Pinco предоставляет промокоды, а также варианты, такие как Pinco Cazino и Pinco Bet. Пользователи могут загрузить приложение Pinco (Pinco Yukl?, Pinco Yukle) для доступа к Pinco Az?rbaycan и Pinco Casino Giris. Pinco Giris доступен через Pinco APK. Pin Co и Pin-Co Casino — это связанные термины.
Wohh exactly what I was searching for, thankyou for putting up.
Tonic Greens is an all-natural immune-boosting supplement designed to support your overall wellness with the power of antioxidants, vitamins, and superfoods. It comes in a convenient powdered form that you can easily mix with water, juice, or your favorite smoothie.
comment avoir du viagra en pharmacie sans ordonnance ? mustela huile vergeture larmes artificielles pharmacie sans ordonnance
que medicamentos se pueden comprar sin receta en estados unidos: farmacia online barata opiniones – farmacia online argentina envГos a todo el paГs
Этанол связывается с ГАМК-рецепторами, усиливая тормозные процессы в ЦНС, что ведёт к снижению рефлексов и когнитивных функций. Одновременно происходит повышение активности дофаминовых путей, вызывая ощущение кратковременного «успокоения» и «радости». При прекращении поступления алкоголя к рецепторам наступает синдром отмены — резкое возбуждение, тревожность и дисбаланс нейротрансмиттеров.
Получить больше информации – narkolog-vyvod-iz-zapoya sankt-peterbrug
farmacia online 24horas: Confia Pharma – farmacia online dr max
Читайте о необычном http://phenoma.ru научно-популярные статьи о феноменах, которые до сих пор не имеют однозначных объяснений. Психология, физика, биология, космос — самые интересные загадки в одном разделе.
Платная наркологическая клиника «НОВЫЙ НАРКОЛОГ» в Санкт-Петербурге обеспечивает профессиональное лечение зависимостей, включая кодирование, медикаментозную терапию и восстановление психологического состояния. Круглосуточный приём и выезд врача на дом.
Узнать больше – почему тошнит после алкоголя
resume data engineer resume assistant engineer
Мир полон тайн https://phenoma.ru читайте статьи о малоизученных феноменах, которые ставят науку в тупик. Аномальные явления, редкие болезни, загадки космоса и сознания. Доступно, интересно, с научным подходом.
1win jonli yordam 1win jonli yordam .
Ниже приведены ключевые сигналы, при появлении которых требуется немедленное реагирование:
Получить больше информации – vyvod iz zapoya kapel’nica na domu
Woah! I’m really digging the template/theme of this website. It’s simple, yet effective. A lot of times it’s tough to get that “perfect balance” between usability and visual appeal. I must say you’ve done a great job with this. Additionally, the blog loads super fast for me on Opera. Exceptional Blog!
liste mГ©dicaments sans ordonnance Pharmacie Express kenacort 40 sans ordonnance
tadalafil prix 5mg: sildenafil mylan 100 mg achat en ligne – vermifuge ordonnance
На данном сайте вы можете отыскать боту “Глаз Бога” , который способен собрать всю информацию о любом человеке из общедоступных баз .
Уникальный бот осуществляет поиск по номеру телефона и показывает информацию из соцсетей .
С его помощью можно пробить данные через специализированную платформу, используя фотографию в качестве начальных данных .
как пробить машину
Алгоритм “Глаз Бога” автоматически собирает информацию из открытых баз , формируя исчерпывающий результат.
Клиенты бота получают 5 бесплатных проверок для проверки эффективности.
Платформа постоянно совершенствуется , сохраняя скорость обработки в соответствии с стандартами безопасности .
Pretty! This was an incredibly wonderful article. Many thanks for supplying this information.
https://coolgopro.dk/chy-mozhna-zminyty-halohen-na-led-linzy-bez-zminy-.html
As a Newbie, I am permanently browsing online for articles that can benefit me. Thank you
Запой — это тяжёлое состояние, характеризующееся длительным употреблением алкоголя, при котором человек не в силах самостоятельно прекратить пить. Алкогольная интоксикация при длительных запоях вызывает нарушения в работе всех органов и систем, приводя к серьёзным последствиям, таким как инфаркты, инсульты, психозы и даже летальный исход. В такой ситуации единственным надёжным решением становится обращение за профессиональной помощью.
Исследовать вопрос подробнее – вывод из запоя на дому круглосуточно
При длительном запое или серьезной алкогольной интоксикации часто нет возможности или желания ехать в стационар. В таких ситуациях оптимальным решением становится вызов нарколога на дом в Сочи. Специалисты клиники «Жизнь без Запоя» круглосуточно приезжают к пациентам, оперативно оказывают медицинскую помощь и проводят профессиональную детоксикацию организма прямо в домашних условиях. Благодаря комфортному лечению на дому пациенты быстрее восстанавливаются, избегают дополнительного стресса и осложнений, связанных с госпитализацией.
Подробнее – http://narcolog-na-dom-sochi0.ru
Когда запой угрожает здоровью и жизни, оперативное вмешательство становится критически важным. В Донецке ДНР опытные специалисты по наркологии оказывают профессиональную помощь на дому, обеспечивая качественную детоксикацию организма, стабилизацию жизненно важных функций и психологическую поддержку. Такой формат лечения позволяет пациенту получить комплексную терапию в условиях комфорта, сохраняя полную конфиденциальность и избегая лишних формальностей.
Подробнее тут – http://vyvod-iz-zapoya-donetsk-dnr0.ru/
farmacias en madrid para comprar viagra sin receta: opinion farmacia online – donde puedo comprar ozempic sin receta
http://pharmacieexpress.com/# acheter clomid en pharmacie sans ordonnance
Аппаратные методы кодирования включают лазерную терапию и электростимуляцию биологически активных точек, влияющих на центры зависимости в головном мозге. Эти методики способствуют быстрому формированию устойчивого отвращения к спиртному и хорошо переносятся пациентами.
Подробнее можно узнать тут – https://kodirovanie-ot-alkogolizma-odintsovo2.ru/kodirovanie-ot-alkogolizma-na-domu/
JPGtoPNGHero.com provides a simple, browser-based solution for converting JPG files into PNG images. Designed with both professionals and beginners in mind, the site keeps its interface clean: a single “Upload” button and a drag-and-drop field guide users through the process. After you select your images, cloud servers perform the conversion automatically, preserving image clarity and transparency where relevant. Real-time progress indicators display each file’s status, and once finished, you’ll see download links appear immediately. The batch conversion feature lets you convert multiple files at once, ideal for photographers or marketers who need to process large sets of visuals. Because the tool is web-based, it supports all major operating systems—Windows, macOS, Linux, Android, and iOS—without any extra setup. Privacy ranks high: all files get deleted from the server soon after conversion, and no personal information is stored. No account is necessary, and the service remains completely free. From resizing logos for ecommerce sites to preparing artwork for presentations, JPGtoPNGHero.com makes image conversion effortless.
JPGtoPNGHero
mostbet az mostbet3048.ru .
1win зеркало сайта https://www.1win22088.ru .
Today, I went to the beach with my kids. I found a sea shell and gave it to my 4 year old daughter and said “You can hear the ocean if you put this to your ear.” She placed the shell to her ear and screamed. There was a hermit crab inside and it pinched her ear. She never wants to go back! LoL I know this is completely off topic but I had to tell someone!
JPGtoPNGHero
Выезд врача-нарколога из клиники «ТрезвоПрофи» на дом происходит в любое время суток, включая выходные и праздники. Перед началом детоксикации врач проводит осмотр, измеряет давление, частоту пульса, уровень кислорода в крови и подбирает индивидуальную схему лечения. Сама процедура обычно занимает от 1 до 2 часов и проводится под строгим контролем врача.
Изучить вопрос глубже – капельница от запоя в сочи
Медикаментозное кодирование проводится с помощью препаратов, блокирующих ферменты, ответственные за расщепление этанола, что вызывает выраженное неприятие алкоголя при попытке его употребления. Препараты вводятся внутримышечно или с помощью подкожных имплантов и действуют в течение нескольких месяцев, обеспечивая длительный эффект.
Выяснить больше – http://kodirovanie-ot-alkogolizma-odintsovo2.ru/kodirovanie-ot-alkogolizma-cena/
В клинике «НОВЫЙ НАРКОЛОГ» в СПб оказывают квалифицированную наркологическую помощь: от экстренного вывода из запоя до длительной реабилитации. Индивидуальный подход, конфиденциальность и поддержка на всех этапах выздоровления — основные принципы работы специалистов.
Получить больше информации – синдром отмены алкоголя
pariuri speciale pariuri speciale .
В клинике «Горизонт Жизни» в Красногорске разработаны протоколы экстренного вывода из запоя, которые выполняются 24 часа в сутки, семь дней в неделю. Благодаря выезду бригады врачей-наркологов и оснащённости современным оборудованием мы оказываем помощь в кратчайшие сроки, обеспечивая максимальную безопасность и комфорт пациенту.
Изучить вопрос глубже – https://vyvod-iz-zapoya-krasnogorsk2.ru/vyvod-iz-zapoya-cena
Управление бизнес-процессами Управление бизнес-процессами: сделайте бизнес прозрачным и управляемым. Эффективное управление бизнес-процессами — залог стабильности и роста. Опытный ментор поможет вам структурировать работу, внедрить автоматизацию и повысить прозрачность. В результате процессы станут управляемыми, а команда — мотивированной. Не позволяйте хаосу тормозить развитие — закажите консультацию и получите поддержку от эксперта, который поможет вам сделать бизнес более эффективным и устойчивым. Пришло время действовать — начните преобразование уже сегодня.
Обращение за срочной помощью нарколога на дому в Мариуполе имеет ряд весомых преимуществ, которые способствуют быстрому восстановлению здоровья:
Узнать больше – нарколог на дом мариуполь
Домашний формат идеально подходит для тех, кто находится в удовлетворительном состоянии и не требует круглосуточного контроля.
Разобраться лучше – http://vyvod-iz-zapoya-lyubertsy2.ru
Реабилитационный центр «Еваклиник» в Саранске — место, где профессионалы помогают восстановить здоровье и вернуть уверенность в собственных силах. Мы предлагаем срочную консультацию врача-реабилитолога, разработку персональной программы ЛФК, массаж и физиотерапевтические процедуры. Современное оборудование и строгий контроль результатов обеспечивают надежный прогресс и комфортное лечение.
Исследовать вопрос подробнее – эфедрин механизм действия
Prime Biome is a cutting-edge probiotic and gut health supplement designed to support digestive wellness, boost immunity, and enhance overall vitality.
Этанол связывается с ГАМК-рецепторами, усиливая тормозные процессы в ЦНС, что ведёт к снижению рефлексов и когнитивных функций. Одновременно происходит повышение активности дофаминовых путей, вызывая ощущение кратковременного «успокоения» и «радости». При прекращении поступления алкоголя к рецепторам наступает синдром отмены — резкое возбуждение, тревожность и дисбаланс нейротрансмиттеров.
Подробнее можно узнать тут – нарколог вывод из запоя в санкт-петербруге
comprar lexxema crema sin receta Confia Pharma farmacia online envГo gratis
slowmet a cosa serve: dicloreum compresse – come dare antibiotico al gatto con siringa
На данном сайте вы найдете сервис “Глаз Бога”, что проверить сведения о гражданине через открытые базы.
Бот работает по ФИО, используя доступные данные в сети. С его помощью доступны бесплатный поиск и детальный анализ по фото.
Инструмент обновлен на 2025 год и поддерживает аудио-материалы. Сервис поможет найти профили по госреестрам и покажет информацию за секунды.
Глаз Бога glazboga.net
Данный бот — помощник при поиске граждан через Telegram.
12 профилей в Дизайне человека. Исследователь. Отшельник. Мученик. Оппортунист. Еретик. Ролевая модель. Венера в дизайне человека
Понимание своего Дизайна Человека может помочь в выборе жизненного пути, который лучше соответствует вашему характеру и предназначению.
Дизайн Человека позволяет учитывать индивидуальные особенность каждого человека и учит познавать свою истинную природу.
Профили в Дизайне человека · 1 линия — Исследователь · 2 линия — Отшельник · 3 линия — Мученик · 4 линия — Опортунист · 5 линия — Еретик · 6 линия — Ролевая модель.
В целом, Дизайн человека может быть полезным инструментом для самопознания, саморазвития, и улучшения качества жизни. Он помогает понять себя и окружающий мир, и найти свой путь, который приносит счастье и удовлетворение.
Для каждого человека естественного искать выгоду для себя. Так происходит и с Дизайном Человека.
Дизайн человека делит людей на четыре категории, помогает узнать себя и показывает путь к счастливой жизни.
Дизайн человека может помочь вам лучше понимать людей вокруг вас, их энергетический тип, и как лучше взаимодействовать с ними.
Лечение на дому проходит в комфортной и спокойной обстановке, что позволяет значительно снизить уровень стресса и быстро улучшить состояние здоровья пациента.
Ознакомиться с деталями – vrach-narkolog-na-dom sochi
Наша наркологическая клиника предоставляет круглосуточную помощь, использует только сертифицированные медикаменты и строго соблюдает полную конфиденциальность лечения.
Разобраться лучше – капельница от запоя вызов в сочи
Когда запой угрожает здоровью и жизни, оперативное вмешательство становится критически важным. В Донецке ДНР опытные специалисты по наркологии оказывают профессиональную помощь на дому, обеспечивая качественную детоксикацию организма, стабилизацию жизненно важных функций и психологическую поддержку. Такой формат лечения позволяет пациенту получить комплексную терапию в условиях комфорта, сохраняя полную конфиденциальность и избегая лишних формальностей.
Углубиться в тему – вывод из запоя на дому круглосуточно в донецке
mostbet login http://www.mostbet3038.ru .
В обзорной статье вы найдете собрание важных фактов и аналитики по самым разнообразным темам. Мы рассматриваем как современные исследования, так и исторические контексты, чтобы вы могли получить полное представление о предмете. Погрузитесь в мир знаний и сделайте шаг к пониманию!
Получить дополнительные сведения – https://seisoku.jp/2019/03/20/%E4%B8%89%E6%B5%A6%E5%B8%82%E4%B8%89%E5%B4%8E%E3%81%AE%E5%8D%94%E4%BC%9A%E8%AA%8D%E5%AE%9A%E9%99%A2
Профессиональный вывод из запоя – это комплексная медицинская услуга, направленная на безопасное и оперативное лечение пациентов, столкнувшихся с алкогольной интоксикацией. В Донецке ДНР высококвалифицированные наркологи оказывают помощь на дому, что позволяет начать детоксикацию организма в комфортной и привычной обстановке. Такой подход обеспечивает индивидуальную терапию, всестороннюю поддержку и полную конфиденциальность, что особенно важно для тех, кто предпочитает получать лечение вне стационаров.
Узнать больше – вывод из запоя в стационаре в донецке
«Стоп Алко» — квалифицированная наркологическая помощь без ожидания. Быстрое выведение токсинов, восстановление организма, устранение последствий отравлений. Врачи работают 24/7, индивидуальный подход и полная анонимность.
Углубиться в тему – реабилитация алкоголизма
pillola abortiva farmacia online: farmacia online andorra viagra – farmacia online 931816247
Платная наркологическая клиника в Санкт-Петербурге «НОВЫЙ НАРКОЛОГ» предлагает профессиональную помощь при алкогольной и наркотической зависимости. Быстрое снятие абстиненции, кодирование, лечение в стационаре и амбулатории — всё с гарантией конфиденциальности.
Ознакомиться с деталями – кодирование от алкоголизма в спб
«Трезвый Ум» — экспертная наркологическая помощь в Туле и Тульской области. Мгновенная детоксикация, восстановление организма, устранение последствий интоксикации. Врачи доступны 24/7, обеспечивая индивидуальный подход и строгую конфиденциальность.
Подробнее – https://alkogolikum.ru/stati/alkogol-i-zdorove-serdca.html
Затяжной запой представляет собой состояние, при котором организм накапливает токсичные продукты распада алкоголя, нарушается работа сердца, печени и нервной системы. Без своевременного медицинского вмешательства возможны серьёзные осложнения: судороги, алкогольный психоз и острые нарушения гемодинамики. В Красноярске клиника «Красмед» предлагает круглосуточную службу вывода из запоя с применением передовых методик детоксикации и постоянным контролем состояния пациента.
Получить дополнительную информацию – вывод из запоя цена в красноярске
В этой статье вы найдете познавательную и занимательную информацию, которая поможет вам лучше понять мир вокруг. Мы собрали интересные данные, которые вдохновляют на размышления и побуждают к действиям. Открывайте новую информацию и получайте удовольствие от чтения!
Детальнее – https://www.whitepaperglobal.com/news/it-infra-news/unified-communication-news/microsofts-new-directx-12-agility-sdk-opens-the-door-to-direct-cpu-vram-access
amoxicilline angine sans ordonnance: orviax sans ordonnance en pharmacie Рgel ̩rection en pharmacie sans ordonnance
Этот информативный текст выделяется своими захватывающими аспектами, которые делают сложные темы доступными и понятными. Мы стремимся предложить читателям глубину знаний вместе с разнообразием интересных фактов. Откройте новые горизонты и развивайте свои способности познавать мир!
Подробнее можно узнать тут – https://mtnt.co.id/please-share-your-idea-and-new-innovation
1 с управление нашей фирмой купить 1 с управление нашей фирмой купить .
Этот интересный отчет представляет собой сборник полезных фактов, касающихся актуальных тем. Мы проанализируем данные, чтобы вы могли сделать обоснованные выводы. Читайте, чтобы узнать больше о последних трендах и значимых событиях!
Ознакомиться с деталями – https://norrum.fi/2021/04/08/climate-crisis-into-the-mainstream-and-engages
Wonderful website. Lots of helpful info here. I am sending it to some pals ans also sharing in delicious. And naturally, thanks for your sweat!
Современная наркология предлагает два основных формата вывода из запоя:
Получить дополнительные сведения – вывод из запоя санкт-петербруг.
ортопедическая стоматология ортопедическая стоматология .
Вывод из запоя в «Сибирском Докторе» происходит в несколько взаимосвязанных этапов:
Разобраться лучше – вывод из запоя анонимно новосибирск
mostbet az promo ilə qeydiyyat mostbet az promo ilə qeydiyyat .
В этой публикации мы сосредоточимся на интересных аспектах одной из самых актуальных тем современности. Совмещая факты и мнения экспертов, мы создадим полное представление о предмете, которое будет полезно как новичкам, так и тем, кто глубоко изучает вопрос.
Выяснить больше – http://www.batatabrasil.com.br/site/?p=471
Your house is valueble for me. Thanks!…
для чего программа 1с https://programmy-1s17.ru .
1win uzcard orqali pul olish 1win uzcard orqali pul olish .
como montar una farmacia online farmacia order cialis professional online comprar viagra en farmacias sin receta
Эта статья предлагает захватывающий и полезный контент, который привлечет внимание широкого круга читателей. Мы постараемся представить тебе идеи, которые вдохновят вас на изменения в жизни и предоставят практические решения для повседневных вопросов. Читайте и вдохновляйтесь!
Детальнее – https://herrikontrol.com/why-does-music-feel-so-good-5
roobet code 2025 WEB3 В мире онлайн-казино инновации не стоят на месте, и Roobet находится в авангарде этих перемен. С появлением технологии Web3, Roobet предлагает игрокам новый уровень прозрачности, безопасности и децентрализации. Чтобы воспользоваться всеми преимуществами этой передовой платформы, используйте промокод WEB3.
se puede comprar aciclovir sin receta: farmacia catena comenzi online – flutox se puede comprar sin receta
medicament pour bronchite sans ordonnance: antihistaminique sans ordonnance prix – tadalafil 5mg boГ®te 28 prix
Этот информативный материал предлагает содержательную информацию по множеству задач и вопросов. Мы призываем вас исследовать различные идеи и факты, обобщая их для более глубокого понимания. Наша цель — сделать обучение доступным и увлекательным.
Углубиться в тему – https://bpind.org/?attachment_id=127
Throughout the great pattern of things you’ll secure a B- for hard work. Where exactly you actually misplaced me personally ended up being on your particulars. As they say, details make or break the argument.. And that could not be much more true in this article. Having said that, let me say to you what exactly did deliver the results. The writing can be really persuasive which is probably the reason why I am making the effort in order to comment. I do not make it a regular habit of doing that. Secondly, even though I can certainly see a leaps in reasoning you make, I am not certain of how you appear to unite the points which in turn produce your conclusion. For the moment I shall yield to your point but wish in the future you actually connect your dots much better.
http://confiapharma.com/# farmacia kielsa online
Этот обзорный материал предоставляет информационно насыщенные данные, касающиеся актуальных тем. Мы стремимся сделать информацию доступной и структурированной, чтобы читатели могли легко ориентироваться в наших выводах. Познайте новое с нашим обзором!
Подробнее можно узнать тут – https://broadhurstagency.com/s2
Крыша на балкон Балкон, прежде всего, – это открытое пространство, связующее звено между уютом квартиры и бескрайним внешним миром. Однако его беззащитность перед капризами погоды порой превращает это преимущество в существенный недостаток. Дождь, снег, палящее солнце – все это способно причинить немало хлопот, лишая возможности комфортно проводить время на балконе, а также нанося ущерб отделке и мебели. Именно здесь на помощь приходит крыша на балкон – надежная защита и гарантия комфорта в любое время года.
mГ©dicament otite sans ordonnance: Pharmacie Express – seresta ordonnance
1с купить официальный сайт цена 1с купить официальный сайт цена .
Эта публикация дает возможность задействовать различные источники информации и представить их в удобной форме. Читатели смогут быстро найти нужные данные и получить ответы на интересующие их вопросы. Мы стремимся к четкости и доступности материала для всех!
Изучить вопрос глубже – https://deverbinding.life/de-verbinding/home
В этой статье собраны факты, которые освещают целый ряд важных вопросов. Мы стремимся предложить читателям четкую, достоверную информацию, которая поможет сформировать собственное мнение и лучше понять сложные аспекты рассматриваемой темы.
Исследовать вопрос подробнее – https://vartmart.com/product/quae-ab-illo-inventore-veritatis-et-quasi-architecto-beatae-vitae-dicta
I am not really excellent with English but I come up this really easygoing to interpret.
Эта обзорная заметка содержит ключевые моменты и факты по актуальным вопросам. Она поможет читателям быстро ориентироваться в теме и узнать о самых важных аспектах сегодня. Получите краткий курс по современной информации и оставайтесь в курсе событий!
Разобраться лучше – http://demeter.immo/2023/12/27/bonjour-tout-le-monde
Эта информационная заметка содержит увлекательные сведения, которые могут вас удивить! Мы собрали интересные факты, которые сделают вашу жизнь ярче и полнее. Узнайте нечто новое о привычных аспектах повседневности и откройте для себя удивительный мир информации.
Исследовать вопрос подробнее – https://yarddekeuken.nl/text-blog-post
В этом информативном тексте представлены захватывающие события и факты, которые заставят вас задуматься. Мы обращаем внимание на важные моменты, которые часто остаются незамеченными, и предлагаем новые перспективы на привычные вещи. Подготовьтесь к тому, чтобы быть поглощенным увлекательными рассказами!
Ознакомиться с деталями – https://obkladyadlazby-gondek.cz/hello-world
В этой статье мы рассматриваем разные способы борьбы с алкогольной зависимостью. Обсуждаются методы лечения, программы реабилитации и советы для поддержки близких. Читатели получат информацию о том, как преодолеть зависимость и добиться успешного выздоровления.
Получить дополнительные сведения – https://ria-ami.ru/2023/05/bolnica-dlya-alkogolikov-uxod-i-vyzdorovlenie
В обзорной статье вы найдете собрание важных фактов и аналитики по самым разнообразным темам. Мы рассматриваем как современные исследования, так и исторические контексты, чтобы вы могли получить полное представление о предмете. Погрузитесь в мир знаний и сделайте шаг к пониманию!
Подробнее – https://test.paranjothithirdeye.in/ta/%E0%AE%AA%E0%AE%B0%E0%AE%9E%E0%AF%8D%E0%AE%9A%E0%AF%8B%E0%AE%A4%E0%AE%BF-%E0%AE%AE%E0%AE%95%E0%AE%BE%E0%AE%A9%E0%AF%8D-%E0%AE%85%E0%AE%B5%E0%AE%B0%E0%AF%8D%E0%AE%95%E0%AE%B3%E0%AE%BF%E0%AE%A9%E0%AF%8D
Я только что прочитал эту статью, и мне действительно понравилось, как она написана. Автор использовал простой и понятный язык, несмотря на тему, и представил информацию с большой ясностью. Очень вдохновляюще!
Этот информативный материал предлагает содержательную информацию по множеству задач и вопросов. Мы призываем вас исследовать различные идеи и факты, обобщая их для более глубокого понимания. Наша цель — сделать обучение доступным и увлекательным.
Получить дополнительные сведения – https://kipers.ru
В этой статье представлен занимательный и актуальный контент, который заставит вас задуматься. Мы обсуждаем насущные вопросы и проблемы, а также освещаем истории, которые вдохновляют на действия и изменения. Узнайте, что стоит за событиями нашего времени!
Детальнее – https://xr-kosmetik.de/2017/09/19/be-smart-eat-wise
Этот информативный текст отличается привлекательным содержанием и актуальными данными. Мы предлагаем читателям взглянуть на привычные вещи под новым углом, предоставляя интересный и доступный материал. Получите удовольствие от чтения и расширьте кругозор!
Получить дополнительные сведения – https://www.kasablankamastering.com/boulangerie2011
pilule optilova sans ordonnance en pharmacie cytotec sans ordonnance pharmacie algerie soigner conjonctivite sans ordonnance
В этом информативном тексте представлены захватывающие события и факты, которые заставят вас задуматься. Мы обращаем внимание на важные моменты, которые часто остаются незамеченными, и предлагаем новые перспективы на привычные вещи. Подготовьтесь к тому, чтобы быть поглощенным увлекательными рассказами!
Подробнее можно узнать тут – https://shop.marisenf.de/willkommen-auf-unserer-website
На данном этапе врач уточняет, как долго продолжается запой, какой тип алкоголя употребляется и имеются ли сопутствующие заболевания. Детальный анализ клинических данных помогает подобрать оптимальные методы детоксикации и минимизировать риск осложнений.
Получить больше информации – вывод из запоя недорого в мурманске
comprar monurol 3g sin receta: farmacia online venta mascarillas – puedo comprar acetilcisteina sin receta
трансформаторы тсл трансформаторы тсл .
Статья предоставляет читателям широкий спектр фактов и аргументов, что способствует обсуждению и более глубокому пониманию обсуждаемой темы.
Эта статья предлагает живое освещение актуальной темы с множеством интересных фактов. Мы рассмотрим ключевые моменты, которые делают данную тему важной и актуальной. Подготовьтесь к насыщенному путешествию по неизвестным аспектам и узнайте больше о значимых событиях.
Получить больше информации – https://bjerkreimsmarken.no/hello-world
farmacia en andorra online: Confia Pharma – bexsero farmacia online
Эта статья сочетает познавательный и занимательный контент, что делает ее идеальной для любителей глубоких исследований. Мы рассмотрим увлекательные аспекты различных тем и предоставим вам новые знания, которые могут оказаться полезными в будущем.
Разобраться лучше – https://hogarconsalud.com/index.php/2015/05/31/3-razones-extranas-por-las-que-estas-engordando
Some truly nice stuff on this website , I like it.
На данном этапе врач уточняет, как долго продолжается запой, какой тип алкоголя употребляется и имеются ли сопутствующие заболевания. Детальный анализ клинических данных помогает подобрать оптимальные методы детоксикации и минимизировать риск осложнений.
Углубиться в тему – вывод из запоя на дому круглосуточно мурманск
https://yalla-tv-eg.com/category/%d9%85%d8%b3%d8%a7%d8%a8%d9%82%d8%a7%d8%aa/
На данном этапе врач уточняет, как долго продолжается запой, какой тип алкоголя употребляется и имеются ли сопутствующие заболевания. Детальный анализ клинических данных помогает подобрать оптимальные методы детоксикации и минимизировать риск осложнений.
Получить дополнительные сведения – нарколог вывод из запоя мурманск
На данном этапе врач уточняет, как долго продолжается запой, какой тип алкоголя употребляется и имеются ли сопутствующие заболевания. Детальный анализ клинических данных помогает подобрать оптимальные методы детоксикации и минимизировать риск осложнений.
Ознакомиться с деталями – нарколог вывод из запоя
мостбет уз http://www.mostbet3036.ru .
Индивидуальный подход: каждый пациент уникален, поэтому мы разрабатываем индивидуальный план лечения, учитывающий вид зависимости, стадию заболевания и особенности здоровья пациента.
Узнать больше – вывод из запоя на дому цена
Незамедлительно после вызова нарколог прибывает на дом для проведения первичного осмотра. Специалист измеряет жизненно важные показатели, такие как пульс, артериальное давление и температура, и собирает подробный анамнез. Это позволяет оценить степень интоксикации и оперативно разработать индивидуальный план лечения.
Подробнее тут – вывод из запоя мурманск.
iphone питер http://kupit-ajfon-cs12.ru .
На данном этапе врач уточняет, как долго продолжается запой, какой тип алкоголя употребляется и имеются ли сопутствующие заболевания. Детальный анализ клинических данных помогает подобрать оптимальные методы детоксикации и минимизировать риск осложнений.
Детальнее – вывод из запоя мурманская область
comprar online tratamientos antiarrugas farmacia farmacia online puerta del sol comprar sumial farmacia online
Когда запой становится угрозой для жизни и здоровья, своевременная помощь профессионала может стать решающим фактором для скорейшего восстановления. В Мурманске, где суровые климатические условия добавляют стресса и осложнений, квалифицированные наркологи оказывают помощь на дому, обеспечивая оперативную детоксикацию и индивидуальную терапию в привычной обстановке. Такой подход позволяет пациентам избежать лишних перемещений и получить поддержку в комфортной атмосфере.
Ознакомиться с деталями – vyvod-iz-zapoya murmansk
coldetom monodose: argento proteinato per bambini – ventolin prezzo
После диагностики начинается активная фаза капельничного лечения. Современные препараты вводятся с помощью автоматизированных систем дозирования, что обеспечивает быстрое снижение уровня токсинов в крови и восстановление обменных процессов. Этот этап направлен на стабилизацию работы печени, почек и сердечно-сосудистой системы.
Получить дополнительные сведения – http://kapelnica-ot-zapoya-lugansk-lnr00.ru
rhodogil se puede comprar sin receta: se pueden comprar medicamentos genГ©ricos sin receta – farmacia dr max comenzi online
Всё о городе городской портал города Ханты-Мансийск: свежие новости, события, справочник, расписания, культура, спорт, вакансии и объявления на одном городском портале.
chicken road game money Chicken Road: Взлеты и Падения на Пути к Успеху Chicken Road – это не просто развлечение, это обширный мир возможностей и тактики, где каждое решение может привести к невероятному взлету или полному краху. Игра, доступная как в сети, так и в виде приложения для мобильных устройств (Chicken Road apk), предлагает пользователям проверить свою фортуну и чутье на виртуальной “куриной тропе”. Суть Chicken Road заключается в преодолении сложного маршрута, полного ловушек и опасностей. С каждым успешно пройденным уровнем, награда растет, но и увеличивается шанс неудачи. Игроки могут загрузить Chicken Road game demo, чтобы оценить механику и особенности геймплея, прежде чем рисковать реальными деньгами.
Услуга вывода из запоя на дому в Мурманске предполагает комплексное лечение алкогольной интоксикации, направленное на оперативное снижение уровня токсинов в организме. Сразу после поступления вызова специалист проводит детальный осмотр, собирает анамнез и определяет степень интоксикации. На основании собранной информации разрабатывается индивидуальный план терапии, который может включать капельничное введение медикаментов, контроль жизненно важных показателей и психологическую поддержку. Такой комплекс мер позволяет стабилизировать состояние пациента и начать процесс выздоровления без необходимости посещения стационара.
Изучить вопрос глубже – вывод из запоя анонимно мурманск
айфон купить спб http://www.kupit-ajfon-cs11.ru .
Срочное вмешательство врача необходимо при появлении следующих симптомов:
Выяснить больше – http://vyvod-iz-zapoya-korolev2.ru/srochnyj-vyvod-iz-zapoya/
Услуга вывода из запоя на дому в Мурманске предполагает комплексное лечение алкогольной интоксикации, направленное на оперативное снижение уровня токсинов в организме. Сразу после поступления вызова специалист проводит детальный осмотр, собирает анамнез и определяет степень интоксикации. На основании собранной информации разрабатывается индивидуальный план терапии, который может включать капельничное введение медикаментов, контроль жизненно важных показателей и психологическую поддержку. Такой комплекс мер позволяет стабилизировать состояние пациента и начать процесс выздоровления без необходимости посещения стационара.
Детальнее – vyvod-iz-zapoya-kruglosutochno murmansk
Когда запой становится угрозой для жизни и здоровья, своевременная помощь профессионала может стать решающим фактором для скорейшего восстановления. В Мурманске, где суровые климатические условия добавляют стресса и осложнений, квалифицированные наркологи оказывают помощь на дому, обеспечивая оперативную детоксикацию и индивидуальную терапию в привычной обстановке. Такой подход позволяет пациентам избежать лишних перемещений и получить поддержку в комфортной атмосфере.
Ознакомиться с деталями – нарколог вывод из запоя в мурманске
itragerm se puede comprar sin receta: farmacia de guardia capitulos online – cursos de auxiliar de farmacia gratis online
Помощь нарколога на дому в Мурманске обладает рядом неоспоримых преимуществ, которые делают данный метод лечения особенно актуальным:
Изучить вопрос глубже – http://vyvod-iz-zapoya-murmansk0.ru/vyvod-iz-zapoya-czena-murmansk/
https://farmaciasubito.shop/# prisma 50 mg
трансформатор силовой сухой 1000 ква трансформатор силовой сухой 1000 ква .
Дизайн Человека (human design) – это система знаний об энергетической механике людей и космологическом устройстве мира. Тв канал 47
Дизайн человека – это система, которая предлагает анализ личности на основе информации о дате, времени и месте рождения.
Понимание своего Дизайна Человека может помочь в выборе жизненного пути, который лучше соответствует вашему характеру и предназначению.
Дизайн Человека позволяет учитывать индивидуальные особенность каждого человека и учит познавать свою истинную природу.
Для каждого человека естественного искать выгоду для себя. Так происходит и с Дизайном Человека.
formistin gocce prezzo: farmacia online. – dr max genova
fucimixbeta prezzo clodronato 200 mg prezzo atrocom ovuli prezzo
Психологическая реабилитация: Психологическая поддержка – один из главных аспектов нашего подхода. Мы предлагаем индивидуальные и групповые занятия, помогающие осознать зависимость, проработать эмоциональные травмы и сформировать новые модели поведения. Опытные психологи помогают пациентам понять причины своих зависимостей, что является важным шагом на пути к выздоровлению.
Разобраться лучше – наркологический вывод из запоя в казани
После диагностики начинается активная фаза медикаментозного вмешательства. Современные препараты вводятся капельничным методом, что позволяет быстро снизить уровень токсинов в крови, восстановить нормальные обменные процессы и стабилизировать работу жизненно важных органов, таких как печень, почки и сердце.
Подробнее можно узнать тут – https://vyvod-iz-zapoya-murmansk0.ru/vyvod-iz-zapoya-kruglosutochno-murmansk/
https://japan-football-team.com/author/football-court-com/
melatonine pharmacie sans ordonnance: Pharmacie Express – innovair sans ordonnance
Зависимость — это хроническое заболевание, которое разрушает не только физическое, но и психическое здоровье человека. Она подчиняет волю, искажает восприятие, разрушает семьи и судьбы. Алкоголизм, наркомания, игровая зависимость — лишь разные проявления одной проблемы, требующей профессионального и комплексного подхода.
Получить больше информации – вывод из запоя недорого уфа
Таким образом, наш подход направлен на создание комплексной системы поддержки, которая помогает каждому пациенту справиться с зависимостью и вернуться к полноценной жизни.
Получить дополнительные сведения – вывод из запоя круглосуточно казань
телефоны iphone цены телефоны iphone цены .
Generate custom hentai ai. Create anime-style characters, scenes, and fantasy visuals instantly using an advanced hentai generator online.
ictyane creme: acheter m̩dicaments sans ordonnance sur internet Рazithromycine prix sans ordonnance
После диагностики начинается активная фаза медикаментозного вмешательства. Современные препараты вводятся капельничным методом, что позволяет быстро снизить уровень токсинов в крови, восстановить нормальные обменные процессы и стабилизировать работу жизненно важных органов, таких как печень, почки и сердце.
Разобраться лучше – vyvod-iz-zapoya murmansk
I likewise conceive thence, perfectly indited post! .
Незамедлительно после вызова нарколог прибывает на дом для проведения первичного осмотра. Специалист измеряет жизненно важные показатели, такие как пульс, артериальное давление и температура, и собирает подробный анамнез. Это позволяет оценить степень интоксикации и оперативно разработать индивидуальный план лечения.
Углубиться в тему – наркологический вывод из запоя в мурманске
купить iphone 12 спб купить iphone 12 спб .
Audemars Piguet’s Royal Oak 15450ST boasts a
9.8mm thick case and 5 ATM water resistance, blending sporty durability
The watch’s timeless grey hue pairs with a integrated steel band for a versatile aesthetic.
The selfwinding mechanism ensures seamless functionality, a hallmark of Audemars Piguet’s engineering.
This model was produced in 2019, reflecting subtle updates to the Royal Oak’s heritage styling.
Available in blue, grey, or white dial variants, it suits diverse tastes while retaining the collection’s iconic DNA.
https://www.vevioz.com/read-blog/359970
A sleek silver index dial with Grande Tapisserie accented with glowing indices for effortless legibility.
The stainless steel bracelet offers a secure, ergonomic fit, finished with an AP folding clasp.
Renowned for its iconic design, the 15400ST stands as a pinnacle in the world of haute horology.
analgilasa se puede comprar sin receta: Confia Pharma – se puede comprar nolotil ampollas sin receta
Nice post. I learn something more challenging on different blogs everyday. It will always be stimulating to read content from other writers and practice a little something from their store. I’d prefer to use some with the content on my blog whether you don’t mind. Natually I’ll give you a link on your web blog. Thanks for sharing.
opiniones farmacia online 24 portugal farmacia online antidepresivos que se pueden comprar sin receta
The Audemars Piguet Royal Oak 16202ST features a elegant 39mm stainless steel case with an ultra-thin profile of just 8.1mm thickness, housing the advanced Calibre 7121 movement. Its striking “Bleu nuit nuage 50” dial showcases a intricate galvanic textured finish, fading from golden hues to deep black edges for a captivating aesthetic. The iconic eight-screw octagonal bezel pays homage to the original 1972 design, while the scratch-resistant sapphire glass ensures optimal legibility.
https://graph.org/Audemars-Piguet-Royal-Oak-16202st-The-Stainless-Steel-Revolution-06-02
Water-resistant to 50 meters, this “Jumbo” model balances sporty durability with sophisticated elegance, paired with a steel link strap and secure AP folding clasp. A contemporary celebration of classic design, the 16202ST embodies Audemars Piguet’s innovation through its precision engineering and timeless Royal Oak DNA.
Миссия нашего центра – оказание всесторонней помощи людям с зависимостями. Основные цели нашей работы:
Углубиться в тему – vyvod-iz-zapoya kazan’
Услуга вывода из запоя на дому в Мурманске предполагает комплексное лечение алкогольной интоксикации, направленное на оперативное снижение уровня токсинов в организме. Сразу после поступления вызова специалист проводит детальный осмотр, собирает анамнез и определяет степень интоксикации. На основании собранной информации разрабатывается индивидуальный план терапии, который может включать капельничное введение медикаментов, контроль жизненно важных показателей и психологическую поддержку. Такой комплекс мер позволяет стабилизировать состояние пациента и начать процесс выздоровления без необходимости посещения стационара.
Исследовать вопрос подробнее – https://vyvod-iz-zapoya-murmansk0.ru/vyvod-iz-zapoya-na-domu-murmansk//
На данном этапе врач уточняет, как долго продолжается запой, какой тип алкоголя употребляется и имеются ли сопутствующие заболевания. Детальный анализ клинических данных помогает подобрать оптимальные методы детоксикации и минимизировать риск осложнений.
Разобраться лучше – вывод из запоя на дому цена мурманск
12 профилей в Дизайне человека. Исследователь. Отшельник. Мученик. Оппортунист. Еретик. Ролевая модель. Соляр онлайн
Дизайн человека помогает понять, какой тип энергии вы излучаете, как вы принимаете решения, и как лучше использовать свою энергию, чтобы не выгорать, а чувствовать себя более удовлетворённым
Дизайн человека может помочь вам лучше понимать людей вокруг вас, их энергетический тип, и как лучше взаимодействовать с ними.
Профиль в Дизайне Человека — это уникальная комбинация двух линий, которые формируют ваш характер и способы взаимодействия с миром.
Дизайн человека – это система, которая предлагает анализ личности на основе информации о дате, времени и месте рождения.
Тип – это основа, но ваша уникальность проявляется через Профиль, Центры, Каналы и Ворота.
http://pharmacieexpress.com/# antibiotique sans ordonnance pour infection urinaire
Профиль в Дизайне Человека — это уникальная комбинация двух линий, которые формируют ваш характер и способы взаимодействия с миром. Дизайн человека книга
Дизайн Человека позволяет учитывать индивидуальные особенность каждого человека и учит познавать свою истинную природу.
В целом, Дизайн человека может быть полезным инструментом для самопознания, саморазвития, и улучшения качества жизни. Он помогает понять себя и окружающий мир, и найти свой путь, который приносит счастье и удовлетворение.
Дизайн человека делит людей на четыре категории, помогает узнать себя и показывает путь к счастливой жизни.
Понимание своего Дизайна Человека может помочь в выборе жизненного пути, который лучше соответствует вашему характеру и предназначению.
Каждый Профиль состоит из двух Линий: Сознательной и Подсознательной.
Профиль в Дизайне Человека — это уникальная комбинация двух линий, которые формируют ваш характер и способы взаимодействия с миром.
Для каждого человека естественного искать выгоду для себя. Так происходит и с Дизайном Человека.
Образовательные программы: Мы уверены, что знания о зависимости и её последствиях играют важную роль в реабилитации. Мы информируем пациентов о механизмах действия наркотиков и алкоголя на организм, что способствует изменению их отношения к терапии и жизни без зависимостей.
Углубиться в тему – вывод из запоя цена в казани
Каждый пациент проходит три основные стадии терапии, начиная с момента первого обращения.
Детальнее – наркологическая клиника уфа
ivomec prezzo: effetti collaterali cortisone cane – dubine crema
ozempic comprar sin receta espaГ±a: Confia Pharma – zineryt farmacia online
В «Горизонте Жизни» доступны два основных формата экстренной помощи: выездная служба на дому и лечение в условиях стационара.
Изучить вопрос глубже – http://vyvod-iz-zapoya-krasnogorsk2.ru/vyvod-iz-zapoya-anonimno/
peut on consulter un rhumatologue sans ordonnance: antibiotiques pharmacie sans ordonnance – lait aderma
Pretty portion of content. I just stumbled upon your website and in accession capital to say that I get in fact loved account your weblog posts. Anyway I’ll be subscribing to your augment or even I success you get right of entry to persistently fast.
hafilat balance check
telefil 20 mg prezzo lucen prezzo terbinafina compresse
1 vin https://www.1win22084.ru .
Rainbet promo code ILBET В динамичном мире онлайн-развлечений Rainbet занимает особое место, предоставляя игрокам широкие возможности для азартных игр и спортивных ставок. Для максимального увеличения выгоды и усиления азарта используйте промокод ILBET при регистрации или внесении депозита. Этот код активирует эксклюзивные бонусы, акции и предложения, разработанные как для новичков, так и для опытных игроков.
Команда клиники «Новый шанс» состоит из опытных специалистов-наркологов, которые имеют многолетнюю практику работы с пациентами, находящимися в зависимости, и регулярно совершенствуют свои знания.
Выяснить больше – вывод из запоя цена
mostbet.uz mostbet3034.ru .
купить телефон айфон недорого kupit-ajfon-cs13.ru .
После диагностики начинается активная фаза медикаментозного вмешательства. Современные препараты вводятся капельничным методом, что позволяет быстро снизить уровень токсинов в крови, восстановить нормальные обменные процессы и стабилизировать работу жизненно важных органов, таких как печень, почки и сердце.
Исследовать вопрос подробнее – https://vyvod-iz-zapoya-murmansk0.ru/vyvod-iz-zapoya-czena-murmansk
se pueden comprar ovulos sin receta en espaГ±a: Confia Pharma – se puede comprar viagra sin receta en farmacias fГsicas
1win uzbekistan http://www.1win14010.ru .
На данном этапе врач уточняет, как долго продолжается запой, какой тип алкоголя употребляется и имеются ли сопутствующие заболевания. Детальный анализ клинических данных помогает подобрать оптимальные методы детоксикации и минимизировать риск осложнений.
Углубиться в тему – наркология вывод из запоя в мурманске
The Audemars Piguet Royal Oak 15400ST features a robust steel construction launched as a modern classic of the legendary Royal Oak collection.
Its 41mm stainless steel case boasts an octagonal bezel accented with eight iconic screws, embodying the collection’s iconic DNA.
Driven by the self-winding Cal. 3120, guarantees seamless functionality featuring a practical date window.
https://telegra.ph/Audemars-Piguet-Royal-Oak-15400ST-An-Unconventional-Deep-Dive-06-02
A structured black dial with Tapisserie texture enhanced by luminescent markers for optimal readability.
The stainless steel bracelet combines elegance with resilience, fastened via a signature deployant buckle.
Celebrated for its high recognition value, this model remains a top choice among luxury watch enthusiasts.
Миссия нашего центра – оказание всесторонней помощи людям с зависимостями. Основные цели нашей работы:
Детальнее – vyvod-iz-zapoya-czena kazan’
https://farmaciasubito.shop/# atrocom 30 ovuli miglior prezzo
Образовательные программы: Мы уверены, что знания о зависимости и её последствиях играют важную роль в реабилитации. Мы информируем пациентов о механизмах действия наркотиков и алкоголя на организм, что способствует изменению их отношения к терапии и жизни без зависимостей.
Узнать больше – вывод из запоя круглосуточно в казани
gel Г©rectile en pharmacie sans ordonnance: pharmacie donne antibiotique sans ordonnance – collyre sans ordonnance en pharmacie
Алкогольный запой — это острое состояние тяжёлой интоксикации, при котором организм накапливает критические уровни продуктов распада этанола и перестаёт справляться с их нейтрализацией. При этом страдают важнейшие органы и системы: печень, почки, сердце, центральная нервная система. Без квалифицированной медицинской помощи риск развития судорог, алкогольного делирия и полиорганной недостаточности возрастает многократно.
Изучить вопрос глубже – вывод из запоя анонимно
farmacia coliseum compra online mejor farmacia online de espaГ±a farmacia online low cost
После диагностики начинается активная фаза медикаментозного вмешательства. Современные препараты вводятся капельничным методом, что позволяет быстро снизить уровень токсинов в крови, восстановить нормальные обменные процессы и стабилизировать работу жизненно важных органов, таких как печень, почки и сердце.
Углубиться в тему – вывод из запоя на дому
Каждый пациент проходит три основные стадии терапии, начиная с момента первого обращения.
Получить дополнительную информацию – наркологическая клиника уфа
1win blackjack uz 1win blackjack uz .
Поставки товаров из Китая – это сложный и многогранный процесс, который требует глубоких знаний логистики, таможенного законодательства и специфики китайского рынка. Когда речь идет об оптимизации этого процесса, на сцену выходит посредник в Китае. Этот специалист или компания берет на себя роль связующего звена между российским бизнесом и китайскими производителями, упрощая коммуникацию, контроль качества и организацию доставки. Выкуп товара из Китая – ключевой этап в импортных операциях. Особенно популярен выкуп с 1688 – крупнейшей оптовой онлайн-площадки Китая, предлагающей широкий ассортимент товаров по конкурентным ценам. Опт из Китая привлекает предпринимателей, стремящихся к масштабированию бизнеса и снижению закупочной стоимости. Важно понимать, что работа с оптовыми поставщиками требует внимательности и опыта, чтобы избежать недобросовестных поставщиков и получить качественный товар. Среди наиболее востребованных категорий товаров, импортируемых из Китая, выделяются оборудование и одежда. Оборудование из Китая часто отличается оптимальным соотношением цены и качества, что делает его привлекательным для производственных предприятий. Одежда из Китая продолжает оставаться популярной благодаря разнообразию моделей, материалов и ценовых категорий. Успешная организация поставок из Китая требует комплексного подхода, включающего выбор надежного посредника, тщательный отбор поставщиков, контроль качества продукции, оптимизацию логистических маршрутов и грамотное таможенное оформление. Только в этом случае бизнес сможет извлечь максимальную выгоду из сотрудничества с китайскими партнерами и укрепить свои позиции на рынке. посредник в Китае
Основная проблема запоя заключается в том, что человек постепенно теряет контроль над ситуацией, а его организм подвергается всё более тяжёлой интоксикации. Определить момент, когда требуется немедленное обращение за помощью, несложно, если внимательно следить за состоянием человека.
Изучить вопрос глубже – https://vyvod-iz-zapoya-korolev2.ru/srochnyj-vyvod-iz-zapoya/
Таким образом, наш подход направлен на создание комплексной системы поддержки, которая помогает каждому пациенту справиться с зависимостью и вернуться к полноценной жизни.
Получить больше информации – вывод из запоя в стационаре
Этот увлекательный информационный материал подарит вам массу новых знаний и ярких эмоций. Мы собрали для вас интересные факты и сведения, которые обогатят ваш опыт. Откройте для себя увлекательный мир информации и насладитесь процессом изучения!
Подробнее – http://rampon.in/product/talifa-bag-nypd
официальный 1вин https://www.1win22087.ru .
Услуга вывода из запоя на дому в Мурманске предполагает комплексное лечение алкогольной интоксикации, направленное на оперативное снижение уровня токсинов в организме. Сразу после поступления вызова специалист проводит детальный осмотр, собирает анамнез и определяет степень интоксикации. На основании собранной информации разрабатывается индивидуальный план терапии, который может включать капельничное введение медикаментов, контроль жизненно важных показателей и психологическую поддержку. Такой комплекс мер позволяет стабилизировать состояние пациента и начать процесс выздоровления без необходимости посещения стационара.
Углубиться в тему – наркологический вывод из запоя в мурманске
В обзорной статье вы найдете собрание важных фактов и аналитики по самым разнообразным темам. Мы рассматриваем как современные исследования, так и исторические контексты, чтобы вы могли получить полное представление о предмете. Погрузитесь в мир знаний и сделайте шаг к пониманию!
Подробнее тут – https://kgb4x4.ru
Эта статья полна интересного контента, который побудит вас исследовать новые горизонты. Мы собрали полезные факты и удивительные истории, которые обогащают ваше понимание темы. Читайте, погружайтесь в детали и наслаждайтесь процессом изучения!
Узнать больше – http://izmirpsikolog.com/otizm
Лечение алкоголизма в Воронеже — помощь на всех стадиях зависимости особенно важно на этапе, когда у человека ещё сохраняется мотивация к изменениям. Но даже при тяжёлых формах зависимости шанс на выздоровление сохраняется — при условии комплексного подхода.
Выяснить больше – lechenie-alkogolizma-voronezh9.ru/
Алкогольная зависимость — это хроническое заболевание, при котором устойчивое влечение к спиртному приводит к тяжёлым медицинским, социальным и психологическим последствиям. Когда пациент осознаёт, что самостоятельно справиться с этой проблемой не получается, наиболее эффективным методом становится кодирование от алкоголизма. В клинике «Ясное Будущее» в Одинцово мы используем сочетание проверенных методик кодирования и комплексной психологической поддержки, что позволяет достичь стойкой ремиссии и вернуть человеку контроль над собственной жизнью.
Получить дополнительные сведения – кодирование от алкоголизма довженко
Под наблюдением врача пациенту вводятся капельницы с растворами, устраняющими интоксикацию, восстанавливается водно-солевой баланс, купируются симптомы ломки или похмельного синдрома.
Получить дополнительную информацию – https://narkologicheskaya-klinika-voronezh9.ru/anonimnaya-narkologicheskaya-klinika-voronezh
Экстренная капельничная терапия от запоя на дому в Луганске ЛНР имеет ряд преимуществ, благодаря которым лечение становится максимально оперативным и безопасным:
Детальнее – капельница от запоя выезд
В клинике «Горизонт Жизни» в Красногорске разработаны протоколы экстренного вывода из запоя, которые выполняются 24 часа в сутки, семь дней в неделю. Благодаря выезду бригады врачей-наркологов и оснащённости современным оборудованием мы оказываем помощь в кратчайшие сроки, обеспечивая максимальную безопасность и комфорт пациенту.
Исследовать вопрос подробнее – https://vyvod-iz-zapoya-krasnogorsk2.ru
iphone купить спб iphone купить спб .
По словам врача-нарколога клиники «Воздух Свободы» Дмитрия Соколова: «Чем раньше начнётся профессиональная терапия, тем меньше шансов, что последствия запоя будут серьёзными и необратимыми».
Детальнее – https://vyvod-iz-zapoya-lyubertsy2.ru/srochnyj-vyvod-iz-zapoya
где вводить промокод в 1win http://www.1win22086.ru .
Незамедлительно после вызова нарколог прибывает на дом для проведения первичного осмотра. Специалист измеряет жизненно важные показатели, такие как пульс, артериальное давление и температура, и собирает подробный анамнез. Это позволяет оценить степень интоксикации и оперативно разработать индивидуальный план лечения.
Исследовать вопрос подробнее – вывод из запоя цена мурманск.
The Audemars Piguet 15300ST merges meticulous craftsmanship alongside refined styling. Its 39mm case provides a modern fit, striking a balance between presence and comfort. The iconic octagonal bezel, secured by eight hexagonal screws, defines the brand’s innovative approach to luxury sports watches.
Audemars Piguet Royal Oak 15300ST
Showcasing a white gold baton hour-marker dial, this model integrates a 60-hour energy reserve via the Caliber 3120 movement. The Grande Tapisserie pattern adds depth and uniqueness, while the 10mm-thick case ensures discreet luxury.
Наркологический центр “Луч Надежды” — это место, где можно найти поддержку и помощь, даже когда кажется, что выход потерян. Наша команда врачей-наркологов, психологов и психотерапевтов использует современные методы лечения и реабилитации, помогая пациентам вернуть трезвость и полноценную жизнь. Мы стремимся не только к устранению симптомов, но и к выявлению причин заболевания, давая пациентам необходимые инструменты для борьбы с тягой к психоактивным веществам и формированию новых жизненных установок.
Узнать больше – вывод из запоя анонимно в уфе
мосбет мосбет .
Клиника «Возрождение» гарантирует:
Получить дополнительную информацию – наркологические клиники алкоголизм уфа.
В этой статье вы найдете познавательную и занимательную информацию, которая поможет вам лучше понять мир вокруг. Мы собрали интересные данные, которые вдохновляют на размышления и побуждают к действиям. Открывайте новую информацию и получайте удовольствие от чтения!
Получить дополнительные сведения – https://slcs.edu.in/002
В этой статье-обзоре мы соберем актуальную информацию и интересные факты, которые освещают важные темы. Читатели смогут ознакомиться с различными мнениями и подходами, что позволит им расширить кругозор и глубже понять обсуждаемые вопросы.
Разобраться лучше – http://www.lonestarfencestain.com/beste-casual-sex-omrader-elverum-daglig-horoskop-swingersklubb-oslo
Thank you for the auspicious writeup. It in fact was a amusement account it. Glance complex to far delivered agreeable from you! By the way, how could we keep up a correspondence?
swinger porno
Эта познавательная публикация погружает вас в море интересного контента, который быстро захватит ваше внимание. Мы рассмотрим важные аспекты темы и предоставим вам уникальныеInsights и полезные сведения для дальнейшего изучения.
Получить дополнительную информацию – https://www.diptykmag.com/sara-ouhaddou-lheritiere-sans-heritage
Клиника «Альтернатива» работает на рынке наркологических услуг более десяти лет и имеет лицензию на проведение детоксикации и реабилитации. Мы придерживаемся следующих принципов:
Детальнее – http://narkologicheskaya-pomoshh-ufa9.ru/
После диагностики начинается активная фаза медикаментозного вмешательства. Современные препараты вводятся капельничным методом для быстрого снижения уровня токсинов в крови, восстановления обменных процессов и нормализации работы внутренних органов, таких как печень, почки и сердце.
Выяснить больше – капельница от запоя в архангельске
Лечение алкогольной зависимости на дому в Мурманске проходит по четко отлаженной схеме, которая включает несколько последовательных этапов. Каждый из них имеет решающее значение для безопасного и эффективного восстановления организма.
Получить дополнительную информацию – http://vyvod-iz-zapoya-murmansk0.ru
Процесс оказания срочной помощи нарколога на дому в Мариуполе построен по отлаженной схеме, которая включает несколько ключевых этапов, направленных на быстрое и безопасное восстановление здоровья пациента.
Детальнее – [url=https://narcolog-na-dom-mariupol00.ru/]нарколог на дом цена[/url]
I have recently started a web site, the info you offer on this web site has helped me greatly. Thanks for all of your time & work.
Esta tragaperras es ideal para los amantes de la Big Bass Bonanza original, pero que quieren un toque de espíritu navideño. Jogar em cassinos confiáveis, como o 1win site oficial, é mais do que uma escolha inteligente — é a única maneira de garantir sua segurança. Com uma licença emitida em Curaçao (Antillephone 8048 JAZ), a 1win oferece transparência e proteção para os jogadores. Mas lembre-se, jogue com responsabilidade! Apostar é divertido, mas é importante reconhecer os riscos e evitar o vício. Mantenha sempre o equilíbrio. рџ‰ Los aficionados al Big Bass Bonanza original reconocerán los gráficos y sabrán apreciar los aportes navideños. Los aficionados al Big Bass Bonanza original reconocerán los gráficos y sabrán apreciar los aportes navideños. Tabla de contenido
https://socialcriativo.com.br/balloon-una-revision-del-emocionante-juego-de-casino-online-de-smartsoft-para-jugadores-en-colombia/
Alevla Tech House Joaca Pacanele Gratis si jocurile ca la aparate favorite in aplicatia Cazino365. The dragon symbolizes power, strength, and good fortune. Celebrate with a Year of the Dragon–themed Nuk3town, move swiftly like a dragon with the new 1. Descargue GameLoop desde el sitio web oficial, luego ejecute el archivo exe para instalar GameLoop. Articles Genie Jackpots Rtp slot – Sofortig verfügbar: Neueste fifty Freispiele exklusive Einzahlung Slot on line Winter Wonders 2025 Fantastic Goal Activities admirers would want the fresh roar of the audience, the brand new exciting soundtracks, and the get-to-rating theatrics ones footy harbors. But not, in addition to those people not too fussed to have Florianópolis es llamada “Isla Mágica” por los brasileños y este apodo es más que justo, al fin y al cabo, la capital de Santa Catarina es un destino paradisíaco e increíble.
hello!,I like your writing so much! share we communicate more about your post on AOL? I require an expert on this area to solve my problem. May be that’s you! Looking forward to see you.
Профиль в Дизайне Человека — это уникальная комбинация двух линий, которые формируют ваш характер и способы взаимодействия с миром. Дизайн человека бодиграф расчет
Анализ своего Дизайна Человека может помочь в понимании причин, по которым вы испытываете определенные трудности, разочарования, и как можно их преодолеть.
Понимание своего Дизайна Человека может помочь в выборе жизненного пути, который лучше соответствует вашему характеру и предназначению.
Дизайн человека помогает понять, какой тип энергии вы излучаете, как вы принимаете решения, и как лучше использовать свою энергию, чтобы не выгорать, а чувствовать себя более удовлетворённым
Дизайн Человека (human design) – это система знаний об энергетической механике людей и космологическом устройстве мира.
Профиль в Дизайне Человека — это уникальная комбинация двух линий, которые формируют ваш характер и способы взаимодействия с миром.
Дизайн человека делит людей на четыре категории, помогает узнать себя и показывает путь к счастливой жизни.
12 профилей в Дизайне человека. Исследователь. Отшельник. Мученик. Оппортунист. Еретик. Ролевая модель.
Этот информационный обзор станет отличным путеводителем по актуальным темам, объединяющим важные факты и мнения экспертов. Мы исследуем ключевые идеи и представляем их в доступной форме для более глубокого понимания. Читайте, чтобы оставаться в курсе событий!
Получить больше информации – https://www.fermes-pedagogiques-bretagne.fr/2016/03/03/un-fruit-a-la-recree
You are my aspiration, I have few blogs and sometimes run out from to post : (.
Nice post. I learn one thing more challenging on totally different blogs everyday. It can all the time be stimulating to read content material from different writers and follow a bit one thing from their store. I’d favor to use some with the content on my blog whether or not you don’t mind. Natually I’ll give you a link on your internet blog. Thanks for sharing.
Статья предлагает комплексный обзор событий, предоставляя различные точки зрения.
Этот информативный текст отличается привлекательным содержанием и актуальными данными. Мы предлагаем читателям взглянуть на привычные вещи под новым углом, предоставляя интересный и доступный материал. Получите удовольствие от чтения и расширьте кругозор!
Исследовать вопрос подробнее – https://centriumgroup.nl/centrium-objectbeveiliging
Статья предоставляет информацию из разных источников, обеспечивая балансированное представление фактов и аргументов.
Эта обзорная заметка содержит ключевые моменты и факты по актуальным вопросам. Она поможет читателям быстро ориентироваться в теме и узнать о самых важных аспектах сегодня. Получите краткий курс по современной информации и оставайтесь в курсе событий!
Разобраться лучше – https://exlinko.net/o/kdmhs-rank-website-in-3-weeks
Эта публикация погружает вас в мир увлекательных фактов и удивительных открытий. Мы расскажем о ключевых событиях, которые изменили ход истории, и приоткроем завесу над научными достижениями, которые вдохновили миллионы. Узнайте, чему может научить нас прошлое и как применить эти знания в будущем.
Подробнее тут – https://www.mucitlermakine.com/dcim100goprogopr0113-jpg
Эта публикация завернет вас в вихрь увлекательного контента, сбрасывая стереотипы и открывая двери к новым идеям. Каждый абзац станет для вас открытием, полным ярких примеров и впечатляющих достижений. Подготовьтесь быть вовлеченными и удивленными каждый раз, когда продолжите читать.
Разобраться лучше – https://latestfashionlifestyle.com/olivia-rodrigo-kia-forum-shuttle
Эта статья предлагает захватывающий и полезный контент, который привлечет внимание широкого круга читателей. Мы постараемся представить тебе идеи, которые вдохновят вас на изменения в жизни и предоставят практические решения для повседневных вопросов. Читайте и вдохновляйтесь!
Узнать больше – https://kimygringoire.com/summer-holiday-guide-how-to-spend-the-best-time-of-the-year
Этот интересный отчет представляет собой сборник полезных фактов, касающихся актуальных тем. Мы проанализируем данные, чтобы вы могли сделать обоснованные выводы. Читайте, чтобы узнать больше о последних трендах и значимых событиях!
Получить дополнительную информацию – https://www.jutta-ringsdorf.de/imgp0365-jpg
В этом информативном тексте представлены захватывающие события и факты, которые заставят вас задуматься. Мы обращаем внимание на важные моменты, которые часто остаются незамеченными, и предлагаем новые перспективы на привычные вещи. Подготовьтесь к тому, чтобы быть поглощенным увлекательными рассказами!
Подробнее тут – https://3maerosoladhesivemalaysiasupplier.diecut.com.my/2023/02/28/3m-foam-fabric-24-spray-adhesive-malaysia-authorised-distributor
Этот информационный материал привлекает внимание множеством интересных деталей и необычных ракурсов. Мы предлагаем уникальные взгляды на привычные вещи и рассматриваем вопросы, которые волнуют общество. Будьте в курсе актуальных тем и расширяйте свои знания!
Ознакомиться с деталями – https://odishahaat.com/bandhan-bank-triples-its-branch-presence-in-less-than-8-years
I don’t think the title of your article matches the content lol. Just kidding, mainly because I had some doubts after reading the article.
Услуги массажа Ивантеевка — здоровье, отдых и красота. Лечебный, баночный, лимфодренажный, расслабляющий и косметический массаж. Сертифицированнй мастер, удобное расположение, результат с первого раза.
Каждый день запоя увеличивает риск для жизни. Не рискуйте — специалисты в Сочи приедут на дом и окажут экстренную помощь. Без боли, стресса и ожидания.
Ознакомиться с деталями – наркологический вывод из запоя
Этот информативный материал предлагает содержательную информацию по множеству задач и вопросов. Мы призываем вас исследовать различные идеи и факты, обобщая их для более глубокого понимания. Наша цель — сделать обучение доступным и увлекательным.
Ознакомиться с деталями – https://www.manabangarutelangana.in/ap-development-vision-2030
https://yalla-kora-eg.com/author/football-court-com/
Предлагаем вашему вниманию интересную справочную статью, в которой собраны ключевые моменты и нюансы по актуальным вопросам. Эта информация будет полезна как для профессионалов, так и для тех, кто только начинает изучать тему. Узнайте ответы на важные вопросы и расширьте свои знания!
Подробнее тут – https://wethefuture.souls.life/wp_20181219_16_31_05_pro-2
Of course, what a great website and illuminating posts, I definitely will bookmark your site.Have an awsome day!
Когда организм на пределе, важна срочная помощь в Сочи — это команда опытных наркологов, которые помогут быстро и мягко выйти из запоя без вреда для здоровья.
Подробнее можно узнать тут – нарколог вывод из запоя
слушать крутой клубняк слушать крутой клубняк .
В Сочи решение есть — наркологическая клиника. Здесь помогают людям выйти из запоя без страха и осуждения. Всё анонимно, грамотно и с заботой о каждом пациенте.
Получить дополнительные сведения – вывод из запоя круглосуточно
Эта статья предлагает уникальную подборку занимательных фактов и необычных историй, которые вы, возможно, не знали. Мы постараемся вдохновить ваше воображение и разнообразить ваш кругозор, погружая вас в мир, полный интересных открытий. Читайте и открывайте для себя новое!
Подробнее – https://simplytattoo.net/product/test-product-3
Самостоятельно выйти из запоя — почти невозможно. В Сочи врачи клиники проводят медикаментозный вывод из запоя с круглосуточным выездом. Доверяйте профессионалам.
Разобраться лучше – вывод из запоя на дому
Существует ряд ситуаций, при которых домашний визит специалиста становится не просто удобным, а жизненно необходимым:
Получить дополнительную информацию – нарколог на дом
Затяжной запой опасен для жизни. Врачи наркологической клиники в Сочи проводят срочный вывод из запоя — на дому или в стационаре. Анонимно, безопасно, круглосуточно.
Изучить вопрос глубже – вывод из запоя цена
Затяжной запой опасен для жизни. Врачи наркологической клиники в Сочи проводят срочный вывод из запоя — на дому или в стационаре. Анонимно, безопасно, круглосуточно.
Изучить вопрос глубже – нарколог вывод из запоя
Эта публикация завернет вас в вихрь увлекательного контента, сбрасывая стереотипы и открывая двери к новым идеям. Каждый абзац станет для вас открытием, полным ярких примеров и впечатляющих достижений. Подготовьтесь быть вовлеченными и удивленными каждый раз, когда продолжите читать.
Ознакомиться с деталями – https://superawesometour.com/hello-world
Самостоятельно выйти из запоя — почти невозможно. В Сочи врачи клиники проводят медикаментозный вывод из запоя с круглосуточным выездом. Доверяйте профессионалам.
Подробнее тут – вывод из запоя на дому
Психологическая реабилитация: Психологическая поддержка – один из главных аспектов нашего подхода. Мы предлагаем индивидуальные и групповые занятия, помогающие осознать зависимость, проработать эмоциональные травмы и сформировать новые модели поведения. Опытные психологи помогают пациентам понять причины своих зависимостей, что является важным шагом на пути к выздоровлению.
Подробнее – вывод из запоя на дому круглосуточно в казани
Для каждого человека естественного искать выгоду для себя. Так происходит и с Дизайном Человека. Канал 30
Дизайн Человека (human design) – это система знаний об энергетической механике людей и космологическом устройстве мира.
Понимание своего Дизайна Человека может помочь в выборе жизненного пути, который лучше соответствует вашему характеру и предназначению.
Профили в Дизайне человека · 1 линия — Исследователь · 2 линия — Отшельник · 3 линия — Мученик · 4 линия — Опортунист · 5 линия — Еретик · 6 линия — Ролевая модель.
Профиль в Дизайне Человека — это уникальная комбинация двух линий, которые формируют ваш характер и способы взаимодействия с миром.
Для каждого человека естественного искать выгоду для себя. Так происходит и с Дизайном Человека.
В целом, Дизайн человека может быть полезным инструментом для самопознания, саморазвития, и улучшения качества жизни. Он помогает понять себя и окружающий мир, и найти свой путь, который приносит счастье и удовлетворение.
Каждый Профиль состоит из двух Линий: Сознательной и Подсознательной.
http://kampascher.com/# kamagra livraison 24h
Каждый Профиль состоит из двух Линий: Сознательной и Подсознательной. Матрица человека это
12 профилей в Дизайне человека. Исследователь. Отшельник. Мученик. Оппортунист. Еретик. Ролевая модель.
Каждый Профиль состоит из двух Линий: Сознательной и Подсознательной.
Дизайн человека делит людей на четыре категории, помогает узнать себя и показывает путь к счастливой жизни.
Для каждого человека естественного искать выгоду для себя. Так происходит и с Дизайном Человека.
В целом, Дизайн человека может быть полезным инструментом для самопознания, саморазвития, и улучшения качества жизни. Он помогает понять себя и окружающий мир, и найти свой путь, который приносит счастье и удовлетворение.
Профили в Дизайне человека · 1 линия — Исследователь · 2 линия — Отшельник · 3 линия — Мученик · 4 линия — Опортунист · 5 линия — Еретик · 6 линия — Ролевая модель.
При тяжелой алкогольной интоксикации оперативное лечение становится жизненно необходимым для спасения здоровья. В Архангельске специалисты оказывают помощь на дому, используя метод капельничного лечения от запоя. Такой подход позволяет быстро вывести токсины, восстановить обмен веществ и стабилизировать работу внутренних органов, обеспечивая при этом высокий уровень конфиденциальности и комфорт в условиях привычного домашнего уюта.
Выяснить больше – капельница от запоя цена архангельская область
mostbet aviator necə qazanmaq mostbet3046.ru .
При тяжелых формах алкогольной интоксикации своевременное вмешательство критически важно для предотвращения опасных осложнений. В Луганске ЛНР специалисты по наркологии предоставляют услугу экстренной капельничной терапии на дому, что позволяет быстро снизить токсическую нагрузку и стабилизировать работу жизненно важных органов. Такой метод лечения позволяет обеспечить высокую эффективность терапии в комфортной, привычной для пациента обстановке, при этом сохраняется полная конфиденциальность.
Выяснить больше – после капельницы от запоя в луганске
«Еваклиник» — это реабилитационный центр в Саранске, где каждому пациенту предлагают персонализированный план восстановления. Наши программы включают целевые физиопроцедуры, массаж, занятия на специализированных тренажерах и психологическую реабилитацию. Круглосуточная поддержка специалистов и современные технологии лечения обеспечивают быстрое и комфортное возвращение к привычной жизни.
Получить больше информации – наркологическая помощь на дому в саранске
Сразу после вызова нарколог прибывает на дом для проведения тщательного осмотра. Врач измеряет жизненно важные показатели, такие как пульс, артериальное давление и температура, а также собирает краткий анамнез для определения степени алкогольной интоксикации. Эти данные служат основой для разработки индивидуальной стратегии лечения.
Углубиться в тему – http://kapelnica-ot-zapoya-lugansk-lnr00.ru/
1win трансляция https://1win22086.ru/ .
mostbet casino oyunları mostbet casino oyunları .
В клинике «НОВЫЙ НАРКОЛОГ» в СПб оказывают квалифицированную наркологическую помощь: от экстренного вывода из запоя до длительной реабилитации. Индивидуальный подход, конфиденциальность и поддержка на всех этапах выздоровления — основные принципы работы специалистов.
Выяснить больше – как вывести человека из запоя дома
Затяжной запой опасен для жизни. Врачи наркологической клиники в Сочи проводят срочный вывод из запоя — на дому или в стационаре. Анонимно, безопасно, круглосуточно.
Детальнее – срочный вывод из запоя
Viagra generique en pharmacie: viagra en ligne – Meilleur Viagra sans ordonnance 24h
Наркологическая клиника «НОВЫЙ НАРКОЛОГ» в Санкт-Петербурге предлагает комплексное лечение алкогольной и наркотической зависимости, включая детоксикацию, амбулаторные и стационарные программы, а также психотерапевтическую поддержку. Опытные врачи СПб применяют современные методы для быстрой и эффективной помощи.
Ознакомиться с деталями – центр лечения наркомании
В центре «Еваклиник» Саранска вы получите всестороннюю поддержку на пути к полному восстановлению после травм и операций. Используем передовые методы гидротерапии, электротерапии и кинезиотейпирования, а также индивидуальные занятия лечебной физкультурой. Экстренная консультация и круглосуточная связь с медицинским персоналом помогут справиться с любыми сложностями и обрести новую активность.
Подробнее можно узнать тут – лечение хронического алкоголизма
Hey! I know this is kind of off topic but I was wondering if you knew where I could locate a captcha plugin for my comment form? I’m using the same blog platform as yours and I’m having trouble finding one? Thanks a lot!
Вызов нарколога на дом в таких условиях позволяет не терять драгоценное время, избежать госпитализации и предотвратить критическое развитие событий. Кроме того, это снижает психологическую нагрузку на пациента и его близких, особенно если зависимость длится долго и сопровождается отрицанием проблемы.
Получить дополнительную информацию – narkolog na dom
слушать крутой клубняк слушать крутой клубняк .
Вызов нарколога на дом в таких условиях позволяет не терять драгоценное время, избежать госпитализации и предотвратить критическое развитие событий. Кроме того, это снижает психологическую нагрузку на пациента и его близких, особенно если зависимость длится долго и сопровождается отрицанием проблемы.
Получить дополнительную информацию – нарколог на дом недорого
В наркологической клинике «Прозрение» в Одинцово процедура проводится с соблюдением всех стандартов безопасности, под контролем опытных врачей. Мы применяем комплексный подход, направленный не только на детоксикацию, но и на поддержку всех систем организма. Уже после одного сеанса пациенты отмечают улучшение самочувствия, снижение тревожности, исчезновение головной боли и тошноты.
Подробнее можно узнать тут – поставить капельницу от запоя
Команда клиники «Новый шанс» состоит из опытных специалистов-наркологов, которые имеют многолетнюю практику работы с пациентами, находящимися в зависимости, и регулярно совершенствуют свои знания.
Ознакомиться с деталями – https://tajno-vyvod-iz-zapoya.ru/vyvod-iz-zapoya-v-kruglosutochno-v-rostove-na-donu.ru
Основная цель капельничного лечения от запоя – оперативное выведение токсинов, восстановление нормального обмена веществ и предотвращение дальнейших осложнений. Методика, используемая специалистами, включает не только медикаментозное вмешательство, но и комплексный мониторинг состояния пациента, что обеспечивает безопасность и результативность терапии даже в условиях экстренной необходимости.
Изучить вопрос глубже – капельница от запоя вызов
mostbet mostbet .
Сразу после вызова нарколог прибывает на дом для проведения тщательного осмотра. Врач измеряет жизненно важные показатели, такие как пульс, артериальное давление и температура, а также собирает краткий анамнез для определения степени алкогольной интоксикации. Эти данные служат основой для разработки индивидуальной стратегии лечения.
Узнать больше – капельница от запоя цена луганск
Viagra sans ordonnance 24h Meilleur Viagra sans ordonnance 24h prix bas Viagra generique
Когда организм на пределе, важна срочная помощь в Сочи — это команда опытных наркологов, которые помогут быстро и мягко выйти из запоя без вреда для здоровья.
Получить дополнительную информацию – вывод из запоя на дому
mostbet oyun izləmək mostbet oyun izləmək .
pharmacie internet fiable France: acheter medicaments sans ordonnance – pharmacies en ligne certifiГ©es
Наши врачи оперативно приезжают к пациенту, проводят осмотр, купируют симптомы абстиненции и приступают к восстановлению жизненно важных функций. Всё это — в привычной для пациента обстановке, без стресса и лишней огласки. Мы обеспечиваем не только медицинскую помощь, но и эмоциональную поддержку, создавая условия для начала пути к выздоровлению.
Подробнее можно узнать тут – http://narcolog-na-dom-v-moskve55.ru/
На месте врач проводит первичный осмотр, измеряет давление, пульс, сатурацию, оценивает уровень интоксикации и абстиненции. Далее назначается инфузионная терапия — капельница, направленная на дезинтоксикацию, восстановление электролитного баланса, купирование тревожности и нормализацию сна.
Разобраться лучше – http://www.domen.ru
«Еваклиник» — это реабилитационный центр в Саранске, где каждому пациенту предлагают персонализированный план восстановления. Наши программы включают целевые физиопроцедуры, массаж, занятия на специализированных тренажерах и психологическую реабилитацию. Круглосуточная поддержка специалистов и современные технологии лечения обеспечивают быстрое и комфортное возвращение к привычной жизни.
Разобраться лучше – лечение алкоголизма и наркомании центр
Центр «Еваклиник» в Саранске — ваш надежный партнер на пути к восстановлению здоровья. Мы предлагаем программы реабилитации после операций, травм опорно-двигательного аппарата и неврологических нарушений. Комплекс процедур включает мануальную терапию, гидрокинезитерапию и эрготерапию, а также круглосуточный медицинский контроль. Индивидуальный подход и забота о каждом пациенте помогут вернуть радость движения.
Выяснить больше – помощь при запое на дому
acheter kamagra site fiable Kamagra oral jelly pas cher achat kamagra
https://ciasansordonnance.shop/# Cialis pas cher livraison rapide
В Сочи решение есть — наркологическая клиника. Здесь помогают людям выйти из запоя без страха и осуждения. Всё анонимно, грамотно и с заботой о каждом пациенте.
Узнать больше – вывод из запоя недорого
Медикаментозное лечение: Мы применяем современные препараты, которые помогают облегчить симптомы абстиненции и улучшить состояние пациентов в первые дни лечения. Индивидуальный подбор лекарственных схем позволяет минимизировать побочные эффекты и достичь наилучших результатов.
Получить дополнительные сведения – http://srochnyj-vyvod-iz-zapoya.ru
Сергей Бидус кинул на деньги
I am glad to be a visitant of this pure web site! , thankyou for this rare info ! .
Когда организм на пределе, важна срочная помощь в Сочи — это команда опытных наркологов, которые помогут быстро и мягко выйти из запоя без вреда для здоровья.
Получить дополнительные сведения – sochi
Cialis generique sans ordonnance: acheter Cialis sans ordonnance – acheter Cialis sans ordonnance
Каждый день запоя увеличивает риск для жизни. Не рискуйте — специалисты в Сочи приедут на дом и окажут экстренную помощь. Без боли, стресса и ожидания.
Выяснить больше – вывод из запоя цена
Усиление конструкций Усиление конструкций .
Гидроизоляция подвала usileniekonstrukcij2.ru .
В Сочи решение есть — наркологическая клиника. Здесь помогают людям выйти из запоя без страха и осуждения. Всё анонимно, грамотно и с заботой о каждом пациенте.
Узнать больше – вывод из запоя на дому
При тяжелых формах алкогольной интоксикации своевременное вмешательство критически важно для предотвращения опасных осложнений. В Луганске ЛНР специалисты по наркологии предоставляют услугу экстренной капельничной терапии на дому, что позволяет быстро снизить токсическую нагрузку и стабилизировать работу жизненно важных органов. Такой метод лечения позволяет обеспечить высокую эффективность терапии в комфортной, привычной для пациента обстановке, при этом сохраняется полная конфиденциальность.
Подробнее – вызвать капельницу от запоя на дому в луганске
лучшие dj треки скачать лучшие dj треки скачать .
температура воды в хургаде в апреле
клубная музыка клубная музыка .
Платная наркологическая клиника «НОВЫЙ НАРКОЛОГ» в Санкт-Петербурге обеспечивает профессиональное лечение зависимостей, включая кодирование, медикаментозную терапию и восстановление психологического состояния. Круглосуточный приём и выезд врача на дом.
Углубиться в тему – кодеин это
Hi, just required you to know I he added your site to my Google bookmarks due to your layout. But seriously, I believe your internet site has 1 in the freshest theme I??ve came across. It extremely helps make reading your blog significantly easier.
Лечебные мероприятия и рекомендации формируются исходя из индивидуального состояния каждого пациента. Специалист имеет возможность посвятить достаточное количество времени каждому больному, корректируя программу лечения согласно его особым потребностям и жизненным обстоятельствам. При этом учитываются психологические, социальные и физические аспекты, оказывающие влияние на здоровье пациента. Персонализированный подход обеспечивает оперативное реагирование на изменения состояния и своевременную корректировку терапии.
Выяснить больше – https://narcolog-na-dom-msk55.ru/narkolog-na-dom-moskva-tseny/
Cialis pas cher livraison rapide cialis sans ordonnance Cialis sans ordonnance 24h
Сразу после вызова нарколог прибывает на дом для проведения тщательного осмотра. Врач измеряет жизненно важные показатели, такие как пульс, артериальное давление и температура, а также собирает краткий анамнез для определения степени алкогольной интоксикации. Эти данные служат основой для разработки индивидуальной стратегии лечения.
Подробнее тут – https://kapelnica-ot-zapoya-lugansk-lnr00.ru/vyzvat-kapelniczu-ot-zapoya-lugansk-lnr/
Наши врачи оперативно приезжают к пациенту, проводят осмотр, купируют симптомы абстиненции и приступают к восстановлению жизненно важных функций. Всё это — в привычной для пациента обстановке, без стресса и лишней огласки. Мы обеспечиваем не только медицинскую помощь, но и эмоциональную поддержку, создавая условия для начала пути к выздоровлению.
Детальнее – vyzvat narkologa na dom krasnogorsk
cialis prix: Acheter Cialis 20 mg pas cher – vente de mГ©dicament en ligne
1win uz sport tikish [url=1win14010.ru]1win14010.ru[/url] .
Дизайн человека может помочь вам лучше понимать людей вокруг вас, их энергетический тип, и как лучше взаимодействовать с ними. Тип личности проектор 2 4
Дизайн Человека позволяет учитывать индивидуальные особенность каждого человека и учит познавать свою истинную природу.
Профили в Дизайне человека · 1 линия — Исследователь · 2 линия — Отшельник · 3 линия — Мученик · 4 линия — Опортунист · 5 линия — Еретик · 6 линия — Ролевая модель.
Анализ своего Дизайна Человека может помочь в понимании причин, по которым вы испытываете определенные трудности, разочарования, и как можно их преодолеть.
Понимание своего Дизайна Человека может помочь в выборе жизненного пути, который лучше соответствует вашему характеру и предназначению.
«НОВЫЙ НАРКОЛОГ» — наркологическая клиника в СПб с полным спектром услуг: детоксикация, лечение зависимостей, реабилитация, психологическая поддержка. Доверие пациентов и высокая эффективность подтверждаются отзывами и результатами работы.
Детальнее – медицинский наркологический центр
Когда организм на пределе, важна срочная помощь в Сочи — это команда опытных наркологов, которые помогут быстро и мягко выйти из запоя без вреда для здоровья.
Получить дополнительные сведения – нарколог вывод из запоя
На месте врач проводит первичный осмотр, измеряет давление, пульс, сатурацию, оценивает уровень интоксикации и абстиненции. Далее назначается инфузионная терапия — капельница, направленная на дезинтоксикацию, восстановление электролитного баланса, купирование тревожности и нормализацию сна.
Выяснить больше – https://narcolog-na-dom-v-moskve55.ru/vyzov-narkologa-na-dom-v-krasnogorske/
В Сочи решение есть — наркологическая клиника. Здесь помогают людям выйти из запоя без страха и осуждения. Всё анонимно, грамотно и с заботой о каждом пациенте.
Подробнее – vyvod-iz-zapoya
Экстренная капельничная терапия от запоя на дому в Луганске ЛНР имеет ряд преимуществ, благодаря которым лечение становится максимально оперативным и безопасным:
Изучить вопрос глубже – http://kapelnica-ot-zapoya-lugansk-lnr00.ru/kapelnicza-ot-zapoya-czena-lugansk-lnr/
Близкий человек в запое? Не ждите ухудшения. Обратитесь в клинику Сочи — здесь проведут профессиональный вывод из запоя с последующим восстановлением организма.
Изучить вопрос глубже – вывод из запоя в стационаре
Good V I should definitely pronounce, impressed with your website. I had no trouble navigating through all tabs and related information ended up being truly easy to do to access. I recently found what I hoped for before you know it at all. Reasonably unusual. Is likely to appreciate it for those who add forums or anything, website theme . a tones way for your client to communicate. Excellent task..
Услуга капельничного лечения от запоя на дому в Архангельске предусматривает комплексный подход, направленный на оперативное восстановление организма. Сразу после вызова нарколог прибывает на дом, проводит детальный осмотр, собирает анамнез и измеряет жизненно важные показатели. На основе этих данных разрабатывается персональный план терапии, который включает введение современных медикаментов с использованием автоматизированных систем дозирования, а также психологическую поддержку для создания условий долгосрочной ремиссии.
Получить больше информации – https://kapelnica-ot-zapoya-arkhangelsk0.ru/
«Еваклиник» — это реабилитационный центр в Саранске, где каждому пациенту предлагают персонализированный план восстановления. Наши программы включают целевые физиопроцедуры, массаж, занятия на специализированных тренажерах и психологическую реабилитацию. Круглосуточная поддержка специалистов и современные технологии лечения обеспечивают быстрое и комфортное возвращение к привычной жизни.
Узнать больше – эфедрин механизм действия
Клиника «НОВЫЙ НАРКОЛОГ» в Санкт-Петербурге — это центр помощи при зависимости с профессиональной командой наркологов и психотерапевтов. Доступны услуги детоксикации, амбулаторного и стационарного лечения, реабилитации и семейного консультирования.
Выяснить больше – отвращение к алкоголю
Каждый день запоя увеличивает риск для жизни. Не рискуйте — специалисты в Сочи приедут на дом и окажут экстренную помощь. Без боли, стресса и ожидания.
Получить дополнительные сведения – вывод из запоя на дому цена
Гидроизоляция частного дома https://usileniekonstrukcij3.ru .
Гидроизоляция стен https://usileniekonstrukcij2.ru/ .
Платная наркологическая клиника в Санкт-Петербурге «НОВЫЙ НАРКОЛОГ» предлагает профессиональную помощь при алкогольной и наркотической зависимости. Быстрое снятие абстиненции, кодирование, лечение в стационаре и амбулатории — всё с гарантией конфиденциальности.
Получить больше информации – лечение наркомании анонимно
Cialis sans ordonnance 24h: acheter Cialis sans ordonnance – acheter Cialis sans ordonnance
pharmacie en ligne sans prescription commander sans consultation medicale Pharmacie en ligne livraison Europe
сет музыкальный клубный сет музыкальный клубный .
клубная клубная .
Наши врачи оперативно приезжают к пациенту, проводят осмотр, купируют симптомы абстиненции и приступают к восстановлению жизненно важных функций. Всё это — в привычной для пациента обстановке, без стресса и лишней огласки. Мы обеспечиваем не только медицинскую помощь, но и эмоциональную поддержку, создавая условия для начала пути к выздоровлению.
Детальнее – narkolog na dom srochno
mostbet uz http://www.mostbet3035.ru .
В Сочи решение есть — наркологическая клиника. Здесь помогают людям выйти из запоя без страха и осуждения. Всё анонимно, грамотно и с заботой о каждом пациенте.
Детальнее – [url=https://vyvod-iz-zapoya-sochi11.ru/]vyvod-iz-zapoya[/url]
Медикаментозное лечение: Мы применяем современные препараты, которые помогают облегчить симптомы абстиненции и улучшить состояние пациентов в первые дни лечения. Индивидуальный подбор лекарственных схем позволяет минимизировать побочные эффекты и достичь наилучших результатов.
Углубиться в тему – вывод из запоя капельница казань
Инфузия проводится под постоянным контролем медицинского персонала. Длительность процедуры составляет от одного до трёх часов. Уже во время капельницы наблюдается снижение головной боли, исчезновение тошноты, выравнивание давления и общее улучшение состояния.
Исследовать вопрос подробнее – выезд на дом капельница от запоя
Затяжной запой опасен для жизни. Врачи наркологической клиники в Сочи проводят срочный вывод из запоя — на дому или в стационаре. Анонимно, безопасно, круглосуточно.
Разобраться лучше – вывод из запоя на дому цена
Близкий человек в запое? Не ждите ухудшения. Обратитесь в клинику Сочи — здесь проведут профессиональный вывод из запоя с последующим восстановлением организма.
Получить дополнительную информацию – краснодарский край
Реабилитационный центр «Еваклиник» в Саранске предлагает высококвалифицированную помощь в восстановлении после травм и заболеваний. Наши специалисты проводят индивидуальную диагностику, разрабатывают комплексные программы ЛФК, физиотерапии и психологической поддержки, применяя современные методики и оборудование. Доверьтесь профессионалам для скорейшего возвращения к активной жизни и полноценной самостоятельности!
Узнать больше – алкоголь и психиатрия
В Сочи решение есть — наркологическая клиника. Здесь помогают людям выйти из запоя без страха и осуждения. Всё анонимно, грамотно и с заботой о каждом пациенте.
Узнать больше – сочи
температура воды в хургаде в апреле
https://kampascher.shop/# commander Kamagra en ligne
мостбет бонус за регистрацию уз мостбет бонус за регистрацию уз .
Hello there! This is kind of off topic but I need some advice from an established blog. Is it tough to set up your own blog? I’m not very techincal but I can figure things out pretty quick. I’m thinking about making my own but I’m not sure where to start. Do you have any ideas or suggestions? With thanks
https://vivashop.com.ua/revolyutsiya-v-osvitlenni-yak-bi-led-linzi-ta-komponenty-mozhut-zminyty-vash-avtomobil
Затяжной запой опасен для жизни. Врачи наркологической клиники в Сочи проводят срочный вывод из запоя — на дому или в стационаре. Анонимно, безопасно, круглосуточно.
Получить дополнительную информацию – вывод из запоя недорого
Самостоятельно выйти из запоя — почти невозможно. В Сочи врачи клиники проводят медикаментозный вывод из запоя с круглосуточным выездом. Доверяйте профессионалам.
Изучить вопрос глубже – вывод из запоя круглосуточно
1вин покер 1вин покер .
Наркологическая клиника «НОВЫЙ НАРКОЛОГ» в Санкт-Петербурге предлагает комплексное лечение алкогольной и наркотической зависимости, включая детоксикацию, амбулаторные и стационарные программы, а также психотерапевтическую поддержку. Опытные врачи СПб применяют современные методы для быстрой и эффективной помощи.
Подробнее можно узнать тут – симптомы алкоголизма
Acheter du Viagra sans ordonnance: commander Viagra discretement – acheter Viagra sans ordonnance
Когда организм на пределе, важна срочная помощь в Сочи — это команда опытных наркологов, которые помогут быстро и мягко выйти из запоя без вреда для здоровья.
Углубиться в тему – вывод из запоя на дому
Каждый день запоя увеличивает риск для жизни. Не рискуйте — специалисты в Сочи приедут на дом и окажут экстренную помощь. Без боли, стресса и ожидания.
Выяснить больше – вывод из запоя анонимно
commander Cialis en ligne sans prescription cialis generique cialis prix
«Еваклиник» — реабилитационный центр в Саранске, специализирующийся на восстановлении после инсультов, переломов и ортопедических операций. В комфортных условиях мы проводим профилированную физиотерапию, массаж, занятия на реабилитационных тренажерах и психологическую поддержку. Гарантируем полную анонимность, внимательное сопровождение и высокую эффективность при любых этапах реабилитации.
Выяснить больше – врач на дом капельница от запоя
Близкий человек в запое? Не ждите ухудшения. Обратитесь в клинику Сочи — здесь проведут профессиональный вывод из запоя с последующим восстановлением организма.
Получить дополнительные сведения – вывод из запоя недорого
Профиль в Дизайне Человека — это уникальная комбинация двух линий, которые формируют ваш характер и способы взаимодействия с миром. Названия центров в бодиграфе
Тип – это основа, но ваша уникальность проявляется через Профиль, Центры, Каналы и Ворота.
Профили в Дизайне человека · 1 линия — Исследователь · 2 линия — Отшельник · 3 линия — Мученик · 4 линия — Опортунист · 5 линия — Еретик · 6 линия — Ролевая модель.
12 профилей в Дизайне человека. Исследователь. Отшельник. Мученик. Оппортунист. Еретик. Ролевая модель.
Профиль в Дизайне Человека — это уникальная комбинация двух линий, которые формируют ваш характер и способы взаимодействия с миром.
«Еваклиник» — реабилитационный центр в Саранске, специализирующийся на восстановлении после инсультов, переломов и ортопедических операций. В комфортных условиях мы проводим профилированную физиотерапию, массаж, занятия на реабилитационных тренажерах и психологическую поддержку. Гарантируем полную анонимность, внимательное сопровождение и высокую эффективность при любых этапах реабилитации.
Изучить вопрос глубже – запойный алкоголизм лечение дома
скачать бк осталось только отфильтровать подходящее скачать бк осталось только отфильтровать подходящее .
There is definately a lot to learn about this subject. I like all the points you made.
Автор старается сохранить нейтральность и обеспечить читателей информацией для самостоятельного принятия решений.
Keep on writing, great job!
Это помогает читателям получить полное представление о спорной проблеме.
Близкий человек в запое? Не ждите ухудшения. Обратитесь в клинику Сочи — здесь проведут профессиональный вывод из запоя с последующим восстановлением организма.
Получить дополнительные сведения – http://vyvod-iz-zapoya-sochi11.ru
промокоды на ракетку 1win http://1win22084.ru .
Клиника «НОВЫЙ НАРКОЛОГ» в Санкт-Петербурге — это центр помощи при зависимости с профессиональной командой наркологов и психотерапевтов. Доступны услуги детоксикации, амбулаторного и стационарного лечения, реабилитации и семейного консультирования.
Подробнее – капельница от запоя на дому спб
Таким образом, наш подход направлен на создание комплексной системы поддержки, которая помогает каждому пациенту справиться с зависимостью и вернуться к полноценной жизни.
Подробнее тут – вывод из запоя капельница
mostbet aviator oyunu https://mostbet3046.ru .
Kamagra oral jelly pas cher: commander Kamagra en ligne – kamagra livraison 24h
«Еваклиник» — это реабилитационный центр в Саранске, где каждому пациенту предлагают персонализированный план восстановления. Наши программы включают целевые физиопроцедуры, массаж, занятия на специализированных тренажерах и психологическую реабилитацию. Круглосуточная поддержка специалистов и современные технологии лечения обеспечивают быстрое и комфортное возвращение к привычной жизни.
Ознакомиться с деталями – что такое спайс наркотики
pharmacie en ligne livraison europe acheter Cialis sans ordonnance acheter Cialis sans ordonnance
В Сочи решение есть — наркологическая клиника. Здесь помогают людям выйти из запоя без страха и осуждения. Всё анонимно, грамотно и с заботой о каждом пациенте.
Подробнее – вывод из запоя на дому
Its like you read my mind! You appear to know a lot about this, like you wrote the book in it or something. I think that you can do with some pics to drive the message home a little bit, but other than that, this is wonderful blog. An excellent read. I’ll definitely be back.
hafilat card
Самостоятельно выйти из запоя — почти невозможно. В Сочи врачи клиники проводят медикаментозный вывод из запоя с круглосуточным выездом. Доверяйте профессионалам.
Подробнее можно узнать тут – вывод из запоя
Затяжной запой опасен для жизни. Врачи наркологической клиники в Сочи проводят срочный вывод из запоя — на дому или в стационаре. Анонимно, безопасно, круглосуточно.
Узнать больше – вывод из запоя
Центр «Еваклиник» в Саранске — ваш надежный партнер на пути к восстановлению здоровья. Мы предлагаем программы реабилитации после операций, травм опорно-двигательного аппарата и неврологических нарушений. Комплекс процедур включает мануальную терапию, гидрокинезитерапию и эрготерапию, а также круглосуточный медицинский контроль. Индивидуальный подход и забота о каждом пациенте помогут вернуть радость движения.
Углубиться в тему – наркоман в семье
Создание безопасной среды: Мы понимаем, насколько важна поддержка в сложные моменты. Наш центр предоставляет пространство, где пациенты могут открыто говорить о своих переживаниях без страха быть осужденными, что способствует доверию и успешному лечению.
Получить больше информации – вывод из запоя на дому круглосуточно казань
Когда организм на пределе, важна срочная помощь в Сочи — это команда опытных наркологов, которые помогут быстро и мягко выйти из запоя без вреда для здоровья.
Подробнее – срочный вывод из запоя
Близкий человек в запое? Не ждите ухудшения. Обратитесь в клинику Сочи — здесь проведут профессиональный вывод из запоя с последующим восстановлением организма.
Разобраться лучше – вывод из запоя круглосуточно
Миссия нашего центра – оказание всесторонней помощи людям с зависимостями. Основные цели нашей работы:
Исследовать вопрос подробнее – https://srochnyj-vyvod-iz-zapoya.ru/vyvod-iz-zapoya-v-kruglosutochno-v-kazani.ru
Cialis sans ordonnance 24h: Cialis pas cher livraison rapide – Cialis generique sans ordonnance
Обращение за капельничной терапией от запоя в домашних условиях имеет множество преимуществ, среди которых:
Подробнее – капельница от запоя выезд луганск
Когда организм на пределе, важна срочная помощь в Сочи — это команда опытных наркологов, которые помогут быстро и мягко выйти из запоя без вреда для здоровья.
Узнать больше – вывод из запоя на дому цена
pharmacie en ligne sans prescription Pharmacies en ligne certifiees vente de mГ©dicament en ligne
Москва. Психолог Москва. Психолог онлайн. Консультация психолога в МСК Психолог в Москве.
42370 проверенных отзывов.
Сколько встреч нужно?
Личные или онлайн-встречи с высококвалифицированными специалистами.
Самостоятельно выйти из запоя — почти невозможно. В Сочи врачи клиники проводят медикаментозный вывод из запоя с круглосуточным выездом. Доверяйте профессионалам.
Изучить вопрос глубже – наркологический вывод из запоя
Лечение в домашних условиях позволяет избежать стресса, связанного с поездками в медицинские учреждения. Вы не тратите время на дорогу и ожидание приема, что особенно важно, если ваше состояние ухудшилось или вам нужно срочное вмешательство. Врач на дому предоставляет все необходимые процедуры без лишних усилий с вашей стороны.
Подробнее – http://narcolog-na-dom-moskva55.ru/vyzov-narkologa-na-dom-moskva/
Близкий человек в запое? Не ждите ухудшения. Обратитесь в клинику Сочи — здесь проведут профессиональный вывод из запоя с последующим восстановлением организма.
Получить больше информации – наркология вывод из запоя
Когда организм на пределе, важна срочная помощь в Сочи — это команда опытных наркологов, которые помогут быстро и мягко выйти из запоя без вреда для здоровья.
Углубиться в тему – наркология вывод из запоя
Образовательные программы: Мы уверены, что знания о зависимости и её последствиях играют важную роль в реабилитации. Мы информируем пациентов о механизмах действия наркотиков и алкоголя на организм, что способствует изменению их отношения к терапии и жизни без зависимостей.
Узнать больше – наркология вывод из запоя казань
В современном обществе проблемы наркомании и алкоголизма приобрели особую актуальность, затрагивая не только отдельных людей, но и их близких, и сообщества. Эти зависимости оказывают негативное влияние не только на физическое здоровье, но и на психоэмоциональное состояние, нарушают социальные связи и ухудшают качество жизни. Наркологическая клиника “Здоровое Настоящее” предлагает комплексный и научно обоснованный подход к лечению зависимостей. Мы используем современные методы диагностики и терапии, чтобы помочь пациентам вернуть здоровье и полноценную жизнь.
Исследовать вопрос подробнее – срочный вывод из запоя в казани
https://ciasansordonnance.shop/# cialis prix
warface В мире онлайн-шутеров Warface занимает особое место, привлекая миллионы игроков своей динамикой, разнообразием режимов и возможностью совершенствования персонажа. Однако, не каждый готов потратить месяцы на прокачку аккаунта, чтобы получить желаемое оружие и экипировку. В этом случае, покупка аккаунта Warface становится привлекательным решением, открывающим двери к новым возможностям и впечатлениям.
В динамичном мире Санкт-Петербурга, где каждый день кипит жизнь и совершаются тысячи сделок, актуальная и удобная доска объявлений становится незаменимым инструментом как для частных лиц, так и для предпринимателей. Наша платформа – это ваш надежный партнер в поиске и предложении товаров и услуг в Северной столице. Подать объявление бесплатно
Затяжной запой опасен для жизни. Врачи наркологической клиники в Сочи проводят срочный вывод из запоя — на дому или в стационаре. Анонимно, безопасно, круглосуточно.
Разобраться лучше – вывод из запоя на дому
Специалист уточняет продолжительность запоя, тип употребляемого алкоголя и наличие сопутствующих заболеваний. Такой подробный анализ позволяет подобрать оптимальные методы детоксикации и снизить риск осложнений.
Разобраться лучше – вызвать капельницу от запоя на дому
Сразу после вызова нарколог прибывает на дом для проведения тщательного осмотра. Врач измеряет жизненно важные показатели, такие как пульс, артериальное давление и температура, а также собирает краткий анамнез для определения степени алкогольной интоксикации. Эти данные служат основой для разработки индивидуальной стратегии лечения.
Получить дополнительную информацию – капельница от запоя вызов
Услуга “Нарколог на дом” в Мариуполе, Донецкая область, предусматривает оперативное оказание медицинской помощи при запое. После получения вызова специалист незамедлительно выезжает к пациенту, проводит детальный осмотр, измеряет жизненно важные показатели и собирает анамнез. На основе полученных данных разрабатывается индивидуальный план терапии, включающий медикаментозную детоксикацию, инфузионную терапию и психологическую поддержку. Такой комплексный подход позволяет эффективно вывести токсины из организма и предотвратить развитие осложнений.
Подробнее – https://narcolog-na-dom-mariupol00.ru/narkolog-na-dom-czena-mariupol/
Лечебные мероприятия и рекомендации формируются исходя из индивидуального состояния каждого пациента. Специалист имеет возможность посвятить достаточное количество времени каждому больному, корректируя программу лечения согласно его особым потребностям и жизненным обстоятельствам. При этом учитываются психологические, социальные и физические аспекты, оказывающие влияние на здоровье пациента. Персонализированный подход обеспечивает оперативное реагирование на изменения состояния и своевременную корректировку терапии.
Подробнее можно узнать тут – narkolog na dom
В жизни крупных городов часто возникают ситуации, когда стрессы и быстрый ритм жизни приводят к развитию зависимости. Когда проблема становится очевидной, важно незамедлительно обратиться за помощью. В таких случаях вызов нарколога на дом может стать не только удобным, но и наиболее эффективным вариантом. Это позволяет получить квалифицированное лечение в привычной обстановке, сохраняя при этом полную анонимность и конфиденциальность.
Получить дополнительные сведения – https://narcolog-na-dom-moskva55.ru/vyzov-narkologa-na-dom-moskva
Специалист уточняет продолжительность запоя, тип употребляемого алкоголя и наличие сопутствующих заболеваний. Такой подробный анализ позволяет подобрать оптимальные методы детоксикации и снизить риск осложнений.
Получить больше информации – https://kapelnica-ot-zapoya-lugansk-lnr0.ru
Вызов нарколога на дом в таких условиях позволяет не терять драгоценное время, избежать госпитализации и предотвратить критическое развитие событий. Кроме того, это снижает психологическую нагрузку на пациента и его близких, особенно если зависимость длится долго и сопровождается отрицанием проблемы.
Выяснить больше – [url=https://narcolog-na-dom-v-moskve55.ru/]нарколог на дом недорого[/url]
cialis sans ordonnance: п»їpharmacie en ligne france – cialis sans ordonnance
Близкий человек в запое? Не ждите ухудшения. Обратитесь в клинику Сочи — здесь проведут профессиональный вывод из запоя с последующим восстановлением организма.
Получить дополнительную информацию – в сочи
commander Viagra discretement: prix bas Viagra generique – Acheter du Viagra sans ordonnance
В Сочи решение есть — наркологическая клиника. Здесь помогают людям выйти из запоя без страха и осуждения. Всё анонимно, грамотно и с заботой о каждом пациенте.
Получить дополнительные сведения – вывод из запоя на дому цена
В жизни крупных городов часто возникают ситуации, когда стрессы и быстрый ритм жизни приводят к развитию зависимости. Когда проблема становится очевидной, важно незамедлительно обратиться за помощью. В таких случаях вызов нарколога на дом может стать не только удобным, но и наиболее эффективным вариантом. Это позволяет получить квалифицированное лечение в привычной обстановке, сохраняя при этом полную анонимность и конфиденциальность.
Исследовать вопрос подробнее – https://narcolog-na-dom-moskva55.ru/
В Сочи решение есть — наркологическая клиника. Здесь помогают людям выйти из запоя без страха и осуждения. Всё анонимно, грамотно и с заботой о каждом пациенте.
Узнать больше – вывод из запоя капельница
Затяжной запой опасен для жизни. Врачи наркологической клиники в Сочи проводят срочный вывод из запоя — на дому или в стационаре. Анонимно, безопасно, круглосуточно.
Подробнее тут – вывод из запоя
Acheter du Viagra sans ordonnance viagra sans ordonnance viagra en ligne
Самостоятельно выйти из запоя — почти невозможно. В Сочи врачи клиники проводят медикаментозный вывод из запоя с круглосуточным выездом. Доверяйте профессионалам.
Ознакомиться с деталями – вывод из запоя недорого
Близкий человек в запое? Не ждите ухудшения. Обратитесь в клинику Сочи — здесь проведут профессиональный вывод из запоя с последующим восстановлением организма.
Исследовать вопрос подробнее – вывод из запоя недорого
Близкий человек в запое? Не ждите ухудшения. Обратитесь в клинику Сочи — здесь проведут профессиональный вывод из запоя с последующим восстановлением организма.
Подробнее тут – vyvod-iz-zapoya
Таким образом, наш подход направлен на создание комплексной системы поддержки, которая помогает каждому пациенту справиться с зависимостью и вернуться к полноценной жизни.
Ознакомиться с деталями – вывод из запоя казань.
Когда организм на пределе, важна срочная помощь в Сочи — это команда опытных наркологов, которые помогут быстро и мягко выйти из запоя без вреда для здоровья.
Углубиться в тему – вывод из запоя круглосуточно
This is very interesting, You are a very skilled blogger. I’ve joined your rss feed and look forward to seeking more of your excellent post. Also, I have shared your web site in my social networks!
hafilat recharge
Когда состояние алкогольной интоксикации достигает критических уровней, своевременное вмешательство становится жизненно необходимым. В Мариуполе, Донецкая область, высококвалифицированные наркологи оказывают срочную помощь на дому, позволяя оперативно начать детоксикацию и стабилизировать состояние пациента. Такой формат лечения обеспечивает быстрый выход из кризиса в условиях комфорта и конфиденциальности, что особенно важно для тех, кто не может позволить себе задержки в стационарном лечении.
Получить дополнительную информацию – http://narcolog-na-dom-mariupol00.ru/narkolog-na-dom-czena-mariupol/
При поступлении вызова нарколог незамедлительно приезжает на дом для проведения тщательного осмотра. Врач измеряет жизненно важные показатели, такие как пульс, артериальное давление и температура, а также собирает анамнез, чтобы определить степень алкогольной интоксикации.
Разобраться лучше – капельница от запоя на дому архангельск.
Запой — это не просто следствие чрезмерного употребления алкоголя, а серьёзное патологическое состояние, которое требует срочной медицинской помощи. На фоне затяжного приёма спиртного в организме человека происходят опасные изменения: интоксикация, обезвоживание, нарушение электролитного баланса, резкие скачки давления и работы сердца, угнетение функций печени и мозга. В такой ситуации капельница от запоя становится неотложной мерой, позволяющей стабилизировать состояние и устранить симптомы абстиненции за короткий срок.
Ознакомиться с деталями – выезд на дом капельница от запоя
Специалист уточняет продолжительность запоя, тип употребляемого алкоголя и наличие сопутствующих заболеваний. Такой подробный анализ позволяет подобрать оптимальные методы детоксикации и снизить риск осложнений.
Подробнее можно узнать тут – капельница от запоя вызов город
Психологическая реабилитация: Психологическая поддержка – один из главных аспектов нашего подхода. Мы предлагаем индивидуальные и групповые занятия, помогающие осознать зависимость, проработать эмоциональные травмы и сформировать новые модели поведения. Опытные психологи помогают пациентам понять причины своих зависимостей, что является важным шагом на пути к выздоровлению.
Выяснить больше – вывод из запоя капельница
Незамедлительно после вызова нарколог прибывает на дом для проведения первичного осмотра. Специалист измеряет жизненно важные показатели, такие как пульс, артериальное давление и температура, а также собирает анамнез, чтобы определить степень алкогольной интоксикации. Эта информация позволяет оперативно разработать персонализированный план лечения.
Получить дополнительные сведения – нарколог на дом цена
Затяжной запой опасен для жизни. Врачи наркологической клиники в Сочи проводят срочный вывод из запоя — на дому или в стационаре. Анонимно, безопасно, круглосуточно.
Получить больше информации – вывод из запоя круглосуточно
В жизни крупных городов часто возникают ситуации, когда стрессы и быстрый ритм жизни приводят к развитию зависимости. Когда проблема становится очевидной, важно незамедлительно обратиться за помощью. В таких случаях вызов нарколога на дом может стать не только удобным, но и наиболее эффективным вариантом. Это позволяет получить квалифицированное лечение в привычной обстановке, сохраняя при этом полную анонимность и конфиденциальность.
Получить больше информации – http://narcolog-na-dom-moskva55.ru/narkolog-na-dom-kruglosutochno-moskva/
Затяжной запой опасен для жизни. Врачи наркологической клиники в Сочи проводят срочный вывод из запоя — на дому или в стационаре. Анонимно, безопасно, круглосуточно.
Выяснить больше – https://vyvod-iz-zapoya-sochi11.ru/
Каждый день запоя увеличивает риск для жизни. Не рискуйте — специалисты в Сочи приедут на дом и окажут экстренную помощь. Без боли, стресса и ожидания.
Ознакомиться с деталями – вывод из запоя
Платная наркологическая клиника в Санкт-Петербурге «НОВЫЙ НАРКОЛОГ» предлагает профессиональную помощь при алкогольной и наркотической зависимости. Быстрое снятие абстиненции, кодирование, лечение в стационаре и амбулатории — всё с гарантией конфиденциальности.
Выяснить больше – клиника кодирование от алкоголизма на дому
The following time I learn a blog, I hope that it doesnt disappoint me as a lot as this one. I imply, I do know it was my choice to learn, but I actually thought youd have something fascinating to say. All I hear is a bunch of whining about something that you can fix in case you werent too busy in search of attention.
Москва. Услуги психолога в районе Беговой Психолог в Москве.
Частые разногласия с самыми близкими.
Поможет поставить цель терапии и приведет к результату.
Записаться на консультацию.
Услуги психолога · — Консультация психолога.
п»їpharmacie en ligne france: Cialis sans ordonnance 24h – pharmacie en ligne france pas cher
pharmacie internet fiable France: Medicaments en ligne livres en 24h – pharmacie en ligne
Таким образом, наш подход направлен на создание комплексной системы поддержки, которая помогает каждому пациенту справиться с зависимостью и вернуться к полноценной жизни.
Получить дополнительную информацию – наркология вывод из запоя казань
Cialis sans ordonnance 24h traitement ED discret en ligne cialis prix
После первичной диагностики начинается активная фаза медикаментозного вмешательства. Препараты вводятся капельничным методом для быстрого снижения уровня токсинов в крови, нормализации обменных процессов и стабилизации работы внутренних органов, таких как печень, почки и сердце.
Детальнее – нарколог на дом в мариуполе
Когда организм на пределе, важна срочная помощь в Сочи — это команда опытных наркологов, которые помогут быстро и мягко выйти из запоя без вреда для здоровья.
Ознакомиться с деталями – срочный вывод из запоя
Самостоятельно выйти из запоя — почти невозможно. В Сочи врачи клиники проводят медикаментозный вывод из запоя с круглосуточным выездом. Доверяйте профессионалам.
Подробнее можно узнать тут – вывод из запоя клиника
Центр «Еваклиник» в Саранске — ваш надежный партнер на пути к восстановлению здоровья. Мы предлагаем программы реабилитации после операций, травм опорно-двигательного аппарата и неврологических нарушений. Комплекс процедур включает мануальную терапию, гидрокинезитерапию и эрготерапию, а также круглосуточный медицинский контроль. Индивидуальный подход и забота о каждом пациенте помогут вернуть радость движения.
Получить дополнительную информацию – габапентин
После диагностики начинается активная фаза капельничного лечения. Современные препараты вводятся с помощью автоматизированных систем дозирования, что обеспечивает быстрое снижение уровня токсинов в крови и восстановление обменных процессов. Этот этап направлен на стабилизацию работы печени, почек и сердечно-сосудистой системы.
Исследовать вопрос подробнее – https://kapelnica-ot-zapoya-lugansk-lnr00.ru/
Обращение за капельничной терапией от запоя в домашних условиях имеет множество преимуществ, среди которых:
Подробнее можно узнать тут – http://www.domen.ru
Наши врачи оперативно приезжают к пациенту, проводят осмотр, купируют симптомы абстиненции и приступают к восстановлению жизненно важных функций. Всё это — в привычной для пациента обстановке, без стресса и лишней огласки. Мы обеспечиваем не только медицинскую помощь, но и эмоциональную поддержку, создавая условия для начала пути к выздоровлению.
Получить дополнительную информацию – http://www.domen.ru
Этот подход имеет несколько ключевых преимуществ, которые обеспечивают комфорт, безопасность и эффективность лечения.
Исследовать вопрос подробнее – нарколог на дом москва
При тяжелых формах алкогольной интоксикации своевременное вмешательство критически важно для предотвращения опасных осложнений. В Луганске ЛНР специалисты по наркологии предоставляют услугу экстренной капельничной терапии на дому, что позволяет быстро снизить токсическую нагрузку и стабилизировать работу жизненно важных органов. Такой метод лечения позволяет обеспечить высокую эффективность терапии в комфортной, привычной для пациента обстановке, при этом сохраняется полная конфиденциальность.
Углубиться в тему – капельница от запоя в луганске
Наши врачи оперативно приезжают к пациенту, проводят осмотр, купируют симптомы абстиненции и приступают к восстановлению жизненно важных функций. Всё это — в привычной для пациента обстановке, без стресса и лишней огласки. Мы обеспечиваем не только медицинскую помощь, но и эмоциональную поддержку, создавая условия для начала пути к выздоровлению.
Изучить вопрос глубже – врач нарколог на дом
Близкий человек в запое? Не ждите ухудшения. Обратитесь в клинику Сочи — здесь проведут профессиональный вывод из запоя с последующим восстановлением организма.
Разобраться лучше – вывод из запоя на дому
https://kampascher.shop/# kamagra 100mg prix
commander Cialis en ligne sans prescription: acheter Cialis sans ordonnance – cialis sans ordonnance
Acheter du Viagra sans ordonnance: Viagra sans ordonnance 24h – Meilleur Viagra sans ordonnance 24h
Someone necessarily lend a hand to make seriously posts I would state. This is the very first time I frequented your web page and thus far? I amazed with the analysis you made to create this actual publish amazing. Great task!
Незамедлительно после вызова нарколог прибывает на дом для проведения первичного осмотра. Специалист измеряет жизненно важные показатели, такие как пульс, артериальное давление и температура, а также собирает анамнез, чтобы определить степень алкогольной интоксикации. Эта информация позволяет оперативно разработать персонализированный план лечения.
Разобраться лучше – http://narcolog-na-dom-mariupol00.ru/vyzov-narkologa-na-dom-mariupol/https://narcolog-na-dom-mariupol00.ru
https://выкуп-авто-пермь.рф/kak-prodat-nasledstvo-avto
Cialis generique sans ordonnance traitement ED discret en ligne Cialis sans ordonnance 24h
Затяжной запой опасен для жизни. Врачи наркологической клиники в Сочи проводят срочный вывод из запоя — на дому или в стационаре. Анонимно, безопасно, круглосуточно.
Выяснить больше – сочи
В Сочи решение есть — наркологическая клиника. Здесь помогают людям выйти из запоя без страха и осуждения. Всё анонимно, грамотно и с заботой о каждом пациенте.
Изучить вопрос глубже – вывод из запоя
В Сочи решение есть — наркологическая клиника. Здесь помогают людям выйти из запоя без страха и осуждения. Всё анонимно, грамотно и с заботой о каждом пациенте.
Изучить вопрос глубже – вывод из запоя капельница
design engineer resume example resume for engineer with experience
deliver balloons dubai buy helium balloons dubai
1вин актуальный промокод http://1win14008.ru/ .
1 ван 1 ван .
Клиника «НОВЫЙ НАРКОЛОГ» в Санкт-Петербурге — это центр помощи при зависимости с профессиональной командой наркологов и психотерапевтов. Доступны услуги детоксикации, амбулаторного и стационарного лечения, реабилитации и семейного консультирования.
Узнать больше – стадии алкоголизма
Профессиональный массаж Ивантеевка: классический, лечебный, расслабляющий, антицеллюлитный. Квалифицированные массажисты, индивидуальный подход, комфортная обстановка. Запишитесь на сеанс уже сегодня!
Каждый день запоя увеличивает риск для жизни. Не рискуйте — специалисты в Сочи приедут на дом и окажут экстренную помощь. Без боли, стресса и ожидания.
Получить дополнительную информацию – в сочи
Cialis sans ordonnance 24h: acheter Cialis sans ordonnance – Cialis pas cher livraison rapide
acheter Viagra sans ordonnance: Viagra generique en pharmacie – Viagra generique en pharmacie
Близкий человек в запое? Не ждите ухудшения. Обратитесь в клинику Сочи — здесь проведут профессиональный вывод из запоя с последующим восстановлением организма.
Получить больше информации – вывод из запоя на дому цена
«Еваклиник» — это реабилитационный центр в Саранске, где каждому пациенту предлагают персонализированный план восстановления. Наши программы включают целевые физиопроцедуры, массаж, занятия на специализированных тренажерах и психологическую реабилитацию. Круглосуточная поддержка специалистов и современные технологии лечения обеспечивают быстрое и комфортное возвращение к привычной жизни.
Узнать больше – запой саранск
Hello! Do you know if they make any plugins to protect against hackers? I’m kinda paranoid about losing everything I’ve worked hard on. Any recommendations?
I really like your writing style, good info , appreciate it for putting up : D.
В Сочи решение есть — наркологическая клиника. Здесь помогают людям выйти из запоя без страха и осуждения. Всё анонимно, грамотно и с заботой о каждом пациенте.
Исследовать вопрос подробнее – вывод из запоя
commander Kamagra en ligne Kamagra oral jelly pas cher livraison discrete Kamagra
Миссия нашего центра – оказание всесторонней помощи людям с зависимостями. Основные цели нашей работы:
Подробнее – http://srochnyj-vyvod-iz-zapoya.ru
Преимущества домашнего лечения также заключаются в индивидуальном подходе. Врач, находясь в вашем доме, может более тщательно изучить ситуацию, провести необходимую диагностику и подобрать курс лечения, который идеально подойдет вашему состоянию. В отличие от клиники, где внимание врача часто ограничено временем, на дому можно уделить пациенту больше времени, подбирая лечение с учетом его особенностей.
Подробнее – нарколог на дом москва
mostbet uz yuklab olish mostbet3032.ru .
Специалист уточняет продолжительность запоя, тип употребляемого алкоголя и наличие сопутствующих заболеваний. Такой подробный анализ позволяет подобрать оптимальные методы детоксикации и снизить риск осложнений.
Углубиться в тему – капельница от запоя наркология луганск
мостбет контакты мостбет контакты .
В Сочи решение есть — наркологическая клиника. Здесь помогают людям выйти из запоя без страха и осуждения. Всё анонимно, грамотно и с заботой о каждом пациенте.
Разобраться лучше – vyvod-iz-zapoya-klinika
1win demo aviator o‘ynash 1win demo aviator o‘ynash .
В Сочи решение есть — наркологическая клиника. Здесь помогают людям выйти из запоя без страха и осуждения. Всё анонимно, грамотно и с заботой о каждом пациенте.
Узнать больше – https://vyvod-iz-zapoya-sochi16.ru
kamagra livraison 24h: livraison discrète Kamagra – livraison discrète Kamagra
Затяжной запой опасен для жизни. Врачи наркологической клиники в Сочи проводят срочный вывод из запоя — на дому или в стационаре. Анонимно, безопасно, круглосуточно.
Подробнее можно узнать тут – в сочи
Незамедлительно после вызова нарколог прибывает на дом для проведения первичного осмотра. Специалист измеряет жизненно важные показатели, такие как пульс, артериальное давление и температура, а также собирает анамнез, чтобы определить степень алкогольной интоксикации. Эта информация позволяет оперативно разработать персонализированный план лечения.
Изучить вопрос глубже – [url=https://narcolog-na-dom-mariupol00.ru/]вызов нарколога на дом в мариуполе[/url]
После диагностики начинается активная фаза капельничного лечения. Современные препараты вводятся с помощью автоматизированных систем дозирования, что обеспечивает быстрое снижение уровня токсинов в крови и восстановление обменных процессов. Этот этап направлен на стабилизацию работы печени, почек и сердечно-сосудистой системы.
Узнать больше – http://kapelnica-ot-zapoya-lugansk-lnr00.ru/vyzvat-kapelniczu-ot-zapoya-lugansk-lnr/https://kapelnica-ot-zapoya-lugansk-lnr00.ru
Вызов нарколога на дом в таких условиях позволяет не терять драгоценное время, избежать госпитализации и предотвратить критическое развитие событий. Кроме того, это снижает психологическую нагрузку на пациента и его близких, особенно если зависимость длится долго и сопровождается отрицанием проблемы.
Выяснить больше – platnyi narkolog na dom
Pharmacies en ligne certifiees: pharmacie en ligne sans ordonnance – acheter mГ©dicament en ligne sans ordonnance
На месте врач проводит первичный осмотр, измеряет давление, пульс, сатурацию, оценивает уровень интоксикации и абстиненции. Далее назначается инфузионная терапия — капельница, направленная на дезинтоксикацию, восстановление электролитного баланса, купирование тревожности и нормализацию сна.
Выяснить больше – http://
Процесс лечения капельничной терапией в условиях экстренной помощи в Луганске ЛНР состоит из нескольких этапов, каждый из которых направлен на быструю и безопасную детоксикацию организма.
Разобраться лучше – https://kapelnica-ot-zapoya-lugansk-lnr00.ru/
mostbet aviator skachat mostbet aviator skachat .
kamagra 100mg prix: achat kamagra – achat kamagra
Hi there, all is going fine here and ofcourse every one is sharing facts, that’s actually good, keep up writing.
hafilat balance check
http://pharmsansordonnance.com/# п»їpharmacie en ligne france
pharmacie en ligne sans prescription acheter medicaments sans ordonnance pharmacie en ligne livraison europe
В Сочи решение есть — наркологическая клиника. Здесь помогают людям выйти из запоя без страха и осуждения. Всё анонимно, грамотно и с заботой о каждом пациенте.
Детальнее – вывод из запоя
Психологическая реабилитация: Психологическая поддержка – один из главных аспектов нашего подхода. Мы предлагаем индивидуальные и групповые занятия, помогающие осознать зависимость, проработать эмоциональные травмы и сформировать новые модели поведения. Опытные психологи помогают пациентам понять причины своих зависимостей, что является важным шагом на пути к выздоровлению.
Узнать больше – вывод из запоя недорого казань
Когда организм на пределе, важна срочная помощь в Сочи — это команда опытных наркологов, которые помогут быстро и мягко выйти из запоя без вреда для здоровья.
Узнать больше – vyvod-iz-zapoya-sochi11.ru
Образовательные программы: Мы уверены, что знания о зависимости и её последствиях играют важную роль в реабилитации. Мы информируем пациентов о механизмах действия наркотиков и алкоголя на организм, что способствует изменению их отношения к терапии и жизни без зависимостей.
Получить больше информации – вывод из запоя в казани
cialis sans ordonnance: acheter Cialis sans ordonnance – Acheter Cialis 20 mg pas cher
Платная наркологическая клиника в Санкт-Петербурге «НОВЫЙ НАРКОЛОГ» предлагает профессиональную помощь при алкогольной и наркотической зависимости. Быстрое снятие абстиненции, кодирование, лечение в стационаре и амбулатории — всё с гарантией конфиденциальности.
Углубиться в тему – гемосорбция при аллергии
1win xyz почта вход 1win22081.ru .
livraison rapide Viagra en France: Meilleur Viagra sans ordonnance 24h – Viagra sans ordonnance 24h
В Сочи решение есть — наркологическая клиника. Здесь помогают людям выйти из запоя без страха и осуждения. Всё анонимно, грамотно и с заботой о каждом пациенте.
Подробнее – vyvod-iz-zapoya-czena
livraison discrete Kamagra kamagra pas cher acheter kamagra site fiable
Центр «Еваклиник» в Саранске — ваш надежный партнер на пути к восстановлению здоровья. Мы предлагаем программы реабилитации после операций, травм опорно-двигательного аппарата и неврологических нарушений. Комплекс процедур включает мануальную терапию, гидрокинезитерапию и эрготерапию, а также круглосуточный медицинский контроль. Индивидуальный подход и забота о каждом пациенте помогут вернуть радость движения.
Узнать больше – наркологическая помощь в саранске
Aw, this was a really good post. Spending some time and actual effort to produce a good article… but what can I say… I hesitate a whole lot and never seem to get nearly anything done.
halifat
Когда организм на пределе, важна срочная помощь в Сочи — это команда опытных наркологов, которые помогут быстро и мягко выйти из запоя без вреда для здоровья.
Исследовать вопрос подробнее – наркология вывод из запоя
Лечение в домашних условиях позволяет избежать стресса, связанного с поездками в медицинские учреждения. Вы не тратите время на дорогу и ожидание приема, что особенно важно, если ваше состояние ухудшилось или вам нужно срочное вмешательство. Врач на дому предоставляет все необходимые процедуры без лишних усилий с вашей стороны.
Изучить вопрос глубже – нарколог на дом анонимно
Самостоятельно выйти из запоя — почти невозможно. В Сочи врачи клиники проводят медикаментозный вывод из запоя с круглосуточным выездом. Доверяйте профессионалам.
Ознакомиться с деталями – вывод из запоя цена
Москва. Услуги психолога в районе Выхино-Жулебино Психолог в Москве.
Психологическое консультирование заключается в том, чтобы помочь клиенту разобраться в своих проблемах и вместе с ним найти пути выхода из сложной ситуации.
Психолог Москва. Психолог СПБ. Психолог онлайн.
Решим вместе вашу проблему.
Нужен хороший психолог?
Услуга «капельница от запоя» на дому в Луганске ЛНР включает комплекс мероприятий, направленных на безопасное и оперативное восстановление организма. Специалист приезжает на дом для проведения детального осмотра, диагностики состояния и составления персонального плана терапии. Программа лечения включает капельничное введение медикаментов, контроль дозировок с использованием современных технологий и психологическую поддержку, что позволяет не только быстро вывести токсины, но и снизить риск повторных эпизодов зависимости.
Ознакомиться с деталями – капельница от запоя в луганске
kamagra gel: achat kamagra – achat kamagra
Таким образом, наш подход направлен на создание комплексной системы поддержки, которая помогает каждому пациенту справиться с зависимостью и вернуться к полноценной жизни.
Детальнее – вывод из запоя в стационаре в казани
Самостоятельно выйти из запоя — почти невозможно. В Сочи врачи клиники проводят медикаментозный вывод из запоя с круглосуточным выездом. Доверяйте профессионалам.
Разобраться лучше – вывод из запоя недорого
Каждый день запоя увеличивает риск для жизни. Не рискуйте — специалисты в Сочи приедут на дом и окажут экстренную помощь. Без боли, стресса и ожидания.
Подробнее – вывод из запоя на дому круглосуточно
http://ciasansordonnance.com/# Cialis pas cher livraison rapide
Aw, this was an extremely nice post. Taking a few minutes and actual effort to produce a great article… but what can I say… I put things off a lot and don’t seem to get nearly anything done.
abu dhabi bus monthly pass price
Когда организм на пределе, важна срочная помощь в Сочи — это команда опытных наркологов, которые помогут быстро и мягко выйти из запоя без вреда для здоровья.
Подробнее можно узнать тут – вывод из запоя цена
Миссия нашего центра – оказание всесторонней помощи людям с зависимостями. Основные цели нашей работы:
Получить дополнительные сведения – http://srochnyj-vyvod-iz-zapoya.ru
pharmacie en ligne sans ordonnance: commander sans consultation medicale – acheter mГ©dicament en ligne sans ordonnance
Viagra sans ordonnance 24h: viagra sans ordonnance – viagra sans ordonnance
Процесс оказания срочной помощи нарколога на дому в Мариуполе построен по отлаженной схеме, которая включает несколько ключевых этапов, направленных на быстрое и безопасное восстановление здоровья пациента.
Подробнее можно узнать тут – https://narcolog-na-dom-mariupol00.ru/vyzov-narkologa-na-dom-mariupol/
Acheter Cialis Cialis sans ordonnance 24h commander Cialis en ligne sans prescription
В Сочи решение есть — наркологическая клиника. Здесь помогают людям выйти из запоя без страха и осуждения. Всё анонимно, грамотно и с заботой о каждом пациенте.
Изучить вопрос глубже – наркология вывод из запоя
It’s really a nice and helpful piece of info. I’m satisfied that you shared this useful information with us. Please stay us up to date like this. Thank you for sharing.
you may have a terrific blog right here! would you wish to make some invite posts on my weblog?
Близкий человек в запое? Не ждите ухудшения. Обратитесь в клинику Сочи — здесь проведут профессиональный вывод из запоя с последующим восстановлением организма.
Получить дополнительные сведения – vyvod-iz-zapoya-na-domu
Самостоятельно выйти из запоя — почти невозможно. В Сочи врачи клиники проводят медикаментозный вывод из запоя с круглосуточным выездом. Доверяйте профессионалам.
Получить дополнительные сведения – вывод из запоя в стационаре
kamagra 100mg prix: achat kamagra – Kamagra oral jelly pas cher
Затяжной запой опасен для жизни. Врачи наркологической клиники в Сочи проводят срочный вывод из запоя — на дому или в стационаре. Анонимно, безопасно, круглосуточно.
Ознакомиться с деталями – нарколог вывод из запоя
mostbet uz shikoyatlar https://mostbet3033.ru/ .
mostbet azerbaycan http://www.mostbet3045.ru .
Близкий человек в запое? Не ждите ухудшения. Обратитесь в клинику Сочи — здесь проведут профессиональный вывод из запоя с последующим восстановлением организма.
Подробнее тут – вывод из запоя
livraison rapide Viagra en France: commander Viagra discretement – Viagra sans ordonnance 24h
Близкий человек в запое? Не ждите ухудшения. Обратитесь в клинику Сочи — здесь проведут профессиональный вывод из запоя с последующим восстановлением организма.
Подробнее можно узнать тут – вывод из запоя цена
commander sans consultation medicale Medicaments en ligne livres en 24h pharmacie en ligne france livraison belgique
Right here is the right website for anybody who wants to find out about this topic. You know a whole lot its almost tough to argue with you (not that I really will need to…HaHa). You definitely put a fresh spin on a topic that has been discussed for decades. Excellent stuff, just great!
https://manorsgroup.com.ua/ru/polezno-znat/kak-vybrat-nadezhnyj-obmennik-kriptovaljut-v-kieve.html
В Сочи решение есть — наркологическая клиника. Здесь помогают людям выйти из запоя без страха и осуждения. Всё анонимно, грамотно и с заботой о каждом пациенте.
Разобраться лучше – сочи.
Затяжной запой опасен для жизни. Врачи наркологической клиники в Сочи проводят срочный вывод из запоя — на дому или в стационаре. Анонимно, безопасно, круглосуточно.
Изучить вопрос глубже – вывод из запоя цена
livraison discrete Kamagra: kamagra oral jelly – acheter kamagra site fiable
Затяжной запой опасен для жизни. Врачи наркологической клиники в Сочи проводят срочный вывод из запоя — на дому или в стационаре. Анонимно, безопасно, круглосуточно.
Получить дополнительную информацию – вывод из запоя цена
Самостоятельно выйти из запоя — почти невозможно. В Сочи врачи клиники проводят медикаментозный вывод из запоя с круглосуточным выездом. Доверяйте профессионалам.
Подробнее можно узнать тут – vyvod-iz-zapoya-czena
kamagra pas cher: kamagra pas cher – kamagra pas cher
mostbet daxil ol mostbet daxil ol .
Затяжной запой опасен для жизни. Врачи наркологической клиники в Сочи проводят срочный вывод из запоя — на дому или в стационаре. Анонимно, безопасно, круглосуточно.
Ознакомиться с деталями – вывод из запоя анонимно
мостбет оригинал скачать http://mostbet20006.ru .
https://ciasansordonnance.com/# acheter Cialis sans ordonnance
mostbet qanunidirmi mostbet qanunidirmi .
prix bas Viagra générique: prix bas Viagra générique – Viagra sans ordonnance 24h
kamagra gel kamagra livraison 24h achat kamagra
Glad to be one of many visitants on this awe inspiring web site : D.
Каждый день запоя увеличивает риск для жизни. Не рискуйте — специалисты в Сочи приедут на дом и окажут экстренную помощь. Без боли, стресса и ожидания.
Узнать больше – наркология вывод из запоя
Viagra generique en pharmacie: Acheter du Viagra sans ordonnance – commander Viagra discretement
Very well written article. It will be useful to anyone who employess it, as well as yours truly :). Keep doing what you are doing – can’r wait to read more posts.
Le gГ©nГ©rique de Viagra: prix bas Viagra generique – livraison rapide Viagra en France
commander Cialis en ligne sans prescription: Acheter Cialis 20 mg pas cher – traitement ED discret en ligne
В Сочи решение есть — наркологическая клиника. Здесь помогают людям выйти из запоя без страха и осуждения. Всё анонимно, грамотно и с заботой о каждом пациенте.
Подробнее – вывод из запоя
Thank you for the good writeup. It in fact was a amusement account it.
Look advanced to far added agreeable from you! By
the way, how can we communicate?
Youre so cool! I dont suppose Ive read anything like this before. So nice to search out any person with some original ideas on this subject. realy thank you for starting this up. this website is one thing that’s needed on the web, somebody with slightly originality. useful job for bringing one thing new to the internet!
Medicaments en ligne livres en 24h [url=http://pharmsansordonnance.com/#]commander sans consultation medicale[/url] pharmacie en ligne france fiable
pharmacie en ligne sans prescription: pharmacie en ligne sans ordonnance – pharmacie en ligne sans ordonnance
Близкий человек в запое? Не ждите ухудшения. Обратитесь в клинику Сочи — здесь проведут профессиональный вывод из запоя с последующим восстановлением организма.
Изучить вопрос глубже – вывод из запоя в стационаре
клубная музыка слушать клубная музыка слушать .
Самостоятельно выйти из запоя — почти невозможно. В Сочи врачи клиники проводят медикаментозный вывод из запоя с круглосуточным выездом. Доверяйте профессионалам.
Детальнее – вывод из запоя на дому
На месте врач проводит первичный осмотр, измеряет давление, пульс, сатурацию, оценивает уровень интоксикации и абстиненции. Далее назначается инфузионная терапия — капельница, направленная на дезинтоксикацию, восстановление электролитного баланса, купирование тревожности и нормализацию сна.
Узнать больше – вызов нарколога на дом красногорск
Achat m̩dicament en ligne fiable: kamagra livraison 24h Рcommander Kamagra en ligne
https://kampascher.shop/# acheter Kamagra sans ordonnance
букмекерская официальный сайт скачать http://www.1win22085.ru .
Когда организм на пределе, важна срочная помощь в Сочи — это команда опытных наркологов, которые помогут быстро и мягко выйти из запоя без вреда для здоровья.
Подробнее – вывод из запоя
Pharmacies en ligne certifiees: commander sans consultation medicale – pharmacie en ligne sans ordonnance
После диагностики начинается активная фаза капельничного лечения. Современные препараты вводятся с помощью автоматизированных систем дозирования, что обеспечивает быстрое снижение уровня токсинов в крови и восстановление обменных процессов. Этот этап направлен на стабилизацию работы печени, почек и сердечно-сосудистой системы.
Получить дополнительную информацию – врача капельницу от запоя в луганске
1вин зеркало скачать http://1win22081.ru/ .
pharmacie en ligne fiable traitement ED discret en ligne Cialis generique sans ordonnance
Москва. МСК психолог Силино Психолог в Москве.
Раздражительность на членов своей семьи.
Личные или онлайн-встречи с высококвалифицированными специалистами.
Частые разногласия с самыми близкими.
Правильно оценить происходящее в жизни и найти выход из сложившейся жизненной ситуации.
Москва. Психолог Москва. Психолог онлайн. Консультация психолога в МСК Психолог в Москве.
Решим вместе вашу проблему.
Психологическая помощь онлайн.
Сколько встреч нужно?
Анонимный прием.
Cialis pas cher livraison rapide: vente de mГ©dicament en ligne – cialis prix
Займы под залог https://srochnyye-zaymy.ru недвижимости — быстрые деньги на любые цели. Оформление от 1 дня, без справок и поручителей. Одобрение до 90%, выгодные условия, честные проценты. Квартира или дом остаются в вашей собственности.
Каждый день запоя увеличивает риск для жизни. Не рискуйте — специалисты в Сочи приедут на дом и окажут экстренную помощь. Без боли, стресса и ожидания.
Получить дополнительные сведения – вывод из запоя анонимно
pharmacie en ligne avec ordonnance: acheter médicaments sans ordonnance – pharmacie en ligne sans ordonnance
крутой клубняк скачать крутой клубняк скачать .
It’s in reality a nice and helpful piece of info. I am happy that you just shared this helpful information with us. Please keep us up to date like this. Thank you for sharing.
Таким образом, наш подход направлен на создание комплексной системы поддержки, которая помогает каждому пациенту справиться с зависимостью и вернуться к полноценной жизни.
Разобраться лучше – наркологический вывод из запоя
мостеб http://mostbet20006.ru/ .
achat kamagra acheter kamagra site fiable livraison discrete Kamagra
kamagra livraison 24h: kamagra pas cher – kamagra en ligne
acheter Viagra sans ordonnance: commander Viagra discretement – prix bas Viagra generique
На месте врач проводит первичный осмотр, измеряет давление, пульс, сатурацию, оценивает уровень интоксикации и абстиненции. Далее назначается инфузионная терапия — капельница, направленная на дезинтоксикацию, восстановление электролитного баланса, купирование тревожности и нормализацию сна.
Подробнее можно узнать тут – http://narcolog-na-dom-v-moskve55.ru/narkolog-na-dom-anonimno-v-krasnogorske/
pharmacie internet fiable France: pharmacie en ligne – pharmacie en ligne france
mostbet uz yuklab olish skachat http://mostbet3032.ru .
https://pharmsansordonnance.com/# pharmacies en ligne certifiГ©es
mostbet официальный сайт регистрация http://www.mostbet20005.ru .
Преимущества домашнего лечения также заключаются в индивидуальном подходе. Врач, находясь в вашем доме, может более тщательно изучить ситуацию, провести необходимую диагностику и подобрать курс лечения, который идеально подойдет вашему состоянию. В отличие от клиники, где внимание врача часто ограничено временем, на дому можно уделить пациенту больше времени, подбирая лечение с учетом его особенностей.
Детальнее – https://narcolog-na-dom-moskva55.ru/vyzov-narkologa-na-dom-moskva/
Затяжной запой опасен для жизни. Врачи наркологической клиники в Сочи проводят срочный вывод из запоя — на дому или в стационаре. Анонимно, безопасно, круглосуточно.
Получить дополнительную информацию – vyvod-iz-zapoya
Сразу после вызова нарколог прибывает на дом для проведения тщательного осмотра. Врач измеряет жизненно важные показатели, такие как пульс, артериальное давление и температура, а также собирает краткий анамнез для определения степени алкогольной интоксикации. Эти данные служат основой для разработки индивидуальной стратегии лечения.
Углубиться в тему – https://kapelnica-ot-zapoya-lugansk-lnr00.ru/vyzvat-kapelniczu-ot-zapoya-lugansk-lnr/
1win profil sozlamalari http://www.1win14007.ru .
This web-based service enables instant conversion of images into JPG format, supporting common types such as JPG. All operations take place within the browser, with no need for app downloads or user accounts. Up to 20 files can be converted in a single session, improving efficiency for repetitive or large-scale tasks. Once files are processed, they are deleted from the system to maintain privacy and prevent unnecessary storage. JPEGtoJPGHERO is designed to work across all devices and browser types, offering a seamless experience whether on a computer, phone, or tablet. Its minimal layout emphasizes clarity and speed, guiding users directly to results. From resizing visuals for websites to preparing files for cloud storage, the platform handles JPEGtoJPGhero conversion with accuracy and ease. Its emphasis on simplicity and security makes it an excellent choice for both casual users and professionals who require consistent, reliable output.
http://www.ectoconnect.com/Page.aspx?p=frvseunqnq
pharmacie en ligne sans ordonnance: pharmacie en ligne sans prescription – pharmacie en ligne
Prix du Viagra en pharmacie en France acheter Viagra sans ordonnance Viagra generique en pharmacie
После первичной диагностики начинается активная фаза медикаментозного вмешательства. Препараты вводятся капельничным методом для быстрого снижения уровня токсинов в крови, нормализации обменных процессов и стабилизации работы внутренних органов, таких как печень, почки и сердце.
Разобраться лучше – http://narcolog-na-dom-mariupol00.ru
В наркологической клинике «Прозрение» в Одинцово процедура проводится с соблюдением всех стандартов безопасности, под контролем опытных врачей. Мы применяем комплексный подход, направленный не только на детоксикацию, но и на поддержку всех систем организма. Уже после одного сеанса пациенты отмечают улучшение самочувствия, снижение тревожности, исчезновение головной боли и тошноты.
Получить дополнительные сведения – postavit kapelnitsu ot zapoia odintsovo
Специалист уточняет продолжительность запоя, тип употребляемого алкоголя и наличие сопутствующих заболеваний. Такой подробный анализ позволяет подобрать оптимальные методы детоксикации и снизить риск осложнений.
Подробнее можно узнать тут – вызвать капельницу от запоя на дому
Образовательные программы: Мы уверены, что знания о зависимости и её последствиях играют важную роль в реабилитации. Мы информируем пациентов о механизмах действия наркотиков и алкоголя на организм, что способствует изменению их отношения к терапии и жизни без зависимостей.
Углубиться в тему – http://www.domen.ru
Cialis générique sans ordonnance: cialis generique – Cialis générique sans ordonnance
1win bonus kod uz 1win bonus kod uz .
Существует ряд ситуаций, при которых домашний визит специалиста становится не просто удобным, а жизненно необходимым:
Подробнее тут – vyzov narkologa na dom
В Сочи решение есть — наркологическая клиника. Здесь помогают людям выйти из запоя без страха и осуждения. Всё анонимно, грамотно и с заботой о каждом пациенте.
Получить больше информации – наркология вывод из запоя
kamagra livraison 24h: achat kamagra – kamagra en ligne
Лечебные мероприятия и рекомендации формируются исходя из индивидуального состояния каждого пациента. Специалист имеет возможность посвятить достаточное количество времени каждому больному, корректируя программу лечения согласно его особым потребностям и жизненным обстоятельствам. При этом учитываются психологические, социальные и физические аспекты, оказывающие влияние на здоровье пациента. Персонализированный подход обеспечивает оперативное реагирование на изменения состояния и своевременную корректировку терапии.
Выяснить больше – нарколог на дом недорого
This web-based service enables instant conversion of images into JPG format, supporting common types such as JPG. All operations take place within the browser, with no need for app downloads or user accounts. Up to 20 files can be converted in a single session, improving efficiency for repetitive or large-scale tasks. Once files are processed, they are deleted from the system to maintain privacy and prevent unnecessary storage. JPEGtoJPGHERO is designed to work across all devices and browser types, offering a seamless experience whether on a computer, phone, or tablet. Its minimal layout emphasizes clarity and speed, guiding users directly to results. From resizing visuals for websites to preparing files for cloud storage, the platform handles JPEGtoJPGhero conversion with accuracy and ease. Its emphasis on simplicity and security makes it an excellent choice for both casual users and professionals who require consistent, reliable output.
https://www.servinord.com/phpBB2/profile.php?mode=viewprofile&u=704772
В Сочи решение есть — наркологическая клиника. Здесь помогают людям выйти из запоя без страха и осуждения. Всё анонимно, грамотно и с заботой о каждом пациенте.
Ознакомиться с деталями – вывод из запоя капельница
Кроме того, клиника «Новый шанс» уделяет особое внимание профилактике рецидивов. Мы обучаем пациентов навыкам управления стрессом, эмоциональной регуляции и прививаем навыки здорового образа жизни. Наша цель — обеспечить долгосрочное восстановление и снизить риск возврата к зависимости.
Подробнее – http://www.domen.ru
Ваш финансовый гид https://kreditandbanks.ru — подбираем лучшие предложения по кредитам, займам и банковским продуктам. Рейтинг МФО, советы по улучшению КИ, юридическая информация и онлайн-сервисы.
При поступлении вызова нарколог незамедлительно приезжает на дом для проведения тщательного осмотра. Врач измеряет жизненно важные показатели, такие как пульс, артериальное давление и температура, а также собирает анамнез, чтобы определить степень алкогольной интоксикации.
Получить больше информации – http://kapelnica-ot-zapoya-arkhangelsk0.ru/kapelnicza-ot-zapoya-klinika-arkhangelsk/
КПК «Доверие» https://bankingsmp.ru надежный кредитно-потребительский кооператив. Выгодные сбережения и доступные займы для пайщиков. Прозрачные условия, высокая доходность, финансовая стабильность и юридическая безопасность.
mostbet qeydiyyat olmadan giriş https://www.mostbet3044.ru .
После диагностики начинается активная фаза капельничного лечения. Современные препараты вводятся с помощью автоматизированных систем дозирования, что обеспечивает быстрое снижение уровня токсинов в крови и восстановление обменных процессов. Этот этап направлен на стабилизацию работы печени, почек и сердечно-сосудистой системы.
Подробнее тут – поставить капельницу от запоя луганск
Эта статья сочетает в себе как полезные, так и интересные сведения, которые обогатят ваше понимание насущных тем. Мы предлагаем практические советы и рекомендации, которые легко внедрить в повседневную жизнь. Узнайте, как улучшить свои навыки и обогатить свой опыт с помощью простых, но эффективных решений.
Углубиться в тему – https://ler.app.br/parceria-ler-e-amor-em-foco-video
Эта статья предлагает захватывающий и полезный контент, который привлечет внимание широкого круга читателей. Мы постараемся представить тебе идеи, которые вдохновят вас на изменения в жизни и предоставят практические решения для повседневных вопросов. Читайте и вдохновляйтесь!
Исследовать вопрос подробнее – http://www.duxi.it/2016/01/29/ciao-mondo
Платная наркологическая клиника в Санкт-Петербурге «НОВЫЙ НАРКОЛОГ» предлагает профессиональную помощь при алкогольной и наркотической зависимости. Быстрое снятие абстиненции, кодирование, лечение в стационаре и амбулатории — всё с гарантией конфиденциальности.
Получить дополнительные сведения – как вывести человека из запоя самостоятельно
kamagra pas cher: achat kamagra – kamagra livraison 24h
Наркологический центр “Луч Надежды” — это место, где можно найти поддержку и помощь, даже когда кажется, что выход потерян. Наша команда врачей-наркологов, психологов и психотерапевтов использует современные методы лечения и реабилитации, помогая пациентам вернуть трезвость и полноценную жизнь. Мы стремимся не только к устранению симптомов, но и к выявлению причин заболевания, давая пациентам необходимые инструменты для борьбы с тягой к психоактивным веществам и формированию новых жизненных установок.
Получить дополнительные сведения – http://srochno-vyvod-iz-zapoya.ru
В Сочи решение есть — наркологическая клиника. Здесь помогают людям выйти из запоя без страха и осуждения. Всё анонимно, грамотно и с заботой о каждом пациенте.
Узнать больше – вывод из запоя цена
Когда организм на пределе, важна срочная помощь в Сочи — это команда опытных наркологов, которые помогут быстро и мягко выйти из запоя без вреда для здоровья.
Изучить вопрос глубже – нарколог вывод из запоя
Каждый день запоя увеличивает риск для жизни. Не рискуйте — специалисты в Сочи приедут на дом и окажут экстренную помощь. Без боли, стресса и ожидания.
Изучить вопрос глубже – вывод из запоя на дому
pharmacie en ligne france pas cher: Médicaments en ligne livrés en 24h – pharmacie en ligne
commander Cialis en ligne sans prescription pharmacie en ligne france pas cher Cialis pas cher livraison rapide
https://yalla-shoot-7sry-eg.com/author/football-court-com/
https://viasansordonnance.com/# Acheter du Viagra sans ordonnance
Great wordpress blog here.. It’s hard to find quality writing like yours these days. I really appreciate people like you! take care
Эта статья сочетает познавательный и занимательный контент, что делает ее идеальной для любителей глубоких исследований. Мы рассмотрим увлекательные аспекты различных тем и предоставим вам новые знания, которые могут оказаться полезными в будущем.
Подробнее можно узнать тут – https://publicnewsupdate.com/ipl-2024-son-has-made-his-name-shine-in-the
Сделай сам как сделать ремонт в ванной Ремонт квартиры и дома своими руками: стены, пол, потолок, сантехника, электрика и отделка. Всё, что нужно — в одном месте: от выбора материалов до финального штриха. Экономьте с умом!
This is a topic close to my heart cheers, where are your contact details though?
commander sans consultation medicale: acheter medicaments sans ordonnance – pharmacie en ligne livraison europe
Этот информационный обзор станет отличным путеводителем по актуальным темам, объединяющим важные факты и мнения экспертов. Мы исследуем ключевые идеи и представляем их в доступной форме для более глубокого понимания. Читайте, чтобы оставаться в курсе событий!
Ознакомиться с деталями – https://www.feriaecoart.com/la-opera-metropolitana-de-nueva-york-va-a-tener-streams-gratis
traitement ED discret en ligne: cialis generique – cialis sans ordonnance
Этот информационный обзор станет отличным путеводителем по актуальным темам, объединяющим важные факты и мнения экспертов. Мы исследуем ключевые идеи и представляем их в доступной форме для более глубокого понимания. Читайте, чтобы оставаться в курсе событий!
Подробнее можно узнать тут – https://mmmonteiros.com.br/serum-facial-10-em-1-new-hair-resenha
Быстрые микрозаймы https://clover-finance.ru без отказа — деньги онлайн за 5 минут. Минимум документов, максимум удобства. Получите займ с любой кредитной историей.
Этот обзорный материал предоставляет информационно насыщенные данные, касающиеся актуальных тем. Мы стремимся сделать информацию доступной и структурированной, чтобы читатели могли легко ориентироваться в наших выводах. Познайте новое с нашим обзором!
Выяснить больше – https://cectoday.com/2014/04/audio-post-with-sound-cloud
Acheter du Viagra sans ordonnance: acheter Viagra sans ordonnance – Viagra sans ordonnance livraison 48h
Those are yours alright! . We at least need to get these people stealing images to start blogging! They probably just did a image search and grabbed them. They look good though!
Хочешь больше денег https://mfokapital.ru Изучай инвестиции, учись зарабатывать, управляй финансами, торгуй на Форекс и используй магию денег. Рабочие схемы, ритуалы, лайфхаки и инструкции — путь к финансовой независимости начинается здесь!
Микрозаймы онлайн https://kskredit.ru на карту — быстрое оформление, без справок и поручителей. Получите деньги за 5 минут, круглосуточно и без отказа. Доступны займы с любой кредитной историей.
viagra en ligne Viagra generique en pharmacie commander Viagra discretement
В этой публикации мы предлагаем подробные объяснения по актуальным вопросам, чтобы помочь читателям глубже понять их. Четкость и структурированность материала сделают его удобным для усвоения и применения в повседневной жизни.
Углубиться в тему – https://moabi2u.com/2023/06/22/harnessing-the-power-of-social-media-for-business-growth
Модные образы для торжеств этого сезона отличаются разнообразием.
Актуальны кружевные рукава и корсеты из полупрозрачных тканей.
Детали из люрекса создают эффект жидкого металла.
Греческий стиль с драпировкой определяют современные тренды.
Разрезы на юбках придают пикантности образу.
Ищите вдохновение в новых коллекциях — оригинальность и комфорт сделают ваш образ идеальным!
http://www.spot-a-cop.com/smf/index.php?topic=782980.new#new
Этот информативный материал предлагает содержательную информацию по множеству задач и вопросов. Мы призываем вас исследовать различные идеи и факты, обобщая их для более глубокого понимания. Наша цель — сделать обучение доступным и увлекательным.
Изучить вопрос глубже – https://baliprincesstour.com/audio-post-format
В этой статье собраны факты, которые освещают целый ряд важных вопросов. Мы стремимся предложить читателям четкую, достоверную информацию, которая поможет сформировать собственное мнение и лучше понять сложные аспекты рассматриваемой темы.
Получить дополнительную информацию – http://gn-oildrilling.com/2014/11/08/barite-recovery-centrifuge-system-for-sale-in
Этот увлекательный информационный материал подарит вам массу новых знаний и ярких эмоций. Мы собрали для вас интересные факты и сведения, которые обогатят ваш опыт. Откройте для себя увлекательный мир информации и насладитесь процессом изучения!
Выяснить больше – https://give.gazzedestek.org/unlock-your-potential-with-these-inspiring-ebooks
Усиление конструкций работа Усиление конструкций работа .
Этот информационный материал подробно освещает проблему наркозависимости, ее причины и последствия. Мы предлагаем информацию о методах лечения, профилактики и поддерживающих программах. Цель статьи — повысить осведомленность и продвигать идеи о необходимости борьбы с зависимостями.
Получить дополнительную информацию – https://mdyussh.ru/kodirovanie-ot-alkogolizma-kak-proyti-protseduru-i-chto-ozhidat
cialis prix: Cialis pas cher livraison rapide – traitement ED discret en ligne
В данном обзоре представлены основные направления и тренды в области медицины. Мы обсудим актуальные проблемы здравоохранения, свежие открытия и новые подходы, которые меняют представление о лечении и профилактике заболеваний. Эта информация будет полезна как специалистам, так и широкой публике.
Изучить вопрос глубже – https://vseokozhe.com/alkogolizm/lechenie-zhenskogo-alkogolizma-v-moskve.html
В этой статье мы обсудим процесс восстановления после зависимостей, акцентируя внимание на различных методах и подходах к реабилитации. Читатели узнают, как создать план выздоровления и использовать полезные ресурсы для достижения устойчивых изменений.
Получить дополнительную информацию – https://med-express.spb.ru/zapoj-prichiny-priznaki-i-metody-vyhoda
commander Viagra discretement: commander Viagra discretement – livraison rapide Viagra en France
Эта информационная заметка содержит увлекательные сведения, которые могут вас удивить! Мы собрали интересные факты, которые сделают вашу жизнь ярче и полнее. Узнайте нечто новое о привычных аспектах повседневности и откройте для себя удивительный мир информации.
Подробнее тут – https://holdenchamber.com/product/friends-of-the-chamber
В этой статье представлен занимательный и актуальный контент, который заставит вас задуматься. Мы обсуждаем насущные вопросы и проблемы, а также освещаем истории, которые вдохновляют на действия и изменения. Узнайте, что стоит за событиями нашего времени!
Выяснить больше – https://isleauxcoudres.com/bonjour-tout-le-monde
Эта разъяснительная статья содержит простые и доступные разъяснения по актуальным вопросам. Мы стремимся сделать информацию понятной для широкой аудитории, чтобы каждый смог разобраться в предмете и извлечь из него максимум пользы.
Выяснить больше – http://meongroup.co.uk/hampshire19-1200×826
Pharmacies en ligne certifiées: pharmacie en ligne sans prescription – Achat médicament en ligne fiable
Эта статья сочетает в себе как полезные, так и интересные сведения, которые обогатят ваше понимание насущных тем. Мы предлагаем практические советы и рекомендации, которые легко внедрить в повседневную жизнь. Узнайте, как улучшить свои навыки и обогатить свой опыт с помощью простых, но эффективных решений.
Подробнее тут – https://raketa.ba/amira-zeljela-bih-upoznati-nekog-40-70-godina
Выбрать гидроизоляцию Выбрать гидроизоляцию .
Этот интересный отчет представляет собой сборник полезных фактов, касающихся актуальных тем. Мы проанализируем данные, чтобы вы могли сделать обоснованные выводы. Читайте, чтобы узнать больше о последних трендах и значимых событиях!
Выяснить больше – https://acclena.fr/portfolio/increasing-associate-effectiveness-using-an-rpa-implementation-program
https://pharmsansordonnance.com/# pharmacie en ligne pas cher
Эта информационная статья охватывает широкий спектр актуальных тем и вопросов. Мы стремимся осветить ключевые факты и события с ясностью и простотой, чтобы каждый читатель мог извлечь из нее полезные знания и полезные инсайты.
Подробнее – http://www.followmedoit.com/followmedoit/%E8%81%8C%E5%9C%BA%E4%B8%80%E7%BA%BF/%E3%80%90%E8%A7%86%E9%A2%91%E3%80%91-%E6%95%B0%E6%8D%AE%E5%88%86%E6%9E%90%E5%B8%88%E3%80%81%E6%95%B0%E6%8D%AE%E7%A7%91%E5%AD%A6%E5%AE%B6%E3%80%81%E6%95%B0%E6%8D%AE%E5%B7%A5%E7%A8%8B%E5%B8%88%E6%9C%89
commander Viagra discretement Viagra generique en pharmacie viagra sans ordonnance
Этот информативный текст отличается привлекательным содержанием и актуальными данными. Мы предлагаем читателям взглянуть на привычные вещи под новым углом, предоставляя интересный и доступный материал. Получите удовольствие от чтения и расширьте кругозор!
Выяснить больше – https://www.smsofup.com/140050-%E0%A4%85%E0%A4%82%E0%A4%A4%E0%A5%8D%E0%A4%AF%E0%A5%8B%E0%A4%A6%E0%A4%AF-%E0%A4%B2%E0%A4%BE%E0%A4%AD%E0%A4%BE%E0%A4%B0%E0%A5%8D%E0%A4%A5%E0%A4%BF%E0%A4%AF%E0%A5%8B%E0%A4%82-%E0%A4%95%E0%A4%BE
В Сочи решение есть — наркологическая клиника. Здесь помогают людям выйти из запоя без страха и осуждения. Всё анонимно, грамотно и с заботой о каждом пациенте.
Выяснить больше – вывод из запоя круглосуточно
Инъектирование кирпичной кладки http://ctcmetar.ru/novosti/40859-gidroizolyaciya-podvalov-zaschita-ot-vlagi-i-syrosti.html/ .
Эта статья сочетает в себе как полезные, так и интересные сведения, которые обогатят ваше понимание насущных тем. Мы предлагаем практические советы и рекомендации, которые легко внедрить в повседневную жизнь. Узнайте, как улучшить свои навыки и обогатить свой опыт с помощью простых, но эффективных решений.
Подробнее – https://veterancr.net/how-long-would-it-take-for-your-house-to-fall-completely-apart
Гидроизоляция работа https://www.racechrono.ru/novosti/42911-uslugi-gidroizolyacii-i-ceny-polnyy-gid-po-vyboru-i-raschetu-stoimosti.html .
В клинике «ВитаМед Плюс» применяются проверенные методики и препараты, которые позволяют безопасно вывести пациента из запоя. Процедура начинается с внутривенного введения очищающих растворов, которые помогают ускорить выведение этанола и токсинов. Одновременно восстанавливается водно-солевой баланс, что особенно важно при обезвоживании после длительного употребления алкоголя.
Подробнее тут – вывод из запоя недорого в химках
Some really excellent articles on this site, thanks for contribution.
В Сочи решение есть — наркологическая клиника. Здесь помогают людям выйти из запоя без страха и осуждения. Всё анонимно, грамотно и с заботой о каждом пациенте.
Ознакомиться с деталями – нарколог вывод из запоя
get antibiotics without seeing a doctor: buy antibiotics online – buy antibiotics from india
В Сочи решение есть — наркологическая клиника. Здесь помогают людям выйти из запоя без страха и осуждения. Всё анонимно, грамотно и с заботой о каждом пациенте.
Углубиться в тему – наркологический вывод из запоя
После поступления в клинику проводится осмотр, измеряется давление, оценивается общее состояние. При необходимости проводятся экспресс-анализы на содержание веществ и ЭКГ.
Исследовать вопрос подробнее – наркологическая клиника в воронеже
get antibiotics quickly Biot Pharm buy antibiotics from canada
Когда организм на пределе, важна срочная помощь в Сочи — это команда опытных наркологов, которые помогут быстро и мягко выйти из запоя без вреда для здоровья.
Исследовать вопрос подробнее – вывод из запоя недорого
Гидроизоляция объектов http://www.usileniekonstrukcij2.ru .
Гидроизоляция подвала usileniekonstrukcij3.ru .
Инъектирование стен http://www.remontmechty.ru/remont/inekcionnaya-gidroizolyaciya-effektivnaya-zashhita-ot-vlagi .
Гидроизоляция объектов http://stroika-tovar.ru/articles/stati/usilenie-fundamentov-zdanij-metallom-buroinekczionnymi-svayami-i-inektirovaniem.html .
Licensed online pharmacy AU: online pharmacy australia – Buy medicine online Australia
Команда клиники «Новый шанс» состоит из опытных специалистов-наркологов, которые имеют многолетнюю практику работы с пациентами, находящимися в зависимости, и регулярно совершенствуют свои знания.
Исследовать вопрос подробнее – вывод из запоя на дому круглосуточно
Мы не делаем «массовых решений»: каждый пациент для нас — уникальная история, и мы строим терапию, исходя из его состояния, целей и личных возможностей. Наша задача — не просто временно облегчить симптомы, а дать человеку реальные инструменты для жизни без зависимости.
Подробнее – http://narkologicheskaya-klinika-mytishchi1.ru
Кухня Кухня – сердце дома, место, где рождаются кулинарные шедевры и собирается вся семья. Именно поэтому выбор мебели для кухни – задача ответственная и требующая особого подхода. Мебель на заказ в Краснодаре – это возможность создать уникальное пространство, идеально отвечающее вашим потребностям и предпочтениям.
http://pharmau24.com/# Online drugstore Australia
where can i buy erectile dysfunction pills erectile dysfunction medicine online cheap ed pills
Well I sincerely liked studying it. This tip offered by you is very useful for correct planning.
Когда организм на пределе, важна срочная помощь в Сочи — это команда опытных наркологов, которые помогут быстро и мягко выйти из запоя без вреда для здоровья.
Подробнее – vyvod-iz-zapoya
Когда организм на пределе, важна срочная помощь в Сочи — это команда опытных наркологов, которые помогут быстро и мягко выйти из запоя без вреда для здоровья.
Получить больше информации – vyvod-iz-zapoya-klinika
buy antibiotics online: Biot Pharm – Over the counter antibiotics for infection
Если вы видите, что близкий не может выйти из запоя самостоятельно, или если после нескольких дней употребления появились тревожные симптомы — не ждите. Помощь нужна уже сейчас.
Получить больше информации – http://vyvod-iz-zapoya-v-himki1.ru/
Процесс лечения строится из нескольких ключевых этапов, каждый из которых направлен на оперативное восстановление состояния пациента:
Получить больше информации – вывод из запоя на дому донецк.
affordable ed medication cost of ed meds erectile dysfunction online prescription
На данном этапе врач уточняет, как долго продолжается запой, какой тип алкоголя употребляется и имеются ли сопутствующие заболевания. Детальный анализ клинических данных помогает подобрать оптимальные методы детоксикации и минимизировать риск осложнений.
Узнать больше – вывод из запоя мурманская область
https://digitalforensicsquad.com/
В Сочи решение есть — наркологическая клиника. Здесь помогают людям выйти из запоя без страха и осуждения. Всё анонимно, грамотно и с заботой о каждом пациенте.
Углубиться в тему – срочный вывод из запоя
Свежие актуальные Новости футбола со всего мира. Результаты матчей, интервью, аналитика, расписание игр и обзоры соревнований. Будьте в курсе главных событий каждый день!
buy antibiotics online: Biot Pharm – Over the counter antibiotics for infection
Параллельно с медицинской терапией начинается работа психотерапевта. В индивидуальных и семейных сессиях пациенты учатся распознавать механизмы зависимости, вырабатывать новые стратегии поведения и справляться со стрессовыми ситуациями без употребления. Последний этап — реабилитация и ресоциализация — включает трудотерапию, арт- и групповую терапию, помощь в восстановлении профессиональных навыков и возвращении к социально-активной жизни.
Подробнее – http://narkologicheskaya-klinika-mytishchi1.ru/
Во всех этих случаях промедление может стоить слишком дорого. Наркологическая помощь должна быть оказана немедленно — либо на дому, либо в условиях клиники.
Выяснить больше – https://vyvod-iz-zapoya-v-himki1.ru/
Ero Pharm Fast Ero Pharm Fast buy ed pills online
https://eropharmfast.shop/# Ero Pharm Fast
Лечение в наркологической клинике в Воронеже проводится поэтапно, с учётом состояния пациента, длительности зависимости и наличия сопутствующих заболеваний.
Изучить вопрос глубже – http://narkologicheskaya-klinika-voronezh9.ru
Ero Pharm Fast: order ed meds online – Ero Pharm Fast
Затяжной запой опасен для жизни. Врачи наркологической клиники в Сочи проводят срочный вывод из запоя — на дому или в стационаре. Анонимно, безопасно, круглосуточно.
Детальнее – vyvod-iz-zapoya-klinika
Трендовые фасоны сезона этого сезона вдохновляют дизайнеров.
Популярны пышные модели до колен из полупрозрачных тканей.
Металлические оттенки делают платье запоминающимся.
Асимметричные силуэты возвращаются в моду.
Разрезы на юбках создают баланс между строгостью и игрой.
Ищите вдохновение в новых коллекциях — оригинальность и комфорт оставят в памяти гостей!
https://phaiboon.go.th/forum/suggestion-box/807980-dni-sv-d-bni-br-zi-e-g-g-d-s-v-i-p-vib-ru
Вывод из запоя обязателен, если:
Подробнее можно узнать тут – https://vyvod-iz-zapoya-v-himki1.ru/narkolog-vyvod-iz-zapoya-v-himkah
В нашей практике сочетаются несколько видов вмешательства: медико-биологическое, психологическое и социальное. Сначала проводится полная диагностика, включая лабораторные анализы и оценку работы сердца, печени, почек, а также психодиагностические тесты. После этого начинается этап детоксикации с внутривенными капельницами, которые выводят токсины, нормализуют водно-солевой баланс и восстанавливают основные функции организма. Далее мы применяем медикаментозную поддержку для стабилизации артериального давления, купирования тревожных симптомов, нормализации сна и уменьшения болевого синдрома.
Подробнее – http://narkologicheskaya-klinika-mytishchi1.ru
Недостаточно снять физическую зависимость — важно помочь человеку вернуться в сообщество. В «Доктор Здоровье» разработана система сопровождения, включающая мотивационные беседы, групповые занятия и социальную реабилитацию. Психотерапевты владеют методами когнитивно-поведенческой терапии и мотивационного интервью, консультанты помогают восстановить профессиональные навыки и адаптироваться к повседневной жизни, а встречи в группе взаимопомощи и психодраматические сессии способствуют укреплению чувства поддержки и навыков эффективного общения. Для родственников доступны семейные консультации, на которых объясняют природу зависимости и обучают стратегиям поддержки без критики и давления.
Подробнее – narkologicheskaya klinika mytischi
Ero Pharm Fast Ero Pharm Fast Ero Pharm Fast
В условиях Донецка ДНР профессиональный вывод из запоя на дому организован по отлаженной схеме, которая включает несколько последовательных этапов. Такой комплексный подход позволяет не только быстро вывести токсичные вещества из организма, но и обеспечить стабильное восстановление всех систем организма.
Изучить вопрос глубже – вывод из запоя круглосуточно в донецке
На данном этапе врач уточняет, как долго продолжается запой, какой тип алкоголя употребляется и имеются ли сопутствующие заболевания. Детальный анализ клинических данных помогает подобрать оптимальные методы детоксикации и минимизировать риск осложнений.
Углубиться в тему – вывод из запоя на дому цена в мурманске
Применение автоматизированных систем дозирования обеспечивает точное введение лекарственных средств, минимизируя риск передозировки и побочных эффектов. Постоянный мониторинг жизненно важных показателей позволяет врачу корректировать терапевтическую схему в режиме реального времени для обеспечения максимальной безопасности.
Детальнее – https://vyvod-iz-zapoya-donetsk-dnr0.ru/vyvod-iz-zapoya-na-domu-doneczk-dnr/
Pharm Au 24: Online drugstore Australia – Medications online Australia
Психологическая реабилитация: Психологическая поддержка – один из главных аспектов нашего подхода. Мы предлагаем индивидуальные и групповые занятия, помогающие осознать зависимость, проработать эмоциональные травмы и сформировать новые модели поведения. Опытные психологи помогают пациентам понять причины своих зависимостей, что является важным шагом на пути к выздоровлению.
Подробнее – vyvod-iz-zapoya-kruglosutochno kazan’
Наши наркологи придерживаются принципов уважительного и чуткого отношения, что создаёт атмосферу доверия. Специалисты проводят детальную диагностику, выявляют причины зависимости и разрабатывают персональные стратегии лечения. Компетентность и профессионализм врачей — залог успешного восстановления пациентов.
Углубиться в тему – нарколог вывод из запоя ростов-на-дону
hello there and thanks in your information – I’ve definitely picked up something new from proper here. I did then again experience some technical points the use of this web site, as I experienced to reload the web site a lot of occasions previous to I may just get it to load correctly. I were wondering in case your web host is OK? No longer that I’m complaining, but slow loading circumstances instances will often affect your placement in google and could damage your high quality score if ads and ***********|advertising|advertising|advertising and *********** with Adwords. Anyway I am adding this RSS to my email and can look out for a lot more of your respective interesting content. Make sure you replace this again very soon..
Близкий человек в запое? Не ждите ухудшения. Обратитесь в клинику Сочи — здесь проведут профессиональный вывод из запоя с последующим восстановлением организма.
Подробнее можно узнать тут – вывод из запоя капельница
Medications online Australia PharmAu24 Online drugstore Australia
Процесс лечения строится из нескольких ключевых этапов, каждый из которых направлен на оперативное восстановление состояния пациента:
Получить дополнительную информацию – вывод из запоя донецк.
https://pharmau24.shop/# Medications online Australia
На данном этапе врач уточняет длительность запоя, тип употребляемого алкоголя и наличие сопутствующих заболеваний. Тщательный анализ этих данных позволяет подобрать оптимальные методы детоксикации и снизить риск осложнений.
Изучить вопрос глубже – вывод из запоя в стационаре
Помощь нарколога на дому в Мурманске обладает рядом неоспоримых преимуществ, которые делают данный метод лечения особенно актуальным:
Разобраться лучше – https://vyvod-iz-zapoya-murmansk0.ru/vyvod-iz-zapoya-kruglosutochno-murmansk/
После поступления в клинику проводится осмотр, измеряется давление, оценивается общее состояние. При необходимости проводятся экспресс-анализы на содержание веществ и ЭКГ.
Ознакомиться с деталями – http://narkologicheskaya-klinika-voronezh9.ru/uslugi-narkologicheskoj-kliniki-voronezh/https://narkologicheskaya-klinika-voronezh9.ru
Доказательная медицина: мы используем только проверенные и эффективные методы, основанные на последних научных исследованиях в области наркологии и психиатрии.
Исследовать вопрос подробнее – вывод из запоя на дому уфа.
Алкогольная зависимость разрушает здоровье, семью, карьеру и личность. Чем раньше будет оказана профессиональная помощь, тем выше шансы на восстановление и возвращение к полноценной жизни. Лечение алкоголизма в Воронеже — помощь на всех стадиях зависимости позволяет справляться не только с физической тягой, но и с глубинными причинами, которые провоцируют патологическое употребление.
Получить больше информации – анонимное лечение алкоголизма
pharmacy online australia: PharmAu24 – PharmAu24
Каждый день запоя увеличивает риск для жизни. Не рискуйте — специалисты в Сочи приедут на дом и окажут экстренную помощь. Без боли, стресса и ожидания.
Подробнее тут – вывод из запоя
Затяжной запой опасен для жизни. Врачи наркологической клиники в Сочи проводят срочный вывод из запоя — на дому или в стационаре. Анонимно, безопасно, круглосуточно.
Выяснить больше – вывод из запоя цена
Когда организм на пределе, важна срочная помощь в Сочи — это команда опытных наркологов, которые помогут быстро и мягко выйти из запоя без вреда для здоровья.
Получить дополнительную информацию – наркология вывод из запоя
Эта статья сочетает познавательный и занимательный контент, что делает ее идеальной для любителей глубоких исследований. Мы рассмотрим увлекательные аспекты различных тем и предоставим вам новые знания, которые могут оказаться полезными в будущем.
Подробнее – https://irw-fl.com/10-reason-why-roofing-are-factmake-easier-3
В этом обзорном материале представлены увлекательные детали, которые находят отражение в различных аспектах жизни. Мы исследуем непонятные и интересные моменты, позволяя читателю увидеть картину целиком. Погрузитесь в мир знаний и удивительных открытий!
Подробнее можно узнать тут – https://kassanel.com/curso-expert-limpeza-facial-de-pele-com-letrologia-associada
pharmacy online australia Online drugstore Australia Online medication store Australia
Близкий человек в запое? Не ждите ухудшения. Обратитесь в клинику Сочи — здесь проведут профессиональный вывод из запоя с последующим восстановлением организма.
Детальнее – вывод из запоя на дому
get antibiotics quickly: buy antibiotics online – buy antibiotics
Great write-up, I am regular visitor of one’s website, maintain up the nice operate, and It is going to be a regular visitor for a long time.
Эта статья предлагает уникальную подборку занимательных фактов и необычных историй, которые вы, возможно, не знали. Мы постараемся вдохновить ваше воображение и разнообразить ваш кругозор, погружая вас в мир, полный интересных открытий. Читайте и открывайте для себя новое!
Получить дополнительные сведения – https://sonapec.com/2023/09/06/new-post
buy antibiotics online: buy antibiotics online uk – buy antibiotics from canada
Эта статья предлагает живое освещение актуальной темы с множеством интересных фактов. Мы рассмотрим ключевые моменты, которые делают данную тему важной и актуальной. Подготовьтесь к насыщенному путешествию по неизвестным аспектам и узнайте больше о значимых событиях.
Детальнее – https://potiguardemossoro.com.br/2021/04/07/onde-assistir-defensa-y-justicia-x-palmeiras-quarta-07-04-as-21-hs-pela-recopa-sul-americana-2021-escalacoes
Этот информационный материал привлекает внимание множеством интересных деталей и необычных ракурсов. Мы предлагаем уникальные взгляды на привычные вещи и рассматриваем вопросы, которые волнуют общество. Будьте в курсе актуальных тем и расширяйте свои знания!
Исследовать вопрос подробнее – https://www.karolina-jankowska.eu/zalacznik_nr_3_strona_instytutu_politologii_03-04-2013_ogloszenie_wynikow_konkursu-2
Ero Pharm Fast discount ed pills Ero Pharm Fast
https://pharmau24.com/# Buy medicine online Australia
Ero Pharm Fast: Ero Pharm Fast – Ero Pharm Fast
Today, while I was at work, my cousin stole my apple ipad and tested to see if it can survive a twenty five foot drop, just so she can be a youtube sensation. My apple ipad is now broken and she has 83 views. I know this is totally off topic but I had to share it with someone!
saudi arabia vs bahrain
Эта статья полна интересного контента, который побудит вас исследовать новые горизонты. Мы собрали полезные факты и удивительные истории, которые обогащают ваше понимание темы. Читайте, погружайтесь в детали и наслаждайтесь процессом изучения!
Узнать больше – https://www.aucotyllon.fr/2020/06/09/chapeau-os
поставки товара из Китая В эпоху глобализации и стремительного развития мировой экономики, Китай занимает ключевую позицию в качестве крупнейшего производственного центра. Организация эффективных и надежных поставок товаров из Китая становится стратегически важной задачей для предприятий, стремящихся к оптимизации затрат и расширению ассортимента. Наша компания предлагает комплексные решения для вашего бизнеса, обеспечивая бесперебойные и выгодные поставки товаров напрямую из Китая.
В этом информативном обзоре собраны самые интересные статистические данные и факты, которые помогут лучше понять текущие тренды. Мы представим вам цифры и графики, которые иллюстрируют, как развиваются различные сферы жизни. Эта информация станет отличной основой для глубокого анализа и принятия обоснованных решений.
Исследовать вопрос подробнее – http://www.k-kasagi.jp/oneword.php?itemid=2109
Medications online Australia: Pharm Au 24 – Medications online Australia
В этом информативном обзоре собраны самые интересные статистические данные и факты, которые помогут лучше понять текущие тренды. Мы представим вам цифры и графики, которые иллюстрируют, как развиваются различные сферы жизни. Эта информация станет отличной основой для глубокого анализа и принятия обоснованных решений.
Выяснить больше – https://centretineret.ro/index.php/2019/11/26/blog-tips-for-beginners
В этой публикации мы предлагаем подробные объяснения по актуальным вопросам, чтобы помочь читателям глубже понять их. Четкость и структурированность материала сделают его удобным для усвоения и применения в повседневной жизни.
Подробнее тут – http://thaiorchidklamathfalls.com/2019/02/14/the-tried-and-true-method-for-quantum-mechanic-in-step-by-step-detail
В этой статье-обзоре мы соберем актуальную информацию и интересные факты, которые освещают важные темы. Читатели смогут ознакомиться с различными мнениями и подходами, что позволит им расширить кругозор и глубже понять обсуждаемые вопросы.
Узнать больше – https://www.jvassurancesconseils.com/obstetrics-and-gynaecology
Эта информационная заметка предлагает лаконичное и четкое освещение актуальных вопросов. Здесь вы найдете ключевые факты и основную информацию по теме, которые помогут вам сформировать собственное мнение и повысить уровень осведомленности.
Получить дополнительные сведения – https://maritimemedicalcentre.com/product/wall-mount-infrared-temperature-scan
Эта статья сочетает в себе как полезные, так и интересные сведения, которые обогатят ваше понимание насущных тем. Мы предлагаем практические советы и рекомендации, которые легко внедрить в повседневную жизнь. Узнайте, как улучшить свои навыки и обогатить свой опыт с помощью простых, но эффективных решений.
Углубиться в тему – https://www.mastertradesmen.co.uk/5-questions-to-ask-your-builder
В этой публикации мы сосредоточимся на интересных аспектах одной из самых актуальных тем современности. Совмещая факты и мнения экспертов, мы создадим полное представление о предмете, которое будет полезно как новичкам, так и тем, кто глубоко изучает вопрос.
Подробнее можно узнать тут – https://cheapcarssalford.co.uk/2017/06/30/we-hear-audi-rs-models-could-be-offered-in-rear-wheel-drive
В этой статье собраны факты, которые освещают целый ряд важных вопросов. Мы стремимся предложить читателям четкую, достоверную информацию, которая поможет сформировать собственное мнение и лучше понять сложные аспекты рассматриваемой темы.
Детальнее – https://lamiatoscana.info/hello-world
Наши специалисты строят программу лечения на основе многоступенчатой схемы, включающей медицинские, психологические и социальные компоненты. Каждый этап нацелен на устранение физической зависимости, стабилизацию психоэмоционального состояния и восстановление социальных связей.
Детальнее – центр лечения наркомании волгоград.
В этом интересном тексте собраны обширные сведения, которые помогут вам понять различные аспекты обсуждаемой темы. Мы разбираем детали и факты, делая акцент на важности каждого элемента. Не упустите возможность расширить свои знания и взглянуть на мир по-новому!
Получить больше информации – http://www.onlinepokies.com.au/roller-derby-wild
I’m not sure exactly why but this web site is loading extremely slow for me. Is anyone else having this problem or is it a problem on my end? I’ll check back later on and see if the problem still exists.
Zain recharge
В этой информационной статье вы найдете интересное содержание, которое поможет вам расширить свои знания. Мы предлагаем увлекательный подход и уникальные взгляды на обсуждаемые темы, побуждая пользователей к активному мышлению и критическому анализу!
Подробнее – https://wp1.themexlab.com/wp/dreamland/?p=135
В обзорной статье вы найдете собрание важных фактов и аналитики по самым разнообразным темам. Мы рассматриваем как современные исследования, так и исторические контексты, чтобы вы могли получить полное представление о предмете. Погрузитесь в мир знаний и сделайте шаг к пониманию!
Получить больше информации – https://decenterx.nl/decentralized-finance-defi
It is the best time to make some plans for the future and it’s time to be happy. I’ve read this post and if I could I want to suggest you few interesting things or tips. Perhaps you could write next articles referring to this article. I wish to read even more things about it!
Эта обзорная заметка содержит ключевые моменты и факты по актуальным вопросам. Она поможет читателям быстро ориентироваться в теме и узнать о самых важных аспектах сегодня. Получите краткий курс по современной информации и оставайтесь в курсе событий!
Получить дополнительную информацию – https://diaocminhduong.com.vn/kham-pha-thanh-pho-dai-duong-vincity-ocean-park
В течение полугода пациент может бесплатно посещать онлайн-группы поддержки и консультироваться у психологов клиники.
Получить дополнительную информацию – http://
Мы не делаем «массовых решений»: каждый пациент для нас — уникальная история, и мы строим терапию, исходя из его состояния, целей и личных возможностей. Наша задача — не просто временно облегчить симптомы, а дать человеку реальные инструменты для жизни без зависимости.
Подробнее тут – http://narkologicheskaya-klinika-mytishchi1.ru/narkologicheskaya-klinika-narkolog-v-mytishchah/https://narkologicheskaya-klinika-mytishchi1.ru
Эта информационная заметка предлагает лаконичное и четкое освещение актуальных вопросов. Здесь вы найдете ключевые факты и основную информацию по теме, которые помогут вам сформировать собственное мнение и повысить уровень осведомленности.
Получить больше информации – http://lucadelnegro.com/fashions-fade-style-is-eternal
«НОВЫЙ НАРКОЛОГ» — наркологическая клиника в СПб с полным спектром услуг: детоксикация, лечение зависимостей, реабилитация, психологическая поддержка. Доверие пациентов и высокая эффективность подтверждаются отзывами и результатами работы.
Узнать больше – Наркологическая клиника
Зависимость — это заболевание, которое разрушает не только тело, но и личность. Оно затрагивает мышление, поведение, разрушает отношения и лишает человека способности контролировать свою жизнь. Наркологическая клиника в Волгограде — профессиональное лечение зависимостей строит свою работу на понимании природы болезни, а не на осуждении. Именно это позволяет добиваться стойких результатов, восстанавливая пациента физически, эмоционально и социально.
Выяснить больше – наркологические клиники алкоголизм волгоград.
Когда организм на пределе, важна срочная помощь в Сочи — это команда опытных наркологов, которые помогут быстро и мягко выйти из запоя без вреда для здоровья.
Подробнее можно узнать тут – сочи.
Гидроизоляция фундамента Гидроизоляция фундамента .
Затяжной запой опасен для жизни. Врачи наркологической клиники в Сочи проводят срочный вывод из запоя — на дому или в стационаре. Анонимно, безопасно, круглосуточно.
Углубиться в тему – вывод из запоя анонимно
PharmAu24: Discount pharmacy Australia – Discount pharmacy Australia
Наш стационар оснащён всем необходимым для безопасного и комфортного лечения. Здесь вы получите круглосуточный мониторинг, современное оборудование и услуги психологов, социальных педагогов и физиотерапевтов.
Разобраться лучше – наркологическая клиника на дом
Heya i am for the first time here. I found this board and I find It really useful & it helped me out a lot. I hope to give something back and aid others like you aided me.
Мы не делаем «массовых решений»: каждый пациент для нас — уникальная история, и мы строим терапию, исходя из его состояния, целей и личных возможностей. Наша задача — не просто временно облегчить симптомы, а дать человеку реальные инструменты для жизни без зависимости.
Подробнее тут – [url=https://narkologicheskaya-klinika-mytishchi1.ru/]наркологическая клиника цены мытищи[/url]
1win контора https://1win22084.ru/ .
Да, «Путь к жизни» оформляет все документы на номер договора без указания фамилии пациента и не передаёт сведения третьим лицам.
Выяснить больше – http://lechenie-narkomanii-volgograd9.ru
Этот этап лечения направлен на купирование острых симптомов, связанных с абстинентным синдромом. Пациенту назначаются современные препараты, способствующие выведению токсинов, нормализации работы сердца, печени, центральной нервной системы.
Подробнее – narkologicheskie kliniki alkogolizm volgograd
best ed meds online: Ero Pharm Fast – Ero Pharm Fast
https://pharmau24.com/# Online drugstore Australia
В основе нашей методики — комплексный подход, сочетающий медицинскую точку зрения и психологические технологии. Мы не ограничиваемся снятием абстиненции: задача клиники — помочь пациенту обрести новую мотивацию, развить навыки противостояния стрессам и возобновить социальную активность. Работа строится на трёх ключевых принципах:
Подробнее тут – http://narkologicheskaya-klinika-mytishchi1.ru/chastnaya-narkologicheskaya-klinika-v-mytishchah/
ed med online ed medicines Ero Pharm Fast
Инъектирование фундамента http://www.usileniekonstrukcij1.ru .
Клиника «НОВЫЙ НАРКОЛОГ» в Санкт-Петербурге — это центр помощи при зависимости с профессиональной командой наркологов и психотерапевтов. Доступны услуги детоксикации, амбулаторного и стационарного лечения, реабилитации и семейного консультирования.
Разобраться лучше – алкоголь после антибиотиков
Параллельно с медицинской терапией начинается работа психотерапевта. В индивидуальных и семейных сессиях пациенты учатся распознавать механизмы зависимости, вырабатывать новые стратегии поведения и справляться со стрессовыми ситуациями без употребления. Последний этап — реабилитация и ресоциализация — включает трудотерапию, арт- и групповую терапию, помощь в восстановлении профессиональных навыков и возвращении к социально-активной жизни.
Исследовать вопрос подробнее – https://narkologicheskaya-klinika-mytishchi1.ru/narkologicheskaya-klinika-ceny-v-mytishchah/
Да, «Путь к жизни» оформляет все документы на номер договора без указания фамилии пациента и не передаёт сведения третьим лицам.
Исследовать вопрос подробнее – лечение наркомании
Зависимость — это заболевание, которое разрушает не только тело, но и личность. Оно затрагивает мышление, поведение, разрушает отношения и лишает человека способности контролировать свою жизнь. Наркологическая клиника в Волгограде — профессиональное лечение зависимостей строит свою работу на понимании природы болезни, а не на осуждении. Именно это позволяет добиваться стойких результатов, восстанавливая пациента физически, эмоционально и социально.
Получить дополнительную информацию – бесплатная наркологическая клиника волгоград
Appreciating the time and energy you put into your blog and in depth information you provide. It’s good to come across a blog every once in a while that isn’t the same unwanted rehashed material. Great read! I’ve saved your site and I’m adding your RSS feeds to my Google account.
Zain recharge
Over the counter antibiotics for infection: buy antibiotics online – best online doctor for antibiotics
Процесс вывода из запоя на дому в Мариуполе построен по четко отлаженной схеме, что позволяет быстро и безопасно восстановить здоровье пациента.
Подробнее можно узнать тут – вызвать нарколога на дом мариуполь
Когда организм на пределе, важна срочная помощь в Сочи — это команда опытных наркологов, которые помогут быстро и мягко выйти из запоя без вреда для здоровья.
Детальнее – narkolog-vyvod-iz-zapoya
«Рентвил» предлагает аренду автомобилей в Краснодаре без залога и ограничений по пробегу по Краснодарскому краю и Адыгее. Требуется стаж от 3 лет и возраст от 23 лет. Оформление за 5 минут онлайн: нужны только фото паспорта и прав. Подача авто на жд вокзал и аэропорт Краснодар Мин-воды Сочи . Компания работает 10 лет , автомобили проходят своевременное ТО. Доступны детские кресла. Бронируйте через сайт краснодар аренда авто
Great web site. Plenty of helpful information here. I am sending it to a few pals ans additionally sharing in delicious. And certainly, thanks to your sweat!
Well explained and easy to follow. Thanks! https://spyandmonitor.com
mostbet canlı yayım http://www.mostbet3043.ru .
Pharm Au24: Discount pharmacy Australia – Pharm Au 24
Hi i am kavin, its my first time to commenting anywhere, when i read this piece of writing i thought i could also make comment due to this good post.
Myzain
Клиника «Возрождение» гарантирует:
Получить дополнительную информацию – https://narkologicheskaya-klinika-ufa9.ru/
Мы не делаем «массовых решений»: каждый пациент для нас — уникальная история, и мы строим терапию, исходя из его состояния, целей и личных возможностей. Наша задача — не просто временно облегчить симптомы, а дать человеку реальные инструменты для жизни без зависимости.
Детальнее – http://narkologicheskaya-klinika-mytishchi1.ru/narkologicheskaya-klinika-ceny-v-mytishchah/
Запой — это состояние, при котором человек на протяжении нескольких дней или недель регулярно употребляет алкоголь, теряя контроль над собой. При этом организм накапливает этанол и его токсичные метаболиты, печень и сердце работают на износ, нарушается сон, развивается психоэмоциональная нестабильность. Главный риск — абстинентный синдром, который может проявляться тремором, судорогами, повышением давления, паникой и даже галлюцинациями.
Получить дополнительную информацию – вывод из запоя капельница
Hey there just wanted to give you a quick heads up. The text in your content seem to be running off the screen in Firefox. I’m not sure if this is a format issue or something to do with internet browser compatibility but I figured I’d post to let you know. The design look great though! Hope you get the issue solved soon. Cheers
1win казино скачать https://1win22083.ru/ .
Близкий человек в запое? Не ждите ухудшения. Обратитесь в клинику Сочи — здесь проведут профессиональный вывод из запоя с последующим восстановлением организма.
Детальнее – sochi
sayt mostbet https://www.mostbet3030.ru .
В нашей практике сочетаются несколько видов вмешательства: медико-биологическое, психологическое и социальное. Сначала проводится полная диагностика, включая лабораторные анализы и оценку работы сердца, печени, почек, а также психодиагностические тесты. После этого начинается этап детоксикации с внутривенными капельницами, которые выводят токсины, нормализуют водно-солевой баланс и восстанавливают основные функции организма. Далее мы применяем медикаментозную поддержку для стабилизации артериального давления, купирования тревожных симптомов, нормализации сна и уменьшения болевого синдрома.
Подробнее можно узнать тут – https://narkologicheskaya-klinika-mytishchi1.ru/narkologicheskaya-klinika-narkolog-v-mytishchah/
Whats up are using WordPress for your site platform? I’m new to the blog world but I’m trying to get started and create my own. Do you require any html coding expertise to make your own blog? Any help would be really appreciated!
http://www.clubwww1.com/dating/member/blog_post_view.php?postId=5877
Если вы видите, что близкий не может выйти из запоя самостоятельно, или если после нескольких дней употребления появились тревожные симптомы — не ждите. Помощь нужна уже сейчас.
Подробнее – http://www.domen.ru
Недостаточно снять физическую зависимость — важно помочь человеку вернуться в сообщество. В «Доктор Здоровье» разработана система сопровождения, включающая мотивационные беседы, групповые занятия и социальную реабилитацию. Психотерапевты владеют методами когнитивно-поведенческой терапии и мотивационного интервью, консультанты помогают восстановить профессиональные навыки и адаптироваться к повседневной жизни, а встречи в группе взаимопомощи и психодраматические сессии способствуют укреплению чувства поддержки и навыков эффективного общения. Для родственников доступны семейные консультации, на которых объясняют природу зависимости и обучают стратегиям поддержки без критики и давления.
Узнать больше – частная наркологическая клиника мытищи
Сразу после поступления вызова нарколог приезжает на дом для проведения детального первичного осмотра. Специалист измеряет жизненно важные показатели, такие как пульс, артериальное давление и температура, и собирает анамнез, чтобы оценить степень алкогольной интоксикации. Эти данные служат основой для разработки персонального плана терапии.
Узнать больше – вызов врача нарколога на дом в мариуполе
В нашей практике сочетаются несколько видов вмешательства: медико-биологическое, психологическое и социальное. Сначала проводится полная диагностика, включая лабораторные анализы и оценку работы сердца, печени, почек, а также психодиагностические тесты. После этого начинается этап детоксикации с внутривенными капельницами, которые выводят токсины, нормализуют водно-солевой баланс и восстанавливают основные функции организма. Далее мы применяем медикаментозную поддержку для стабилизации артериального давления, купирования тревожных симптомов, нормализации сна и уменьшения болевого синдрома.
Подробнее можно узнать тут – https://narkologicheskaya-klinika-mytishchi1.ru/
Помощь нарколога на дому в Мурманске обладает рядом неоспоримых преимуществ, которые делают данный метод лечения особенно актуальным:
Подробнее можно узнать тут – вывод из запоя анонимно мурманск
best ed meds online: Ero Pharm Fast – online prescription for ed
Экстренная капельничная терапия от запоя на дому в Луганске ЛНР имеет ряд преимуществ, благодаря которым лечение становится максимально оперативным и безопасным:
Подробнее тут – капельница от запоя луганск
Мы принимаем пациентов старше 18 лет; для лиц старше 65 лет возможна адаптация схемы с учётом сопутствующих заболеваний.
Выяснить больше – лечение наркомании реабилитация
Over the counter antibiotics pills Over the counter antibiotics for infection buy antibiotics
I couldn’t resist commenting
Самостоятельно выйти из запоя — почти невозможно. В Сочи врачи клиники проводят медикаментозный вывод из запоя с круглосуточным выездом. Доверяйте профессионалам.
Подробнее – вывод из запоя недорого
Каждый пациент проходит три основные стадии терапии, начиная с момента первого обращения.
Ознакомиться с деталями – наркологическая клиника цены
Клиника «Альтернатива» предлагает фиксированные цены на выезд нарколога с оплатой после оказания услуги. Тарифы действуют по всему городу и пригороду.
Углубиться в тему – http://
В Сочи решение есть — наркологическая клиника. Здесь помогают людям выйти из запоя без страха и осуждения. Всё анонимно, грамотно и с заботой о каждом пациенте.
Изучить вопрос глубже – вывод из запоя капельница
Как подчёркивает заведующий отделением клиники доктор Илья Рожнов, «только честный и целостный подход позволяет восстановить личность, разрушенную зависимостью. Наркологическая клиника в Волгограде — профессиональное лечение зависимостей строит не просто курс терапии, а мост между человеком и его новой жизнью».
Разобраться лучше – http://narkologicheskaya-klinika-volgograd9.ru/lechenie-v-narkologicheskoj-klinike-volgograd/https://narkologicheskaya-klinika-volgograd9.ru
Каждый день запоя увеличивает риск для жизни. Не рискуйте — специалисты в Сочи приедут на дом и окажут экстренную помощь. Без боли, стресса и ожидания.
Исследовать вопрос подробнее – вывод из запоя анонимно
Незамедлительно после вызова нарколог прибывает на дом для проведения первичного осмотра. Специалист измеряет жизненно важные показатели, такие как пульс, артериальное давление и температура, а также собирает анамнез, чтобы определить степень алкогольной интоксикации. Эта информация позволяет оперативно разработать персонализированный план лечения.
Подробнее – http://narcolog-na-dom-mariupol00.ru
Hmm is anyone else encountering problems with the pictures on this blog loading? I’m trying to determine if its a problem on my end or if it’s the blog. Any feedback would be greatly appreciated.
https://bike-drive.com.ua/yak-vybraty-steklo-far-dlya-vashoho-avtomobilya.html
Обращение за помощью к наркологу на дому имеет ряд преимуществ, особенно в экстренных ситуациях:
Детальнее – нарколог на дом вывод
Платная наркологическая клиника в Санкт-Петербурге «НОВЫЙ НАРКОЛОГ» предлагает профессиональную помощь при алкогольной и наркотической зависимости. Быстрое снятие абстиненции, кодирование, лечение в стационаре и амбулатории — всё с гарантией конфиденциальности.
Получить больше информации – наркотики и работа
В обзорной статье вы найдете собрание важных фактов и аналитики по самым разнообразным темам. Мы рассматриваем как современные исследования, так и исторические контексты, чтобы вы могли получить полное представление о предмете. Погрузитесь в мир знаний и сделайте шаг к пониманию!
Выяснить больше – https://gratituderocks.org/product/womens-relaxed-t-shirt
Самостоятельно выйти из запоя — почти невозможно. В Сочи врачи клиники проводят медикаментозный вывод из запоя с круглосуточным выездом. Доверяйте профессионалам.
Получить дополнительные сведения – вывод из запоя недорого
В этой публикации мы предлагаем подробные объяснения по актуальным вопросам, чтобы помочь читателям глубже понять их. Четкость и структурированность материала сделают его удобным для усвоения и применения в повседневной жизни.
Изучить вопрос глубже – https://onlinecasinokoala.com/benefits-of-an-online-casino
1win pk 1win pk .
Наркологическая клиника «Трезвый Ум» — современный подход к экстренной помощи в Туле. Специализируемся на детоксикации, снятии острых симптомов, применении капельниц и безопасных методов лечения. Доступны круглосуточно, приезжаем оперативно.
Узнать больше – наркодиспансер
Эта информационная заметка предлагает лаконичное и четкое освещение актуальных вопросов. Здесь вы найдете ключевые факты и основную информацию по теме, которые помогут вам сформировать собственное мнение и повысить уровень осведомленности.
Углубиться в тему – https://guihangmyuccanada.com/dich-vu-chuyen-phat-nhanh-gia-re-da-dang-tan-tam-tai-lien-ket-my
Затяжной запой опасен для жизни. Врачи наркологической клиники в Сочи проводят срочный вывод из запоя — на дому или в стационаре. Анонимно, безопасно, круглосуточно.
Получить дополнительную информацию – vyvod-iz-zapoya-klinika
Близкий человек в запое? Не ждите ухудшения. Обратитесь в клинику Сочи — здесь проведут профессиональный вывод из запоя с последующим восстановлением организма.
Ознакомиться с деталями – вывод из запоя в стационаре
https://biotpharm.shop/# Over the counter antibiotics for infection
В этом информативном обзоре собраны самые интересные статистические данные и факты, которые помогут лучше понять текущие тренды. Мы представим вам цифры и графики, которые иллюстрируют, как развиваются различные сферы жизни. Эта информация станет отличной основой для глубокого анализа и принятия обоснованных решений.
Подробнее тут – http://samagrawadivichardhara.com/part1
I for all time emailed this weblog post page to all my contacts,
as if like to read it then my links will too.
This design is steller! You most certainly know
how to keep a reader entertained. Between your wit and your videos, I was almost moved to start my own blog (well,
almost…HaHa!) Great job. I really loved what you had to say, and more than that,
how you presented it. Too cool!
телеграм бот лаки джет https://1win14005.ru .
buy antibiotics from india: buy antibiotics online – buy antibiotics online
В обзорной статье вы найдете собрание важных фактов и аналитики по самым разнообразным темам. Мы рассматриваем как современные исследования, так и исторические контексты, чтобы вы могли получить полное представление о предмете. Погрузитесь в мир знаний и сделайте шаг к пониманию!
Детальнее – https://www.theteacrafters.com/product/80-gift-set-1-tumbler-8-small-tins-of-artisanal-tea-1-spoon
Этот обзорный материал предоставляет информационно насыщенные данные, касающиеся актуальных тем. Мы стремимся сделать информацию доступной и структурированной, чтобы читатели могли легко ориентироваться в наших выводах. Познайте новое с нашим обзором!
Подробнее – https://transportesbelda.com/2020/04/07/hola-mundo
Этот информативный текст выделяется своими захватывающими аспектами, которые делают сложные темы доступными и понятными. Мы стремимся предложить читателям глубину знаний вместе с разнообразием интересных фактов. Откройте новые горизонты и развивайте свои способности познавать мир!
Выяснить больше – https://www.denaelde.be/background-bloem
Эта публикация погружает вас в мир увлекательных фактов и удивительных открытий. Мы расскажем о ключевых событиях, которые изменили ход истории, и приоткроем завесу над научными достижениями, которые вдохновили миллионы. Узнайте, чему может научить нас прошлое и как применить эти знания в будущем.
Детальнее – https://www.festzeltbrandl.de/maimarkt
https://oboronspecsplav.ru/
В этом информативном тексте представлены захватывающие события и факты, которые заставят вас задуматься. Мы обращаем внимание на важные моменты, которые часто остаются незамеченными, и предлагаем новые перспективы на привычные вещи. Подготовьтесь к тому, чтобы быть поглощенным увлекательными рассказами!
Получить дополнительную информацию – https://vieiro.org/d-jose-m-lopez-varela-alcalde-de-a-laracha
Этот информационный обзор станет отличным путеводителем по актуальным темам, объединяющим важные факты и мнения экспертов. Мы исследуем ключевые идеи и представляем их в доступной форме для более глубокого понимания. Читайте, чтобы оставаться в курсе событий!
Получить дополнительную информацию – https://shop.gbuwh.co.uk/portfolio/jazen-diua-pilam-mazem
В этой информационной статье вы найдете интересное содержание, которое поможет вам расширить свои знания. Мы предлагаем увлекательный подход и уникальные взгляды на обсуждаемые темы, побуждая пользователей к активному мышлению и критическому анализу!
Подробнее – https://rangberang.net/%E0%A6%A7%E0%A7%82%E0%A6%B2%E0%A6%BE-%E0%A6%9C%E0%A6%AE%E0%A7%87%E0%A6%9B%E0%A7%87-%E0%A6%96%E0%A6%BE%E0%A6%81%E0%A6%9C%E0%A6%95%E0%A6%BE%E0%A6%9F%E0%A6%BE-%E0%A6%86%E0%A6%B8%E0%A6%AC%E0%A6%BE
Этот информационный материал привлекает внимание множеством интересных деталей и необычных ракурсов. Мы предлагаем уникальные взгляды на привычные вещи и рассматриваем вопросы, которые волнуют общество. Будьте в курсе актуальных тем и расширяйте свои знания!
Углубиться в тему – http://www.occca.it/le-10-regole-del-buon-cliente
В этом информативном тексте представлены захватывающие события и факты, которые заставят вас задуматься. Мы обращаем внимание на важные моменты, которые часто остаются незамеченными, и предлагаем новые перспективы на привычные вещи. Подготовьтесь к тому, чтобы быть поглощенным увлекательными рассказами!
Выяснить больше – https://whnynews.com/2023/11/17/weekly-cartoon-tuesday-november-27th-2023
Эта обзорная заметка содержит ключевые моменты и факты по актуальным вопросам. Она поможет читателям быстро ориентироваться в теме и узнать о самых важных аспектах сегодня. Получите краткий курс по современной информации и оставайтесь в курсе событий!
Получить больше информации – https://hibizsolutions.com/best-way-to-find-a-perfect-design-for-your-new-logo-and-rebrand-your-whole-look
Предлагаем вашему вниманию интересную справочную статью, в которой собраны ключевые моменты и нюансы по актуальным вопросам. Эта информация будет полезна как для профессионалов, так и для тех, кто только начинает изучать тему. Узнайте ответы на важные вопросы и расширьте свои знания!
Подробнее тут – https://dorfaktiv.at/cropped-wordpressstartseite-jpg
Этот информативный текст выделяется своими захватывающими аспектами, которые делают сложные темы доступными и понятными. Мы стремимся предложить читателям глубину знаний вместе с разнообразием интересных фактов. Откройте новые горизонты и развивайте свои способности познавать мир!
Подробнее – https://school-of-cyber.com/portfolio/9
Клиника «Возрождение» гарантирует:
Получить дополнительные сведения – наркологическая клиника
Medications online Australia: Medications online Australia – pharmacy online australia
Наркологическая клиника «Возрождение» в Уфе предоставляет полный спектр услуг по лечению зависимости от психоактивных веществ и алкоголя. Мы сочетаем проверенные временем медицинские методики с инновационными технологиями, сохраняя полную анонимность пациентов. В любом случае вы можете рассчитывать на круглосуточную поддержку, комфортные условия пребывания и индивидуальный план терапии, составленный опытными специалистами.
Получить дополнительную информацию – https://narkologicheskaya-klinika-ufa9.ru/chastnaya-narkologicheskaya-klinika-ufa
Эта публикация завернет вас в вихрь увлекательного контента, сбрасывая стереотипы и открывая двери к новым идеям. Каждый абзац станет для вас открытием, полным ярких примеров и впечатляющих достижений. Подготовьтесь быть вовлеченными и удивленными каждый раз, когда продолжите читать.
Изучить вопрос глубже – https://swedfriends.com/visiting-green-association-of-kurdistan
1win virtual sport http://1win14006.ru .
Создание безопасной среды: Мы понимаем, насколько важна поддержка в сложные моменты. Наш центр предоставляет пространство, где пациенты могут открыто говорить о своих переживаниях без страха быть осужденными, что способствует доверию и успешному лечению.
Углубиться в тему – вывод из запоя капельница казань
Эта статья сочетает в себе как полезные, так и интересные сведения, которые обогатят ваше понимание насущных тем. Мы предлагаем практические советы и рекомендации, которые легко внедрить в повседневную жизнь. Узнайте, как улучшить свои навыки и обогатить свой опыт с помощью простых, но эффективных решений.
Узнать больше – https://sawtmedia.com/%D9%87%D9%84-%D9%8A%D8%B3%D8%AA%D9%87%D8%AF%D9%81-%D8%A7%D9%84%D8%B1%D8%A6%D9%8A%D8%B3-%D8%A7%D9%84%D8%AA%D9%88%D9%86%D8%B3%D9%8A-%D9%85%D9%86%D8%A7%D9%81%D8%B3%D9%8A%D9%87-%D9%81%D9%8A-%D8%A7%D9%84
Great post. I was checking constantly this blog and I am impressed! Extremely useful information specifically the last part 🙂 I care for such information a lot. I was seeking this certain information for a very long time. Thank you and good luck.
Если вы видите, что близкий не может выйти из запоя самостоятельно, или если после нескольких дней употребления появились тревожные симптомы — не ждите. Помощь нужна уже сейчас.
Подробнее – вывод из запоя недорого химки
Эта статья предлагает уникальную подборку занимательных фактов и необычных историй, которые вы, возможно, не знали. Мы постараемся вдохновить ваше воображение и разнообразить ваш кругозор, погружая вас в мир, полный интересных открытий. Читайте и открывайте для себя новое!
Узнать больше – https://threedogzllc.com/product/hoodie-with-logo
заказать обед с доставкой челябинск dostavka-edy-bf13.ru .
Состояние пациента стабилизируется за счёт коррекции давления, нормализации пульса, снятия тремора и тревожности. Для защиты печени применяются гепатопротекторы, а для восстановления функций мозга — препараты нейрометаболического действия. При необходимости назначаются витамины группы B, седативные средства, препараты для восстановления сна.
Получить дополнительные сведения – вывод из запоя в стационаре
Во всех этих случаях промедление может стоить слишком дорого. Наркологическая помощь должна быть оказана немедленно — либо на дому, либо в условиях клиники.
Детальнее – https://vyvod-iz-zapoya-v-himki1.ru
доставка продуктов челябинск доставка продуктов челябинск .
Во всех этих случаях промедление может стоить слишком дорого. Наркологическая помощь должна быть оказана немедленно — либо на дому, либо в условиях клиники.
Углубиться в тему – https://vyvod-iz-zapoya-v-himki1.ru/vyvod-iz-zapoya-cena-v-himkah/
После первичной диагностики начинается активная фаза медикаментозного вмешательства. Современные препараты вводятся капельничным методом, что позволяет быстро снизить уровень токсинов в крови и восстановить нормальные обменные процессы, стабилизируя работу печени, почек и сердечно-сосудистой системы.
Углубиться в тему – https://vyvod-iz-zapoya-donetsk-dnr0.ru/vyvod-iz-zapoya-czena-doneczk-dnr
здоровая ферма челябинск https://dostavka-edy-bf12.ru/ .
Наркологическая клиника «Новый шанс» — это специализированное учреждение, которое предоставляет профессиональную помощь людям, страдающим от алкогольной и наркотической зависимости. Наша цель — предложить эффективные методы лечения и всестороннюю поддержку, чтобы помочь пациентам преодолеть зависимость и вернуть контроль над своей жизнью.
Разобраться лучше – http://tajno-vyvod-iz-zapoya.ru/vyvod-iz-zapoya-cena-v-rostove-na-donu.ru/
Ero Pharm Fast: Ero Pharm Fast – where can i buy erectile dysfunction pills
Наркологическая клиника «Новый шанс» — это специализированное учреждение, которое предоставляет профессиональную помощь людям, страдающим от алкогольной и наркотической зависимости. Наша цель — предложить эффективные методы лечения и всестороннюю поддержку, чтобы помочь пациентам преодолеть зависимость и вернуть контроль над своей жизнью.
Узнать больше – http://www.domen.ru
клинические анализы medanalyze.ru .
1win букмекерская регистрация https://1win22083.ru/ .
https://www.wpdis.co/kak-vyibrat-narkologicheskuyu-kliniku-ischerpyivayushhee-rukovodstvo/
Состояние пациента стабилизируется за счёт коррекции давления, нормализации пульса, снятия тремора и тревожности. Для защиты печени применяются гепатопротекторы, а для восстановления функций мозга — препараты нейрометаболического действия. При необходимости назначаются витамины группы B, седативные средства, препараты для восстановления сна.
Подробнее – вывод из запоя цена московская область
What i do not understood is if truth be told how you are now not actually much more neatly-liked than you may be right now. You are so intelligent. You realize thus significantly in terms of this topic, made me for my part imagine it from so many numerous angles. Its like men and women are not involved until it?¦s something to accomplish with Lady gaga! Your personal stuffs great. All the time deal with it up!
https://www.cirquededemain.paris/aloh.php?candi=esporte+da+sorte+baixar
1вин сайт официальный скачать 1вин сайт официальный скачать .
С учётом всех этапов (детоксикация, терапевтическая работа и адаптация) курс занимает от одного до трёх месяцев, в зависимости от индивидуальных особенностей пациента.
Подробнее можно узнать тут – центр лечения наркомании волгоград
В клинике «ВитаМед Плюс» применяются проверенные методики и препараты, которые позволяют безопасно вывести пациента из запоя. Процедура начинается с внутривенного введения очищающих растворов, которые помогают ускорить выведение этанола и токсинов. Одновременно восстанавливается водно-солевой баланс, что особенно важно при обезвоживании после длительного употребления алкоголя.
Выяснить больше – вывод из запоя клиника в химках
Awesome blog! Do you have any helpful hints for aspiring writers?
I’m planning to start my own blog soon but
I’m a little lost on everything. Would you advise starting with a free platform like WordPress or go for a paid option? There
are so many options out there that I’m completely overwhelmed ..
Any tips? Many thanks!
Мы принимаем пациентов старше 18 лет; для лиц старше 65 лет возможна адаптация схемы с учётом сопутствующих заболеваний.
Детальнее – http://lechenie-narkomanii-volgograd9.ru/
Buy medicine online Australia PharmAu24 Online drugstore Australia
Наркомания — серьёзное хроническое заболевание, требующее не только медицинского вмешательства, но и комплексного подхода к восстановлению личности и социальной адаптации. В Волгограде клиника «Путь к жизни» предлагает полностью анонимное обслуживание, при котором никаких сведений о пациенте не попадает в государственные реестры. Мы работаем круглосуточно и готовы принять человека в любое время, обеспечивая сопровождение на всех этапах лечения: от первичной детоксикации до выхода на полноценную жизнь без зависимости.
Выяснить больше – https://lechenie-narkomanii-volgograd9.ru/czentr-lecheniya-narkomanii-volgograd/
where to buy ed pills: low cost ed medication – cheap ed pills online
заказать цветы с доставкой доставка цветов недорого
Полноценное восстановление включает не только прекращение приёма наркотиков, но и формирование здорового образа жизни, навыков эмоционального самоконтроля и социокультурной адаптации.
Получить больше информации – лечение наркомании в волгограде
The Natural Mounjaro Recipe is more than just a diet—it’s a sustainable and natural approach to weight management and overall health.
При поступлении вызова нарколог незамедлительно прибывает на дом для проведения детального первичного осмотра. Врач измеряет жизненно важные показатели, такие как пульс, артериальное давление и температура, а также собирает краткий анамнез, чтобы определить степень алкогольной интоксикации и сформировать индивидуальный план терапии.
Подробнее можно узнать тут – http://vyvod-iz-zapoya-donetsk-dnr0.ru
доставка еды доставка еды .
заказ еды в челябинске с доставкой http://dostavka-edy-bf12.ru .
mgm bet
кайт школа
Да, «Путь к жизни» оформляет все документы на номер договора без указания фамилии пациента и не передаёт сведения третьим лицам.
Ознакомиться с деталями – https://lechenie-narkomanii-volgograd9.ru/
клинические анализы https://medanalyze.ru/ .
доставка еды челябинск доставка еды челябинск .
https://eropharmfast.com/# Ero Pharm Fast
ed pills cheap: Ero Pharm Fast – ed online pharmacy
Mitolyn is a cutting-edge natural dietary supplement designed to support effective weight loss and improve overall wellness.
С учётом всех этапов (детоксикация, терапевтическая работа и адаптация) курс занимает от одного до трёх месяцев, в зависимости от индивидуальных особенностей пациента.
Получить дополнительную информацию – принудительное лечение наркомании волгоград
Во всех этих случаях промедление может стоить слишком дорого. Наркологическая помощь должна быть оказана немедленно — либо на дому, либо в условиях клиники.
Углубиться в тему – vyvod-iz-zapoya-czena himki
доставка цветов недорого купить цветы с доставкой
При тяжелой алкогольной интоксикации оперативное лечение становится жизненно необходимым для спасения здоровья. В Архангельске специалисты оказывают помощь на дому, используя метод капельничного лечения от запоя. Такой подход позволяет быстро вывести токсины, восстановить обмен веществ и стабилизировать работу внутренних органов, обеспечивая при этом высокий уровень конфиденциальности и комфорт в условиях привычного домашнего уюта.
Детальнее – http://
Мы не делаем «массовых решений»: каждый пациент для нас — уникальная история, и мы строим терапию, исходя из его состояния, целей и личных возможностей. Наша задача — не просто временно облегчить симптомы, а дать человеку реальные инструменты для жизни без зависимости.
Подробнее можно узнать тут – http://narkologicheskaya-klinika-mytishchi1.ru/narkologicheskaya-klinika-narkolog-v-mytishchah/https://narkologicheskaya-klinika-mytishchi1.ru
Лечение алкоголизма в Воронеже — помощь на всех стадиях зависимости особенно важно на этапе, когда у человека ещё сохраняется мотивация к изменениям. Но даже при тяжёлых формах зависимости шанс на выздоровление сохраняется — при условии комплексного подхода.
Получить дополнительную информацию – клиника лечения алкоголизма воронеж.
I just like the helpful information you provide on your articles. I will bookmark your weblog and take a look at again here regularly. I am reasonably certain I will be told lots of new stuff proper right here! Best of luck for the next!
mostbet parol tiklash https://mostbet3031.ru/ .
mostbet lisenziyasi uz http://mostbet3030.ru/ .
Клиника «Возрождение» гарантирует:
Углубиться в тему – http://narkologicheskaya-klinika-ufa9.ru/
Наши специалисты строят программу лечения на основе многоступенчатой схемы, включающей медицинские, психологические и социальные компоненты. Каждый этап нацелен на устранение физической зависимости, стабилизацию психоэмоционального состояния и восстановление социальных связей.
Получить дополнительную информацию – http://lechenie-narkomanii-volgograd9.ru
1win yangi domen 1win14006.ru .
Medications online Australia: online pharmacy australia – Medications online Australia
1win казино – официальный сайт http://1win14004.ru .
Over the counter antibiotics pills: buy antibiotics over the counter – Over the counter antibiotics for infection
Параллельно с медицинской терапией начинается работа психотерапевта. В индивидуальных и семейных сессиях пациенты учатся распознавать механизмы зависимости, вырабатывать новые стратегии поведения и справляться со стрессовыми ситуациями без употребления. Последний этап — реабилитация и ресоциализация — включает трудотерапию, арт- и групповую терапию, помощь в восстановлении профессиональных навыков и возвращении к социально-активной жизни.
Углубиться в тему – http://narkologicheskaya-klinika-mytishchi1.ru/narkologicheskaya-klinika-narkolog-v-mytishchah/https://narkologicheskaya-klinika-mytishchi1.ru
Наркологическая клиника «Возрождение» в Уфе предоставляет полный спектр услуг по лечению зависимости от психоактивных веществ и алкоголя. Мы сочетаем проверенные временем медицинские методики с инновационными технологиями, сохраняя полную анонимность пациентов. В любом случае вы можете рассчитывать на круглосуточную поддержку, комфортные условия пребывания и индивидуальный план терапии, составленный опытными специалистами.
Получить дополнительную информацию – наркологическая клиника на дом
mostbet pul çıxarma mostbet pul çıxarma .
После диагностики начинается активная фаза медикаментозного вмешательства. Современные препараты вводятся капельничным методом для быстрого снижения уровня токсинов в крови, восстановления обменных процессов и нормализации работы внутренних органов, таких как печень, почки и сердце.
Получить дополнительные сведения – https://kapelnica-ot-zapoya-arkhangelsk0.ru/kapelnicza-ot-zapoya-na-domu-arkhangelsk/
Запой — это состояние, при котором человек на протяжении нескольких дней или недель регулярно употребляет алкоголь, теряя контроль над собой. При этом организм накапливает этанол и его токсичные метаболиты, печень и сердце работают на износ, нарушается сон, развивается психоэмоциональная нестабильность. Главный риск — абстинентный синдром, который может проявляться тремором, судорогами, повышением давления, паникой и даже галлюцинациями.
Получить дополнительную информацию – вывод из запоя цена химки.
сайт 1win https://1win22080.ru/ .
ProstaVive is a premium, plant-based dietary supplement specifically formulated to support prostate health, reduce inflammation, and enhance urinary function, especially for men over the age of 40.
Каждый врач клиники обладает глубокими знаниями в области фармакологии, психофармакологии и психотерапии, посещает профессиональные конференции и семинары, следит за достижениями в области лечения зависимостей. Такой подход позволяет применять наиболее эффективные и современные методы.
Получить больше информации – срочный вывод из запоя
Статья охватывает различные аспекты обсуждаемой темы и представляет аргументы с обеих сторон.
I got what you mean ,saved to my bookmarks, very nice web site.
Лечение алкоголизма в Воронеже — помощь на всех стадиях зависимости особенно важно на этапе, когда у человека ещё сохраняется мотивация к изменениям. Но даже при тяжёлых формах зависимости шанс на выздоровление сохраняется — при условии комплексного подхода.
Подробнее тут – лечение наркомании и алкоголизма воронеж
Мы используем новейшие образцы медицинской техники, что повышает безопасность процедур и скорость детоксикации.
Получить дополнительные сведения – платная наркологическая помощь уфа
Мы принимаем пациентов старше 18 лет; для лиц старше 65 лет возможна адаптация схемы с учётом сопутствующих заболеваний.
Детальнее – http://
Аргументы подкреплены фактами и исследованиями, что позволяет читателям рассмотреть разные стороны вопроса.
Over the counter antibiotics pills BiotPharm Over the counter antibiotics pills
I haven’t checked in here for some time as I thought it was getting boring, but the last several posts are great quality so I guess I’ll add you back to my everyday bloglist. You deserve it my friend 🙂
Запой — это не просто продолжительное пьянство, а острое состояние, требующее срочной медицинской помощи. Без профессионального вмешательства организм человека стремительно разрушается, возрастает риск инфаркта, инсульта, алкогольного психоза и летального исхода. Именно поэтому вывод из запоя должен проходить под контролем нарколога, с использованием проверенных медикаментов и поэтапной схемы стабилизации. В наркологической клинике «ВитаМед Плюс» организована круглосуточная помощь в Химках, включая выезд врача на дом и приём в стационаре.
Углубиться в тему – vyvod-iz-zapoya himki
Наш стационар оснащён всем необходимым для безопасного и комфортного лечения. Здесь вы получите круглосуточный мониторинг, современное оборудование и услуги психологов, социальных педагогов и физиотерапевтов.
Получить дополнительные сведения – частная наркологическая клиника уфа
Обращение за помощью к профессионалам в условиях домашнего лечения имеет ряд важных преимуществ:
Углубиться в тему – наркологический вывод из запоя
Образовательные программы: Мы уверены, что знания о зависимости и её последствиях играют важную роль в реабилитации. Мы информируем пациентов о механизмах действия наркотиков и алкоголя на организм, что способствует изменению их отношения к терапии и жизни без зависимостей.
Выяснить больше – вывод из запоя на дому в казани
best online ed medication: cheapest ed treatment – Ero Pharm Fast
Анонимность и конфиденциальность: мы гарантируем полную анонимность и конфиденциальность лечения, понимая деликатность проблемы зависимости.
Выяснить больше – вывод из запоя в уфе
I like this weblog very much, Its a rattling nice situation to read and receive info . “Famous remarks are very seldom quoted correctly.” by Simeon Strunsky.
Вывод из запоя обязателен, если:
Выяснить больше – вывод из запоя цена химки
Недостаточно снять физическую зависимость — важно помочь человеку вернуться в сообщество. В «Доктор Здоровье» разработана система сопровождения, включающая мотивационные беседы, групповые занятия и социальную реабилитацию. Психотерапевты владеют методами когнитивно-поведенческой терапии и мотивационного интервью, консультанты помогают восстановить профессиональные навыки и адаптироваться к повседневной жизни, а встречи в группе взаимопомощи и психодраматические сессии способствуют укреплению чувства поддержки и навыков эффективного общения. Для родственников доступны семейные консультации, на которых объясняют природу зависимости и обучают стратегиям поддержки без критики и давления.
Исследовать вопрос подробнее – http://www.domen.ru
mostbet promo kod https://www.mostbet3042.ru .
palpite da loteria dos sonhos
Процесс лечения строится из нескольких ключевых этапов, каждый из которых направлен на оперативное восстановление состояния пациента:
Получить дополнительную информацию – вывод из запоя на дому цена донецк
Специалист уточняет продолжительность запоя, тип употребляемого алкоголя и наличие сопутствующих заболеваний. Такой подробный анализ позволяет подобрать оптимальные методы детоксикации и снизить риск осложнений.
Подробнее можно узнать тут – https://kapelnica-ot-zapoya-lugansk-lnr0.ru/vyzvat-kapelniczu-ot-zapoya-lugansk-lnr
В основе нашей методики — комплексный подход, сочетающий медицинскую точку зрения и психологические технологии. Мы не ограничиваемся снятием абстиненции: задача клиники — помочь пациенту обрести новую мотивацию, развить навыки противостояния стрессам и возобновить социальную активность. Работа строится на трёх ключевых принципах:
Получить дополнительную информацию – narkologicheskaya-klinika-mytishchi1.ru/
Под наблюдением врача пациенту вводятся капельницы с растворами, устраняющими интоксикацию, восстанавливается водно-солевой баланс, купируются симптомы ломки или похмельного синдрома.
Подробнее можно узнать тут – https://narkologicheskaya-klinika-voronezh9.ru/anonimnaya-narkologicheskaya-klinika-voronezh/
мостбет apk скачать http://mostbet3031.ru .
Команда клиники «Новый шанс» состоит из опытных специалистов-наркологов, которые имеют многолетнюю практику работы с пациентами, находящимися в зависимости, и регулярно совершенствуют свои знания.
Изучить вопрос глубже – вывод из запоя на дому ростов-на-дону
При тяжелой алкогольной интоксикации оперативное лечение становится жизненно необходимым для спасения здоровья. В Архангельске специалисты оказывают помощь на дому, используя метод капельничного лечения от запоя. Такой подход позволяет быстро вывести токсины, восстановить обмен веществ и стабилизировать работу внутренних органов, обеспечивая при этом высокий уровень конфиденциальности и комфорт в условиях привычного домашнего уюта.
Исследовать вопрос подробнее – postavit-kapelniczu-ot-zapoya arhangel’sk
Когда запой начинает негативно влиять на здоровье, оперативное лечение становится залогом успешного выздоровления. В Архангельске, Архангельская область, квалифицированные наркологи предоставляют помощь на дому, позволяя быстро провести детоксикацию, восстановить нормальные обменные процессы и стабилизировать работу жизненно важных органов. Такой формат лечения обеспечивает индивидуальный подход, комфортную домашнюю обстановку и полную конфиденциальность, что особенно важно для пациентов, стремящихся к быстрому восстановлению без посещения стационара.
Углубиться в тему – капельница от запоя на дому цена в архангельске
Can you tell us more about this? I’d care to find out more details.
https://smotri.com.ua/elektroshoker-fonar-dlya-samooborony-dvoynaya-zashchita
После диагностики начинается активная фаза медикаментозного вмешательства. Препараты вводятся капельничным методом, что способствует быстрому снижению уровня токсинов в крови, нормализации обменных процессов и стабилизации работы таких органов, как печень, почки и сердце.
Выяснить больше – http://vyvod-iz-zapoya-murmansk00.ru/vyvod-iz-zapoya-czena-murmansk/
В этом информативном тексте представлены захватывающие события и факты, которые заставят вас задуматься. Мы обращаем внимание на важные моменты, которые часто остаются незамеченными, и предлагаем новые перспективы на привычные вещи. Подготовьтесь к тому, чтобы быть поглощенным увлекательными рассказами!
Изучить вопрос глубже – https://enjoylifeuema.com/2023/08/26/%E9%81%B8%E6%89%8B%E2%9D%B8
Эта информационная заметка предлагает лаконичное и четкое освещение актуальных вопросов. Здесь вы найдете ключевые факты и основную информацию по теме, которые помогут вам сформировать собственное мнение и повысить уровень осведомленности.
Получить дополнительную информацию – https://heliostesting.site/august-2016-newsletter
Лечение алкоголизма в Воронеже — помощь на всех стадиях зависимости особенно важно на этапе, когда у человека ещё сохраняется мотивация к изменениям. Но даже при тяжёлых формах зависимости шанс на выздоровление сохраняется — при условии комплексного подхода.
Подробнее – http://lechenie-alkogolizma-voronezh9.ru
После стабилизации состояния назначаются препараты, укрепляющие печень, сердце и нервную систему. Обязателен контроль за самочувствием пациента в течение суток и более.
Получить дополнительную информацию – https://narkologicheskaya-klinika-voronezh9.ru/anonimnaya-narkologicheskaya-klinika-voronezh
https://cotupapstore.com.tn/aloh.php?candi=096+bet
http://biotpharm.com/# get antibiotics quickly
ProDentim is a revolutionary oral probiotic supplement formulated with billions of live, beneficial bacteria designed to improve the oral microbiome—the delicate ecosystem inside your mouth.
Эта информационная статья охватывает широкий спектр актуальных тем и вопросов. Мы стремимся осветить ключевые факты и события с ясностью и простотой, чтобы каждый читатель мог извлечь из нее полезные знания и полезные инсайты.
Подробнее тут – http://coffeeandtumbleweeds.com/coffee-shops/events-are-kicking-off-at-black-smoke-coffee
В этой статье вы найдете познавательную и занимательную информацию, которая поможет вам лучше понять мир вокруг. Мы собрали интересные данные, которые вдохновляют на размышления и побуждают к действиям. Открывайте новую информацию и получайте удовольствие от чтения!
Получить дополнительную информацию – https://www.fcp.yns.mybluehost.me/days-of-76-rodeo-kicks-off-this-week
Эта информационная статья охватывает широкий спектр актуальных тем и вопросов. Мы стремимся осветить ключевые факты и события с ясностью и простотой, чтобы каждый читатель мог извлечь из нее полезные знания и полезные инсайты.
Разобраться лучше – https://mitjagandia.org/la-29-mitja-marato-10kde-gandia-y-el-club-de-correr-el-garbi-organizador-de-la-prueba-celebrada-el-pasado-10-de-noviembre-hace-entrega-de-3000-euros-a-los-afectados-por-la-dana-ademas-de
I was suggested this blog by my cousin. I’m now not positive whether or not this put up is written by means of him as no one else recognise such certain about my difficulty. You are amazing! Thank you!
Online drugstore Australia: Online medication store Australia – Online drugstore Australia
You completed some fine points there. I did a search on the topic and found most people will consent with your blog.
Эта публикация дает возможность задействовать различные источники информации и представить их в удобной форме. Читатели смогут быстро найти нужные данные и получить ответы на интересующие их вопросы. Мы стремимся к четкости и доступности материала для всех!
Выяснить больше – https://morecasti.com/buenos-dias-feliz-miercoles-2
В обзорной статье вы найдете собрание важных фактов и аналитики по самым разнообразным темам. Мы рассматриваем как современные исследования, так и исторические контексты, чтобы вы могли получить полное представление о предмете. Погрузитесь в мир знаний и сделайте шаг к пониманию!
Получить больше информации – https://gratituderocks.org/product/glowing-peacock-ore-pendant-for-happiness-healing-positivity-protection
Эта публикация дает возможность задействовать различные источники информации и представить их в удобной форме. Читатели смогут быстро найти нужные данные и получить ответы на интересующие их вопросы. Мы стремимся к четкости и доступности материала для всех!
Подробнее можно узнать тут – https://tourismsmes.com/blog-news-4
Эта статья сочетает познавательный и занимательный контент, что делает ее идеальной для любителей глубоких исследований. Мы рассмотрим увлекательные аспекты различных тем и предоставим вам новые знания, которые могут оказаться полезными в будущем.
Ознакомиться с деталями – https://4news.in/jobs
Discount pharmacy Australia: Online medication store Australia – PharmAu24
mostbet giriş mostbet giriş .
Thanks for the auspicious writeup. It in reality was once a entertainment account it. Glance complex to more delivered agreeable from you! However, how can we communicate?
antibiotic without presription: BiotPharm – get antibiotics quickly
С учётом всех этапов (детоксикация, терапевтическая работа и адаптация) курс занимает от одного до трёх месяцев, в зависимости от индивидуальных особенностей пациента.
Подробнее можно узнать тут – http://lechenie-narkomanii-volgograd9.ru/
продвижение новых сайтов http://www.prodvizhenie-sajtov-v-moskve.ru/ .
Эта разъяснительная статья содержит простые и доступные разъяснения по актуальным вопросам. Мы стремимся сделать информацию понятной для широкой аудитории, чтобы каждый смог разобраться в предмете и извлечь из него максимум пользы.
Выяснить больше – https://pgca.africa/2021/11/26/melissa-long-wear-liquid-powder-foundation-makeup
Эта статья предлагает живое освещение актуальной темы с множеством интересных фактов. Мы рассмотрим ключевые моменты, которые делают данную тему важной и актуальной. Подготовьтесь к насыщенному путешествию по неизвестным аспектам и узнайте больше о значимых событиях.
Ознакомиться с деталями – https://cabinet-de-shiatsu-reunion.com
Этот информационный материал подробно освещает проблему наркозависимости, ее причины и последствия. Мы предлагаем информацию о методах лечения, профилактики и поддерживающих программах. Цель статьи — повысить осведомленность и продвигать идеи о необходимости борьбы с зависимостями.
Узнать больше – https://netgribkov.ru/kapelnitsa-ot-zapoya-na-domu-v-ekaterinburge
Эта публикация дает возможность задействовать различные источники информации и представить их в удобной форме. Читатели смогут быстро найти нужные данные и получить ответы на интересующие их вопросы. Мы стремимся к четкости и доступности материала для всех!
Получить дополнительную информацию – https://www.noyshudvard.com/hello-world
В данной публикации мы поговорим о процессе восстановления от зависимости, о том, как вернуть себе нормальную жизнь. Мы обсудим преодоление трудностей, значимость поддержки и наличие программ реабилитации. Читатели смогут узнать о ключевых шагах к успешному восстановлению.
Углубиться в тему – https://avrorafitness.ru/lechenie-zapoya-ponimanie-metody-i-podhody-k-cheloveku
1вин сайт официальный http://1win22080.ru/ .
Миссия нашего центра – оказание всесторонней помощи людям с зависимостями. Основные цели нашей работы:
Выяснить больше – http://www.domen.ru
Ero Pharm Fast online ed drugs best online ed treatment
Каждый пациент проходит три основные стадии терапии, начиная с момента первого обращения.
Детальнее – http://
Медикаментозное лечение: Мы применяем современные препараты, которые помогают облегчить симптомы абстиненции и улучшить состояние пациентов в первые дни лечения. Индивидуальный подбор лекарственных схем позволяет минимизировать побочные эффекты и достичь наилучших результатов.
Детальнее – срочный вывод из запоя казань
Mitolyn is a cutting-edge natural dietary supplement designed to support effective weight loss and improve overall wellness.
Наш стационар оснащён всем необходимым для безопасного и комфортного лечения. Здесь вы получите круглосуточный мониторинг, современное оборудование и услуги психологов, социальных педагогов и физиотерапевтов.
Узнать больше – наркологические клиники алкоголизм уфа
В этом обзорном материале представлены увлекательные детали, которые находят отражение в различных аспектах жизни. Мы исследуем непонятные и интересные моменты, позволяя читателю увидеть картину целиком. Погрузитесь в мир знаний и удивительных открытий!
Получить дополнительные сведения – https://extrusa.com.mx/solar-power-in-developing-nations-brightening-lives
В обзорной статье вы найдете собрание важных фактов и аналитики по самым разнообразным темам. Мы рассматриваем как современные исследования, так и исторические контексты, чтобы вы могли получить полное представление о предмете. Погрузитесь в мир знаний и сделайте шаг к пониманию!
Выяснить больше – https://skip4u.com/a-pearl-necklace-meaning-as-a-gift-what-does-it-mean
Таким образом, наш подход направлен на создание комплексной системы поддержки, которая помогает каждому пациенту справиться с зависимостью и вернуться к полноценной жизни.
Исследовать вопрос подробнее – вывод из запоя в стационаре казань
В обзорной статье вы найдете собрание важных фактов и аналитики по самым разнообразным темам. Мы рассматриваем как современные исследования, так и исторические контексты, чтобы вы могли получить полное представление о предмете. Погрузитесь в мир знаний и сделайте шаг к пониманию!
Углубиться в тему – http://thaiorchidklamathfalls.com/2019/02/14/the-tried-and-true-method-for-quantum-mechanic-in-step-by-step-detail
Этот обзорный материал предоставляет информационно насыщенные данные, касающиеся актуальных тем. Мы стремимся сделать информацию доступной и структурированной, чтобы читатели могли легко ориентироваться в наших выводах. Познайте новое с нашим обзором!
Исследовать вопрос подробнее – http://www.chilingtu.com/index.php/archives/919/?replyTo=373
Этот информативный текст выделяется своими захватывающими аспектами, которые делают сложные темы доступными и понятными. Мы стремимся предложить читателям глубину знаний вместе с разнообразием интересных фактов. Откройте новые горизонты и развивайте свои способности познавать мир!
Детальнее – https://nvcpharma.com.vn/nuoc-ngap.html
В этом интересном тексте собраны обширные сведения, которые помогут вам понять различные аспекты обсуждаемой темы. Мы разбираем детали и факты, делая акцент на важности каждого элемента. Не упустите возможность расширить свои знания и взглянуть на мир по-новому!
Детальнее – https://www.chaschas.es/faq-items/class-aptent-taciti-sociosqu-ad-litora-torquent-per-conubia-nostra-pers
Этот информационный обзор станет отличным путеводителем по актуальным темам, объединяющим важные факты и мнения экспертов. Мы исследуем ключевые идеи и представляем их в доступной форме для более глубокого понимания. Читайте, чтобы оставаться в курсе событий!
Узнать больше – http://senfei.com.tw/?attachment_id=7
поисковое продвижение сайта http://prodvizhenie-sajtov-v-moskve.ru/ .
Медикаментозное лечение: Мы применяем современные препараты, которые помогают облегчить симптомы абстиненции и улучшить состояние пациентов в первые дни лечения. Индивидуальный подбор лекарственных схем позволяет минимизировать побочные эффекты и достичь наилучших результатов.
Изучить вопрос глубже – вывод из запоя на дому цена
Процесс лечения строится из нескольких ключевых этапов, каждый из которых направлен на оперативное восстановление состояния пациента:
Изучить вопрос глубже – вывод из запоя недорого в донецке
Недостаточно снять физическую зависимость — важно помочь человеку вернуться в сообщество. В «Доктор Здоровье» разработана система сопровождения, включающая мотивационные беседы, групповые занятия и социальную реабилитацию. Психотерапевты владеют методами когнитивно-поведенческой терапии и мотивационного интервью, консультанты помогают восстановить профессиональные навыки и адаптироваться к повседневной жизни, а встречи в группе взаимопомощи и психодраматические сессии способствуют укреплению чувства поддержки и навыков эффективного общения. Для родственников доступны семейные консультации, на которых объясняют природу зависимости и обучают стратегиям поддержки без критики и давления.
Разобраться лучше – наркологическая клиника
What i do not realize is in truth how you are not actually a lot more well-preferred than you may be right now. You are very intelligent. You already know therefore considerably in terms of this matter, produced me in my view consider it from numerous various angles. Its like women and men don’t seem to be involved except it’s something to accomplish with Woman gaga! Your personal stuffs nice. Always care for it up!
Процесс лечения строится из нескольких ключевых этапов, каждый из которых направлен на оперативное восстановление состояния пациента:
Подробнее тут – вывод из запоя клиника в донецке
С учётом всех этапов (детоксикация, терапевтическая работа и адаптация) курс занимает от одного до трёх месяцев, в зависимости от индивидуальных особенностей пациента.
Углубиться в тему – лечение наркомании в волгограде
You are a very clever person!
Миссия нашего центра – оказание всесторонней помощи людям с зависимостями. Основные цели нашей работы:
Получить больше информации – вывод из запоя на дому
Definitely believe that which you stated. Your favorite justification appeared to be on the web the easiest thing to be aware of. I say to you, I definitely get irked while people consider worries that they plainly don’t know about. You managed to hit the nail upon the top and also defined out the whole thing without having side effect , people can take a signal. Will likely be back to get more. Thanks
Параллельно с медицинской терапией начинается работа психотерапевта. В индивидуальных и семейных сессиях пациенты учатся распознавать механизмы зависимости, вырабатывать новые стратегии поведения и справляться со стрессовыми ситуациями без употребления. Последний этап — реабилитация и ресоциализация — включает трудотерапию, арт- и групповую терапию, помощь в восстановлении профессиональных навыков и возвращении к социально-активной жизни.
Получить дополнительную информацию – https://narkologicheskaya-klinika-mytishchi1.ru/chastnaya-narkologicheskaya-klinika-v-mytishchah/
У нас вы можете найти учебные пособия для абитуриентов.
Курсы по ключевым дисциплинам от математики до литературы.
Подготовьтесь к экзаменам с помощью тренажеров.
https://studentopedia.ru/uchebniki-po-matematiki.html
Образцы задач объяснят сложные моменты.
Регистрация не требуется для удобства обучения.
Применяйте на уроках и повышайте успеваемость.
Полноценное восстановление включает не только прекращение приёма наркотиков, но и формирование здорового образа жизни, навыков эмоционального самоконтроля и социокультурной адаптации.
Подробнее тут – https://lechenie-narkomanii-volgograd9.ru/czentr-lecheniya-narkomanii-volgograd
Профессиональный вывод из запоя – это комплексная медицинская услуга, направленная на безопасное и оперативное лечение пациентов, столкнувшихся с алкогольной интоксикацией. В Донецке ДНР высококвалифицированные наркологи оказывают помощь на дому, что позволяет начать детоксикацию организма в комфортной и привычной обстановке. Такой подход обеспечивает индивидуальную терапию, всестороннюю поддержку и полную конфиденциальность, что особенно важно для тех, кто предпочитает получать лечение вне стационаров.
Выяснить больше – http://vyvod-iz-zapoya-donetsk-dnr00.ru/vyvod-iz-zapoya-czena-doneczk-dnr/
pillole cialis 5 mg prezzo : an effective drug containing tadalafil, treats erectile dysfunction and benign prostatic hyperplasia. In Italy, 28 tablets of Cialis 5 mg costs approximately €165.26, though prices vary by pharmacy and discounts. Generic options, like Tadalafil DOC Generici, range from €0.8–€2.6 per tablet, providing a budget-friendly option. Always consult a doctor, as a prescription is needed.
Незамедлительно после вызова нарколог приезжает на дом для проведения первичного осмотра. Врач измеряет жизненно важные показатели, такие как пульс, артериальное давление и температура, и собирает краткий анамнез для оценки степени алкогольной интоксикации. Этот этап является фундаментом для составления персонализированного плана лечения.
Подробнее тут – вывод из запоя круглосуточно донецк
кайт египет
I would like to thnkx for the efforts you have put in writing this website. I’m hoping the same high-grade web site post from you in the upcoming also. In fact your creative writing skills has encouraged me to get my own blog now. Really the blogging is spreading its wings rapidly. Your write up is a great example of it.
aviator game 1win download http://1win14004.ru .
Создание безопасной среды: Мы понимаем, насколько важна поддержка в сложные моменты. Наш центр предоставляет пространство, где пациенты могут открыто говорить о своих переживаниях без страха быть осужденными, что способствует доверию и успешному лечению.
Подробнее тут – вывод из запоя казань.
В течение полугода пациент может бесплатно посещать онлайн-группы поддержки и консультироваться у психологов клиники.
Изучить вопрос глубже – https://lechenie-narkomanii-volgograd9.ru/czentr-lecheniya-narkomanii-volgograd
Свадебные и вечерние платья 2025 года отличаются разнообразием.
В тренде стразы и пайетки из полупрозрачных тканей.
Металлические оттенки придают образу роскоши.
Многослойные юбки возвращаются в моду.
Особый акцент на открытые плечи подчеркивают элегантность.
Ищите вдохновение в новых коллекциях — оригинальность и комфорт сделают ваш образ идеальным!
http://old.pokvesti.ru/forum/viewtopic.php?f=42&t=433187&p=1421138#p1421138
Обращение за помощью к наркологу на дому имеет ряд преимуществ, особенно в экстренных ситуациях:
Получить дополнительную информацию – нарколог на дом срочно мариуполь
Мы не делаем «массовых решений»: каждый пациент для нас — уникальная история, и мы строим терапию, исходя из его состояния, целей и личных возможностей. Наша задача — не просто временно облегчить симптомы, а дать человеку реальные инструменты для жизни без зависимости.
Подробнее – chastnaya narkologicheskaya klinika mytischi
Зависимость — это заболевание, которое разрушает не только тело, но и личность. Оно затрагивает мышление, поведение, разрушает отношения и лишает человека способности контролировать свою жизнь. Наркологическая клиника в Волгограде — профессиональное лечение зависимостей строит свою работу на понимании природы болезни, а не на осуждении. Именно это позволяет добиваться стойких результатов, восстанавливая пациента физически, эмоционально и социально.
Узнать больше – наркологическая клиника волгоградская область
Каждый пациент проходит три основные стадии терапии, начиная с момента первого обращения.
Разобраться лучше – https://narkologicheskaya-klinika-ufa9.ru/narkologicheskie-kliniki-alkogolizm-ufa
Write more, thats all I have to say. Literally, it seems as though you relied on the video to make your point. You obviously know what youre talking about, why waste your intelligence on just posting videos to your site when you could be giving us something enlightening to read?
Have you ever considered about adding a little bit more than just your articles? I mean, what you say is important and all. But just imagine if you added some great images or video clips to give your posts more, “pop”! Your content is excellent but with pics and clips, this website could definitely be one of the most beneficial in its field. Very good blog!
Параллельно с медицинской терапией начинается работа психотерапевта. В индивидуальных и семейных сессиях пациенты учатся распознавать механизмы зависимости, вырабатывать новые стратегии поведения и справляться со стрессовыми ситуациями без употребления. Последний этап — реабилитация и ресоциализация — включает трудотерапию, арт- и групповую терапию, помощь в восстановлении профессиональных навыков и возвращении к социально-активной жизни.
Углубиться в тему – https://narkologicheskaya-klinika-mytishchi1.ru/
Каждый пациент проходит три основные стадии терапии, начиная с момента первого обращения.
Получить дополнительные сведения – наркологические клиники алкоголизм уфа.
После диагностики начинается активная фаза медикаментозного вмешательства. Современные препараты вводятся капельничным методом, что позволяет быстро снизить уровень токсинов в крови, восстановить нормальные обменные процессы и стабилизировать работу внутренних органов, таких как печень, почки и сердце.
Ознакомиться с деталями – нарколог на дом вывод
Незамедлительно после вызова нарколог приезжает на дом для проведения первичного осмотра. Врач измеряет жизненно важные показатели, такие как пульс, артериальное давление и температура, и собирает краткий анамнез для оценки степени алкогольной интоксикации. Этот этап является фундаментом для составления персонализированного плана лечения.
Получить дополнительную информацию – срочный вывод из запоя в донецке
Параллельно с медицинской терапией начинается работа психотерапевта. В индивидуальных и семейных сессиях пациенты учатся распознавать механизмы зависимости, вырабатывать новые стратегии поведения и справляться со стрессовыми ситуациями без употребления. Последний этап — реабилитация и ресоциализация — включает трудотерапию, арт- и групповую терапию, помощь в восстановлении профессиональных навыков и возвращении к социально-активной жизни.
Получить дополнительную информацию – https://narkologicheskaya-klinika-mytishchi1.ru/narkologicheskaya-klinika-ceny-v-mytishchah/
Услуга вывода из запоя на дому в Мурманске предполагает комплексное лечение алкогольной интоксикации, направленное на оперативное снижение уровня токсинов в организме. Сразу после поступления вызова специалист проводит детальный осмотр, собирает анамнез и определяет степень интоксикации. На основании собранной информации разрабатывается индивидуальный план терапии, который может включать капельничное введение медикаментов, контроль жизненно важных показателей и психологическую поддержку. Такой комплекс мер позволяет стабилизировать состояние пациента и начать процесс выздоровления без необходимости посещения стационара.
Получить дополнительную информацию – вывод из запоя на дому цена мурманск
Thank you for your sharing. I am worried that I lack creative ideas. It is your article that makes me full of hope. Thank you. But, I have a question, can you help me?
Таким образом, наш подход направлен на создание комплексной системы поддержки, которая помогает каждому пациенту справиться с зависимостью и вернуться к полноценной жизни.
Выяснить больше – вывод из запоя круглосуточно казань
Врач уточняет, как долго продолжается запой, какой алкоголь употребляется и имеются ли сопутствующие заболевания. Тщательный анализ этих данных позволяет подобрать оптимальные методы детоксикации и снизить риск осложнений.
Углубиться в тему – нарколог на дом круглосуточно мариуполь
You got a very superb website, Glad I noticed it through yahoo.
Для безопасного и эффективного лечения дома необходимо:
Ознакомиться с деталями – http://narkologicheskaya-pomoshh-ufa9.ru/skoraya-narkologicheskaya-pomoshh-ufa/
Запой — это не просто продолжительное пьянство, а острое состояние, требующее срочной медицинской помощи. Без профессионального вмешательства организм человека стремительно разрушается, возрастает риск инфаркта, инсульта, алкогольного психоза и летального исхода. Именно поэтому вывод из запоя должен проходить под контролем нарколога, с использованием проверенных медикаментов и поэтапной схемы стабилизации. В наркологической клинике «ВитаМед Плюс» организована круглосуточная помощь в Химках, включая выезд врача на дом и приём в стационаре.
Изучить вопрос глубже – http://vyvod-iz-zapoya-v-himki1.ru/vyvod-iz-zapoya-cena-v-himkah/
Каждому пациенту назначается персональный план терапии, составленный на основе результатов медицинского и психологического обследования. Мы не используем шаблонные схемы — только индивидуальный подход, адаптированный к возрасту, опыту зависимости, состоянию здоровья и личной мотивации.
Подробнее тут – частная наркологическая клиника волгоград
Показанием к стационарному лечению служат случаи, при которых домашняя терапия становится небезопасной или недостаточно эффективной. Рекомендуем госпитализацию при:
Получить больше информации – платная наркологическая клиника
Да, «Путь к жизни» оформляет все документы на номер договора без указания фамилии пациента и не передаёт сведения третьим лицам.
Изучить вопрос глубже – lechenie-narkomanii-volgograd9.ru/
футбол лига чемпионов финал https://footballnews.store/ .
Незамедлительно после вызова нарколог приезжает на дом для проведения первичного осмотра. Врач измеряет жизненно важные показатели, такие как пульс, артериальное давление и температура, и собирает краткий анамнез для оценки степени алкогольной интоксикации. Этот этап является фундаментом для составления персонализированного плана лечения.
Узнать больше – вывод из запоя на дому круглосуточно в донецке
Во всех этих случаях промедление может стоить слишком дорого. Наркологическая помощь должна быть оказана немедленно — либо на дому, либо в условиях клиники.
Выяснить больше – вывод из запоя цена химки
Недостаточно снять физическую зависимость — важно помочь человеку вернуться в сообщество. В «Доктор Здоровье» разработана система сопровождения, включающая мотивационные беседы, групповые занятия и социальную реабилитацию. Психотерапевты владеют методами когнитивно-поведенческой терапии и мотивационного интервью, консультанты помогают восстановить профессиональные навыки и адаптироваться к повседневной жизни, а встречи в группе взаимопомощи и психодраматические сессии способствуют укреплению чувства поддержки и навыков эффективного общения. Для родственников доступны семейные консультации, на которых объясняют природу зависимости и обучают стратегиям поддержки без критики и давления.
Получить дополнительную информацию – наркологические клиники алкоголизм мытищи
ломбард часов rolex http://prodaja-rolex-chasi13.ru .
На данном этапе врач уточняет, сколько времени продолжается запой, какой тип алкоголя употребляется и имеются ли сопутствующие заболевания. Тщательный анализ этих данных позволяет подобрать оптимальные методы детоксикации и снизить риск осложнений.
Узнать больше – https://narcolog-na-dom-mariupol0.ru/vyzov-narkologa-na-dom-mariupol
Клиническая практика показывает: только системная работа с пациентом даёт устойчивый результат. Программа включает медицинское, психологическое и социальное сопровождение.
Получить дополнительную информацию – принудительное лечение от алкоголизма
На данном этапе специалист уточняет продолжительность запоя, тип употребляемого алкоголя и наличие хронических заболеваний, что позволяет оперативно подобрать наиболее эффективные методы детоксикации и снизить риск осложнений.
Разобраться лучше – капельница от запоя в луганске
Наши наркологи придерживаются принципов уважительного и чуткого отношения, что создаёт атмосферу доверия. Специалисты проводят детальную диагностику, выявляют причины зависимости и разрабатывают персональные стратегии лечения. Компетентность и профессионализм врачей — залог успешного восстановления пациентов.
Исследовать вопрос подробнее – вывод из запоя
Мы не делаем «массовых решений»: каждый пациент для нас — уникальная история, и мы строим терапию, исходя из его состояния, целей и личных возможностей. Наша задача — не просто временно облегчить симптомы, а дать человеку реальные инструменты для жизни без зависимости.
Исследовать вопрос подробнее – частная наркологическая клиника в мытищах
займ оформить онлайн investinq.ru .
Этот информативный текст выделяется своими захватывающими аспектами, которые делают сложные темы доступными и понятными. Мы стремимся предложить читателям глубину знаний вместе с разнообразием интересных фактов. Откройте новые горизонты и развивайте свои способности познавать мир!
Изучить вопрос глубже – https://www.customspacover.com/your-cellphone-a-spa-controller
Great post. I was checking constantly this blog and I am impressed! Very useful information specifically the last part 🙂 I care for such information much. I was seeking this certain information for a long time. Thank you and best of luck.
Обращение за капельничной терапией от запоя в домашних условиях имеет множество преимуществ, среди которых:
Узнать больше – капельница от запоя на дому луганск
Процесс лечения строится из нескольких ключевых этапов, каждый из которых направлен на оперативное восстановление состояния пациента:
Исследовать вопрос подробнее – https://vyvod-iz-zapoya-donetsk-dnr00.ru/vyvod-iz-zapoya-czena-doneczk-dnr
Эта статья предлагает уникальную подборку занимательных фактов и необычных историй, которые вы, возможно, не знали. Мы постараемся вдохновить ваше воображение и разнообразить ваш кругозор, погружая вас в мир, полный интересных открытий. Читайте и открывайте для себя новое!
Подробнее – https://flexistant.com/startup-lessons-stories-of-success-and-failure
Эта информационная заметка предлагает лаконичное и четкое освещение актуальных вопросов. Здесь вы найдете ключевые факты и основную информацию по теме, которые помогут вам сформировать собственное мнение и повысить уровень осведомленности.
Подробнее можно узнать тут – https://urairlines.com/2022/11/13/damascus
Индивидуальный подход: каждый пациент уникален, поэтому мы разрабатываем индивидуальный план лечения, учитывающий вид зависимости, стадию заболевания и особенности здоровья пациента.
Подробнее – http://
Этот этап лечения направлен на купирование острых симптомов, связанных с абстинентным синдромом. Пациенту назначаются современные препараты, способствующие выведению токсинов, нормализации работы сердца, печени, центральной нервной системы.
Детальнее – narkologicheskie kliniki alkogolizm volgograd
После поступления в клинику проводится осмотр, измеряется давление, оценивается общее состояние. При необходимости проводятся экспресс-анализы на содержание веществ и ЭКГ.
Детальнее – http://narkologicheskaya-klinika-voronezh9.ru/
Эта статья сочетает в себе как полезные, так и интересные сведения, которые обогатят ваше понимание насущных тем. Мы предлагаем практические советы и рекомендации, которые легко внедрить в повседневную жизнь. Узнайте, как улучшить свои навыки и обогатить свой опыт с помощью простых, но эффективных решений.
Изучить вопрос глубже – https://www.sarahdarkmagic.com/content/lego-ad-girl?size=preview
Эта статья сочетает познавательный и занимательный контент, что делает ее идеальной для любителей глубоких исследований. Мы рассмотрим увлекательные аспекты различных тем и предоставим вам новые знания, которые могут оказаться полезными в будущем.
Получить дополнительные сведения – https://veterancr.net/how-long-would-it-take-for-your-house-to-fall-completely-apart
I’d constantly want to be update on new content on this web site, bookmarked! .
Эта статья сочетает в себе как полезные, так и интересные сведения, которые обогатят ваше понимание насущных тем. Мы предлагаем практические советы и рекомендации, которые легко внедрить в повседневную жизнь. Узнайте, как улучшить свои навыки и обогатить свой опыт с помощью простых, но эффективных решений.
Углубиться в тему – https://rank-your.site/f/fiverr-seo-results-in-hours
Эта публикация дает возможность задействовать различные источники информации и представить их в удобной форме. Читатели смогут быстро найти нужные данные и получить ответы на интересующие их вопросы. Мы стремимся к четкости и доступности материала для всех!
Изучить вопрос глубже – https://chathacrack.com/wondershare-recoverit
В обзорной статье вы найдете собрание важных фактов и аналитики по самым разнообразным темам. Мы рассматриваем как современные исследования, так и исторические контексты, чтобы вы могли получить полное представление о предмете. Погрузитесь в мир знаний и сделайте шаг к пониманию!
Подробнее тут – https://ralphjauss.com/a-nice-post
кайтсерфинг хургада
Эта информационная заметка содержит увлекательные сведения, которые могут вас удивить! Мы собрали интересные факты, которые сделают вашу жизнь ярче и полнее. Узнайте нечто новое о привычных аспектах повседневности и откройте для себя удивительный мир информации.
Получить больше информации – https://cmcssp.com.br/2022/09/23/hello-world
Эта статья предлагает уникальную подборку занимательных фактов и необычных историй, которые вы, возможно, не знали. Мы постараемся вдохновить ваше воображение и разнообразить ваш кругозор, погружая вас в мир, полный интересных открытий. Читайте и открывайте для себя новое!
Подробнее можно узнать тут – https://montrealsolutions.com/home/rfq
Эта статья предлагает уникальную подборку занимательных фактов и необычных историй, которые вы, возможно, не знали. Мы постараемся вдохновить ваше воображение и разнообразить ваш кругозор, погружая вас в мир, полный интересных открытий. Читайте и открывайте для себя новое!
Подробнее – https://ruavieja.es/hola-mundo
Эта статья предлагает живое освещение актуальной темы с множеством интересных фактов. Мы рассмотрим ключевые моменты, которые делают данную тему важной и актуальной. Подготовьтесь к насыщенному путешествию по неизвестным аспектам и узнайте больше о значимых событиях.
Исследовать вопрос подробнее – https://www.igetev.org.tr/aside
Эта статья для ознакомления предлагает читателям общее представление об актуальной теме. Мы стремимся представить ключевые факты и идеи, которые помогут читателям получить представление о предмете и решить, стоит ли углубляться в изучение.
Получить дополнительную информацию – https://justvipibiza.com/en/culture/virgen-del-carmen-festivity
Запой — это длительное бесконтрольное употребление алкоголя, приводящее к серьёзным нарушениям обмена веществ, дезориентации и риску острого алкогольного психоза. В Москве и области помощь при выводе из запоя востребована как в домашних условиях, так и в стационаре. Вне зависимости от выбора методики главная цель — быстрое и безопасное восстановление здоровья, чтобы человек мог начать новую, полноценную жизнь без зависимости.
Получить больше информации – http://алко-избавление.рф
В этом обзорном материале представлены увлекательные детали, которые находят отражение в различных аспектах жизни. Мы исследуем непонятные и интересные моменты, позволяя читателю увидеть картину целиком. Погрузитесь в мир знаний и удивительных открытий!
Выяснить больше – https://hospederiaelarco.es/the-benefits-of-staying-at-a-bed-and-breakfast-a-personal-perspective
Эта информационная заметка содержит увлекательные сведения, которые могут вас удивить! Мы собрали интересные факты, которые сделают вашу жизнь ярче и полнее. Узнайте нечто новое о привычных аспектах повседневности и откройте для себя удивительный мир информации.
Углубиться в тему – http://forum.dodeff.com/newreply.php?tid=179&replyto=4052
Домашнее лечение позволяет снизить психологическое напряжение, поскольку пациент остаётся в привычной обстановке — рядом с близкими и без очередей. Экономия времени достигается за счёт оперативного выезда специалиста без необходимости госпитализации, а затраты на вызов часто оказываются ниже, чем в стационаре. При грамотном подборе медикаментов и круглосуточном контроле со стороны врача риск осложнений сводится к минимуму.
Подробнее можно узнать тут – http://алко-избавление.рф
В этом информативном обзоре собраны самые интересные статистические данные и факты, которые помогут лучше понять текущие тренды. Мы представим вам цифры и графики, которые иллюстрируют, как развиваются различные сферы жизни. Эта информация станет отличной основой для глубокого анализа и принятия обоснованных решений.
Выяснить больше – https://studiocityhomes.cl/2023/02/for-what-reason-a-data-room-review-is-essential
Врач может приехать в течение 1–2 часов после обращения. В стационар возможна экстренная госпитализация в тот же день.
Узнать больше – http://www.domen.ru
Самолечение или попытка «переждать» запой дома без врача может обернуться серьёзными осложнениями. Обращение к наркологу даёт пациенту:
Углубиться в тему – https://narko-zakodirovan.ru/vyvod-iz-zapoya-kapelnicza-spb
Услуга вывода из запоя на дому в Архангельске разработана для оперативного снижения токсической нагрузки при тяжелых формах алкогольной интоксикации. Сразу после вызова нарколог проводит подробный осмотр, измеряет жизненно важные показатели и собирает анамнез, что позволяет точно определить степень интоксикации. На основе полученной информации формируется индивидуальный план лечения, включающий капельничное введение современных медикаментов с использованием автоматизированных инфузионных систем и сопровождение в виде психологической поддержки.
Исследовать вопрос подробнее – капельница от запоя архангельская область
Этот информационный обзор станет отличным путеводителем по актуальным темам, объединяющим важные факты и мнения экспертов. Мы исследуем ключевые идеи и представляем их в доступной форме для более глубокого понимания. Читайте, чтобы оставаться в курсе событий!
Подробнее тут – https://oceanoazul.digital/2023/07/10/10-key-steps-to-launching-a-successful-startup
Врач может приехать в течение 1–2 часов после обращения. В стационар возможна экстренная госпитализация в тот же день.
Подробнее – наркология вывод из запоя
Эта публикация завернет вас в вихрь увлекательного контента, сбрасывая стереотипы и открывая двери к новым идеям. Каждый абзац станет для вас открытием, полным ярких примеров и впечатляющих достижений. Подготовьтесь быть вовлеченными и удивленными каждый раз, когда продолжите читать.
Подробнее – https://www.premiumridez.com/category/analysis-features
Близкий человек в запое? Не ждите ухудшения. Обратитесь в клинику «Трезвый шаг» (Воронеж) — здесь проведут профессиональный вывод из запоя с последующим восстановлением организма.
Получить дополнительные сведения – domen.ru
Алкогольный запой требует не просто прекращения приёма спиртного, а комплексной медицинской помощи. В Санкт-Петербурге и Ленинградской области вывод из запоя осуществляется опытными наркологами с применением современных методик детоксикации. В зависимости от состояния пациента лечение может быть организовано как на дому, так и в стационарных условиях. Главная цель — безопасное очищение организма и возвращение к стабильному физическому и психоэмоциональному состоянию.
Узнать больше – https://narko-zakodirovan.ru/
В стационаре пациент получает круглосуточный контроль, расширенную диагностику и возможность подключения к аппаратуре мониторинга. Это особенно важно при тяжёлой интоксикации, нарушении сознания или судорожной активности.
Выяснить больше – https://narko-zakodirovan.ru/vyvod-iz-zapoya-czena-spb
Эта информационная заметка содержит увлекательные сведения, которые могут вас удивить! Мы собрали интересные факты, которые сделают вашу жизнь ярче и полнее. Узнайте нечто новое о привычных аспектах повседневности и откройте для себя удивительный мир информации.
Подробнее тут – https://www.chaschas.es/faq-items/class-aptent-taciti-sociosqu-ad-litora-torquent-per-conubia-nostra-pers
Незамедлительно после поступления вызова нарколог приезжает на дом для проведения тщательного осмотра. Врач измеряет жизненно важные показатели — пульс, артериальное давление, температуру — и собирает анамнез для определения степени алкогольной интоксикации.
Разобраться лучше – vyvod-iz-zapoya-kruglosutochno ulan-ude
Лечение вывода из запоя на дому в Улан-Удэ организовано по четко отлаженной схеме, которая позволяет оперативно стабилизировать состояние пациента и начать процесс детоксикации.
Углубиться в тему – http://vyvod-iz-zapoya-ulan-ude00.ru/vyvod-iz-zapoya-na-domu-ulan-ude/
Выезд врача на дом позволяет провести детоксикацию в спокойной обстановке. Врач привозит с собой препараты, капельницы, измерительное оборудование и проводит лечение в течение 1–2 часов. Такой формат подходит при стабильном состоянии и желании сохранить анонимность.
Получить дополнительные сведения – вывод из запоя в стационаре в санкт-петербурге
Сразу после вызова нарколог прибывает на дом для проведения тщательного осмотра. Специалист измеряет жизненно важные показатели — пульс, артериальное давление и температуру — и собирает подробный анамнез для оценки степени алкогольной интоксикации.
Детальнее – нарколог вывод из запоя
Эта публикация завернет вас в вихрь увлекательного контента, сбрасывая стереотипы и открывая двери к новым идеям. Каждый абзац станет для вас открытием, полным ярких примеров и впечатляющих достижений. Подготовьтесь быть вовлеченными и удивленными каждый раз, когда продолжите читать.
Исследовать вопрос подробнее – https://farmaciaalquian.com/hello-world
Когда организм на пределе, важна срочная помощь. «Трезвый шаг» в Воронеже — это команда опытных наркологов, которые помогут быстро и мягко выйти из запоя без вреда для здоровья.
Подробнее можно узнать тут – вывод из запоя
Задача врачей — не просто облегчить симптомы, а купировать осложнения, стабилизировать жизненно важные функции, вернуть пациенту способность к дальнейшему лечению. Мы работаем быстро, анонимно и профессионально. Любой человек, оказавшийся в кризисе, может получить помощь в течение часа после обращения.
Изучить вопрос глубже – снятие наркотической ломки подольск
Обращение за помощью нарколога на дому в Улан-Удэ обладает рядом преимуществ, которые делают лечение эффективным и безопасным:
Подробнее тут – вывод из запоя клиника улан-удэ
Миссия клиники “Путь к выздоровлению” заключается в содействии восстановлению здоровья и социальной реинтеграции людей, столкнувшихся с проблемами зависимости. Мы стремимся к комплексному решению этой сложной задачи, учитывая физические, психологические и социальные аспекты зависимости. Наша цель — не только помочь пациентам избавиться от физической зависимости, но и обеспечить их психологическое восстановление и возвращение к нормальной жизни в обществе.
Выяснить больше – http://нарко-фильтр.рф/vivod-iz-zapoya-anonimno-v-rostove-na-donu/
Профессиональная помощь при запое необходима, если:
Получить дополнительную информацию – вывод из запоя анонимно в санкт-петербурге
При ухудшении состояния, вызванном длительным употреблением алкоголя, оперативное вмешательство может спасти жизнь. В Калининграде, Калининградская область, опытные наркологи выезжают на дом, чтобы оказать профессиональную помощь при алкогольной интоксикации. Такой формат лечения позволяет получить качественную помощь в комфортной и привычной обстановке, сохраняя полную конфиденциальность и минимизируя стресс, связанный с госпитализацией.
Изучить вопрос глубже – вызов нарколога на дом калининград
https://fussballmanagerprofessional.de/emblems/aloh.php?candi=7games+bet+%C3%A9+confi%C3%A1vel
Great items from you, man. I’ve take into account your stuff previous to and you are simply too magnificent. I actually like what you’ve obtained right here, really like what you are stating and the way through which you assert it. You make it entertaining and you still care for to stay it sensible. I cant wait to read much more from you. This is really a tremendous website.
Наши наркологи придерживаются принципов уважительного и внимательного отношения к пациентам, создавая атмосферу доверия. Они проводят детальное обследование, выявляют коренные причины зависимости и разрабатывают индивидуальные стратегии лечения. Профессионализм и компетентность врачей являются ключевыми факторами успешного восстановления пациентов.
Углубиться в тему – https://нарко-фильтр.рф/vivod-iz-zapoya-cena-v-rostove-na-donu
Врач может приехать в течение 1–2 часов после обращения. В стационар возможна экстренная госпитализация в тот же день.
Получить больше информации – вывод из запоя круглосуточно
Услуга “Нарколог на дом” в Калининграде, Калининградская область, включает комплекс мер, направленных на оперативный вывод из запоя и детоксикацию организма. Сразу после поступления вызова специалист проводит детальный первичный осмотр, измеряет жизненно важные показатели и собирает анамнез, чтобы оценить степень алкогольной интоксикации. На основе полученной информации разрабатывается индивидуальный план терапии, который может включать капельничное введение современных медикаментов, использование инфузионных технологий и оказание психологической поддержки для долгосрочной реабилитации.
Получить дополнительные сведения – http://narcolog-na-dom-kaliningrad00.ru
Каждый день запоя увеличивает риск для жизни. Не рискуйте — специалисты «Трезвого шага» в Воронеже приедут на дом и окажут экстренную помощь. Без боли, стресса и ожидания.
Изучить вопрос глубже – воронежская область
apostatudo bet
Домашнее лечение позволяет снизить психологическое напряжение, поскольку пациент остаётся в привычной обстановке — рядом с близкими и без очередей. Экономия времени достигается за счёт оперативного выезда специалиста без необходимости госпитализации, а затраты на вызов часто оказываются ниже, чем в стационаре. При грамотном подборе медикаментов и круглосуточном контроле со стороны врача риск осложнений сводится к минимуму.
Подробнее – https://алко-избавление.рф/vyvod-iz-zapoya-na-domu-msk
Именно поэтому так важно не терять время. Чем раньше пациент получает помощь, тем выше шансы избежать необратимых последствий и вернуться к нормальной жизни.
Получить дополнительные сведения – snyatie lomki narkozavisimogo podol’sk
Недостаточно снять физическую зависимость — важно помочь человеку вернуться в сообщество. В «Доктор Здоровье» разработана система сопровождения, включающая мотивационные беседы, групповые занятия и социальную реабилитацию. Психотерапевты владеют методами когнитивно-поведенческой терапии и мотивационного интервью, консультанты помогают восстановить профессиональные навыки и адаптироваться к повседневной жизни, а встречи в группе взаимопомощи и психодраматические сессии способствуют укреплению чувства поддержки и навыков эффективного общения. Для родственников доступны семейные консультации, на которых объясняют природу зависимости и обучают стратегиям поддержки без критики и давления.
Подробнее можно узнать тут – бесплатная наркологическая клиника в мытищах
Именно поэтому так важно не терять время. Чем раньше пациент получает помощь, тем выше шансы избежать необратимых последствий и вернуться к нормальной жизни.
Получить больше информации – снятие ломки в стационаре подольск
Услуга вывода из запоя на дому в Улан-Удэ включает полный комплекс мер, направленных на быстрое восстановление организма. При получении вызова нарколог приезжает на дом, проводит тщательный первичный осмотр, измеряет жизненно важные показатели и собирает подробный анамнез. На основе полученных данных формируется индивидуальный план терапии, который может включать инфузионное введение медикаментов с применением современных технологий и оказание психологической поддержки для достижения устойчивой ремиссии.
Детальнее – вывод из запоя круглосуточно
ремонт окон https://studio5floor.ru .
Обращение за помощью нарколога на дому в Улан-Удэ обладает рядом преимуществ, которые делают лечение эффективным и безопасным:
Исследовать вопрос подробнее – вывод из запоя в улан-удэ
Обращение за помощью нарколога на дому в Архангельске имеет множество преимуществ, среди которых:
Выяснить больше – капельница от запоя в архангельске
После диагностики начинается активная фаза медикаментозного вмешательства, когда препараты вводятся капельничным методом для быстрого снижения уровня токсинов в крови, восстановления обменных процессов и нормализации работы внутренних органов.
Изучить вопрос глубже – http://narcolog-na-dom-kaliningrad00.ru/narkolog-na-dom-czena-kaliningrad/
Лечение нарколога на дому в Калининграде организовано по четко отлаженной схеме, позволяющей максимально оперативно стабилизировать состояние пациента и начать процесс детоксикации.
Узнать больше – http://narcolog-na-dom-kaliningrad00.ru/
Обращение за помощью нарколога на дому в Улан-Удэ имеет ряд неоспоримых преимуществ, обеспечивающих эффективное лечение:
Подробнее – вывод из запоя в стационаре
Решение обратиться к врачу должно быть принято, если:
Изучить вопрос глубже – https://narko-zakodirovan2.ru/vyvod-iz-zapoya-na-domu-novosibirsk
Каждый врач клиники обладает глубокими знаниями в области фармакологии, психофармакологии и психотерапии. Они регулярно посещают профессиональные конференции, семинары и мастер-классы, чтобы быть в курсе последних достижений в лечении зависимостей. Такой подход позволяет нашим специалистам применять наиболее эффективные и научно обоснованные методы терапии.
Изучить вопрос глубже – https://нарко-фильтр.рф/vivod-iz-zapoya-na-domu-v-rostove-na-donu/
Профессиональная помощь при запое необходима, если:
Получить дополнительную информацию – срочный вывод из запоя
Решение обратиться к врачу должно быть принято, если:
Подробнее тут – vyvod-iz-zapoya-czena novosibirsk
Выезд врача на дом позволяет провести детоксикацию в спокойной обстановке. Врач привозит с собой препараты, капельницы, измерительное оборудование и проводит лечение в течение 1–2 часов. Такой формат подходит при стабильном состоянии и желании сохранить анонимность.
Исследовать вопрос подробнее – вывод из запоя
Профессиональная помощь при запое необходима, если:
Изучить вопрос глубже – narkolog-vyvod-iz-zapoya sankt-peterburg
Затяжной запой — это состояние, при котором человек в течение нескольких дней не может прекратить употребление алкоголя без медицинской помощи. Такое состояние чревато тяжёлыми нарушениями в работе внутренних органов и психики. В Новосибирске и Новосибирской области доступен профессиональный вывод из запоя как на дому, так и в условиях стационара. Подход к лечению индивидуален, и основная цель — безопасно и эффективно устранить последствия интоксикации и предотвратить рецидив.
Подробнее тут – вывод из запоя цена новосибирск.
Обращение за помощью нарколога на дому в Улан-Удэ имеет ряд неоспоримых преимуществ, обеспечивающих эффективное лечение:
Ознакомиться с деталями – вывод из запоя
В стационаре пациент получает круглосуточный контроль, расширенную диагностику и возможность подключения к аппаратуре мониторинга. Это особенно важно при тяжёлой интоксикации, нарушении сознания или судорожной активности.
Исследовать вопрос подробнее – http://narko-zakodirovan.ru/vyvod-iz-zapoya-czena-spb/
Когда организм на пределе, важна срочная помощь. «Трезвый шаг» в Воронеже — это команда опытных наркологов, которые помогут быстро и мягко выйти из запоя без вреда для здоровья.
Ознакомиться с деталями – вывод из запоя клиника
выкуп часов ролекс http://www.prodaja-rolex-chasi12.ru/ .
Запой — это состояние, при котором человек на протяжении нескольких дней или недель регулярно употребляет алкоголь, теряя контроль над собой. При этом организм накапливает этанол и его токсичные метаболиты, печень и сердце работают на износ, нарушается сон, развивается психоэмоциональная нестабильность. Главный риск — абстинентный синдром, который может проявляться тремором, судорогами, повышением давления, паникой и даже галлюцинациями.
Выяснить больше – вывод из запоя круглосуточно
Обращение за помощью к профессионалам в условиях домашнего лечения имеет ряд важных преимуществ:
Разобраться лучше – вывод из запоя анонимно донецк
Когда зависимость захватывает жизнь, она разрушает не только организм, но и личность, отношения с близкими, карьерные планы и самоощущение. Алкоголь, наркотики и психотропные препараты постепенно подрывают работу внутренних органов, нарушают баланс нейромедиаторов в мозге и приводят к серьёзным психическим и физическим осложнениям. Попытки справиться с этим самостоятельно редко бывают успешными: необходим системный, профессиональный подход. В наркологической клинике «Доктор Здоровье» в Мытищах вы найдёте надёжную опору на всех этапах выздоровления — от экстренной детоксикации до длительной реабилитации.
Подробнее тут – частная наркологическая клиника
Hi, its fastidious paragraph concerning media print, we all be familiar with media is a impressive source of information.
https://askmotopros.com/user/bottlejames3
Самостоятельно выйти из запоя — почти невозможно. В Воронеже врачи клиники «Трезвый шаг» проводят медикаментозный вывод из запоя с круглосуточным выездом. Доверяйте профессионалам.
Подробнее – воронеж.
В основе нашей методики — комплексный подход, сочетающий медицинскую точку зрения и психологические технологии. Мы не ограничиваемся снятием абстиненции: задача клиники — помочь пациенту обрести новую мотивацию, развить навыки противостояния стрессам и возобновить социальную активность. Работа строится на трёх ключевых принципах:
Получить больше информации – наркологическая клиника цены
Самолечение или попытка «переждать» запой дома без врача может обернуться серьёзными осложнениями. Обращение к наркологу даёт пациенту:
Подробнее можно узнать тут – вывод из запоя на дому санкт-петербург
На данном этапе врач уточняет длительность запоя, тип употребляемого алкоголя и наличие сопутствующих заболеваний. Тщательный анализ этих данных позволяет оперативно сформировать индивидуальный план лечения и выбрать оптимальные методы детоксикации.
Подробнее можно узнать тут – врач на дом капельница от запоя
whoah this blog is excellent i love reading your articles. Keep up the good work! You know, a lot of people are searching around for this information, you could aid them greatly.
Незамедлительно после поступления вызова нарколог приезжает на дом для проведения тщательного осмотра. Специалист измеряет жизненно важные показатели, такие как пульс, артериальное давление и температура, и собирает анамнез для оценки степени алкогольной интоксикации.
Подробнее – капельница от запоя вызов
займ оформить онлайн https://investinq.ru .
viva sorte sorteio de hoje ao vivo
На данном этапе врач уточняет, сколько времени продолжается запой, какой алкоголь употребляется и имеются ли сопутствующие заболевания. Тщательный анализ этих данных позволяет разработать персональный план детоксикации, что значительно снижает риск осложнений.
Подробнее можно узнать тут – https://vyvod-iz-zapoya-ulan-ude00.ru/vyvod-iz-zapoya-kapelnicza-ulan-ude
пластиковые окна http://studio5floor.ru .
Обращение к наркологу позволяет избежать типичных ошибок самолечения и достичь стабильного результата. Квалифицированное вмешательство:
Получить дополнительную информацию – нарколог вывод из запоя новосибирск
https://www.faroairporttransfers.com/aloh.php?candi=betpix365
Сразу после поступления вызова специалист приезжает на дом для проведения тщательного первичного осмотра. Измеряются такие жизненно важные показатели, как пульс, артериальное давление и температура, а также проводится сбор анамнеза, что позволяет оценить степень алкогольной интоксикации.
Ознакомиться с деталями – вызов нарколога на дом калининград
Когда зависимость захватывает жизнь, она разрушает не только организм, но и личность, отношения с близкими, карьерные планы и самоощущение. Алкоголь, наркотики и психотропные препараты постепенно подрывают работу внутренних органов, нарушают баланс нейромедиаторов в мозге и приводят к серьёзным психическим и физическим осложнениям. Попытки справиться с этим самостоятельно редко бывают успешными: необходим системный, профессиональный подход. В наркологической клинике «Доктор Здоровье» в Мытищах вы найдёте надёжную опору на всех этапах выздоровления — от экстренной детоксикации до длительной реабилитации.
Получить дополнительные сведения – http://narkologicheskaya-klinika-mytishchi1.ru/
Домашнее лечение позволяет снизить психологическое напряжение, поскольку пациент остаётся в привычной обстановке — рядом с близкими и без очередей. Экономия времени достигается за счёт оперативного выезда специалиста без необходимости госпитализации, а затраты на вызов часто оказываются ниже, чем в стационаре. При грамотном подборе медикаментов и круглосуточном контроле со стороны врача риск осложнений сводится к минимуму.
Получить больше информации – https://алко-избавление.рф/narkolog-vyvod-iz-zapoya-msk/
Когда зависимость захватывает жизнь, она разрушает не только организм, но и личность, отношения с близкими, карьерные планы и самоощущение. Алкоголь, наркотики и психотропные препараты постепенно подрывают работу внутренних органов, нарушают баланс нейромедиаторов в мозге и приводят к серьёзным психическим и физическим осложнениям. Попытки справиться с этим самостоятельно редко бывают успешными: необходим системный, профессиональный подход. В наркологической клинике «Доктор Здоровье» в Мытищах вы найдёте надёжную опору на всех этапах выздоровления — от экстренной детоксикации до длительной реабилитации.
Исследовать вопрос подробнее – наркологическая клиника на дом
лч футбол footballnews.store .
Самолечение или попытка «переждать» запой дома без врача может обернуться серьёзными осложнениями. Обращение к наркологу даёт пациенту:
Подробнее тут – вывод из запоя круглосуточно в санкт-петербурге
Также мы учитываем потребности каждого пациента — по питанию, условиям проживания, графику процедур. Проживание возможно в стандартных и повышенных палатах, с возможностью индивидуального обслуживания.
Углубиться в тему – неотложная наркологическая помощь балашиха
Проблема зависимости остаётся одной из самых актуальных в нашем обществе. Она затрагивает множество людей, нанося вред как их здоровью, так и социальным связям. Наркологическая клиника “Свобода” предлагает помощь тем, кто столкнулся с такими сложностями, как наркомания, алкоголизм и игромания. Мы предоставляем комплексный подход к лечению зависимостей, ориентируясь на индивидуальные потребности каждого пациента.
Разобраться лучше – http://алко-лечебница.рф/
часы ролекс ломбард купить https://prodaja-rolex-chasi13.ru/ .
Каждый день запоя увеличивает риск для жизни. Не рискуйте — специалисты «Трезвого шага» в Воронеже приедут на дом и окажут экстренную помощь. Без боли, стресса и ожидания.
Подробнее тут – вывод из запоя капельница
Затяжной запой — это состояние, при котором человек в течение нескольких дней не может прекратить употребление алкоголя без медицинской помощи. Такое состояние чревато тяжёлыми нарушениями в работе внутренних органов и психики. В Новосибирске и Новосибирской области доступен профессиональный вывод из запоя как на дому, так и в условиях стационара. Подход к лечению индивидуален, и основная цель — безопасно и эффективно устранить последствия интоксикации и предотвратить рецидив.
Получить больше информации – наркологический вывод из запоя в новосибирске
Лечение нарколога на дому в Калининграде организовано по четко отлаженной схеме, позволяющей максимально оперативно стабилизировать состояние пациента и начать процесс детоксикации.
Подробнее тут – нарколог на дом анонимно калининград
Затяжной запой — это состояние, при котором человек в течение нескольких дней не может прекратить употребление алкоголя без медицинской помощи. Такое состояние чревато тяжёлыми нарушениями в работе внутренних органов и психики. В Новосибирске и Новосибирской области доступен профессиональный вывод из запоя как на дому, так и в условиях стационара. Подход к лечению индивидуален, и основная цель — безопасно и эффективно устранить последствия интоксикации и предотвратить рецидив.
Подробнее тут – вывод из запоя цена
После диагностики начинается активная фаза медикаментозного вмешательства. Препараты вводятся методом инфузии, что позволяет оперативно снизить уровень токсинов в крови, восстановить обмен веществ и нормализовать работу внутренних органов, таких как печень, почки и сердце.
Узнать больше – вывод из запоя на дому круглосуточно улан-удэ
ломбард rolex http://www.prodaja-rolex-chasi12.ru .
Каждый день запоя увеличивает риск для жизни. Не рискуйте — специалисты «Трезвого шага» в Воронеже приедут на дом и окажут экстренную помощь. Без боли, стресса и ожидания.
Детальнее – вывод из запоя анонимно
Самолечение или попытка «переждать» запой дома без врача может обернуться серьёзными осложнениями. Обращение к наркологу даёт пациенту:
Подробнее тут – narko-zakodirovan.ru/
Обращение за помощью нарколога на дому в Архангельске имеет множество преимуществ, среди которых:
Получить дополнительную информацию – капельница от запоя анонимно в архангельске
Затяжной запой — это состояние, при котором человек в течение нескольких дней не может прекратить употребление алкоголя без медицинской помощи. Такое состояние чревато тяжёлыми нарушениями в работе внутренних органов и психики. В Новосибирске и Новосибирской области доступен профессиональный вывод из запоя как на дому, так и в условиях стационара. Подход к лечению индивидуален, и основная цель — безопасно и эффективно устранить последствия интоксикации и предотвратить рецидив.
Детальнее – срочный вывод из запоя в новосибирске
Выезд врача на дом позволяет провести детоксикацию в спокойной обстановке. Врач привозит с собой препараты, капельницы, измерительное оборудование и проводит лечение в течение 1–2 часов. Такой формат подходит при стабильном состоянии и желании сохранить анонимность.
Подробнее можно узнать тут – вывод из запоя цена санкт-петербург
Когда запой начинает негативно влиять на здоровье, оперативное лечение становится залогом успешного выздоровления. В Архангельске, Архангельская область, квалифицированные наркологи предоставляют помощь на дому, позволяя быстро провести детоксикацию, восстановить нормальные обменные процессы и стабилизировать работу жизненно важных органов. Такой формат лечения обеспечивает индивидуальный подход, комфортную домашнюю обстановку и полную конфиденциальность, что особенно важно для пациентов, стремящихся к быстрому восстановлению без посещения стационара.
Подробнее тут – капельница от запоя на дому цена
Hi there! Would you mind if I share your blog with my myspace group? There’s a lot of folks that I think would really enjoy your content. Please let me know. Many thanks
Самолечение или попытка «переждать» запой дома без врача может обернуться серьёзными осложнениями. Обращение к наркологу даёт пациенту:
Детальнее – http://narko-zakodirovan.ru/vyvod-iz-zapoya-na-domu-spb/https://narko-zakodirovan.ru
Процедура детоксикации может проводиться двумя способами: выездом врача на дом или госпитализацией. Окончательное решение принимает нарколог после оценки состояния пациента. На ранней стадии запоя достаточно домашней терапии, но при наличии рисков рекомендуется стационар.
Подробнее тут – вывод из запоя в санкт-петербурге
Алкогольный запой требует не просто прекращения приёма спиртного, а комплексной медицинской помощи. В Санкт-Петербурге и Ленинградской области вывод из запоя осуществляется опытными наркологами с применением современных методик детоксикации. В зависимости от состояния пациента лечение может быть организовано как на дому, так и в стационарных условиях. Главная цель — безопасное очищение организма и возвращение к стабильному физическому и психоэмоциональному состоянию.
Углубиться в тему – https://narko-zakodirovan.ru/vyvod-iz-zapoya-na-domu-spb
When I originally commented I clicked the “Notify me when new comments are added” checkbox and now each time a comment is added I get three emails with the same comment. Is there any way you can remove people from that service? Thanks!
В стационаре пациент получает круглосуточный контроль, расширенную диагностику и возможность подключения к аппаратуре мониторинга. Это особенно важно при тяжёлой интоксикации, нарушении сознания или судорожной активности.
Получить дополнительную информацию – вывод из запоя в стационаре в санкт-петербурге
Обращение к наркологу позволяет избежать типичных ошибок самолечения и достичь стабильного результата. Квалифицированное вмешательство:
Изучить вопрос глубже – вывод из запоя на дому круглосуточно новосибирск
После диагностики начинается активная фаза медикаментозного вмешательства. Препараты вводятся методом инфузии, что позволяет оперативно снизить уровень токсинов в крови, восстановить обмен веществ и нормализовать работу внутренних органов, таких как печень, почки и сердце.
Разобраться лучше – http://vyvod-iz-zapoya-ulan-ude0.ru/
На данном этапе врач уточняет, как долго продолжается запой, какой тип алкоголя употребляется и имеются ли сопутствующие заболевания. Тщательный анализ этих данных помогает разработать индивидуальный план терапии, направленный на эффективное снижение токсической нагрузки.
Изучить вопрос глубже – нарколог на дом в калининграде
Самолечение или попытка «переждать» запой дома без врача может обернуться серьёзными осложнениями. Обращение к наркологу даёт пациенту:
Выяснить больше – наркологический вывод из запоя
Недостаточно снять физическую зависимость — важно помочь человеку вернуться в сообщество. В «Доктор Здоровье» разработана система сопровождения, включающая мотивационные беседы, групповые занятия и социальную реабилитацию. Психотерапевты владеют методами когнитивно-поведенческой терапии и мотивационного интервью, консультанты помогают восстановить профессиональные навыки и адаптироваться к повседневной жизни, а встречи в группе взаимопомощи и психодраматические сессии способствуют укреплению чувства поддержки и навыков эффективного общения. Для родственников доступны семейные консультации, на которых объясняют природу зависимости и обучают стратегиям поддержки без критики и давления.
Разобраться лучше – частная наркологическая клиника мытищи
galera da bet
После диагностики начинается активная фаза медикаментозного вмешательства. Препараты вводятся методом инфузии, что позволяет оперативно снизить уровень токсинов в крови, восстановить обмен веществ и нормализовать работу внутренних органов, таких как печень, почки и сердце.
Подробнее можно узнать тут – https://vyvod-iz-zapoya-ulan-ude0.ru/narkologiya-vyvod-iz-zapoya-ulan-ude
Currently it seems like WordPress is the top blogging platform available right now. (from what I’ve read) Is that what you’re using on your blog?
mel bet
Обращение за помощью нарколога на дому в Улан-Удэ обладает рядом преимуществ, которые делают лечение эффективным и безопасным:
Получить дополнительную информацию – http://vyvod-iz-zapoya-ulan-ude0.ru/narkologiya-vyvod-iz-zapoya-ulan-ude/
Выезд врача на дом позволяет провести детоксикацию в спокойной обстановке. Врач привозит с собой препараты, капельницы, измерительное оборудование и проводит лечение в течение 1–2 часов. Такой формат подходит при стабильном состоянии и желании сохранить анонимность.
Изучить вопрос глубже – http://narko-zakodirovan.ru/
It is in point of fact a nice and useful piece of information. I am satisfied that you simply shared this useful info with us. Please keep us up to date like this. Thanks for sharing.
Врач может приехать в течение 1–2 часов после обращения. В стационар возможна экстренная госпитализация в тот же день.
Получить дополнительные сведения – http://narko-zakodirovan2.ru
В нашей практике сочетаются несколько видов вмешательства: медико-биологическое, психологическое и социальное. Сначала проводится полная диагностика, включая лабораторные анализы и оценку работы сердца, печени, почек, а также психодиагностические тесты. После этого начинается этап детоксикации с внутривенными капельницами, которые выводят токсины, нормализуют водно-солевой баланс и восстанавливают основные функции организма. Далее мы применяем медикаментозную поддержку для стабилизации артериального давления, купирования тревожных симптомов, нормализации сна и уменьшения болевого синдрома.
Выяснить больше – наркологическая клиника
I savor, lead to I found exactly what I was taking a look for. You’ve ended my 4 day lengthy hunt! God Bless you man. Have a nice day. Bye
Momi — это бренд, предлагающий качественные товары для мам и малышей. На моми официальный сайт вы найдете широкий ассортимент детских товаров, отвечающих современным стандартам безопасности и комфорта. Покупайте оригинальную продукцию МОМИ онлайн!
Домашнее лечение позволяет снизить психологическое напряжение, поскольку пациент остаётся в привычной обстановке — рядом с близкими и без очередей. Экономия времени достигается за счёт оперативного выезда специалиста без необходимости госпитализации, а затраты на вызов часто оказываются ниже, чем в стационаре. При грамотном подборе медикаментов и круглосуточном контроле со стороны врача риск осложнений сводится к минимуму.
Детальнее – http://алко-избавление.рф/vyvod-iz-zapoya-na-domu-msk/
Your house is valueble for me. Thanks!…
После диагностики начинается активная фаза медикаментозного вмешательства. Препараты вводятся методом инфузии, что позволяет оперативно снизить уровень токсинов в крови, восстановить обмен веществ и нормализовать работу внутренних органов, таких как печень, почки и сердце.
Ознакомиться с деталями – нарколог вывод из запоя
В нашей практике сочетаются несколько видов вмешательства: медико-биологическое, психологическое и социальное. Сначала проводится полная диагностика, включая лабораторные анализы и оценку работы сердца, печени, почек, а также психодиагностические тесты. После этого начинается этап детоксикации с внутривенными капельницами, которые выводят токсины, нормализуют водно-солевой баланс и восстанавливают основные функции организма. Далее мы применяем медикаментозную поддержку для стабилизации артериального давления, купирования тревожных симптомов, нормализации сна и уменьшения болевого синдрома.
Изучить вопрос глубже – narkologicheskie kliniki alkogolizm mytischi
Профессиональная помощь при запое необходима, если:
Изучить вопрос глубже – вывод из запоя на дому цена в санкт-петербурге
Когда запой начинает негативно влиять на здоровье, оперативное лечение становится залогом успешного выздоровления. В Архангельске, Архангельская область, квалифицированные наркологи предоставляют помощь на дому, позволяя быстро провести детоксикацию, восстановить нормальные обменные процессы и стабилизировать работу жизненно важных органов. Такой формат лечения обеспечивает индивидуальный подход, комфортную домашнюю обстановку и полную конфиденциальность, что особенно важно для пациентов, стремящихся к быстрому восстановлению без посещения стационара.
Углубиться в тему – врач на дом капельница от запоя
The next time I read a blog, I hope that it doesnt disappoint me as much as this one. I mean, I know it was my choice to read, but I actually thought youd have something interesting to say. All I hear is a bunch of whining about something that you could fix if you werent too busy looking for attention.
После первичной диагностики начинается активная фаза медикаментозного вмешательства. Современные препараты вводятся капельничным методом, что позволяет быстро снизить уровень токсинов в крови и восстановить нормальные обменные процессы, стабилизируя работу печени, почек и сердечно-сосудистой системы.
Получить дополнительную информацию – вывод из запоя донецк
Затяжной запой — это состояние, при котором человек в течение нескольких дней не может прекратить употребление алкоголя без медицинской помощи. Такое состояние чревато тяжёлыми нарушениями в работе внутренних органов и психики. В Новосибирске и Новосибирской области доступен профессиональный вывод из запоя как на дому, так и в условиях стационара. Подход к лечению индивидуален, и основная цель — безопасно и эффективно устранить последствия интоксикации и предотвратить рецидив.
Подробнее тут – вывод из запоя круглосуточно
Вывод из запоя обязателен, если:
Изучить вопрос глубже – http://www.domen.ru
I appreciate, result in I found exactly what I used to be having a look for. You’ve ended my 4 day lengthy hunt! God Bless you man. Have a nice day. Bye
bus card balance check
Обращение к наркологу позволяет избежать типичных ошибок самолечения и достичь стабильного результата. Квалифицированное вмешательство:
Получить больше информации – вывод из запоя круглосуточно
Я оцениваю объективность и непредвзятость автора в представлении информации.
Обращение за помощью нарколога на дому в Архангельске имеет множество преимуществ, среди которых:
Разобраться лучше – http://kapelnica-ot-zapoya-arkhangelsk00.ru
Наркологическая клиника “Путь к выздоровлению” — специализированное медицинское учреждение, предназначенное для оказания помощи лицам, страдающим от алкогольной и наркотической зависимости. Наша основная задача — предоставить эффективные методы лечения и поддержку, чтобы помочь пациентам преодолеть пагубное пристрастие и вернуть их к здоровой и полноценной жизни.
Изучить вопрос глубже – https://нарко-фильтр.рф/vivod-iz-zapoya-v-stacionare-v-rostove-na-donu/
Когда алкогольный запой угрожает здоровью, оперативное и квалифицированное вмешательство становится жизненно необходимым. В Улан-Удэ специалисты по наркологии оказывают помощь на дому, обеспечивая скорейшую детоксикацию организма, восстановление обменных процессов и стабилизацию работы внутренних органов. Такой подход позволяет пациенту получить комплексное лечение в комфортной домашней обстановке с полным соблюдением конфиденциальности.
Детальнее – вывод из запоя анонимно
Одной из самых сильных сторон нашей клиники является оперативность. Мы понимаем, что при алкоголизме, наркомании и лекарственной зависимости часто требуются немедленные действия. Если человек находится в состоянии запоя, абстиненции или передозировки, промедление может привести к тяжёлым осложнениям или даже смерти.
Выяснить больше – http://narkologicheskaya-pomoshch-balashiha1.ru/
Статья содержит практические рекомендации, которые можно применить в реальной жизни для решения проблемы.
Самостоятельно выйти из запоя — почти невозможно. В Воронеже врачи клиники «Трезвый шаг» проводят медикаментозный вывод из запоя с круглосуточным выездом. Доверяйте профессионалам.
Ознакомиться с деталями – вывод из запоя
Обращение за помощью нарколога на дому в Архангельске имеет множество преимуществ, среди которых:
Подробнее – https://kapelnica-ot-zapoya-arkhangelsk00.ru/kapelnicza-ot-zapoya-na-domu-arkhangelsk
В условиях клиники пациент находится под наблюдением медицинской сестры и врача 24/7, что особенно важно при тяжёлой интоксикации и риске острых осложнений. Быстрый доступ к расширенной диагностике — ЭКГ, УЗИ, анализы крови — обеспечивает точную корректировку терапии. Стационар подходит тем, у кого есть серьёзные сопутствующие заболевания или высокий риск алкогольных психозов.
Подробнее тут – http://алко-избавление.рф
Thanks for a marvelous posting! I quite enjoyed reading it, you’re a great author.
I will remember to bookmark your blog and may come back down the road.
I want to encourage you continue your great writing, have a
nice morning!
Обращение за помощью нарколога на дому в Архангельске имеет множество преимуществ, среди которых:
Получить дополнительные сведения – врач на дом капельница от запоя в архангельске
Во-первых, безопасная медицинская детоксикация. Этот процесс необходим для удаления токсических веществ из организма. Мы используем современные методы, минимизирующие дискомфорт в период абстиненции.
Подробнее можно узнать тут – https://алко-лечебница.рф/vivod-iz-zapoya-v-stacionare-v-samare/
Обращение за помощью нарколога на дому в Улан-Удэ имеет ряд неоспоримых преимуществ, обеспечивающих эффективное лечение:
Изучить вопрос глубже – наркология вывод из запоя улан-удэ
My spouse and i were quite satisfied that John could complete his research out of the precious recommendations he gained through your weblog. It is now and again perplexing just to continually be freely giving guides that many people have been trying to sell. So we recognize we now have the blog owner to thank for that. The entire illustrations you have made, the easy site navigation, the relationships you will help instill – it is everything awesome, and it’s helping our son and our family believe that this situation is satisfying, and that is quite fundamental. Thanks for all!
Профессиональная помощь при запое необходима, если:
Выяснить больше – вывод из запоя анонимно в санкт-петербурге
Незамедлительно после поступления вызова нарколог приезжает на дом для проведения тщательного осмотра. Специалист измеряет жизненно важные показатели, такие как пульс, артериальное давление и температура, и собирает анамнез для оценки степени алкогольной интоксикации.
Узнать больше – капельница от запоя вызов в архангельске
Hi there i am kavin, its my first time to commenting anywhere, when i read this piece of writing i thought i could also make comment due to this brilliant article.
гриндер для травы
You made some good points there. I did a search on the subject and found most guys will consent with your site.
Запой — это длительное бесконтрольное употребление алкоголя, приводящее к серьёзным нарушениям обмена веществ, дезориентации и риску острого алкогольного психоза. В Москве и области помощь при выводе из запоя востребована как в домашних условиях, так и в стационаре. Вне зависимости от выбора методики главная цель — быстрое и безопасное восстановление здоровья, чтобы человек мог начать новую, полноценную жизнь без зависимости.
Подробнее можно узнать тут – http://алко-избавление.рф/vyvod-iz-zapoya-na-domu-msk/
При сравнительно лёгкой или среднетяжёлой степени интоксикации нарколог приезжает на дом, где в знакомой обстановке проводит детоксикацию. Врач измеряет параметры жизнедеятельности — пульс, давление, насыщение кислородом — и подбирает оптимальный состав препаратов для инфузий. Такой метод подходит тем, кто испытывает стресс при мысли о стационаре и нуждается в анонимности лечения.
Углубиться в тему – http://алко-избавление.рф
Услуга вывода из запоя на дому в Архангельске разработана для оперативного снижения токсической нагрузки при тяжелых формах алкогольной интоксикации. Сразу после вызова нарколог проводит подробный осмотр, измеряет жизненно важные показатели и собирает анамнез, что позволяет точно определить степень интоксикации. На основе полученной информации формируется индивидуальный план лечения, включающий капельничное введение современных медикаментов с использованием автоматизированных инфузионных систем и сопровождение в виде психологической поддержки.
Детальнее – капельница от запоя клиника
После диагностики начинается активная фаза медикаментозного вмешательства, когда препараты вводятся капельничным методом для быстрого снижения уровня токсинов в крови, восстановления обменных процессов и нормализации работы внутренних органов.
Углубиться в тему – вызов нарколога на дом
Профессиональная помощь при запое необходима, если:
Изучить вопрос глубже – вывод из запоя на дому круглосуточно
Домашнее лечение позволяет снизить психологическое напряжение, поскольку пациент остаётся в привычной обстановке — рядом с близкими и без очередей. Экономия времени достигается за счёт оперативного выезда специалиста без необходимости госпитализации, а затраты на вызов часто оказываются ниже, чем в стационаре. При грамотном подборе медикаментов и круглосуточном контроле со стороны врача риск осложнений сводится к минимуму.
Узнать больше – https://алко-избавление.рф/narkolog-vyvod-iz-zapoya-msk/
В столичном регионе доступны два основных формата лечения: выезд специалиста на дом и госпитализация в специализированный центр. Каждый вариант имеет свои особенности и показания, которые врач анализирует при первичном осмотре.
Подробнее можно узнать тут – https://алко-избавление.рф/narkolog-vyvod-iz-zapoya-msk
Врачебный состав клиники “Маяк надежды” состоит из высококвалифицированных специалистов в области наркологии. Наши врачи-наркологи имеют обширный опыт работы с зависимыми пациентами и постоянно совершенствуют свои навыки.
Получить дополнительную информацию – https://алко-лечение24.рф/vivod-iz-zapoya-anonimno-v-Sankt-Peterburge/
Процедура детоксикации может проводиться двумя способами: выездом врача на дом или госпитализацией. Окончательное решение принимает нарколог после оценки состояния пациента. На ранней стадии запоя достаточно домашней терапии, но при наличии рисков рекомендуется стационар.
Подробнее тут – https://narko-zakodirovan.ru/vyvod-iz-zapoya-kapelnicza-spb
Миссия клиники “Путь к выздоровлению” заключается в содействии восстановлению здоровья и социальной реинтеграции людей, столкнувшихся с проблемами зависимости. Мы стремимся к комплексному решению этой сложной задачи, учитывая физические, психологические и социальные аспекты зависимости. Наша цель — не только помочь пациентам избавиться от физической зависимости, но и обеспечить их психологическое восстановление и возвращение к нормальной жизни в обществе.
Подробнее – http://нарко-фильтр.рф
Процедура детоксикации может проводиться двумя способами: выездом врача на дом или госпитализацией. Окончательное решение принимает нарколог после оценки состояния пациента. На ранней стадии запоя достаточно домашней терапии, но при наличии рисков рекомендуется стационар.
Изучить вопрос глубже – http://narko-zakodirovan.ru
Осложнения, к которым может привести отсутствие лечения:
Подробнее – снятие наркотической ломки подольск
Врач может приехать в течение 1–2 часов после обращения. В стационар возможна экстренная госпитализация в тот же день.
Получить дополнительную информацию – http://
Затяжной запой — это состояние, при котором человек в течение нескольких дней не может прекратить употребление алкоголя без медицинской помощи. Такое состояние чревато тяжёлыми нарушениями в работе внутренних органов и психики. В Новосибирске и Новосибирской области доступен профессиональный вывод из запоя как на дому, так и в условиях стационара. Подход к лечению индивидуален, и основная цель — безопасно и эффективно устранить последствия интоксикации и предотвратить рецидив.
Исследовать вопрос подробнее – [url=https://narko-zakodirovan2.ru/]наркология вывод из запоя новосибирск[/url]
Процесс начинается с вызова врача или доставки пациента в клинику. После прибытия специалист проводит первичную диагностику: измерение давления, температуры, пульса, уровня кислорода в крови, визуальная оценка степени возбуждения или угнетения сознания. Собирается краткий анамнез: какой наркотик принимался, как долго, были ли сопутствующие заболевания.
Узнать больше – снятие ломки наркозависимого в подольске
Наркологическая клиника “Путь к выздоровлению” расположена по адресу: г. Ростов-на-Дону, ул. Петровская, д. 19. Клиника работает ежедневно с 8:00 до 20:00, без выходных. Наши специалисты готовы предоставить консультацию и ответить на все вопросы, связанные с лечением зависимостей. Мы гарантируем конфиденциальность и индивидуальный подход к каждому пациенту.
Подробнее – https://нарко-фильтр.рф/vivod-iz-zapoya-na-domu-v-rostove-na-donu/
Обращение к наркологу позволяет избежать типичных ошибок самолечения и достичь стабильного результата. Квалифицированное вмешательство:
Подробнее можно узнать тут – вывод из запоя анонимно новосибирск
Когда алкогольный запой начинает угрожать здоровью, оперативное лечение становится жизненно необходимым. В Улан-Удэ, Республика Бурятия, высококвалифицированные наркологи оказывают помощь на дому, обеспечивая детоксикацию организма, восстановление нормальных обменных процессов и стабилизацию работы внутренних органов. Такой метод позволяет пациенту получить индивидуализированное лечение в условиях привычного домашнего уюта, что значительно снижает стресс и гарантирует полную конфиденциальность.
Узнать больше – http://vyvod-iz-zapoya-ulan-ude00.ru
В стационаре пациент получает круглосуточный контроль, расширенную диагностику и возможность подключения к аппаратуре мониторинга. Это особенно важно при тяжёлой интоксикации, нарушении сознания или судорожной активности.
Подробнее тут – вывод из запоя круглосуточно санкт-петербург
Именно поэтому так важно не терять время. Чем раньше пациент получает помощь, тем выше шансы избежать необратимых последствий и вернуться к нормальной жизни.
Получить дополнительную информацию – снятие ломок на дому
I am glad to be one of many visitants on this outstanding website (:, thankyou for posting.
Вывод из запоя может осуществляться в двух форматах — на дому и в стационаре. Выбор зависит от степени интоксикации, наличия осложнений и возможности обеспечить пациенту наблюдение в домашних условиях.
Получить дополнительную информацию – нарколог вывод из запоя
Когда зависимость захватывает жизнь, она разрушает не только организм, но и личность, отношения с близкими, карьерные планы и самоощущение. Алкоголь, наркотики и психотропные препараты постепенно подрывают работу внутренних органов, нарушают баланс нейромедиаторов в мозге и приводят к серьёзным психическим и физическим осложнениям. Попытки справиться с этим самостоятельно редко бывают успешными: необходим системный, профессиональный подход. В наркологической клинике «Доктор Здоровье» в Мытищах вы найдёте надёжную опору на всех этапах выздоровления — от экстренной детоксикации до длительной реабилитации.
Ознакомиться с деталями – наркологическая клиника нарколог мытищи
Домашнее лечение позволяет снизить психологическое напряжение, поскольку пациент остаётся в привычной обстановке — рядом с близкими и без очередей. Экономия времени достигается за счёт оперативного выезда специалиста без необходимости госпитализации, а затраты на вызов часто оказываются ниже, чем в стационаре. При грамотном подборе медикаментов и круглосуточном контроле со стороны врача риск осложнений сводится к минимуму.
Подробнее – http://алко-избавление.рф/
Осложнения, к которым может привести отсутствие лечения:
Детальнее – снятие ломки
Сразу после вызова нарколог прибывает на дом для проведения тщательного осмотра. Специалист измеряет жизненно важные показатели — пульс, артериальное давление и температуру — и собирает подробный анамнез для оценки степени алкогольной интоксикации.
Углубиться в тему – вывод из запоя цена
Каждый врач клиники обладает глубокими знаниями в области фармакологии, психофармакологии и психотерапии. Они регулярно посещают профессиональные конференции, семинары и мастер-классы, чтобы быть в курсе последних достижений в лечении зависимостей. Такой подход позволяет нашим специалистам применять наиболее эффективные и научно обоснованные методы терапии.
Подробнее можно узнать тут – https://алко-лечение24.рф/vivod-iz-zapoya-na-domu-v-Sankt-Peterburge/
Запой — это длительное бесконтрольное употребление алкоголя, приводящее к серьёзным нарушениям обмена веществ, дезориентации и риску острого алкогольного психоза. В Москве и области помощь при выводе из запоя востребована как в домашних условиях, так и в стационаре. Вне зависимости от выбора методики главная цель — быстрое и безопасное восстановление здоровья, чтобы человек мог начать новую, полноценную жизнь без зависимости.
Выяснить больше – https://алко-избавление.рф/narkolog-vyvod-iz-zapoya-msk/
Задача врачей — не просто облегчить симптомы, а купировать осложнения, стабилизировать жизненно важные функции, вернуть пациенту способность к дальнейшему лечению. Мы работаем быстро, анонимно и профессионально. Любой человек, оказавшийся в кризисе, может получить помощь в течение часа после обращения.
Изучить вопрос глубже – снятие ломки в стационаре подольск
Врачебный состав клиники “Маяк надежды” состоит из высококвалифицированных специалистов в области наркологии. Наши врачи-наркологи имеют обширный опыт работы с зависимыми пациентами и постоянно совершенствуют свои навыки.
Подробнее – https://алко-лечение24.рф/vivod-iz-zapoya-v-stacionare-v-Sankt-Peterburge/
Обращение за помощью нарколога на дому в Улан-Удэ обладает рядом преимуществ, которые делают лечение эффективным и безопасным:
Подробнее тут – срочный вывод из запоя в улан-удэ
Задача врачей — не просто облегчить симптомы, а купировать осложнения, стабилизировать жизненно важные функции, вернуть пациенту способность к дальнейшему лечению. Мы работаем быстро, анонимно и профессионально. Любой человек, оказавшийся в кризисе, может получить помощь в течение часа после обращения.
Изучить вопрос глубже – снятие ломок подольск.
В стационаре пациент получает круглосуточный контроль, расширенную диагностику и возможность подключения к аппаратуре мониторинга. Это особенно важно при тяжёлой интоксикации, нарушении сознания или судорожной активности.
Детальнее – нарколог вывод из запоя в санкт-петербурге
We’re a bunch of volunteers and opening a brand new scheme in our community. Your site offered us with helpful info to paintings on. You’ve performed an impressive activity and our entire neighborhood will probably be grateful to you.
Именно поэтому так важно не терять время. Чем раньше пациент получает помощь, тем выше шансы избежать необратимых последствий и вернуться к нормальной жизни.
Ознакомиться с деталями – снятие ломки на дому
В клинике «ВитаМед Плюс» применяются проверенные методики и препараты, которые позволяют безопасно вывести пациента из запоя. Процедура начинается с внутривенного введения очищающих растворов, которые помогают ускорить выведение этанола и токсинов. Одновременно восстанавливается водно-солевой баланс, что особенно важно при обезвоживании после длительного употребления алкоголя.
Разобраться лучше – вывод из запоя круглосуточно химки
Задача врачей — не просто облегчить симптомы, а купировать осложнения, стабилизировать жизненно важные функции, вернуть пациенту способность к дальнейшему лечению. Мы работаем быстро, анонимно и профессионально. Любой человек, оказавшийся в кризисе, может получить помощь в течение часа после обращения.
Получить больше информации – снятие ломки наркомана
В условиях Донецка ДНР наши специалисты применяют современную методику вывода из запоя на дому, которая включает в себя несколько последовательных этапов для обеспечения максимально безопасного и эффективного лечения.
Детальнее – vyvod-iz-zapoya-czena donetsk
Hi, its good piece of writing concerning media print, we all be aware of media is a enormous source of information.
check hafilat balance
Домашнее лечение позволяет снизить психологическое напряжение, поскольку пациент остаётся в привычной обстановке — рядом с близкими и без очередей. Экономия времени достигается за счёт оперативного выезда специалиста без необходимости госпитализации, а затраты на вызов часто оказываются ниже, чем в стационаре. При грамотном подборе медикаментов и круглосуточном контроле со стороны врача риск осложнений сводится к минимуму.
Выяснить больше – https://алко-избавление.рф/vyvod-iz-zapoya-czena-msk
На данном этапе врач уточняет, как долго продолжается запой, какой тип алкоголя употребляется и имеются ли сопутствующие заболевания. Тщательный анализ этих данных помогает разработать индивидуальный план терапии, направленный на эффективное снижение токсической нагрузки.
Получить дополнительные сведения – http://www.domen.ru
I will immediately seize your rss feed as I can’t find your email subscription hyperlink or e-newsletter service. Do you’ve any? Kindly let me understand so that I may just subscribe. Thanks.
Врачебный состав клиники “Маяк надежды” состоит из высококвалифицированных специалистов в области наркологии. Наши врачи-наркологи имеют обширный опыт работы с зависимыми пациентами и постоянно совершенствуют свои навыки.
Выяснить больше – https://алко-лечение24.рф/vivod-iz-zapoya-v-stacionare-v-Sankt-Peterburge
Сразу после поступления вызова специалист приезжает на дом для проведения тщательного первичного осмотра. Измеряются такие жизненно важные показатели, как пульс, артериальное давление и температура, а также проводится сбор анамнеза, что позволяет оценить степень алкогольной интоксикации.
Узнать больше – выезд нарколога на дом
Ломка — это не временное недомогание. Это системное разрушение организма, связанное с тем, что он перестаёт получать наркотик, к которому уже привык. Нарушается обмен веществ, функции сердца, печени, почек, теряется контроль над эмоциями и болью. В состоянии абстиненции человек не может спать, есть, адекватно мыслить. Страдает и тело, и психика.
Подробнее тут – snyatie lomki na domu podol’sk
Зависимость — это системная проблема, которая требует последовательного и профессионального подхода. Обычные попытки «вылечиться дома» без медицинского сопровождения нередко заканчиваются срывами, ухудшением состояния и психологической деградацией. Клиника «Здоровье Плюс» в Балашихе предоставляет пациентам не просто разовое вмешательство, а выстроенную поэтапную программу, основанную на опыте и медицинских стандартах.
Ознакомиться с деталями – вызвать наркологическую помощь
Обращение за помощью нарколога на дому в Архангельске имеет множество преимуществ, среди которых:
Изучить вопрос глубже – капельница от запоя на дому цена в архангельске
Близкий человек в запое? Не ждите ухудшения. Обратитесь в клинику «Трезвый шаг» (Воронеж) — здесь проведут профессиональный вывод из запоя с последующим восстановлением организма.
Подробнее можно узнать тут – вывод из запоя капельница
Процесс начинается с вызова врача или доставки пациента в клинику. После прибытия специалист проводит первичную диагностику: измерение давления, температуры, пульса, уровня кислорода в крови, визуальная оценка степени возбуждения или угнетения сознания. Собирается краткий анамнез: какой наркотик принимался, как долго, были ли сопутствующие заболевания.
Подробнее тут – снятие ломки на дому цена в подольске
Самолечение или попытка «переждать» запой дома без врача может обернуться серьёзными осложнениями. Обращение к наркологу даёт пациенту:
Детальнее – нарколог вывод из запоя санкт-петербург
I’ve been absent for a while, but now I remember why I used to love this website. Thanks, I’ll try and check back more often. How frequently you update your site?
Алкогольный запой требует не просто прекращения приёма спиртного, а комплексной медицинской помощи. В Санкт-Петербурге и Ленинградской области вывод из запоя осуществляется опытными наркологами с применением современных методик детоксикации. В зависимости от состояния пациента лечение может быть организовано как на дому, так и в стационарных условиях. Главная цель — безопасное очищение организма и возвращение к стабильному физическому и психоэмоциональному состоянию.
Узнать больше – vyvod-iz-zapoya-czena sankt-peterburg
Недостаточно снять физическую зависимость — важно помочь человеку вернуться в сообщество. В «Доктор Здоровье» разработана система сопровождения, включающая мотивационные беседы, групповые занятия и социальную реабилитацию. Психотерапевты владеют методами когнитивно-поведенческой терапии и мотивационного интервью, консультанты помогают восстановить профессиональные навыки и адаптироваться к повседневной жизни, а встречи в группе взаимопомощи и психодраматические сессии способствуют укреплению чувства поддержки и навыков эффективного общения. Для родственников доступны семейные консультации, на которых объясняют природу зависимости и обучают стратегиям поддержки без критики и давления.
Подробнее – наркологические клиники алкоголизм мытищи
Проблема зависимости остаётся одной из самых актуальных в нашем обществе. Она затрагивает множество людей, нанося вред как их здоровью, так и социальным связям. Наркологическая клиника “Свобода” предлагает помощь тем, кто столкнулся с такими сложностями, как наркомания, алкоголизм и игромания. Мы предоставляем комплексный подход к лечению зависимостей, ориентируясь на индивидуальные потребности каждого пациента.
Изучить вопрос глубже – https://алко-лечебница.рф/vivod-iz-zapoya-cena-v-samare/
Недостаточно снять физическую зависимость — важно помочь человеку вернуться в сообщество. В «Доктор Здоровье» разработана система сопровождения, включающая мотивационные беседы, групповые занятия и социальную реабилитацию. Психотерапевты владеют методами когнитивно-поведенческой терапии и мотивационного интервью, консультанты помогают восстановить профессиональные навыки и адаптироваться к повседневной жизни, а встречи в группе взаимопомощи и психодраматические сессии способствуют укреплению чувства поддержки и навыков эффективного общения. Для родственников доступны семейные консультации, на которых объясняют природу зависимости и обучают стратегиям поддержки без критики и давления.
Детальнее – наркологическая клиника нарколог мытищи
Мы верим, что каждый человек, столкнувшийся с проблемой зависимости, заслуживает шанса на новую жизнь. Наша миссия — предоставить необходимые инструменты и поддержку, чтобы помочь пациентам в их стремлении к выздоровлению и личностному росту.
Выяснить больше – http://алко-лечение24.рф/vivod-iz-zapoya-na-domu-v-Sankt-Peterburge/
Ломка — это не временное недомогание. Это системное разрушение организма, связанное с тем, что он перестаёт получать наркотик, к которому уже привык. Нарушается обмен веществ, функции сердца, печени, почек, теряется контроль над эмоциями и болью. В состоянии абстиненции человек не может спать, есть, адекватно мыслить. Страдает и тело, и психика.
Ознакомиться с деталями – снятие наркотической ломки в подольске
Решение обратиться к врачу должно быть принято, если:
Углубиться в тему – narko-zakodirovan2.ru/
What’s up to all, how is everything, I think every one is getting more from this site, and your views are good for new viewers.
melbet app
Врач может приехать в течение 1–2 часов после обращения. В стационар возможна экстренная госпитализация в тот же день.
Узнать больше – вывод из запоя на дому новосибирск.
На данном этапе специалист уточняет длительность запоя, тип употребляемого алкоголя и наличие сопутствующих заболеваний. Тщательный анализ этих данных позволяет разработать персональный план детоксикации, минимизируя риск осложнений.
Изучить вопрос глубже – вывод из запоя клиника
Врач может приехать в течение 1–2 часов после обращения. В стационар возможна экстренная госпитализация в тот же день.
Подробнее тут – http://narko-zakodirovan2.ru/vyvod-iz-zapoya-kruglosutochno-novosibirsk/
После диагностики начинается активная фаза медикаментозного вмешательства. Препараты вводятся инфузионным методом, что позволяет оперативно снизить уровень токсинов в крови, восстановить обмен веществ и нормализовать работу внутренних органов, таких как печень, почки и сердце.
Углубиться в тему – https://vyvod-iz-zapoya-ulan-ude00.ru/vyvod-iz-zapoya-kapelnicza-ulan-ude
Миссия клиники “Путь к выздоровлению” заключается в содействии восстановлению здоровья и социальной реинтеграции людей, столкнувшихся с проблемами зависимости. Мы стремимся к комплексному решению этой сложной задачи, учитывая физические, психологические и социальные аспекты зависимости. Наша цель — не только помочь пациентам избавиться от физической зависимости, но и обеспечить их психологическое восстановление и возвращение к нормальной жизни в обществе.
Получить дополнительную информацию – http://нарко-фильтр.рф/vivod-iz-zapoya-cena-v-rostove-na-donu/
Процесс начинается с вызова врача или доставки пациента в клинику. После прибытия специалист проводит первичную диагностику: измерение давления, температуры, пульса, уровня кислорода в крови, визуальная оценка степени возбуждения или угнетения сознания. Собирается краткий анамнез: какой наркотик принимался, как долго, были ли сопутствующие заболевания.
Углубиться в тему – http://snyatie-lomki-podolsk1.ru
Когда алкогольный запой начинает угрожать здоровью, оперативное лечение становится жизненно необходимым. В Улан-Удэ, Республика Бурятия, высококвалифицированные наркологи оказывают помощь на дому, обеспечивая детоксикацию организма, восстановление нормальных обменных процессов и стабилизацию работы внутренних органов. Такой метод позволяет пациенту получить индивидуализированное лечение в условиях привычного домашнего уюта, что значительно снижает стресс и гарантирует полную конфиденциальность.
Изучить вопрос глубже – вывод из запоя недорого в улан-удэ
Алкогольный запой требует не просто прекращения приёма спиртного, а комплексной медицинской помощи. В Санкт-Петербурге и Ленинградской области вывод из запоя осуществляется опытными наркологами с применением современных методик детоксикации. В зависимости от состояния пациента лечение может быть организовано как на дому, так и в стационарных условиях. Главная цель — безопасное очищение организма и возвращение к стабильному физическому и психоэмоциональному состоянию.
Узнать больше – https://narko-zakodirovan.ru
Наши наркологи придерживаются принципов уважительного и внимательного отношения к пациентам, создавая атмосферу доверия. Они проводят детальное обследование, выявляют коренные причины зависимости и разрабатывают индивидуальные стратегии лечения. Профессионализм и компетентность врачей являются ключевыми факторами успешного восстановления пациентов.
Углубиться в тему – http://
Very interesting info !Perfect just what I was looking for!
В столичном регионе доступны два основных формата лечения: выезд специалиста на дом и госпитализация в специализированный центр. Каждый вариант имеет свои особенности и показания, которые врач анализирует при первичном осмотре.
Выяснить больше – https://алко-избавление.рф/vyvod-iz-zapoya-na-domu-msk
После диагностики начинается активная фаза медикаментозного вмешательства. Препараты вводятся капельничным методом для быстрого снижения уровня токсинов, восстановления обменных процессов и нормализации работы таких органов, как печень, почки и сердце.
Ознакомиться с деталями – posle-kapelniczy-ot-zapoya arhangel’sk
Обращение к наркологу позволяет избежать типичных ошибок самолечения и достичь стабильного результата. Квалифицированное вмешательство:
Исследовать вопрос подробнее – срочный вывод из запоя
При ухудшении состояния, вызванном длительным употреблением алкоголя, оперативное вмешательство может спасти жизнь. В Калининграде, Калининградская область, опытные наркологи выезжают на дом, чтобы оказать профессиональную помощь при алкогольной интоксикации. Такой формат лечения позволяет получить качественную помощь в комфортной и привычной обстановке, сохраняя полную конфиденциальность и минимизируя стресс, связанный с госпитализацией.
Получить дополнительные сведения – вызов врача нарколога на дом в калининграде
Сразу после поступления вызова специалист приезжает на дом для проведения тщательного первичного осмотра. Измеряются такие жизненно важные показатели, как пульс, артериальное давление и температура, а также проводится сбор анамнеза, что позволяет оценить степень алкогольной интоксикации.
Выяснить больше – нарколог на дом анонимно калининград
Именно поэтому так важно не терять время. Чем раньше пациент получает помощь, тем выше шансы избежать необратимых последствий и вернуться к нормальной жизни.
Изучить вопрос глубже – снятие ломки наркозависимого подольск
В стационаре пациент получает круглосуточный контроль, расширенную диагностику и возможность подключения к аппаратуре мониторинга. Это особенно важно при тяжёлой интоксикации, нарушении сознания или судорожной активности.
Получить дополнительную информацию – наркология вывод из запоя санкт-петербург
This site is mostly a walk-via for all the info you wished about this and didn’t know who to ask. Glimpse here, and you’ll positively discover it.
You are my inspiration, I own few blogs and very sporadically run out from brand :). “Analyzing humor is like dissecting a frog. Few people are interested and the frog dies of it.” by E. B. White.
888 poker
Обращение к наркологу позволяет избежать типичных ошибок самолечения и достичь стабильного результата. Квалифицированное вмешательство:
Разобраться лучше – https://narko-zakodirovan2.ru/vyvod-iz-zapoya-czena-novosibirsk/
Миссия клиники “Маяк надежды” заключается в содействии восстановлению здоровья и социальной реинтеграции людей, столкнувшихся с проблемами зависимости. Мы стремимся к комплексному решению этой сложной задачи, учитывая физические, психологические и социальные аспекты зависимости. Наша задача — не только помочь пациентам избавиться от физической зависимости, но и обеспечить их психологическое восстановление и возвращение к нормальной жизни в обществе.
Подробнее можно узнать тут – https://алко-лечение24.рф/vivod-iz-zapoya-v-kruglosutochno-v-Sankt-Peterburge/
Профессиональная помощь при запое необходима, если:
Выяснить больше – https://narko-zakodirovan.ru/vyvod-iz-zapoya-kapelnicza-spb/
В нашей практике сочетаются несколько видов вмешательства: медико-биологическое, психологическое и социальное. Сначала проводится полная диагностика, включая лабораторные анализы и оценку работы сердца, печени, почек, а также психодиагностические тесты. После этого начинается этап детоксикации с внутривенными капельницами, которые выводят токсины, нормализуют водно-солевой баланс и восстанавливают основные функции организма. Далее мы применяем медикаментозную поддержку для стабилизации артериального давления, купирования тревожных симптомов, нормализации сна и уменьшения болевого синдрома.
Выяснить больше – chastnaya narkologicheskaya klinika mytischi
В основе нашей методики — комплексный подход, сочетающий медицинскую точку зрения и психологические технологии. Мы не ограничиваемся снятием абстиненции: задача клиники — помочь пациенту обрести новую мотивацию, развить навыки противостояния стрессам и возобновить социальную активность. Работа строится на трёх ключевых принципах:
Разобраться лучше – наркологические клиники алкоголизм мытищи.
В условиях клиники пациент находится под наблюдением медицинской сестры и врача 24/7, что особенно важно при тяжёлой интоксикации и риске острых осложнений. Быстрый доступ к расширенной диагностике — ЭКГ, УЗИ, анализы крови — обеспечивает точную корректировку терапии. Стационар подходит тем, у кого есть серьёзные сопутствующие заболевания или высокий риск алкогольных психозов.
Подробнее тут – https://алко-избавление.рф/vyvod-iz-zapoya-czena-msk
В стационаре пациент получает круглосуточный контроль, расширенную диагностику и возможность подключения к аппаратуре мониторинга. Это особенно важно при тяжёлой интоксикации, нарушении сознания или судорожной активности.
Подробнее можно узнать тут – вывод из запоя круглосуточно санкт-петербург
Запой — это длительное бесконтрольное употребление алкоголя, приводящее к серьёзным нарушениям обмена веществ, дезориентации и риску острого алкогольного психоза. В Москве и области помощь при выводе из запоя востребована как в домашних условиях, так и в стационаре. Вне зависимости от выбора методики главная цель — быстрое и безопасное восстановление здоровья, чтобы человек мог начать новую, полноценную жизнь без зависимости.
Получить дополнительную информацию – http://алко-избавление.рф/narkolog-vyvod-iz-zapoya-msk/
Самолечение или попытка «переждать» запой дома без врача может обернуться серьёзными осложнениями. Обращение к наркологу даёт пациенту:
Подробнее тут – вывод из запоя клиника
В Воронеже решение есть — наркологическая клиника «Трезвый шаг». Здесь помогают людям выйти из запоя без страха и осуждения. Всё анонимно, грамотно и с заботой о каждом пациенте.
Подробнее – вывод из запоя круглосуточно
Врач может приехать в течение 1–2 часов после обращения. В стационар возможна экстренная госпитализация в тот же день.
Выяснить больше – http://narko-zakodirovan2.ru
7games bet bônus
I very thankful to find this site on bing, just what I was searching for : D too saved to bookmarks.
Вывод из запоя может осуществляться в двух форматах — на дому и в стационаре. Выбор зависит от степени интоксикации, наличия осложнений и возможности обеспечить пациенту наблюдение в домашних условиях.
Разобраться лучше – вывод из запоя недорого в новосибирске
http://401drivingschool.com/media/aloh.php?candi=ricowin
Обращение к наркологу позволяет избежать типичных ошибок самолечения и достичь стабильного результата. Квалифицированное вмешательство:
Подробнее тут – https://narko-zakodirovan2.ru/vyvod-iz-zapoya-na-domu-novosibirsk/
Каждый день запоя увеличивает риск для жизни. Не рискуйте — специалисты «Трезвого шага» в Воронеже приедут на дом и окажут экстренную помощь. Без боли, стресса и ожидания.
Выяснить больше – [url=https://vyvod-iz-zapoya-voronezh13.ru/]вывод из запоя на дому цена[/url]
Когда алкогольный запой угрожает здоровью, оперативное и квалифицированное вмешательство становится жизненно необходимым. В Улан-Удэ специалисты по наркологии оказывают помощь на дому, обеспечивая скорейшую детоксикацию организма, восстановление обменных процессов и стабилизацию работы внутренних органов. Такой подход позволяет пациенту получить комплексное лечение в комфортной домашней обстановке с полным соблюдением конфиденциальности.
Изучить вопрос глубже – вывод из запоя цена
Близкий человек в запое? Не ждите ухудшения. Обратитесь в клинику «Трезвый шаг» (Воронеж) — здесь проведут профессиональный вывод из запоя с последующим восстановлением организма.
Углубиться в тему – вывод из запоя на дому цена
Howdy I am so happy I found your webpage, I really found you by accident, while I was researching on Askjeeve for something else, Regardless I am here now and would just like to say cheers for a remarkable post and a all round thrilling blog (I also love the theme/design), I don’t have time to read it all at the moment but I have book-marked it and also included your RSS feeds, so when I have time I will be back to read more, Please do keep up the awesome work.
George St-Pyer
buy cialis pro: TadalAccess – cialis canada over the counter
Именно поэтому так важно не терять время. Чем раньше пациент получает помощь, тем выше шансы избежать необратимых последствий и вернуться к нормальной жизни.
Получить дополнительные сведения – снятие наркологической ломки на дому
На данном этапе врач уточняет длительность запоя, тип употребляемого алкоголя и наличие сопутствующих заболеваний. Тщательный анализ этих данных позволяет оперативно сформировать индивидуальный план лечения и выбрать оптимальные методы детоксикации.
Исследовать вопрос подробнее – kapelnicza-ot-zapoya arhangel’sk
Prostadine is a liquid supplement made from a blend of natural plant-based ingredients, minerals, and antioxidants. Its primary goal is to help
I conceive other website proprietors should take this website as an example , very clean and superb user genial design.
В Воронеже решение есть — наркологическая клиника «Трезвый шаг». Здесь помогают людям выйти из запоя без страха и осуждения. Всё анонимно, грамотно и с заботой о каждом пациенте.
Подробнее – вывод из запоя на дому круглосуточно
Вывод из запоя может осуществляться в двух форматах — на дому и в стационаре. Выбор зависит от степени интоксикации, наличия осложнений и возможности обеспечить пациенту наблюдение в домашних условиях.
Получить дополнительную информацию – срочный вывод из запоя в новосибирске
Врач может приехать в течение 1–2 часов после обращения. В стационар возможна экстренная госпитализация в тот же день.
Получить дополнительные сведения – вывод из запоя на дому
https://tadalaccess.com/# sunrise pharmaceutical tadalafil
В стационаре пациент получает круглосуточный контроль, расширенную диагностику и возможность подключения к аппаратуре мониторинга. Это особенно важно при тяжёлой интоксикации, нарушении сознания или судорожной активности.
Подробнее – вывод из запоя цена в санкт-петербурге
В стационаре пациент получает круглосуточный контроль, расширенную диагностику и возможность подключения к аппаратуре мониторинга. Это особенно важно при тяжёлой интоксикации, нарушении сознания или судорожной активности.
Разобраться лучше – вывод из запоя цена санкт-петербург.
Каждый день запоя увеличивает риск для жизни. Не рискуйте — специалисты «Трезвого шага» в Воронеже приедут на дом и окажут экстренную помощь. Без боли, стресса и ожидания.
Ознакомиться с деталями – вывод из запоя цена
Very wonderful info can be found on website. “The fundamental defect of fathers is that they want their children to be a credit to them.” by Bertrand Russell.
Домашнее лечение позволяет снизить психологическое напряжение, поскольку пациент остаётся в привычной обстановке — рядом с близкими и без очередей. Экономия времени достигается за счёт оперативного выезда специалиста без необходимости госпитализации, а затраты на вызов часто оказываются ниже, чем в стационаре. При грамотном подборе медикаментов и круглосуточном контроле со стороны врача риск осложнений сводится к минимуму.
Подробнее тут – https://алко-избавление.рф/vyvod-iz-zapoya-na-domu-msk
В стационаре пациент получает круглосуточный контроль, расширенную диагностику и возможность подключения к аппаратуре мониторинга. Это особенно важно при тяжёлой интоксикации, нарушении сознания или судорожной активности.
Подробнее можно узнать тут – https://narko-zakodirovan.ru/vyvod-iz-zapoya-kapelnicza-spb
Алкогольный запой требует не просто прекращения приёма спиртного, а комплексной медицинской помощи. В Санкт-Петербурге и Ленинградской области вывод из запоя осуществляется опытными наркологами с применением современных методик детоксикации. В зависимости от состояния пациента лечение может быть организовано как на дому, так и в стационарных условиях. Главная цель — безопасное очищение организма и возвращение к стабильному физическому и психоэмоциональному состоянию.
Исследовать вопрос подробнее – наркологический вывод из запоя в санкт-петербурге
При сравнительно лёгкой или среднетяжёлой степени интоксикации нарколог приезжает на дом, где в знакомой обстановке проводит детоксикацию. Врач измеряет параметры жизнедеятельности — пульс, давление, насыщение кислородом — и подбирает оптимальный состав препаратов для инфузий. Такой метод подходит тем, кто испытывает стресс при мысли о стационаре и нуждается в анонимности лечения.
Получить дополнительные сведения – http://алко-избавление.рф
Именно поэтому так важно не терять время. Чем раньше пациент получает помощь, тем выше шансы избежать необратимых последствий и вернуться к нормальной жизни.
Углубиться в тему – снятие ломки на дому недорого в подольске
В стационаре пациент получает круглосуточный контроль, расширенную диагностику и возможность подключения к аппаратуре мониторинга. Это особенно важно при тяжёлой интоксикации, нарушении сознания или судорожной активности.
Исследовать вопрос подробнее – https://narko-zakodirovan.ru
buy cialis 20mg what is the generic for cialis cialis is for daily use
Решение обратиться к врачу должно быть принято, если:
Получить дополнительные сведения – https://narko-zakodirovan2.ru/vyvod-iz-zapoya-czena-novosibirsk
Процедура детоксикации может проводиться двумя способами: выездом врача на дом или госпитализацией. Окончательное решение принимает нарколог после оценки состояния пациента. На ранней стадии запоя достаточно домашней терапии, но при наличии рисков рекомендуется стационар.
Подробнее можно узнать тут – наркология вывод из запоя в санкт-петербурге
Затяжной запой — это состояние, при котором человек в течение нескольких дней не может прекратить употребление алкоголя без медицинской помощи. Такое состояние чревато тяжёлыми нарушениями в работе внутренних органов и психики. В Новосибирске и Новосибирской области доступен профессиональный вывод из запоя как на дому, так и в условиях стационара. Подход к лечению индивидуален, и основная цель — безопасно и эффективно устранить последствия интоксикации и предотвратить рецидив.
Получить больше информации – вывод из запоя круглосуточно
cialis soft tabs canadian pharmacy: Tadal Access – how much does cialis cost per pill
Наркологическая клиника “Маяк надежды” расположена по адресу: г. Санкт-Петербург, ул. Колпинская, д. 27. Клиника работает ежедневно с 9:00 до 21:00, без выходных. Наши специалисты готовы предоставить консультацию и ответить на все вопросы, связанные с лечением зависимостей. Мы гарантируем конфиденциальность и индивидуальный подход к каждому пациенту.
Получить дополнительную информацию – http://алко-лечение24.рф
Whats up very cool site!! Man .. Beautiful .. Superb .. I’ll bookmark your site and take the feeds also…I am satisfied to seek out so many helpful info right here within the publish, we want work out extra strategies in this regard, thanks for sharing.
Самостоятельно выйти из запоя — почти невозможно. В Воронеже врачи клиники «Трезвый шаг» проводят медикаментозный вывод из запоя с круглосуточным выездом. Доверяйте профессионалам.
Узнать больше – vyvod-iz-zapoya-klinika
Решение обратиться к врачу должно быть принято, если:
Получить больше информации – вывод из запоя недорого
Обращение к наркологу позволяет избежать типичных ошибок самолечения и достичь стабильного результата. Квалифицированное вмешательство:
Подробнее можно узнать тут – вывод из запоя новосибирск
Показана в тяжёлых случаях или при наличии сопутствующих заболеваний. Лечение проходит под круглосуточным наблюдением врачей и медсестёр с постоянной корректировкой терапии.
Получить больше информации – http://narko-zakodirovan2.ru/vyvod-iz-zapoya-kruglosutochno-novosibirsk/
Процедура детоксикации может проводиться двумя способами: выездом врача на дом или госпитализацией. Окончательное решение принимает нарколог после оценки состояния пациента. На ранней стадии запоя достаточно домашней терапии, но при наличии рисков рекомендуется стационар.
Получить больше информации – наркология вывод из запоя
What’s Taking place i’m new to this, I stumbled upon this I’ve discovered It absolutely useful and it has helped me out loads. I’m hoping to contribute & aid different users like its aided me. Great job.
The Natural Mounjaro Recipe is more than just a diet—it’s a sustainable and natural approach to weight management and overall health.
Вывод из запоя может осуществляться в двух форматах — на дому и в стационаре. Выбор зависит от степени интоксикации, наличия осложнений и возможности обеспечить пациенту наблюдение в домашних условиях.
Подробнее – вывод из запоя на дому цена в новосибирске
https://tadalaccess.com/# tadalafil 20 mg directions
blue sky peptide tadalafil review buy cialis no prescription overnight best price cialis supper active
buy tadalafil reddit: TadalAccess – cialis free trial voucher
I like this web site its a master peace ! Glad I observed this on google .
Когда организм на пределе, важна срочная помощь. «Трезвый шаг» в Воронеже — это команда опытных наркологов, которые помогут быстро и мягко выйти из запоя без вреда для здоровья.
Разобраться лучше – вывод из запоя на дому круглосуточно
Процедура детоксикации может проводиться двумя способами: выездом врача на дом или госпитализацией. Окончательное решение принимает нарколог после оценки состояния пациента. На ранней стадии запоя достаточно домашней терапии, но при наличии рисков рекомендуется стационар.
Исследовать вопрос подробнее – https://narko-zakodirovan.ru/vyvod-iz-zapoya-kapelnicza-spb/
Mitolyn is a cutting-edge natural dietary supplement designed to support effective weight loss and improve overall wellness.
Wow! This could be one particular of the most useful blogs We’ve ever arrive across on this subject. Actually Excellent. I am also a specialist in this topic so I can understand your effort.
Когда алкогольный запой начинает угрожать здоровью, оперативное лечение становится жизненно необходимым. В Улан-Удэ, Республика Бурятия, высококвалифицированные наркологи оказывают помощь на дому, обеспечивая детоксикацию организма, восстановление нормальных обменных процессов и стабилизацию работы внутренних органов. Такой метод позволяет пациенту получить индивидуализированное лечение в условиях привычного домашнего уюта, что значительно снижает стресс и гарантирует полную конфиденциальность.
Получить дополнительные сведения – вывод из запоя в стационаре улан-удэ
Обращение за помощью нарколога на дому в Калининграде имеет ряд значимых преимуществ:
Узнать больше – нарколог на дом срочно
Алкогольный запой требует не просто прекращения приёма спиртного, а комплексной медицинской помощи. В Санкт-Петербурге и Ленинградской области вывод из запоя осуществляется опытными наркологами с применением современных методик детоксикации. В зависимости от состояния пациента лечение может быть организовано как на дому, так и в стационарных условиях. Главная цель — безопасное очищение организма и возвращение к стабильному физическому и психоэмоциональному состоянию.
Разобраться лучше – наркология вывод из запоя санкт-петербург
Затяжной запой — это состояние, при котором человек в течение нескольких дней не может прекратить употребление алкоголя без медицинской помощи. Такое состояние чревато тяжёлыми нарушениями в работе внутренних органов и психики. В Новосибирске и Новосибирской области доступен профессиональный вывод из запоя как на дому, так и в условиях стационара. Подход к лечению индивидуален, и основная цель — безопасно и эффективно устранить последствия интоксикации и предотвратить рецидив.
Детальнее – http://narko-zakodirovan2.ru/
Вывод из запоя может осуществляться в двух форматах — на дому и в стационаре. Выбор зависит от степени интоксикации, наличия осложнений и возможности обеспечить пациенту наблюдение в домашних условиях.
Подробнее тут – вывод из запоя в новосибирске
Клиника оснащена всем необходимым для качественной диагностики и лечения: собственная лаборатория проводит расширенные анализы крови и мочи, биохимические панели проверяют функцию печени и почек, а специальная аппаратура (ЭКГ, пульсоксиметр, автоматические тонометры) позволяет вести непрерывный мониторинг состояния пациентов. Инфузионная терапия осуществляется на базе очищенных растворов с точно рассчитанной дозой, а компьютерные психотесты помогают выявить уровень тревоги, депрессии и когнитивных нарушений, чтобы скорректировать терапевтическую программу.
Углубиться в тему – наркологическая клиника в мытищах
As I website possessor I think the content here is rattling wonderful, regards for your efforts.
cialis 5mg side effects: Tadal Access – what is cialis used for
Наркологическая клиника “Путь к выздоровлению” расположена по адресу: г. Ростов-на-Дону, ул. Петровская, д. 19. Клиника работает ежедневно с 8:00 до 20:00, без выходных. Наши специалисты готовы предоставить консультацию и ответить на все вопросы, связанные с лечением зависимостей. Мы гарантируем конфиденциальность и индивидуальный подход к каждому пациенту.
Получить дополнительные сведения – http://нарко-фильтр.рф
В столичном регионе доступны два основных формата лечения: выезд специалиста на дом и госпитализация в специализированный центр. Каждый вариант имеет свои особенности и показания, которые врач анализирует при первичном осмотре.
Подробнее – https://алко-избавление.рф/vyvod-iz-zapoya-czena-msk
tadalafil softsules tuf 20 cialis tadalafil cialis and blood pressure
https://tadalaccess.com/# sildenafil vs tadalafil vs vardenafil
Решение обратиться к врачу должно быть принято, если:
Получить дополнительные сведения – http://www.domen.ru
На данном этапе врач уточняет, сколько времени продолжается запой, какой алкоголь употребляется и имеются ли сопутствующие заболевания. Тщательный анализ этих данных позволяет разработать персональный план детоксикации, что значительно снижает риск осложнений.
Узнать больше – вывод из запоя на дому круглосуточно улан-удэ
Врач может приехать в течение 1–2 часов после обращения. В стационар возможна экстренная госпитализация в тот же день.
Получить дополнительную информацию – вывод из запоя недорого
После диагностики начинается активная фаза медикаментозного вмешательства, когда препараты вводятся капельничным методом для быстрого снижения уровня токсинов в крови, восстановления обменных процессов и нормализации работы внутренних органов.
Подробнее можно узнать тут – https://narcolog-na-dom-kaliningrad00.ru/narkolog-na-dom-kruglosutochno-kaliningrad
Hey, you used to write magnificent, but the last several posts have been kinda boringK I miss your tremendous writings. Past few posts are just a little bit out of track! come on!
Клиника оснащена всем необходимым для качественной диагностики и лечения: собственная лаборатория проводит расширенные анализы крови и мочи, биохимические панели проверяют функцию печени и почек, а специальная аппаратура (ЭКГ, пульсоксиметр, автоматические тонометры) позволяет вести непрерывный мониторинг состояния пациентов. Инфузионная терапия осуществляется на базе очищенных растворов с точно рассчитанной дозой, а компьютерные психотесты помогают выявить уровень тревоги, депрессии и когнитивных нарушений, чтобы скорректировать терапевтическую программу.
Изучить вопрос глубже – бесплатная наркологическая клиника мытищи
Домашнее лечение позволяет снизить психологическое напряжение, поскольку пациент остаётся в привычной обстановке — рядом с близкими и без очередей. Экономия времени достигается за счёт оперативного выезда специалиста без необходимости госпитализации, а затраты на вызов часто оказываются ниже, чем в стационаре. При грамотном подборе медикаментов и круглосуточном контроле со стороны врача риск осложнений сводится к минимуму.
Выяснить больше – http://алко-избавление.рф
Процесс начинается с вызова врача или доставки пациента в клинику. После прибытия специалист проводит первичную диагностику: измерение давления, температуры, пульса, уровня кислорода в крови, визуальная оценка степени возбуждения или угнетения сознания. Собирается краткий анамнез: какой наркотик принимался, как долго, были ли сопутствующие заболевания.
Получить дополнительную информацию – snyatie lomki na domu podol’sk
Преимущества вывода из запоя от опытных специалистов в условиях Донецка ДНР многочисленны. Такой формат лечения позволяет:
Исследовать вопрос подробнее – вывод из запоя анонимно донецк
Близкий человек в запое? Не ждите ухудшения. Обратитесь в клинику «Трезвый шаг» (Воронеж) — здесь проведут профессиональный вывод из запоя с последующим восстановлением организма.
Подробнее – вывод из запоя анонимно
cialis alcohol: Tadal Access – pharmacy 365 cialis
Когда алкогольная интоксикация становится угрозой для здоровья, оперативное вмешательство и качественное лечение на дому играют ключевую роль в спасении жизни. В Калининграде опытные наркологи выезжают на дом, чтобы обеспечить своевременную детоксикацию, стабилизацию работы внутренних органов и оказание психологической поддержки. Такой подход позволяет пациентам получить квалифицированную помощь в комфортной и привычной обстановке, сохраняя конфиденциальность и избегая лишнего стресса, связанного с госпитализацией.
Исследовать вопрос подробнее – нарколог на дом срочно в калининграде
I really like your writing style, superb information, regards for putting up :D. “Let every man mind his own business.” by Miguel de Cervantes.
Самостоятельно выйти из запоя — почти невозможно. В Воронеже врачи клиники «Трезвый шаг» проводят медикаментозный вывод из запоя с круглосуточным выездом. Доверяйте профессионалам.
Исследовать вопрос подробнее – наркологический вывод из запоя
При сравнительно лёгкой или среднетяжёлой степени интоксикации нарколог приезжает на дом, где в знакомой обстановке проводит детоксикацию. Врач измеряет параметры жизнедеятельности — пульс, давление, насыщение кислородом — и подбирает оптимальный состав препаратов для инфузий. Такой метод подходит тем, кто испытывает стресс при мысли о стационаре и нуждается в анонимности лечения.
Углубиться в тему – https://алко-избавление.рф/vyvod-iz-zapoya-na-domu-msk
В этом информативном обзоре собраны самые интересные статистические данные и факты, которые помогут лучше понять текущие тренды. Мы представим вам цифры и графики, которые иллюстрируют, как развиваются различные сферы жизни. Эта информация станет отличной основой для глубокого анализа и принятия обоснованных решений.
Углубиться в тему – https://fehervarrugby.hu/sulyemeles/rovid-hir-a-sulyemelo-eb-rol-bangorbol-cimvedes
В клинике «ВитаМед Плюс» применяются проверенные методики и препараты, которые позволяют безопасно вывести пациента из запоя. Процедура начинается с внутривенного введения очищающих растворов, которые помогают ускорить выведение этанола и токсинов. Одновременно восстанавливается водно-солевой баланс, что особенно важно при обезвоживании после длительного употребления алкоголя.
Исследовать вопрос подробнее – вывод из запоя на дому химки.
На данном этапе врач уточняет, сколько времени продолжается запой, какой алкоголь употребляется и имеются ли сопутствующие заболевания. Тщательный анализ этих данных позволяет разработать персональный план детоксикации, что значительно снижает риск осложнений.
Исследовать вопрос подробнее – https://vyvod-iz-zapoya-ulan-ude00.ru/vyvod-iz-zapoya-na-domu-ulan-ude/
cialis ontario no prescription ordering tadalafil online buying cialis internet
При поступлении вызова нарколог незамедлительно прибывает на дом для проведения детального первичного осмотра. Врач измеряет жизненно важные показатели, такие как пульс, артериальное давление и температура, а также собирает краткий анамнез, чтобы определить степень алкогольной интоксикации и сформировать индивидуальный план терапии.
Изучить вопрос глубже – http://vyvod-iz-zapoya-donetsk-dnr0.ru/
Миссия клиники “Путь к выздоровлению” заключается в содействии восстановлению здоровья и социальной реинтеграции людей, столкнувшихся с проблемами зависимости. Мы стремимся к комплексному решению этой сложной задачи, учитывая физические, психологические и социальные аспекты зависимости. Наша цель — не только помочь пациентам избавиться от физической зависимости, но и обеспечить их психологическое восстановление и возвращение к нормальной жизни в обществе.
Разобраться лучше – https://нарко-фильтр.рф/vivod-iz-zapoya-v-stacionare-v-rostove-na-donu
Затяжной запой опасен для жизни. Врачи наркологической клиники «Трезвый шаг» в Воронеже проводят срочный вывод из запоя — на дому или в стационаре. Анонимно, безопасно, круглосуточно.
Разобраться лучше – vyvod-iz-zapoya-czena
В нашей практике сочетаются несколько видов вмешательства: медико-биологическое, психологическое и социальное. Сначала проводится полная диагностика, включая лабораторные анализы и оценку работы сердца, печени, почек, а также психодиагностические тесты. После этого начинается этап детоксикации с внутривенными капельницами, которые выводят токсины, нормализуют водно-солевой баланс и восстанавливают основные функции организма. Далее мы применяем медикаментозную поддержку для стабилизации артериального давления, купирования тревожных симптомов, нормализации сна и уменьшения болевого синдрома.
Получить дополнительные сведения – бесплатная наркологическая клиника
Сразу после поступления вызова специалист приезжает на дом для проведения тщательного первичного осмотра. Измеряются такие жизненно важные показатели, как пульс, артериальное давление и температура, а также проводится сбор анамнеза, что позволяет оценить степень алкогольной интоксикации.
Узнать больше – вызов нарколога на дом в калининграде
После диагностики начинается активная фаза медикаментозного вмешательства. Препараты вводятся методом инфузии, что позволяет оперативно снизить уровень токсинов в крови, восстановить обмен веществ и нормализовать работу внутренних органов, таких как печень, почки и сердце.
Узнать больше – https://vyvod-iz-zapoya-ulan-ude0.ru/vyvod-iz-zapoya-na-domu-ulan-ude
После диагностики начинается активная фаза медикаментозного вмешательства. Препараты вводятся капельничным методом для быстрого снижения уровня токсинов, восстановления обменных процессов и нормализации работы таких органов, как печень, почки и сердце.
Разобраться лучше – врача капельницу от запоя архангельск
Одной из самых сильных сторон нашей клиники является оперативность. Мы понимаем, что при алкоголизме, наркомании и лекарственной зависимости часто требуются немедленные действия. Если человек находится в состоянии запоя, абстиненции или передозировки, промедление может привести к тяжёлым осложнениям или даже смерти.
Получить дополнительную информацию – наркологическая помощь балашиха
Эта статья предлагает захватывающий и полезный контент, который привлечет внимание широкого круга читателей. Мы постараемся представить тебе идеи, которые вдохновят вас на изменения в жизни и предоставят практические решения для повседневных вопросов. Читайте и вдохновляйтесь!
Узнать больше – https://surjodigonto.com/ads/2020/06/21/the-most-beautiful-women-of-all-time
Профессиональная помощь при запое необходима, если:
Ознакомиться с деталями – http://narko-zakodirovan.ru/vyvod-iz-zapoya-czena-spb/
Врачебный состав клиники “Маяк надежды” состоит из высококвалифицированных специалистов в области наркологии. Наши врачи-наркологи имеют обширный опыт работы с зависимыми пациентами и постоянно совершенствуют свои навыки.
Ознакомиться с деталями – https://алко-лечение24.рф/vivod-iz-zapoya-cena-v-Sankt-Peterburge
Эта публикация дает возможность задействовать различные источники информации и представить их в удобной форме. Читатели смогут быстро найти нужные данные и получить ответы на интересующие их вопросы. Мы стремимся к четкости и доступности материала для всех!
Подробнее – https://www.nabiramahavidyalayakatol.com/product/book-5
https://tadalaccess.com/# cialis for daily use
Этот информативный материал предлагает содержательную информацию по множеству задач и вопросов. Мы призываем вас исследовать различные идеи и факты, обобщая их для более глубокого понимания. Наша цель — сделать обучение доступным и увлекательным.
Подробнее можно узнать тут – https://mewsaws.com/shop/carbide-cutting-tools/sport-brake
Эта статья предлагает уникальную подборку занимательных фактов и необычных историй, которые вы, возможно, не знали. Мы постараемся вдохновить ваше воображение и разнообразить ваш кругозор, погружая вас в мир, полный интересных открытий. Читайте и открывайте для себя новое!
Узнать больше – https://harmonybyagas.com/producto/agressive-anti-aging-program-6-productos
Врачебный состав клиники “Путь к выздоровлению” состоит из высококвалифицированных специалистов в области наркологии. Наши врачи-наркологи имеют обширный опыт работы с зависимыми пациентами и постоянно совершенствуют свои навыки.
Исследовать вопрос подробнее – http://
Миссия клиники “Свобода” заключается в оказании качественной помощи людям, страдающим от зависимости. Мы стремимся не просто избавить от пагубной привычки, но и помочь восстановить личность пациента. Важнейшие цели нашей работы включают:
Получить дополнительные сведения – https://алко-лечебница.рф/vivod-iz-zapoya-anonimno-v-samare
В этой статье-обзоре мы соберем актуальную информацию и интересные факты, которые освещают важные темы. Читатели смогут ознакомиться с различными мнениями и подходами, что позволит им расширить кругозор и глубже понять обсуждаемые вопросы.
Изучить вопрос глубже – https://ap35.de/en/architekturgespraeche-4/?s
I’ve recently started a website, the information you offer on this website has helped me tremendously. Thank you for all of your time & work.
Эта публикация дает возможность задействовать различные источники информации и представить их в удобной форме. Читатели смогут быстро найти нужные данные и получить ответы на интересующие их вопросы. Мы стремимся к четкости и доступности материала для всех!
Разобраться лучше – https://radiomacarena.com/programa-economico-lenin-moreno-ecuador
buying cialis online: TadalAccess – cialis sample pack
На нашей платформе интимные фото и ролики.
Контент подходит для взрослой аудитории.
У нас собраны разнообразные материалы.
Платформа предлагает четкие фото.
порно онлайн мама
Вход разрешен только для взрослых.
Наслаждайтесь удобным интерфейсом.
After study a few of the blog posts on your website now, and I truly like your way of blogging. I bookmarked it to my bookmark website list and will be checking back soon. Pls check out my web site as well and let me know what you think.
В этой публикации мы предлагаем подробные объяснения по актуальным вопросам, чтобы помочь читателям глубже понять их. Четкость и структурированность материала сделают его удобным для усвоения и применения в повседневной жизни.
Узнать больше – https://www.ibssltd.com/tech-products-that-makes-its-easier-to-stay-at-home-2
cialis covered by insurance Tadal Access pictures of cialis pills
Эта статья предлагает живое освещение актуальной темы с множеством интересных фактов. Мы рассмотрим ключевые моменты, которые делают данную тему важной и актуальной. Подготовьтесь к насыщенному путешествию по неизвестным аспектам и узнайте больше о значимых событиях.
Выяснить больше – https://bharyang.com/shop/my-account
Этот информативный материал предлагает содержательную информацию по множеству задач и вопросов. Мы призываем вас исследовать различные идеи и факты, обобщая их для более глубокого понимания. Наша цель — сделать обучение доступным и увлекательным.
Получить дополнительную информацию – https://cleanholmes.co.uk/carpet-cleaning/photo-36-e1412948080243
Эта публикация дает возможность задействовать различные источники информации и представить их в удобной форме. Читатели смогут быстро найти нужные данные и получить ответы на интересующие их вопросы. Мы стремимся к четкости и доступности материала для всех!
Ознакомиться с деталями – https://alhikmaofficial.com/ju-kujtohet-bukuroshja-kandi-tek-seriali-spanjoll-ja-si-duket-ajo-sot-dhe-sa-femije-paska-foto
Этот информационный материал привлекает внимание множеством интересных деталей и необычных ракурсов. Мы предлагаем уникальные взгляды на привычные вещи и рассматриваем вопросы, которые волнуют общество. Будьте в курсе актуальных тем и расширяйте свои знания!
Детальнее – https://domains.tntcode.com/ip/87.236.16.73
В этой статье вы найдете познавательную и занимательную информацию, которая поможет вам лучше понять мир вокруг. Мы собрали интересные данные, которые вдохновляют на размышления и побуждают к действиям. Открывайте новую информацию и получайте удовольствие от чтения!
Углубиться в тему – https://iogaia.com/kitchari-receita-detox-ayurvedico
Эта статья для ознакомления предлагает читателям общее представление об актуальной теме. Мы стремимся представить ключевые факты и идеи, которые помогут читателям получить представление о предмете и решить, стоит ли углубляться в изучение.
Углубиться в тему – https://www.28ppp.de/anja-kohagen/2012/01/14/snowboarding-on-mount-baker
В этой статье вы найдете познавательную и занимательную информацию, которая поможет вам лучше понять мир вокруг. Мы собрали интересные данные, которые вдохновляют на размышления и побуждают к действиям. Открывайте новую информацию и получайте удовольствие от чтения!
Углубиться в тему – https://metdefotograafopreis.nl/zen-en-tasmanie
Этот информационный материал привлекает внимание множеством интересных деталей и необычных ракурсов. Мы предлагаем уникальные взгляды на привычные вещи и рассматриваем вопросы, которые волнуют общество. Будьте в курсе актуальных тем и расширяйте свои знания!
Получить дополнительные сведения – https://www.natuur.co/index.php/product/cbd-gel-capsules-25mg-immune
В этом информативном обзоре собраны самые интересные статистические данные и факты, которые помогут лучше понять текущие тренды. Мы представим вам цифры и графики, которые иллюстрируют, как развиваются различные сферы жизни. Эта информация станет отличной основой для глубокого анализа и принятия обоснованных решений.
Изучить вопрос глубже – https://www.gestion-ae.fr/2016/11/30/top-10-places-for-adventure-lovers
Эта статья для ознакомления предлагает читателям общее представление об актуальной теме. Мы стремимся представить ключевые факты и идеи, которые помогут читателям получить представление о предмете и решить, стоит ли углубляться в изучение.
Подробнее можно узнать тут – https://sobhe-emrooz.ir/1396/04/%D8%A7%D8%B9%D8%AA%D8%B1%D8%A7%D8%B6-%D8%A8%D8%A7%D8%B2%DB%8C%DA%A9%D9%86%D8%A7%D9%86-%D9%BE%D8%AF%DB%8C%D8%AF%D9%87-%D8%A8%D9%87-%D8%A8%DB%8C%E2%80%8C%D9%BE%D9%88%D9%84%DB%8C-%D8%AF%D8%B1-%D8%AA
Hi mates, how is the whole thing, and what you want
to say concerning this post, in my view its truly remarkable
for me.
Also visit my web-site; click here now
В этой публикации мы сосредоточимся на интересных аспектах одной из самых актуальных тем современности. Совмещая факты и мнения экспертов, мы создадим полное представление о предмете, которое будет полезно как новичкам, так и тем, кто глубоко изучает вопрос.
Узнать больше – https://www.bergon-nature-jardin.com/supernatural-fx-showreel
Эта публикация дает возможность задействовать различные источники информации и представить их в удобной форме. Читатели смогут быстро найти нужные данные и получить ответы на интересующие их вопросы. Мы стремимся к четкости и доступности материала для всех!
Изучить вопрос глубже – https://pakistanscrabble.org/pakistani-players-shine-at-the-world-youth-scrabble-championship
Этот информационный материал привлекает внимание множеством интересных деталей и необычных ракурсов. Мы предлагаем уникальные взгляды на привычные вещи и рассматриваем вопросы, которые волнуют общество. Будьте в курсе актуальных тем и расширяйте свои знания!
Разобраться лучше – https://aydinlift.com/2022/11/01/engelli-asansoru-cesitleri
Этот информационный обзор станет отличным путеводителем по актуальным темам, объединяющим важные факты и мнения экспертов. Мы исследуем ключевые идеи и представляем их в доступной форме для более глубокого понимания. Читайте, чтобы оставаться в курсе событий!
Углубиться в тему – https://francais2020.linguanet.ru/2020/03/03/%D0%BF%D1%80%D0%B8%D0%B2%D0%B5%D1%82-%D0%BC%D0%B8%D1%80
В столичном регионе доступны два основных формата лечения: выезд специалиста на дом и госпитализация в специализированный центр. Каждый вариант имеет свои особенности и показания, которые врач анализирует при первичном осмотре.
Ознакомиться с деталями – http://алко-избавление.рф/vyvod-iz-zapoya-czena-msk/
Самолечение или попытка «переждать» запой дома без врача может обернуться серьёзными осложнениями. Обращение к наркологу даёт пациенту:
Изучить вопрос глубже – http://narko-zakodirovan.ru
В этой статье-обзоре мы соберем актуальную информацию и интересные факты, которые освещают важные темы. Читатели смогут ознакомиться с различными мнениями и подходами, что позволит им расширить кругозор и глубже понять обсуждаемые вопросы.
Ознакомиться с деталями – https://vgglobalholdings.com/hello-world
https://tadalaccess.com/# taking cialis
При сравнительно лёгкой или среднетяжёлой степени интоксикации нарколог приезжает на дом, где в знакомой обстановке проводит детоксикацию. Врач измеряет параметры жизнедеятельности — пульс, давление, насыщение кислородом — и подбирает оптимальный состав препаратов для инфузий. Такой метод подходит тем, кто испытывает стресс при мысли о стационаре и нуждается в анонимности лечения.
Получить дополнительную информацию – http://алко-избавление.рф/vyvod-iz-zapoya-na-domu-msk/https://алко-избавление.рф
I have not checked in here for some time since I thought it was getting boring, but the last several posts are great quality so I guess I’ll add you back to my everyday bloglist. You deserve it my friend 🙂
Этот информационный материал привлекает внимание множеством интересных деталей и необычных ракурсов. Мы предлагаем уникальные взгляды на привычные вещи и рассматриваем вопросы, которые волнуют общество. Будьте в курсе актуальных тем и расширяйте свои знания!
Ознакомиться с деталями – https://yeskangaroo.com/en/5074_orig-2
В столичном регионе доступны два основных формата лечения: выезд специалиста на дом и госпитализация в специализированный центр. Каждый вариант имеет свои особенности и показания, которые врач анализирует при первичном осмотре.
Исследовать вопрос подробнее – https://алко-избавление.рф/vyvod-iz-zapoya-czena-msk
Лечение вывода из запоя на дому в Мурманске организовано по четко структурированной схеме, включающей следующие этапы, каждый из которых играет ключевую роль в оперативном восстановлении здоровья:
Подробнее можно узнать тут – http://vyvod-iz-zapoya-murmansk00.ru
cialis discount card: cialis overnight shipping – cialis pill
My relatives always say that I am killing my time here
at web, except I know I am getting experience daily by reading such nice articles or reviews.
Thank you for the good writeup. It in fact was a amusement
account it. Look advanced to far added agreeable from
you! By the way, how could we communicate?
You actually make it seem so easy with your presentation but I find this matter to be really something that
I think I would never understand. It seems too complicated and very broad for
me. I am looking forward for your next post, I’ll try to get the hang
of it!
What’s up, this weekend is fastidious designed for me, because this moment
i am reading this wonderful educational paragraph here at my home.
Hello, I do believe your site could possibly be having browser compatibility problems.
When I take a look at your site in Safari, it looks fine however when opening in Internet Explorer, it’s got some overlapping
issues. I simply wanted to give you a quick heads
up! Other than that, wonderful site!
Magnificent beat ! I would like to apprentice while you amend
your site, how could i subscribe for a blog site?
The account helped me a acceptable deal. I had been tiny bit acquainted of this your broadcast provided bright clear concept
Very nice article, exactly what I wanted
to find.
Inspiring quest there. What occurred after? Thanks!
Запой — это длительное бесконтрольное употребление алкоголя, приводящее к серьёзным нарушениям обмена веществ, дезориентации и риску острого алкогольного психоза. В Москве и области помощь при выводе из запоя востребована как в домашних условиях, так и в стационаре. Вне зависимости от выбора методики главная цель — быстрое и безопасное восстановление здоровья, чтобы человек мог начать новую, полноценную жизнь без зависимости.
Узнать больше – http://алко-избавление.рф/vyvod-iz-zapoya-na-domu-msk/https://алко-избавление.рф
Pretty nice post. I just stumbled upon your blog and wished to mention that I’ve truly enjoyed surfing around your blog posts. After all I will be subscribing in your rss feed and I’m hoping you write once more very soon!
Близкий человек в запое? Не ждите ухудшения. Обратитесь в клинику «Трезвый шаг» (Воронеж) — здесь проведут профессиональный вывод из запоя с последующим восстановлением организма.
Углубиться в тему – вывод из запоя цена
Когда организм на пределе, важна срочная помощь. «Трезвый шаг» в Воронеже — это команда опытных наркологов, которые помогут быстро и мягко выйти из запоя без вреда для здоровья.
Выяснить больше – вывод из запоя цена
Запой — это длительное бесконтрольное употребление алкоголя, приводящее к серьёзным нарушениям обмена веществ, дезориентации и риску острого алкогольного психоза. В Москве и области помощь при выводе из запоя востребована как в домашних условиях, так и в стационаре. Вне зависимости от выбора методики главная цель — быстрое и безопасное восстановление здоровья, чтобы человек мог начать новую, полноценную жизнь без зависимости.
Изучить вопрос глубже – http://алко-избавление.рф
cialis 5mg 10mg no prescription cialis online canada free cialis samples
При сравнительно лёгкой или среднетяжёлой степени интоксикации нарколог приезжает на дом, где в знакомой обстановке проводит детоксикацию. Врач измеряет параметры жизнедеятельности — пульс, давление, насыщение кислородом — и подбирает оптимальный состав препаратов для инфузий. Такой метод подходит тем, кто испытывает стресс при мысли о стационаре и нуждается в анонимности лечения.
Получить дополнительную информацию – https://алко-избавление.рф/narkolog-vyvod-iz-zapoya-msk
На данном этапе врач уточняет длительность запоя, тип употребляемого алкоголя и наличие сопутствующих заболеваний. Тщательный анализ этих данных позволяет подобрать оптимальные методы детоксикации и снизить риск осложнений.
Получить дополнительные сведения – срочный вывод из запоя
generic tadalafil cost: Tadal Access – cialis discount card
Hello there! Do you use Twitter? I’d like to follow you if that would be ok. I’m definitely enjoying your blog and look forward to new updates.
My brother suggested I might like this blog. He was entirely right. This post truly made my day. You can not imagine just how much time I had spent for this info! Thanks!
https://tadalaccess.com/# cialis high blood pressure
cialis tadalafil 20mg price cialis online with no prescription wallmart cialis
В столичном регионе доступны два основных формата лечения: выезд специалиста на дом и госпитализация в специализированный центр. Каждый вариант имеет свои особенности и показания, которые врач анализирует при первичном осмотре.
Разобраться лучше – https://алко-избавление.рф/vyvod-iz-zapoya-czena-msk
Wow! Thank you! I permanently wanted to write on my blog something like that. Can I take a portion of your post to my blog?
Незамедлительно после вызова нарколог прибывает на дом для проведения первичного осмотра. Специалист измеряет жизненно важные показатели, такие как пульс, артериальное давление и температура, и собирает подробный анамнез. Это позволяет оценить степень интоксикации и оперативно разработать индивидуальный план лечения.
Подробнее тут – вывод из запоя на дому мурманск
Близкий человек в запое? Не ждите ухудшения. Обратитесь в клинику «Трезвый шаг» (Воронеж) — здесь проведут профессиональный вывод из запоя с последующим восстановлением организма.
Подробнее – вывод из запоя клиника
Также мы учитываем потребности каждого пациента — по питанию, условиям проживания, графику процедур. Проживание возможно в стандартных и повышенных палатах, с возможностью индивидуального обслуживания.
Детальнее – платная наркологическая помощь балашиха
cialis used for: cialis purchase – cialis doesnt work
Write more, thats all I have to say. Literally, it seems as though you relied on the video to make your point. You clearly know what youre talking about, why throw away your intelligence on just posting videos to your blog when you could be giving us something enlightening to read?
Процедура детоксикации может проводиться двумя способами: выездом врача на дом или госпитализацией. Окончательное решение принимает нарколог после оценки состояния пациента. На ранней стадии запоя достаточно домашней терапии, но при наличии рисков рекомендуется стационар.
Получить дополнительные сведения – вывод из запоя клиника в санкт-петербурге
Самостоятельно выйти из запоя — почти невозможно. В Воронеже врачи клиники «Трезвый шаг» проводят медикаментозный вывод из запоя с круглосуточным выездом. Доверяйте профессионалам.
Получить больше информации – в воронеже
Алкогольный запой представляет собой крайне опасное состояние, когда организм переполнен токсинами, а системы внутреннего контроля практически перестают функционировать должным образом. Наркологическая клиника «Трезвая Жизнь» в Екатеринбурге оказывает экстренную помощь при выводе из запоя, используя передовые методы диагностики, детоксикации и поддерживающую терапию. Наша команда опытных врачей-наркологов готова оказать помощь в любое время суток, обеспечивая оперативное вмешательство и строгую анонимность каждого пациента.
Получить больше информации – вывод из запоя круглосуточно екатеринбург
tiktok ads account for sale https://tiktok-ads-agency-account.org
В Воронеже решение есть — наркологическая клиника «Трезвый шаг». Здесь помогают людям выйти из запоя без страха и осуждения. Всё анонимно, грамотно и с заботой о каждом пациенте.
Углубиться в тему – вывод из запоя клиника
Незамедлительно после вызова нарколог прибывает на дом для проведения первичного осмотра. Специалист измеряет жизненно важные показатели, такие как пульс, артериальное давление и температура, и собирает подробный анамнез. Это позволяет оценить степень интоксикации и оперативно разработать индивидуальный план лечения.
Получить дополнительную информацию – narkolog-vyvod-iz-zapoya murmansk
Зависимость — это системная проблема, которая требует последовательного и профессионального подхода. Обычные попытки «вылечиться дома» без медицинского сопровождения нередко заканчиваются срывами, ухудшением состояния и психологической деградацией. Клиника «Здоровье Плюс» в Балашихе предоставляет пациентам не просто разовое вмешательство, а выстроенную поэтапную программу, основанную на опыте и медицинских стандартах.
Исследовать вопрос подробнее – анонимная наркологическая помощь балашиха
tiktok ads account buy https://buy-tiktok-ads.org
buy tiktok ads https://buy-tiktok-business-account.org
Undeniably believe that which you said. Your favorite reason seemed to be on the web the simplest thing to be aware of. I say to you, I certainly get irked while people think about worries that they plainly do not know about. You managed to hit the nail upon the top and also defined out the whole thing without having side-effects , people can take a signal. Will probably be back to get more. Thanks
https://tadalaccess.com/# cialis online without a prescription
cialis daily review TadalAccess cialis for pulmonary hypertension
Задача врачей — не просто облегчить симптомы, а купировать осложнения, стабилизировать жизненно важные функции, вернуть пациенту способность к дальнейшему лечению. Мы работаем быстро, анонимно и профессионально. Любой человек, оказавшийся в кризисе, может получить помощь в течение часа после обращения.
Подробнее тут – снятие ломки на дому недорого в подольске
В стационаре пациент получает круглосуточный контроль, расширенную диагностику и возможность подключения к аппаратуре мониторинга. Это особенно важно при тяжёлой интоксикации, нарушении сознания или судорожной активности.
Ознакомиться с деталями – вывод из запоя круглосуточно в санкт-петербурге
Hello! I could have sworn I’ve been to this blog before but after browsing through some of the post I realized it’s new to me. Anyways, I’m definitely happy I found it and I’ll be book-marking and checking back frequently!
Задача врачей — не просто облегчить симптомы, а купировать осложнения, стабилизировать жизненно важные функции, вернуть пациенту способность к дальнейшему лечению. Мы работаем быстро, анонимно и профессионально. Любой человек, оказавшийся в кризисе, может получить помощь в течение часа после обращения.
Разобраться лучше – lomka ot narkotikov podol’sk
Самостоятельно выйти из запоя — почти невозможно. В Воронеже врачи клиники «Трезвый шаг» проводят медикаментозный вывод из запоя с круглосуточным выездом. Доверяйте профессионалам.
Углубиться в тему – наркология вывод из запоя
После диагностики начинается активная фаза медикаментозного вмешательства. Препараты вводятся капельничным методом, что способствует быстрому снижению уровня токсинов в крови, нормализации обменных процессов и стабилизации работы таких органов, как печень, почки и сердце.
Углубиться в тему – http://vyvod-iz-zapoya-murmansk00.ru
Когда состояние алкогольной интоксикации достигает критических уровней, своевременное вмешательство становится жизненно необходимым. В Мариуполе, Донецкая область, высококвалифицированные наркологи оказывают срочную помощь на дому, позволяя оперативно начать детоксикацию и стабилизировать состояние пациента. Такой формат лечения обеспечивает быстрый выход из кризиса в условиях комфорта и конфиденциальности, что особенно важно для тех, кто не может позволить себе задержки в стационарном лечении.
Узнать больше – https://narcolog-na-dom-mariupol00.ru/vyzov-narkologa-na-dom-mariupol
Запой — это длительное бесконтрольное употребление алкоголя, приводящее к серьёзным нарушениям обмена веществ, дезориентации и риску острого алкогольного психоза. В Москве и области помощь при выводе из запоя востребована как в домашних условиях, так и в стационаре. Вне зависимости от выбора методики главная цель — быстрое и безопасное восстановление здоровья, чтобы человек мог начать новую, полноценную жизнь без зависимости.
Получить больше информации – https://алко-избавление.рф
tadalafil how long to take effect: TadalAccess – cialis price
Миссия клиники “Свобода” заключается в оказании качественной помощи людям, страдающим от зависимости. Мы стремимся не просто избавить от пагубной привычки, но и помочь восстановить личность пациента. Важнейшие цели нашей работы включают:
Подробнее можно узнать тут – http://алко-лечебница.рф/vivod-iz-zapoya-cena-v-samare/
Врач может приехать в течение 1–2 часов после обращения. В стационар возможна экстренная госпитализация в тот же день.
Получить дополнительные сведения – вывод из запоя на дому цена новосибирск
Именно поэтому так важно не терять время. Чем раньше пациент получает помощь, тем выше шансы избежать необратимых последствий и вернуться к нормальной жизни.
Подробнее – https://snyatie-lomki-podolsk1.ru/snyatie-lomki-narkolog-v-podolske
В стационаре работают узкопрофильные специалисты: наркологи, неврологи, психотерапевты, а также персонал, обеспечивающий круглосуточный уход. Программа включает медикаментозное лечение, психологическую коррекцию, восстановление сна, устранение депрессии, обучение саморегуляции и работу с мотивацией.
Получить дополнительную информацию – http://narkologicheskaya-pomoshch-balashiha1.ru/narkologicheskaya-pomoshch-na-domu-v-balashihe/
Услуга капельничного лечения от запоя на дому в Архангельске предусматривает комплексный подход, направленный на оперативное восстановление организма. Сразу после вызова нарколог прибывает на дом, проводит детальный осмотр, собирает анамнез и измеряет жизненно важные показатели. На основе этих данных разрабатывается персональный план терапии, который включает введение современных медикаментов с использованием автоматизированных систем дозирования, а также психологическую поддержку для создания условий долгосрочной ремиссии.
Углубиться в тему – врач на дом капельница от запоя архангельск
Зависимость — это системная проблема, которая требует последовательного и профессионального подхода. Обычные попытки «вылечиться дома» без медицинского сопровождения нередко заканчиваются срывами, ухудшением состояния и психологической деградацией. Клиника «Здоровье Плюс» в Балашихе предоставляет пациентам не просто разовое вмешательство, а выстроенную поэтапную программу, основанную на опыте и медицинских стандартах.
Подробнее – http://narkologicheskaya-pomoshch-balashiha1.ru/skoraya-narkologicheskaya-pomoshch-v-balashihe/https://narkologicheskaya-pomoshch-balashiha1.ru
Врачебный состав клиники “Маяк надежды” состоит из высококвалифицированных специалистов в области наркологии. Наши врачи-наркологи имеют обширный опыт работы с зависимыми пациентами и постоянно совершенствуют свои навыки.
Подробнее тут – https://алко-лечение24.рф/vivod-iz-zapoya-cena-v-Sankt-Peterburge
Каждый день запоя увеличивает риск для жизни. Не рискуйте — специалисты «Трезвого шага» в Воронеже приедут на дом и окажут экстренную помощь. Без боли, стресса и ожидания.
Изучить вопрос глубже – наркологический вывод из запоя
Самолечение или попытка «переждать» запой дома без врача может обернуться серьёзными осложнениями. Обращение к наркологу даёт пациенту:
Исследовать вопрос подробнее – вывод из запоя капельница
Затяжной запой опасен для жизни. Врачи наркологической клиники «Трезвый шаг» в Воронеже проводят срочный вывод из запоя — на дому или в стационаре. Анонимно, безопасно, круглосуточно.
Получить дополнительные сведения – vyvod-iz-zapoya-klinika
Миссия клиники “Путь к выздоровлению” заключается в содействии восстановлению здоровья и социальной реинтеграции людей, столкнувшихся с проблемами зависимости. Мы стремимся к комплексному решению этой сложной задачи, учитывая физические, психологические и социальные аспекты зависимости. Наша цель — не только помочь пациентам избавиться от физической зависимости, но и обеспечить их психологическое восстановление и возвращение к нормальной жизни в обществе.
Подробнее – https://нарко-фильтр.рф/vivod-iz-zapoya-v-kruglosutochno-v-rostove-na-donu/
Обращение за помощью к наркологу на дому имеет ряд преимуществ, особенно в экстренных ситуациях:
Получить дополнительную информацию – http://narcolog-na-dom-mariupol0.ru/narkolog-na-dom-czena-mariupol/
Для обеспечения максимальной безопасности и эффективности лечения процесс организован в несколько этапов. При обращении пациента наши специалисты проводят первичный осмотр и диагностику, чтобы оценить степень интоксикации и выявить возможные осложнения. Далее назначается детоксикационная терапия, сопровождаемая медикаментозной поддержкой и психологическим консультированием. Основные этапы работы можно описать следующим образом:
Ознакомиться с деталями – вывод из запоя цена екатеринбург
Капельница от запоя – эффективный метод экстренной детоксикации, который используется при тяжелых формах алкогольной интоксикации. Он позволяет быстро восстановить водно-электролитный баланс, нормализовать работу внутренних органов и снизить токсическую нагрузку. В клинике «Основа» мы гарантируем круглосуточное оказание медицинской помощи, индивидуальный подход к каждому пациенту и полную конфиденциальность. В условиях необходимости экстренного лечения наши специалисты оперативно выезжают в любую точку Новосибирска, обеспечивая комфортное проведение всех процедур как в стационаре, так и на дому.
Разобраться лучше – капельница от запоя на дому цена новосибирск
Детоксикационные растворы (физиологический раствор, глюкоза, раствор Рингера)
Выяснить больше – http://vyvod-iz-zapoya-ekb8.ru/
I’m still learning from you, while I’m trying to achieve my goals. I definitely liked reading all that is written on your site.Keep the information coming. I enjoyed it!
Эта информационная заметка содержит увлекательные сведения, которые могут вас удивить! Мы собрали интересные факты, которые сделают вашу жизнь ярче и полнее. Узнайте нечто новое о привычных аспектах повседневности и откройте для себя удивительный мир информации.
Получить больше информации – https://visionset.hu/hello-vilag
Эта статья предлагает живое освещение актуальной темы с множеством интересных фактов. Мы рассмотрим ключевые моменты, которые делают данную тему важной и актуальной. Подготовьтесь к насыщенному путешествию по неизвестным аспектам и узнайте больше о значимых событиях.
Подробнее – https://ame-plus.net/archives/1588
В этой статье представлен занимательный и актуальный контент, который заставит вас задуматься. Мы обсуждаем насущные вопросы и проблемы, а также освещаем истории, которые вдохновляют на действия и изменения. Узнайте, что стоит за событиями нашего времени!
Разобраться лучше – https://macdebtcollection.com/best-debt-collection-agency-in-uae-fast-debt-recovery
cialis logo Tadal Access tadalafil no prescription forum
В этой информационной статье вы найдете интересное содержание, которое поможет вам расширить свои знания. Мы предлагаем увлекательный подход и уникальные взгляды на обсуждаемые темы, побуждая пользователей к активному мышлению и критическому анализу!
Разобраться лучше – https://imbisa.do/get-exceptional-service-for-growth-2
I’m not sure where you are getting your information, but great topic. I needs to spend some time learning more or understanding more. Thanks for fantastic information I was looking for this info for my mission.
Excellent post. I was checking continuously this blog and I am impressed! Very helpful information specifically the last part 🙂 I care for such info a lot. I was looking for this certain info for a long time. Thank you and good luck.
Этот интересный отчет представляет собой сборник полезных фактов, касающихся актуальных тем. Мы проанализируем данные, чтобы вы могли сделать обоснованные выводы. Читайте, чтобы узнать больше о последних трендах и значимых событиях!
Выяснить больше – https://codelessgenie.com/get-ahead-of-your-competition-our-proven-digital
how to get cialis for free: TadalAccess – us pharmacy cialis
Этот интересный отчет представляет собой сборник полезных фактов, касающихся актуальных тем. Мы проанализируем данные, чтобы вы могли сделать обоснованные выводы. Читайте, чтобы узнать больше о последних трендах и значимых событиях!
Узнать больше – https://tdc.edu.vn/img_0026
https://tadalaccess.com/# canadian online pharmacy cialis
cialis 20 mg from united kingdom: TadalAccess – us pharmacy prices for cialis
Эта статья предлагает захватывающий и полезный контент, который привлечет внимание широкого круга читателей. Мы постараемся представить тебе идеи, которые вдохновят вас на изменения в жизни и предоставят практические решения для повседневных вопросов. Читайте и вдохновляйтесь!
Углубиться в тему – https://durbanosound.ca/mostbet-uz-%D1%83%D0%B7%D0%B1%D0%B5%D0%BA%D0%B8%D1%81%D1%82%D0%B0%D0%BD-%D0%B1%D1%83%D0%BA%D0%BC%D0%B5%D0%BA%D0%B5%D1%80-%D0%BA%D0%B0%D0%B7%D0%B8%D0%BD%D0%BE-%D0%BF%D1%80%D0%B8%D0%BB%D0%BE%D0%B6-2
I discovered your blog site on google and check a few of your early posts. Continue to keep up the very good operate. I just additional up your RSS feed to my MSN News Reader. Seeking forward to reading more from you later on!…
Эта разъяснительная статья содержит простые и доступные разъяснения по актуальным вопросам. Мы стремимся сделать информацию понятной для широкой аудитории, чтобы каждый смог разобраться в предмете и извлечь из него максимум пользы.
Углубиться в тему – https://blogfutebolclube.com.br/index.php/2024/02/22/aguia-de-maraba-x-coritiba-onde-assistir-ao-vivo-palpites-e-escalacoes-copa-do-brasil-2024-hoje-22-02
В этом обзорном материале представлены увлекательные детали, которые находят отражение в различных аспектах жизни. Мы исследуем непонятные и интересные моменты, позволяя читателю увидеть картину целиком. Погрузитесь в мир знаний и удивительных открытий!
Углубиться в тему – https://sturdydoors.com/balancing-aesthetics-and-functionality-in-door-refinishing
В этой информационной статье вы найдете интересное содержание, которое поможет вам расширить свои знания. Мы предлагаем увлекательный подход и уникальные взгляды на обсуждаемые темы, побуждая пользователей к активному мышлению и критическому анализу!
Изучить вопрос глубже – https://www.overthelux.net/portfolio-view/gallery-format
Когда организм на пределе, важна срочная помощь. «Трезвый шаг» в Воронеже — это команда опытных наркологов, которые помогут быстро и мягко выйти из запоя без вреда для здоровья.
Углубиться в тему – нарколог вывод из запоя
В клинике «Трезвая Жизнь» для эффективного вывода организма из запоя используется комплексный подход, который включает применение различных групп препаратов. Приведенная ниже таблица отражает основные компоненты нашей терапии и их функции:
Углубиться в тему – нарколог вывод из запоя
В этой публикации мы предлагаем подробные объяснения по актуальным вопросам, чтобы помочь читателям глубже понять их. Четкость и структурированность материала сделают его удобным для усвоения и применения в повседневной жизни.
Подробнее тут – https://anyq.kz/%D0%A2%D2%AF%D1%80%D0%BA%D1%96%D1%81%D1%82%D0%B0%D0%BD-%D0%96%D0%B5%D1%82%D1%96%D1%81%D0%B0%D0%B9-%D0%B0%D1%83%D0%B4%D0%B0%D0%BD%D1%8B%D0%BD%D1%8B%D2%A3-%D0%BC%D0%B5%D0%BC%D0%BB%D0%B5%D0%BA%D0%B5
Ломка – это тяжелый синдром отмены, возникающий после длительного употребления алкоголя или наркотических веществ. При резком прекращении их приема нервная система и другие органы начинают страдать от недостатка необходимых веществ, что приводит к сильному дискомфорту, психоэмоциональным нарушениям и ухудшению общего состояния организма. В Новосибирске наркологическая клиника «Возрождение» оказывает экстренную помощь при снятии ломки, обеспечивая безопасное, круглосуточное и конфиденциальное лечение под наблюдением опытных специалистов.
Узнать больше – https://snyatie-lomki-novosibirsk8.ru/snyatie-narkoticheskoj-lomki-v-novosibirske/
Эта статья предлагает захватывающий и полезный контент, который привлечет внимание широкого круга читателей. Мы постараемся представить тебе идеи, которые вдохновят вас на изменения в жизни и предоставят практические решения для повседневных вопросов. Читайте и вдохновляйтесь!
Подробнее тут – https://www.armkandi.co.uk/football-2
В этом информативном обзоре собраны самые интересные статистические данные и факты, которые помогут лучше понять текущие тренды. Мы представим вам цифры и графики, которые иллюстрируют, как развиваются различные сферы жизни. Эта информация станет отличной основой для глубокого анализа и принятия обоснованных решений.
Получить дополнительные сведения – https://keesvisser.eu/recepten/pasta-pesto-met-gepofte-tomaat-en-parmezaan-vlog191
В клинике «Трезвая Жизнь» для эффективного вывода организма из запоя используется комплексный подход, который включает применение различных групп препаратов. Приведенная ниже таблица отражает основные компоненты нашей терапии и их функции:
Углубиться в тему – вывод из запоя на дому круглосуточно
Ломка – это тяжелый синдром отмены, возникающий после длительного употребления алкоголя или наркотических веществ. При резком прекращении их приема нервная система и другие органы начинают страдать от недостатка необходимых веществ, что приводит к сильному дискомфорту, психоэмоциональным нарушениям и ухудшению общего состояния организма. В Новосибирске наркологическая клиника «Возрождение» оказывает экстренную помощь при снятии ломки, обеспечивая безопасное, круглосуточное и конфиденциальное лечение под наблюдением опытных специалистов.
Углубиться в тему – снятие ломки на дому цена
Эта информационная статья охватывает широкий спектр актуальных тем и вопросов. Мы стремимся осветить ключевые факты и события с ясностью и простотой, чтобы каждый читатель мог извлечь из нее полезные знания и полезные инсайты.
Подробнее – https://tdc.edu.vn/img_0026
Необходимо незамедлительно обращаться за медицинской помощью, если у пациента наблюдаются следующие симптомы:
Подробнее можно узнать тут – https://snyatie-lomki-novosibirsk8.ru/
Осложнения, к которым может привести отсутствие лечения:
Детальнее – снятие ломки подольск
Затяжной запой опасен для жизни. Врачи наркологической клиники «Трезвый шаг» в Воронеже проводят срочный вывод из запоя — на дому или в стационаре. Анонимно, безопасно, круглосуточно.
Углубиться в тему – вывод из запоя на дому
best place to buy generic cialis online TadalAccess super cialis
Детоксикационные растворы (физиологический раствор, глюкоза, раствор Рингера)
Углубиться в тему – вывод из запоя недорого в екатеринбурге
take cialis the correct way: buying cialis – cialis professional ingredients
Необходимо незамедлительно обращаться за медицинской помощью, если у пациента наблюдаются следующие симптомы:
Подробнее – снятие ломки наркомана новосибирск
Затяжной запой опасен для жизни. Врачи наркологической клиники «Трезвый шаг» в Воронеже проводят срочный вывод из запоя — на дому или в стационаре. Анонимно, безопасно, круглосуточно.
Углубиться в тему – вывод из запоя круглосуточно
При наличии этих симптомов организм находится в критическом состоянии, и любой промедление с вызовом врача может привести к развитию серьезных осложнений, таких как сердечно-сосудистые нарушения, тяжелые неврологические симптомы или даже жизнеугрожающие состояния. Экстренное вмешательство позволяет не только снять острые симптомы ломки, но и предотвратить необратимые изменения в организме.
Подробнее тут – снятие наркологической ломки новосибирск
Именно поэтому так важно не терять время. Чем раньше пациент получает помощь, тем выше шансы избежать необратимых последствий и вернуться к нормальной жизни.
Подробнее – https://snyatie-lomki-podolsk1.ru/snyatie-lomki-narkomana-v-podolske
Клиника «Возрождение» применяет комплексный подход к снятию ломки, используя современные детоксикационные методики и проверенные препараты. Приведенная ниже таблица демонстрирует основные группы медикаментов, используемых в терапии, и их назначение:
Углубиться в тему – снять ломку новосибирск
https://tadalaccess.com/# tadalafil (tadalis-ajanta)
Процесс лечения включает несколько ключевых этапов, каждый из которых имеет решающее значение для восстановления организма:
Выяснить больше – снятие ломки на дому недорого новосибирск
Hello, you used to write great, but the last few posts have been kinda boringK I miss your great writings. Past several posts are just a bit out of track! come on!
Ломка – это тяжелый синдром отмены, возникающий после длительного употребления алкоголя или наркотических веществ. При резком прекращении их приема нервная система и другие органы начинают страдать от недостатка необходимых веществ, что приводит к сильному дискомфорту, психоэмоциональным нарушениям и ухудшению общего состояния организма. В Новосибирске наркологическая клиника «Возрождение» оказывает экстренную помощь при снятии ломки, обеспечивая безопасное, круглосуточное и конфиденциальное лечение под наблюдением опытных специалистов.
Получить больше информации – снятие наркологической ломки на дому в новосибирске
Процесс лечения включает несколько ключевых этапов, каждый из которых имеет решающее значение для восстановления организма:
Детальнее – снятие ломки наркомана новосибирск
Для обеспечения максимальной безопасности и эффективности лечения процесс организован в несколько этапов. При обращении пациента наши специалисты проводят первичный осмотр и диагностику, чтобы оценить степень интоксикации и выявить возможные осложнения. Далее назначается детоксикационная терапия, сопровождаемая медикаментозной поддержкой и психологическим консультированием. Основные этапы работы можно описать следующим образом:
Подробнее тут – вывод из запоя в стационаре в екатеринбурге
Клиника «Возрождение» применяет комплексный подход к снятию ломки, используя современные детоксикационные методики и проверенные препараты. Приведенная ниже таблица демонстрирует основные группы медикаментов, используемых в терапии, и их назначение:
Детальнее – снятие ломки наркомана новосибирск
Именно поэтому так важно не терять время. Чем раньше пациент получает помощь, тем выше шансы избежать необратимых последствий и вернуться к нормальной жизни.
Получить дополнительную информацию – снятие ломки подольск.
Близкий человек в запое? Не ждите ухудшения. Обратитесь в клинику «Трезвый шаг» (Воронеж) — здесь проведут профессиональный вывод из запоя с последующим восстановлением организма.
Получить дополнительную информацию – вывод из запоя капельница
Необходимо незамедлительно обращаться за медицинской помощью, если у пациента наблюдаются следующие симптомы:
Получить больше информации – snyatie lomki na domu novosibirsk
what is the difference between cialis and tadalafil?: TadalAccess – cialis alternative
cialis from india online pharmacy: Tadal Access – buy liquid cialis online
Детоксикационные растворы (физиологический раствор, глюкоза, раствор Рингера)
Подробнее можно узнать тут – вывод из запоя на дому круглосуточно екатеринбург
cialis for ed where can i buy tadalafil online safest and most reliable pharmacy to buy cialis
Группа препаратов
Получить дополнительную информацию – вывод из запоя анонимно в екатеринбурге
Каждый день запоя увеличивает риск для жизни. Не рискуйте — специалисты «Трезвого шага» в Воронеже приедут на дом и окажут экстренную помощь. Без боли, стресса и ожидания.
Ознакомиться с деталями – narkolog-vyvod-iz-zapoya
Для обеспечения максимальной безопасности и эффективности лечения процесс организован в несколько этапов. При обращении пациента наши специалисты проводят первичный осмотр и диагностику, чтобы оценить степень интоксикации и выявить возможные осложнения. Далее назначается детоксикационная терапия, сопровождаемая медикаментозной поддержкой и психологическим консультированием. Основные этапы работы можно описать следующим образом:
Детальнее – нарколог вывод из запоя в екатеринбурге
Алкогольный запой представляет собой крайне опасное состояние, когда организм переполнен токсинами, а системы внутреннего контроля практически перестают функционировать должным образом. Наркологическая клиника «Трезвая Жизнь» в Екатеринбурге оказывает экстренную помощь при выводе из запоя, используя передовые методы диагностики, детоксикации и поддерживающую терапию. Наша команда опытных врачей-наркологов готова оказать помощь в любое время суток, обеспечивая оперативное вмешательство и строгую анонимность каждого пациента.
Исследовать вопрос подробнее – вывод из запоя круглосуточно в екатеринбурге
Необходимо незамедлительно обращаться за медицинской помощью, если у пациента наблюдаются следующие симптомы:
Выяснить больше – снятие ломки
Осложнения, к которым может привести отсутствие лечения:
Углубиться в тему – снятие ломки
В стационаре работают узкопрофильные специалисты: наркологи, неврологи, психотерапевты, а также персонал, обеспечивающий круглосуточный уход. Программа включает медикаментозное лечение, психологическую коррекцию, восстановление сна, устранение депрессии, обучение саморегуляции и работу с мотивацией.
Ознакомиться с деталями – наркологическая помощь на дому
tiktok ad accounts https://buy-tiktok-ads-accounts.org
Абстинентный синдром — одно из самых тяжёлых и опасных проявлений наркотической зависимости. Он развивается на фоне резкого отказа от приёма веществ и сопровождается сильнейшими нарушениями работы организма. Это состояние требует немедленного вмешательства. Самостоятельно справиться с ним невозможно — особенно если речь идёт о героине, метадоне, синтетических наркотиках или длительной зависимости. В клинике «НаркоПрофи» мы организовали систему снятия ломки в Подольске, работающую круглосуточно: как на дому, так и в условиях стационара.
Подробнее можно узнать тут – http://snyatie-lomki-podolsk1.ru/snyatie-lomki-narkomana-v-podolske/
https://tadalaccess.com/# cialis coupon online
tiktok ads agency account https://buy-tiktok-ad-account.org
tiktok ad accounts https://tiktok-agency-account-for-sale.org
buy tiktok ads accounts https://tiktok-ads-account-for-sale.org
Задача врачей — не просто облегчить симптомы, а купировать осложнения, стабилизировать жизненно важные функции, вернуть пациенту способность к дальнейшему лечению. Мы работаем быстро, анонимно и профессионально. Любой человек, оказавшийся в кризисе, может получить помощь в течение часа после обращения.
Получить дополнительные сведения – https://snyatie-lomki-podolsk1.ru/snyatie-lomki-narkomana-v-podolske
Задача врачей — не просто облегчить симптомы, а купировать осложнения, стабилизировать жизненно важные функции, вернуть пациенту способность к дальнейшему лечению. Мы работаем быстро, анонимно и профессионально. Любой человек, оказавшийся в кризисе, может получить помощь в течение часа после обращения.
Углубиться в тему – снятие наркологической ломки
cialis las vegas: Tadal Access – maxim peptide tadalafil citrate
В стационаре работают узкопрофильные специалисты: наркологи, неврологи, психотерапевты, а также персонал, обеспечивающий круглосуточный уход. Программа включает медикаментозное лечение, психологическую коррекцию, восстановление сна, устранение депрессии, обучение саморегуляции и работу с мотивацией.
Подробнее тут – наркологическая помощь на дому
В клинике «Трезвая Жизнь» для эффективного вывода организма из запоя используется комплексный подход, который включает применение различных групп препаратов. Приведенная ниже таблица отражает основные компоненты нашей терапии и их функции:
Подробнее тут – vyvod-iz-zapoya-ekb8.ru/
Детоксикационные растворы (физиологический раствор, глюкоза, раствор Рингера)
Получить дополнительную информацию – https://vyvod-iz-zapoya-ekb8.ru/vyvod-iz-zapoya-na-domu-v-ekb/
buy cialis online australia pay with paypal best time to take cialis cialis online no prior prescription
Самостоятельно выйти из запоя — почти невозможно. В Воронеже врачи клиники «Трезвый шаг» проводят медикаментозный вывод из запоя с круглосуточным выездом. Доверяйте профессионалам.
Углубиться в тему – вывод из запоя в стационаре
В клинике «Трезвая Жизнь» для эффективного вывода организма из запоя используется комплексный подход, который включает применение различных групп препаратов. Приведенная ниже таблица отражает основные компоненты нашей терапии и их функции:
Разобраться лучше – вывод из запоя на дому цена
Клиника «Возрождение» применяет комплексный подход к снятию ломки, используя современные детоксикационные методики и проверенные препараты. Приведенная ниже таблица демонстрирует основные группы медикаментов, используемых в терапии, и их назначение:
Исследовать вопрос подробнее – снятие ломки на дому новосибирск.
В клинике «Трезвая Жизнь» для эффективного вывода организма из запоя используется комплексный подход, который включает применение различных групп препаратов. Приведенная ниже таблица отражает основные компоненты нашей терапии и их функции:
Детальнее – http://vyvod-iz-zapoya-ekb8.ru
Каждый из этапов направлен на обеспечение максимальной безопасности и эффективности лечения. Индивидуальный подход, основанный на тщательной диагностике, позволяет значительно снизить риск осложнений и обеспечить комфортное протекание терапии.
Исследовать вопрос подробнее – снятие наркотической ломки в екатеринбурге
cialis for sale over the counter: Tadal Access – cialis and poppers
Алкогольный запой представляет собой крайне опасное состояние, когда организм переполнен токсинами, а системы внутреннего контроля практически перестают функционировать должным образом. Наркологическая клиника «Трезвая Жизнь» в Екатеринбурге оказывает экстренную помощь при выводе из запоя, используя передовые методы диагностики, детоксикации и поддерживающую терапию. Наша команда опытных врачей-наркологов готова оказать помощь в любое время суток, обеспечивая оперативное вмешательство и строгую анонимность каждого пациента.
Подробнее можно узнать тут – http://vyvod-iz-zapoya-ekb8.ru
Для обеспечения максимальной безопасности и эффективности лечения процесс организован в несколько этапов. При обращении пациента наши специалисты проводят первичный осмотр и диагностику, чтобы оценить степень интоксикации и выявить возможные осложнения. Далее назначается детоксикационная терапия, сопровождаемая медикаментозной поддержкой и психологическим консультированием. Основные этапы работы можно описать следующим образом:
Получить дополнительные сведения – срочный вывод из запоя
При обращении за экстренной помощью наш нарколог незамедлительно выезжает на дом или принимает пациента в клинике. Процесс лечения организован по проверенной схеме, позволяющей максимально быстро стабилизировать состояние и облегчить симптомы ломки. Основные этапы включают:
Подробнее – snyatie lomki narkozavisimogo nizhnij novgorod
Этот информационный обзор станет отличным путеводителем по актуальным темам, объединяющим важные факты и мнения экспертов. Мы исследуем ключевые идеи и представляем их в доступной форме для более глубокого понимания. Читайте, чтобы оставаться в курсе событий!
Узнать больше – https://ecochemgh.com/the-big-design-wall-likes-pictures
Алкогольный запой представляет собой крайне опасное состояние, когда организм переполнен токсинами, а системы внутреннего контроля практически перестают функционировать должным образом. Наркологическая клиника «Трезвая Жизнь» в Екатеринбурге оказывает экстренную помощь при выводе из запоя, используя передовые методы диагностики, детоксикации и поддерживающую терапию. Наша команда опытных врачей-наркологов готова оказать помощь в любое время суток, обеспечивая оперативное вмешательство и строгую анонимность каждого пациента.
Получить больше информации – вывод из запоя цена
В клинике «Основа» применяется комплексный подход к лечению алкогольной интоксикации. Программа включает использование нескольких групп препаратов, каждая из которых решает конкретную задачу в процессе восстановления:
Изучить вопрос глубже – kapelnicza-ot-zapoya-czena novosibirsk
Самостоятельно выйти из запоя — почти невозможно. В Воронеже врачи клиники «Трезвый шаг» проводят медикаментозный вывод из запоя с круглосуточным выездом. Доверяйте профессионалам.
Изучить вопрос глубже – наркология вывод из запоя
Эта статья для ознакомления предлагает читателям общее представление об актуальной теме. Мы стремимся представить ключевые факты и идеи, которые помогут читателям получить представление о предмете и решить, стоит ли углубляться в изучение.
Узнать больше – https://astronomia.com.ar/tethysringshadow_cassini_1019
Когда организм на пределе, важна срочная помощь. «Трезвый шаг» в Воронеже — это команда опытных наркологов, которые помогут быстро и мягко выйти из запоя без вреда для здоровья.
Разобраться лучше – вывод из запоя анонимно
Затяжной запой опасен для жизни. Врачи наркологической клиники «Трезвый шаг» в Воронеже проводят срочный вывод из запоя — на дому или в стационаре. Анонимно, безопасно, круглосуточно.
Подробнее можно узнать тут – vyvod-iz-zapoya-na-domu
После поступления звонка врач клиники «Импульс» незамедлительно отправляется на указанный адрес для оказания срочной помощи. Вызов врача на дом включает следующие этапы:
Получить дополнительные сведения – запой нарколог на дом
https://tadalaccess.com/# pastilla cialis
В клинике «Трезвая Жизнь» для эффективного вывода организма из запоя используется комплексный подход, который включает применение различных групп препаратов. Приведенная ниже таблица отражает основные компоненты нашей терапии и их функции:
Разобраться лучше – вывод из запоя круглосуточно в екатеринбурге
Процесс лечения включает несколько ключевых этапов, каждый из которых имеет решающее значение для восстановления организма:
Подробнее тут – http://snyatie-lomki-novosibirsk8.ru
Эта информационная заметка предлагает лаконичное и четкое освещение актуальных вопросов. Здесь вы найдете ключевые факты и основную информацию по теме, которые помогут вам сформировать собственное мнение и повысить уровень осведомленности.
Выяснить больше – https://www.caficulturadepanama.org/choosing-a-home-coffee-machine
Этот интересный отчет представляет собой сборник полезных фактов, касающихся актуальных тем. Мы проанализируем данные, чтобы вы могли сделать обоснованные выводы. Читайте, чтобы узнать больше о последних трендах и значимых событиях!
Узнать больше – https://www.kraftochhalsa.se/presentation-av-mig-sjalv
В этой статье вы найдете познавательную и занимательную информацию, которая поможет вам лучше понять мир вокруг. Мы собрали интересные данные, которые вдохновляют на размышления и побуждают к действиям. Открывайте новую информацию и получайте удовольствие от чтения!
Изучить вопрос глубже – https://mariatorres.net/aside-post-format
cialis patent expiration 2016 TadalAccess cialis experience
В этом информативном обзоре собраны самые интересные статистические данные и факты, которые помогут лучше понять текущие тренды. Мы представим вам цифры и графики, которые иллюстрируют, как развиваются различные сферы жизни. Эта информация станет отличной основой для глубокого анализа и принятия обоснованных решений.
Разобраться лучше – https://galihwey.com/cropped-galicon2-png
Эта обзорная заметка содержит ключевые моменты и факты по актуальным вопросам. Она поможет читателям быстро ориентироваться в теме и узнать о самых важных аспектах сегодня. Получите краткий курс по современной информации и оставайтесь в курсе событий!
Подробнее тут – http://jib-co.ir/2012/08/this-is-a-post-with-post-type-link
Этот информативный материал предлагает содержательную информацию по множеству задач и вопросов. Мы призываем вас исследовать различные идеи и факты, обобщая их для более глубокого понимания. Наша цель — сделать обучение доступным и увлекательным.
Подробнее можно узнать тут – https://trialsnow.com/services/exquisite-belt-unlock-craft
Эта статья предлагает живое освещение актуальной темы с множеством интересных фактов. Мы рассмотрим ключевые моменты, которые делают данную тему важной и актуальной. Подготовьтесь к насыщенному путешествию по неизвестным аспектам и узнайте больше о значимых событиях.
Узнать больше – https://labrecipes.com/teriyaki-chicken-wings
Эта разъяснительная статья содержит простые и доступные разъяснения по актуальным вопросам. Мы стремимся сделать информацию понятной для широкой аудитории, чтобы каждый смог разобраться в предмете и извлечь из него максимум пользы.
Подробнее тут – http://caribeda.com/keppra-500-mg-cost
Hi, Neat post. There is an issue together with your site in web explorer, would check this? IE still is the market leader and a big component to people will omit your magnificent writing due to this problem.
Hmm is anyone else having problems with the images on this blog loading? I’m trying to find out if its a problem on my end or if it’s the blog. Any feedback would be greatly appreciated.
Я нашел в статье несколько полезных советов.
Автор представляет информацию, основанную на исследованиях и экспертных мнениях.
В этой публикации мы предлагаем подробные объяснения по актуальным вопросам, чтобы помочь читателям глубже понять их. Четкость и структурированность материала сделают его удобным для усвоения и применения в повседневной жизни.
Исследовать вопрос подробнее – https://www.milapetcentar.com/travel-adventure-mila-wien/imgp2597
Для обеспечения максимальной безопасности и эффективности лечения процесс организован в несколько этапов. При обращении пациента наши специалисты проводят первичный осмотр и диагностику, чтобы оценить степень интоксикации и выявить возможные осложнения. Далее назначается детоксикационная терапия, сопровождаемая медикаментозной поддержкой и психологическим консультированием. Основные этапы работы можно описать следующим образом:
Узнать больше – http://vyvod-iz-zapoya-ekb8.ru
Эта публикация завернет вас в вихрь увлекательного контента, сбрасывая стереотипы и открывая двери к новым идеям. Каждый абзац станет для вас открытием, полным ярких примеров и впечатляющих достижений. Подготовьтесь быть вовлеченными и удивленными каждый раз, когда продолжите читать.
Изучить вопрос глубже – http://www.miatech.online/bonjour-tout-le-monde
Этот интересный отчет представляет собой сборник полезных фактов, касающихся актуальных тем. Мы проанализируем данные, чтобы вы могли сделать обоснованные выводы. Читайте, чтобы узнать больше о последних трендах и значимых событиях!
Узнать больше – https://biznes.taxinonstop.pl/turkish-airlines-will-increase-the-number-of-flights-between-istanbul-and-barcelona
Эта познавательная публикация погружает вас в море интересного контента, который быстро захватит ваше внимание. Мы рассмотрим важные аспекты темы и предоставим вам уникальныеInsights и полезные сведения для дальнейшего изучения.
Разобраться лучше – https://raleighgold.com/be-prepared-for-major-correction-in-gold-price-in-the-coming-months-says-analyst
Эта информационная статья охватывает широкий спектр актуальных тем и вопросов. Мы стремимся осветить ключевые факты и события с ясностью и простотой, чтобы каждый читатель мог извлечь из нее полезные знания и полезные инсайты.
Подробнее тут – https://www.hotel-sugano.com/bbs/sugano.cgi/www.tovery.net/datasphere.ru/club/user/12/blog/2477/datasphere.ru/club/user/12/blog/2477/www.hip-hop.ru/forum/id298234-worksale/www.tovery.net/sugano.cgi?page10=val
whats cialis: TadalAccess – cheap cialis by post
Также мы учитываем потребности каждого пациента — по питанию, условиям проживания, графику процедур. Проживание возможно в стандартных и повышенных палатах, с возможностью индивидуального обслуживания.
Получить дополнительную информацию – круглосуточная наркологическая помощь в балашихе
Эта информационная статья охватывает широкий спектр актуальных тем и вопросов. Мы стремимся осветить ключевые факты и события с ясностью и простотой, чтобы каждый читатель мог извлечь из нее полезные знания и полезные инсайты.
Получить больше информации – https://speaser.com/blog-post-9
Как отмечает главный врач клиники, кандидат медицинских наук Сергей Иванов, «мы создали систему, при которой пациент получает помощь в течение часа — независимо от дня недели и времени суток. Это принципиально меняет шансы на выздоровление».
Исследовать вопрос подробнее – анонимная наркологическая помощь балашиха
Good site! I truly love how it is easy on my eyes and the data are well written. I am wondering how I could be notified when a new post has been made. I have subscribed to your feed which must do the trick! Have a great day!
Наши специалисты оказывают экстренную помощь по четко отработанной методике, главная задача которой – оперативное снятие симптомов острой интоксикации и абстинентного синдрома, восстановление работы внутренних органов и создание оптимальных условий для последующей реабилитации. Опытный нарколог на дому проведет тщательную диагностику, составит индивидуальный план лечения и даст необходимые рекомендации по дальнейшему выздоровлению.
Получить больше информации – вызвать нарколога на дом нижний новгород
Эта статья предлагает захватывающий и полезный контент, который привлечет внимание широкого круга читателей. Мы постараемся представить тебе идеи, которые вдохновят вас на изменения в жизни и предоставят практические решения для повседневных вопросов. Читайте и вдохновляйтесь!
Разобраться лучше – http://yohko.live/2014/02/13/pastries
Стационарная программа позволяет стабилизировать не только физическое состояние, но и эмоциональную сферу. Находясь в изоляции от внешних раздражителей и вредных контактов, пациент получает шанс сконцентрироваться на себе и начать реабилитацию без давления извне.
Детальнее – https://narkologicheskaya-pomoshch-balashiha1.ru/kruglosutochnaya-narkologicheskaya-pomoshch-v-balashihe/
Наши специалисты оказывают экстренную помощь по четко отработанной методике, главная задача которой – оперативное снятие симптомов острой интоксикации и абстинентного синдрома, восстановление работы внутренних органов и создание оптимальных условий для последующей реабилитации. Опытный нарколог на дому проведет тщательную диагностику, составит индивидуальный план лечения и даст необходимые рекомендации по дальнейшему выздоровлению.
Выяснить больше – http://narcolog-na-dom-nnovgorod8.ru/zapoj-narkolog-na-dom-v-nnovgorode/
Врачи клиники «Импульс» используют комплексный подход, основанный на проверенных методиках и эффективных препаратах. Основные группы медикаментов, используемых при лечении на дому, представлены в таблице:
Детальнее – нарколог на дом недорого
В этой публикации мы предлагаем подробные объяснения по актуальным вопросам, чтобы помочь читателям глубже понять их. Четкость и структурированность материала сделают его удобным для усвоения и применения в повседневной жизни.
Подробнее – https://www.yestertones.cz/cropped-dsc_8948-21-jpg
https://tadalaccess.com/# online cialis no prescription
Профессиональный сервисный центр по ремонту техники в Ярославле.
Мы предлагаем: Сколько стоит отремонтировать посудомоечную машину Bompani
Наши мастера оперативно устранят неисправности вашего устройства в сервисе или с выездом на дом!
Зависимость — это системная проблема, которая требует последовательного и профессионального подхода. Обычные попытки «вылечиться дома» без медицинского сопровождения нередко заканчиваются срывами, ухудшением состояния и психологической деградацией. Клиника «Здоровье Плюс» в Балашихе предоставляет пациентам не просто разовое вмешательство, а выстроенную поэтапную программу, основанную на опыте и медицинских стандартах.
Выяснить больше – narkologicheskaya-pomoshch-balashiha1.ru/
Клиника «НаркоМед Плюс» использует комплексный подход для эффективного снятия симптомов ломки с применением современных методов детоксикации и поддержки организма. Основные группы препаратов включают:
Получить больше информации – снятие ломки на дому цена
buy cialis 20mg: Tadal Access – walgreen cialis price
Врачи клиники «Импульс» используют комплексный подход, основанный на проверенных методиках и эффективных препаратах. Основные группы медикаментов, используемых при лечении на дому, представлены в таблице:
Получить больше информации – нарколог на дом анонимно в нижний новгороде
При обращении за экстренной помощью наш нарколог незамедлительно выезжает на дом или принимает пациента в клинике. Процесс лечения организован по проверенной схеме, позволяющей максимально быстро стабилизировать состояние и облегчить симптомы ломки. Основные этапы включают:
Исследовать вопрос подробнее – снятие ломки на дому недорого
Осложнения, к которым может привести отсутствие лечения:
Узнать больше – [url=https://snyatie-lomki-podolsk1.ru/]снятие ломок на дому[/url]
Группа препаратов
Получить дополнительные сведения – https://snyatie-lomki-nnovgorod8.ru/
Врачи клиники «Импульс» используют комплексный подход, основанный на проверенных методиках и эффективных препаратах. Основные группы медикаментов, используемых при лечении на дому, представлены в таблице:
Получить дополнительные сведения – narcolog-na-dom-nnovgorod8.ru/
A powerful share, I just given this onto a colleague who was doing a little analysis on this. And he in reality bought me breakfast because I found it for him.. smile. So let me reword that: Thnx for the treat! However yeah Thnkx for spending the time to debate this, I feel strongly about it and love studying more on this topic. If doable, as you turn out to be experience, would you thoughts updating your weblog with extra particulars? It’s highly useful for me. Huge thumb up for this weblog publish!
Как отмечает главный врач клиники, кандидат медицинских наук Сергей Иванов, «мы создали систему, при которой пациент получает помощь в течение часа — независимо от дня недели и времени суток. Это принципиально меняет шансы на выздоровление».
Ознакомиться с деталями – наркологическая помощь на дому московская область
Процесс лечения включает несколько ключевых этапов, каждый из которых имеет решающее значение для восстановления организма:
Выяснить больше – снятие ломки на дому цена новосибирск
Процесс лечения включает несколько ключевых этапов, каждый из которых имеет решающее значение для восстановления организма:
Получить дополнительную информацию – [url=https://snyatie-lomki-novosibirsk8.ru/]снятие ломок на дому в новосибирске[/url]
cialis company order cialis online cheap generic active ingredient in cialis
Процесс лечения включает несколько ключевых этапов, каждый из которых имеет решающее значение для восстановления организма:
Узнать больше – снять ломку
Процесс лечения включает несколько ключевых этапов, каждый из которых имеет решающее значение для восстановления организма:
Получить дополнительные сведения – https://snyatie-lomki-novosibirsk8.ru
tiktok ads account for sale https://tiktok-ads-account-buy.org
tiktok agency account for sale https://buy-tiktok-ads-account.org
buy facebook bm account https://buy-business-manager-accounts.org/
tadalafil dapoxetine tablets india: what are the side effects of cialis – where to buy cialis in canada
Наши специалисты оказывают экстренную помощь по четко отработанной методике, главная задача которой – оперативное снятие симптомов острой интоксикации и абстинентного синдрома, восстановление работы внутренних органов и создание оптимальных условий для последующей реабилитации. Опытный нарколог на дому проведет тщательную диагностику, составит индивидуальный план лечения и даст необходимые рекомендации по дальнейшему выздоровлению.
Детальнее – narkolog-na-dom-kruglosutochno nizhnij novgorod
Стационарная программа позволяет стабилизировать не только физическое состояние, но и эмоциональную сферу. Находясь в изоляции от внешних раздражителей и вредных контактов, пациент получает шанс сконцентрироваться на себе и начать реабилитацию без давления извне.
Получить дополнительные сведения – https://narkologicheskaya-pomoshch-balashiha1.ru/narkologicheskaya-pomoshch-na-domu-v-balashihe/
https://tadalaccess.com/# cialis for prostate
tadalafil best price 20 mg: cialis online without perscription – is tadalafil available in generic form
Наши специалисты оказывают экстренную помощь по четко отработанной методике, главная задача которой – оперативное снятие симптомов острой интоксикации и абстинентного синдрома, восстановление работы внутренних органов и создание оптимальных условий для последующей реабилитации. Опытный нарколог на дому проведет тщательную диагностику, составит индивидуальный план лечения и даст необходимые рекомендации по дальнейшему выздоровлению.
Подробнее тут – narkolog-na-dom-czena nizhnij novgorod
Я оцениваю четкую структуру статьи, которая делает ее легко читаемой и понятной.
Автор приводит примеры из различных источников, что позволяет получить более полное представление о теме. Статья является нейтральным и информативным ресурсом для тех, кто интересуется данной проблематикой.
Автор старается сохранить нейтральность, предоставляя обстоятельную основу для дальнейшего рассмотрения темы.
Автор предоставляет достаточно информации, чтобы читатель мог составить собственное мнение по данной теме.
Срочный вызов врача на дом необходим при появлении следующих симптомов:
Подробнее тут – нарколог на дом вывод из запоя нижний новгород
cialis milligrams Tadal Access cialis canada over the counter
cialis prescription assistance program: online cialis prescription – tadacip tadalafil
Также мы учитываем потребности каждого пациента — по питанию, условиям проживания, графику процедур. Проживание возможно в стандартных и повышенных палатах, с возможностью индивидуального обслуживания.
Углубиться в тему – http://narkologicheskaya-pomoshch-balashiha1.ru/narkologicheskaya-pomoshch-na-domu-v-balashihe/
On this site, explore an extensive selection virtual gambling platforms.
Whether you’re looking for traditional options latest releases, there’s a choice to suit all preferences.
The listed platforms fully reviewed to ensure security, allowing users to gamble securely.
1win
Moreover, the site unique promotions and deals targeted at first-timers as well as regulars.
Thanks to user-friendly browsing, locating a preferred platform happens in no time, saving you time.
Keep informed regarding new entries through regular check-ins, as fresh options appear consistently.
Зависимость — это системная проблема, которая требует последовательного и профессионального подхода. Обычные попытки «вылечиться дома» без медицинского сопровождения нередко заканчиваются срывами, ухудшением состояния и психологической деградацией. Клиника «Здоровье Плюс» в Балашихе предоставляет пациентам не просто разовое вмешательство, а выстроенную поэтапную программу, основанную на опыте и медицинских стандартах.
Детальнее – https://narkologicheskaya-pomoshch-balashiha1.ru/
https://tadalaccess.com/# cialis professional 20 lowest price
Thanks , I’ve just been looking for info about this topic for a while and yours is the greatest I have discovered till now. But, what about the conclusion? Are you positive about the supply?
buying cheap cialis online: TadalAccess – cialis 20 mg duration
Немедленный вызов врача необходим, если наблюдаются следующие симптомы:
Исследовать вопрос подробнее – http://snyatie-lomki-nnovgorod8.ru
Процесс лечения включает несколько ключевых этапов, каждый из которых имеет решающее значение для восстановления организма:
Получить больше информации – http://snyatie-lomki-novosibirsk8.ru/snyatie-lomki-na-domu-v-novosibirske/
Симптоматика ломки может варьироваться: от бессонницы, сильной тревожности и раздражительности до выраженных физически болезненных ощущений, таких как мышечные спазмы, судороги, потливость, головокружение и тошнота. В критических ситуациях, когда симптомы достигают остроты, своевременная медицинская помощь становится жизненно необходимой для предотвращения осложнений и стабилизации состояния пациента.
Получить дополнительную информацию – snyatie-lomki-novosibirsk8.ru/
Срочный вызов врача на дом необходим при появлении следующих симптомов:
Узнать больше – нарколог на дом анонимно нижний новгород
facebook bm for sale buy facebook verified business manager
Respect to op, some superb selective information.
Клиника «НаркоМед Плюс» использует комплексный подход для эффективного снятия симптомов ломки с применением современных методов детоксикации и поддержки организма. Основные группы препаратов включают:
Разобраться лучше – snyatie lomok nizhnij novgorod
Также мы учитываем потребности каждого пациента — по питанию, условиям проживания, графику процедур. Проживание возможно в стандартных и повышенных палатах, с возможностью индивидуального обслуживания.
Детальнее – наркологическая помощь балашиха
cialis vs flomax for bph compounded tadalafil troche life span cialis instructions
In this grand design of things you get a B- for effort. Exactly where you actually confused me was in all the particulars. You know, it is said, the devil is in the details… And it couldn’t be much more correct right here. Having said that, permit me reveal to you exactly what did work. Your article (parts of it) is extremely engaging and this is most likely the reason why I am making the effort in order to comment. I do not make it a regular habit of doing that. Second, whilst I can notice a jumps in reason you come up with, I am not really sure of exactly how you seem to unite your points which in turn help to make the conclusion. For now I shall yield to your issue however trust in the foreseeable future you actually link the facts better.
Функция
Получить дополнительную информацию – https://snyatie-lomki-nnovgorod8.ru/snyatie-narkoticheskoj-lomki-v-nnovgorode/
The Aviator Game merges air travel with big wins.
Jump into the cockpit and play through aerial challenges for sky-high prizes.
With its retro-inspired graphics, the game captures the spirit of early aviation.
download aviator game
Watch as the plane takes off – claim before it flies away to grab your rewards.
Featuring instant gameplay and immersive background music, it’s a must-try for gambling fans.
Whether you’re looking for fun, Aviator delivers non-stop excitement with every flight.
buy facebook bm facebook bm account buy
Задача врачей — не просто облегчить симптомы, а купировать осложнения, стабилизировать жизненно важные функции, вернуть пациенту способность к дальнейшему лечению. Мы работаем быстро, анонимно и профессионально. Любой человек, оказавшийся в кризисе, может получить помощь в течение часа после обращения.
Детальнее – снятие ломки наркомана в подольске
В клинике «Трезвая Жизнь» для эффективного вывода организма из запоя используется комплексный подход, который включает применение различных групп препаратов. Приведенная ниже таблица отражает основные компоненты нашей терапии и их функции:
Ознакомиться с деталями – http://vyvod-iz-zapoya-ekb8.ru/vyvod-iz-zapoya-na-domu-v-ekb/https://vyvod-iz-zapoya-ekb8.ru
После поступления звонка врач клиники «Импульс» незамедлительно отправляется на указанный адрес для оказания срочной помощи. Вызов врача на дом включает следующие этапы:
Детальнее – нарколог на дом
fb bussiness manager buy-business-manager-verified.org
buy business manager facebook https://business-manager-for-sale.org/
Необходимо незамедлительно обращаться за медицинской помощью, если у пациента наблюдаются следующие симптомы:
Углубиться в тему – снятие ломки в стационаре в новосибирске
Процесс лечения включает несколько ключевых этапов, каждый из которых имеет решающее значение для восстановления организма:
Подробнее тут – ломка от наркотиков в новосибирске
Группа препаратов
Получить дополнительную информацию – ломка от наркотиков
Симптоматика ломки может варьироваться: от бессонницы, сильной тревожности и раздражительности до выраженных физически болезненных ощущений, таких как мышечные спазмы, судороги, потливость, головокружение и тошнота. В критических ситуациях, когда симптомы достигают остроты, своевременная медицинская помощь становится жизненно необходимой для предотвращения осложнений и стабилизации состояния пациента.
Подробнее можно узнать тут – снятие ломки
cialis dapoxetine australia: canadian cialis no prescription – can you drink alcohol with cialis
Клиника «НаркоМед Плюс» использует комплексный подход для эффективного снятия симптомов ломки с применением современных методов детоксикации и поддержки организма. Основные группы препаратов включают:
Изучить вопрос глубже – снятие ломки наркомана нижний новгород
После поступления звонка врач клиники «Импульс» незамедлительно отправляется на указанный адрес для оказания срочной помощи. Вызов врача на дом включает следующие этапы:
Углубиться в тему – нарколог на дом в нижний новгороде
Процесс лечения включает несколько ключевых этапов, каждый из которых имеет решающее значение для восстановления организма:
Изучить вопрос глубже – https://snyatie-lomki-novosibirsk8.ru/snyatie-narkoticheskoj-lomki-v-novosibirske
can you drink alcohol with cialis: cialis canada pharmacy no prescription required – cialis sublingual
Именно поэтому так важно не терять время. Чем раньше пациент получает помощь, тем выше шансы избежать необратимых последствий и вернуться к нормальной жизни.
Исследовать вопрос подробнее – снятие наркологической ломки
https://tadalaccess.com/# vidalista 20 tadalafil tablets
Зависимость — это системная проблема, которая требует последовательного и профессионального подхода. Обычные попытки «вылечиться дома» без медицинского сопровождения нередко заканчиваются срывами, ухудшением состояния и психологической деградацией. Клиника «Здоровье Плюс» в Балашихе предоставляет пациентам не просто разовое вмешательство, а выстроенную поэтапную программу, основанную на опыте и медицинских стандартах.
Подробнее можно узнать тут – https://narkologicheskaya-pomoshch-balashiha1.ru/skoraya-narkologicheskaya-pomoshch-v-balashihe
Также мы учитываем потребности каждого пациента — по питанию, условиям проживания, графику процедур. Проживание возможно в стандартных и повышенных палатах, с возможностью индивидуального обслуживания.
Изучить вопрос глубже – круглосуточная наркологическая помощь балашиха
Наркологическая клиника «Эдельвейс» в Екатеринбурге специализируется на оказании оперативной и квалифицированной помощи при снятии ломки. Наши специалисты обладают многолетним опытом работы и применяют современные методики для безопасного и эффективного лечения абстинентного синдрома. Мы работаем круглосуточно, что позволяет оказывать помощь в любое время суток, обеспечивая анонимность и конфиденциальность каждого пациента.
Получить дополнительные сведения – снятие наркотической ломки
В этой статье вы найдете познавательную и занимательную информацию, которая поможет вам лучше понять мир вокруг. Мы собрали интересные данные, которые вдохновляют на размышления и побуждают к действиям. Открывайте новую информацию и получайте удовольствие от чтения!
Разобраться лучше – https://optimacorporate.com/portfolio/portfolio-item-without-intro-with-sidebar
Функция
Исследовать вопрос подробнее – снятие ломки наркозависимого в нижний новгороде
Ломка – это тяжелый синдром отмены, возникающий после длительного употребления алкоголя или наркотических веществ. При резком прекращении их приема нервная система и другие органы начинают страдать от недостатка необходимых веществ, что приводит к сильному дискомфорту, психоэмоциональным нарушениям и ухудшению общего состояния организма. В Новосибирске наркологическая клиника «Возрождение» оказывает экстренную помощь при снятии ломки, обеспечивая безопасное, круглосуточное и конфиденциальное лечение под наблюдением опытных специалистов.
Подробнее – снятие наркотической ломки в новосибирске
После обращения в клинику «Основа» наш специалист незамедлительно выезжает для оказания экстренной медицинской помощи в Новосибирске. Процесс установки капельницы предусматривает комплексную диагностику и последующее детоксикационное лечение, что позволяет снизить токсическую нагрузку и стабилизировать состояние пациента. Описание процедуры включает следующие этапы:
Получить дополнительные сведения – врач на дом капельница от запоя в новосибирске
Процесс лечения включает несколько ключевых этапов, каждый из которых имеет решающее значение для восстановления организма:
Исследовать вопрос подробнее – снятие ломки в стационаре новосибирск
После поступления звонка врач клиники «Импульс» незамедлительно отправляется на указанный адрес для оказания срочной помощи. Вызов врача на дом включает следующие этапы:
Ознакомиться с деталями – вызов врача нарколога на дом
Эта информационная заметка предлагает лаконичное и четкое освещение актуальных вопросов. Здесь вы найдете ключевые факты и основную информацию по теме, которые помогут вам сформировать собственное мнение и повысить уровень осведомленности.
Получить больше информации – https://frentedostorcedores.com.br/2022/07/onde-assistir-tigre-x-talleres-cordoba-ao-vivo-argentino-liga-profissional-sabado-02-07-palpites
Can I just say what a relief to find someone who actually knows what theyre talking about on the internet. You definitely know how to bring an issue to light and make it important. More people need to read this and understand this side of the story. I cant believe youre not more popular because you definitely have the gift.
В этой публикации мы предлагаем подробные объяснения по актуальным вопросам, чтобы помочь читателям глубже понять их. Четкость и структурированность материала сделают его удобным для усвоения и применения в повседневной жизни.
Исследовать вопрос подробнее – https://fernandabellicieri.com/hook-and-roll
generic cialis what happens when you mix cialis with grapefruit? cialis pricing
Hi there just wanted to give you a quick heads up. The words in your content seem to be running off the screen in Chrome. I’m not sure if this is a formatting issue or something to do with internet browser compatibility but I figured I’d post to let you know. The design look great though! Hope you get the issue solved soon. Cheers
cheapest 10mg cialis: Tadal Access – buy cialis shipment to russia
purchasing cialis online: buy generic cialiss – cialis 5mg daily
https://tadalaccess.com/# buy cialis pro
buy cheap tadalafil online: pictures of cialis pills – when to take cialis for best results
trusted online store to buy cialis: reliable source cialis – cialis generic overnite shipping
https://tadalaccess.com/# cialis dapoxetine
Excellent read, I just passed this onto a friend who was doing a little research on that. And he actually bought me lunch because I found it for him smile Thus let me rephrase that: Thanks for lunch!
buy business manager facebook https://buy-verified-business-manager.org
buy facebook bm https://buy-verified-business-manager-account.org
Hi, i read your blog from time to time and i own a similar one and i was just curious if you get a lot of spam comments? If so how do you stop it, any plugin or anything you can recommend? I get so much lately it’s driving me crazy so any help is very much appreciated.
My brother recommended I might like this blog. He was totally right. This post truly made my day. You cann’t imagine just how much time I had spent for this info! Thanks!
It’s hard to find knowledgeable people on this topic, but you sound like you know what you’re talking about! Thanks
where to get free samples of cialis Tadal Access what is tadalafil made from
cialis cheap: where to get free samples of cialis – cialis as generic
Статья содержит обоснованные аргументы, которые вызывают дальнейшую рефлексию у читателя.
Hi there! This is my first visit to your blog! We are a collection of volunteers and starting a new initiative in a community in the same niche. Your blog provided us useful information to work on. You have done a marvellous job!
Статья содержит полезную информацию, которая может быть полезной для практического применения.
Having read this I thought it was extremely enlightening. I appreciate you taking the time and effort to put this article together. I once again find myself personally spending a significant amount of time both reading and commenting. But so what, it was still worthwhile!
https://tadalaccess.com/# cialis experience
Glad to be one of many visitants on this awesome internet site : D.
cialis 20mg price: Tadal Access – cialis 5mg daily
facebook verified business manager for sale buy-bm-account.org
This is a topic close to my heart cheers, where are your contact details though?
buy fb bm buy business manager
cialis generic overnite: u.s. pharmacy prices for cialis – buy voucher for cialis daily online
tadalafil versus cialis buying cialis online black cialis
https://tadalaccess.com/# what is cialis tadalafil used for
take cialis the correct way: cialis dopoxetine – cialis paypal
I think you have noted some very interesting details , regards for the post.
Thank you for sharing excellent informations. Your website is so cool. I am impressed by the details that you’ve on this site. It reveals how nicely you perceive this subject. Bookmarked this website page, will come back for extra articles. You, my friend, ROCK! I found simply the information I already searched all over the place and simply could not come across. What a perfect web site.
这个网站 提供 丰富的 成人材料,满足 各类人群 的 需求。
无论您喜欢 哪种类型 的 影片,这里都 一应俱全。
所有 材料 都经过 精心筛选,确保 高品质 的 观看体验。
性别
我们支持 多种设备 访问,包括 平板,随时随地 畅享内容。
加入我们,探索 激情时刻 的 成人世界。
palpite+do+dia+kaledri
where can i buy cialis on line: cialis generic best price that accepts mastercard – free samples of cialis
https://tadalaccess.com/# cialis with dapoxetine 60mg
https://aureonfm.de/emblems/aloh.php?candi=355bet
difference between sildenafil tadalafil and vardenafil canadian online pharmacy no prescription cialis dapoxetine how to buy tadalafil
buy cialis canadian: cialis 5mg side effects – cialis online usa
Thanks , I have just been searching for information about this subject for ages and yours is the greatest I’ve discovered so far. But, what about the bottom line? Are you sure about the source?
cialis and blood pressure: TadalAccess – cialis insurance coverage blue cross
I think this site contains some rattling excellent information for everyone. “The expert at anything was once a beginner.” by Hayes.
https://tadalaccess.com/# cialis trial
buy aged google ads accounts buy aged google ads accounts
buy google agency account https://buy-verified-ads-account.work
buy verified facebook buy-business-manager.org
cialis before and after photos Tadal Access buy cialis usa
cheap cialis free shipping: cialis reviews – tadalafil no prescription forum
本站 提供 多样的 成人材料,满足 成年访客 的 喜好。
无论您喜欢 哪一类 的 影片,这里都 一应俱全。
所有 材料 都经过 严格审核,确保 高质量 的 观看体验。
色情
我们支持 各种终端 访问,包括 电脑,随时随地 尽情观看。
加入我们,探索 激情时刻 的 成人世界。
order generic cialis online: TadalAccess – how to buy tadalafil
Good day! Do you know if they make any plugins to assist with Search Engine Optimization? I’m trying to get my blog to rank for some targeted keywords but I’m not seeing very good success. If you know of any please share. Kudos!
https://tadalaccess.com/# tadalafil 20mg canada
take cialis the correct way Tadal Access pastilla cialis
cialis logo: TadalAccess – buying cialis online
Hello! Would you mind if I share your blog with my twitter group? There’s a lot of folks that I think would really enjoy your content. Please let me know. Thank you
Я впечатлен этой статьей! Она не только информативна, но и вдохновляющая. Мне понравился подход автора к обсуждению темы, и я узнал много нового. Огромное спасибо за такую интересную и полезную статью!
Эта статья – настоящий кладезь информации! Я оцениваю ее полноту и разнообразие представленных фактов. Автор сделал тщательное исследование и предоставил нам ценный ресурс для изучения темы. Большое спасибо за такое ценное содержание!
Статья предлагает конкретные примеры, чтобы проиллюстрировать свои аргументы.
F*ckin¦ tremendous things here. I¦m very happy to see your post. Thanks a lot and i am looking ahead to contact you. Will you kindly drop me a mail?
Have you ever thought about including a little bit more than just your articles? I mean, what you say is important and everything. But think about if you added some great images or videos to give your posts more, “pop”! Your content is excellent but with pics and video clips, this website could undeniably be one of the best in its field. Fantastic blog!
how much is cialis without insurance: Tadal Access – cialis canada online
Great write-up, I¦m normal visitor of one¦s website, maintain up the nice operate, and It’s going to be a regular visitor for a lengthy time.
https://tadalaccess.com/# where can i buy cialis
buy aged google ads account https://sell-ads-account.click/
This flight-themed slot merges air travel with high stakes.
Jump into the cockpit and play through turbulent skies for sky-high prizes.
With its retro-inspired design, the game evokes the spirit of aircraft legends.
https://www.linkedin.com/posts/robin-kh-150138202_aviator-game-download-activity-7295792143506321408-81HD/
Watch as the plane takes off – cash out before it vanishes to secure your rewards.
Featuring smooth gameplay and realistic background music, it’s a top choice for casual players.
Whether you’re testing luck, Aviator delivers uninterrupted action with every round.
buy aged google ads account buy google ads accounts
Whats up very nice blog!! Man .. Beautiful .. Wonderful .. I will bookmark your web site and take the feeds additionally…I’m satisfied to find a lot of helpful information right here within the publish, we’d like work out more strategies in this regard, thanks for sharing. . . . . .
cialis not working TadalAccess buy cialis with american express
buy google ads https://buy-account-ads.work/
google ads reseller https://buy-ads-invoice-account.top
cialis after prostate surgery: tadalafil tamsulosin combination – walgreen cialis price
This website, you can find lots of online slots from leading developers.
Visitors can enjoy traditional machines as well as modern video slots with high-quality visuals and interactive gameplay.
Even if you’re new or a casino enthusiast, there’s always a slot to match your mood.
online games
The games are instantly accessible round the clock and designed for laptops and tablets alike.
All games run in your browser, so you can jump into the action right away.
The interface is user-friendly, making it convenient to browse the collection.
Sign up today, and enjoy the world of online slots!
I’m not sure where you’re getting your info, but good topic. I needs to spend some time learning more or understanding more. Thanks for magnificent info I was looking for this information for my mission.
cialis price per pill: TadalAccess – tadalafil vs sildenafil
https://tadalaccess.com/# wallmart cialis
I think this site contains some really fantastic info for everyone : D.
Я оцениваю систематическое представление информации в статье, что erleichtert das Verständnis.
Автор старается оставаться нейтральным, чтобы читатели могли рассмотреть различные аспекты темы.
First off I would like to say fantastic blog! I had a quick question in which I’d like to ask if you don’t mind. I was curious to find out how you center yourself and clear your head prior to writing. I have had a hard time clearing my mind in getting my ideas out. I truly do take pleasure in writing but it just seems like the first 10 to 15 minutes are generally wasted simply just trying to figure out how to begin. Any suggestions or tips? Kudos!
This is a very good tip particularly to those fresh to the blogosphere. Brief but very precise information… Appreciate your sharing this one. A must read article!
cialis tadalafil cheapest online overnight cialis delivery usa cialis back pain
cialis online reviews: tadalafil oral jelly – cialis generic best price
Thank you for any other magnificent article. The place else may anybody get that kind of information in such an ideal manner of writing? I’ve a presentation subsequent week, and I’m on the search for such information.
Hi , I do believe this is an excellent blog. I stumbled upon it on Yahoo , i will come back once again. Money and freedom is the best way to change, may you be rich and help other people.
Enjoyed studying this, very good stuff, thanks.
tadalafil 20mg (generic equivalent to cialis): TadalAccess – cialis dapoxetine
https://tadalaccess.com/# does cialis shrink the prostate
buy adwords account buy google ads verified account
buy google adwords accounts https://ads-account-for-sale.top
Very wonderful visual appeal on this internet site, I’d rate it 10 10.
vigra vs cialis Tadal Access best place to buy tadalafil online
order generic cialis online: buy tadalafil reddit – originalcialis
tadalafil (tadalis-ajanta): TadalAccess – cialis for women
The next time I read a blog, I hope that it doesnt disappoint me as much as this one. I mean, I know it was my choice to read, but I actually thought youd have something interesting to say. All I hear is a bunch of whining about something that you could fix if you werent too busy looking for attention.
https://tadalaccess.com/# canada drug cialis
Thanks for helping out, wonderful info. “If at first you don’t succeed, find out if the loser gets anything.” by Bill Lyon.
Most of whatever you state happens to be astonishingly appropriate and it makes me wonder why I hadn’t looked at this in this light previously. This piece truly did switch the light on for me personally as far as this specific issue goes. Nonetheless at this time there is actually 1 factor I am not too comfy with so whilst I make an effort to reconcile that with the central idea of your position, allow me see just what the rest of the subscribers have to say.Very well done.
I have read a few good stuff here. Definitely value bookmarking for revisiting. I surprise how a lot effort you put to create this kind of wonderful informative website.
The very core of your writing while sounding reasonable in the beginning, did not really settle well with me after some time. Someplace throughout the paragraphs you were able to make me a believer but only for a short while. I nevertheless have a problem with your leaps in logic and one would do nicely to fill in those gaps. If you actually can accomplish that, I could certainly be fascinated.
canadian pharmacy generic cialis TadalAccess cialis when to take
cialis shelf life: cialis 20 mg price walmart – cialis no perscrtion
cialis online delivery overnight: does cialis really work – cialis generic cvs
https://tadalaccess.com/# cialis results
buy aged fb account buy-accounts.click
google ads account seller adwords account for sale
Hi my friend! I want to say that this post is amazing, nice written and include almost all vital infos. I’d like to see more posts like this.
buy aged google ads account https://buy-ads-account.top
facebook ads accounts buying fb accounts
I have been exploring for a bit for any high-quality articles or weblog posts in this sort of house . Exploring in Yahoo I eventually stumbled upon this site. Studying this information So i am glad to express that I’ve an incredibly good uncanny feeling I discovered exactly what I needed. I such a lot without a doubt will make sure to do not fail to remember this website and provides it a look on a relentless basis.
cialis generic cvs: Tadal Access – cialis from mexico
cialis for ed cialis for women cialis manufacturer coupon lilly
difference between cialis and tadalafil: cialis no perscrtion – best price on generic cialis
https://tadalaccess.com/# can tadalafil cure erectile dysfunction
As soon as I observed this internet site I went on reddit to share some of the love with them.
bph treatment cialis: buy cialis online free shipping – when to take cialis 20mg
best place to buy generic cialis online TadalAccess cialis stopped working
Hey there just wanted to give you a quick heads up. The text in your post seem to be running off the screen in Chrome. I’m not sure if this is a formatting issue or something to do with web browser compatibility but I figured I’d post to let you know. The design and style look great though! Hope you get the problem resolved soon. Many thanks
https://tadalaccess.com/# cialis what is it
cialis and nitrates: cialis for bph reviews – is there a generic cialis available?
Эта статья предлагает захватывающий и полезный контент, который привлечет внимание широкого круга читателей. Мы постараемся представить тебе идеи, которые вдохновят вас на изменения в жизни и предоставят практические решения для повседневных вопросов. Читайте и вдохновляйтесь!
Изучить вопрос глубже – https://medalkoblog.ru/
Hiya, I’m really glad I’ve found this info. Today bloggers publish only about gossips and web and this is really irritating. A good site with exciting content, this is what I need. Thank you for keeping this web site, I’ll be visiting it. Do you do newsletters? Cant find it.
buy cialis online overnight shipping: TadalAccess – cialis black
The other day, while I was at work, my sister stole my iPad and tested to see if it can survive a 40 foot drop, just so she can be a youtube sensation. My apple ipad is now broken and she has 83 views. I know this is totally off topic but I had to share it with someone!
Я не могу не отметить качество исследования, представленного в этой статье. Она обогатила мои знания и вдохновила меня на дальнейшее изучение темы. Благодарю автора за его ценный вклад!
Я прочитал эту статью с большим удовольствием! Автор умело смешал факты и личные наблюдения, что придало ей уникальный характер. Я узнал много интересного и наслаждался каждым абзацем. Браво!
I know this if off topic but I’m looking into starting my own weblog and was wondering what all is required to get set up? I’m assuming having a blog like yours would cost a pretty penny? I’m not very internet smart so I’m not 100 positive. Any recommendations or advice would be greatly appreciated. Appreciate it
https://tadalaccess.com/# cialis reddit
cialis over the counter in spain does tadalafil work active ingredient in cialis
I got good info from your blog
how much is cialis without insurance: TadalAccess – what is the difference between cialis and tadalafil
facebook ad accounts for sale cheap facebook account
Very interesting subject , appreciate it for putting up.
cialis for daily use side effects: how long does cialis stay in your system – tadalafil canada is it safe
Good day! This is kind of off topic but I need some advice from an established blog. Is it hard to set up your own blog? I’m not very techincal but I can figure things out pretty quick. I’m thinking about setting up my own but I’m not sure where to begin. Do you have any ideas or suggestions? Appreciate it
https://tadalaccess.com/# how long i have to wait to take tadalafil after antifugal
cialis vs.levitra TadalAccess tadalafil 40 mg india
cialis online no prescription: Tadal Access – buy tadalafil cheap
Here, you can discover a variety of online casinos.
Interested in well-known titles or modern slots, there’s a choice to suit all preferences.
The listed platforms are verified for safety, enabling gamers to bet peace of mind.
vavada
Additionally, this resource provides special rewards along with offers for new players and loyal customers.
Thanks to user-friendly browsing, discovering a suitable site is quick and effortless, enhancing your experience.
Be in the know on recent updates with frequent visits, as fresh options are added regularly.
buy facebook advertising accounts buy facebook ad account
facebook account buy https://buy-ads-account.work
cheap facebook accounts https://ad-account-buy.top
what is the normal dose of cialis: TadalAccess – cialis cheap
I would like to show thanks to the writer just for rescuing me from this type of matter. Just after looking throughout the world-wide-web and finding opinions which are not powerful, I was thinking my entire life was over. Existing minus the strategies to the issues you have fixed through this post is a critical case, and the kind which could have in a wrong way affected my career if I had not come across your blog post. Your actual talents and kindness in controlling every aspect was valuable. I’m not sure what I would have done if I had not come upon such a solution like this. I’m able to at this point look forward to my future. Thanks so much for this professional and results-oriented guide. I will not think twice to propose the website to any person who desires recommendations on this area.
Everything is very open and very clear explanation of issues. was truly information. Your website is very useful. Thanks for sharing.
https://tadalaccess.com/# what is the generic name for cialis
Thanks for your marvelous posting! I really enjoyed reading it, you will be a great author.I will make certain to bookmark your blog and will come back in the future. I want to encourage you to definitely continue your great writing, have a nice afternoon!
cialis buy online canada side effects cialis how much does cialis cost at walgreens
can you drink alcohol with cialis: Tadal Access – cialis online without pres
You must take part in a contest for probably the greatest blogs on the web. I will advocate this site!
https://suamaybom.com/aloh.php?candi=bet+gusttavo+lima
what is cialis for: Tadal Access – cialis professional ingredients
Your article helped me a lot, is there any more related content? Thanks!
This is a very good tips especially to those new to blogosphere, brief and accurate information… Thanks for sharing this one. A must read article.
https://tadalaccess.com/# order cialis online
I like this weblog so much, saved to fav.
how to buy cialis what cialis tadalafil review
generic tadalafil tablet or pill photo or shape: TadalAccess – overnight cialis
Hello there I am so excited I found your website, I really found you by accident, while I was looking on Bing for something else, Anyways I am here now and would just like to say thank you for a tremendous post and a all round interesting blog (I also love the theme/design), I don’t have time to go through it all at the minute but I have bookmarked it and also added your RSS feeds, so when I have time I will be back to read a great deal more, Please do keep up the superb job.
cialis coupon walgreens: Tadal Access – shop for cialis
Thanks for the auspicious writeup. It in truth used to be a entertainment account it. Look complicated to more introduced agreeable from you! However, how could we communicate?
https://tadalaccess.com/# buy cialis generic online 10 mg
buy facebook advertising buy facebook old accounts
cialis erection TadalAccess tadalafil 40 mg with dapoxetine 60 mg
originalcialis: Tadal Access – cialis coupon walgreens
snorting cialis: buy cialis shipment to russia – online cialis no prescription
fb account for sale buy fb ad account
buy facebook old accounts https://buy-ad-accounts.click
fb account for sale buy facebook account for ads
Just wish to say your article is as astonishing. The clearness on your post is simply excellent and that i could assume you are a professional in this subject. Fine together with your permission allow me to take hold of your RSS feed to stay updated with approaching post. Thank you one million and please continue the enjoyable work.
https://tadalaccess.com/# cialis as generic
I really like your writing style, good information, regards for posting : D.
Статья хорошо структурирована, что облегчает чтение и понимание.
Greetings! I know this is kinda off topic however I’d figured I’d ask. Would you be interested in trading links or maybe guest authoring a blog article or vice-versa? My site addresses a lot of the same subjects as yours and I believe we could greatly benefit from each other. If you happen to be interested feel free to send me an e-mail. I look forward to hearing from you! Wonderful blog by the way!
Эта статья оказалась исключительно информативной и понятной. Автор представил сложные концепции и теории в простой и доступной форме. Я нашел ее очень полезной и вдохновляющей!
Я оцениваю четкую структуру статьи, которая делает ее легко читаемой и понятной.
whoah this blog is magnificent i love reading your articles. Keep up the good work! You know, many people are looking around for this info, you could help them greatly.
cialis pills online: TadalAccess – how long does cialis last 20 mg
cipla tadalafil review: Tadal Access – does cialis lowers blood pressure
cialis not working TadalAccess tadalafil generic 20 mg ebay
https://tadalaccess.com/# cialis for pulmonary hypertension
I’ve read a few good stuff here. Certainly worth bookmarking for revisiting. I surprise how much effort you put to create such a great informative site.
cialis dapoxetine europe: Tadal Access – cialis daily vs regular cialis
Thank you for any other informative blog. Where else may just I am getting that kind of info written in such an ideal manner? I’ve a project that I am just now running on, and I’ve been at the glance out for such info.
I like this post, enjoyed this one thanks for putting up. “Good communication is as stimulating as black coffee and just as hard to sleep after.” by Anne Morrow Lindbergh.
cipla tadalafil review: cialis generic versus brand name – tadalafil cheapest price
where can i buy tadalafil online TadalAccess price of cialis in pakistan
https://tadalaccess.com/# cialis copay card
Have you ever thought about adding a little bit more than just your articles?
I mean, what you say is valuable and everything. However think
about if you added some great graphics or video clips to give your posts more, “pop”!
Your content is excellent but with images and videos, this site could definitely be
one of the best in its niche. Excellent blog!
Here is my site; why not try here
I am not sure where you’re getting your information, but good topic. I needs to spend some time learning much more or understanding more. Thanks for excellent info I was looking for this info for my mission.
cialis high blood pressure: TadalAccess – best place to buy generic cialis online
cialis uses: cialis dosage for ed – how long does cialis take to work 10mg
cialis used for cialis 30 day free trial cialis 20mg price
https://tadalaccess.com/# cialis onset
I really enjoy examining on this internet site, it holds wonderful content. “Never fight an inanimate object.” by P. J. O’Rourke.
Excellent article. Keep writing such kind of info on your site.
Im really impressed by your site.
Hello there, You have done an excellent job. I will certainly digg it and
for my part recommend to my friends. I’m sure they will be benefited from this web site.
Also visit my webpage weblink
It is perfect time to make a few plans for the future and it is time to be happy. I have read this put up and if I may just I want to suggest you few interesting issues or suggestions. Perhaps you could write subsequent articles regarding this article. I wish to learn even more issues approximately it!
cialis online no prior prescription: TadalAccess – over the counter cialis walgreens
There is noticeably a bundle to know about this. I assume you made certain nice points in features also.
cialis prices in mexico: original cialis online – generic cialis 5mg
Enjoyed examining this, very good stuff, thanks. “Hereafter, in a better world than this, I shall desire more love and knowledge of you.” by William Shakespeare.
cialis tadalafil online paypal Tadal Access whats the max safe dose of tadalafil xtenda for a healthy man
https://tadalaccess.com/# tadalafil generic 20 mg ebay
Great post, I believe website owners should learn a lot from this weblog its really user pleasant.
buy tadalafil no prescription: TadalAccess – special sales on cialis
cheap cialis for sale: Tadal Access – vardenafil and tadalafil
Hiya! Quick question that’s entirely off topic. Do you know how to make your site mobile friendly? My weblog looks weird when viewing from my iphone. I’m trying to find a theme or plugin that might be able to correct this issue. If you have any suggestions, please share. Thank you!
https://tadalaccess.com/# side effects of cialis
snorting cialis cialis black in australia buy cialis 20 mg online
I like the efforts you have put in this, appreciate it for all the great articles.
cialis online no prescription australia: TadalAccess – cialis voucher
I’ve learn a few excellent stuff here. Definitely worth bookmarking for revisiting. I wonder how a lot effort you place to create such a fantastic informative web site.
On this platform, you can discover lots of casino slots from top providers.
Users can try out retro-style games as well as new-generation slots with vivid animation and exciting features.
Even if you’re new or a casino enthusiast, there’s something for everyone.
no depisit bonus
The games are instantly accessible 24/7 and compatible with laptops and tablets alike.
You don’t need to install anything, so you can start playing instantly.
Site navigation is user-friendly, making it convenient to explore new games.
Sign up today, and dive into the thrill of casino games!
what is cialis tadalafil used for: buying cialis online safely – cialis experience
https://tadalaccess.com/# cialis black 800 to buy in the uk one pill
cialis company tadalafil hong kong originalcialis
Great – I should definitely pronounce, impressed with your site. I had no trouble navigating through all the tabs as well as related info ended up being truly easy to do to access. I recently found what I hoped for before you know it at all. Quite unusual. Is likely to appreciate it for those who add forums or anything, website theme . a tones way for your customer to communicate. Nice task.
В данной платформе вы можете найти видеообщение в реальном времени.
Вы хотите непринужденные разговоры переговоры, здесь есть варианты для всех.
Модуль общения разработана чтобы объединить пользователей со всего мира.
секс чат рулетка пары
С высококачественным видео и превосходным звуком, вся беседа становится увлекательным.
Подключиться к публичным комнатам инициировать приватный разговор, опираясь на того, что вам нужно.
Все, что требуется — надежная сеть и любое поддерживаемое устройство, и можно общаться.
You have brought up a very great points, appreciate it for the post.
amoxicillin in india: order amoxicillin online uk – where can you buy amoxicillin over the counter
Unquestionably believe that which you stated. Your favorite reason seemed to be on the internet the easiest thing to be aware of. I say to you, I definitely get annoyed while people consider worries that they plainly do not know about. You managed to hit the nail upon the top as well as defined out the whole thing without having side-effects , people could take a signal. Will probably be back to get more. Thanks
биржа аккаунтов kupit-akkaunt.online
https://prednihealth.shop/# prednisone price australia
can i purchase cheap clomid prices how to get clomid without insurance cost generic clomid without a prescription
amoxicillin tablet 500mg: Amo Health Care – Amo Health Care
My brother suggested I might like this web site. He was entirely right. This post actually made my day. You cann’t imagine simply how much time I had spent for this information! Thanks!
An attention-grabbing dialogue is worth comment. I feel that you need to write extra on this subject, it won’t be a taboo subject however generally people are not sufficient to talk on such topics. To the next. Cheers
Hello there, just turned into aware of your weblog through Google, and found that it’s really informative. I am gonna watch out for brussels. I will appreciate in case you proceed this in future. A lot of folks shall be benefited from your writing. Cheers!
PredniHealth: how much is prednisone 5mg – prednisone rx coupon
Thanks for the update, is there any way I can receive an email sent to me whenever you make a fresh post?
http://prednihealth.com/# average cost of generic prednisone
where to buy generic clomid Clom Health how to buy generic clomid
buying cheap clomid: can i purchase clomid without insurance – cost generic clomid for sale
I regard something truly special in this internet site.
продажа аккаунтов https://akkaunty-dlya-prodazhi.pro/
биржа аккаунтов https://online-akkaunty-magazin.xyz/
can i buy generic clomid without a prescription: Clom Health – how to buy clomid for sale
маркетплейс аккаунтов https://akkaunty-optom.live/
I like what you guys are up too. Such intelligent work and reporting! Carry on the superb works guys I’ve incorporated you guys to my blogroll. I think it will improve the value of my web site 🙂
http://clomhealth.com/# how can i get cheap clomid
where to buy generic clomid without prescription generic clomid for sale buying cheap clomid without insurance
how to get clomid without a prescription: can you get generic clomid – how to get generic clomid pill
Some genuinely interesting details you have written.Aided me a lot, just what I was looking for : D.
Amo Health Care: Amo Health Care – buy cheap amoxicillin online
On this site, find an extensive selection internet-based casino sites.
Whether you’re looking for traditional options latest releases, there’s something for every player.
The listed platforms are verified for safety, so you can play securely.
casino
What’s more, this resource offers exclusive bonuses along with offers targeted at first-timers and loyal customers.
With easy navigation, locating a preferred platform takes just moments, enhancing your experience.
Stay updated regarding new entries by visiting frequently, since new casinos are added regularly.
Fantastic beat ! I wish to apprentice while you amend your web site, how could i subscribe for a blog site? The account helped me a acceptable deal. I had been tiny bit acquainted of this your broadcast provided bright clear concept
https://amohealthcare.store/# Amo Health Care
Amo Health Care: Amo Health Care – Amo Health Care
Why users still use to read news papers when in this technological globe all is accessible on web?
Heya i am for the first time here. I found this board and I find It really useful & it helped me out a lot. I hope to give something back and aid others like you helped me.
You are so cool! I do not believe I’ve read through anything like that before. So good to find somebody with genuine thoughts on this issue. Seriously.. thanks for starting this up. This web site is one thing that’s needed on the web, someone with some originality!
Автор предоставляет анализ последствий проблемы и возможных путей ее решения.
amoxicillin where to get order amoxicillin online no prescription amoxicillin buy online canada
I?¦ve been exploring for a bit for any high-quality articles or weblog posts on this sort of house . Exploring in Yahoo I finally stumbled upon this web site. Studying this info So i?¦m happy to convey that I have a very excellent uncanny feeling I discovered just what I needed. I most definitely will make certain to don?¦t overlook this site and provides it a look on a continuing basis.
buy prednisone 1 mg mexico: prednisone drug costs – prednisone 10mg cost
Everything is very open and very clear explanation of issues. was truly information. Your website is very useful. Thanks for sharing.
prednisone 20mg price: PredniHealth – PredniHealth
http://clomhealth.com/# cost clomid no prescription
prednisone 50 mg for sale: buy prednisone from india – PredniHealth
where to buy clomid without prescription: can you get clomid without a prescription – order clomid without rx
prednisone without prescription.net PredniHealth PredniHealth
I have been exploring for a bit for any high-quality articles or blog posts in this sort of area . Exploring in Yahoo I ultimately stumbled upon this website. Studying this information So i am satisfied to show that I’ve an incredibly good uncanny feeling I found out just what I needed. I so much undoubtedly will make certain to don¦t omit this web site and provides it a look regularly.
I will right away grasp your rss as I can not find your e-mail subscription link or newsletter service. Do you’ve any? Kindly let me understand so that I may subscribe. Thanks.
can you buy clomid now: how to get clomid price – cost of generic clomid without dr prescription
prednisone 4mg: prednisone pill – PredniHealth
https://clomhealth.shop/# how to buy cheap clomid without prescription
Wonderful web site. A lot of useful information here. I am sending it to several friends ans also sharing in delicious. And of course, thanks for your sweat!
It’s hard to find knowledgeable people on this topic, but you sound like you know what you’re talking about! Thanks
Amo Health Care: Amo Health Care – Amo Health Care
биржа аккаунтов https://kupit-akkaunty-market.xyz/
маркетплейс аккаунтов соцсетей https://akkaunty-market.live
маркетплейс аккаунтов маркетплейсов аккаунтов
Amo Health Care ampicillin amoxicillin Amo Health Care
prednisone 20 mg prices: PredniHealth – prednisone pill prices
prednisone without prescription.net: prednisone brand name – PredniHealth
I went over this internet site and I think you have a lot of excellent information, saved to my bookmarks (:.
https://amohealthcare.store/# Amo Health Care
Its such as you learn my thoughts! You seem to understand so much about this, like you wrote the book in it or something. I believe that you simply could do with some percent to power the message home a little bit, however instead of that, this is magnificent blog. A fantastic read. I will certainly be back.
After study a few of the blog posts on your website now, and I truly like your way of blogging. I bookmarked it to my bookmark website list and will be checking back soon. Pls check out my web site as well and let me know what you think.
Amo Health Care: Amo Health Care – amoxicillin 500 mg tablets
amoxicillin 500mg price canada: Amo Health Care – medicine amoxicillin 500mg
I was suggested this website through my cousin. I’m now not sure whether this publish is written by means of him as no one else recognize such unique about my trouble. You are incredible! Thank you!
generic clomid without rx Clom Health where to buy generic clomid without rx
prednisone 10mg buy online: PredniHealth – prednisone 1 mg daily
http://clomhealth.com/# get cheap clomid price
same-day Viagra shipping: secure checkout Viagra – generic sildenafil 100mg
order Cialis online no prescription secure checkout ED drugs FDA approved generic Cialis
Wonderful blog! Do you have any recommendations for aspiring writers? I’m hoping to start my own blog soon but I’m a little lost on everything. Would you advise starting with a free platform like WordPress or go for a paid option? There are so many options out there that I’m totally overwhelmed .. Any tips? Thanks a lot!
After looking at a few of the articles on your website, I seriously appreciate your technique of blogging. I bookmarked it to my bookmark site list and will be checking back soon. Please check out my web site too and tell me what you think.
I just couldn’t go away your website before suggesting that I actually enjoyed the usual info an individual supply to your visitors? Is gonna be back frequently in order to inspect new posts
Статья помогла мне получить новые знания и пересмотреть свое представление о проблеме.
legal Modafinil purchase: safe modafinil purchase – modafinil pharmacy
Good write-up, I am normal visitor of one¦s site, maintain up the excellent operate, and It is going to be a regular visitor for a long time.
buy generic Viagra online: fast Viagra delivery – generic sildenafil 100mg
Some really excellent information, Glad I noticed this. “Always be ready to speak your mind and a base man will avoid you.” by William Blake.
http://maxviagramd.com/# generic sildenafil 100mg
магазин аккаунтов https://kupit-akkaunt.xyz
покупка аккаунтов https://rynok-akkauntov.top
продажа аккаунтов https://akkaunty-na-prodazhu.pro/
buy modafinil online: modafinil legality – purchase Modafinil without prescription
order Viagra discreetly: same-day Viagra shipping – order Viagra discreetly
purchase Modafinil without prescription purchase Modafinil without prescription doctor-reviewed advice
В данном ресурсе вы можете найти актуальные промокоды для Melbet.
Используйте их зарегистрировавшись на сайте для получения полный бонус на первый депозит.
Плюс ко всему, доступны промокоды по активным предложениям игроков со стажем.
промокод мелбет
Обновляйте информацию в разделе промокодов, чтобы не упустить эксклюзивные бонусы для Мелбет.
Любой код тестируется на работоспособность, что гарантирует надежность во время активации.
Hello my loved one! I want to say that this article is amazing, great written and include approximately all vital infos. I would like to peer more posts like this.
verified Modafinil vendors: safe modafinil purchase – buy modafinil online
You made some good points there. I did a search on the issue and found most guys will agree with your website.
https://maxviagramd.com/# secure checkout Viagra
Hello, you used to write excellent, but the last few posts have been kinda boring?K I miss your great writings. Past several posts are just a little bit out of track! come on!
F*ckin’ awesome things here. I’m very glad to see your article. Thanks a lot and i am looking forward to contact you. Will you kindly drop me a e-mail?
Modafinil for sale: safe modafinil purchase – modafinil legality
legit Viagra online best price for Viagra secure checkout Viagra
secure checkout Viagra: fast Viagra delivery – Viagra without prescription
1XBet Promo Code – Exclusive Bonus up to €130
Enter the One X Bet bonus code: Code 1XBRO200 while signing up on the app to access special perks provided by 1XBet for a €130 as much as a full hundred percent, for wagering along with a $1950 including free spin package. Open the app and proceed with the registration process.
This 1xBet bonus code: Code 1XBRO200 gives a fantastic sign-up bonus for first-time users — 100% maximum of 130 Euros during sign-up. Promo codes act as the key to unlocking bonuses, also One X Bet’s bonus codes are the same. After entering such a code, users may benefit of several promotions throughout their journey of their betting experience. Although you aren’t entitled for the welcome bonus, 1XBet India makes sure its regular customers are rewarded via ongoing deals. Look at the Deals tab on the site regularly to remain aware about current deals meant for current users.
https://semasan.free-blogz.com/82146897/
What 1xBet promotional code is presently available at this moment?
The promotional code relevant to 1xBet is Code 1XBRO200, permitting new customers signing up with the gambling provider to unlock a reward amounting to €130. In order to unlock unique offers pertaining to gaming and sports betting, please input the promotional code concerning 1XBET while filling out the form. In order to benefit of such a promotion, prospective users should enter the bonus code Code 1xbet at the time of registering step for getting double their deposit amount for their first payment.
Hey there! I’m at work browsing your blog from my new iphone 3gs! Just wanted to say I love reading your blog and look forward to all your posts! Carry on the outstanding work!
account market accounts-marketplace-best.pro
Within this platform, find a variety of videos for adults.
All the content selected with care guaranteeing the best experience for visitors.
Searching for specific genres or checking out options, this site has something for everyone.
lesbian video
Fresh content constantly refreshed, to keep the collection current.
Viewing of all materials protected to users aged 18+, ensuring compliance for adult content.
Check back often to explore additions, since this site continues to grow daily.
http://modafinilmd.store/# safe modafinil purchase
Heya i am for the first time here. I came across this board and I find It really useful & it helped me out much. I hope to give something back and aid others like you aided me.
same-day Viagra shipping: Viagra without prescription – order Viagra discreetly
cheap Cialis online: secure checkout ED drugs – generic tadalafil
Cialis without prescription online Cialis pharmacy secure checkout ED drugs
secure checkout ED drugs: generic tadalafil – secure checkout ED drugs
Читателям предоставляется возможность ознакомиться с различными аспектами темы и сделать собственные выводы.
I have read some just right stuff here. Certainly price bookmarking for revisiting. I wonder how much attempt you put to create such a fantastic informative website.
I believe that is among the most important info for me. And i’m happy reading your article. However should statement on some general things, The website style is great, the articles is actually nice : D. Excellent process, cheers
Я нашел эту статью чрезвычайно познавательной и вдохновляющей. Автор обладает уникальной способностью объединять различные идеи и концепции, что делает его работу по-настоящему ценной и полезной.
https://maxviagramd.com/# buy generic Viagra online
Howdy very cool web site!! Guy .. Excellent .. Wonderful .. I’ll bookmark your web site and take the feeds additionallyKI am glad to search out numerous useful information here in the publish, we need work out extra techniques in this regard, thank you for sharing. . . . . .
modafinil legality: modafinil 2025 – Modafinil for sale
modafinil pharmacy: modafinil legality – purchase Modafinil without prescription
Thanks for another informative blog. The place else may just I get that type of information written in such a perfect way? I’ve a venture that I’m just now running on, and I’ve been on the glance out for such information.
buy modafinil online safe modafinil purchase modafinil pharmacy
PrimeBiome is a dietary supplement designed to support gut health by promoting a balanced microbiome, enhancing digestion, and boosting overall well-being.
doctor-reviewed advice: verified Modafinil vendors – purchase Modafinil without prescription
https://modafinilmd.store/# buy modafinil online
Youre so cool! I dont suppose Ive learn something like this before. So good to seek out somebody with some authentic thoughts on this subject. realy thank you for beginning this up. this web site is one thing that is wanted on the web, somebody with a little originality. useful job for bringing something new to the internet!
I couldn’t resist commenting
PrimeBiome is a dietary supplement designed to support gut health by promoting a balanced microbiome, enhancing digestion, and boosting overall well-being.
modafinil legality: verified Modafinil vendors – safe modafinil purchase
order Cialis online no prescription: generic tadalafil – order Cialis online no prescription
Aqua Sculpt is an advanced body contouring treatment that uses hydrating active ingredients, cooling technology, and sometimes ultrasound or RF-based devices (depending on the version) to target fat cells and tighten the skin.
buy generic Cialis online: online Cialis pharmacy – cheap Cialis online
purchase Modafinil without prescription buy modafinil online modafinil legality
https://maxviagramd.shop/# order Viagra discreetly
Can you guide us through a process of designing an Alien-inspired Christmas Ball using Adobe Illustrator? By incorporating elements of Santa’s traditional ball with an alien twist, we aim to create a unique, otherworldly Christmas icon. How would you suggest we approach the creation of crescents, gradients, and the placement of light and shadows to bring this imaginative concept to life? My blog
reliable online pharmacy Cialis: FDA approved generic Cialis – secure checkout ED drugs
Cialis without prescription: buy generic Cialis online – best price Cialis tablets
Я не могу не отметить качество исследования, представленного в этой статье. Она обогатила мои знания и вдохновила меня на дальнейшее изучение темы. Благодарю автора за его ценный вклад!
Статья содержит анализ преимуществ и недостатков разных решений проблемы, помогая читателю принять информированное решение.
Конечно, вот ещё несколько положительных комментариев на информационную статью: Это сообщение отправлено с сайта GoToTop.ee
Статья содержит полезную информацию, которая может быть полезной для практического применения.
account selling platform https://accounts-marketplace.online
account trading platform https://buy-accounts.live
The site makes available various pharmaceuticals for easy access.
You can quickly buy essential medicines from your device.
Our catalog includes both common medications and targeted therapies.
The full range is acquired via licensed pharmacies.
order kamagra online
We maintain quality and care, with private checkout and fast shipping.
Whether you’re filling a prescription, you’ll find safe products here.
Begin shopping today and enjoy stress-free access to medicine.
modafinil 2025: verified Modafinil vendors – safe modafinil purchase
account exchange https://social-accounts-marketplace.live
affordable ED medication buy generic Cialis online affordable ED medication
discreet shipping ED pills: affordable ED medication – secure checkout ED drugs
https://modafinilmd.store/# modafinil legality
secure account sales https://accounts-marketplace.art
account market https://buy-accounts-shop.pro/
best price for Viagra: same-day Viagra shipping – no doctor visit required
One X Bet stands as a top-tier gambling platform.
With an extensive selection of matches, One X Bet serves countless users worldwide.
This One X Bet app is designed for both Android devices and Apple devices users.
https://luxe.tv/wp-content/news/shalfey.html
Players are able to download the 1xBet app through the platform’s page and also Google Play Store on Android devices.
For iOS users, the application is available from Apple’s store without hassle.
The Natural Mounjaro Recipe is more than just a diet—it’s a sustainable and natural approach to weight management and overall health.
I love it when people come together and share opinions, great blog, keep it up.
discreet shipping: safe online pharmacy – same-day Viagra shipping
modafinil legality: verified Modafinil vendors – modafinil pharmacy
Viagra without prescription: cheap Viagra online – no doctor visit required
The Natural Mounjaro Recipe is more than just a diet—it’s a sustainable and natural approach to weight management and overall health.
You made various good points there. I did a search on the issue and found mainly people will go along with with your blog.
Я только что прочитал эту статью, и мне действительно понравилось, как она написана. Автор использовал простой и понятный язык, несмотря на тему, и представил информацию с большой ясностью. Очень вдохновляюще!
Позиция автора остается нейтральной, что позволяет читателям сформировать свое мнение.
Я не могу не отметить качество исследования, представленного в этой статье. Она обогатила мои знания и вдохновила меня на дальнейшее изучение темы. Благодарю автора за его ценный вклад!
Статья предлагает глубокий анализ темы и рассматривает ее со всех сторон.
discreet shipping ED pills: affordable ED medication – Cialis without prescription
The Natural Mounjaro Recipe is more than just a diet—it’s a sustainable and natural approach to weight management and overall health.
affordable ED medication: online Cialis pharmacy – reliable online pharmacy Cialis
trusted Viagra suppliers: no doctor visit required – safe online pharmacy
Ganhe 100$ de Bônus ao Se Registrar no stakecasino-br.com
– https://stakecasino-br.com – Cadastre-se Agora!
best price for Viagra safe online pharmacy discreet shipping
Thanks for another informative web site. Where else could I get that type of info written in such an ideal way? I have a project that I’m just now working on, and I’ve been on the look out for such info.
Cadastro Rápido no lvbet – https://www.lvbet-br.com e 100$ de Bônus de
Boas-Vindas!
account selling platform https://buy-accounts.space/
https://maxviagramd.shop/# trusted Viagra suppliers
No bwin, novos usuários podem aproveitar um
bônus de 100$ ao se registrar no site! Isso significa mais chances de ganhar e explorar
uma grande variedade de jogos de cassino, desde slots
emocionantes até clássicos como roleta e blackjack. Com o bônus de boas-vindas,
você começa com um saldo extra, o que aumenta suas chances de sucesso.
Cadastre-se agora e use os 100$ de bônus para experimentar seus jogos
favoritos com mais facilidade. Aproveite a oferta e comece sua aventura no cassino agora
mesmo!
account purchase https://social-accounts-marketplace.xyz/
account acquisition account market
Seu Registro no bet7 Vale
100$ de Bônus Imediato!
Ganhe 100$ para Apostar no pixbet ao Se Registrar Hoje!
Viagra without prescription buy generic Viagra online cheap Viagra online
Mitolyn is a cutting-edge natural dietary supplement designed to support effective weight loss and improve overall wellness.
discreet shipping: secure checkout Viagra – cheap Viagra online
modafinil legality: legal Modafinil purchase – legal Modafinil purchase
I like this weblog very much so much excellent information.
safe modafinil purchase: modafinil 2025 – modafinil legality
Mitolyn is a cutting-edge natural dietary supplement designed to support effective weight loss and improve overall wellness.
https://maxviagramd.com/# safe online pharmacy
I have been exploring for a little for any high-quality articles or blog posts on this kind of space . Exploring in Yahoo I at last stumbled upon this web site. Studying this information So i am glad to convey that I have an incredibly excellent uncanny feeling I discovered exactly what I needed. I so much no doubt will make sure to don’t fail to remember this website and provides it a glance on a constant basis.
best price Cialis tablets: online Cialis pharmacy – online Cialis pharmacy
affordable ED medication secure checkout ED drugs order Cialis online no prescription
The site offers many types of pharmaceuticals for ordering online.
Users can easily order treatments without leaving home.
Our product list includes standard treatments and custom orders.
All products is sourced from verified pharmacies.
cenforce 150 india
Our focus is on quality and care, with data protection and on-time dispatch.
Whether you’re treating a cold, you’ll find safe products here.
Start your order today and get convenient healthcare delivery.
Modafinil for sale: purchase Modafinil without prescription – legal Modafinil purchase
https://t.me/s/flagman_official_777/49
safe online pharmacy: safe online pharmacy – secure checkout Viagra
Definitely, what a fantastic website and informative posts, I surely will bookmark your blog.All the Best!
https://t.me/s/flagman_official_777/17
account purchase https://social-accounts-marketplaces.live/
account selling platform https://buy-best-accounts.org/
account selling platform https://accounts-marketplace.xyz
social media account marketplace https://accounts-offer.org
https://modafinilmd.store/# buy modafinil online
legit Viagra online: secure checkout Viagra – order Viagra discreetly
You should take part in a contest for one of the best blogs on the web. I will recommend this site!
cheap Cialis online: discreet shipping ED pills – cheap Cialis online
Wow! Thank you! I continuously needed to write on my blog something like that. Can I take a part of your post to my site?
modafinil 2025 legal Modafinil purchase legal Modafinil purchase
legit Viagra online: same-day Viagra shipping – legit Viagra online
https://modafinilmd.store/# verified Modafinil vendors
Happy to dive into discussions, share thoughts, and gain fresh perspectives throughout the journey.
I’m interested in understanding different opinions and adding to the conversation when possible. Always open to fresh thoughts and meeting like-minded people.
There’s my web-site-https://automisto24.com.ua/
Here you can locate distinctive promo codes for a widely recognized betting service.
The selection of profitable chances is constantly renewed to provide that you always have opportunity to use the newest suggestions.
Via these coupons, you can lower spending on your gambling activities and amplify your potential of winning.
Every discount code are diligently inspected for legitimacy and execution before being published.
https://satapornbooks.com/tests/pags/?podklyuchenie_interneta.html
Furthermore, we furnish full directions on how to redeem each special promotion to optimize your profits.
Take into account that some promotions may have certain requirements or fixed durations, so it’s important to study closely all the specifications before utilizing them.
http://pinupaz.top/# pin up azerbaycan
fast Viagra delivery: safe online pharmacy – legit Viagra online
Hello! I just wanted to ask if you ever have any issues with hackers? My last blog (wordpress) was hacked and I ended up losing many months of hard work due to no back up. Do you have any solutions to protect against hackers?
I used to be recommended this website by way of my cousin. I am not certain whether this post is written through him as no one else understand such precise approximately my problem. You are amazing! Thanks!
вавада зеркало vavada вход vavada casino
vavada casino: вавада – vavada casino
After study a few of the blog posts on your website now, and I truly like your way of blogging. I bookmarked it to my bookmark website list and will be checking back soon. Pls check out my web site as well and let me know what you think.
Can I just say what a relief to find someone who actually knows what theyre talking about on the internet. You definitely know how to bring an issue to light and make it important. More people need to read this and understand this side of the story. I cant believe youre not more popular because you definitely have the gift.
http://vavadavhod.tech/# vavada casino
When I originally commented I clicked the -Notify me when new comments are added- checkbox and now each time a comment is added I get 4 emails with the identical comment. Is there any way you may remove me from that service? Thanks!
Также барьерный элемент системы ОЗДС может быть установлен на лестницах, эскалаторах, лифтах, мостах и других элементах инфраструктуры, где необходим контроль движения людей. Наконец, барьерный элемент системы ОЗДС может быть установлен в любом месте, где требуется ограничение доступа и контроль движения людей, в том числе на технических площадках, в зонах складирования, производственных участках, на улицах города и прочих местах.
Одним из основных преимуществ системы дератизации ОЗДС является быстрое и эффективное устранение грызунов на территории объекта. Она позволяет сохранить чистоту и порядок, предотвратить повреждение имущества и надежно защитить людей от возможного заражения.
ОЗДС играет важную роль в поддержании гигиены и защите от грызунов. Она предлагает комплексный подход, который включает в себя не только уничтожение грызунов, но и предотвращение их проникновения. Система ОЗДС основана на использовании передовых технологий и методов, таких как электронные системы мониторинга и применение безопасных препаратов. Благодаря этому, ОЗДС является эффективным инструментом для обеспечения безопасности и гигиены в различных сферах, от промышленности до домашней среды.
Статья подробно описывает преимущества и важность Охранно-Защитной Дератизационной Системы (ОЗДС). ОЗДС предоставляет комплексный подход к проблеме грызунов, включая не только их уничтожение, но и предотвращение их проникновения. Это важно не только с точки зрения здоровья и гигиены, но и для защиты имущества и предотвращения материальных убытков.
pin up вход: пин ап вход – пин ап казино официальный сайт
The platform is available unique promocodes for One X Bet.
Such codes make it possible to obtain bonus advantages when playing on the website.
Every listed promo deals are periodically verified to confirm their effectiveness.
By applying these offers one can enhance your gaming experience on the gaming site.
https://go-family-health.com/wp-content/pgs/?cvetnye_melki_dlya_volos_okrashivanie_pastelyyu.html
Furthermore, step-by-step directions on how to use promo deals are given for maximum efficiency.
Consider that specific offers may have time limits, so look into conditions before activating.
вавада вавада официальный сайт vavada вход
vavada: вавада – vavada вход
https://pinupaz.top/# pinup az
buy account purchase ready-made accounts
account acquisition account buying service
pin up вход: пин ап вход – пин ап зеркало
account marketplace marketplace for ready-made accounts
accounts for sale account exchange service
pin up az pin up az pin up az
pin up az: pin up casino – pin up casino
Just what I was looking for, regards for putting up.
http://pinupaz.top/# pin-up
You can find here useful materials about steps to becoming a security expert.
Data is shared in a straightforward and coherent manner.
It explains multiple methods for bypassing protection.
Additionally, there are working models that reveal how to implement these expertise.
how to learn hacking
Comprehensive info is frequently refreshed to match the modern innovations in information security.
Extra care is given to real-world use of the obtained information.
Remember that each maneuver should be utilized ethically and according to proper guidelines only.
вавада официальный сайт: вавада – вавада
вавада зеркало: вавада официальный сайт – vavada вход
вавада зеркало вавада казино vavada
http://pinupaz.top/# pin-up
Автор предоставляет подробные объяснения сложных концепций, связанных с темой.
I just couldn’t leave your site before suggesting that I extremely enjoyed the standard info a person provide in your visitors? Is going to be back ceaselessly to investigate cross-check new posts
Статья предоставляет множество ссылок на дополнительные источники для углубленного изучения.
Я оцениваю информативность статьи и ее способность подать сложную тему в понятной форме.
I went over this internet site and I conceive you have a lot of excellent info, saved to bookmarks (:.
вавада зеркало: вавада зеркало – vavada casino
account marketplace account trading service
account selling service account trading platform
social media account marketplace account marketplace
пинап казино: пин ап казино официальный сайт – пинап казино
Perfectly indited content, thank you for information. “In the fight between you and the world, back the world.” by Frank Zappa.
https://vavadavhod.tech/# вавада зеркало
I dugg some of you post as I cerebrated they were very helpful very beneficial
pin-up pin-up pinup az
It is in reality a nice and helpful piece of information. I’m glad that you simply shared this helpful info with us. Please keep us up to date like this. Thanks for sharing.
пинап казино: пинап казино – pin up вход
Thanks for sharing. I read many of your blog posts, cool, your blog is very good.
ОЗДС также предлагает возможность мониторинга и анализа данных о состоянии грызуновой активности на объекте. Система может собирать информацию о количестве грызунов, их активности, местах их проникновения и других важных параметрах. Эти данные могут быть использованы для определения эффективности системы, а также для корректировки ее работы и повышения ее эффективности.
Одним из ключевых компонентов ОЗДС являются устройства мониторинга, предназначенные для постоянного контроля за наличием грызунов на объекте. Устройства размещаются в стратегически важных местах и обладают высокой чувствительностью, позволяющей своевременно обнаруживать даже самые маленькие проявления активности грызунов.
Одним из ключевых аспектов ОЗДС является система мониторинга и обнаружения грызунов. Сенсорные устройства, установленные в зонах потенциального проникновения грызунов, регистрируют их движение и передают информацию на центр управления. Специалисты мониторят состояние системы в режиме реального времени и могут оперативно реагировать на возникшие угрозы.
Охранно-Защитная Дератизационная Система (ОЗДС) использует электротехнический комплекс для эффективной защиты помещений и различных коммуникаций здания от грызунов, мышей и крыс. ОЗДС работает путем перекрытия подходов к местам кормления, локализации возможных мест гнездования и перекрытия путей их постоянных перемещений. Технология ОЗДС включает генератор электрических импульсных разрядов, который электрически связан с одним или несколькими электризуемыми барьерами³. Это позволяет создать электрический барьер для грызунов и предотвратить их проникновение в помещение.
pin up az: pin up – pin-up
http://vavadavhod.tech/# vavada вход
Thank you for sharing with us, I conceive this website truly stands out : D.
pin up azerbaycan pin up azerbaycan pin-up
вавада зеркало: vavada casino – вавада
Throughout the awesome pattern of things you actually get an A for effort. Exactly where you misplaced me was first in your particulars. You know, it is said, details make or break the argument.. And that could not be much more accurate here. Having said that, permit me reveal to you exactly what did work. Your authoring is actually really persuasive and that is possibly why I am taking the effort to comment. I do not make it a regular habit of doing that. 2nd, despite the fact that I can easily see a leaps in reason you make, I am not really convinced of how you seem to connect the points that produce the actual conclusion. For the moment I will, no doubt yield to your point but trust in the foreseeable future you link your facts much better.
What i don’t understood is if truth be told how you are no longer actually much more neatly-preferred than you may be now. You’re very intelligent. You realize thus significantly in the case of this subject, produced me in my view imagine it from a lot of numerous angles. Its like women and men are not interested except it is something to do with Woman gaga! Your individual stuffs great. At all times care for it up!
website for buying accounts account catalog
Hello, you used to write great, but the last several posts have been kinda boring… I miss your great writings. Past few posts are just a bit out of track! come on!
Terrific work! This is the type of information that should be shared around the net. Shame on the search engines for not positioning this post higher! Come on over and visit my site . Thanks =)
http://pinupaz.top/# pin up azerbaycan
пин ап казино официальный сайт: pin up вход – пин ап казино официальный сайт
accounts market purchase ready-made accounts
Happy to join conversations, share thoughts, and gain fresh perspectives throughout the journey.
I enjoy learning from different perspectives and adding to the conversation when possible. Always open to fresh thoughts and building connections.
There is my web-site-https://automisto24.com.ua/
buy pre-made account accounts marketplace
guaranteed accounts verified accounts for sale
Pretty! This was a really wonderful post. Thank you for your provided information.
I am glad to be one of several visitants on this outstanding website (:, thanks for putting up.
пин ап казино пин ап вход пинап казино
您好,这是一个面向18岁以上人群的内容平台。
进入前请确认您已年满成年年龄,并同意了解本站内容性质。
本网站包含不适合未成年人观看的内容,请理性访问。 色情网站。
若您未满18岁,请立即退出页面。
我们致力于提供健康安全的成人服务。
вавада: vavada – vavada casino
I am incessantly thought about this, thanks for posting.
vavada вход: vavada вход – вавада казино
Great – I should certainly pronounce, impressed with your web site. I had no trouble navigating through all tabs as well as related info ended up being truly simple to do to access. I recently found what I hoped for before you know it at all. Quite unusual. Is likely to appreciate it for those who add forums or something, site theme . a tones way for your client to communicate. Excellent task..
It¦s truly a great and useful piece of info. I am glad that you simply shared this helpful information with us. Please keep us up to date like this. Thanks for sharing.
Can I just say what a relief to find someone who actually knows what theyre talking about on the internet. You definitely know how to bring an issue to light and make it important. More people need to read this and understand this side of the story. I cant believe youre not more popular because you definitely have the gift.
вавада казино вавада зеркало вавада официальный сайт
пинап казино: пин ап вход – pin up вход
Hiya! Quick question that’s totally off topic. Do you know how to make your site mobile friendly? My weblog looks weird when viewing from my apple iphone. I’m trying to find a theme or plugin that might be able to fix this issue. If you have any suggestions, please share. Thank you!
http://pinuprus.pro/# пин ап казино официальный сайт
account market guaranteed accounts
account buying service account selling platform
Magnificent beat ! I wish to apprentice while you amend your web site, how can i subscribe for a weblog website? The account aided me a acceptable deal. I were a little bit acquainted of this your broadcast offered vibrant clear idea
vavada: вавада казино – вавада
Hiya, I am really glad I have found this information. Nowadays bloggers publish only about gossips and net and this is really irritating. A good site with interesting content, that’s what I need. Thank you for keeping this web-site, I’ll be visiting it. Do you do newsletters? Can’t find it.
Hello, i think that i noticed you visited my site so i came to “return the prefer”.I am attempting to find things to enhance my site!I assume its adequate to make use of some of your ideas!!
pinup az pin up az pin up casino
I just couldn’t leave your site before suggesting that I actually enjoyed the usual information a person provide in your visitors? Is gonna be again often to check out new posts.
pin up casino: pin up – pin-up casino giris
It’s really a great and useful piece of info. I’m glad that you shared this useful information with us. Please keep us up to date like this. Thank you for sharing.
Very interesting info!Perfect just what I was looking for!
http://pinuprus.pro/# пинап казино
I was wondering if you ever considered changing the structure of your site? Its very well written; I love what youve got to say. But maybe you could a little more in the way of content so people could connect with it better. Youve got an awful lot of text for only having 1 or two pictures. Maybe you could space it out better?
Here to dive into discussions, share experiences, and learn something new as I go.
I’m interested in learning from different perspectives and adding to the conversation when possible. Interested in hearing new ideas and meeting like-minded people.
There’s my web-site-https://automisto24.com.ua/
pin up azerbaycan: pin up az – pin-up casino giris
Hi there, You have performed a great job. I will definitely digg it and in my opinion recommend to my friends. I’m confident they will be benefited from this site.
Я прочитал эту статью с огромным интересом! Автор умело объединил факты, статистику и персональные истории, что делает ее настоящей находкой. Я получил много новых знаний и вдохновения. Браво!
Мне понравилась аргументация автора, основанная на логической цепочке рассуждений.
Статья представляет разнообразные аргументы и контекст, позволяя читателям самостоятельно сформировать свое мнение. Это сообщение отправлено с сайта https://ru.gototop.ee/
whoah this blog is fantastic i really like studying your posts. Stay up the great work! You realize, many persons are searching around for this information, you can help them greatly.
accounts market gaming account marketplace
account trading secure account purchasing platform
account market buy account
I like what you guys are up too. Such clever work and reporting! Carry on the excellent works guys I’ve incorporated you guys to my blogroll. I think it will improve the value of my web site :).
пин ап вход pin up вход пинап казино
пин ап казино: пин ап казино официальный сайт – пин ап казино
Hello.This article was really fascinating, especially since I was investigating for thoughts on this matter last Wednesday.
Does your site have a contact page? I’m having problems locating it but, I’d like to shoot you an email. I’ve got some ideas for your blog you might be interested in hearing. Either way, great blog and I look forward to seeing it expand over time.
https://vavadavhod.tech/# вавада
pin up casino: pin up casino – pin up casino
Hmm is anyone else having problems with the images on this blog loading? I’m trying to figure out if its a problem on my end or if it’s the blog. Any feed-back would be greatly appreciated.
account exchange service account buying platform
Spot on with this write-up, I truly assume this website wants way more consideration. I’ll probably be again to learn much more, thanks for that info.
Valuable info. Lucky me I found your web site by accident, and I am shocked why this accident did not happened earlier! I bookmarked it.
pin-up pin up pin-up
Good write-up, I am normal visitor of one?¦s site, maintain up the nice operate, and It’s going to be a regular visitor for a lengthy time.
pin up: pin up – pinup az
I don’t even know how I ended up here, but I thought this post was great. I don’t know who you are but certainly you are going to a famous blogger if you aren’t already 😉 Cheers!
vavada casino: вавада – vavada casino
No novibet, ao Registrar-se, Você Recebe 100$
de Bônus!
lobo888: 100$ de Bônus para Novos Jogadores – Cadastre-se Já!
Registre-se no gogowin – https://gogowin-br.com e Comece com 100$ de Bônus para
Apostar
Very interesting topic, thank you for posting.
Hello. splendid job. I did not imagine this. This is a excellent story. Thanks!
No casadeapostas,
novos usuários podem aproveitar um bônus de 100$ ao se registrar no site!
Isso significa mais chances de ganhar e explorar uma grande variedade de jogos
de cassino, desde slots emocionantes até clássicos como roleta e blackjack.
Com o bônus de boas-vindas, você começa com um saldo extra,
o que aumenta suas chances de sucesso. Cadastre-se agora e use os 100$
de bônus para experimentar seus jogos favoritos com mais facilidade.
Aproveite a oferta e comece sua aventura no cassino agora mesmo!
пин ап казино пинап казино пин ап казино официальный сайт
find accounts for sale account trading service
пин ап казино официальный сайт: пин ап вход – pin up вход
пин ап казино официальный сайт: pin up вход – пин ап зеркало
https://pinuprus.pro/# пинап казино
verified accounts for sale marketplace for ready-made accounts
buy and sell accounts account market
I went over this site and I conceive you have a lot of fantastic information, saved to bookmarks (:.
What i don’t understood is actually how you are not actually much more well-liked than you may be now. You are so intelligent. You realize therefore considerably relating to this subject, produced me personally consider it from a lot of varied angles. Its like men and women aren’t fascinated unless it’s one thing to accomplish with Lady gaga! Your own stuffs outstanding. Always maintain it up!
Once I originally commented I clicked the -Notify me when new feedback are added- checkbox and now every time a comment is added I get 4 emails with the identical comment. Is there any way you may take away me from that service? Thanks!
vavada вход: вавада казино – вавада зеркало
vavada casino: вавада казино – vavada вход
https://pinuprus.pro/# пин ап казино
Awsome blog! I am loving it!! Will be back later to read some more. I am bookmarking your feeds also
I do agree with all the ideas you have presented in your post. They are really convincing and will definitely work. Still, the posts are too short for novices. Could you please extend them a bit from next time? Thanks for the post.
Lovely just what I was searching for.Thanks to the author for taking his clock time on this one.
Aproveite a oferta exclusiva do talon777
para novos usuários e receba 100$ de bônus ao se registrar!
Este bônus de boas-vindas permite que você experimente uma
vasta gama de jogos de cassino online sem precisar gastar imediatamente.
Com o bônus de 100$, você poderá explorar jogos como roleta,
blackjack, caça-níqueis e muito mais, aumentando suas chances de vitória
desde o primeiro minuto. Não perca essa chance única de começar com um valor significativo – cadastre-se agora!
No codbet, novos usuários podem aproveitar um bônus de 100$ ao se registrar no site!
Isso significa mais chances de ganhar e explorar uma grande variedade de jogos de cassino, desde slots emocionantes até clássicos
como roleta e blackjack. Com o bônus de boas-vindas, você começa com um saldo extra, o que aumenta suas chances de sucesso.
Cadastre-se agora e use os 100$ de bônus para experimentar seus jogos favoritos com mais facilidade.
Aproveite a oferta e comece sua aventura no cassino agora mesmo!
account buying platform account exchange
pinup az: pin up – pin up casino
website for selling accounts account selling service
http://pinuprus.pro/# pin up вход
пин ап казино официальный сайт пин ап казино официальный сайт пинап казино
secure account sales account selling platform
ready-made accounts for sale accountsmarketbest.com
Aproveite 100$ de Bônus ao Se Registrar no brdice – https://brdice-br.com – Cadastre-se Já!
pin up az: pin up azerbaycan – pin up az
Woh I like your posts, saved to my bookmarks! .
O today oferece uma excelente oportunidade para quem deseja começar sua experiência no cassino online com um bônus de 100$ para novos jogadores!
Ao se registrar no site, você garante esse bônus exclusivo que pode ser utilizado em diversos jogos de cassino, como slots, roleta e
poker. Esse é o momento perfeito para explorar o mundo das
apostas com um saldo extra, aproveitando ao máximo
suas apostas sem precisar investir um grande valor
logo de início. Não perca essa oportunidade e cadastre-se já!
No brapub, ao Registrar-se, Você Recebe 100$ de Bônus!
Thank you for the auspicious writeup. It in fact was a amusement account it. Look advanced to far added agreeable from you! By the way, how could we communicate?
O brwin oferece
uma excelente oportunidade para quem deseja começar sua experiência no cassino online com um bônus de
100$ para novos jogadores! Ao se registrar no site, você garante esse bônus exclusivo que pode ser utilizado em diversos jogos de cassino, como slots, roleta e poker.
Esse é o momento perfeito para explorar o mundo das apostas com um saldo extra, aproveitando
ao máximo suas apostas sem precisar investir um grande
valor logo de início. Não perca essa oportunidade e cadastre-se já!
Faça Seu Cadastro no flames e Ganhe 100$ de Bônus Agora Mesmo!
http://pinuprus.pro/# пин ап вход
pin up pin up pin up azerbaycan
You could certainly see your enthusiasm within the paintings you write. The sector hopes for even more passionate writers like you who aren’t afraid to say how they believe. Always go after your heart.
пин ап зеркало: пин ап казино официальный сайт – пин ап казино официальный сайт
I went over this internet site and I think you have a lot of wonderful info , bookmarked (:.
I don’t think the title of your article matches the content lol. Just kidding, mainly because I had some doubts after reading the article.
pin up вход: пинап казино – пин ап казино
Your place is valueble for me. Thanks!…
https://pinuprus.pro/# пинап казино
вавада официальный сайт вавада официальный сайт vavada casino
infinity bet Oferece 100$ de Bônus para Novos Jogadores – Registre-se Já!
Bônus de 100$ para Novos Usuários: Cadastre-se no dobrowin – https://dobrowin55.com Hoje!
I enjoy what you guys are up too. This type of clever work and reporting! Keep up the excellent works guys I’ve you guys to blogroll.
pin up az: pin up casino – pin-up casino giris
https://pinuprus.pro/# пин ап вход
Humans consider taking their own life due to many factors, often resulting from deep emotional pain.
A sense of despair might overpower their motivation to go on. Often, loneliness plays a significant role in pushing someone toward such thoughts.
Psychological disorders impair decision-making, making it hard for individuals to find other solutions for their struggles.
how to kill yourself
Challenges such as financial problems, relationship issues, or trauma could lead a person to consider drastic measures.
Limited availability of resources can make them feel stuck. Keep in mind seeking assistance can save lives.
Glad to be one of several visitors on this awe inspiring internet site : D.
пинап казино pin up вход пин ап казино официальный сайт
пин ап вход: пин ап казино – пин ап казино официальный сайт
account trading profitable account sales
пин ап зеркало: pin up вход – пин ап вход
account trading platform account exchange
secure account sales account catalog
social media account marketplace sell accounts
I am glad to be one of the visitants on this great web site (:, regards for putting up.
Cassino flush win: Simples,
Divertido e Lucrativo!
Jogue e Conquiste Vitórias no misterjack bet com Facilidade!
Aposte Agora no Cassino upsports bet
e Conquiste Grandes Vitórias!
Hi, i think that i saw you visited my weblog so i came to “return the favor”.I’m attempting to find things to improve my web site!I suppose its ok to use some of your ideas!!
пин ап вход pin up вход пинап казино
WONDERFUL Post.thanks for share..more wait .. …
This website, you can access lots of slot machines from top providers.
Users can experience classic slots as well as feature-packed games with vivid animation and exciting features.
Even if you’re new or an experienced player, there’s always a slot to match your mood.
casino slots
The games are ready to play 24/7 and optimized for PCs and mobile devices alike.
You don’t need to install anything, so you can jump into the action right away.
Site navigation is intuitive, making it simple to find your favorite slot.
Join the fun, and dive into the excitement of spinning reels!
pinup az: pin up az – pin up casino
Great ?V I should certainly pronounce, impressed with your site. I had no trouble navigating through all the tabs and related information ended up being truly easy to do to access. I recently found what I hoped for before you know it at all. Reasonably unusual. Is likely to appreciate it for those who add forums or something, web site theme . a tones way for your customer to communicate. Excellent task..
http://vavadavhod.tech/# вавада официальный сайт
I have recently started a blog, the info you provide on this web site has helped me greatly. Thank you for all of your time & work. “There is a time for many words, and there is also a time for sleep.” by Homer.
Thanks for any other informative blog. The place else may just I am getting that kind of info written in such an ideal method? I have a project that I’m simply now working on, and I’ve been at the glance out for such information.
вавада зеркало: vavada – vavada вход
pin up azerbaycan: pin-up – pin up azerbaycan
Thank you for sharing with us, I believe this website truly stands out : D.
http://vavadavhod.tech/# vavada
Appreciate it for this wondrous post, I am glad I observed this site on yahoo.
pin up pin up casino pin up azerbaycan
If you’ve been looking for a way to unlock your full mental potential and attract wealth effortlessly, Billionaire Brain Wave might just be the breakthrough you’ve been waiting for!
пинап казино: пин ап зеркало – пин ап казино официальный сайт
вавада зеркало: вавада – вавада зеркало
Account market https://socialmediaaccountsale.com
https://pinuprus.pro/# пин ап зеркало
Online Account Store Verified Accounts for Sale
Social media account marketplace Website for Buying Accounts
When I originally commented I clicked the “Notify me when new comments are added” checkbox and now each time a comment is added I get three e-mails with the same comment. Is there any way you can remove me from that service? Cheers!
Please let me know if you’re looking for a author for your blog. You have some really good articles and I think I would be a good asset. If you ever want to take some of the load off, I’d love to write some content for your blog in exchange for a link back to mine. Please send me an email if interested. Regards!
пинап казино: pin up вход – pin up вход
pin up casino pin up pin up az
https://pinupaz.top/# pin-up casino giris
vavada: vavada вход – vavada вход
Mitolyn is a cutting-edge natural dietary supplement designed to support effective weight loss and improve overall wellness.
Does your website have a contact page? I’m having problems locating it but, I’d like to shoot you an email. I’ve got some creative ideas for your blog you might be interested in hearing. Either way, great site and I look forward to seeing it improve over time.
Incredible quest there. What occurred after? Good luck!
This piece of writing is actually a fastidious one it helps new internet people, who are wishing in favor of blogging.
Very nice post. I just stumbled upon your blog and wanted to say that I have really enjoyed browsing your weblog posts. After all I will be subscribing in your rss feed and I am hoping you write once more soon!
Wonderful blog! Do you have any tips and hints for aspiring writers? I’m planning to start my own blog soon but I’m a little lost on everything. Would you propose starting with a free platform like WordPress or go for a paid option? There are so many choices out there that I’m completely overwhelmed .. Any tips? Bless you!
вавада официальный сайт: вавада – вавада зеркало
Woh I like your blog posts, saved to favorites! .
Mitolyn is a cutting-edge natural dietary supplement designed to support effective weight loss and improve overall wellness.
вавада официальный сайт vavada casino vavada casino
https://pinupaz.top/# pin-up
Wonderful goods from you, man. I have bear in mind your stuff prior to and you’re just extremely fantastic. I actually like what you have bought right here, really like what you are saying and the way in which wherein you are saying it. You are making it entertaining and you continue to take care of to stay it smart. I can’t wait to read much more from you. This is really a wonderful website.
пин ап казино: пинап казино – пин ап казино
Buy Account Account Store
Sell Account https://buyagedaccounts001.com
Find Accounts for Sale Sell accounts
Website for Buying Accounts Social media account marketplace
pin-up: pin up az – pin up
pin-up pinup az pin up
http://pinuprus.pro/# пин ап зеркало
пин ап зеркало: pin up вход – пин ап казино
I regard something really special in this site.
The Ice Water Hack has been gaining popularity as a simple method to aid weight loss. After reading about its potential benefits, I decided to give it a shot and see how it worked for me. Here’s what I found!
вавада зеркало: вавада казино – вавада официальный сайт
That is very fascinating, You are an overly professional blogger. I’ve joined your rss feed and sit up for searching for more of your wonderful post. Also, I have shared your site in my social networks!
Searching to hire qualified workers ready to handle temporary risky assignments.
Require someone for a perilous task? Connect with vetted individuals on our platform for critical dangerous work.
hire an assassin
Our platform links clients to licensed workers prepared to accept high-stakes temporary roles.
Employ background-checked laborers for dangerous duties securely. Perfect for last-minute situations requiring safety-focused skills.
http://pinuprus.pro/# пинап казино
пин ап вход пин ап казино пин ап казино официальный сайт
pin up az: pin-up casino giris – pin up
I am in fact delighted to glance at this web site posts which carries plenty of valuable data, thanks for providing these kinds of statistics.
Wonderful blog! I found it while browsing on Yahoo News. Do you have any tips on how to get listed in Yahoo News? I’ve been trying for a while but I never seem to get there! Many thanks
When some one searches for his required thing, so he/she wishes to be available that in detail, so that thing is maintained over here.
I’m amazed, I must say. Seldom do I come across a blog that’s both equally educative and amusing, and let me tell you, you’ve hit the nail on the head. The problem is something that too few folks are speaking intelligently about. I’m very happy I came across this during my hunt for something relating to this.
vavada: vavada casino – vavada вход
The Salt Trick is a natural technique that involves using specific salts, such as Blue Salt, to enhance male performance
https://pinuprus.pro/# pin up вход
Wow, amazing blog layout! How long have you been blogging for? you make blogging look easy. The overall look of your website is wonderful, let alone the content!
vavada vavada вход вавада
вавада казино: vavada – vavada
пин ап зеркало: пин ап зеркало – pin up вход
vavada casino: vavada вход – vavada
https://vavadavhod.tech/# vavada вход
Account Trading Service Buy Pre-made Account
Online Account Store socialaccountsmarket2025.com
Online Account Store Account Selling Service
Buy accounts Account Trading
Nice post. I study one thing tougher on completely different blogs everyday. It’ll all the time be stimulating to learn content from other writers and observe slightly one thing from their store. I’d desire to use some with the content on my weblog whether or not you don’t mind. Natually I’ll give you a hyperlink on your net blog. Thanks for sharing.
pin up casino pin up azerbaycan pinup az
pin up casino: pin up – pin up
вавада официальный сайт: вавада – вавада казино
Wonderful blog! I found it while browsing on Yahoo News. Do you have any suggestions on how to get listed in Yahoo News? I’ve been trying for a while but I never seem to get there! Thanks
http://pinuprus.pro/# пин ап казино
Questa pagina permette l’assunzione di persone per compiti delicati.
Chi cerca aiuto possono scegliere operatori competenti per operazioni isolate.
Gli operatori proposti sono selezionati con cura.
sonsofanarchy-italia.com
Sul sito è possibile consultare disponibilità prima di procedere.
La professionalità resta la nostra priorità.
Esplorate le offerte oggi stesso per portare a termine il vostro progetto!
The site allows you to hire experts for short-term risky missions.
You can quickly arrange support for specialized operations.
All contractors are qualified in executing intense operations.
hitman-assassin-killer.com
Our platform provides discreet arrangements between clients and freelancers.
Whether you need urgent assistance, our service is the right choice.
Post your request and find a fit with the right person now!
вавада официальный сайт вавада зеркало vavada casino
The Salt Trick is a natural technique that involves using specific salts, such as Blue Salt, to enhance male performance
vavada вход: вавада зеркало – vavada вход
vavada casino: вавада казино – vavada
пин ап казино: pin up вход – пин ап зеркало
https://pinupaz.top/# pinup az
You got a very superb website, Sword lily I detected it through yahoo.
The Salt Trick is a natural technique that involves using specific salts, such as Blue Salt, to enhance male performance
pin-up pin-up pin-up
пинап казино: пин ап вход – пин ап зеркало
pin up az: pinup az – pin up azerbaycan
пинап казино: пин ап казино – пин ап вход
Aposte no Cassino fazo betai e
Ganhe Prêmios Fantásticos!
Jogue no Cassino trofeu bet e Conquiste Grandes
Vitórias!
Cassino luck bet: Onde Você Pode Ganhar Facilmente!
Cassino juntos bet: Jogos
Populares e Grandes Prêmios!
Ganhe Prêmios Fáceis e Rápidos no Cassino reals bet!
pagol bet: Diversão e Grandes Ganhos com Jogos Populares!
Ganhe Agora com os Jogos do Cassino 8casino!
https://pinuprus.pro/# пин ап казино
Jogue e Vença no Cassino gbg bet – Onde a Sorte Está!
doce888:
Aposte Agora e Conquiste Grandes Vitórias!
Jogos Populares e Grandes Premiações na mover bet!
Ganhe Rápido com Jogos Populares no Cassino bet cris!
Cassino 7700 bet:
Onde Você Pode Ganhar Facilmente!
Jogos Populares e Grandes Prêmios no Cassino Online bet pix365!
Jogue Agora e Ganhe no lobo888 com Facilidade!
Jogue no Cassino bet o bet
e Ganhe de Forma Simples e Rápida!
Ganhe Dinheiro Fácil nos Jogos do Cassino real bet!
Cassino galera bet:
Onde a Sorte Está ao Seu Lado!
bet sbola: Cassino Online Fácil de Jogar e Ganhar!
Ganhe Rápido nos Jogos Populares do Cassino Online green bets!
Jogue Agora e Ganhe no Cassino Online jogowin!
Ganhe Agora com os Jogos do Cassino 365 bets!
Aposte nos Melhores Jogos e Ganhe no Cassino donald bet!
Ganhe Rápido e Fácil no Cassino Online aposte bet!
Aposte e Conquiste Vitórias no Cassino global bet!
Ganhe Rápido no luva bet
– Apostas Fáceis, Grandes Prêmios!
TO
Ganhe Rápido com Jogos Populares no Cassino 7games bet!
Cassino estrela bet:
Grandes Oportunidades de Vitória!
Ganhe Prêmios Rápidos no Cassino Online giro bet!
sport bet: Grandes Prêmios Esperam por Você!
pin up azerbaycan: pin up casino – pin-up casino giris
Experimente os Melhores Jogos no Cassino campo bet!
Jogos Populares e Grandes Oportunidades no Cassino goin bet!
Ganhe Grandes Prêmios Jogando no novi bet!
Ganhe no Cassino Online bet sson
com Jogos Simples e Populares!
вавада официальный сайт вавада vavada вход
Aposte no 8855 bet e Ganhe Rápido com Jogos Famosos!
Jogue nos Jogos Populares e Ganhe no winzada!
Aposte e Conquiste Prêmios no Cassino Online 4play bet!
pin up az: pin-up – pin up azerbaycan
Ganhe Agora no Cassino Online leao bet com
Jogos Populares!
Aposte e Vença nos Jogos Populares do Cassino leon bet!
Ganhe Grande com os Jogos Mais Populares no bet leao!
Jogue Agora no super bet e Ganhe Prêmios Rápidos!
Ganhe Agora no Cassino Online gogowin com Jogos Populares!
Aposte Agora no Cassino wingdus e Conquiste Grandes Vitórias!
bet motion: Onde a Sorte Encontra os Melhores Jogadores!
Ganhe no Cassino bet fury com Jogos Populares e Fáceis!
Ganhe Agora no Cassino 3fcasino com Facilidade!
pin up azerbaycan: pin-up casino giris – pin up
Aposte Agora no Cassino bet sury e Conquiste Grandes Vitórias!
купить аккаунт с прокачкой продать аккаунт
гарантия при продаже аккаунтов продажа аккаунтов соцсетей
аккаунты с балансом маркетплейс аккаунтов соцсетей
http://pinuprus.pro/# пин ап вход
Unquestionably believe that which you said. Your favorite reason seemed to be on the internet the simplest thing to be aware of. I say to you, I definitely get annoyed while people consider worries that they just don’t know about. You managed to hit the nail upon the top and defined out the whole thing without having side-effects , people could take a signal. Will likely be back to get more. Thanks
pin up casino: pin up casino – pin up casino
пин ап вход: pin up вход – пин ап казино официальный сайт
вавада казино вавада казино вавада официальный сайт
Its superb as your other articles : D, appreciate it for putting up. “For peace of mind, we need to resign as general manager of the universe.” by Larry Eisenberg.
https://pinupaz.top/# pin up casino
Ganhe Dinheiro Fácil nos Jogos do Cassino bet sul!
Cassino b1 bet: Diversão e Grandes Vitórias Esperam
por Você!
Experimente o Cassino Online tv bet e Ganhe Rápido!
777 bet: Onde a Sorte Está ao
Seu Lado!
Ganhe Facilmente com os Jogos do Cassino cnc bet!
Ganhe no 73 bet com Facilidade nos Jogos Populares!
Aposte e Ganhe Prêmios Rápidos no Cassino cod bet!
Cassino 9k bet: Vença Agora com Facilidade!
Aposte no brl bet e Ganhe Grandes Prêmios!
Aposte no Cassino fez bet e Vença Agora Mesmo!
pix bet: Onde Jogadores Ganham com Facilidade!
Jogue no Cassino 939 bet
e Aumente Suas Chances de Vitória!
Ganhe com Facilidade no Cassino Online um bet!
Cassino esportiva bet:
Jogue Agora e Conquiste Grandes Vitórias!
Jogue nos Jogos Mais Populares e Ganhe no Cassino bet 7k!
Jogos Populares e Grandes Prêmios no Cassino Online bk bet!
Aposte Agora e Conquiste Vitórias no Cassino
sporting bet!
Cassino jon bet: Grandes Oportunidades de
Vitória!
estrella bet: Onde Você Sempre Ganha!
pin up casino: pin up azerbaycan – pinup az
c bet: Jogue e Ganhe
com Prêmios Instantâneos!
Jogue Agora e Ganhe no Cassino Online 20 bet!
Jogue no bet 365 e Ganhe Prêmios Rápidos e Fáceis!
stakecasino: Apostas
Fáceis, Prêmios Incríveis!
Aposte e Ganhe no Cassino Online dj bet!
pin-up: pin up – pin-up casino giris
Cassino Online lv bet:
Simples, Divertido e Lucrativo!
ona bet: Onde Jogadores Conquistam Grandes
Vitórias!
bet 7: Jogue e Ganhe com Prêmios Instantâneos!
omg bet: Onde a Sorte Encontra
os Melhores Jogadores!
Cassino bat bet:
Jogue Agora e Conquiste Grandes Vitórias!
pag bet: Jogue e Ganhe com Prêmios Instantâneos!
Jogue e Ganhe com Facilidade no Cassino bet 77!
giga bet:
Apostas Fáceis, Grandes Chances de Ganhar!
Cassino seu bet:
Grandes Vitórias Esperam por Você!
Ganhe Prêmios Fáceis e Rápidos no Cassino bet apostas!
Descubra os Jogos Populares do Cassino bet vip e Vença!
vavada вход: вавада официальный сайт – вавада официальный сайт
Cassino bet pix: Grandes Vitórias Esperam por Você!
пин ап зеркало пин ап вход pin up вход
Ganhe Rápido nos Jogos Populares do Cassino Online mr bet!
Ganhe Agora no Cassino 166 bet com Facilidade!
http://pinupaz.top/# pin up casino
Ganhe Prêmios Rápidos no Cassino bet 61!
профиль с подписчиками покупка аккаунтов
Aposte no Cassino fb bet e Ganhe Grande!
Aposte e Ganhe no gg bet com Jogos Fáceis!
Jogue no Cassino f12 bet
e Ganhe de Forma Simples e Rápida!
I have recently started a site, the information you provide on this web site has helped me tremendously. Thank you for all of your time & work.
Ganhe no Cassino esporte bet com
Jogos Populares e Fáceis!
маркетплейс для реселлеров платформа для покупки аккаунтов
Cassino 9d bet: Onde Você
Pode Ganhar Facilmente!
Jogue no 365 bet e Ganhe com Facilidade nos Jogos Populares!
профиль с подписчиками продажа аккаунтов соцсетей
lampions bet:
Apostas Fáceis e Grandes Vitórias!
nacional bet: Onde Grandes Vitórias São Fáceis de
Alcançar!
Cassino Online starda: Onde os Jogos Populares Levam
à Vitória!
маркетплейс для реселлеров безопасная сделка аккаунтов
Ganhe Rápido com os Jogos Populares do Cassino iri bet!
pin-up casino giris: pin up az – pin up casino
пинап казино: пинап казино – пин ап казино
пин ап казино: пинап казино – пин ап казино
pin up casino pin-up pin up
https://pinuprus.pro/# пин ап зеркало
pin up azerbaycan: pin-up casino giris – pin up az
pin up az: pin up – pin-up
Thanks on your marvelous posting! I definitely enjoyed reading it, you may be a great author.I will be sure to bookmark your blog and will eventually come back sometime soon. I want to encourage that you continue your great job, have a nice afternoon!
WOW just what I was searching for. Came here by searching for meta_keyword
Yes! Finally someone writes about keyword1.
Hi there i am kavin, its my first occasion to commenting anywhere, when i read this post i thought i could also make comment due to this sensible piece of writing.
A final da copa do brasil Garante a Segurança dos Seus Saques: Saiba Como Evitar Problemas
copa do brasil tabela
e a Segurança de Seus Saques: Como Protegemos Seu Dinheiro
Acelerando Seus Saques na brasil copa do mundo:
Como Tornar o Processo Mais Ágil
Acelerando Seus Saques na copa do brasil classificação:
Como Tornar o Processo Mais Ágil
A Importância da Verificação de Documentos
no Saque da tabela copa do brasil 2025
Como Acelerar Seus Saques na chaveamento copa do brasil 2025:
Dicas Para Evitar Demoras
Dúvidas Sobre o Saque na copa do brasil 2025 tabela?
Veja Como Você Pode Retirar Seu Dinheiro Sem Complicação
final da copa do brasil 2025: Como Retirar Seu Dinheiro em Poucos Passos
Na premiação copa do brasil 2025, a plataforma garante
a segurança de suas informações, permitindo que você retire
seus ganhos de maneira tranquila e rápida.
Saque Rápido e Seguro: Como a copa do brasil ao vivo Protege
Seus Ganhos
jogos copa do brasil: O Que Você Precisa Saber Para
Fazer Saques Rápidos e Sem Erros
A jogos da copa do brasil de hoje cuida de sua segurança financeira, permitindo que você retire seus fundos sem preocupações, desde que envie os documentos
corretos.
A Importância da Verificação de Documentos no Saque
da jogos de hoje copa do brasil
A plataforma resultado copa do brasil é uma
das mais seguras do mercado, garantindo a segurança dos seus saques com a exigência de documentos básicos.
Se você está pensando em fazer um saque, a jogos da copa do brasil 2025
oferece um processo fácil. Apenas envie os
documentos solicitados e a transação será feita rapidamente.
jogos da copa do brasil:
Como Retirar Dinheiro de Forma Rápida e Segura Sem Complicação
O Que A tabela de classificação da copa do brasil Precisa Para Realizar Seu Saque
Sem Demoras
Com a jogos da copa do brasil hoje, você
pode retirar seus ganhos com facilidade e sem preocupações.
O processo de retirada é ágil e totalmente seguro.
Guia Completo de Saque na oitavas de final da copa do brasil 2025: Como Garantir Que Seu
Dinheiro Chegue Rápido
jogo copa do brasil: Como Garantir que Seus
Saques Sejam Processados Sem Erros
premiação copa do brasil: Como Realizar Saque Rápido e Sem Stress
Como Evitar Problemas ao Solicitar Saques na sorteio da copa do brasil 2025
copa do brasil de futebol de 2025: Como Realizar Saques Rápidos com
Documentação Apropriada
пин ап казино: пинап казино – pin up вход
Saque na copa do brasil final:
Como Enviar os Documentos Corretos para Evitar Retardos
http://pinupaz.top/# pin up
Tudo Sobre Saque na jogos de copa do brasil:
Como Retirar Seus Ganhos de Forma Rápida e Segura
quantas copa do brasil o corinthians tem: Como Garantir Que Seus Saques Cheguem Sem Problemas
Retirar Seus Fundos na sorteio da copa do brasil de Forma Rápida:
Dicas e Truques
copa do brasil games: Como Solicitar Saque com Documentação Adequada e Sem Atrasos
Guia Completo Para Retirar Seus Fundos na final copa do brasil de Forma Segura
пин ап вход пин ап казино пин ап вход
Yuksek oranlar, lisansli yapilar ve ozel promosyonlarla dolu Bedava bonus veren siteler dunyasina giris yap!
Como Retirar Seus Fundos na semifinal copa do brasil de Forma Simples e Segura
Akcabet �lk uyelik Bonusu hakkinda en guncel bilgilere ulasin. Giris adresi, bonus firsatlari, guvenilirlik ve uyelik detaylariyla Akcabet �lk uyelik Bonusu sizi bekliyor.
copa do brasil hoje:
Como Garantir a Segurança do Seu Dinheiro Durante o Processo de Saque
Saque Rápido na quartas de final copa do brasil:
Passo a Passo para Retirar Seu Dinheiro Sem Complicação
Efescasino Giris hakkinda en guncel bilgilere ulasin. Giris adresi, bonus firsatlari, guvenilirlik ve uyelik detaylariyla Efescasino Giris sizi bekliyor.
Processo de Retirada na chaveamento copa do brasil: Como Evitar Problemas e Garantir
Agilidade
Quer realizar um saque na jogo da copa do brasil?
Só precisa enviar seu CPF e um comprovante de pagamento.
Fácil e seguro!
Retirando seus Lucros da sorteio copa do brasil: O Que Você Precisa Saber Para um Processo Ágil
Com a classificação da copa do brasil, o
processo de saque é direto e sem complicação. Envie os
documentos corretos e você receberá seus fundos rapidamente.
Documentos Para Saque na classificação copa do brasil:
O Que Você Precisa Enviar Para Garantir Sua Retirada
vavada casino: вавада – vavada casino
Retirada de Fundos Sem Estresse: Como a estatísticas de copa do brasil Garante Seu Saque
A copa do brasil sorteio Protege Seu Dinheiro:
Como Garantir Saques Rápidos e Seguros
Como Retirar Seus Lucros de Forma Ágil na sorteio copa do brasil 2025
Processo de Retirada na rodada da copa do brasil:
Como Evitar Problemas e Garantir Agilidade
Retirada de Fundos Sem Estresse: Como a jogos copa do brasil 2025 Garante Seu Saque
Guia Completo de Saque: Como Evitar Complicações na copa do brasil oitavas
Saque na tabela copa do brasil: Como Garantir
que Seus Ganhos Cheguem Rápido à Sua Conta
Passo a Passo para Retirar Seus Ganhos na copa do brasil sub 20:
Agilidade e Segurança
Processo de Retirada na tabela da copa do brasil 2025: Como
Evitar Problemas e Garantir Agilidade
Saque na flamengo copa do brasil:
Como Enviar os Documentos Corretos para Evitar Retardos
A quartas copa do brasil 2025 assegura transações rápidas e seguras.
Basta enviar os documentos certos e você poderá sacar
seus ganhos sem demora!
Você pode confiar na final copa do brasil 2025 para uma experiência de saque
sem problemas. O processo é rápido e seus dados financeiros ficam seguros.
Realize seu saque na tabela da copa do brasil com
confiança, pois a plataforma garante a segurança de seus dados e transações
financeiras.
Processo de Retirada na classificação copa do brasil 2025: Como Evitar Problemas e Garantir Agilidade
vavada вход: vavada вход – вавада
Acelerando Seus Saques na sao paulo copa do brasil: Como Tornar o Processo
Mais Ágil
Na resultado da copa do brasil, a segurança dos seus fundos é garantida.
Apenas envie seus documentos e seus saques serão processados sem demora.
Segurança e Agilidade no Saque da copa do brasil 2021: Como Retirar Seus
Fundos com Confiança
Saque Seguro na copa do brasil 2025:
Como Evitar Fraudes e Garantir Seu Dinheiro
I have been absent for a while, but now I remember why I used to love this blog. Thank you, I will try and check back more frequently. How frequently you update your website?
pin up casino: pin up az – pin up casino
http://pinuprus.pro/# пин ап казино
пинап казино пин ап казино пин ап вход
маркетплейс аккаунтов платформа для покупки аккаунтов
pin up: pin-up – pinup az
vavada casino: вавада зеркало – vavada
https://pinupaz.top/# pin up
Very informative and fantastic structure of written content, now that’s user genial (:.
покупка аккаунтов платформа для покупки аккаунтов
Normally I don’t learn post on blogs, but I would like to say that this write-up very forced me to take a look at and do it! Your writing taste has been surprised me. Thanks, quite nice post.
пин ап казино официальный сайт pin up вход пин ап зеркало
гарантия при продаже аккаунтов биржа аккаунтов
vavada casino: vavada вход – вавада зеркало
futebol ao vivo serie b: Como
Garantir Que Seus Saques Cheguem Rápido e Com Segurança
Saques Sem Complicação: Como Retirar Seus Ganhos
na futebol ao vivo santos
futebol americano ao vivo:
O Que Você Precisa Saber Para Fazer Saques Rápidos e Sem Erros
A tem futebol ao vivo hoje torna o processo
de saque fácil e seguro. Com documentos básicos, você terá acesso aos
seus fundos rapidamente.
Ao retirar na futebol ao vivo sao paulo, você só precisa fornecer informações básicas, como CPF e identidade.
O sistema é rápido e altamente seguro!
Yat�r�ms�z Deneme Bonusu Veren Siteler ile kay�t ol, para yat�rmadan slot ve casino oyunlar�n� dene!
Documentos e Procedimentos para Saque na futebol ao vivo de hoje: Como Evitar Retardos
I don’t even know the way I stopped up here, however I assumed this submit was good. I do not understand who you’re but definitely you are going to a well-known blogger in case you are not already. Cheers!
I am regular reader, how are you everybody? This piece of writing posted at this web page is really fastidious.
I was wondering if you ever considered changing the structure of your blog? Its very well written; I love what youve got to say. But maybe you could a little more in the way of content so people could connect with it better. Youve got an awful lot of text for only having 1 or 2 images. Maybe you could space it out better?
Dúvidas Sobre o Saque na portal rmc futebol ao vivo?
Veja Como Você Pode Retirar Seu Dinheiro Sem Complicação
Retirando Dinheiro da futebol ao vivo na net: O Que Fazer Para Garantir Seu Saque Rápido
Segurança no Saque da futebol ao vivo biz: Como
Evitar Problemas e Retirar Seu Dinheiro com Facilidade
Na rei do futebol ao vivo, seus saques são processados com agilidade e
você sempre sabe exatamente quais documentos são necessários.
futebol max ao vivo hoje: Como Realizar Saques Rápidos e Sem Complicação
I simply wanted to post a note in order to say thanks to you for all of the unique secrets you are posting here. My incredibly long internet investigation has at the end of the day been recognized with pleasant concept to share with my good friends. I ‘d say that most of us site visitors are unequivocally endowed to live in a good website with so many marvellous professionals with very beneficial tips. I feel rather blessed to have come across your entire webpage and look forward to really more cool moments reading here. Thanks a lot again for everything.
O processo de retirada na copa do brasil
é muito simples. Basta enviar os documentos solicitados e a plataforma processa
rapidamente seu saque.
futebol on line ao vivo:
Como Garantir Agilidade no Processo de Saque
Saque Sem Complicação: O Que Você Precisa Saber
na score futebol ao vivo
Documentos e Procedimentos para Saque na google futebol ao vivo: Como Evitar Retardos
assisti futebol ao vivo e
a Segurança de Seus Saques: Como Protegemos Seu Dinheiro
Para realizar um saque na tv brasil futebol ao vivo, basta enviar seus dados pessoais e comprovantes.
O processo é ágil e totalmente seguro.
vavada casino: vavada casino – вавада казино
A futebol ao vivo online hd se preocupa com a
segurança dos seus dados e oferece um sistema de
saque altamente eficiente.
A futebol ao vivo no youtube Protege Seu Dinheiro:
Como Garantir Saques Rápidos e Seguros
Saques na ver futebol ao vivo gratis: O Que
Você Precisa Saber Para Retirar Seu Dinheiro com Facilidade
Como Realizar um Saque na max ao vivo futebol
de Forma Simples e Ágil
Como Realizar um Saque na futebol ao vivo grates de Forma Simples
e Ágil
A placar do futebol ao vivo torna o processo
de saque fácil e seguro. Com documentos básicos, você terá acesso aos
seus fundos rapidamente.
Se você deseja realizar um saque de forma simples
e segura, a sbt futebol ao vivo hoje
é a melhor plataforma para isso. Envie os documentos e aguarde a
confirmação.
futebol ao vivo net: Como Retirar Seus
Ganhos Rapidamente e Sem Riscos
O Que A assista futebol ao vivo Precisa Para Realizar Seu Saque Sem Demoras
https://pinuprus.pro/# пин ап зеркало
Passo a Passo para Retirada de Fundos na futebol resultado ao vivo de Forma Simples
аккаунты с балансом купить аккаунт
Como Garantir Saques Rápidos e Seguros na flashscore futebol ao vivo
A canal de futebol ao vivo é uma das plataformas mais seguras para realizar saques.
Você só precisa fornecer seus dados e comprovantes, e o saque será feito rapidamente.
Para retirar dinheiro na jogos ao vivo futebol, tudo o
que você precisa fazer é enviar alguns documentos simples, e pronto!
Saques Rápidos e Seguros na assistir ao vivo futebol: O Que Você Precisa Saber
pin up: pin up casino – pin-up casino giris
I believe this site has got some rattling excellent info for everyone. “He is able who thinks he is able.” by Buddha.
пин ап казино pin up вход пинап казино
Documentos Para Saque na futebol interior ao vivo:
O Que Você Precisa Enviar Para Garantir Sua Retirada
A tv tudo futebol ao vivo oferece um
processo de saque simples e seguro, garantindo que suas informações financeiras estarão sempre protegidas.
Saque Seguro na placar ao vivo de futebol:
Como Evitar Fraudes e Garantir Seu Dinheiro
tv brasil ao vivo futebol: Como Retirar
Seus Ganhos de Forma Simples e sem Erros
Como Evitar Problemas ao Solicitar Saques na futebol ao vivo internet
futebol ao vivo celular: Como Retirar Seus Fundos de
Forma Eficiente
Como Evitar Problemas ao Solicitar Saques na futebol ao vivo youtube
Como Retirar Seus Fundos da futebol pelo mundo ao vivo de Forma
Segura e Eficiente
pin up casino: pin up azerbaycan – pin up az
Quais Documentos Você Precisa Enviar para Realizar um Saque na futebol ao vivo placar?
Como Retirar Seus Fundos na futebol ao vivo de graca:
Dicas Para um Processo Rápido e Seguro
Hello.This post was really motivating, especially because I was looking for thoughts on this topic last Friday.
Guia Completo de Saque na futebol ao vivo app:
Como Garantir Que Seu Dinheiro Chegue Rápido
https://pinuprus.pro/# пин ап зеркало
Retirada de Fundos Sem Estresse: Como a aplicativo futebol ao vivo Garante Seu Saque
Segurança no Saque da futebol ao vivo sem travar:
Como Evitar Problemas e Retirar Seu Dinheiro com Facilidade
Dúvidas Sobre o Saque na acompanhar futebol ao vivo?
Veja Como Você Pode Retirar Seu Dinheiro Sem Complicação
Na futebol de graça ao vivo,
você pode sacar seus ganhos rapidamente.
O processo é simples e os documentos necessários são fáceis de enviar.
ver futebol ao vivo online: Como
Retirar Seu Dinheiro em Poucos Passos
Guia Completo de Saque: Como Evitar Complicações na futebol ao vivo e online
Passo a Passo para Retirar Seus Ganhos na jogo ao vivo de futebol:
Agilidade e Segurança
пин ап зеркало: пин ап казино – пин ап казино официальный сайт
магазин аккаунтов аккаунт для рекламы
pin up вход пин ап казино официальный сайт пин ап вход
This is really interesting, You’re a very skilled blogger. I have joined your feed and look forward to seeking more of your fantastic post. Also, I’ve shared your website in my social networks!
купить аккаунт с прокачкой продажа аккаунтов
Você quer saber como fazer um saque rápido na futemax ao vivo futebol?
Envie apenas seus dados pessoais e comprovantes, e a plataforma cuidará
do resto.
pin up вход: пин ап зеркало – пин ап казино
http://expressrxcanada.com/# reddit canadian pharmacy
I am constantly thought about this, thankyou for putting up.
Здесь вы сможете найти подробную информацию о партнёрском предложении: 1win.
Доступны все аспекты работы, условия участия и потенциальные вознаграждения.
Все части детально описан, что помогает быстро освоить в тонкостях функционирования.
Плюс ко всему, имеются разъяснения по запросам и практические указания для новичков.
Материалы поддерживаются в актуальном состоянии, поэтому вы смело полагаться в достоверности предоставленных материалов.
Источник поможет в изучении партнёрской программы 1Win.
indian pharmacy: Medicine From India – indian pharmacy online
маркетплейс аккаунтов купить аккаунт
My developer is trying to convince me to move to .net from PHP. I have always disliked the idea because of the expenses. But he’s tryiong none the less. I’ve been using WordPress on a variety of websites for about a year and am anxious about switching to another platform. I have heard fantastic things about blogengine.net. Is there a way I can transfer all my wordpress content into it? Any kind of help would be greatly appreciated!
Excellent way of describing, and pleasant article to get facts on the topic of my presentation topic, which i am going to deliver in university.
Hi there colleagues, its enormous piece of writing about teachingand fully explained, keep it up all the time.
indian pharmacy online indian pharmacy online reputable indian pharmacies
the canadian drugstore: Express Rx Canada – canadian pharmacy sarasota
http://medicinefromindia.com/# MedicineFromIndia
маркетплейс для реселлеров продажа аккаунтов
indian pharmacy: medicine courier from India to USA – indian pharmacy online shopping
We’re a group of volunteers and opening a new scheme in our community. Your site offered us with valuable info to work on. You have done an impressive job and our entire community will be thankful to you.
safe reliable canadian pharmacy: Express Rx Canada – canadian pharmacy 1 internet online drugstore
reliable canadian online pharmacy Generic drugs from Canada canadian world pharmacy
canadian pharmacy ltd: ExpressRxCanada – best canadian pharmacy
http://rxexpressmexico.com/# Rx Express Mexico
mexican rx online: RxExpressMexico – mexico pharmacies prescription drugs
I do agree with all the ideas you have offered for your post. They are really convincing and can definitely work. Nonetheless, the posts are very brief for starters. May just you please extend them a little from subsequent time? Thanks for the post.
I don’t even know how I ended up here, but I thought this post was great. I don’t know who you are but certainly you are going to a famous blogger if you are not already 😉 Cheers!
Superb blog you have here but I was wondering if you knew of any user discussion forums that cover the same topics talked about in this article? I’d really like to be a part of online community where I can get responses from other knowledgeable people that share the same interest. If you have any recommendations, please let me know. Thank you!
vipps approved canadian online pharmacy: Express Rx Canada – canada ed drugs
Como Realizar um Saque na futebol play hd ao vivo de Forma
Simples e Ágil
Como Sacar Seus Ganhos na futebol ao vivo com imagem de Forma
Rápida e Segura
Passo a Passo para Realizar Saque na site de futebol ao vivo: Garantindo
Agilidade
At Nursing Professionals Certifications Online, we are dedicated to providing accessible, convenient, and high-quality medical certification courses to healthcare professionals worldwide. Our platform is designed to meet the evolving needs of medical professionals seeking to enhance their skills, expand their knowledge, and advance their careers. Do you have problems passing your exam? We provide medical students with certificates, licenses, questions, and answers and upgrade previous scores for Prometric exams. #ECFMG #MCAT #SCFHS #MSNCB #OET #DHA #NLCEX #HAAD #MOH #MRCGP #MCAT #OMSB #SMLE #USMLE #QCHP #NHRA #DHCC #AMC #MRCS #MRCOG. You can obtain the above certificate and license online without attending the exam. Provide leaked questions bank and answers before the exam date. You can also upgrade your previous results. Study materials and tips are available for your upcoming exam dates. Chat on WhatsApp with +971 56 954 4538
Como Retirar Ganhos na futebol ao vivo em hd com Agilidade e Segurança
tv online futebol ao vivo: Como
Retirar Seus Ganhos de Forma Simples e sem Erros
Saque Seguro na futebol gr谩tis ao vivo: Como
Evitar Fraudes e Garantir Seu Dinheiro
futebol tv ao vivo: Como Solicitar Saque com Documentação Adequada e Sem Atrasos
https://medicinefromindia.shop/# indian pharmacy online
Para realizar saques rápidos e seguros na futebol ao vivo futemax,
basta enviar o seu CPF e um comprovante de residência.
É fácil e rápido!
Rx Express Mexico: mexico pharmacies prescription drugs – mexico pharmacies prescription drugs
Retirar Seus Fundos na assitir futebol ao vivo
de Forma Rápida: Dicas e Truques
MedicineFromIndia medicine courier from India to USA Medicine From India
online canadian pharmacy: Buy medicine from Canada – canada rx pharmacy world
Quais São as Formas de Saque na ao vivo futebol e
Como Elas Garantem Sua Segurança?
Como Retirar Seu Dinheiro da resultados ao vivo futebol: Tudo o
Que Você Precisa Saber
Saque na futebol ao vivo br: Como Enviar os Documentos Corretos para Evitar Retardos
Passo a Passo de Como Retirar Seus Ganhos na futebol ao vivo rmc com Facilidade
canada pharmacy: Generic drugs from Canada – canadian pharmacy 365
Como Retirar Seus Ganhos da futebol hd ao vivo: O Processo Explicado
Guia Completo Para Retirar Seus Fundos na jogos futebol hoje ao vivo de Forma Segura
futebol ao vivo tudo tv:
Como Evitar Erros no Processo de Saque
resultado ao vivo futebol:
Como Realizar Saques Rápidos e Sem Complicação
Como Solicitar Saque de Forma Rápida na app futebol ao vivo:
Evite Atrasos
futebol na tv hoje ao vivo:
Como Retirar Seus Fundos de Forma Eficiente
Passo a Passo para Retirada de Fundos na resultados futebol ao vivo de Forma Simples
https://medicinefromindia.shop/# MedicineFromIndia
canada drugs online: Canadian pharmacy shipping to USA – reliable canadian pharmacy
Como Realizar Saques Sem Estresse na futebol gratis ao vivo
Como Retirar Seus Fundos da futebol ao vivo assistir de Forma Segura e Eficiente
canadian family pharmacy: Canadian pharmacy shipping to USA – pharmacy wholesalers canada
Retirar seu dinheiro na futebol ao vivo palmeiras é simples!
Apenas envie os documentos necessários e seu saque será
processado rapidamente.
Rx Express Mexico buying prescription drugs in mexico online RxExpressMexico
canadian online pharmacy reviews: canadian pharmacy 24 com – legit canadian online pharmacy
futebol max ao vivo: Como Retirar Seus Ganhos Rapidamente e
Sem Riscos
Para retirar seus ganhos na futebol ao vivo multi, basta enviar
os documentos necessários e você terá seu saque processado em pouco tempo.
Passo a Passo para Retirada de Fundos na futebol ao vivo na tv hoje de Forma Simples
Como Retirar Seus Fundos da futebol ao vivo premiere de Forma Segura e Eficiente
Documentos Necessários Para Realizar Saque na jogos de futebol ao vivo: Confira a Lista Completa
futebol play ao vivo: Como Obter Seu Dinheiro Rápido com Documentação Correta
Como Garantir Saques Rápidos e Seguros na max futebol ao vivo
Dúvidas Sobre o Saque na futebol ao vivo multicanal?
Veja Como Você Pode Retirar Seu Dinheiro Sem Complicação
Na placar de futebol ao vivo, seu
saque é tratado com a máxima prioridade, desde que você forneça os documentos
necessários. Sem complicação!
medicine courier from India to USA: indian pharmacy online – indian pharmacy online shopping
http://rxexpressmexico.com/# mexico pharmacies prescription drugs
Aposte nos Melhores Jogos no maromba bet
e Ganhe!
Aposte no Cassino infinity bet e Conquiste Grandes Prêmios!
top 10 online pharmacy in india: indian pharmacy – MedicineFromIndia
buying from canadian pharmacies: Buy medicine from Canada – canadian online pharmacy reviews
pharmacy wholesalers canada Generic drugs from Canada canadian king pharmacy
Aposte no Cassino sorte na bet e Vença
Agora Mesmo!
Ganhe Prêmios Rápidos e Simples no Cassino beto ribeiro!
Medicine From India: Medicine From India – india online pharmacy
https://rxexpressmexico.shop/# mexico pharmacy order online
Rx Express Mexico: mexico drug stores pharmacies – RxExpressMexico
buying from online mexican pharmacy: mexico drug stores pharmacies – Rx Express Mexico
canadian pharmacy price checker Express Rx Canada canadian pharmacy price checker
Medicine From India: indian pharmacy online – mail order pharmacy india
https://medicinefromindia.com/# MedicineFromIndia
Основные параметры ОЗДС могут варьироваться в зависимости от размера объекта, уровня зараженности грызунами и требований заказчика.
mexican rx online: Rx Express Mexico – mexico drug stores pharmacies
Medicine From India: indian pharmacy online – indian pharmacy online shopping
Saque Sem Complicação: O Que Você Precisa Saber na futebol hoje ao vivo
A futebol ao vivo de gra莽a garante que seu processo de saque será feito rapidamente, desde que você envie os documentos corretos.
mexico pharmacies prescription drugs mexico pharmacy order online mexican online pharmacy
Na futebol ao vivo, você pode sacar
seus fundos com rapidez, apenas fornecendo um documento de identidade
e um comprovante de residência.
futebol ao vivo hoje na tv:
O Que Você Precisa Saber Antes de Solicitar o Seu Saque
Retirando Fundos na resultado futebol ao vivo:
O Guia Completo de Segurança e Agilidade
canada rx pharmacy world: ExpressRxCanada – prescription drugs canada buy online
A futebol hoje na tv ao vivo se preocupa com a segurança dos seus dados e oferece um sistema de saque altamente eficiente.
https://medicinefromindia.shop/# Medicine From India
jogo de futebol ao vivo:
Como Garantir que Seu Saque Seja Processado Imediatamente
Saques Sem Complicação: Como Retirar Seus Ganhos na futebol ao vivo agora
A ver futebol ao vivo hoje tem um sistema eficiente para garantir que
seu saque seja processado de maneira ágil e segura.
A nosso futebol ao vivo oferece
saques rápidos e sem complicação, com total
segurança para seus dados e transações financeiras.
Retirando Dinheiro da futebol ao vivo online: O Que Fazer Para Garantir Seu Saque Rápido
Medicine From India: indian pharmacy – indian pharmacy
Retirando Fundos na futebol:
O Guia Completo de Segurança e Agilidade
A futebol ao vivo no celular oferece saques rápidos e
sem complicação, com total segurança para seus dados e transações financeiras.
Para retirar dinheiro da g1 futebol ao vivo, tudo o
que você precisa fazer é enviar o seu CPF e
um comprovante de residência. Rápido e fácil!
futebol ao vivo flamengo e a Segurança
de Seus Saques: Como Protegemos Seu Dinheiro
indian pharmacy online shopping: MedicineFromIndia – indian pharmacy online shopping
Valuable info. Lucky me I found your web site by accident, and I am shocked why this accident didn’t happened earlier! I bookmarked it.
Como Realizar um Saque na mundo fut futebol ao vivo
de Forma Simples e Ágil
Documentos Necessários para Saque na futebol online ao vivo:
Evite Atrasos
Para um saque rápido na futebol ao vivo tv, basta enviar seus dados
de identidade e comprovante de residência. A plataforma
cuida de todo o resto.
Your article helped me a lot, is there any more related content? Thanks!
A futebol ao vivo gr谩tis oferece um
sistema de saque eficiente, permitindo que você retire
seus ganhos com facilidade e segurança.
futemax futebol ao vivo:
Como Evitar Problemas ao Solicitar um Saque
futebol ao vivo na tv: O Que Você Precisa
Fazer Para Retirar Seus Ganhos Sem Problemas
Você sabia que na futebol feminino ao vivo, para
realizar o saque, tudo o que você precisa é um documento de identidade válido e um comprovante de residência recente?
Tadalafil 20 mg prix sans ordonnance: cialis generique – Tadalafil 20 mg prix sans ordonnance tadalmed.shop
Achat Cialis en ligne fiable Tadalafil achat en ligne Cialis generique prix tadalmed.com
Passo a Passo de Como Retirar Seus Ganhos na futebol ao vivo hd com Facilidade
Lovely just what I was searching for.Thanks to the author for taking his time on this one.
achat kamagra: kamagra oral jelly – kamagra livraison 24h
Pharmacie en ligne livraison Europe: Pharmacie en ligne France – п»їpharmacie en ligne france pharmafst.com
http://pharmafst.com/# pharmacie en ligne livraison europe
kamagra livraison 24h: Kamagra Oral Jelly pas cher – acheter kamagra site fiable
beto barbosa: Apostas Simples, Grandes Premiações!
beto carrero:
Jogos Populares e Grandes Vitórias!
heads bet:
Vença com Jogos Populares e Rápidos!
kamagra gel Kamagra Commander maintenant Achetez vos kamagra medicaments
Kamagra Oral Jelly pas cher: kamagra gel – kamagra gel
Achat Cialis en ligne fiable: cialis prix – cialis sans ordonnance tadalmed.shop
Compre visualizações e espectadores reais para suas lives no YouTube, Instagram, Twitch, TikTok e Facebook. Aumente seu engajamento e credibilidade online com serviços seguros e confiáveis. Impulsione suas transmissões ao vivo hoje!
https://kamagraprix.com/# kamagra 100mg prix
Cialis sans ordonnance 24h: Tadalafil achat en ligne – Tadalafil sans ordonnance en ligne tadalmed.shop
vente de mГ©dicament en ligne: Pharmacie en ligne France – pharmacie en ligne france fiable pharmafst.com
The very core of your writing while sounding agreeable in the beginning, did not really sit properly with me personally after some time. Someplace throughout the paragraphs you actually were able to make me a believer but only for a very short while. I however have got a problem with your jumps in logic and you might do nicely to fill in all those breaks. If you actually can accomplish that, I could surely be impressed.
http://tadalmed.com/# Cialis sans ordonnance 24h
Hello.This article was really motivating, particularly since I was browsing for thoughts on this topic last week.
cialis sans ordonnance: Achat Cialis en ligne fiable – Pharmacie en ligne Cialis sans ordonnance tadalmed.shop
What’s Happening i am new to this, I stumbled upon this I have found It absolutely helpful and it has helped me out loads. I’m hoping to contribute & help different users like its helped me. Good job.
https://pharmafst.shop/# pharmacie en ligne avec ordonnance
pharmacie en ligne france pas cher: Pharmacies en ligne certifiees – pharmacie en ligne france pas cher pharmafst.com
On this site, you can find top websites for CS:GO betting.
We have collected a wide range of gaming platforms specialized in CS:GO players.
Every website is handpicked to secure safety.
csgo accounts
Whether you’re new to betting, you’ll quickly select a platform that matches your preferences.
Our goal is to help you to connect with reliable CS:GO wagering platforms.
Check out our list today and elevate your CS:GO playing experience!
Hi there colleagues, good piece of writing and fastidious urging commented here, I am truly enjoying by these.
通过本平台,您可以联系专门从事临时的高风险任务的执行者。
我们提供大量可靠的从业人员供您选择。
不管是何种高风险任务,您都可以方便找到合适的人选。
为了钱而下令谋杀
所有合作人员均经过审核,维护您的利益。
服务中心注重匿名性,让您的危险事项更加顺利。
如果您需要详细资料,请立即联系!
https://kamagraprix.com/# kamagra livraison 24h
п»їpharmacie en ligne france: Meilleure pharmacie en ligne – pharmacie en ligne france livraison internationale pharmafst.com
Лето 2025 года обещает быть насыщенным и экспериментальным в плане моды.
В тренде будут асимметрия и яркие акценты.
Актуальные тона включают в себя мягкие пастели, подчеркивающие индивидуальность.
Особое внимание дизайнеры уделяют деталям, среди которых популярны плетёные элементы.
https://webyourself.eu/blogs/433934/Tips-for-Choosing-a-Patchwork-Bag
Опять актуальны элементы модерна, через призму сегодняшнего дня.
В стритстайле уже можно увидеть смелые решения, которые удивляют.
Будьте в курсе, чтобы чувствовать себя уверенно.
kamagra livraison 24h: Acheter Kamagra site fiable – Kamagra pharmacie en ligne
Hi my friend! I wish to say that this article is amazing, nice written and include almost all vital infos. I would like to see more posts like this.
Этот сайт — настоящий интернет-бутик Bottega Veneta с доставкой по стране.
Через наш портал вы можете заказать эксклюзивные вещи Bottega Veneta с гарантией подлинности.
Любая покупка идут с официальной гарантией от производителя.
боттега венета цум
Доставление осуществляется без задержек в по всей территории России.
Платформа предлагает удобную оплату и гарантию возврата средств.
Положитесь на официальном сайте Боттега Венета, чтобы получить безупречный сервис!
Achetez vos kamagra medicaments: achat kamagra – kamagra oral jelly
https://pharmafst.shop/# pharmacie en ligne sans ordonnance
Your point of view caught my eye and was very interesting. Thanks. I have a question for you.
На данной странице вы можете получить действующее зеркало 1 икс бет без проблем.
Постоянно обновляем доступы, чтобы облегчить беспрепятственный доступ к ресурсу.
Переходя через зеркало, вы сможете пользоваться всеми функциями без ограничений.
зеркало 1xbet
Наш сайт позволит вам безопасно получить новую ссылку 1xBet.
Мы стремимся, чтобы все клиенты смог использовать все возможности.
Не пропустите обновления, чтобы быть на связи с 1 икс бет!
kamagra oral jelly Achetez vos kamagra medicaments Kamagra Oral Jelly pas cher
Статья содержит полезную информацию, которая может быть полезной для практического применения.
Я не могу не отметить стиль и ясность изложения в этой статье. Автор использовал простой и понятный язык, что помогло мне легко усвоить материал. Огромное спасибо за такой доступный подход!
Pharmacie sans ordonnance: pharmacie en ligne pas cher – pharmacie en ligne france fiable pharmafst.com
cialis generique: Tadalafil achat en ligne – cialis generique tadalmed.shop
vente de mГ©dicament en ligne: Pharmacies en ligne certifiees – pharmacie en ligne livraison europe pharmafst.com
Aposte no Cassino marjack bet e Vença Agora Mesmo!
I have recently started a web site, the information you provide on this web site has helped me tremendously. Thank you for all of your time & work. “Show me the man who keeps his house in hand, He’s fit for public authority.” by Sophocles.
Ganhe no esoccer bet – Simples, Rápido e
Divertido!
https://tadalmed.com/# Tadalafil 20 mg prix sans ordonnance
acheter mГ©dicament en ligne sans ordonnance: pharmacie en ligne france livraison belgique – pharmacie en ligne france livraison internationale pharmafst.com
cialis sans ordonnance: Acheter Cialis 20 mg pas cher – Cialis sans ordonnance pas cher tadalmed.shop
pharmacie en ligne pas cher Meilleure pharmacie en ligne pharmacie en ligne france pas cher pharmafst.shop
kamagra pas cher: kamagra 100mg prix – kamagra gel
esportenet bet: Onde Jogadores Ganham
com Facilidade!
Il nostro servizio rende possibile il reclutamento di lavoratori per lavori pericolosi.
Gli utenti possono selezionare esperti affidabili per lavori una tantum.
Le persone disponibili sono valutati con severi controlli.
ordina omicidio
Sul sito è possibile leggere recensioni prima di procedere.
La fiducia resta la nostra priorità.
Contattateci oggi stesso per ottenere aiuto specializzato!
https://pharmafst.com/# Pharmacie en ligne livraison Europe
The site lets you hire specialists for short-term hazardous jobs.
Visitors are able to quickly schedule help for specialized operations.
Each professional are trained in executing complex jobs.
hire a killer
This site offers secure arrangements between clients and freelancers.
If you require fast support, this platform is here for you.
List your task and find a fit with a skilled worker today!
Автор статьи представляет информацию, основанную на достоверных источниках.
Pharmacie sans ordonnance: Livraison rapide – vente de mГ©dicament en ligne pharmafst.com
Cialis sans ordonnance 24h: Acheter Cialis – Tadalafil sans ordonnance en ligne tadalmed.shop
Aposte nos Jogos Populares do Cassino mesk bet e Vença!
I always was interested in this topic and stock still am, regards for putting up.
4 play bet:
O Cassino Online Onde Você Ganha Fácil!
Traditional timepieces will always remain relevant.
They represent engineering excellence and showcase a level of detail that modern gadgets simply lack.
Each piece is powered by tiny components, making it both functional and inspiring.
Timepiece lovers admire the hand-assembled parts.
https://sathiharu.com/read-blog/17650
Wearing a mechanical watch is not just about telling time, but about celebrating tradition.
Their styles are classic, often passed from lifetime to legacy.
In short, mechanical watches will stand the test of time.
trouver un mГ©dicament en pharmacie Medicaments en ligne livres en 24h Pharmacie en ligne livraison Europe pharmafst.shop
Have you ever thought about writing an ebook or guest authoring on other websites? I have a blog centered on the same information you discuss and would love to have you share some stories/information. I know my viewers would value your work. If you are even remotely interested, feel free to shoot me an e-mail.
kamagra en ligne: achat kamagra – kamagra pas cher
http://pharmafst.com/# Achat mГ©dicament en ligne fiable
lendas bet: Apostas Fáceis com
Grandes Resultados!
Aposte nos Jogos Mais Famosos no Cassino peixe beta!
Предстоящее лето обещает быть ярким и инновационным в плане моды.
В тренде будут натуральные ткани и неожиданные сочетания.
Гамма оттенков включают в себя неоновые оттенки, создающие настроение.
Особое внимание дизайнеры уделяют тканям, среди которых популярны винтажные очки.
https://www.horseracingnation.com/profile/profiledetail.aspx
Снова популярны элементы модерна, в свежем прочтении.
В новых коллекциях уже можно увидеть захватывающие образы, которые впечатляют.
Не упустите шанс, чтобы встретить лето стильно.
dicas bet: Ganhe Grandes Prêmios com Jogos Fáceis!
Ganhe Grande no Cassino bk bet com com Jogos Populares!
Приобретение туристического полиса для заграничной поездки — это обязательное условие для финансовой защиты путешественника.
Полис покрывает неотложную помощь в случае несчастного случая за границей.
Помимо этого, полис может охватывать покрытие расходов на возвращение домой.
icforce.ru
Многие страны настаивают на предъявление страховки для получения визы.
При отсутствии полиса медицинские расходы могут обойтись дорого.
Оформление полиса заранее
Acheter Kamagra site fiable: kamagra gel – kamagra 100mg prix
Aposte nos Melhores Jogos do Cassino Online 8800 bet!
Very interesting points you have noted, regards for putting up. “Nothing ever goes away.” by Barry Commoner.
Aposte Agora no Cassino curso beta e
Conquiste Grandes Vitórias!
Aposte nos Melhores Jogos e Ganhe no Cassino futebol ao vivo gratis!
pharmacie en ligne: Meilleure pharmacie en ligne – pharmacie en ligne pharmafst.com
https://pharmafst.com/# pharmacie en ligne france pas cher
futemax futebol ao vivo: Apostas Fáceis, Grandes Oportunidades de Vitória!
Cassino Online kto bet: Jogos Populares, Grandes Oportunidades!
Useful information. Lucky me I discovered your site by accident, and I’m stunned why this accident did not took place earlier! I bookmarked it.
pharmacie en ligne livraison europe: Pharmacie en ligne livraison Europe – pharmacie en ligne pas cher pharmafst.com
acheter kamagra site fiable Kamagra Oral Jelly pas cher Kamagra Oral Jelly pas cher
Aposte nos Jogos Populares e Ganhe no mr bet jack!
pharmacie en ligne sans ordonnance: pharmacie en ligne pas cher – Achat mГ©dicament en ligne fiable pharmafst.com
Aposte e Vença no Cassino futebol ao vivo hoje!
Ganhe Prêmios Incríveis com Jogos Populares no Cassino assistir futebol ao vivo!
Ganhe Prêmios Incríveis com Jogos Populares no Cassino futebol ao vivo!
estrelas bet: Apostas Fáceis,
Grandes Vitórias!
Ganhe Agora no Cassino bet favorita com Facilidade!
mister jack bet: Onde Você Joga e Ganha com Facilidade!
Ganhe Fácil no Cassino Online bet estrela!
Aposte e Vença nos Jogos Populares do Cassino prosport bet!
Aposte e Vença no Cassino bet vitoria
– Jogos Fáceis e Populares!
Achat Cialis en ligne fiable: cialis sans ordonnance – Acheter Viagra Cialis sans ordonnance tadalmed.shop
kamagra livraison 24h: Kamagra pharmacie en ligne – kamagra pas cher
https://pharmafst.shop/# pharmacie en ligne france livraison internationale
I love your blog.. very nice colors & theme. Did you create this website yourself? Plz reply back as I’m looking to create my own blog and would like to know wheere u got this from. thanks
Cialis en ligne Tadalafil 20 mg prix en pharmacie Cialis sans ordonnance 24h tadalmed.com
Kamagra pharmacie en ligne: kamagra 100mg prix – kamagra en ligne
Acheter Viagra Cialis sans ordonnance: Cialis sans ordonnance 24h – Cialis sans ordonnance 24h tadalmed.shop
Thanks for sharing such a good idea, piece of writing is pleasant, thats why i have read it fully
https://pharmafst.com/# pharmacie en ligne fiable
Simply desire to say your article is as astonishing. The clearness on your post is just nice and that i could assume you’re a professional on this subject. Fine with your permission allow me to grasp your feed to keep updated with drawing close post. Thanks a million and please carry on the enjoyable work.
Я оцениваю информативность статьи и ее способность подать сложную тему в понятной форме.
Pharmacie en ligne Cialis sans ordonnance: Cialis sans ordonnance pas cher – Cialis sans ordonnance 24h tadalmed.shop
Hi, Neat post. There’s a problem with your website in internet explorer, would check this… IE still is the market leader and a good portion of people will miss your great writing due to this problem.
Acheter Cialis Acheter Cialis Cialis generique prix tadalmed.com
Acheter Viagra Cialis sans ordonnance: Cialis sans ordonnance pas cher – Cialis sans ordonnance pas cher tadalmed.shop
As a Newbie, I am always exploring online for articles that can be of assistance to me. Thank you
Pharmacie en ligne livraison Europe: Meilleure pharmacie en ligne – pharmacie en ligne france pas cher pharmafst.com
https://kamagraprix.shop/# kamagra livraison 24h
Howdy! I know this is kinda off topic but I was wondering if you knew where I could get a captcha plugin for my comment form? I’m using the same blog platform as yours and I’m having trouble finding one? Thanks a lot!
Cialis sans ordonnance pas cher: Pharmacie en ligne Cialis sans ordonnance – Cialis sans ordonnance 24h tadalmed.shop
Enjoyed reading this, very good stuff, thankyou.
Pharmacie en ligne Cialis sans ordonnance: Cialis en ligne – Acheter Cialis 20 mg pas cher tadalmed.shop
acheter kamagra site fiable Kamagra Commander maintenant Kamagra Oral Jelly pas cher
Very interesting subject , appreciate it for posting.
п»їpharmacie en ligne france: pharmacie en ligne sans ordonnance – п»їpharmacie en ligne france pharmafst.com
Pharmacie en ligne Cialis sans ordonnance: cialis generique – Cialis sans ordonnance 24h tadalmed.shop
http://pharmafst.com/# trouver un mГ©dicament en pharmacie
Ganhe no b2x bet com Jogos Fáceis e Populares!
Youre so cool! I dont suppose Ive learn anything like this before. So good to search out somebody with some original ideas on this subject. realy thank you for starting this up. this web site is something that is needed on the net, somebody with just a little originality. useful job for bringing one thing new to the web!
I keep listening to the reports lecture about receiving free online grant applications so I have been looking around for the finest site to get one. Could you advise me please, where could i acquire some?
Автор старается оставаться нейтральным, что помогает читателям получить полную картину и рассмотреть разные аспекты темы.
acheter mГ©dicament en ligne sans ordonnance: pharmacie en ligne sans ordonnance – pharmacie en ligne fiable pharmafst.com
you have a great blog here! would you like to make some invite posts on my blog?
kamagra livraison 24h: acheter kamagra site fiable – kamagra gel
ProDentim is a chewable oral probiotic supplement formulated with a unique mix of probiotics, prebiotics, herbs, and nutrients.
The site provides buggy rentals on the island of Crete.
Travelers may conveniently arrange a machine for travel.
If you’re looking to discover hidden beaches, a buggy is the perfect way to do it.
https://www.tumblr.com/sneakerizer/781689118337990656/alligator-buggy-quad-safari-redefining-off-road
The fleet are ready to go and can be rented for full-day schedules.
On this platform is fast and comes with great support.
Start your journey and enjoy Crete in full freedom.
PrimeBiome is a dietary supplement designed to support gut health by promoting a balanced microbiome, enhancing digestion, and boosting overall well-being.
I am extremely impressed with your writing skills as well as with the layout on your weblog. Is this a paid theme or did you modify it yourself? Either way keep up the nice quality writing, it is rare to see a nice blog like this one nowadays..
I’d forever want to be update on new posts on this internet site, saved to bookmarks! .
The Natural Mounjaro Recipe is more than just a diet—it’s a sustainable and natural approach to weight management and overall health.
Do you mind if I quote a couple of your articles as long as I provide credit and sources back to your website? My website is in the very same niche as yours and my users would really benefit from a lot of the information you present here. Please let me know if this okay with you. Appreciate it!
I will right away grab your rss feed as I can not find your e-mail subscription link or e-newsletter service. Do you have any? Kindly let me recognize so that I may subscribe. Thanks.
I really appreciate this post. I have been looking everywhere for this! Thank goodness I found it on Bing. You have made my day! Thank you again!
Hi would you mind letting me know which webhost you’re using? I’ve loaded your blog in 3 completely different web browsers and I must say this blog loads a lot faster then most. Can you recommend a good hosting provider at a fair price? Thank you, I appreciate it!
achat kamagra: kamagra oral jelly – achat kamagra
Профессиональный сервисный центр по ремонту бытовой техники с выездом на дом.
Мы предлагаем:ремонт бытовой техники в мск
Наши мастера оперативно устранят неисправности вашего устройства в сервисе или с выездом на дом!
I like this post, enjoyed this one appreciate it for putting up. “To affect the quality of the day that is the art of life.” by Henry David Thoreau.
Your point of view caught my eye and was very interesting. Thanks. I have a question for you.
I discovered your blog web site on google and test just a few of your early posts. Proceed to maintain up the excellent operate. I simply extra up your RSS feed to my MSN News Reader. Seeking forward to reading more from you later on!…
Wow! Thank you! I always wanted to write on my blog something like that. Can I implement a portion of your post to my website?
Hi there, You’ve performed an excellent job. I’ll certainly digg it and for my part suggest to my friends. I am sure they will be benefited from this site.
Appreciate it for all your efforts that you have put in this. very interesting information.
WONDERFUL Post.thanks for share..more wait .. …
Aproveite 100$ de Bônus no betsury ao Criar Sua
Conta!
Seu Registro no heads bet Vale 100$ de Bônus Imediato!
Faça Seu Registro no esportenet – https://esportenetbet-br.com e Ganhe 100$ de Bônus Exclusivo!
Bônus de 100$ ao Registrar-se no doce888 – Aproveite Agora!
I like this web blog very much, Its a rattling nice billet to read and incur info . “There is no human problem which could not be solved if people would simply do as I advise.” by Gore Vidal.
O esoccer bet oferece uma excelente oportunidade para quem
deseja começar sua experiência no cassino online com um
bônus de 100$ para novos jogadores! Ao se registrar no site,
você garante esse bônus exclusivo que pode ser utilizado em diversos
jogos de cassino, como slots, roleta e poker. Esse
é o momento perfeito para explorar o mundo das apostas com um saldo extra, aproveitando ao máximo suas apostas sem precisar investir um grande valor logo de início.
Não perca essa oportunidade e cadastre-se já!
Como se Registrar no premier bet – https://premierbet-br.com e
Obter 100$ de Bônus de Boas-Vindas!
No spicy bet, novos usuários podem aproveitar um bônus de 100$ ao se registrar no site!
Isso significa mais chances de ganhar e explorar uma grande variedade
de jogos de cassino, desde slots emocionantes
até clássicos como roleta e blackjack. Com o bônus
de boas-vindas, você começa com um saldo extra, o que aumenta suas chances
de sucesso. Cadastre-se agora e use os 100$
de bônus para experimentar seus jogos favoritos com mais
facilidade. Aproveite a oferta e comece sua aventura no cassino
agora mesmo!
Novo no betestrela?
Ganhe 100$ de Bônus Ao Se Registrar!
Aposte com 100$ de Bônus no lottoland –
Cadastre-se e Aproveite!
Aproveite a oferta exclusiva do bet esporte para novos usuários e receba 100$ de bônus ao se registrar!
Este bônus de boas-vindas permite que você
experimente uma vasta gama de jogos de cassino online sem
precisar gastar imediatamente. Com o bônus de 100$,
você poderá explorar jogos como roleta, blackjack, caça-níqueis e
muito mais, aumentando suas chances de vitória desde o primeiro minuto.
Não perca essa chance única de começar com um valor
significativo – cadastre-se agora!
Registre-se no Bet61 – https://bet61-br.com e
Comece a Apostar com 100$ de Bônus!
O batbet oferece uma
excelente oportunidade para quem deseja começar sua experiência no
cassino online com um bônus de 100$ para novos jogadores!
Ao se registrar no site, você garante esse bônus exclusivo que pode ser utilizado em diversos jogos de cassino, como slots, roleta
e poker. Esse é o momento perfeito para explorar o mundo das apostas com
um saldo extra, aproveitando ao máximo suas apostas sem precisar investir
um grande valor logo de início. Não perca essa oportunidade e cadastre-se já!
No tvbet, novos usuários
podem aproveitar um bônus de 100$ ao se registrar no site!
Isso significa mais chances de ganhar e explorar uma grande variedade de jogos de cassino,
desde slots emocionantes até clássicos como roleta e blackjack.
Com o bônus de boas-vindas, você começa com um saldo extra,
o que aumenta suas chances de sucesso. Cadastre-se agora
e use os 100$ de bônus para experimentar seus jogos favoritos com mais facilidade.
Aproveite a oferta e comece sua aventura no cassino agora
mesmo!
O bet vitoria oferece uma excelente oportunidade para quem
deseja começar sua experiência no cassino online com um bônus de 100$ para novos jogadores!
Ao se registrar no site, você garante esse bônus exclusivo que pode ser utilizado em diversos jogos de cassino, como slots, roleta e poker.
Esse é o momento perfeito para explorar o mundo das apostas com um saldo extra,
aproveitando ao máximo suas apostas sem precisar investir um grande valor logo de início.
Não perca essa oportunidade e cadastre-se já!
You have brought up a very wonderful points, thankyou for the post.
Nice read, keep it up!
Aproveite a oferta exclusiva do esportebet para novos usuários e receba
100$ de bônus ao se registrar! Este bônus de boas-vindas permite que você
experimente uma vasta gama de jogos de cassino online sem precisar gastar imediatamente.
Com o bônus de 100$, você poderá explorar jogos como roleta, blackjack,
caça-níqueis e muito mais, aumentando suas chances de vitória desde o primeiro minuto.
Não perca essa chance única de começar com um valor significativo – cadastre-se agora!
Cadastre-se no apostaganha – https://apostaganhabet-br.com e Receba 100$ para
Apostar em Seus Jogos Favoritos!
No gbg bet, novos
usuários podem aproveitar um bônus de 100$ ao se registrar no site!
Isso significa mais chances de ganhar e explorar uma grande variedade de jogos de cassino, desde slots emocionantes até clássicos como roleta e blackjack.
Com o bônus de boas-vindas, você começa com um saldo
extra, o que aumenta suas chances de sucesso. Cadastre-se agora e use os 100$ de bônus para experimentar seus jogos
favoritos com mais facilidade. Aproveite a oferta e comece sua aventura no
cassino agora mesmo!
Ao se cadastrar no pague bet, você ganha
um bônus de 100$ para começar sua jornada no cassino com o pé direito!
Não importa se você é um novato ou um apostador experiente, o bônus de boas-vindas é a oportunidade perfeita para
explorar todas as opções que o site tem a oferecer.
Jogue seus jogos favoritos, descubra novas opções de apostas e aproveite
para testar estratégias sem risco, já que o bônus ajuda a aumentar suas chances de ganhar.
Cadastre-se hoje e comece com 100$!
Our e-pharmacy features an extensive variety of medications for budget-friendly costs.
You can find various medicines for all health requirements.
Our goal is to keep trusted brands at a reasonable cost.
Speedy and secure shipping provides that your medication gets to you quickly.
Take advantage of getting your meds on our platform.
cenforce side effects
I got what you intend,saved to bookmarks, very decent web site.
Seu Bônus de 100$ Espera por Você no leao –
Cadastre-se Agora!
Cadastre-se no pgwin e Ganhe 100$ para Apostar!
As a Newbie, I am permanently browsing online for articles that can aid me. Thank you
Youre so cool! I dont suppose Ive learn something like this before. So good to search out anyone with some unique ideas on this subject. realy thanks for beginning this up. this web site is something that’s wanted on the net, somebody with just a little originality. helpful job for bringing something new to the web!
I do agree with all of the ideas you’ve offered on your post. They’re really convincing and can certainly work. Still, the posts are very short for beginners. May just you please extend them a little from next time? Thanks for the post.
hello there and thank you for your info – I have definitely picked up something new from right here. I did however expertise several technical issues using this website, since I experienced to reload the site a lot of times previous to I could get it to load correctly. I had been wondering if your web host is OK? Not that I’m complaining, but slow loading instances times will often affect your placement in google and could damage your high-quality score if advertising and marketing with Adwords. Well I am adding this RSS to my e-mail and can look out for a lot more of your respective exciting content. Make sure you update this again soon..
My brother recommended I might like this web site. He was totally right. This post truly made my day. You can not imagine just how much time I had spent for this info! Thanks!
you’re really a excellent webmaster. The website loading velocity is amazing. It seems that you’re doing any distinctive trick. Moreover, The contents are masterpiece. you’ve done a excellent process in this topic!
Were you aware that 1 in 3 people taking prescriptions make dangerous drug mistakes stemming from poor understanding?
Your wellbeing should be your top priority. Every medication decision you implement plays crucial role in your quality of life. Being informed about your prescriptions isn’t optional for successful recovery.
Your health isn’t just about swallowing medications. Each drug affects your body’s chemistry in specific ways.
Remember these critical facts:
1. Combining medications can cause health emergencies
2. Even common supplements have strict usage limits
3. Skipping doses undermines therapy
To protect yourself, always:
✓ Verify interactions using official tools
✓ Read instructions in detail when starting any medication
✓ Consult your doctor about potential side effects
___________________________________
For verified pharmaceutical advice, visit:
https://images.app.goo.gl/9wk3mitEN9Sz4oF3A
On this platform, you can find a great variety of slot machines from leading developers.
Players can try out classic slots as well as new-generation slots with stunning graphics and interactive gameplay.
Even if you’re new or a seasoned gamer, there’s a game that fits your style.
slot casino
Each title are ready to play round the clock and optimized for PCs and tablets alike.
You don’t need to install anything, so you can jump into the action right away.
The interface is user-friendly, making it simple to explore new games.
Join the fun, and enjoy the excitement of spinning reels!
What i don’t realize is actually how you are now not really a lot more smartly-appreciated than you may be right now. You’re so intelligent. You understand therefore significantly when it comes to this matter, made me individually consider it from numerous numerous angles. Its like men and women aren’t interested unless it’s one thing to accomplish with Girl gaga! Your individual stuffs nice. Always deal with it up!
Appreciate the content you put out!
Hi , I do believe this is an excellent blog. I stumbled upon it on Yahoo , i will come back once again. Money and freedom is the best way to change, may you be rich and help other people.
Registre-se no 580bet – https://580-bet.com e Comece com
100$ de Bônus para Apostar
I have been browsing online more than 3 hours lately, yet I by no means discovered any fascinating article like yours. It¦s beautiful value enough for me. In my view, if all website owners and bloggers made good content as you probably did, the net will likely be much more useful than ever before.
Today, I went to the beachfront with my kids. I found a sea shell and gave it to my 4 year old daughter and said “You can hear the ocean if you put this to your ear.” She put the shell to her ear and screamed. There was a hermit crab inside and it pinched her ear. She never wants to go back! LoL I know this is entirely off topic but I had to tell someone!
Hey there! Quick question that’s completely off topic. Do you know how to make your site mobile friendly? My web site looks weird when viewing from my iphone 4. I’m trying to find a template or plugin that might be able to resolve this issue. If you have any recommendations, please share. With thanks!
When I initially commented I clicked the “Notify me when new comments are added” checkbox and now each time a comment is added I get three emails with the same comment. Is there any way you can remove people from that service? Bless you!
Respect to article author, some excellent selective information.
You made some nice points there. I looked on the internet for the issue and found most individuals will agree with your blog.
My partner and I stumbled over here coming from a different web page and thought I should check things out. I like what I see so now i’m following you. Look forward to finding out about your web page again.
As soon as I detected this internet site I went on reddit to share some of the love with them.
Unquestionably believe that which you said. Your favorite justification appeared to be on the internet the simplest thing to be aware of. I say to you, I definitely get irked while people think about worries that they plainly don’t know about. You managed to hit the nail upon the top as well as defined out the whole thing without having side-effects , people can take a signal. Will likely be back to get more. Thanks
Your point of view caught my eye and was very interesting. Thanks. I have a question for you.
Hi, i think that i saw you visited my web site thus i came to “return the favor”.I’m trying to find things to improve my web site!I suppose its ok to use some of your ideas!!
Hi my friend! I want to say that this article is awesome, nice written and include almost all significant infos. I would like to see more posts like this.
Great post. I was checking constantly this blog and I am impressed! Extremely useful information specially the last part 🙂 I care for such info much. I was looking for this certain information for a very long time. Thank you and best of luck.
น่าสนใจมากครับ, ขอบคุณสำหรับข้อมูลครับ.
Feel free to visit my homepage … เว็บตรง
I do enjoy the manner in which you have framed this particular situation plus it does indeed supply us some fodder for thought. Nevertheless, coming from what I have observed, I simply hope when the actual commentary pack on that folks continue to be on point and not start on a soap box regarding some other news du jour. Anyway, thank you for this exceptional point and although I can not necessarily agree with it in totality, I respect the standpoint.
There is noticeably a bundle to know about this. I assume you made certain nice points in features also.
Hiya, I am really glad I have found this info. Today bloggers publish only about gossips and internet and this is actually irritating. A good blog with interesting content, this is what I need. Thank you for keeping this web-site, I’ll be visiting it. Do you do newsletters? Can not find it.
Hmm it seems like your blog ate my first comment (it was extremely long) so I guess I’ll just sum it up what I submitted and say, I’m thoroughly enjoying your blog. I too am an aspiring blog writer but I’m still new to the whole thing. Do you have any tips and hints for inexperienced blog writers? I’d genuinely appreciate it.
Hey there would you mind stating which blog platform you’re working with? I’m going to start my own blog soon but I’m having a hard time choosing between BlogEngine/Wordpress/B2evolution and Drupal. The reason I ask is because your design and style seems different then most blogs and I’m looking for something completely unique. P.S My apologies for being off-topic but I had to ask!
Good ?V I should definitely pronounce, impressed with your site. I had no trouble navigating through all tabs as well as related info ended up being truly simple to do to access. I recently found what I hoped for before you know it at all. Reasonably unusual. Is likely to appreciate it for those who add forums or something, website theme . a tones way for your customer to communicate. Nice task..
Very interesting information!Perfect just what I was searching for!
Do you have a spam issue on this site; I also am a blogger, and I was curious about your situation; many of us have developed some nice procedures and we are looking to exchange techniques with other folks, be sure to shoot me an email if interested.
I haven’t checked in here for some time because I thought it was getting boring, but the last few posts are good quality so I guess I will add you back to my daily bloglist. You deserve it my friend 🙂
wonderful post, very informative. I wonder why the other specialists of this sector do not notice this. You should continue your writing. I’m sure, you have a great readers’ base already!
Enjoyed reading this, very good stuff, regards.
As I web-site possessor I believe the content matter here is rattling excellent , appreciate it for your hard work. You should keep it up forever! Good Luck.
Here, you can access a wide selection of slot machines from top providers.
Players can try out classic slots as well as feature-packed games with high-quality visuals and interactive gameplay.
Even if you’re new or a seasoned gamer, there’s always a slot to match your mood.
play casino
Each title are available anytime and designed for laptops and tablets alike.
You don’t need to install anything, so you can start playing instantly.
The interface is user-friendly, making it quick to browse the collection.
Register now, and discover the thrill of casino games!
Wow, wonderful blog layout! How long have you been blogging for? you make blogging look easy. The overall look of your website is wonderful, as well as the content!
This website, you can find a wide selection of slot machines from top providers.
Players can try out classic slots as well as feature-packed games with stunning graphics and bonus rounds.
Even if you’re new or a casino enthusiast, there’s something for everyone.
play casino
Each title are ready to play 24/7 and designed for desktop computers and mobile devices alike.
You don’t need to install anything, so you can jump into the action right away.
Site navigation is easy to use, making it simple to explore new games.
Sign up today, and enjoy the excitement of spinning reels!
I went over this internet site and I believe you have a lot of good information, saved to fav (:.
Some genuinely nice and utilitarian information on this site, besides I believe the style has got excellent features.
Hey, you used to write great, but the last several posts have been kinda boring… I miss your super writings. Past few posts are just a little bit out of track! come on!
I simply could not go away your web site prior to suggesting that I really enjoyed the usual information a person provide in your guests? Is going to be back continuously to inspect new posts
Your point of view caught my eye and was very interesting. Thanks. I have a question for you.
I besides think therefore, perfectly pent post! .
I’m really inspired with your writing skills as neatly as with the structure in your weblog. Is this a paid subject or did you customize it your self? Either way keep up the nice quality writing, it’s uncommon to see a great blog like this one nowadays!
Really clean site, thankyou for this post.
I think you have observed some very interesting details, appreciate it for the post.
I was looking at some of your articles on this internet site and I think this website is rattling informative ! Keep posting.
На этом сайте дает возможность нахождения вакансий на территории Украины.
На сайте размещены разные объявления от проверенных работодателей.
На платформе появляются предложения по разным направлениям.
Подработка — решаете сами.
https://my-articles-online.com/
Навигация удобен и подстроен на любой уровень опыта.
Оставить отклик очень простое.
Нужна подработка? — сайт к вашим услугам.
Hi, Neat post. There is a problem along with your web site in web explorer, might check this… IE nonetheless is the market leader and a big component of people will leave out your great writing due to this problem.
This website offers a wide selection of decorative wall clocks for all styles.
You can explore urban and classic styles to fit your home.
Each piece is chosen for its aesthetic value and functionality.
Whether you’re decorating a cozy bedroom, there’s always a fitting clock waiting for you.
best el backlight travel clocks
The shop is regularly refreshed with fresh designs.
We focus on quality packaging, so your order is always in safe hands.
Start your journey to better decor with just a few clicks.
This website offers a diverse range of decorative timepieces for any space.
You can discover modern and traditional styles to enhance your interior.
Each piece is hand-picked for its visual appeal and durability.
Whether you’re decorating a creative workspace, there’s always a perfect clock waiting for you.
best horse pendulum wall clocks
The collection is regularly renewed with trending items.
We focus on secure delivery, so your order is always in safe hands.
Start your journey to timeless elegance with just a few clicks.
Here offers a great variety of stylish wall clocks for every room.
You can check out modern and traditional styles to complement your interior.
Each piece is chosen for its design quality and functionality.
Whether you’re decorating a functional kitchen, there’s always a matching clock waiting for you.
timex t309t nature sounds alarm clocks
Our catalog is regularly expanded with trending items.
We prioritize quality packaging, so your order is always in good care.
Start your journey to enhanced interiors with just a few clicks.
I don’t think the title of your article matches the content lol. Just kidding, mainly because I had some doubts after reading the article.
Наш веб-портал — цифровая витрина лицензированного детективного агентства.
Мы предлагаем помощь в области розыска.
Коллектив профессионалов работает с предельной этичностью.
Мы берёмся за поиски людей и выявление рисков.
Услуги детектива
Каждое обращение рассматривается индивидуально.
Опираемся на эффективные инструменты и соблюдаем юридические нормы.
Ищете реальную помощь — вы по адресу.
How to Log In to patti and
Claim Your $100 Bonus Upon Registration
Unlock Your $100 Bonus by Registering on sbobet Today
24bet Login and Registration Made Easy – Claim Your $100 Bonus!
Your $100 Welcome Bonus is Ready at slotv – Register Now!
How to Register on 32red and Start
Playing with $100 Bonus
How to Log In and Claim Your $100 Bonus at bizzo
Claim Your $100 Bonus with a Quick Registration at leon!
Impressive research and clear presentation.
Greetings! Very useful advice in this particular article! It’s the little changes that will make the most significant changes. Many thanks for sharing!
Whoa! This blog looks just like my old one! It’s on a completely different subject but it has pretty much the same page layout and design. Superb choice of colors!
Платформа BlackSprut — это хорошо известная точек входа в darknet-среде, открывающая разнообразные сервисы для всех, кто интересуется сетью.
Здесь реализована удобная навигация, а структура меню понятен даже новичкам.
Гости ценят стабильность работы и активное сообщество.
bs2best.markets
Площадка разработана на удобство и минимум лишней информации при навигации.
Если вы интересуетесь альтернативные цифровые пространства, площадка будет хорошим примером.
Прежде чем начать лучше ознакомиться с базовые принципы анонимной сети.
As soon as I detected this site I went on reddit to share some of the love with them.
Here, you can access lots of online slots from famous studios.
Players can experience classic slots as well as feature-packed games with stunning graphics and interactive gameplay.
If you’re just starting out or an experienced player, there’s something for everyone.
play aviator
Each title are available 24/7 and optimized for desktop computers and tablets alike.
All games run in your browser, so you can start playing instantly.
Platform layout is intuitive, making it quick to browse the collection.
Register now, and dive into the thrill of casino games!
Здесь представлены слоты от казино Vavada.
Любой игрок может подобрать подходящую игру — от классических игр до современных слотов с бонусными раундами.
Платформа Vavada открывает возможность сыграть в проверенных автоматов, включая слоты с крупными выигрышами.
Каждый слот запускается в любое время и оптимизирован как для ПК, так и для планшетов.
официальный сайт vavada
Каждый геймер ощутит настоящим драйвом, не выходя из любимого кресла.
Структура платформы понятна, что позволяет без труда начать играть.
Начните прямо сейчас, чтобы почувствовать азарт с Vavada!
На данной платформе вы найдёте интересные слоты казино на платформе Champion.
Выбор игр включает проверенные временем слоты и актуальные новинки с качественной анимацией и специальными возможностями.
Каждый слот оптимизирован для максимального удовольствия как на компьютере, так и на мобильных устройствах.
Независимо от опыта, здесь вы найдёте подходящий вариант.
чемпион регистрация
Игры работают круглосуточно и не нуждаются в установке.
Кроме того, сайт предусматривает бонусы и полезную информацию, для улучшения опыта.
Погрузитесь в игру уже сегодня и оцените преимущества с играми от Champion!
Can you be more specific about the content of your article? After reading it, I still have some doubts. Hope you can help me.
Thanks very nice blog!
На этом сайте вы можете наслаждаться большим выбором слотов.
Эти слоты славятся яркой графикой и интерактивным игровым процессом.
Каждая игра даёт индивидуальные бонусные функции, повышающие вероятность победы.
1xbet игровые автоматы
Игра в игровые автоматы предназначена любителей азартных игр всех мастей.
Можно опробовать игру без ставки, и потом испытать азарт игры на реальные ставки.
Испытайте удачу и насладитесь неповторимой атмосферой игровых автоматов.
На этом сайте вы можете испытать широким ассортиментом игровых слотов.
Слоты обладают красочной графикой и интерактивным игровым процессом.
Каждый слот предлагает уникальные бонусные раунды, повышающие вероятность победы.
1xbet казино
Слоты созданы для как новичков, так и опытных игроков.
Есть возможность воспользоваться демо-режимом, а затем перейти к игре на реальные деньги.
Попробуйте свои силы и окунитесь в захватывающий мир слотов.
Taking one’s own life is a complex issue that impacts many families around the globe.
It is often associated with psychological struggles, such as bipolar disorder, stress, or addiction problems.
People who consider suicide may feel isolated and believe there’s no other way out.
ways to commit suicide
We must spread knowledge about this subject and support those in need.
Early support can reduce the risk, and talking to someone is a crucial first step.
If you or someone you know is thinking about suicide, don’t hesitate to get support.
You are not forgotten, and help is available.
Health informatics uses technology to manage health information effectively. Understanding how electronic health records (EHRs) work impacts patient care. Learning about patient portals provides access to personal health data. Awareness of data privacy and security in health tech is crucial. Knowing how data analytics influences medical preparations and research is relevant. Finding reliable information on navigating digital health tools is helpful. The iMedix podcast discusses the intersection of health and technology. It’s a health news podcast covering innovations like health informatics. Tune into the iMedix health news features for digital health updates. iMedix: podcast content explaining modern healthcare tools.
Nanomedicine targets diseases microscopically. The iMedix Medical podcast explores this frontier technology. Researchers explain cancer-fighting “smart particles”. The extremely small could make enormous differences—learn how with iMedix health care!
Our platform offers a large variety of slot games, ideal for both beginners and experienced users.
Right here, you can discover classic slots, feature-rich games, and progressive jackpots with stunning graphics and immersive sound.
If you are looking for easy fun or seek engaging stories, you’ll find a perfect match.
https://gazeta-curier.ru/img/pgs/prostynya_na_rezinke_180h200_sposob_sdelaty_vashu_spalynyu_komfortnoy.html
Every slot can be accessed anytime, with no installation, and fully optimized for both all devices.
Apart from the machines, the site includes helpful reviews, special offers, and player feedback to guide your play.
Join now, start playing, and get immersed in the excitement of spinning!
BlackSprut – платформа с особыми возможностями
Сервис BlackSprut вызывает внимание широкой аудитории. Что делает его уникальным?
Этот проект предлагает интересные функции для тех, кто им интересуется. Визуальная составляющая системы отличается функциональностью, что делает его интуитивно удобной даже для тех, кто впервые сталкивается с подобными сервисами.
Стоит учитывать, что этот ресурс работает по своим принципам, которые делают его особенным в определенной среде.
При рассмотрении BlackSprut важно учитывать, что многие пользователи имеют разные мнения о нем. Некоторые выделяют его возможности, а некоторые относятся к нему более критично.
Подводя итоги, данный сервис остается объектом интереса и удерживает внимание разных слоев интернет-сообщества.
Рабочее зеркало к BlackSprut – проверьте здесь
Если нужен обновленный домен BlackSprut, вы на верном пути.
https://bs2best
Сайт может меняться, поэтому важно знать обновленный домен.
Свежий доступ всегда можно найти здесь.
Проверьте актуальную ссылку прямо сейчас!
На этом сайте можно найти актуальные международные политические новости. Частые обновления помогают следить за главных новостей. Вы узнаете о дипломатических переговорах. Объективная аналитика способствуют глубже понять ситуацию. Оставайтесь информированными с этим ресурсом.
https://justdoitnow03042025.com
Your point of view caught my eye and was very interesting. Thanks. I have a question for you.
Что такое BlackSprut?
Сервис BlackSprut удостаивается внимание широкой аудитории. Но что это такое?
Эта площадка обеспечивает интересные функции для своих пользователей. Визуальная составляющая платформы отличается функциональностью, что делает платформу интуитивно удобной даже для новичков.
Необходимо помнить, что BlackSprut работает по своим принципам, которые отличают его в своей нише.
При рассмотрении BlackSprut важно учитывать, что различные сообщества оценивают его по-разному. Многие выделяют его функциональность, а некоторые рассматривают более критично.
Таким образом, данный сервис остается предметом обсуждений и вызывает заинтересованность широкой аудитории.
Обновленный домен БлэкСпрут – ищите здесь
Хотите узнать актуальное ссылку на БлэкСпрут? Мы поможем.
bs2best at
Сайт часто обновляет адреса, и лучше иметь актуальный домен.
Обновленный адрес легко узнать у нас.
Посмотрите актуальную ссылку прямо сейчас!
BlackSprut – платформа с особыми возможностями
Платформа BlackSprut вызывает интерес широкой аудитории. В чем его особенности?
Этот проект предоставляет широкие опции для тех, кто им интересуется. Оформление платформы выделяется простотой, что делает его понятной даже для новичков.
Необходимо помнить, что данная система обладает уникальными характеристиками, которые формируют его имидж в определенной среде.
При рассмотрении BlackSprut важно учитывать, что определенная аудитория выражают неоднозначные взгляды. Многие подчеркивают его возможности, а некоторые оценивают его более критично.
В целом, эта платформа продолжает быть темой дискуссий и вызывает заинтересованность широкой аудитории.
Ищете актуальное ссылку BlackSprut?
Хотите найти свежее ссылку на BlackSprut? Мы поможем.
bs2best актуальная ссылка
Сайт может меняться, и лучше знать актуальный линк.
Свежий доступ всегда можно найти здесь.
Посмотрите актуальную ссылку прямо сейчас!
Regardless of the rise of smartwatches, classic wristwatches are still timeless.
A lot of enthusiasts value the artistry that goes into traditional timepieces.
Compared to smartwatches, that need frequent upgrades, classic timepieces stay relevant for decades.
https://www.daciabigsterforums.com/viewtopic.php?t=219
Prestigious watchmakers are always introducing limited-edition traditional watches, proving that their desirability is as high as ever.
To a lot of people, a mechanical watch is not just an accessory, but a reflection of timeless elegance.
Though digital watches offer convenience, mechanical watches represent an art form that stands the test of time.
Our store provides a vast selection of high-quality healthcare solutions to suit your health requirements.
This website provides fast and reliable delivery right to your door.
Every item is sourced from trusted manufacturers so you get effectiveness and reliability.
Easily search through our selection and get your medicines in minutes.
Need help? Our support team will guide you at any time.
Prioritize your well-being with reliable medical store!
https://members2.boardhost.com/businessbooks6/msg/1727381659.html
Прохождение сертификации в нашей стране остается ключевым этапом выхода продукции на рынок.
Этот процесс гарантирует соответствие государственным стандартам и официальным требованиям, что, в свою очередь, гарантирует защиту конечных пользователей от некачественных товаров.
сертификация качества продукции
Также наличие сертификатов способствует деловые отношения с партнерами и расширяет перспективы в предпринимательской деятельности.
Если продукция не сертифицирована, может возникнуть юридические риски и сложности при продаже товаров.
Таким образом, получение сертификатов является не просто обязательным, но и важным фактором устойчивого роста бизнеса в сфере торговли.
Swiss watches have long been a gold standard in horology. Crafted by legendary watchmakers, they combine tradition with innovation.
Each detail demonstrate superior workmanship, from precision-engineered calibers to high-end finishes.
Investing in a horological masterpiece is more than a way to check the hour. It represents timeless elegance and heritage craftsmanship.
No matter if you love a bold statement piece, Swiss watches provide unparalleled beauty that never goes out of style.
http://www.anti-social.site/index.php?topic=1319.new#new
What’s up to all, how is all, I think every one is getting more from this
site, and your views are nice for new visitors.
В наступающем году будут в тренде стильные оттенки, естественные фактуры и уникальный силуэт.
Особое внимание стоит обратить ярких деталей и нестандартных рисунков.
Гуру стиля рекомендуют играть с фактурами и уверенно внедрять свежие веяния в свой образ.
Базовые вещи остаются в моде, но стоит попробовать дополнить оригинальными элементами.
Вот почему главное правило нынешнего сезона — уверенность в себе и гармоничное комбинирование смелых идей и базовых вещей.
https://blogs.rufox.ru/~lepodium/57234.htm
This post offers clear idea designed for the new viewers of
blogging, that really how to do blogging and site-building.
Здесь вы найдете учреждение психологического здоровья, которая обеспечивает профессиональную помощь для людей, страдающих от стресса и других психических расстройств. Наша комплексное лечение для восстановления психического здоровья. Наши опытные психологи готовы помочь вам решить психологические барьеры и вернуться к гармонии. Профессионализм наших специалистов подтверждена множеством положительных обратной связи. Обратитесь с нами уже сегодня, чтобы начать путь к оздоровлению.
http://lifeextensionpills.com/__media__/js/netsoltrademark.php?d=empathycenter.ru%2Farticles%2Fgemofobiya-boyazn-vida-krovi%2F
На данной платформе вы найдете учреждение ментального здоровья, которая обеспечивает профессиональную помощь для людей, страдающих от тревоги и других ментальных расстройств. Наша индивидуальный подход для восстановления ментального здоровья. Наши опытные психологи готовы помочь вам справиться с психологические барьеры и вернуться к психологическому благополучию. Профессионализм наших врачей подтверждена множеством положительных рекомендаций. Обратитесь с нами уже сегодня, чтобы начать путь к лучшей жизни.
http://lglfareast.com/__media__/js/netsoltrademark.php?d=empathycenter.ru%2Fpreparations%2Fk%2Fkorvalol%2F
I was looking at some of your content on this site and I believe this website is really instructive! Continue posting.
Здесь вы найдете клинику ментального здоровья, которая предлагает психологические услуги для людей, страдающих от депрессии и других психологических расстройств. Мы предлагаем эффективные методы для восстановления ментального здоровья. Наши специалисты готовы помочь вам решить трудности и вернуться к сбалансированной жизни. Профессионализм наших специалистов подтверждена множеством положительных обратной связи. Свяжитесь с нами уже сегодня, чтобы начать путь к восстановлению.
http://jconkle.com/__media__/js/netsoltrademark.php?d=empathycenter.ru%2Fpreparations%2Ff%2Ffenibut%2F
Your article helped me a lot, is there any more related content? Thanks!
На территории Российской Федерации сертификация играет важную роль в обеспечении качества и безопасности товаров и услуг. Прохождение сертификации нужно как для производителей, так и для потребителей. Документ о сертификации гарантирует соответствие товара нормам и требованиям. Это особенно важно для товаров, влияющих на здоровье и безопасность. Сертификация помогает повысить доверие к бренду. Кроме того, это часто является обязательным условием для выхода на рынок. В итоге, сертификация способствует развитию бизнеса и укреплению позиций на рынке.
добровольная сертификация
Hi there just wanted to give you a quick heads up.
The words in your content seem to be running off the screen in Firefox.
I’m not sure if this is a format issue or something to do with web browser compatibility but I figured I’d post to let you know.
The style and design look great though! Hope you get the
problem resolved soon. Kudos
На данной платформе вы найдете клинику психологического здоровья, которая предоставляет психологические услуги для людей, страдающих от стресса и других психических расстройств. Эта индивидуальный подход для восстановления ментального здоровья. Наши опытные психологи готовы помочь вам решить трудности и вернуться к гармонии. Профессионализм наших специалистов подтверждена множеством положительных обратной связи. Свяжитесь с нами уже сегодня, чтобы начать путь к восстановлению.
http://avrose.com/__media__/js/netsoltrademark.php?d=empathycenter.ru%2Fpreparations%2Fz%2Fzopiklon%2F
Thanks for sharing. I read many of your blog posts, cool, your blog is very good.
Thanks for sharing. I read many of your blog posts, cool, your blog is very good.
Excellent blog! Do you have any tips and hints for aspiring writers?
I’m hoping to start my own site soon but
I’m a little lost on everything. Would you suggest starting with a
free platform like WordPress or go for a paid option? There are so many options
out there that I’m completely confused .. Any tips?
Many thanks!
This online pharmacy provides a wide range of pharmaceuticals for budget-friendly costs.
Shoppers will encounter various medicines for all health requirements.
We strive to maintain high-quality products at a reasonable cost.
Fast and reliable shipping ensures that your order arrives on time.
Take advantage of ordering medications online on our platform.
https://open.spotify.com/episode/0CRXoHgaUbHJjJk7TeWRqo
Thanks for sharing. I read many of your blog posts, cool, your blog is very good.
Thanks for sharing. I read many of your blog posts, cool, your blog is very good. https://accounts.binance.com/register?ref=P9L9FQKY
Thank you for your sharing. I am worried that I lack creative ideas. It is your article that makes me full of hope. Thank you. But, I have a question, can you help me?
Can you be more specific about the content of your article? After reading it, I still have some doubts. Hope you can help me.
На данном сайте вы можете приобрести подписчиков для Telegram. Доступны активные аккаунты, которые способствуют развитию вашего канала. Быстрая накрутка и стабильный прирост обеспечат надежный рост подписчиков. Тарифы доступные, а процесс заказа не требует лишних действий. Запустите продвижение уже сегодня и увеличьте аудиторию своего канала!
Накрутка подписчиков в Телеграм живые активные бесплатно
Your article helped me a lot, is there any more related content? Thanks!
Центр ментального здоровья — это пространство, где каждый может получить помощь и квалифицированную консультацию.
Специалисты работают с различными проблемами, включая повышенную тревожность, эмоциональное выгорание и психологический дискомфорт.
http://i-three.co/__media__/js/netsoltrademark.php?d=empathycenter.ru%2Farticles%2Fniktofobiya-krayniy-strakh-nochi-ili-temnoty%2F
В центре применяются эффективные методы лечения, направленные на улучшение внутренней гармонии.
Здесь создана комфортная атмосфера для открытого общения. Цель центра — поддержать каждого обратившегося на пути к душевному равновесию.
Центр ментального здоровья — это пространство, где любой может найти помощь и профессиональную консультацию.
Специалисты помогают различными проблемами, включая стресс, усталость и депрессивные состояния.
http://arlingtonvermont.com/__media__/js/netsoltrademark.php?d=empathycenter.ru%2Farticles%2Fantidepressanty%2F
В центре применяются современные методы терапии, направленные на улучшение внутренней гармонии.
Здесь организована безопасная атмосфера для открытого общения. Цель центра — помочь каждого обратившегося на пути к психологическому здоровью.
Здесь можно найти способы диагностики и советы по восстановлению.
http://bowerynft.com/__media__/js/netsoltrademark.php?d=empathycenter.ru%2Fpreparations%2Fk%2Fkvetiapin%2F
Отдельный раздел уделяется возрастным изменениям и их связи с эмоциональным состоянием.
Также рассматриваются эффективные медикаментозные и немедикаментозные методы лечения.
Материалы помогут разобраться, как справляться с угнетенным состоянием в пожилом возрасте.
На этом сайте АвиаЛавка (AviaLavka) вы можете купить дешевые авиабилеты в любые направления.
Мы подбираем лучшие тарифы от проверенных перевозчиков.
Простой интерфейс позволит быстро найти подходящий рейс.
https://www.avialavka.ru
Интеллектуальный фильтр помогает выбрать самые дешевые варианты перелетов.
Бронируйте билеты онлайн без переплат.
АвиаЛавка — ваш удобный помощник в поиске авиабилетов!
5FPohlamM4l
cMJlDGISKpA
RVsYmj42gEn
sOwCmi29jBl
Z5BCoriyqpM
bcA8k46pG1Q
YbJYswTf2D5
JAPaurIYpae
653EAnfdNbI
wtrJnrMlt1X
SPylxaCYoiq
l9QA6ip3CX5
qJvEiDHWwVN
bFmFIH8NblQ
oH50BBe9zpn
1L8YcSvYWF6
UumPo2GfFNk
9kogsLMlR1p
7sfbXVZ6moD
edvrzvmqtD4
Kc7UTP5za6i
x4CkhjXYCpT
mszVUv2lFhK
Pj07lcgoeg5
5FfAkQfZuHo
25TaL9yxg2z
QmDSxEKdrKG
qy5B3fYT4oE
mVIPr3VRiQ3
92eh002pRPq
XcOczJQq7Lp
NkuYlK3RHpi
saSWTexmztK
На данном сайте вы можете приобрести онлайн мобильные номера разных операторов. Они подходят для подтверждения профилей в различных сервисах и приложениях.
В каталоге представлены как долговременные, так и временные номера, что можно использовать чтобы принять сообщений. Это простое решение если вам не желает указывать основной номер в интернете.
виртуальные номера
Процесс покупки очень удобный: выбираете необходимый номер, оплачиваете, и он сразу становится готов к использованию. Оцените сервис прямо сейчас!
Здесь размещены последние события России и всего мира.
Представлены важные новостные материалы на различные темы.
https://ecopies.rftimes.ru/
Читайте главных событий каждый день .
Надежность и оперативность в каждом репортаже.
This extensive resource serves as an in-depth guide to the world of modern video surveillance, offering valuable information for both experienced CCTV installers and entrepreneurs seeking to enhance their security infrastructure.
Report Merge Software
The site presents a detailed analysis of cloud-based video surveillance systems, exploring their benefits, drawbacks, and real-world applications.
На этом сайте можно найти информацией о телешоу “Однажды в сказке”, его сюжете и главных персонажах. смотреть однажды в сказке хорошем качестве Здесь представлены интересные материалы о производстве шоу, исполнителях ролей и фактах из-за кулис.
Программа наблюдения за объектами – это актуальное решение для защиты имущества, объединяющий технологии и удобство использования .
На сайте вы найдете детальные инструкции по настройке и установке систем видеонаблюдения, включая онлайн-хранилища, их преимущества и ограничения .
IP Camera Software
Рассматриваются комбинированные системы, объединяющие локальное и удаленное хранение, что делает систему более гибкой и надежной .
Важной частью является разбор ключевых интеллектуальных возможностей, таких как определение активности, идентификация элементов и другие AI-технологии .
На этом сайте можно найти информацией о телешоу “Однажды в сказке”, развитии событий и главных персонажах. смотреть однажды в сказке хорошем качестве Здесь размещены подробные материалы о производстве шоу, исполнителях ролей и фактах из-за кулис.
На этом сайте можно найти информацией о сериале “Однажды в сказке”, его сюжете и главных персонажах. однажды в сказке Здесь размещены подробные материалы о создании шоу, актерах и фактах из-за кулис.
На этом сайте вы сможете найти полезную информацию о лекарственном средстве Ципралекс. Вы узнаете здесь сведения о показаниях, режиме приёма и вероятных побочных эффектах.
http://PunteaLupuluiRomania.omob.xyz/category/website/wgI2vZFhZf5rbhFqBTP7G0CD1
This CCTV software provides a powerful video surveillance solution, offering intelligent detection capabilities for humans, felines, avians, and canines. As a versatile surveillance camera software, it acts as an IP camera recorder and includes time-lapse recording. CCTV Software Enjoy secure remote access to your IP camera feeds through a reliable cloud video surveillance platform. This video monitoring software strengthens your security system and is an ideal option for your CCTV monitoring needs.
На этом сайте вы найдёте полезную информацию о лекарственном средстве Ципралекс. Здесь представлены сведения о показаниях, режиме приёма и вероятных побочных эффектах.
http://NovyySelemetMoldovaRepublicof.eorg.xyz/category/website/wgI2vZFhZf5rbhFqBTP7G0CD1
На этом сайте вы сможете найти полезную информацию о препарате Ципралекс. Вы узнаете здесь сведения о показаниях, режиме приёма и возможных побочных эффектах.
http://KoreanUnitedChurch-usa.eorg.site/category/website/wgI2vZFhZf5rbhFqBTP7G0CD1
На данном сайте можно найти информацией о системах видеонаблюдения, их видах и ключевых характеристиках. Здесь представлены подробные сведения о подборе оборудования, монтаже и настройке.
Система удалённого доступа для видеонаблюдения
На этом сайте можно ознакомиться с информацией о решениях видеонаблюдения, их видах и ключевых характеристиках. Здесь представлены подробные сведения о выборе оборудования, его установке и настройке.
видеонаблюдение
На данном сайте вы сможете найти полезную информацию о препарате Ципралекс. Вы узнаете здесь сведения о показаниях, дозировке и возможных побочных эффектах.
http://QaasSaadinSaudiArabia.eorg.xyz/category/website/wgI2vZFhZf5rbhFqBTP7G0CD1
На данном сайте вы найдёте полезную информацию о способах лечения депрессии у пожилых людей. Также здесь представлены методах профилактики, современных подходах и рекомендациях специалистов.
http://andi67.bplaced.net/dokuwiki/doku.php?id=%D0%94%D0%B5%D0%BF%D1%80%D0%B5%D1%81%D1%81%D0%B8%D1%8F%20%D1%83%20%D0%BF%D0%BE%D0%B6%D0%B8%D0%BB%D1%8B%D1%85
На этом сайте вы можете ознакомиться с важной информацией о терапии депрессии у людей старшего возраста. Здесь представлены рекомендации и описания способов лечения данным заболеванием.
http://bessintours.com/general-information/
В этом магазине можно заказать кроссовки New Balance по выгодным ценам. Оцените лучшие модели у нас.
https://bookmarkuse.com/story18293451/new-balance-550
Фирменный интернет-магазин Боттега Венета предлагает широкий ассортимент изделий премиум-класса от легендарного бренда. На сайте вы сможете выбрать и купить продукцию из новых коллекций с доставкой по Москве и России.
https://bottega-official.ru
Бренд Тиссо — легендарный Швейцарский производитель наручных устройств, что славится своим первоклассным качеством и уникальным дизайном. Уже более 150 лет фирма создаёт престижные хронометры, что завоевали доверие по всему миру.
https://tissot.icefashion.ru
На нашем сайте вы можете купить оригинальные изделия Gucci. У нас представлены коллекции этой известной марки, которые отличаются неповторимым стилем и высочайшим качеством. Найдите широкий ассортимент Gucci с доставкой и гарантией качества.
https://shop.gucci1.ru
Вещи бренда Fendi можно приобрести здесь. Широкий ассортимент Fendi поможет подобрать идеальные вещи для вашего гардероба.
https://fendi.sneakerside.ru