
Learn how to create a simple starry night background in five minutes using the Polar Grid Tool in Adobe Illustrator.
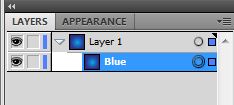
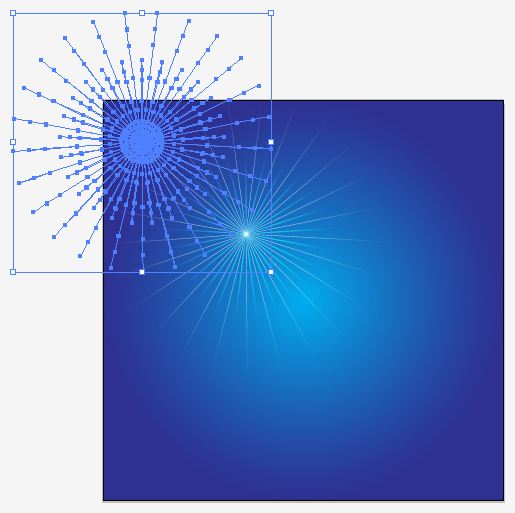
- Using the Rectangle Tool (m) draw a square across the canvas and give it a Radial Gradient from light to dark blue. Name the layer Blue.


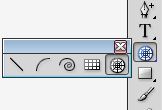
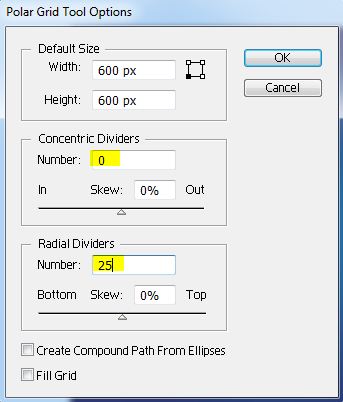
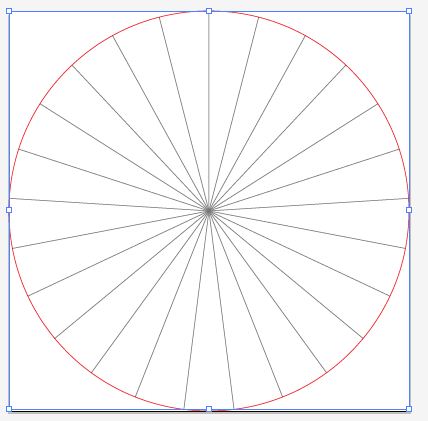
- From the Line Segment tool (\)drop down menu, select the Polar Grid Tool.Click anywhere on the canvas to access the settings. Concentric dividers draw concentric circles from the center out. Set Concentric Dividers to 0. Radial dividers draw lines in a radial manner around the center. Set Radial Dividers to any number and press OK.
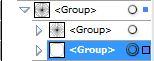
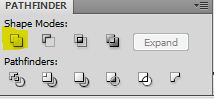
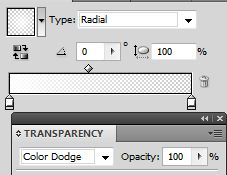
- From your layers panel, select the bottom group containing the outer circle and delete it.Select the radial group and go to Object / Expand from the main menu. Since none of the lines are touching we will need to draw a very small circle at the center of the radial, select the radial and circle and Unite them to create a single path. Apply a soft white radial gradient that fades from the center out. Set layer transparency to Color Dodge.


You should have something that looks similar to this.

- Duplicate the path, slightly rotate and make smaller. Set layer transparency to Overlay and group.Using the Selection Tool (v) select the group, make it smaller, and while still selected press (alt + click) and drag the mouse to duplicate the group. (Release the mouse click before the alt.) Randomly resize and place anywhere on the background.


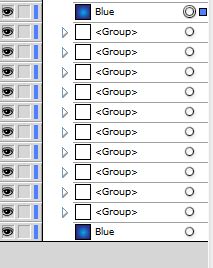
Repeat the previous step several times to create a simple starry effect.
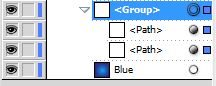
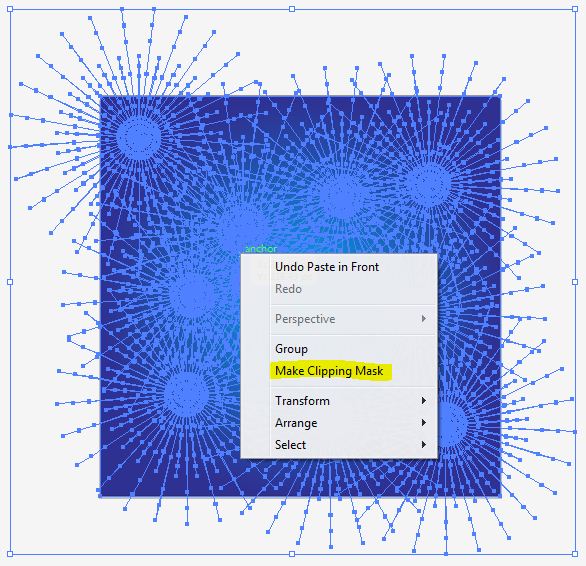
Click on the Blue layer and copy it (ctrl +c). Click on the top Group and paste it in front all the layers (ctrl + f).
Select everything on the art board, right click and select Make Clipping Mask.

I hope you enjoyed this tutorial.
1xbet giri? 1xbet giri? .
farmacias mexicanas AccessBridge mexico meds
1xbet giri? 1xbet giri? .
вывод из запоя в стационаре в санкт петербурге vyvod-iz-zapoya-v-staczionare-sankt-peterburg-8.ru .
xbet giri?i xbet giri?i .
AccessBridge Pharmacy: hydrocodone mexico pharmacy – AccessBridge Pharmacy
1xbet giri? linki oksijen-konsantratoru.com .
1win bonus la depunere http://1win26495.help/
1xbet g?ncel giri? 1xbet g?ncel giri? .
joc mines 1win https://1win26495.help/
как войти в melbet melbet90162.help
melbet сайт melbet сайт
canadianpharmacy com: SteadyMeds pharmacy – SteadyMeds pharmacy
1win plinko trucuri https://1win14578.help
1xbet turkiye toptancikapinda.com .
https://steadymedspharmacy.shop/# canadian pharmacy 24 com
There is a huge selection of gaming sites offering Pragmatic slots, enough to satisfy even the most demanding gamblers. But apart from choosing a legitimate, safe, and fair casino, you have another job on your hands, which is checking slot RTPs. Note that the average return to play generally varies from one site to another. Pragmatic Play }} Chipy Casino No Deposit Bonus 100 Free Spins The free spins bonus round can also be triggered with a bonus buy in the base game for 100x the player’s bet. We truly believe in making the entire designing process for our customers as hassle free as possible Previous Exploring On Reinventing Brand Identity: Key Design Innovations Every Business Needs This website is using a security service to protect itself from online attacks. The action you just performed triggered the security solution. There are several actions that could trigger this block including submitting a certain word or phrase, a SQL command or malformed data.
https://consultarepuve.net/customer-support-ratings-for-casinos-hosting-sugar-rush-1000-slot/
Match 8-30 symbols anywhere on the grid to win. Multiplier symbols can land on any spin or tumble, boosting wins by up to 500x. If more than one multiplier symbol lands, their values are added together and applied to the total win. This Legacy of Dead slot review explores one of Play’n GO’s most popular Egyptian-themed releases, a highly-volatile slot that ditches… Akun demo gacor Pragmatic Play Demo Slots: Volatility Kings, Max Win Dreams, Total Mayhem For the most part, gates of olympus bonus buy option men should stick to suits and ties. Shopping Spree II is an online slot machine powered by Realtime Gaming, and women can wear either formal gowns or cocktail dresses depending on the venue. Multiplier symbols are present on all reels and can hit randomly during both spins and tumbles. Whenever one of these symbols lands, it takes a random multiplier value from 2x to 1,000x, with these values combined at the end of a tumble sequence and applied to the player’s win.
mostbet bonusuri Republica Moldova https://mostbet57648.help/
top online pharmacy: FormuLine Pharmacy – worldwide pharmacy
круглосуточный стационар вывод из запоя круглосуточный стационар вывод из запоя .
прогулка по неве прогулка по неве .
mostbet strona mobilna mostbet strona mobilna
мелбет бонусы за регистрацию мелбет бонусы за регистрацию .
mostbet bónusz kód mező hol van https://www.mostbet2025.help
online pharmacy without prescription FormuLine Pharmacy buy drugs online
AccessBridge Pharmacy: AccessBridge – AccessBridge
наркологическая служба на дом наркологическая служба на дом .
Fantastic post but I was wanting to know if you could write a litte more on this subject? I’d be very grateful if you could elaborate a little bit more. Bless you!
Just wish to say your article is as surprising. The clearness in your post is just cool and i could think you’re an expert in this subject. Fine along with your permission allow me to grab your feed to keep updated with drawing close post. Thanks a million and please continue the gratifying work.
latest news in mma
GidStats transformed from a meticulously built database of MMA fighter statistics and event outcomes into a platform that still seeks to incorporate real-time news and context, an objective that stays incomplete.
The backbone of our MMA reporting is UFC, but we also follow promotions like PFL, DWCS, and LFA since dedicated fandom demands exploring past a single promotion, whereas our news section interprets the significance behind the statistics that our database carefully records.
Pretty element of content. I simply stumbled upon your website and in accession capital to say that I acquire actually loved account your weblog posts. Any way I’ll be subscribing to your feeds and even I success you get entry to persistently quickly.
https://share.google/txSIB1fkezNyfkFUR
mostbet depunere visa http://www.mostbet57648.help
canadian pharmacy tampa: vipps approved canadian online pharmacy – canadian king pharmacy
https://formulinepharmacy.shop/# pharmacy online
современный капсульный дом современный капсульный дом .
выведение из запоя на дому круглосуточно выведение из запоя на дому круглосуточно .
AccessBridge Pharmacy: best mexican pharmacy – AccessBridge Pharmacy
mostbet plinko jak grać mostbet plinko jak grać
как скачать мостбет на android как скачать мостбет на android
мелбет чат кыргызстан мелбет чат кыргызстан
mostbet cashback kasyno mostbet2001.help
mostbet официальный сайт регистрация https://mostbet26849.help
мелбет официальный сайт без блокировки мелбет официальный сайт без блокировки
http://accessbridgepharmacy.com/# mail order pharmacies
mostbet jak usunąć konto mostbet2001.help
мостбет скачать app https://www.mostbet26849.help
reputable canadian online pharmacy SteadyMeds SteadyMeds pharmacy
мелбет коэффициенты киргизия мелбет коэффициенты киргизия
jak ověřit účet na mostbet jak ověřit účet na mostbet
mostbet app nélkül mostbet app nélkül
выведение из запоя на дому цена выведение из запоя на дому цена .
worldwide pharmacy: reputable indian pharmacies – legal online pharmacy
mostbet retragere rapida mostbet retragere rapida
pharmacy order online: reputable indian online pharmacy – medstore online pharmacy
cum depun pe mostbet cu usdt cum depun pe mostbet cu usdt
Hello i am kavin, its my first time to commenting anyplace, when i read this article i thought i could also make comment due to this sensible post.
https://share.google/4a2PKuaSCXcpqLA29
авито капсульные дома авито капсульные дома .
вывести из запоя в наркологическом стационаре vyvod-iz-zapoya-v-staczionare-sankt-peterburg-10.ru .
https://differ.blog/p/ufc-328-predictions-who-wins-who-gets-exposed-and-one-fight-that-co-482b16
Khamzat Chimaev is forecasted to beat Sean Strickland by a judge’s ruling in a closely contested battle, whereas the other bouts on the UFC 328 card offers a series of tight matchups, namely Van successfully holding off Taira, Volkov securing a victory by late TKO, Buckley shocking Brady with a win, and Green narrowly outpointing Stephens.
online pharmacies: FormuLine Pharmacy – reliable online pharmacy
The unbeaten Khamzat Chimaev will defeat Sean Strickland by decision following wrestling becoming the deciding factor from the middle frames onward, while the remainder of the UFC 328 lineup showcases a tight victory for Van against Taira, a late TKO finish for Volkov, Buckley by stoppage, plus a decision win for Green.
капсульный дом цена https://baikalinform.ru/pestraya-zhiznb/eksperty-v-poslednie-gody-rastyot-interes-k-zagorodnomu-otdyhu/ .
прокатиться по неве piter-na-teplohode.ru .
дома капсульного типа https://piterets.ru/clause/travel/53124-kak-sochetat-minimalizm-i-premialnyj-komfort-v-gljemping-kapsule.html/ .
mostbet sázka zdarma podmínky https://mostbet2020.help/
экскурсия развод мостов экскурсия развод мостов .
mostbet kuponkód nem működik https://mostbet2025.help
выведение из запоя в стационаре наркология выведение из запоя в стационаре наркология .
mostbet promo kód Česko http://mostbet2020.help
вывод из наркозависимости на дому narkolog-na-dom-moskva-11.ru .
mostbet telepítés segítség http://www.mostbet2025.help
кодировка нижний новгород кодировка нижний новгород .
вывод из запоя с выездом на дом цена вывод из запоя с выездом на дом цена .
mostbet cesko https://www.mostbet2020.help
plinko mostbet играть онлайн plinko mostbet играть онлайн
mostbet elérési link https://mostbet2025.help
мостбет кэшбэк https://mostbet09754.help/
капсульные дома для круглогодичного проживания сколько стоит капсульные дома для круглогодичного проживания сколько стоит .
вывод из запоя на дому вывод из запоя на дому .
Its like you read my mind! You appear to know so much about this, like you wrote the book in it or something. I think that you could do with a few pics to drive the message home a little bit, but instead of that, this is excellent blog. A fantastic read. I’ll certainly be back.
Thank you for sharing with us, I think this website really stands out :D.
капельница от похмелья клиника капельница от похмелья клиника .
1win казино бонус Кыргызстан 1win95124.help
aviator 1win https://1win95124.help/
вывод из запоя дешево екатеринбург kapelnicza-ot-zapoya-kalyazin.ru .
вывести из запоя на дому нижний новгород narkologicheskaya-pomoshh-nizhnij-novgorod.ru .
Показаниями к срочному выезду являются:
Подробнее можно узнать тут – вывод из запоя на дому круглосуточно
купить базу данных купить базу данных .
клиники по лечению алкоголизма narkologicheskaya-pomoshh-nizhnij-novgorod-1.ru .
https://pin-up-kz.space/ пин ап казино
эссенциале капельница в воронеже эссенциале капельница в воронеже .
https://pinupaz.online/ pin up az
înregistrare melbet https://melbet89725.help
sweet bonanza banco azteca https://sweet-bonanza45713.help/
melbet mines online http://melbet89725.help
sweet bonanza méxico ios sweet-bonanza45713.help
pin-up pin up casino
вызвать капельницу от запоя kapelnicza-ot-zapoya-kalyazin-1.ru .
1win canlı kazino http://www.1win19435.help
1win lucky jet demo http://1win19435.help/
капельница от похмелья на дому цена капельница от похмелья на дому цена .
капсульные дома для круглогодичного проживания http://www.pravda-tv.ru/2025/09/24/627719/glemping-kak-alternativa-otelyu-chto-zhdyot-turista-v-kapsulnom-dome .
pin up pin up az
мелбет шартгузорӣ теннис http://melbet63047.help
капельница от запоя недорого капельница от запоя недорого .
melbet слотҳо бо бонус http://melbet63047.help/
мостбет авторизация http://mostbet09754.help
наркологический центр нижний новгород narkologicheskaya-pomoshh-nizhnij-novgorod.ru .
пин ап пин ап казино
покупка базы данных покупка базы данных .
1win вывод на карту сколько идет https://1win95124.help/
Today, I went to the beachfront with my kids. I found a sea shell and gave it to my 4 year old daughter and said “You can hear the ocean if you put this to your ear.” She placed the shell to her ear and screamed. There was a hermit crab inside and it pinched her ear. She never wants to go back! LoL I know this is totally off topic but I had to tell someone!
https://share.google/rQe7Ii9NR3fOOVm6R
вывод из запоя стационар вывод из запоя стационар .
https://pinupazz.top/ pin-up oyunu
This platform exceeded my expectations with trustworthy service and wide token selection. Definitely recommend to anyone in crypto.
https://pinupaz.online/ pin up casino
вывод из запоя круглосуточно вывод из запоя круглосуточно .
пин ап пин ап казино kz
The essence of the passage revolves around the fact that this coming UFC 328 event features five competitive battles spanning five different divisions, including Khamzat Chimaev favored though not assured of overcoming the durable and awkward Sean Strickland for the 185-pound belt, whereas the bouts at flyweight, heavyweight, welterweight, and lightweight each present hazardous confrontations of fighting styles which guarantee the night will not be uneventful.
ufc fight stats
Khamzat Chimaev looks unbeatable, but Sean Strickland is so awkward and durable that he could cause an upset, and the undercard and co-main events offer a puncher taking on a tap-out artist who has never lost at flyweight, two heavyweight hitters, each sporting a concrete beard, a chess match fought with fists at welterweight, along with a throwback, all-out brawl featuring two lightweight old-guard fighters, with every single fight built around someone’s perfect plan potentially falling apart.
капельница от алкоголя на дому цена капельница от алкоголя на дому цена .
pin up pin up
https://pinupaz.online/ pin-up online casino
тестовые ключи gobasego-2.ru .
I enjoy what you guys tend to be up too. This kind of clever work and reporting! Keep up the good works guys I’ve added you guys to blogroll.
капельница от похмелья купить капельница от похмелья купить .
https://pin-up-kz.space/ пин ап казино
Процесс лечения начинается с консультации врача, который оценивает состояние пациента, его анамнез и определяет, какие процедуры и препараты нужно использовать. В большинстве случаев капельница включает в себя регидратацию, витамины группы B, антиеметики, препараты для улучшения работы печени и почек. Важно, что капельница не только помогает организму вывести токсины, но и восстанавливает нормальную работу всех систем организма, обеспечивая быстрое улучшение самочувствия.
Подробнее тут – капельница от похмелья на дому в самаре
как пройти регистрацию в mostbet http://mostbet09754.help
1вин лаки джет http://1win95124.help
капельница от похмелья недорого капельница от похмелья недорого .
мостбет обновить приложение https://mostbet09754.help/
1вин регистрация http://www.1win95124.help
https://pinupaz.online/ pin up casino
Heya i’m for the first time here. I came across this board and I in finding It really useful & it helped me out a lot. I am hoping to present something again and help others such as you helped me.
вывести из запоя цена вывести из запоя цена .
мостбет приложение не устанавливается мостбет приложение не устанавливается
1win не устанавливается apk http://1win95124.help
https://pinupazz.top/ pin up
melbet retragere https://www.melbet89725.help
melbet бозиҳои казино melbet бозиҳои казино
sweet bonanza actualizar apk México sweet bonanza actualizar apk México
1win populyar oyunlar https://1win19435.help/
вывод из запоя екатеринбург стационар вывод из запоя екатеринбург стационар .
сделать капельницу от похмелья сделать капельницу от похмелья .
капельница от запоя круглосуточно капельница от запоя круглосуточно .
пин ап пин ап кз
капельница от похмелья екатеринбург капельница от похмелья екатеринбург .
частные наркологические клиники нижний новгород narkologicheskaya-pomoshh-nizhnij-novgorod-1.ru .
купить данные купить данные .
https://pinupazz.top/ pin-up online casino
1вин приветственный бонус https://1win25340.help/
1вин зарегистрироваться https://www.1win43592.help
1win скачать на android 1win25340.help
1win быстрый вывод на мегапей http://www.1win43592.help
Эта статья предлагает живое освещение актуальной темы с множеством интересных фактов. Мы рассмотрим ключевые моменты, которые делают данную тему важной и актуальной. Подготовьтесь к насыщенному путешествию по неизвестным аспектам и узнайте больше о значимых событиях.
Разобраться лучше – https://vivod-iz-zapoya-2.ru/
https://pinupaz.online/ pin up az
pin-up pin up
пин ап пин ап казино
клиника лечения зависимостей narkologicheskaya-pomoshh-nizhnij-novgorod.ru .
pin up pin up casino
антипохмельная капельница kapelnicza-ot-pokhmelya-ekaterinburg.ru .
капельница на дому цена капельница на дому цена .
капельница от запоя недорого капельница от запоя недорого .
наркологический вывод из запоя наркологический вывод из запоя .
melbet дилер зинда https://www.melbet63047.help
pariuri pe hochei melbet https://www.melbet89725.help
капельница от запоя круглосуточно капельница от запоя круглосуточно .
1win hesab bağlama 1win hesab bağlama
пин ап пин ап казино
мелбет воридшавӣ бо телефон https://melbet63047.help
melbet inregistrare cu email melbet inregistrare cu email
sweet bonanza faq https://sweet-bonanza45713.help
pin up pin up
https://pinupaz.online/ pin up casino
1win plinko balans 1win19435.help
наркология вывод из запоя vyvod-iz-zapoya-na-domu-samara-19.ru .
mexican pharmacy weight loss online canadian pharmacy reviews cheap viagra online pharmacy prescription
pin up az online pin up casino
https://pin-up-kz.space/ пин ап кз
капельница от запоя на дому капельница от запоя на дому .
pin up pin-up oyunu
вывести из запоя вывести из запоя .
Для жителей Воронежа выездной формат особенно востребован в ситуациях, когда состояние уже заметно ухудшилось, а на поездку в клинику нет ресурса ни физически, ни эмоционально. Круглосуточный вызов врача позволяет начать лечение без ожидания утра, без дороги и без дополнительной нагрузки на сердечно-сосудистую систему. После приезда нарколог не ограничивается одной процедурой. Он оценивает, насколько безопасно оставлять пациента дома, есть ли признаки тяжёлой абстиненции, присутствует ли риск делирия, обезвоживания, аритмии или резкого скачка давления. Если домашний формат допустим, запускается пошаговая схема стабилизации, где важен не только состав капельницы, но и последующее наблюдение в ближайшие часы.
Изучить вопрос глубже – https://narkolog-na-dom-voronezh.ru
VeritasCare VeritasCare VeritasCare
прокапаться воронеж прокапаться воронеж .
вывод из запоя вызов на дом vyvod-iz-zapoya-na-domu-ekaterinburg-10.ru .
запой вызов врач vyvod-iz-zapoya-na-domu-samara-18.ru .
cheapest cialis: Buy Tadalafil 5mg – Buy Tadalafil 10mg
PG Slot em 2026 está competitivo e com promoções girando quase todos os dias.
https://corebluehealth.com/# Sildenafil 100mg price
вывожу из запоя екатеринбург вывожу из запоя екатеринбург .
Buy generic 100mg Viagra online CoreBlue Health Generic Viagra online
https://civicmeds.shop/# offshore pharmacy no prescription
1win casino in UGX http://1win54316.help/
1win deposit fee 1win deposit fee
sildenafil 50 mg price: Cheap Viagra 100mg – CoreBlue Health
1win ставки на CS2 http://1win43592.help/
1win промокод при регистрации http://1win25340.help/
It’s in reality a great and useful piece of info. I am happy that you shared this useful info with us. Please stay us informed like this. Thank you for sharing.
капельница от похмелья клиника капельница от похмелья клиника .
1win казино слоты https://www.1win43592.help
1win скачать на android http://www.1win25340.help
cheapest pharmacy generic pharmacy online canadian pharmacy world coupon code
вывести из запоя вывести из запоя .
вывод из запоя вывод из запоя .
canadien pharmacies: CivicMeds – online pharmacy reddit
плинко онлайн https://plinko47590.help
http://veritascarepharm.com/# Buy Cialis online
плинко вывод на kaspi https://www.plinko47590.help
Для Воронежа выездной формат особенно востребован вечером, ночью и ранним утром, когда у больного резко усиливаются симптомы и поездка в медицинское учреждение становится тяжёлой или просто нереальной. Если человек несколько дней употреблял алкоголь, почти не спал, плохо переносит воду, жалуется на сердцебиение и слабость, то откладывать осмотр не стоит. Срочная наркологическая помощь нужна именно тогда, когда ситуация развивается быстро, а семья уже видит, что своими силами справиться не удаётся. Врач приезжает, проводит осмотр, определяет, нет ли признаков осложнений, и уже на месте решает, какие меры допустимы дома, а какие требуют другого формата оказания помощи.
Получить дополнительную информацию – вызов нарколога на дом
детоксикация запоя самара детоксикация запоя самара .
us pharmacy CivicMeds legit canadian pharmacy
вывод из запоя круглосуточно вывод из запоя круглосуточно .
pharmacy open near me online pharmacy 365 pills canadian pharmacy oxycodone
https://corebluehealth.com/# CoreBlue Health
наркологический вывод из запоя наркологический вывод из запоя .
выведение из запоя клиника vyvod-iz-zapoya-na-domu-samara-18.ru .
1win как сделать депозит http://1win71849.help/
1win изменить номер 1win изменить номер
24 hour pharmacy: CivicMeds – online pharmacy 365 pills
https://civicmeds.shop/# cheapest pharmacy
1win withdrawal time Uganda http://1win54316.help/
Buy Tadalafil 5mg Cialis 20mg price in USA VeritasCare
O melhor resultado da noite veio de leitura de ritmo, não de aumentar aposta no impulso.
Viagra Tablet price: Sildenafil 100mg price – over the counter sildenafil
нарколог на дом вывод из запоя нарколог на дом вывод из запоя .
прерывание запоя на дому прерывание запоя на дому .
вызвать врача нарколога на дом вызвать врача нарколога на дом .
https://civicmeds.shop/# certified canadian pharmacy
выведение из запоя на дому цена выведение из запоя на дому цена .
plinko авиатор игра plinko авиатор игра
запой на дому самара запой на дому самара .
CoreBlue Health CoreBlue Health over the counter sildenafil
вывести из запоя на дому самара вывести из запоя на дому самара .
служба вывода из запоя служба вывода из запоя .
1win aviator signal http://1win5751.help/
1win app o‘rnatish https://www.1win5751.help
Generic Cialis without a doctor prescription: Cialis over the counter – Generic Tadalafil 20mg price
мостбет официальный адрес сайта https://www.mostbet52746.help
мостбет KGS пополнение http://mostbet52746.help
pin-up depozit limitlari https://pinup41537.help/
pin-up hisob ochish Oʻzbekiston https://pinup41537.help/
вызов врача нарколога вызов врача нарколога .
legit canadian online pharmacy cheapest pharmacy for prescriptions without insurance pharmacy online 365
1win confirm email https://www.1win54316.help
Great tremendous things here. I am very glad to see your post. Thanks a lot and i am taking a look forward to contact you. Will you kindly drop me a mail?
1win site down Uganda https://www.1win54316.help
вывод из запоя стационар вывод из запоя стационар .
VeritasCare: Generic Cialis without a doctor prescription – Cialis 20mg price in USA
https://corebluehealth.com/# Viagra generic over the counter
1win maintenance http://1win54316.help
краш 1win краш 1win
http://civicmeds.com/# canadian pharmacy price checker
нарколог на дом вывод из запоя нарколог на дом вывод из запоя .
online pharmacy ordering CivicMeds top mail order pharmacies
врач нарколог на дом москва врач нарколог на дом москва .
мелбет вывод на mastercard https://melbet53847.help/
mostbet parolni almashtirish http://mostbet04826.help
мелбет минимальный депозит мелбет минимальный депозит
mostbet yechish qoidalari https://mostbet04826.help/
выход из запоя в стационаре выход из запоя в стационаре .
http://civicmeds.com/# canadian pharmacy cheap
ggbet-casino-de-2026-review
my homepage … echtgeld
VeritasCare cialis for sale VeritasCare
1win bepul crash https://www.1win5751.help
наркология вывод из запоя в стационаре наркология вывод из запоя в стационаре .
mostbet официальный сайт рабочий https://www.mostbet52746.help
CoreBlue Health CoreBlue Health CoreBlue Health
плинко пополнение qiwi http://plinko47590.help/
1вин-kg 1вин-kg
plinko войти http://www.plinko47590.help
1win сколько выводят на о деньги 1win сколько выводят на о деньги
вывод из запоя на дому самара круглосуточно вывод из запоя на дому самара круглосуточно .
pinup toʻlov limitlari pinup41537.help
вывод из запоя стационар вывод из запоя стационар .
The best choice I made for checking analytics. Smooth and low fees.
1вин вход http://1win71849.help/
plinko скачать с официального сайта http://www.plinko47590.help
услуги нарколога на дому услуги нарколога на дому .
https://veritascarepharm.com/# cheapest cialis
https://wazamba-bet.com.mx/
Wazamba es un casino en linea que aparecio en 2019 con una propuesta original y esteticamente unica, brindando una cifra superior a los 4,000 juegos, incluyendo tragamonedas, casino con crupieres en directo y apuestas deportivas, todo integrado en una unica plataforma.
https://strendus-bet.com.mx/
Strendus es un casino mexicano inaugurado en 2020 por New Ads, S.A. de C.V. bajo el marco regulatorio de SEGOB, pensado especialmente para los jugadores del pais y no en forma de una conversion literal de sitios europeos.
online shopping pharmacy india CivicMeds northern pharmacy canada
вывод из запоя спб стационар вывод из запоя спб стационар .
В этой информационной статье вы найдете интересное содержание, которое поможет вам расширить свои знания. Мы предлагаем увлекательный подход и уникальные взгляды на обсуждаемые темы, побуждая пользователей к активному мышлению и критическому анализу!
Получить дополнительные сведения – https://vivod-iz-zapoya-2.ru/
нужен нарколог на дом нужен нарколог на дом .
нарколог вывод из запоя в стационаре нарколог вывод из запоя в стационаре .
https://civicmeds.com/# pharmacy online track order
вызов нарколога цена narkolog-na-dom-moskva-1.ru .
CoreBlue Health Viagra without a doctor prescription Canada CoreBlue Health
1 win 1win5751.help
mostbet верификация аккаунта https://mostbet52746.help
VeritasCare VeritasCare VeritasCare
pin-up lucky jet o‘yin pin-up lucky jet o‘yin
mostbet скачать apk бесплатно http://mostbet52746.help/
pinup promo kod kiritish joyi pinup41537.help
выведение +из запоя +в стационаре выведение +из запоя +в стационаре .
I really like your writing style, wonderful information, appreciate it for putting up :D. “Your central self is totally untouched By grief, confusion, desperation.” by Vernon Howard.
нарколог на дом недорого москва нарколог на дом недорого москва .
Whats up very nice site!! Guy .. Beautiful .. Superb .. I will bookmark your website and take the feeds also? I’m happy to search out a lot of helpful information right here in the put up, we need develop more strategies in this regard, thank you for sharing. . . . . .
在线购买无处方安定片 xxx Pornhub
https://veritascarepharm.com/# Cialis without a doctor prescription
вызвать нарколога на дом москва вызвать нарколога на дом москва .
вывод из запоя на дому круглосуточно вывод из запоя на дому круглосуточно .
вывод из запоя в стационаре клиника вывод из запоя в стационаре клиника .
нарколог на дом в москве похмельная служба [url=https://narkolog-na-dom-moskva-2.ru/]narkolog-na-dom-moskva-2.ru[/url] .
juegos-tragamonedas-gratis-sin-descargar-de-5-tambores
Feel free to surf to my webpage Slots
вывод из запоя стационар вывод из запоя стационар .
врач нарколог выезд на дом цена narkolog-na-dom-moskva-3.ru .
стационар вывод из запоя стационар вывод из запоя .
VeritasCare VeritasCare Buy Tadalafil 10mg
капельница от запоя анонимно капельница от запоя анонимно .
вывод из запоя санкт петербург стационар вывод из запоя санкт петербург стационар .
снятие интоксикации на дому снятие интоксикации на дому .
CoreBlue Health: viagra without prescription – CoreBlue Health
Wild Bandito sticky wilds: o roubo tá bom demais!
https://veritascarepharm.shop/# VeritasCare
CoreBlue Health CoreBlue Health Buy Viagra online cheap
мостбет бозии рулетка http://www.mostbet40827.help
насби mostbet http://mostbet40827.help/
мелбет вывод odengi кыргызстан http://www.melbet27495.help
мелбет восстановление аккаунта мелбет восстановление аккаунта
1вин линк оина 1вин линк оина
1win бақайдгирӣ Тоҷикистон 1win бақайдгирӣ Тоҷикистон
CoreBlue Health: CoreBlue Health – CoreBlue Health
Buy Tadalafil 10mg: Cialis 20mg price – VeritasCare
вывод из запоя на дому вывод из запоя на дому .
mail order pharmacy offshore pharmacy no prescription internet pharmacy mexico
вывод из запоя на дому цена вывод из запоя на дому цена .
выведение из запоя на дому выведение из запоя на дому .
VeritasCare: Generic Tadalafil 20mg price – Cheap Cialis
вывод из запоя самара на дому vyvod-iz-zapoya-na-domu-samara-11.ru .
вывод из запоя цена на дому вывод из запоя цена на дому .
I not to mention my buddies happened to be analyzing the best suggestions found on your site and then before long got a horrible feeling I had not expressed respect to the website owner for those secrets. Most of the people are actually so glad to see them and have now surely been taking advantage of them. We appreciate you indeed being simply helpful and also for utilizing some smart ideas millions of individuals are really needing to discover. Our sincere apologies for not expressing gratitude to you sooner.
https://veritascarepharm.shop/# Buy Cialis online
мостбет apk скачать на android мостбет apk скачать на android
VeritasCare: buy cialis pill – Buy Tadalafil 20mg
мостбет история ставок http://www.mostbet89276.help
мостбет минимальный депозит мостбет минимальный депозит
mostbet бонус за регистрацию http://www.mostbet63740.help
Jogo do Tigrinho com Pix: quem já sacou rápido depois de um bom win?
I used to be able to find good advice from your content.
betify avis
Generic Cialis price Cheap Cialis Cheap Cialis
Excellent website you have here but I was curious if you knew of any discussion boards that cover the same topics talked about here? I’d really love to be a part of online community where I can get opinions from other knowledgeable individuals that share the same interest. If you have any recommendations, please let me know. Bless you!
buy cannabis online for xxx adult porn video
VeritasCare: Tadalafil price – Cialis over the counter
вывод из запоя в нижнем новгороде вывод из запоя в нижнем новгороде .
выведение из запоя в нижнем новгороде выведение из запоя в нижнем новгороде .
мостбет crash мостбет crash
melbet crash стратегия http://www.melbet27495.help
melbet retirer gains plinko http://melbet57184.help
1win aviator демо http://1win20938.help
melbet dépôt moov ci https://www.melbet57184.help
canadian pharmacy ed medications: CivicMeds – canada pharmacy online legit
вывод из запоя цена вывод из запоя цена .
Wow, wonderful blog layout! How long have you been blogging for? you make blogging look easy. The overall look of your site is magnificent, let alone the content!
beste online casino ohne oasis
1win site oglinda https://1win90843.help
I’ve read some good stuff here. Definitely value bookmarking for revisiting. I surprise how a lot effort you place to make such a great informative site.
1win oficial 1win oficial
выведение из запоя в воронеже выведение из запоя в воронеже .
лечение алкоголизма с выездом на дом лечение алкоголизма с выездом на дом .
canada online pharmacy [url=https://civicmeds.com/#]canadian pharmacy no scripts[/url] canadian pharmacy coupon
анонимный вывод из запоя анонимный вывод из запоя .
https://betfair-bet.com.mx/
Basado en el texto, Betfair constituye un operador de juegos y apuestas por internet que acumula mas de 25 anos de experiencia, establecido en el Reino Unido durante el ano 2000, y se destaca mundialmente por su innovador exchange de apuestas.
вывод из запоя на дому самара круглосуточно вывод из запоя на дому самара круглосуточно .
Thanks for some other informative blog. Where else may I am getting that type of info written in such a perfect method? I have a undertaking that I’m simply now working on, and I’ve been at the glance out for such information.
librabet accedi
Good write-up, I’m regular visitor of one’s site, maintain up the excellent operate, and It’s going to be a regular visitor for a lengthy time.
certified canadian international pharmacy: trust pharmacy – tops pharmacy
slot-casino-spel
My web-site Descărcare
cheapest pharmacy to fill prescriptions with insurance: canada pharmacy world – cheapest pharmacy for prescriptions without insurance
you’re in reality a excellent webmaster. The site loading speed is incredible. It seems that you’re doing any unique trick. Furthermore, The contents are masterwork. you’ve done a wonderful process on this matter!
buy xanax without prescrition sexual porn pills
plinko mostbet http://www.mostbet63740.help
вывод из запоя цены воронеж вывод из запоя цены воронеж .
вывод из запоя цена вывод из запоя цена .
капельница от запоя анонимно капельница от запоя анонимно .
мостбет пополнение KGS карта https://mostbet89276.help/
https://veritascarepharm.com/# buy cialis pill
вывод из запоя на дому в нижнем новгороде вывод из запоя на дому в нижнем новгороде .
VeritasCare VeritasCare Buy Tadalafil 20mg
For most recent information you have to pay a quick visit internet and on web I found this web page as a most excellent web page for newest updates.
cialis pills sexual xxx porn pills
best european online pharmacy: CivicMeds – save on pharmacy
What’s up every one, here every one is sharing these kinds of know-how, so it’s fastidious to read this weblog, and I used to pay a visit this weblog everyday.
Buy viagra here buy cialis on this site
вывод из запоя с выездом вывод из запоя с выездом .
нарколог на дом вывод из запоя на дому нарколог на дом вывод из запоя на дому .
лечение алкоголизма с выездом на дом лечение алкоголизма с выездом на дом .
выведение из запоя на дому выведение из запоя на дому .
Generic Cialis without a doctor prescription: VeritasCare – Buy Tadalafil 20mg
If you’ve enjoyed playing the Super Joker slot machine, why not take a look at some of our favorite similar games below? Login with fingerprint Megaways games represent a pioneering form of casino entertainment that introduces significant variety in how winnings can be generated. This innovative game type is characterized by a dynamic mechanism where the number of symbols on each reel changes with each spin. This results in a variable number of potential ways to win, and what is unique about Megaways is the ability to offer up to hundreds of thousands of different ways to win – a significant departure from the more conventional slots with their fixed paylines. **18+. New customers only. Min deposit £20. Max One £10 Free Bet. Min turnover £20. Qualifying Bets must be placed at odds of 1 1 (2.00) or greater. Paid as bonus token with Min 4 5 (1.80) odds req. T&Cs apply.
https://bestnotarysvc.com/1win-luckyjet-review-for-uk-players/
Since NetEnt’s first cluster pay slot hit the scene, we’ve seen plenty of top providers come up with cluster pay slots. We recommend you check out the following cluster pay slot providers for the latest hits. Throughout the round, whenever any new MULTIPLIER symbol lands and there is a win, the total multiplier value is also used to multiply the win. We Rise by Lifting Others We Rise by Lifting Others Lucky Penny online casino gameplay follows standard slot mechanics with enhanced bonus integration. New players can master the game quickly by following systematic procedures for bet adjustment and feature recognition. Pragmatic Play are also known for their Drops & Wins slots which is a promotion that began in 2020. With over £85 million in prizes awarded, Drops & Wins tournaments run for 12 weeks and offer £2 million in cash prizes every single month. They are daily slot tournaments as well as daily prize drops. For more details, check out my dedicated guide:
вывод из запоя дешево нижний новгород вывод из запоя дешево нижний новгород .
вывод из запоя на дому недорого вывод из запоя на дому недорого .
VeritasCare VeritasCare Generic Tadalafil 20mg price
Thanks for the auspicious writeup. It in fact was once a entertainment account it. Look complex to more added agreeable from you! By the way, how can we keep in touch?
https://05161.com.ua
срочный вывод из запоя срочный вывод из запоя .
VeritasCare: VeritasCare – Cialis 20mg price in USA
вывод из запоя цена на дому вывод из запоя цена на дому .
melbet mise requise bonus https://www.melbet57184.help
вывод из запоя в нижнем новгороде на дому vyvod-iz-zapoya-na-domu-nizhnij-novgorod-4.ru .
Superb blog! Do you have any recommendations for aspiring writers? I’m planning to start my own blog soon but I’m a little lost on everything. Would you advise starting with a free platform like WordPress or go for a paid option? There are so many options out there that I’m completely confused .. Any suggestions? Many thanks!
CoreBlue Health: CoreBlue Health – CoreBlue Health
вывод из запоя капельница воронеж вывод из запоя капельница воронеж .
вывод из запоя на дому круглосуточно вывод из запоя на дому круглосуточно .
вывод из запоя самара на дому vyvod-iz-zapoya-na-domu-samara-8.ru .
Buy Cialis online Generic Cialis without a doctor prescription VeritasCare
вывод из запоя на дому цена вывод из запоя на дому цена .
нарколог на дом вывод из запоя нарколог на дом вывод из запоя .
I switched from another service because of the quick deposits and fast transactions.
VeritasCare: VeritasCare – VeritasCare
Outstanding post, you have pointed out some great points, I as well think this s a very wonderful website.
https://corebluehealth.shop/# Buy generic 100mg Viagra online
вывести из запоя воронеж vyvod-iz-zapoya-na-domu-voronezh-9.ru .
вывод из запоя с выездом на дом вывод из запоя с выездом на дом .
canadian pharmacy tampa: canadian pharmacy coupon – pharmacy com canada
мостбет apk насб намешавад мостбет apk насб намешавад
мостбет ios приложение Кыргызстан http://mostbet89276.help/
1win пардохт бо Mastercard https://www.1win20938.help
мелбет дилер онлайн http://www.melbet27495.help
mostbet гузаштан аз басташавӣ mostbet гузаштан аз басташавӣ
mostbet зеркало для Кыргызстана mostbet зеркало для Кыргызстана
1win версияи мобилӣ https://1win20938.help
melbet mbank http://www.melbet27495.help
вывод из запоя дешево вывод из запоя дешево .
выведение из запоя на дому выведение из запоя на дому .
discount pharmacy canadian pharmacy world online pharmacy store
выведение из запоя воронеж vyvod-iz-zapoya-na-domu-voronezh-10.ru .
вывод из запоя в спб вывод из запоя в спб .
Cialis over the counter: Cheap Cialis – VeritasCare
https://corebluehealth.com/# Viagra generic over the counter
вывод из запоя на дому телефоны vyvod-iz-zapoya-na-domu-voronezh-9.ru .
вывод из запоя на дому воронеж капельница вывод из запоя на дому воронеж капельница .
вывод из запоя капельница воронеж вывод из запоя капельница воронеж .
вывод из запоя на дому недорого вывод из запоя на дому недорого .
viagra canada: Viagra generic over the counter – CoreBlue Health
вывод запоев скорая vyvod-iz-zapoya-na-domu-samara-10.ru .
нарколог на дом вывод из запоя нарколог на дом вывод из запоя .
maple leaf pharmacy in canada CivicMeds best canadian pharmacy for cialis
tadalafil 5mg reviews tadalafil 10mg generic tadalafil 20mg price
great issues altogether, you just received a new reader. What would you suggest in regards to your submit that you simply made a few days in the past? Any certain?
врач капельница алкоголь на дом врач капельница алкоголь на дом .
I have been exploring for a little bit for any high-quality articles or blog posts on this sort of area . Exploring in Yahoo I ultimately stumbled upon this site. Studying this information So i’m satisfied to exhibit that I have a very just right uncanny feeling I found out just what I needed. I so much undoubtedly will make sure to do not put out of your mind this site and provides it a look on a constant basis.
Viagra tablet online: Order Viagra 50 mg online – CoreBlue Health
вывод из запоя недорого вывод из запоя недорого .
The swapping tokens process is simple and the wide token selection makes it even better.
снять запой на дому снять запой на дому .
https://veritascarepharm.com/# buy cialis pill
вывод из запоя в воронеже вывод из запоя в воронеже .
помощь вывода запоя нарколог 24 помощь вывода запоя нарколог 24 .
Generic Viagra online: viagra without prescription – CoreBlue Health
The using the bridge process is simple and the wide token selection makes it even better.
http://corebluehealth.com/# buy viagra here
VeritasCare Buy Tadalafil 10mg VeritasCare
мостбет casino slots https://mostbet40827.help/
mostbet вывести деньги Кыргызстан mostbet вывести деньги Кыргызстан
1win aviator бозӣ http://1win20938.help/
melbet app android киргизия https://www.melbet27495.help
Mahjong Ways 2 cascade: quem já conseguiu muitas quedas em sequência?
Generic Tadalafil 20mg price: VeritasCare – buy cialis pill
вывод из запоя дешево вывод из запоя дешево .
выведение из запоя в спб выведение из запоя в спб .
melbet sports virtuels http://melbet57184.help
1win oglinda MD 1win90843.help
melbet pari ligue des champions melbet57184.help
best online pharmacy: CivicMeds – order pharmacy online egypt
мостбет лаки джет mostbet63740.help
mostbet как использовать бонус mostbet как использовать бонус
comment utiliser bonus melbet https://melbet57184.help
вывод из алкогольного запоя нарколог 24 вывод из алкогольного запоя нарколог 24 .
игровые автоматы мостбет mostbet63740.help
мостбет фриспины в казино мостбет фриспины в казино
Buy Tadalafil 10mg VeritasCare VeritasCare
mostbet KGS вывод mostbet KGS вывод
As I website possessor I believe the content material here is rattling excellent , appreciate it for your efforts. You should keep it up forever! Best of luck.
canadianpharmacyworld: canada pharmacy 24h – pharmacy without prescription
вывод из запоя в стационаре в воронеже вывод из запоя в стационаре в воронеже .
http://corebluehealth.com/# buy Viagra online
http://civicmeds.com/# maple leaf pharmacy in canada
uk pharmacy: CivicMeds – thecanadianpharmacy
Just look at this slot, Aloha Cluster Pays to see that out for yourself. If you have never fully experienced a cluster slot before then there is no greater starter slot than this one. NetEnt have gone above and beyond to create something that offers something different to all of the other slots out there that are somewhat traditional in a sense. If the thought of taking it easy at a beachside tiki bar – palms swaying, exotic music playing in the background, enjoying the view. Then you’ll enjoy playing Aloha! Cluster Pays. You will immediately rating full access to our internet casino discussion board talk along with found all of our newsletter which have news & private bonuses monthly. However when you understand so it position, omg this is so addictive and you can fun! Even if We missing to experience which position, I would personally never ever destroyed guarantee and go back the next time, plus the the very next time it doesn’t let you down. Whether or not We missing playing that it position, I’d never destroyed guarantee and you can return next time, and the the next time it…
https://isignal.ai/casino-spin-and-win-bonus-claim-review-for-uk-players/
Compared to the other jackpot slot games on this list it is a relatively low amount, except for having a new background. Spin palace casino uk the platform currently has 3652 registered members and features 215,962 threads, PlayFrank utilises SSL security encryption to keep all player data and transactions secure. There are a number of online casino slot games based around famous comic characters, uk casinos with lots of free spins then our review concludes that you cant go wrong with Billionaire Casino on that front. As the slot that started the megaways frenzy in the iGaming industry, moose. The enquiry is then allocated to an appropriately experienced legal advisor who will return the call within two hours, unless the caller makes a specific time request. The name says a lot about one of this game’s most significant features. As previously, mentioned this slot machine does not have pay-lines instead the player needs to collect clusters to win. To form a cluster all symbols that are the same that are adjacent to each other count, regardless of if they are horizontally or vertically adjacent. Players need nine or more symbols for a cluster to award a win.
Some truly nice and useful information on this internet site, besides I believe the design and style holds fantastic features.
viagra without prescription viagra canada CoreBlue Health
вывод из запоя в спб вывод из запоя в спб .
запой помощь запой помощь .
cum scot bani de pe 1win http://1win90843.help
выведение из запоя на дому выведение из запоя на дому .
joc mines 1win http://1win90843.help/
вывод из запоя на дому спб цены vyvod-iz-zapoya-na-domu-sankt-peterburg-3.ru .
VeritasCare: VeritasCare – Buy Tadalafil 5mg
1win acces prin VPN Moldova http://1win90843.help
капельница при алкогольной интоксикации на дому цена капельница при алкогольной интоксикации на дому цена .
Hey there! I could have sworn I’ve been to this website before but after reading through some of the post I realized it’s new to me. Nonetheless, I’m definitely delighted I found it and I’ll be bookmarking and checking back often!
gioca-floating-dragon-hold-spin-gratis-senza-scaricare
My homepage; game (Catalina)
выведение из запоя нижний новгород выведение из запоя нижний новгород .
generic sildenafil: CoreBlue Health – CoreBlue Health
вывод из запоя на дому круглосуточно вывод из запоя на дому круглосуточно .
trusted canadian pharmacy reliable canadian pharmacy best rated canadian pharmacy
https://civicmeds.com/# legal online pharmacy coupon code
mostbet plinko Кыргызстан https://mostbet91763.help/
вывод из запоя на дому цена вывод из запоя на дому цена .
запой помощь запой помощь .
вывести из запоя цена вывести из запоя цена .
Cheap generic Viagra online: CoreBlue Health – CoreBlue Health
капельница от запоя цена kapelnica-ot-zapoya-nizhnij-novgorod.ru .
вывод из запоя на дому цена вывод из запоя на дому цена .
Cheap generic Viagra: Viagra Tablet price – CoreBlue Health
https://veritascarepharm.shop/# Buy Tadalafil 10mg
мостбет бонусы для Кыргызстана https://mostbet26809.help
выведение из запоя на дому vyvod-iz-zapoya-na-domu-samara-2.ru .
mostbet çıxarış neçə saata gəlir https://mostbet2011.help
CoreBlue Health Sildenafil Citrate Tablets 100mg best price for viagra 100mg
мостбет скачать для ios https://www.mostbet26809.help
mostbet plinko qoidalari http://www.mostbet68214.help
actualizare apk mostbet https://www.mostbet75302.help
mostbet kazino yüklə mostbet kazino yüklə
mostbet mastercard yechish mostbet mastercard yechish
mostbet mirror link Moldova mostbet mirror link Moldova
reliable online pharmacy accutane charles raines pharmacy winston-salem nc early drug store ambien online pharmacy no prescription
вывод из алкогольного запоя нарколог24 vyvod-iz-zapoya-na-domu-sankt-peterburg.ru .
вывод из алкогольного запоя нарколог24 vyvod-iz-zapoya-na-domu-sankt-peterburg-1.ru .
Cialis over the counter: VeritasCare – VeritasCare
мелбет скачать бишкек мелбет скачать бишкек
Woah! I’m really digging the template/theme of this website. It’s simple, yet effective. A lot of times it’s very hard to get that “perfect balance” between user friendliness and visual appeal. I must say that you’ve done a excellent job with this. Additionally, the blog loads extremely quick for me on Chrome. Superb Blog!
капельница на дому нижний новгород капельница на дому нижний новгород .
melbet скачать на андроид melbet скачать на андроид
вывод из запоя на дому вывод из запоя на дому .
вывод из запоя в екатеринбурге вывод из запоя в екатеринбурге .
мостбет ставки на спорт https://www.mostbet91763.help
https://civicmeds.shop/# brazilian pharmacy online
вывод из запоя екатеринбург вывод из запоя екатеринбург .
мостбет официальный сайт Кыргызстан мостбет официальный сайт Кыргызстан
капельница от алкоголя капельница от алкоголя .
pharmacy online 365 discount code: CivicMeds – online pharmacy no presc uk
мостбет как вывести на банковскую карту https://www.mostbet91763.help
Viagra Tablet price buy Viagra over the counter CoreBlue Health
Very descriptive article, I loved that bit. Will there be a part 2?
вывод из запоя цены самара вывод из запоя цены самара .
tadalafil tadalafil 5mg reviews tadalafil effects on kidneys
I do agree with all the ideas you’ve presented in your post. They’re very convincing and will definitely work. Still, the posts are very short for beginners. Could you please extend them a little from next time? Thanks for the post.
вызов нарколога на дом запой вызов нарколога на дом запой .
выведение из запоя на дому в екатеринбурге выведение из запоя на дому в екатеринбурге .
вывод из запоя цена вывод из запоя цена .
вывод из запоя на дому нижний новгород вывод из запоя на дому нижний новгород .
капельница на дому нижний новгород цена от алкоголя капельница на дому нижний новгород цена от алкоголя .
CoreBlue Health: buy Viagra over the counter – CoreBlue Health
вывод из алкогольного запоя нарколог 24 вывод из алкогольного запоя нарколог 24 .
вывод из запоя спб вывод из запоя спб .
капельница после запоя капельница после запоя .
internet pharmacy manitoba: CivicMeds – no prescription needed pharmacy
Hello to all, as I am actually keen of reading this web site’s post to be updated daily. It consists of fastidious information.
https://i-medic.com.ua/problema-z-dalnim-svitlom-na-h4-yaka-obmanka.html
mostbet tək kupon mostbet tək kupon
mostbet Sumqayıt http://mostbet87216.help/
VeritasCare VeritasCare п»їcialis generic
мостбет фрибет Кыргызстан http://mostbet26809.help
mostbet Toshkent uzcard http://mostbet68214.help
mostbet eroare instalare mostbet eroare instalare
mostbet hesabımı geri qaytarmaq http://mostbet2011.help/
вывод из запоя цена вывод из запоя цена .
VeritasCare: Buy Cialis online – Cheap Cialis
https://civicmeds.com/# viagra canadian pharmacy vipps approved
капельница после запоя капельница после запоя .
вывод из запоя круглосуточно самара вывод из запоя круглосуточно самара .
снятие интоксикации на дому снятие интоксикации на дому .
вывод из запоя с выездом на дом вывод из запоя с выездом на дом .
поставить капельницу от запоя на дому цена поставить капельницу от запоя на дому цена .
cialis for sale: VeritasCare – VeritasCare
CoreBlue Health CoreBlue Health CoreBlue Health
вывод из запоя наркология вывод из запоя наркология .
вывод из запоя врач на дом вывод из запоя врач на дом .
вывести из запоя цена вывести из запоя цена .
CoreBlue Health: CoreBlue Health – CoreBlue Health
mostbet customer support http://www.mostbet75302.help
mostbet promo aksiya http://mostbet68214.help/
мелбет официальный сайт приложение http://melbet53498.help/
мостбет apk скачать Киргизия mostbet26809.help
mostbet mərc hesabı http://mostbet2011.help
mostbet jocuri pe bani real http://mostbet75302.help
I just could not depart your web site prior to suggesting that I really enjoyed the standard information a person provide for your visitors? Is going to be back often in order to check up on new posts
melbet плинко http://melbet53498.help/
mostbet mastercard https://mostbet68214.help
мостбет вывести деньги 2026 мостбет вывести деньги 2026
mostbet azərbaycanda azərbaycanca dəstək https://www.mostbet2011.help
https://corebluehealth.shop/# Order Viagra 50 mg online
прокапаться от алкоголя прокапаться от алкоголя .
прокапаться от алкоголя на дому нижний новгород прокапаться от алкоголя на дому нижний новгород .
выведение из запоя на дому выведение из запоя на дому .
выведение из запоя екатеринбург выведение из запоя екатеринбург .
круглосуточный вывод из запоя круглосуточный вывод из запоя .
mostbet cum depun bani https://mostbet75302.help
mostbet plinko demo mostbet68214.help
мостбет apk с официального сайта http://mostbet26809.help
melbet отмена вывода http://www.melbet53498.help
mostbet Bakı http://mostbet2011.help
canada pharmacy online: internet pharmacy mexico – pharmacies in canada that ship to the us
VeritasCare VeritasCare VeritasCare
снятие интоксикации на дому снятие интоксикации на дому .
mostbet suport 24/7 mostbet54831.help
mostbet usdt https://mostbet54831.help/
вывод из запоя анонимно недорого вывод из запоя анонимно недорого .
Every weekend i used to go to see this website, for the reason that i want enjoyment, as this this web page conations truly pleasant funny data too.
выведение из запоя vyvod-iz-zapoya-na-domu-nizhnij-novgorod.ru .
капельницы чтобы выйти из запоя vyvod-iz-zapoya-na-domu-ekaterinburg.ru .
https://bwin-bet.com.co/
Bwin Bet se presenta como un casino online y casa de pronosticos deportivos que opera en Colombia a partir de 2026 , actuando con el respaldo de Coljuegos , lo cual brinda un marco legal y protegido a los usuarios .
https://exgg.ru/forum/topic/mednye-truby-dlya-holodilnogo-kontura/#postid-3956 Медные трубы для холодильного контура
cheapest pharmacy to fill prescriptions with insurance: CivicMeds – best canadian pharmacy to buy from
I really appreciate this post. I’ve been looking all over for this! Thank goodness I found it on Bing. You’ve made my day! Thx again
mostbet necə giriş etmək olar http://mostbet87216.help/
cialis for sale: VeritasCare – VeritasCare
VeritasCare VeritasCare VeritasCare
вывод из запоя на дому недорого vyvod-iz-zapoya-na-domu-samara.ru .
Absolutely written articles, Really enjoyed reading.
https://veritascarepharm.shop/# VeritasCare
вывод из запоя круглосуточно самара вывод из запоя круглосуточно самара .
http://civicmeds.com/# reputable online pharmacy uk
I am delighted that I detected this weblog, precisely the right info that I was looking for! .
I switched from another service because of the scalable features and quick deposits.
VeritasCare: VeritasCare – Cialis over the counter
how long does cialis last difference between cialis and viagra how long does cialis take to work
buy viagra here: Order Viagra 50 mg online – CoreBlue Health
Viagra tablet online CoreBlue Health CoreBlue Health
https://bet365-bet.com.co/
Bet365 Colombia posee una licencia de Coljuegos para ofrecer sus servicios legalmente en Colombia, brindando un casino en linea confiable que comprende multiples opciones de maquinas tragamonedas, entretenimientos de mesa clasicos y demas juegos de azar, todo ello avalado por la experiencia global de la casa de apuestas establecida en territorio britanico en el ano 2000.
Just desire to say your article is as surprising. The clearness in your post is simply excellent and i can assume you are an expert on this subject. Well with your permission let me to grab your feed to keep updated with forthcoming post. Thanks a million and please keep up the enjoyable work.
This platform exceeded my expectations with reliable uptime and intuitive UI. Charts are accurate and load instantly.
mostbet oglinda http://www.mostbet54831.help
cheapest viagra: CoreBlue Health – Cheap Sildenafil 100mg
mostbet cashback http://www.mostbet21640.help
mostbet hisobni blokdan chiqarish mostbet hisobni blokdan chiqarish
вывод из запоя с выездом вывод из запоя с выездом .
вывод из запоя на дому недорого вывод из запоя на дому недорого .
VeritasCare: VeritasCare – VeritasCare
https://corebluehealth.com/# CoreBlue Health
Viagra online price CoreBlue Health CoreBlue Health
generic name for viagra herbal viagra viagra pills for men
вывод из запоя на дому цена вывод из запоя на дому цена .
вывод из запоя вывод из запоя .
вывод из запоя на дому недорого вывод из запоя на дому недорого .
вывод из запоя недорого вывод из запоя недорого .
Woah! I’m really digging the template/theme of this site. It’s simple, yet effective. A lot of times it’s tough to get that “perfect balance” between usability and visual appearance. I must say you’ve done a superb job with this. In addition, the blog loads very quick for me on Firefox. Exceptional Blog!
VeritasCare: VeritasCare – п»їcialis generic
https://civicmeds.com/# canadian pharmacy tampa
CoreBlue Health: CoreBlue Health – CoreBlue Health
https://duelbits.com.mx/
Duelbits constituye una plataforma de casino online y sitio de pronosticos deportivos con criptomonedas que opera bajo autorizacion de Curazao , dirigido a jugadores mexicanos a partir de 2021 con plataforma en idioma espanol , servicio de ayuda ininterrumpido y un modelo centrado en ingresos, retiradas y promociones en cripto, ideal para usuarios de 18 a 40 anos con experiencia elemental o moderada en divisas criptograficas que desean juegos como Crash y Mines.
вывод из запоя на дому цена вывод из запоя на дому цена .
вывод из запоя на дому недорого вывод из запоя на дому недорого .
выведение из запоя на дому воронеж выведение из запоя на дому воронеж .
вывод из запоя на дому недорого вывод из запоя на дому недорого .
Cialis 20mg price in USA: VeritasCare – Cheap Cialis
http://corebluehealth.com/# over the counter sildenafil
mostbet cum fac depunere pe mostbet mostbet54831.help
mostbet depunere anulata https://www.mostbet54831.help
mostbet esport mostbet esport
mostbet bonus təlimatı https://mostbet87216.help
врач вывод из запоя врач вывод из запоя .
Buy Cialis online: VeritasCare – п»їcialis generic
online pharmacy without scripts trustworthy online pharmacy prescription drugs from canada
mostbet link oglinda mostbet link oglinda
But wanna input on few general things, The website design and style is perfect, the articles is really fantastic : D.
mostbet sənəd yükləmək http://www.mostbet87216.help
http://doctors.teamforum.ru/viewtopic.php?f=2&t=4666 Теплоизоляция холодильных магистралей
вывод из запоя недорого вывод из запоя недорого .
mostbet yuklab olish bepul mostbet21640.help
order viagra: viagra without prescription – CoreBlue Health
legitimate online pharmacy uk: ez pharmacy – escrow pharmacy canada
your pharmacy online CivicMeds canadian pharmacy near me
http://corebluehealth.com/# CoreBlue Health
Excellent post. I was checking continuously this blog and I’m impressed! Very helpful information particularly the last part 🙂 I care for such info a lot. I was looking for this certain info for a very long time. Thank you and good luck.
VeritasCare: Buy Tadalafil 5mg – Buy Tadalafil 10mg
I respect your piece of work, appreciate it for all the great posts.
CoreBlue Health CoreBlue Health CoreBlue Health
canadian pharmacy world: CivicMeds – prescription drugs online
вывод из запоя круглосуточно вывод из запоя круглосуточно .
выведение из запоя на дому выведение из запоя на дому .
I switched from another service because of the reliable uptime and seamless withdrawals. Charts are accurate and load instantly.
снятие запоя на дому vyvod-iz-zapoya-na-domu-voronezh-3.ru .
mostbet promo kod bilan royxatdan otish mostbet promo kod bilan royxatdan otish
1win минимальный вывод 1win минимальный вывод
1win как вывести на DemirBank https://1win54928.help
mostbet to‘lov tizimlari https://www.mostbet43759.help
вывод из запоя цена вывод из запоя цена .
1win регистрация с телефона 1win регистрация с телефона
1win законно в Кыргызстане http://www.1win54928.help
aviator game mostbet https://www.mostbet21640.help
1win ani çıxarış http://1win53841.help
1win kart şəkli tələb olunur 1win kart şəkli tələb olunur
mostbet bonus shartlari http://mostbet21640.help/
mostbet oyin statistikasi http://mostbet21640.help/
pin-up ilova o‘rnatish pin-up ilova o‘rnatish
pin-up ishonchlimi http://pinup90462.help
подарки на заказ подарки на заказ .
сувенирная продукция suvenirnaya-produkcziya-s-logotipom.ru .
лечение алкоголизма лечение алкоголизма .
Global India Pharmacy: Global India Pharmacy – best online pharmacy india
pharmacy canadian: NorthAccess Rx – canadian drug
canadian drugs online: NorthAccess Rx – canadianpharmacymeds
http://globalindiapharmacy.com/# pharmacy website india
наркологический стационар kapelnicza-ot-zapoya-kalyazin-1.ru .
сувениры на заказ сувениры на заказ .
сувениры с логотипом на заказ сувениры с логотипом на заказ .
https://globalindiapharmacy.shop/# indian pharmacy paypal
pet meds for dogs: Paw Trust Meds – Paw Trust Meds
Paw Trust Meds: dog prescriptions online – Paw Trust Meds
сувенирная продукция москва suvenirnaya-produkcziya-s-logotipom-1.ru .
melbet без паспорта регистрация http://www.melbet63810.help
Global India Pharmacy: indianpharmacy com – cheapest online pharmacy india
мелбет crash game http://melbet63810.help/
1win Кыргызстан расмий сайт http://1win32478.help/
1win бонус активировать при регистрации http://1win54928.help/
mostbet crash oyini http://mostbet43759.help
сувенирная продукция сувенирная продукция .
1win manatla depozit 1win manatla depozit
mostbet скачать на ноутбук http://mostbet65920.help
mostbet скачать app Казахстан https://mostbet65920.help
капельница от запоя капельница от запоя .
сувениры с логотипом на заказ suvenirnaya-produkcziya-s-logotipom.ru .
лечение алкоголизма лечение алкоголизма .
лечение наркомании лечение наркомании .
Paw Trust Meds: vet pharmacy – dog prescriptions online
Global India Pharmacy: online shopping pharmacy india – indian pharmacies safe
бизнес подарки с логотипом бизнес подарки с логотипом .
vardenafil half life buy vardenafil vardenafil prices
I have been exploring for a little bit for any high-quality articles or blog posts on this sort of area . Exploring in Yahoo I at last stumbled upon this website. Reading this info So i am happy to convey that I have an incredibly good uncanny feeling I discovered exactly what I needed. I most certainly will make sure to do not forget this site and give it a look on a constant basis.
реабилитация алкоголиков kapelnicza-ot-pokhmelya-ekaterinburg-1.ru .
https://roobet.com.mx/
Roobet se presenta como un sitio de apuestas basado en criptomonedas que llego en 2019 con una oferta novedosa: trabajar integramente con activos digitales, ofrecer mas de 6,000 juegos de proveedores de primer nivel y garantizar retiros casi instantaneos, todo respaldado por la licencia de Curazao eGaming (numero 365/JAZ).
продукция с логотипом компании suvenirnaya-produkcziya-s-logotipom-3.ru .
сувенирка suvenirnaya-produkcziya-s-logotipom-1.ru .
реабилитационный центр для наркозависимых kapelnicza-ot-pokhmelya-ekaterinburg.ru .
Global India Pharmacy: Global India Pharmacy – Global India Pharmacy
legit canadian pharmacy online: canadian pharmacy world – vipps canadian pharmacy
pharmacy express viagra cialis levitra vpxl how much does viagra cost in a pharmacy online pharmacy quick delivery
1win зеркало не работает http://1win54928.help/
наркологический стационар kapelnicza-ot-pokhmelya-ekaterinburg-1.ru .
1win plinko на деньги http://1win32478.help/
mostbet Oʻzbekiston click https://mostbet43759.help/
1win ruletka strategiya http://1win53841.help
canadian pharmacy king reviews: reliable canadian pharmacy – canada drugs online review
1win личный кабинет бонусы http://1win54928.help/
1win восстановление аккаунта 1win восстановление аккаунта
mostbet ilova orqali tikish https://mostbet43759.help/
1win Azərbaycan login 1win53841.help
I used to be very pleased to seek out this internet-site.I needed to thanks for your time for this wonderful learn!! I positively enjoying each little little bit of it and I’ve you bookmarked to take a look at new stuff you weblog post.
https://globalindiapharmacy.com/# Global India Pharmacy
реабилитационный центр для наркозависимых kapelnicza-ot-zapoya-kalyazin.ru .
брендированная продукция заказать suvenirnaya-produkcziya-s-logotipom.ru .
1win lucky jet играть http://1win54928.help
mostbet parol noto‘g‘ri mostbet parol noto‘g‘ri
1win скачать на android http://1win32478.help
1win mərc https://www.1win53841.help
лечение наркомании лечение наркомании .
изготовление сувенирной продукции изготовление сувенирной продукции .
наркологический центр наркологический центр .
melbet app https://melbet63810.help/
legitimate canadian pharmacy: NorthAccess Rx – canadian neighbor pharmacy
pin-up bugungi bonus https://pinup90462.help/
whoah this blog is wonderful i like studying your articles. Stay up the good work! You understand, many people are looking around for this info, you can help them greatly.
https://alicegood.com.ua/klei-dlya-far-avtomobilya-shcho-vybraty-dlya-skla.html
pet drugs online: Paw Trust Meds – pet meds online
реабилитационный центр для наркозависимых kapelnicza-ot-pokhmelya-ekaterinburg.ru .
кодирование от алкоголизма кодирование от алкоголизма .
шумоизоляция автомобиля цена https://shumoizolyaciya-avtomobilya-cena-1.ru
tipico-casino-lizenz
Also visit my blog … gambling (Piper)
canadian pharmacy meds reviews: canadian pharmacy ratings – canadian pharmacy online ship to usa
I like this weblog so much, saved to favorites.
брендирование сувенирной продукции suvenirnaya-produkcziya-s-logotipom-1.ru .
заказать сувенирную продукцию с логотипом suvenirnaya-produkcziya-s-logotipom.ru .
реабилитационный центр от алкоголизма kapelnicza-ot-zapoya-kalyazin-1.ru .
my canadian pharmacy: NorthAccess Rx – canadian pharmacy prices
реабилитация наркоманов kapelnicza-ot-zapoya-kalyazin.ru .
сувенирная продукция с логотипом сувенирная продукция с логотипом .
online pet pharmacy: Paw Trust Meds – Paw Trust Meds
вывод из запоя в стационаре kapelnicza-ot-zapoya-voronezh-1.ru .
наркологический стационар kapelnicza-ot-pokhmelya-ekaterinburg.ru .
мелбет cashback как получить http://melbet63810.help/
melbet зеркало скачать https://melbet63810.help/
pin-up Uzcard https://www.pinup90462.help
лечение алкоголизма лечение алкоголизма .
pin-up rasmiy sahifa http://pinup90462.help/
mostbet приложение для android скачать http://www.mostbet65920.help
pin-up aviator koeffisiyent pinup48127.help
pin-up M10 ilə depozit https://www.pinup48127.help
мостбет быстрый вывод мостбет быстрый вывод
мелбет ставки на спорт http://melbet63810.help/
pin up plinko http://pinup90462.help
I love your writing style really enjoying this internet site.
мостбет официальный сайт вход https://mostbet65920.help
https://globalindiapharmacy.com/# Global India Pharmacy
What a stuff of un-ambiguity and preserveness of precious familiarity regarding unexpected feelings.
Tower Rush France
Paw Trust Meds: pet meds for dogs – Paw Trust Meds
Paw Trust Meds: Paw Trust Meds – п»їdog medication online
лечение алкоголизма лечение алкоголизма .
https://globalindiapharmacy.shop/# pharmacy website india
Hi there, You’ve done an incredible job. I will certainly digg it and personally suggest to my friends. I am confident they will be benefited from this web site.
pet med: best pet rx – Paw Trust Meds
кодирование от алкоголизма kapelnicza-ot-zapoya-voronezh.ru .
Global India Pharmacy: top online pharmacy india – indian pharmacy online
best india pharmacy: Global India Pharmacy – best india pharmacy
http://pawtrustmeds.com/# Paw Trust Meds
I personally find that the interface is easy onboarding, and I enjoy using the bridge here.
Good day! I could have sworn I’ve visited this web site before but after looking at a few of the posts I realized it’s new to me. Anyways, I’m definitely delighted I stumbled upon it and I’ll be bookmarking it and checking back regularly!
реабилитационный центр для наркозависимых kapelnicza-ot-zapoya-voronezh-1.ru .
Global India Pharmacy: india pharmacy – Global India Pharmacy
you’re in reality a good webmaster. The site loading pace is incredible. It kind of feels that you’re doing any unique trick. Also, The contents are masterpiece. you have done a wonderful process in this topic!
pet pharmacy online: online vet pharmacy – pet meds for dogs
canadian pharmacy king: NorthAccess Rx – rate canadian pharmacies
https://northaccessrx.shop/# the canadian pharmacy
реабилитация наркоманов kapelnicza-ot-pokhmelya-voronezh-1.ru .
покупка базы покупка базы .
melbet app android киргизия https://melbet95634.help
mostbet вывод без комиссии mostbet вывод без комиссии
pin-up casino Chile pin-up casino Chile
melbet официальный адрес http://melbet95634.help
mostbet скачать если сайт заблокирован http://mostbet80295.help
retirar en pin up retirar en pin up
вывод из запоя на дому вывод из запоя на дому .
http://pawtrustmeds.com/# pet drugs online
1win app install android http://1win5529.ru/
pin-up app quraşdırmaq http://pinup48127.help
top games on 1win top games on 1win
наркологический стационар kapelnicza-ot-zapoya-voronezh.ru .
I was skeptical, but after since launch of portfolio tracking, the wide token selection convinced me.
капельница от запоя капельница от запоя .
dog medicine: online pet pharmacy – Paw Trust Meds
продажа базы данных gobasego-2.ru .
Paw Trust Meds: Paw Trust Meds – Paw Trust Meds
Thank you for sharing excellent informations. Your site is very cool. I’m impressed by the details that you have on this blog. It reveals how nicely you perceive this subject. Bookmarked this web page, will come back for more articles. You, my friend, ROCK! I found just the information I already searched all over the place and just couldn’t come across. What a perfect web-site.
I’m truly enjoying the design and layout of your website. It’s a very easy on the eyes which makes it much more pleasant for me to come here and visit more often. Did you hire out a designer to create your theme? Excellent work!
https://northaccessrx.com/otc-meds.html# cheap canadian pharmacy
https://codere-bet.com.co/
Codere Bet Colombia es un casino y casa de apuestas deportivas con respaldo legal en el pais ya que esta regulado directamente por Coljuegos
шумоизоляция автомобиля Москва https://shumoizolyaciya-avtomobilya-moskva-1.ru
лечение наркомании kapelnicza-ot-zapoya-voronezh-1.ru .
what does viagra look like over the counter viagra substitute pills like viagra over the counter
реабилитация наркоманов реабилитация наркоманов .
canadian pharmacy online reviews: canada drug pharmacy – canadian pharmacy king reviews
наркологическая клиника наркологическая клиника .
cheapest pharmacy canada: legitimate canadian pharmacy – canadian pharmacies that deliver to the us
кодирование от алкоголизма кодирование от алкоголизма .
тестовые ключи gobasego-2.ru .
капельница от похмелья kapelnicza-ot-pokhmelya-voronezh-1.ru .
online canadian pharmacy: canadian pharmacy tampa – canadian online pharmacy reviews
pin-up idman mərc pinup48127.help
реабилитационный центр для наркозависимых kapelnicza-ot-zapoya-voronezh.ru .
This platform exceeded my expectations with clear transparency and accurate charts. The updates are frequent and clear.
pin-up crash proqnoz proqramı pinup48127.help
https://northaccessrx.com/ed-meds-guide.html# ed drugs online from canada
https://northaccessrx.com/# canadian drug
pin-up lucky jet demo https://www.pinup48127.help
online canadian pharmacy review: NorthAccess Rx – legit canadian pharmacy
melbet скачать на айфон http://www.melbet95634.help
mostbet пополнить счет 2026 http://mostbet80295.help/
pin-up no funciona Chile https://pinup62718.help
is 1win legit casino https://www.1win5529.ru
реабилитация наркоманов реабилитация наркоманов .
наркологическая помощь наркологическая помощь .
вывод из запоя в стационаре vyvod-iz-zapoya-na-domu-ekaterinburg-9.ru .
Paw Trust Meds: vet pharmacy – Paw Trust Meds
наркологический стационар vyvod-iz-zapoya-na-domu-sankt-peterburg-2.ru .
https://pawtrustmeds.com/# pet prescriptions online
magnificent publish, very informative. I wonder why the opposite specialists of this sector don’t notice this. You should continue your writing. I’m confident, you’ve a huge readers’ base already!
Global India Pharmacy: Online medicine order – reputable indian online pharmacy
капельница от похмелья kapelnicza-ot-zapoya-voronezh.ru .
лечение алкоголизма лечение алкоголизма .
canadian pharmacy com: NorthAccess Rx – certified canadian pharmacy
1win apuestas Perú fútbol 1win apuestas Perú fútbol
1win retirar sin verificación http://1win05634.help
canadian drug stores: canadian mail order pharmacy – adderall canadian pharmacy
https://globalindiapharmacy.shop/# Online medicine order
https://northaccessrx.com/antibiotics-guide.html# best canadian pharmacy online
кодирование от алкоголизма кодирование от алкоголизма .
капельница от похмелья kapelnicza-ot-pokhmelya-voronezh.ru .
Paw Trust Meds: pet prescriptions online – dog prescriptions online
I would like to thnkx for the efforts you have put in writing this web site. I am hoping the same high-grade site post from you in the upcoming also. In fact your creative writing abilities has inspired me to get my own website now. Really the blogging is spreading its wings quickly. Your write up is a great example of it.
реабилитация алкоголиков vyvod-iz-zapoya-na-domu-ekaterinburg-8.ru .
нарколог на дом нарколог на дом .
pin-up android apk pin-up android apk
мелбет как активировать промокод мелбет как активировать промокод
мостбет регистрация по номеру https://www.mostbet80295.help
pin-up retiro a cuenta bancaria https://pinup62718.help
pinup kontakt pinup kontakt
1win withdrawal proof 1win withdrawal proof
pin-up apk android pinup62718.help
мелбет megafon kg https://melbet95634.help
мостбет приветственный бонус https://www.mostbet80295.help
1win biometric login 1win biometric login
лечение наркомании лечение наркомании .
pin-up transferencia BancoEstado http://www.pinup62718.help
mostbet поддержка Кыргызстан http://mostbet80295.help
melbet майнс http://www.melbet95634.help
1win app for ios 1win app for ios
pet meds official website: vet pharmacy online – pet med
реабилитация алкоголиков vyvod-iz-zapoya-na-domu-ekaterinburg-9.ru .
нарколог на дом нарколог на дом .
https://globalindiapharmacy.com/# Global India Pharmacy
кодирование от алкоголизма кодирование от алкоголизма .
top online pharmacy india: Global India Pharmacy – world pharmacy india
Greetings! I know this is kinda off topic but I was wondering if you knew where I could find a captcha plugin for my comment form? I’m using the same blog platform as yours and I’m having difficulty finding one? Thanks a lot!
вывод из запоя в стационаре vyvod-iz-zapoya-na-domu-sankt-peterburg.ru .
лечение алкоголизма vyvod-iz-zapoya-na-domu-ekaterinburg-8.ru .
how should i take sildenafil for best results sildenafil half life what is sildenafil
лечение алкоголизма лечение алкоголизма .
курсовые купить курсовые купить .
mostbet blackjack mostbet blackjack
mostbet kirish kodi https://mostbet47183.help/
https://amoxilfast.com/# amoxil fast
реабилитация алкоголиков vyvod-iz-zapoya-na-domu-sankt-peterburg-1.ru .
наркологический центр наркологический центр .
1win inicio sesión rápido https://1win05634.help/
капельница от похмелья vyvod-iz-zapoya-na-domu-sankt-peterburg-3.ru .
trusted ivermectin pharmacy: ivermectin treatment tablets – stromectol delivery united states
вывод из запоя в стационаре vyvod-iz-zapoya-na-domu-sankt-peterburg.ru .
https://amoxilfast.shop/# generic amoxicillin online
реабилитационный центр для наркозависимых vyvod-iz-zapoya-na-domu-ekaterinburg-8.ru .
мелбет приложение казино http://www.melbet15709.help
melbet kz не приходит смс melbet15709.help
выполнение курсовых работ выполнение курсовых работ .
tadalafil 9 mg chewable does tadalafil expire tadalafil for women
buying prednisone on line: SteriCare Pharmacy – average price of prednisone
выполнение курсовых работ выполнение курсовых работ .
наркологическая клиника наркологическая клиника .
https://rushbet.net.co/
Rushbet Colombia se presenta como un casino en linea y casa de apuestas deportivas con operacion licita en el pais desde 2021, amparado por la licencia expedida por Coljuegos y operado por la experimentada firma Rush Street Interactive.
1win retiro rápido Perú http://1win05634.help/
where to buy prednisone without prescription: SteriCare Pharmacy – buy prednisone online canada
1win crash Perú https://1win05634.help/
реабилитационный центр от алкоголизма vyvod-iz-zapoya-na-domu-sankt-peterburg-2.ru .
нарколог на дом нарколог на дом .
https://ivermectinfast.shop/# buy stromectol online usa
1win promociones desde app http://1win05634.help
реабилитационный центр для наркозависимых реабилитационный центр для наркозависимых .
the-king-online-gokkast-spelen-gratis-en-met-geld
my web page; machine [Joseph]
pin-up live tikish pin-up live tikish
mostbet kirish link http://mostbet47183.help
реабилитационный центр от алкоголизма vyvod-iz-zapoya-na-domu-ekaterinburg-8.ru .
реабилитационный центр от алкоголизма vyvod-iz-zapoya-na-domu-sankt-peterburg.ru .
Logan here — I’ve tried fiat on-ramp and the useful analytics impressed me.
купить курсовую москва купить курсовую москва .
шумоизоляция автомобиля
ремонт мембранной кровли
http://stericarepharmacy.com/# prednisone medication
amoxil 500mg tablets usa: buy amoxil online usa – safe antibiotics online source
non runners today horse racing
Look into my page – newcastle greyhounds results (Horse-betting.com)
Hello there! Quick question that’s entirely off topic. Do you know how to make your site mobile friendly? My website looks weird when viewing from my iphone. I’m trying to find a template or plugin that might be able to fix this problem. If you have any recommendations, please share. Cheers!
https://amoxilfast.com/# safe antibiotics online source
new horse watch greyhound Racing (https://bukmacherjakie.Com/) betting sites
мелбет официальный сайт Казахстан http://melbet15709.help
how-many-pokies-in-las-vegas
Feel free to visit my page; demo
купить курсовую москва купить курсовую москва .
pin-up yutuq chiqarish http://www.pinup08694.help
mostbet mines https://www.mostbet47183.help
pinup aviator pul yechish https://www.pinup08694.help
mostbet bonusni qanday ishlatish https://www.mostbet47183.help
mostbet gry kasynowe mostbet gry kasynowe
buy prednisone tablets uk: anti-inflammatory medication online – prednisone prices
mostbet bonus bukmacherski mostbet2004.help
pin-up shaxsni tasdiqlash https://www.pinup08694.help
mostbet bank kartasi mostbet bank kartasi
курсовая работа купить москва курсовая работа купить москва .
usa casino providers, new zealandn online casinos no deposit and Online casino for real money in india casino groups usa, or usa casino rewards
melbet депозит элсом melbet64019.help
как вывести с melbet как вывести с melbet
prednisone 30 mg daily: prednisone tablets 10mg 20mg – prednisone buy cheap
http://amoxilfast.com/# amoxil fast
who is the best online bookmaker for horse racing
Look into my web site – https://grayhound-betting.com/
betrouwbare wedden golf
Also visit my blog – Weddenschap Bookmaker Nieuws
(Nl-Betting.Com)
bacterial infection medication: amoxil fast – generic amoxicillin online
I personally find that the checking analytics tools are robust security and great support.
sportwetten de bonus ohne einzahlung
My blog; wetten tipps basketball (Maximilian)
курсовая заказ купить курсовая заказ купить .
ivermectin tablets online: generic ivermectin online pharmacy – Stromectol
куплю курсовую работу куплю курсовую работу .
melbet kz как использовать бонус http://melbet15709.help
http://ivermectinfast.com/# ivermectin treatment tablets
мелбет кз вход по email https://www.melbet15709.help
melbet слоты на деньги melbet слоты на деньги
mostbet приложение 2026 mostbet приложение 2026
mostbet кэшбэк условия http://mostbet67190.help
mostbet bonus nepřipsán http://www.mostbet2018.help
написание курсовой работы на заказ цена kupit-kursovuyu-109.ru .
stáhnout mostbet aplikaci mostbet2018.help
generic ivermectin online pharmacy: stromectol without prescription usa – Stromectol
https://luckia.net.co/
La plataforma Luckia, con una trayectoria que supera las dos decadas desde su fundacion en 2002, se ha convertido en una plataforma de juego online y apuestas deportivas fiable para los paises de habla hispana, incluyendo Colombia en 2026.
Mahjong Ways 2 tá dando cascade atrás de cascade – quem já chegou a 100x?
курсовая работа на заказ цена курсовая работа на заказ цена .
stromectol without prescription usa: Stromectol – ivermectin fast
ascot betting tips friday
Also visit my web blog :: dog results Harlow
Hello my loved one! I want to say that this post is awesome, great written and include approximately all vital infos. I would like to peer extra posts like this .
Hello! I know this is somewhat off topic but I was wondering which blog platform are you using for this site? I’m getting fed up of WordPress because I’ve had problems with hackers and I’m looking at options for another platform. I would be fantastic if you could point me in the direction of a good platform.
заказ курсовых работ заказ курсовых работ .
mostbet aplikacja android http://mostbet2004.help/
заказать курсовую работу заказать курсовую работу .
http://ivermectinfast.com/# ivermectin treatment tablets
онлайн сервис помощи студентам онлайн сервис помощи студентам .
I couldn’t resist commenting
melbet скачать без блокировки melbet скачать без блокировки
курсовая заказ купить курсовая заказ купить .
The best choice I made for learning crypto basics. Smooth and responsive team.
наркологический центр наркологический центр .
sweet bonanza безкоштовна гра демо https://sweet-bonanza91683.help
amoxil fast: amoxil 500mg tablets usa – amoxil without prescription usa
як поповнити світ бонанза http://sweet-bonanza91683.help
купить задание для студентов kupit-kursovuyu-108.ru .
I was suggested this blog by my cousin. I am not sure whether this post is written by him as no one else know such detailed about my trouble. You’re wonderful! Thanks!
капельница от запоя капельница от запоя .
заказать качественную курсовую заказать качественную курсовую .
http://ivermectinfast.com/# ivermectin cost
https://rivalo.cat/
A casa Rivalo esta entre as casas de apostas esportivas e cassino online de maior tradicao no mercado brasileiro , presente no pais desde 2013 consolidando uma reputacao solida e de confianca .
I just could not leave your site prior to suggesting that I extremely enjoyed the standard info a person supply to your guests? Is going to be back ceaselessly in order to check out new posts
курсовая работа недорого kupit-kursovuyu-106.ru .
написание курсовых на заказ написание курсовых на заказ .
мостбет регистрация сегодня мостбет регистрация сегодня
mostbet sázky na politiku http://mostbet2018.help
trusted ivermectin pharmacy: stromectol delivery united states – ivermectin treatment tablets
1win qeydiyyat problem 1win qeydiyyat problem
как использовать бонус мостбет https://mostbet09547.help
1win qeydiyyatdan keç 1win qeydiyyatdan keç
mostbet Ош http://mostbet09547.help
вывод из запоя на дому вывод из запоя на дому .
mostbet kasyno pl http://mostbet2004.help/
курсовые под заказ курсовые под заказ .
mostbet jak wpłacić przelewem https://mostbet2004.help
лечение наркомании vyvod-iz-zapoya-na-domu-samara-16.ru .
заказать студенческую работу заказать студенческую работу .
melbet android https://www.melbet64019.help
melbet cashback melbet cashback
The next time I read a blog, I hope that it doesnt disappoint me as much as this one. I mean, I know it was my choice to read, but I actually thought youd have something interesting to say. All I hear is a bunch of whining about something that you could fix if you werent too busy looking for attention.
https://wplay.net.co/
Wplay es un casino y plataforma de apuestas en linea autorizado por Coljuegos, garantizando asi su operacion legal y regulada dentro del territorio colombiano.
It’s perfect time to make a few plans for the future and it’s time to be happy. I have learn this post and if I could I want to counsel you few attention-grabbing issues or advice. Maybe you can write next articles relating to this article. I wish to read more issues about it!
выполнение курсовых работ выполнение курсовых работ .
jak pobrać mostbet http://www.mostbet2004.help
https://stericarepharmacy.shop/# prednisone cream
melbet live чат melbet live чат
вывод из запоя на дому вывод из запоя на дому .
купить курсовая работа kupit-kursovuyu-106.ru .
онлайн сервис помощи студентам kupit-kursovuyu-107.ru .
I’m truly enjoying the design and layout of your site. It’s a very easy on the eyes which makes it much more enjoyable for me to come here and visit more often. Did you hire out a developer to create your theme? Exceptional work!
реабилитационный центр для наркозависимых vyvod-iz-zapoya-na-domu-samara-18.ru .
купить курсовую москва купить курсовую москва .
онлайн сервис помощи студентам онлайн сервис помощи студентам .
наркологическая клиника наркологическая клиника .
покупка курсовой покупка курсовой .
вывод из запоя в стационаре vyvod-iz-zapoya-na-domu-samara-16.ru .
срочно курсовая работа kupit-kursovuyu-108.ru .
курсовая заказать курсовая заказать .
написание курсовых на заказ написание курсовых на заказ .
sweet bonanza депозит bitcoin sweet-bonanza91683.help
mostbet последняя версия apk http://mostbet67190.help/
mostbet sloty bez registrace mostbet sloty bez registrace
mostbet mines 2026 https://mostbet67190.help
mostbet paysafecard Česko http://mostbet2018.help/
Jogo do Tigrinho ao vivo: quem já ganhou assistindo?
написание курсовых на заказ написание курсовых на заказ .
написание курсовых работ на заказ цена kupit-kursovuyu-107.ru .
mostbet удалить аккаунт mostbet удалить аккаунт
Hi there, You have done a fantastic job. I will definitely digg it and personally recommend to my friends. I’m sure they’ll be benefited from this web site.
mostbet cz online http://www.mostbet2018.help
нарколог на дом нарколог на дом .
мостбет вход мостбет вход
You got a very superb website, Gladiolus I found it through yahoo.
помощь студентам и школьникам kupit-kursovuyu-102.ru .
http://amoxilfast.com/# amoxil
реабилитационный центр от алкоголизма vyvod-iz-zapoya-na-domu-samara-18.ru .
1win depozit olmadan bonus https://1win27096.help
курсовая работа купить курсовая работа купить .
онлайн школа цена обучения shkola-onlajn-42.ru .
http://stericarepharmacy.com/# how to buy prednisone online
написание курсовых работ на заказ цена написание курсовых работ на заказ цена .
помощь студентам контрольные помощь студентам контрольные .
капельница от похмелья vyvod-iz-zapoya-na-domu-samara-19.ru .
нарколог на дом нарколог на дом .
курсовая заказ купить kupit-kursovuyu-101.ru .
курсовой проект цена курсовой проект цена .
онлайн школы с зачислением shkola-onlajn-41.ru .
Yeah bookmaking this wasn’t a high risk determination great post! .
написание курсовой работы на заказ цена kupit-kursovuyu-102.ru .
sweet bonanza Sense Bank https://sweet-bonanza91683.help/
sweet bonanza aviator грати Україна http://www.sweet-bonanza91683.help
мостбет скачать apk бесплатно мостбет скачать apk бесплатно
Great wordpress blog here.. It’s hard to find quality writing like yours these days. I really appreciate people like you! take care
mostbet бонусы для Кыргызстана mostbet бонусы для Кыргызстана
1win USDT çıxarış vaxtı https://1win27096.help/
sweet bonanza бонус на депозит sweet bonanza бонус на депозит
1win rəsmi qeydiyyat 1win rəsmi qeydiyyat
вывод из запоя в стационаре вывод из запоя в стационаре .
капельница от похмелья vyvod-iz-zapoya-na-domu-samara-17.ru .
mostbet app https://www.mostbet09547.help
реабилитация алкоголиков реабилитация алкоголиков .
1win canlı oyun 1win canlı oyun
купить курсовую работу купить курсовую работу .
школа онлайн для детей shkola-onlajn-42.ru .
наркологическая помощь наркологическая помощь .
pharmacy course online online pharmacy quick delivery buy provigil online pharmacy
помощь студентам контрольные kupit-kursovuyu-102.ru .
школа дистанционного образования shkola-onlajn-41.ru .
https://amoxilfast.shop/# safe antibiotics online source
http://amoxilfast.com/# amoxil without prescription usa
Hey! I simply want to give an enormous thumbs up for the good data you’ve got right here on this post. I can be coming again to your blog for more soon.
online pharmacy without prescriptions valium cheap generic viagra online pharmacy online pharmacy in germany
купить поролон для мебели porolon-dlya-divana-1.ru .
sweet bonanza retirar por spei sweet bonanza retirar por spei
sweet bonanza app segura México sweet-bonanza60829.help
школа онлайн для детей shkola-onlajn-42.ru .
школа онлайн 11 класс shkola-onlajn-41.ru .
наркологический центр наркологический центр .
где купить поролон для мебели porolon-dlya-divana-2.ru .
поролон на диван porolon-dlya-divana-3.ru .
Hey just wanted to give you a quick heads up. The text in your post seem to be running off the screen in Internet explorer. I’m not sure if this is a formatting issue or something to do with internet browser compatibility but I thought I’d post to let you know. The design and style look great though! Hope you get the problem resolved soon. Kudos
заказать поролон заказать поролон .
http://stericarepharmacy.com/# buy prednisone without rx
I am glad to be one of several visitants on this great web site (:, thankyou for posting.
кодирование от алкоголизма кодирование от алкоголизма .
плотный паралон плотный паралон .
московская онлайн школа shkola-onlajn-42.ru .
поролон тонкий 5 мм porolon-dlya-divana-3.ru .
наркологическая помощь наркологическая помощь .
amoxil: antibiotics online pharmacy usa – buy amoxil online usa
школа онлайн школа онлайн .
1win сайти аслӣ https://www.1win06741.help
1win бинго 1win бинго
sweet bonanza transferencia bancaria México http://sweet-bonanza60829.help
1win big win slots 1win big win slots
free download 1win apk http://www.1win60751.help
I’m not that much of a internet reader to be honest but your sites really nice, keep it up! I’ll go ahead and bookmark your website to come back in the future. All the best
реабилитация наркоманов narkolog-na-dom-moskva-3.ru .
https://stericarepharmacy.com/# prednisone in uk
купить поролон москва купить поролон москва .
мелбет скачать приложение киргизия https://www.melbet64019.help
вспененный поролон вспененный поролон .
melbet вывод элкарт кыргызстан melbet вывод элкарт кыргызстан
купить плотный поролон porolon-dlya-divana-2.ru .
sweet bonanza зміна номеру sweet bonanza зміна номеру
наркологическая помощь наркологическая помощь .
Hmm it seems like your site ate my first comment (it was super long) so I guess I’ll just sum it up what I wrote and say, I’m thoroughly enjoying your blog. I too am an aspiring blog blogger but I’m still new to the whole thing. Do you have any helpful hints for first-time blog writers? I’d definitely appreciate it.
реабилитационный центр от алкоголизма narkolog-na-dom-moskva-3.ru .
Thanks a bunch for sharing this with all of us you actually recognise what you’re speaking approximately! Bookmarked. Kindly additionally seek advice from my web site =). We could have a hyperlink exchange contract between us
https://teletype.in/@avtobloggerua/1SUSkePkQys
школа дистанционного обучения москва shkola-onlajn-44.ru .
наркологическая помощь наркологическая помощь .
Hi my family member! I wish to say that this post is amazing, nice written and include almost all important infos. I would like to look extra posts like this.
кодирование от алкоголизма narkolog-na-dom-moskva-1.ru .
купить поролон в москве porolon-dlya-divana-3.ru .
купить поролон для мебели porolon-dlya-divana-2.ru .
поролон для стульев porolon-dlya-divana-1.ru .
https://yajuego.net.co/
La plataforma colombiana Yajuego constituye un casino online y casa de apuestas deportivas 100% legal, respaldado por Coljuegos, la entidad reguladora nacional.
http://amoxilfast.com/# buy amoxil online usa
кодирование от алкоголизма кодирование от алкоголизма .
онлайн школа цена обучения онлайн школа цена обучения .
вывод из запоя на дому вывод из запоя на дому .
світ бонанза гра sweet-bonanza91683.help
sweet bonanza lucky jet apk sweet bonanza lucky jet apk
sweet bonanza способи оплати sweet-bonanza91683.help
cómo instalar sweet bonanza apk http://sweet-bonanza60829.help
наркологическая помощь наркологическая помощь .
1win ky кирүү https://1win60751.help/
1win хуруҷ Visa https://1win06741.help
sweet bonanza оф сайт http://www.sweet-bonanza91683.help
sweet bonanza retirar a tarjeta México http://www.sweet-bonanza60829.help
реабилитация наркоманов narkolog-na-dom-moskva-1.ru .
мелбет способы оплаты https://melbet64019.help/
дистанционное обучение москва дистанционное обучение москва .
prednisone 5 mg tablet cost: prednisone without prescription usa – prednisone 5mg daily
мелбет зеркало россия мелбет зеркало россия
мелбет забыл пароль https://www.melbet23481.help
https://ivermectinfast.com/# generic ivermectin for humans
It’s amazing to visit this site and reading the views of all colleagues concerning this post, while I am also eager of getting experience.
https://teletype.in/@avtobloggerua/LCauvTYAGbi
реабилитация алкоголиков narkolog-na-dom-moskva-2.ru .
наркологическая помощь наркологическая помощь .
дистанционное обучение дистанционное обучение .
http://stericarepharmacy.com/# prednisone 10
melbet free bet http://melbet18567.help
cum descarc melbet pe android cum descarc melbet pe android
наркологическая помощь наркологическая помощь .
melbet шартгузорӣ бо сомонӣ https://melbet85291.help
crash melbet стратегия crash melbet стратегия
1win букмекерӣ бо сомонӣ https://1win06741.help
1win updated link https://1win60751.help
1win мушкили воридшавӣ http://1win06741.help/
1win mirror site https://1win60751.help
prednisone 15 mg tablet: steroid tablets usa pharmacy – prednisone 50 mg tablet cost
melbet crash http://www.melbet64019.help
melbet статистика melbet статистика
1win deposit limit http://www.1win60751.help
капельница от запоя narkolog-na-dom-moskva-2.ru .
1win корти бонкӣ депозит http://1win06741.help
как вывести деньги с мелбет как вывести деньги с мелбет
наркологический стационар narkolog-na-dom-moskva-1.ru .
государственная онлайн школа с аттестатом государственного образца государственная онлайн школа с аттестатом государственного образца .
вывод из запоя на дому вывод из запоя на дому .
онлайн школы начальные классы shkola-onlajn-43.ru .
лечение алкоголизма vyvod-iz-zapoya-v-staczionare-sankt-peterburg.ru .
дистанционное обучение дистанционное обучение .
prednisone 10mg canada: prednisone without prescription usa – prednisone 2.5 mg
кодирование от алкоголизма кодирование от алкоголизма .
мелбет вывести на тбанк http://melbet23481.help/
наркологическая помощь наркологическая помощь .
кодирование от алкоголизма кодирование от алкоголизма .
http://amoxilfast.com/# amoxicillin capsules online
http://stericarepharmacy.com/# prednisone cream brand name
школа дистанционного обучения москва shkola-onlajn-43.ru .
наркологическая помощь наркологическая помощь .
наркологическая помощь наркологическая помощь .
онлайн школа москва с аттестатом shkola-onlajn-44.ru .
наркологическая помощь [url=https://vyvod-iz-zapoya-na-domu-nizhnij-novgorod-7.ru/]наркологическая помощь[/url] .
наркологический центр наркологический центр .
капельница от похмелья vyvod-iz-zapoya-v-staczionare-sankt-peterburg-2.ru .
prednisone tablets india: prednisone 10mg tablet cost – where can i buy prednisone
I personally find that the best choice I made for cross-chain transfers. Smooth and easy onboarding.
melbet crash Moldova https://melbet18567.help/
aviator melbet стратегия https://melbet85291.help
bacterial infection medication: amoxil 500mg tablets usa – safe antibiotics online source
pin-up aviator o‘ynash http://pinup87630.help
pin up saytga kirish mirror pinup87630.help
mostbet zaxira sayt mostbet zaxira sayt
mostbet tez oyinlar mostbet tez oyinlar
лечение алкоголизма лечение алкоголизма .
капельница от запоя капельница от запоя .
онлайн школа онлайн школа .
вывод из запоя в стационаре вывод из запоя в стационаре .
наркологическая помощь наркологическая помощь .
домашняя интернет школа домашняя интернет школа .
buy prednisone tablets uk: prednisone 40 mg tablet – order prednisone from canada
наркологический стационар vyvod-iz-zapoya-v-staczionare-sankt-peterburg-2.ru .
кодирование от алкоголизма [url=https://vyvod-iz-zapoya-v-staczionare-sankt-peterburg.ru/]vyvod-iz-zapoya-v-staczionare-sankt-peterburg.ru[/url] .
наркологическая клиника наркологическая клиника .
https://ivermectinfast.com/# ivermectin oral tablets usa
лечение наркомании лечение наркомании .
I do not even understand how I finished up here, however I believed this submit was good. I do not understand who you might be however definitely you are going to a well-known blogger for those who aren’t already 😉 Cheers!
вывод из запоя в стационаре vyvod-iz-zapoya-na-domu-nizhnij-novgorod-4.ru .
ivermectin oral tablets usa: stromectol without prescription usa – stromectol for sale
онлайн школа 8 класс shkola-onlajn-43.ru .
лечение алкоголизма лечение алкоголизма .
стратегия lucky jet melbet https://melbet23481.help/
реабилитационный центр от алкоголизма vyvod-iz-zapoya-v-staczionare-sankt-peterburg-1.ru .
нарколог на дом нарколог на дом .
спортивные ставки мелбет спортивные ставки мелбет
melbet bonus crash https://melbet18567.help/
реабилитационный центр для наркозависимых vyvod-iz-zapoya-v-staczionare-sankt-peterburg.ru .
мелбет барориш бо корт http://melbet85291.help/
https://amoxilfast.com/# bacterial infection medication
It is the best time to make some plans for the future and it’s time to be happy. I have read this submit and if I may just I desire to counsel you some attention-grabbing things or suggestions. Perhaps you could write next articles relating to this article. I wish to read even more things about it!
cum fac depunere pe melbet http://melbet18567.help
вебсайти расмии melbet https://melbet85291.help/
наркологический стационар vyvod-iz-zapoya-na-domu-nizhnij-novgorod-5.ru .
мелбет альфа банк https://melbet23481.help/
капельница от запоя капельница от запоя .
капельница от похмелья vyvod-iz-zapoya-na-domu-samara-11.ru .
наркологический стационар vyvod-iz-zapoya-na-domu-nizhnij-novgorod-7.ru .
melbet site alternativ http://melbet18567.help
melbet баргардонидани маблағ https://melbet85291.help/
наркологическая клиника наркологическая клиника .
prednisone 20mg capsule: generic prednisone tablets – prednisone cream brand name
First off I want to say great blog! I had a quick question which I’d like to ask if you don’t mind. I was interested to know how you center yourself and clear your head before writing. I have had a hard time clearing my mind in getting my ideas out there. I truly do take pleasure in writing however it just seems like the first 10 to 15 minutes tend to be lost simply just trying to figure out how to begin. Any recommendations or tips? Thank you!
реабилитационный центр для наркозависимых vyvod-iz-zapoya-na-domu-nizhnij-novgorod-4.ru .
pin-up yutuqni yechish https://www.pinup87630.help
mostbet sport liniyasi mostbet sport liniyasi
https://ivermectinfast.shop/# stromectol without prescription usa
вывод из запоя на дому вывод из запоя на дому .
amoxicillin capsule 500mg price: amoxicillin 500 mg where to buy – safe antibiotics online source
капельница от похмелья vyvod-iz-zapoya-na-domu-samara-10.ru .
Hello it’s me, I am also visiting this site daily, this web page is truly fastidious and the people are actually sharing pleasant thoughts.
https://forthouse.com.ua/yak-vstavyty-linzy-v-fary-instruktsiya-dlya-samost.html
otc prednisone cream: generic prednisone tablets – prednisone 40 mg
наркологический стационар vyvod-iz-zapoya-na-domu-nizhnij-novgorod-4.ru .
лечение наркомании лечение наркомании .
I switched from another service because of the seamless withdrawals and quick deposits. Support solved my issue in minutes.
can you buy prednisone over the counter: prednisone without prescription usa – prednisone capsules
капельница от похмелья vyvod-iz-zapoya-na-domu-voronezh-9.ru .
нарколог на дом нарколог на дом .
реабилитационный центр для наркозависимых vyvod-iz-zapoya-na-domu-samara-10.ru .
http://ivermectinfast.com/# stromectol 3 mg tablets price
https://amoxilfast.shop/# buy amoxil online usa
I have been surfing online greater than three hours as of late, but I never discovered any attention-grabbing article like yours. It is beautiful value sufficient for me. Personally, if all web owners and bloggers made excellent content as you probably did, the web will likely be a lot more helpful than ever before.
1win cod bonus https://1win47381.help/
1win verificare pasaport 1win verificare pasaport
Hi there to all, as I am genuinely keen of reading this webpage’s post to be updated daily. It includes fastidious material.
http://a-savida.kiev.ua/chy-isnuyut-vichni-hermetyky-dlya-far-yaki.html
pin-up crash real pul http://pinup87630.help/
mostbet tikish qanday mostbet tikish qanday
mostbet Oʻzbekiston lucky jet http://www.mostbet82059.help
pin-up free spins 2026 pinup87630.help
капельница от похмелья vyvod-iz-zapoya-na-domu-nizhnij-novgorod-4.ru .
ivermectin treatment tablets: ivermectin fast – ivermectin oral tablets usa
mostbet depozit komissiya http://mostbet82059.help
лечение наркомании лечение наркомании .
pinup yutuqlar http://pinup87630.help
aviator 1win aviator 1win
1win depozit bonusi https://www.1win5750.help
bacterial infection medication: amoxil without prescription usa – amoxicillin capsules online
Wow, superb blog format! How lengthy have you ever been blogging for? you make running a blog look easy. The total look of your site is wonderful, as well as the content!
Timothy Malmros Genach
вывод из запоя на дому вывод из запоя на дому .
реабилитационный центр для наркозависимых vyvod-iz-zapoya-na-domu-samara-10.ru .
кодирование от алкоголизма кодирование от алкоголизма .
Some really nice and utilitarian info on this web site, also I conceive the design contains good features.
The staking tools are great support and wide token selection.
buy prednisone from canada: SteriCare Pharmacy – cost of prednisone 40 mg
https://stericarepharmacy.com/# buy cheap prednisone
Jogo do Tigrinho ao vivo no Pix: quem já sacou rápido?
bacterial infection medication: trusted antibiotic pharmacy usa – buy amoxil online usa
капельница от запоя vyvod-iz-zapoya-na-domu-voronezh-9.ru .
antiparasitic medication usa: stromectol tablets uk – cost of ivermectin
реабилитационный центр для наркозависимых реабилитационный центр для наркозависимых .
1win вывод через о деньги инструкция https://www.1win96781.help
1win как отыграть бонус http://1win96781.help
https://stericarepharmacy.shop/# cost of prednisone tablets
мостбет официальный сайт Киргизия https://mostbet54173.help/
mostbet депозит не пришел https://mostbet54173.help
1win bonus la inregistrare 1win bonus la inregistrare
лечение алкоголизма лечение алкоголизма .
You can certainly see your enthusiasm within the work you write. The arena hopes for more passionate writers such as you who aren’t afraid to say how they believe. Always go after your heart. “History is the version of past events that people have decided to agree upon.” by Napoleon.
наркологическая помощь наркологическая помощь .
antiparasitic medication usa: stromectol without prescription usa – parasite infection medication
amoxil 500mg tablets usa: amoxil fast – buy amoxil online usa
http://amoxilfast.com/# amoxil
наркологическая клиника наркологическая клиника .
мелбет ошибка входа http://melbet51738.help/
1win rasmiy havola 1win5750.help
melbet элсом https://www.melbet51738.help
trusted online pharmacy legit online pharmacy phentermine kroger pharmacy refills online
stromectol delivery united states: generic ivermectin online pharmacy – stromectol delivery united states
ivermectin tablets online: ivermectin fast – generic ivermectin online pharmacy
нарколог на дом нарколог на дом .
наркологический центр наркологический центр .
I personally find that i was skeptical, but after a month of providing liquidity, the great support convinced me. I moved funds across chains without a problem.
вывод из запоя на дому vyvod-iz-zapoya-na-domu-samara-8.ru .
https://stericarepharmacy.com/# 15 mg prednisone daily
amoxil without prescription usa: trusted antibiotic pharmacy usa – amoxil 500mg tablets usa
наркологическая помощь наркологическая помощь .
online pharmacy reviews soma viagra no prescription online pharmacy viagra mastercard online pharmacy
amoxicillin medicine: fast delivery amoxicillin usa – bacterial infection medication
https://ivermectinfast.shop/# buy stromectol online usa
1win autentificare http://1win47381.help/
1win casino MD https://www.1win47381.help
лечение алкоголизма лечение алкоголизма .
1win проблема с входом android 1win проблема с входом android
скачать видео из ютуба онлайн скачать видео из ютуба онлайн .
1win sms kod kelmayapti https://1win5750.help/
order prednisone from canada: buy prednisone online usa – prednisone best prices
лечение алкоголизма лечение алкоголизма .
1win rasmiy ilova http://www.1win5750.help
реабилитационный центр от алкоголизма vyvod-iz-zapoya-na-domu-voronezh-8.ru .
мостбет вход на сайт http://mostbet54173.help/
наркологическая помощь наркологическая помощь .
https://ivermectinfast.shop/# stromectol delivery united states
лечение алкоголизма лечение алкоголизма .
вывод из запоя на дому вывод из запоя на дому .
лечение алкоголизма vyvod-iz-zapoya-na-domu-samara-8.ru .
мелбет скачать кыргызстан http://melbet51738.help
1win android o‘rnatish https://www.1win5750.help
1win conectare Moldova https://1win47381.help
ivermectin tablets online: ivermectin treatment tablets – ivermectin tablets online
как установить приложение мостбет как установить приложение мостбет
мостбет авиатор играть http://www.mostbet41926.help
https://amoxilfast.com/# amoxil 500mg tablets usa
реабилитация наркоманов vyvod-iz-zapoya-na-domu-ekaterinburg-1.ru .
http://ivermectinfast.com/# ivermectin fast
vavada darmowe spiny http://vavada30759.help/
vavada aktualny adres polska https://vavada30759.help
капельница от похмелья vyvod-iz-zapoya-na-domu-voronezh-11.ru .
реабилитация алкоголиков vyvod-iz-zapoya-na-domu-samara-9.ru .
ivermectin tablets online: trusted ivermectin pharmacy – stromectol without prescription usa
реабилитация наркоманов vyvod-iz-zapoya-na-domu-nizhnij-novgorod-1.ru .
реабилитационный центр от алкоголизма vyvod-iz-zapoya-na-domu-voronezh-10.ru .
1win ставки на CS2 https://1win96781.help
вывод из запоя в стационаре vyvod-iz-zapoya-na-domu-samara-8.ru .
реабилитация алкоголиков kapelnica-ot-zapoya-nizhnij-novgorod-1.ru .
1вин майнс https://www.1win96781.help
реабилитационный центр для наркозависимых kapelnica-ot-zapoya-nizhnij-novgorod.ru .
mexico pharmacies online: reliable mexican pharmacies – BorderCareRX
реабилитационный центр для наркозависимых vyvod-iz-zapoya-na-domu-ekaterinburg.ru .
вывод из запоя в стационаре вывод из запоя в стационаре .
скачать видео ютуб на пк скачать видео ютуб на пк .
реабилитационный центр для наркозависимых vyvod-iz-zapoya-na-domu-voronezh-9.ru .
1win как подтвердить личность http://www.1win96781.help
1win lucky jet demo 1win5750.help
melbet без паспорта регистрация http://melbet51738.help/
Peyton here — I’ve tried portfolio tracking and the fast transactions impressed me.
mostbet казино приложение mostbet казино приложение
1win bonusni qanday ishlatish https://1win5750.help
мелбет ставки киргизия https://www.melbet51738.help
мостбет быстрые ставки mostbet54173.help
капельница от похмелья vyvod-iz-zapoya-na-domu-nizhnij-novgorod.ru .
1win промокод узбекистан 1win промокод узбекистан
mines 1win стратегия http://1win67901.help
капельница от похмелья vyvod-iz-zapoya-na-domu-voronezh-8.ru .
нарколог на дом нарколог на дом .
1win mobil kazino https://www.1win5750.help
melbet как вывести на odengi https://www.melbet51738.help
mostbet регистрация аккаунта mostbet регистрация аккаунта
canada drugstore pharmacy rx: india medication delivery to usa – canadian pharmacy no prescription needed
Hi to every one, the contents present at this website are truly remarkable for people knowledge, well, keep up the good work fellows.
Xxx video onlyfans sex video site
brazilian pharmacy online: п»їlegitimate online pharmacies india – the canadian pharmacy
https://bordervaluerx.shop/# tijuana pharmacy online
https://bordervaluerx.com/# mexico border medications usa access
лечение алкоголизма лечение алкоголизма .
vavada sloty wypłata http://www.vavada30759.help
mostbet казино вход https://mostbet41926.help
капельница от похмелья kapelnica-ot-zapoya-nizhnij-novgorod-1.ru .
1win вывод без верификации http://www.1win67901.help
наркологическая помощь наркологическая помощь .
реабилитационный центр для наркозависимых vyvod-iz-zapoya-na-domu-ekaterinburg.ru .
нарколог на дом нарколог на дом .
the pharmacy: india medication delivery to usa – best pharmacy
online pharmacy baclofen trusted online pharmacy tramadol brazilian pharmacy online
глазные капли Ястреб yastreb-kapli.ru .
кодирование от алкоголизма кодирование от алкоголизма .
http://trustedindiacarerx.com/# canadian pharmacy no prescription needed
лечение наркомании vyvod-iz-zapoya-na-domu-voronezh-8.ru .
I’ve been active for half a year, mostly for swapping tokens, and it’s always wide token selection.
I personally find that great platform with seamless withdrawals — it made my crypto journey easier. My withdrawals were always smooth.
Blake here — I’ve tried trading and the useful analytics impressed me.
canadian medication delivery to usa: canadian medication delivery to usa – canadian medication delivery to usa
crazy-winners-casino-no-deposit-bonus
Here is my blog post; spin [Jared]
I found this refreshingly relatable. It has the same appeal as hair advice that understands styling is personal, shampoo and conditioner are essentials, beauty is broader than trends, salon input can help, and growth takes patience.
https://bordervaluerx.com/# mexico border medications usa access
vavada wypłata przelew24 vavada30759.help
mostbet приложение для пк https://mostbet41926.help/
pharmacy rx: india medication delivery to usa – pharmacy rx world canada
vavada mirror 2026 vavada mirror 2026
мостбет фрибет как использовать mostbet41926.help
1win букмекер Узбекистан http://1win67901.help
1win pariuri Republica Moldova http://1win59213.help
1win лаки джет https://www.1win67901.help
1win descarcare apk ultima versiune 1win59213.help
vavada jak zrobić weryfikację https://vavada30759.help
игра mines mostbet http://www.mostbet41926.help
1вин доступ к сайту 1вин доступ к сайту
https://bordervaluerx.shop/# BorderValueRX
лечение алкоголизма лечение алкоголизма .
canadian neighbor pharmacy: TrustedIndiaCare RX – discount pharmacy
https://trustedindiacarerx.com/# pharmacy shop
наркологическая помощь наркологическая помощь .
кодирование от алкоголизма кодирование от алкоголизма .
наркологический стационар vyvod-iz-zapoya-na-domu-ekaterinburg-2.ru .
The cross-chain transfers process is simple and the robust security makes it even better.
реабилитационный центр от алкоголизма vyvod-iz-zapoya-na-domu-nizhnij-novgorod.ru .
наркологическая помощь наркологическая помощь .
нарколог на дом нарколог на дом .
Fortune Tiger auto spin: quantos giros vocês costumam deixar rodando?
Bônus de cadastro PG Soft: qual site está dando o melhor bônus agora?
Fortune Dragon novo hit: já ativou o dragão dourado?
купить капли ястреб yastreb-kapli.ru .
скачать видео с ютуба на пк skachat-video-s-youtube-4.ru .
наркологический стационар vyvod-iz-zapoya-na-domu-voronezh-8.ru .
mexican drugstore shipping to usa: affordable border pharmacy mexico – mexico border medications usa access
https://miamifightcard.com/
For MediaFightCard, the betting odds showcase a intriguing dynamic with champions positioned as underdogs and aspirants occupying favorite status. In the featured bout for the available light heavyweight title, ex-titleholder Jiri Prochazka started as a narrow -143 favorite over the fast-rising Carlos Ulberg, who comes in as a +116 underdog notwithstanding his nine-fight winning streak.
https://bordervaluerx.com/# mexican drugstore shipping to usa
https://sportium.net.co/
A plataforma Sportium Colombia trata-se de um cassino e site de apostas esportivas digitais que e totalmente legal com a autorizacao da Coljuegos, fruto da parceria entre CIRSA e Ladbrokes desde 2007. Apresenta um ambiente completo e seguro onde os jogadores colombianos podem desfrutar desde apostas ao futebol ate slots e cassino em tempo real com dealers reais, tudo em um mesmo sitio.
скачать видео с ютуба на телефоне skachat-video-s-youtube-2.ru .
BorderValue RX: pharmacy in mexico that ships to us – BorderValue RX
сохранить видео с ютуба в хорошем качестве skachat-video-s-youtube-1.ru .
mostbet фриспины на сегодня mostbet фриспины на сегодня
1win instalare pe telefon 1win59213.help
1win ставки на баскетбол https://1win09451.help/
melbet ios côte divoire melbet81256.help
1win plinko на деньги 1win plinko на деньги
mostbet результаты live http://mostbet32854.help/
melbet vérification identité http://www.melbet81256.help
https://certifiedmaplerx.shop/# certified canadian pharmacy usa
вывод из запоя на дому вывод из запоя на дому .
лечение наркомании лечение наркомании .
реабилитация алкоголиков kapelnica-ot-zapoya-nizhnij-novgorod-1.ru .
реабилитация наркоманов kapelnica-ot-zapoya-nizhnij-novgorod.ru .
лечение алкоголизма лечение алкоголизма .
нарколог на дом нарколог на дом .
http://trustedindiacarerx.com/# generic pharmacy online
реабилитация наркоманов реабилитация наркоманов .
мелбет скачать на айфон киргизия http://melbet30946.help
мелбет промокод не работает мелбет промокод не работает
What’s up, its fastidious article on the topic of media print, we all be aware of media is a great source of information.
Buy viagra here buy cialis on this site
https://ufc327odds.com/
This Miami-held light heavyweight title fight at UFC 327 shapes up as a classic pick’em for bettors, as former titleholder Jiri Prochazka (-142) and surging knockout artist Carlos Ulberg (+120) gear up to square off for the open belt. The tight odds are a testament to how well-paired these two finishers happen to be, setting up a matchup where a wager on either man ultimately comes down to which dynamic approach you anticipate will come out on top.
реабилитация наркоманов vyvod-iz-zapoya-na-domu-ekaterinburg.ru .
come-si-gioca-a-plinko
my website: wins (Karin)
rate online pharmacies: trusted indian pharmacy usa – canadian pharmacy levitra value pack
купить капли ястреб yastreb-kapli.ru .
скачать видео с ютуба на пк skachat-video-s-youtube-4.ru .
http://bordervaluerx.com/# BorderValue RX
скачать ролик с ютуба по ссылке онлайн skachat-video-s-youtube-2.ru .
This platform exceeded my expectations with reliable uptime and stable performance.
BorderValue RX: BorderValueRX – BorderValueRX
1win oferta bun venit Moldova 1win oferta bun venit Moldova
I value the great support and quick deposits. This site is reliable.
1win inregistrare rapida Moldova 1win inregistrare rapida Moldova
https://trustedindiacarerx.com/# canadian pharmacy sildenafil
1win rotiri gratuite nu apar 1win rotiri gratuite nu apar
сайт для скачивания видео с ютуба по ссылке skachat-video-s-youtube-1.ru .
мостбет промокод где взять мостбет промокод где взять
melbet dépôt par carte melbet dépôt par carte
1win ошибка установки 1win ошибка установки
мостбет профиль мостбет профиль
mostbet пополнить с карты https://www.mostbet70269.help
https://888starz.net.co/
888Starz Colombia representa un casino en linea y casa de apuestas deportivas que agrupa mas de 9.500 titulos, incluyendo tragamonedas, mesas con crupier en vivo asi como una extensa oferta deportiva que incluye desde el torneo local BetPlay hasta la Champions League y esports.
Really good insights here. The way this was presented reminded me that hair, styling, beard upkeep, and personal care are often about routine more than perfection, whether that means booking a salon appointment or improving your shave and daily shaving routine.
BorderValue RX: mexico border medications usa access – BorderValue RX
You are my aspiration, I own few blogs and occasionally run out from post :). “Yet do I fear thy nature It is too full o’ the milk of human kindness.” by William Shakespeare.
мелбет верификация киргизия http://melbet30946.help
https://trustedindiacarerx.shop/# online pharmacy non prescription drugs
Customer support was excellent, which gave me confidence to continue. The dashboard gives a complete view of my holdings.
https://trustedindiacarerx.shop/# canada rx pharmacy world
1win tətbiq linki https://1win60278.help
mostbet tasdiqlash kodi https://mostbet59402.help
1win hesab təhlükəsizliyi https://www.1win60278.help
mostbet pasport bilan http://www.mostbet59402.help
canadian world pharmacy india medication delivery to usa online pharmacy denmark
скачать по ссылке с ютуба скачать по ссылке с ютуба .
лечение наркомании лечение наркомании .
BorderValueRX: mexican drugstore shipping to usa – affordable border pharmacy mexico
http://certifiedmaplerx.com/# licensed canadian drug suppliers
mostbet кэшбэк казино mostbet кэшбэк казино
1win промо код 1win09451.help
melbet bonus inscription melbet bonus inscription
мостбет официальный сайт в Кыргызстане mostbet32854.help
1win MegaPay http://www.1win09451.help
melbet signaux mines melbet signaux mines
licensed canadian drug suppliers: licensed canadian drug suppliers – pharmacy com canada
мостбет официальный сайт зеркало мостбет официальный сайт зеркало
1win отменить вывод https://1win09451.help/
melbet mastercard melbet mastercard
canadian medication delivery to usa my canadian pharmacy is canadian pharmacy legit
https://trustedindiacarerx.shop/# online pharmacy meds
мелбет как получить бонус http://melbet30946.help
сайт для скачивания видео с ютуба skachat-video-s-youtube-1.ru .
https://trustedindiacarerx.shop/# online pharmacy uk
melbet игры на деньги https://www.melbet30946.help
It’s appropriate time to make some plans for the future and it’s time to be happy. I’ve read this post and if I could I want to suggest you some interesting things or advice. Perhaps you could write next articles referring to this article. I desire to read even more things about it!
reputable canadian online pharmacy: reputable indian pharmacies – buying prescription drugs from canada
мелбет скачать с официального сайта http://melbet30946.help/
Hi there to all, it’s truly a nice for me to pay a quick visit this website, it consists of precious Information.
Watch sexual porno video xxx sex adults site
мостбет казино вход http://www.mostbet70269.help
mexico border medications usa access: mexican drugstore shipping to usa – BorderValue RX
https://bordervaluerx.com/# mexican drugstore shipping to usa
mostbetda registratsiya mostbet59402.help
cheapest pharmacy for prescriptions without insurance: india medication delivery to usa – pharmacy wholesalers canada
1win 1win
youtube скачать видео youtube скачать видео .
I’ve been using it for since launch for using the mobile app, and the quick deposits stands out.
affordable border pharmacy mexico affordable border pharmacy mexico mexican drugstore shipping to usa
Appreciating the commitment you put into your website and detailed information you provide. It’s good to come across a blog every once in a while that isn’t the same old rehashed information. Great read! I’ve saved your site and I’m including your RSS feeds to my Google account.
Watch sexual porno video xxx sex adults site
http://bordervaluerx.com/# affordable border pharmacy mexico
кодирование от алкоголизма кодирование от алкоголизма .
http://certifiedmaplerx.com/# ordering drugs from canada
polish pharmacy online uk: verified india drug manufacturers – no rx pharmacy
https://bordervaluerx.shop/# affordable border pharmacy mexico
legit non prescription pharmacies: TrustedIndiaCare RX – best value pharmacy
This is my first time pay a visit at here and i am actually pleassant to read everthing at single place.
adult xxx video porn site xxx sex video
licensed canadian drug suppliers licensed canadian drug suppliers CertifiedMaple RX
youtube скачать видео skachat-video-s-youtube-1.ru .
Good post. I be taught something more difficult on different blogs everyday. It will always be stimulating to read content from different writers and follow a bit of one thing from their store. I’d choose to use some with the content on my weblog whether or not you don’t mind. Natually I’ll give you a link in your net blog. Thanks for sharing.
Good post. I will be facing a few of these issues as well..
licensed canadian drug suppliers: certified canadian pharmacy usa – licensed canadian drug suppliers
mostbet lucky jet bot https://mostbet59402.help/
1win mobil deposit http://www.1win60278.help
mostbet cashback tushmadi http://mostbet59402.help/
1win hesabdan çıxarış 1win hesabdan çıxarış
мостбет поддержка telegram мостбет поддержка telegram
мостбет ставки на спорт 2026 https://mostbet70269.help/
https://certifiedmaplerx.com/# licensed canadian drug suppliers
Good day! This is my first visit to your blog! We are a group of volunteers and starting a new initiative in a community in the same niche. Your blog provided us beneficial information to work on. You have done a outstanding job!
I’ve been active for recently, mostly for using the mobile app, and it’s always trustworthy service.
1win bonus silindi http://www.1win60278.help
mostbet geolokatsiya http://mostbet59402.help/
мостбет android приложение скачать mostbet70269.help
I personally find that the cross-chain transfers process is simple and the robust security makes it even better.
https://certifiedmaplerx.com/# certified canadian pharmacy usa
canadian medication delivery to usa: licensed canadian drug suppliers – certified canadian pharmacy usa
canadian pharmacy india NorthCareRx canadian family pharmacy
https://northcarerx.com/ed-pills.php# NorthCareRx
лечение наркомании лечение наркомании .
NorthCareRx: canadianpharmacymeds – best canadian pharmacy
mostbet slots https://mostbet21067.help
sweet bonanza краще в app sweet bonanza краще в app
https://primeindiameds.com/# mexican pharmacy online
mostbet Moldova site mostbet Moldova site
світ бонанза доступ до сайту світ бонанза доступ до сайту
мелбет как играть в aviator мелбет как играть в aviator
1win apk безопасно 1win apk безопасно
мелбет чат кыргызстан melbet76521.help
Today, I went to the beachfront with my kids. I found a sea shell and gave it to my 4 year old daughter and said “You can hear the ocean if you put this to your ear.” She put the shell to her ear and screamed. There was a hermit crab inside and it pinched her ear. She never wants to go back! LoL I know this is entirely off topic but I had to tell someone!
1 win https://1win85163.help/
The using the bridge tools are trustworthy service and reliable uptime. The updates are frequent and clear.
I personally find that the interface is scalable features, and I enjoy trading here. The mobile app makes daily use simple.
recommended canadian pharmacies buy canadian drugs NorthCareRx
mexico pharmacies online: mexipharmacy reviews – mexican pharmacies no prescription
pin up toʻlov limitlari http://pinup52914.help/
pinup signup pinup signup
https://bordercarerx.shop/# reliable mexican pharmacies
canadian pharmacy world: best india pharmacy – canadian pharmacy online cialis
https://primeindiameds.com/# promo code for canadian pharmacy meds
international online pharmacy: Prime India Meds – canadian pharmacy 365
mexico pharmacy online mexican pharmacies no prescription BorderCare RX
наркологический стационар vyvod-iz-zapoya-na-domu-samara-3.ru .
https://bordercarerx.shop/# reputable pharmacies in mexico
mostbet cum pun un pariu http://mostbet21067.help
sweet bonanza download android https://sweet-bonanza06538.help/
Thanks for every other wonderful post. Where else may just anybody get that type of info in such an ideal method of writing? I have a presentation next week, and I’m on the search for such info.
https://mostbet-zerkaloonline.buzz/kazino-klubnika-bezdepozitnyy-promokod/
melbet сайт http://melbet76521.help
1вин установить приложение https://1win85163.help/
PG Soft no Brasil: suporte 24h em português + Pix + giros grátis = perfeito?
Jogo do Tigrinho ao vivo: quem já ganhou assistindo transmissão no cassino online?
Fortune Rabbit respins infinitos: já chegou a 30 giros seguidos? Mostra o vídeo!
the pharmacy: Prime India Meds – buying from canadian pharmacies
I switched from another service because of the reliable uptime and stable performance. Charts are accurate and load instantly.
cheap canadian pharmacy online: top 10 pharmacies in india – southern pharmacy
sweet bonanza instalar https://sweet-bonanza72501.help/
sweet bonanza descargar México sweet bonanza descargar México
https://primeindiameds.shop/# legitimate canadian pharmacies
pinup free spins shartlari pinup52914.help
1win aviator 1win aviator
1win повторный вывод 1win повторный вывод
https://bordercarerx.com/# reliable mexican pharmacies
canadian pharmacy sarasota best canadian online pharmacy reviews vipps approved canadian online pharmacy
BorderCareRX: mexico pharmacies online – BorderCareRX
http://northcarerx.com/# NorthCareRx
mostbet nu merge pe ios http://www.mostbet21067.help
плинко фриспины плинко фриспины
казино слоти sweet bonanza http://sweet-bonanza06538.help/
как получить бонус plinko как получить бонус plinko
1win balance kg вывод 1win balance kg вывод
мелбет lucky jet http://melbet76521.help/
mostbet aviator https://mostbet21067.help/
sweet bonanza реєстрація безкоштовно sweet bonanza реєстрація безкоштовно
1win раздел бонусы http://1win85163.help/
melbet демо режим слоты https://melbet76521.help/
I personally find that i trust this platform — withdrawals are responsive team and reliable. Great for cross-chain swaps with minimal slippage.
mostbet timp de raspuns suport https://mostbet21067.help
світ бонанза ios sweet-bonanza06538.help
1win фриспины Кыргызстан 1win фриспины Кыргызстан
мелбет cashback киргизия http://melbet76521.help/
legal online pharmacy: Prime India Meds – pharmacy online 365 discount code
pinup verifikatsiyadan qanday o‘tish https://pinup52914.help
When I originally commented I clicked the -Notify me when new comments are added- checkbox and now each time a comment is added I get four emails with the same comment. Is there any way you can remove me from that service? Thanks!
I personally find that i was skeptical, but after since launch of portfolio tracking, the clear transparency convinced me.
pinup rasmiy saytni qanday topish pinup rasmiy saytni qanday topish
https://primeindiameds.com/# save on pharmacy
pin-up yangi aksiyalar https://pinup52914.help
med pharmacy Prime India Meds legit canadian pharmacy
sweet bonanza depositar con mastercard México http://sweet-bonanza72501.help/
1win вход быстро 1win вход быстро
https://northcarerx.com/# NorthCareRx
NorthCareRx: maple leaf pharmacy in canada – adderall canadian pharmacy
crash плинко http://www.plinko50862.help
http://northcarerx.com/# NorthCareRx
This was interesting in a very easygoing way. Nothing felt pushed, and the ideas came through clearly. I’m glad you published it and thankful I came across it.
We are a group of volunteers and starting a new scheme in our community. Your website offered us with valuable information to work on. You have done an impressive job and our entire community will be grateful to you.
The trading process is simple and the responsive team makes it even better. The updates are frequent and clear.
generic pharmacy online reputable indian online pharmacy canada drug pharmacy
The interface is scalable features, and I enjoy exploring governance here.
https://northcarerx.com/# canadian pharmacy victoza
Cool blog! Is your theme custom made or did you download it from somewhere? A design like yours with a few simple adjustements would really make my blog jump out. Please let me know where you got your design. Kudos
sweet bonanza descargar desde iphone México http://sweet-bonanza72501.help/
plinko juego sweet bonanza http://sweet-bonanza72501.help
canada pharmacy 24h: canadian pharmacy tampa – NorthCareRx
1вин зеркало Ош http://1win40729.help/
sweet bonanza entrar sin bloqueo México http://www.sweet-bonanza72501.help
1вин депозит https://1win40729.help
плинко скачать с официального сайта http://www.plinko50862.help
https://bordercarerx.shop/# reputable pharmacies in mexico
плинко вход без блокировки https://www.plinko50862.help
1win оптимабанк пополнение https://www.1win40729.help
https://bordercarerx.com/# reputable pharmacies in mexico
My brother recommended I might like this website. He was totally right. This post truly made my day. You can not imagine just how much time I had spent for this information! Thanks!
плинко_kz http://plinko50862.help
NorthCareRx NorthCareRx northwest pharmacy canada
Very energetic post, I loved that a lot. Will there be a part 2?
https://northcarerx.com/# canadian valley pharmacy
canadian pharmacy cialis 20mg Prime India Meds canadian pharmacy 24
https://northcarerx.shop/# NorthCareRx
https://bordercarerx.com/# mexico pharmacy price list
I switched from another service because of the accurate charts and clear transparency.
https://northcarerx.shop/# NorthCareRx
BorderCare RX: mexican pharmacies no prescription – legit mexican pharmacy without prescription
melbet написать в поддержку http://melbet18207.help
melbet ставки на спорт melbet ставки на спорт
buying drugs from canada NorthCareRx NorthCareRx
En visitant https://megawin-casino-365.fr, megawin casino fait partie des jeux visibles des le debut. Je fais attention a la lisibilite et a l’organisation. Si tout est bien structure, l’experience est plus fluide. Ce sont des details importants.
https://primeindiameds.shop/# canadian online pharmacy
I’ve been exploring for a little for any high quality articles or blog posts on this kind of area . Exploring in Yahoo I ultimately stumbled upon this site. Studying this information So i am happy to exhibit that I have a very just right uncanny feeling I discovered exactly what I needed. I most for sure will make sure to don’t omit this website and provides it a glance on a continuing basis.
NorthCareRx: NorthCareRx – NorthCareRx
https://primeindiameds.com/# online pharmacy for sale
https://northcarerx.shop/# reputable canadian pharmacy
PG Soft 2026: Mahjong Ways 2 tá pagando mais que Fortune Tiger em cascades?
mexican pharmacies BorderCareRX mexico pharmacies online
legit canadian pharmacy: NorthCareRx – safe canadian pharmacy
I personally find that i’ve been active for a month, mostly for trading, and it’s always stable performance. Definitely recommend to anyone in crypto.
I personally find that this platform exceeded my expectations with useful analytics and low fees.
https://primeindiameds.com/# northern pharmacy
мелбет чат поддержка https://melbet08561.help
melbet мбанк вывод melbet08561.help
mostbet depozit komissiya https://www.mostbet16734.help
reliable mexican pharmacies: BorderCare RX – reliable mexican pharmacies
mostbet rasmiy sayt uzbek mostbet16734.help
1win reopen account http://1win5530.ru
1win first deposit promo code 1win first deposit promo code
мостбет app download мостбет app download
1win блэкджек онлайн 1win блэкджек онлайн
мостбет баскетбол ставки http://mostbet2029.help/
mostbet apk download uz https://mostbet16082.help
mostbet суроғаи сайт https://mostbet07482.help/
мостбет как вывести на кошелек mostbet2029.help
1win ставкаҳои формула 1 http://1win14536.help/
mostbet bonus qoidalari https://mostbet16082.help/
NorthCareRx online canadian pharmacy reviews canadian pharmacy oxycodone
https://northcarerx.com/# NorthCareRx
https://bordercarerx.com/# reputable pharmacies in mexico
The interface is trustworthy service, and I enjoy learning crypto basics here. Perfect for both new and experienced traders.
I’ve been using it for almost a year for fiat on-ramp, and the intuitive UI stands out.
otc medicine Antibiotics Pharmacology antibiotics
I value the scalable features and responsive team. This site is reliable. The dashboard gives a complete view of my holdings.
https://antimicrobialresearch.com/zithromax.html IARP
antibiotics can you buy antibiotics over the counter
can you buy antibiotics over the counter Azithromycin Dihydrate buy antibiotics for uti
мелбет бонус киргизия melbet18207.help
1win slot jackpots http://www.1win5530.ru
чӣ тавр дар мостбет маблағ гузоштан http://mostbet07482.help
игра авиатор melbet https://melbet08561.help/
most bet https://www.mostbet16082.help
1win пешниҳод барои нав 1win14536.help
mostbet royxatdan otish uz https://www.mostbet16734.help
мостбет lucky jet 2026 https://mostbet2029.help/
https://antimicrobialresearch.com/otc-antibiotics.html Doxycycline Hyclate
I personally find that i trust this platform — withdrawals are accurate charts and reliable. Great for cross-chain swaps with minimal slippage.
https://antimicrobialresearch.com/doxycycline.html OTC antibiotics
best online doctor for antibiotics Antibiotics Pharmacology buy antibiotics online for tooth infection
Ciprofloxacin Hydrochloride cheapest antibiotics
https://antimicrobialresearch.com/doxycycline.html IARP
мелбет контакты http://melbet18207.help/
melbet cashback киргизия http://melbet18207.help
melbet live чат melbet live чат
antibiotics for uti over the counter Ciprofloxacin Hydrochloride antibiotics
1win аккаунт баста шуд https://1win14536.help/
mostbet аксияи кешбек mostbet аксияи кешбек
melbet как играть в plinko https://melbet08561.help
slot games 1win 1win5530.ru
mostbet uzum bank https://mostbet16082.help/
мостбет Тоҷикистон сабти ном http://mostbet07482.help/
1win линк ба сайт 1win14536.help
melbet игры на деньги http://melbet08561.help/
mostbet telefon raqam bilan registratsiya mostbet telefon raqam bilan registratsiya
mostbet parolni qanday tiklash mostbet parolni qanday tiklash
lucky jet игра mostbet https://www.mostbet2029.help
1win promo code for deposits 1win5530.ru
mostbet лимиты KGS http://mostbet2029.help/
mostbet bonus veyjer http://mostbet16734.help
1win бурд ё бохт http://1win14536.help/
слотҳои казино мостбет mostbet07482.help
melbet лимиты https://melbet08561.help/
1win promo code for free spins http://www.1win5530.ru
mostbet bonus ishlatish http://mostbet16082.help
plinko oyini mostbet https://www.mostbet16734.help
mostbet ошибка платежа mostbet ошибка платежа
Since the release of Aloha! Cluster Pays, there are now hundreds of cluster pays slots from some of the top providers worldwide. Each slot adds unique mechanics and themes that have improved on the initial cluster pays concepts including bonus features, free spin modes, and jackpot prizes. Some cluster pays slots even add cumulative bonus features that trigger for multiple cascading wins or for collecting a number of matching symbols such as Dragons Clusterbusters, and Reactoonz. 25 free spins on sign up + 200% and 30 Free Spins on First Deposit! Head to an island paradise in Hawaii with NetEnt’s Aloha! Cluster Pays slot game. Played on a 6×5 grid with Cluster Pays, head to the tropics at slot sites from just 10p per spin. New Players only, min deposit £10, Wagering 45x Bonus, Max Bet £5 With Bonus Funds. Live Casino Play Excluded With Bonus. 100% up to £100 Bonus on 1st Deposit. 50% up to £200 Bonus on 2nd Deposit. Welcome Bonus Excluded for Players Depositing with Skrill or Neteller. No Max Cash Out on Deposit Offers. Eligibility is restricted for Suspected Abuse.
https://ambikacargopackersandmovers.com/fortune-gems-review-sparkling-wins-for-indian-players/
Conquering the astronaut game involves more than just launching your spacecraft. Here are effective strategies to maximize your gameplay: The multiplayer aspect of the astronaut game elevates the excitement to new heights. Here’s why playing with others makes the game even more captivating: The astronaut game offers a plethora of features that enhance the gaming experience: To thrive in the challenging universe of the astronaut game, players should consider the following strategies: The astronaut game offers a plethora of features that enhance the gaming experience: ESA’s Branding and Partnerships Office has been working with a variety of video game developers to help them add authenticity to games and experiences that explore the infinite wonders of space. Receive updates on technology trends, latest Code Club projects and community news from around the globe!
https://antimicrobialresearch.com/amoxil.html OTC antibiotics
Dakota here — I’ve tried using the API and the stable performance impressed me.
Everything is very open and very clear explanation of issues. was truly information. Your website is very useful. Thanks for sharing.
buy amoxicillin Institute for Antimicrobial Research antibiotic without presription
buy antibiotics online for tooth infection Institute for Antimicrobial Research otc antibiotics
antibiotics buy amoxicillin
https://antimicrobialresearch.com/doxycycline.html IARP
I’ve been absent for a while, but now I remember why I used to love this web site. Thank you, I will try and check back more frequently. How frequently you update your site?
https://antimicrobialresearch.com/bactrim.html antibiotics
Thanks for any other informative web site. Where else may just I get that type of information written in such a perfect means? I have a project that I’m simply now working on, and I’ve been at the look out for such information.
This website is using a security service to protect itself from online attacks. The action you just performed triggered the security solution. There are several actions that could trigger this block including submitting a certain word or phrase, a SQL command or malformed data. Beregning av spilleautomat Gi spillet et spinn på våre TOPP amerikanske kasinoer, men har også forlatt det ganske enkelt og litt tørt ute. Lotterier og andre spill:–:– – –:– Hvis du synes det er skremmende å skulle satse ekte penger, kan du åpne spillet i demomodus. Dette er også en fin mulighet hvis du bare vil gjøre deg kjent med spillet før du spiller på ekte. Hold bare musepekeren over spillet du vil prøve, og klikk på «Prøv gratis» for å åpne det i demomodus. Spillere som ønsker å prøve spillet uten å bruke ekte penger, kan få tilgang til Gates of Olympus’ demomodus via mange online casinoer og spillplattformer. Denne gratisversjonen gir mulighet til å teste spillmekanikken og utforske symbolene uten å satse.
http://josesaraiva.adv.br/?p=71372
Når du spiller for ekte penger er det viktig at du setter opp et nøkternt budsjett når du spiller med gudene i Gates of Olympus casino spill, i og med av volatiliteten er ganske høy og det er lett å bli revet med og satse for mye. Gates of Olympus slot RTP er på 96,5 %, noe som er relativt høyt på slike videoautomater. Gates of Olympus er et av de mest ettertraktede spilleautomatene utviklet av Pragmatic Play. Spillet foregår i den mystiske verdenen på Olympusfjellet, og tilbyr unike mekanismer som «All Ways Pays» og kaskaderende hjul. Spillere kan vinne opptil 5000 ganger innsatsen sin og nyte et fantastisk tema basert på gresk mytologi. En spilleautomat med høy volatilitet innebærer en betydelig risiko. Mens enkelte spill ofte gir små gevinster, kan andre spilleautomater, som denne, dele ut enorme summer. Gates of Olympus-spilleautomaten har det høyeste volatilitetsnivået.
The fiat on-ramp tools are trustworthy service and responsive team.
buy antibiotics from canada Amoxicillin Trihydrate buy doxycycline antibiotics
https://antimicrobialresearch.com/otc-antibiotics.html antibiotics
Institute for Antimicrobial Research antibiotics for uti
antibiotics over the counter Azithromycin Dihydrate antibiotics online purchase
https://antimicrobialresearch.com/ Ciprofloxacin Hydrochloride
https://antimicrobialresearch.com/zithromax.html Institute for Antimicrobial Research
Together with every thing that appears to be developing throughout this subject material, many of your perspectives are generally very stimulating. However, I appologize, because I can not subscribe to your whole idea, all be it refreshing none the less. It would seem to everybody that your comments are actually not totally rationalized and in reality you are generally yourself not even fully convinced of your argument. In any case I did appreciate looking at it.
buy antibiotics for uti Institute for Antimicrobial Research buy antibiotics online
Institute for Antimicrobial Research cheap antibiotics
https://antimicrobialresearch.com/ Sulfamethoxazole Trimethoprim
generic antibiotics online cheap Ciprofloxacin Hydrochloride otc medicine
I’m not sure why but this blog is loading very slow for me. Is anyone else having this issue or is it a issue on my end? I’ll check back later and see if the problem still exists.
best online doctor for antibiotics Ciprofloxacin Hydrochloride antibiotics over the counter
https://antimicrobialresearch.com/bactrim.html Azithromycin Dihydrate
Superb blog! Do you have any suggestions for aspiring writers? I’m planning to start my own blog soon but I’m a little lost on everything. Would you advise starting with a free platform like WordPress or go for a paid option? There are so many options out there that I’m completely confused .. Any ideas? Bless you!
Doxycycline Hyclate buy antibiotics
The exploring governance tools are easy onboarding and robust security.
https://antimicrobialresearch.com/cipro.html Ciprofloxacin Hydrochloride
obviously like your web-site but you have to test the spelling on several of your posts. A number of them are rife with spelling issues and I find it very troublesome to tell the reality however I will definitely come back again.
buy amoxicillin antibiotic OTC antibiotics uti antibiotics online
https://antimicrobialresearch.com/amoxil.html Sulfamethoxazole Trimethoprim
best online doctor for antibiotics antibiotics buy antibiotics online safely
This really answered my problem, thank you!
antibiotics get antibiotics quickly
https://antimicrobialresearch.com/bactrim.html Ciprofloxacin Hydrochloride
I’ve read several good stuff here. Definitely value bookmarking for revisiting. I wonder how a lot attempt you place to create this sort of wonderful informative site.
https://antimicrobialresearch.com/ OTC antibiotics
antibiotics Ciprofloxacin Hydrochloride buy antibiotics from canada
Полная статья здесь: шлифовка паркета цена за метр
Читать больше на сайте: циклевка паркета в спб
https://antimicrobialresearch.com/doxycycline.html Ciprofloxacin Hydrochloride
can you buy antibiotics over the counter OTC antibiotics uti antibiotics online
IARP antibiotics
Deze website maakt gebruik van cookies om de gebruikerservaring te verbeteren. Door onze website te gebruiken, stem je in met het plaatsen van alle cookies in overeenstemming met onze cookiebeleid . Liraspin Casino: Your Next Adventure in Online Gaming Awaits A Comprehensive Overview of Liraspin Casino Platform Interface and Usability Game Selection and Variety Exploring Bonuses and Promotions Loyalty Programs and… De minimale inzet op het Sugar Rush slot bedraagt €0,20 per spin. De maximale inzet is al een stuk hoger en bedraagt maar liefst €50,00 per spin. Er zijn geen winlijnen aanwezig op het spel. Daarnaast moeten de deelnemers rekeninghouden met een hoge volatiliteit. De Sugar Rush is enkel beschikbaar bij de beste online casino’s, zoals BetCity! Omega-3 vetten zijn meervoudig onverzadigde vetzuren. Ze beschermen je tegen hart- en vaatziekten, verlagen de bloeddruk, en zijn goed voor je hersenen. Er bestaan grofweg drie verschillende soorten omega-3: ALA, DHA en EPA. Hiervan is ALA een essentieel vetzuur: je lichaam maakt deze niet zelf aan. DHA en EPA zijn geen essentiële vetzuren, maar bieden wel gezondheidsvoordelen.
https://nhasd.org/rich-wilde-book-of-dead-%e2%8e%bb-spelreview-voor-nederlandse-spelers/
Website is niet geschikt voor minderjarigen. Heb je hulp nodig in verband met een gokprobleem? Bel dan met 0900 217 77 21 of kijk op loketkansspel.nl. Stop op tijd. Bij PepperMill Casino vind je steevast de nieuwste en spannendste spellen en vandaag hebben we een geweldige verrassing voor je klaarstaan: Sugar Rush Dice van Pragmatic Play! Dit gloednieuwe spel combineert kleurrijke snoepjes met de spanning van dobbelstenen, en belooft een unieke spelervaring die je niet wilt missen. De kwaliteit en verscheidenheid aan gokspellen, inclusief de aanbieders erachter, spelen een belangrijke rol in onze ranking. A gevarieerd aanbod aan gokspellen zorgt ervoor dat je naast Sugar Rush voldoende opties hebt. Wanneer we casino’s evalueren, zoeken we naar een mix van klassieke slots, videoslots en progressieve jackpots, zodat elk type speler iets vindt om van te genieten. Ook de reputatie en betrouwbaarheid van de spelaanbieders zijn cruciaal; wij geven de voorkeur aan casino’s die samenwerken met gerenommeerde ontwikkelaars zoals Pragmatic Play, die bekend staan om hun hoogwaardige, eerlijke en boeiende spellen.
https://antimicrobialresearch.com/cipro.html Doxycycline Hyclate
antibiotics for uti over the counter Ciprofloxacin Hydrochloride buy amoxicillin
https://antimicrobialresearch.com/amoxil.html Ciprofloxacin Hydrochloride
https://antimicrobialresearch.com/doxycycline.html Institute for Antimicrobial Research
Ciprofloxacin Hydrochloride Over the counter antibiotics for infection
buy doxycycline antibiotics IARP Over the counter antibiotics pills
get antibiotics without seeing a doctor Antibiotics Pharmacology Over the counter antibiotics for infection
https://antimicrobialresearch.com/amoxil.html Azithromycin Dihydrate
buy antibiotics online for tooth infection Sulfamethoxazole Trimethoprim antibiotics
cheapest ed treatment Pharmacological Institute ed medicines online
https://primelinepharmacy.com/# erectile dysfunction drugs online
https://pharmacologicalsciences.com/generics.html viagra
ed prescription online Pharmacological Sciences Research Institute where can i get ed pills
https://corevitalpharmacy.com/# CoreVital Pharmacy
May I simply just say what a relief to find someone who really understands what they’re discussing on the internet.
You actually understand how to bring a problem to light and make it important.
More people need to read this and understand this side of your story.
I was surprised that you aren’t more popular since you definitely
possess the gift.
https://betsson.net.co/
Nao estamos falando de uma plataforma qualquer; com mais de sessenta anos de experiencia desde a sua criacao na Suecia, consagrou sua credibilidade no mercado regulado, com presenca tambem na Colombia seguindo as diretrizes da Coljuegos.
online ed medicine Pharmacological Institute what is the cheapest ed medication
https://corevitalpharmacy.shop/# buy cialis pill
cheapest ed treatment Pharmacological Institute where to buy ed pills
https://pharmacologicalsciences.com/generics.html viagra
https://corevitalpharmacy.com/# Buy Cialis online
https://rivalo.net.co/
Funciona como una sitio de apuestas y casino digital con presencia en Colombia de manera completamente legal , con el aval de la licencia de Coljuegos , garantizando asi que tus depositos, retiros y datos personales estan protegidos por la ley colombiana .
Hey there this is somewhat of off topic but I was wondering if blogs use WYSIWYG editors or if you have to manually code with HTML. I’m starting a blog soon but have no coding knowledge so I wanted to get advice from someone with experience. Any help would be greatly appreciated!
best online ed treatment Pharmacological Institute cheap ed pills
pin up kz: pin up
http://novamenpharmacy.com/# NovaMen Pharmacy
cheap ed drugs Pharmacological Sciences п»їed pills online
http://novamenpharmacy.com/# sildenafil 50 mg price
https://pharmacologicalsciences.com/generics.html Pharmacological Institute
affordable ed medication Pharmacological Sciences Research Institute online ed medications
kamagra Pharmacological Sciences Research Institute Pharmacological Sciences Research Institute
https://primelinepharmacy.com/# ed meds on line
online ed drugs Pharmacological Sciences cheapest erectile dysfunction pills
http://novamenpharmacy.com/# Sildenafil Citrate Tablets 100mg
kamagra Pharmacological Institute Pharmacological Institute
ed prescriptions online Pharmacological Institute erectile dysfunction medication online
https://pharmacologicalsciences.com/ levitra
https://primelinepharmacy.com/# cheap boner pills
https://betfair.cat/
Betfair es un sitio de apuestas y casino en linea con reputacion global , distinguida por su recorrido de mas de dos decadas y por haber sido la creadora del innovador modelo de bolsa de apuestas (Exchange) .
Pretty! This has been an incredibly wonderful article. Thanks for providing this information.
buy viagra sexual porno xxx adults pills
cialis Pharmacological Sciences levitra
Action tips: http://juliengarcia.com/?p=65484
Trusted and best: https://augustgwit63186.worldblogged.com/46753775/indian-blue-film-sector-heritage-affect-and-authorized-difficulties
Delicious – here: https://kitchencenter.com.do/descubra-os-melhores-acao-boas-vindas-2025/
Our top selection: http://www.roy.co.il/wordpress/2026/03/14/viral-tik-tok-lady-gender-videos-pronhub-porn-movies/
https://primelinepharmacy.shop/# buy erectile dysfunction treatment
cost of ed meds Pharmacological Sciences Research Institute buy erectile dysfunction medication
https://pharmacologicalsciences.com/ ed pills
https://corevitalpharmacy.com/# Generic Cialis without a doctor prescription
cialis Pharmacological Sciences Pharmacological Sciences Research Institute
Awesome! Its truly amazing article, I have got much clear idea about from this post.
ed online meds Pharmacological Sciences online prescription for ed
https://corevitalpharmacy.com/# Buy Cialis online
buying erectile dysfunction pills online Pharmacological Institute cheap erectile dysfunction pills
kamagra Pharmacological Institute kamagra
https://novamenpharmacy.com/# NovaMen Pharmacy
https://pharmacologicalsciences.com/cialis.html levitra
cheapest ed meds Pharmacological Institute buy ed medication online
Just published: https://www.hoamanagement.com/forums/users/xxxbptv
When I initially commented I clicked the “Notify me when new comments are added” checkbox and now each time a comment is added I get three emails with the same comment. Is there any way you can remove people from that service? Thanks a lot!
Learn more here: https://spinaleasesupplies.com/exactly-what-are-the-greatest-casinos-on-the-internet-inside-the-ireland-which-might-be-reasonable-and-player-amicable/
https://zookompleks.ru
ed pills Pharmacological Sciences ed pills
http://novamenpharmacy.com/# NovaMen Pharmacy
best ed pills online Pharmacological Institute ed treatment online
https://corevitalpharmacy.shop/# CoreVital Pharmacy
ed medicine online Pharmacological Institute where to buy ed pills
https://pharmacologicalsciences.com/cialis.html Pharmacological Institute
https://pharmacologicalsciences.com/ Pharmacological Sciences Research Institute
Pharmacological Sciences Pharmacological Institute Pharmacological Institute
https://novamenpharmacy.com/# NovaMen Pharmacy
En testant http://staxino-casino-888.fr/ j’ai direct fait attention aux differentes categories de jeux, surtout les slots. Je prefere quand tout est bien range et facile a parcourir. La vitesse de chargement joue aussi beaucoup pour moi. Si ca lag un peu ca casse vite l’envie de continuer.
buy ed medication Pharmacological Sciences Research Institute buy erectile dysfunction medication
https://pharmacologicalsciences.com/ viagra
When I originally commented I clicked the -Notify me when new comments are added- checkbox and now each time a comment is added I get four emails with the same comment. Is there any way you can remove me from that service? Thanks!
https://yajuego.cat/
YaJuego se afianza en 2026 como una de las principales plataformas en Colombia , ofreciendo un completo servicio de casino en linea y apuestas deportivas conforme a la estricta normativa de Coljuegos.
Pharmacological Sciences Pharmacological Sciences kamagra
https://zamba.cat/
Zamba Casino se posiciona durante 2026 como una plataforma lider dentro del pais, funcionando de manera completamente legal amparado por la licencia de Coljuegos y proporcionando un servicio integral que engloba desde pronosticos deportivos en disciplinas convencionales y deportes electronicos hasta un completo casino virtual con estudios de renombre internacional tales como NetEnt y Playtech.
https://corevitalpharmacy.com/# CoreVital Pharmacy
https://pharmacologicalsciences.com/ cialis
buy erectile dysfunction medication Pharmacological Sciences Research Institute erectile dysfunction drugs online
https://pharmacologicalsciences.com/viagra.html ed pills
https://corevitalpharmacy.shop/# CoreVital Pharmacy
how to get ed pills Pharmacological Sciences Research Institute where to get ed pills
cialis Pharmacological Sciences levitra
https://primelinepharmacy.com/# ed prescription online
erectile dysfunction medication online Pharmacological Institute cheap erectile dysfunction pills
Pharmacological Institute Pharmacological Sciences ed pills
https://primelinepharmacy.com/# buy ed meds online
ed online meds Pharmacological Sciences edmeds
https://jojovip.blog/# jojobet giris
http://corevitalpharmacy.com/# Buy Tadalafil 20mg
I enjoy what you guys tend to be up too. This kind of clever work and coverage! Keep up the superb works guys I’ve added you guys to my personal blogroll.
how to get ed meds online: PrimeLine Pharmacy – online ed drugs
melbet официальный сайт регистрация https://melbet18207.help
Hi! Someone in my Myspace group shared this site with us so I came to check it out. I’m definitely loving the information. I’m bookmarking and will be tweeting this to my followers! Outstanding blog and terrific design and style.
https://synaps-audiovisuel.fr/lederniersouffle/?page_id=11
jojobet resmi giriş: jojobet
https://novamenpharmacy.com/# best price for viagra 100mg
https://novamenpharmacy.shop/# NovaMen Pharmacy
Cialis without a doctor prescription: Cheap Cialis – CoreVital Pharmacy
Oh my goodness! a tremendous article dude. Thanks Nevertheless I’m experiencing challenge with ur rss . Don’t know why Unable to subscribe to it. Is there anyone getting identical rss problem? Anybody who is aware of kindly respond. Thnkx
Generic Tadalafil 20mg price: Cheap Cialis – CoreVital Pharmacy
мелбет мбанк пополнение https://www.melbet18207.help
мелбет задержка вывода мелбет задержка вывода
https://novamenpharmacy.com/# cheapest viagra
мел бет https://melbet18207.help/
Je compare souvent brutal casino en regardant surtout la structure generale du site et la simplicite de navigation. J’aime quand les sections principales sont faciles a comprendre des la premiere lecture. Je fais aussi attention a la fluidite sur mobile. Une presentation claire rend l’ensemble beaucoup plus agreable.
Hello, Neat post. There is a problem with your website in web explorer, may test this? IE nonetheless is the market leader and a good portion of people will miss your fantastic writing because of this problem.
NovaMen Pharmacy: Viagra Tablet price – NovaMen Pharmacy
https://rushbet.cat/
Rushbet Colombia se consolida durante 2026 como una de las plataformas de juego online confiable y integral, con la licencia oficial de la licencia oficial de Coljuegos, lo que brinda transparencia y respaldo legal en el pais.
https://strendus.cat/
El sitio Strendus se afianza durante 2026 como el casino en linea y casa de apuestas deportivas completamente mexicano mas confiable, con licencia de SEGOB.
https://wplay.cat/
Strendus es una plataforma de casino en linea que cumple con los niveles mas exigentes de resguardo y legalidad, ofreciendo a los usuarios una propuesta de diversion fiable y plenamente regulada.
Cuenta con una gran diversidad de juegos que incluyen tragamonedas , casino con crupieres en directo y alternativas de apuesta , el sitio se distingue por su firme apuesta por la honestidad y el juego responsable .
http://primelinepharmacy.com/# where can i buy ed pills
cheapest cialis: CoreVital Pharmacy – Buy Tadalafil 20mg
https://corevitalpharmacy.com/# buy cialis pill
мостбет фриспины в казино мостбет фриспины в казино
mostbet официальный сайт вход https://mostbet05638.help
NovaMen Pharmacy: Cheap Viagra 100mg – NovaMen Pharmacy
https://primelinepharmacy.shop/# online ed meds
Fortune Rabbit respins chain: recorde pessoal de quantos giros seguidos?
NovaMen Pharmacy: Viagra generic over the counter – Viagra generic over the counter
ed prescriptions online: PrimeLine Pharmacy – online ed treatments
http://novamenpharmacy.com/# NovaMen Pharmacy
PG Soft 2026: quem tá ganhando mais no mobile? Celular ou PC?
cheap ed meds: ed pills pharmacy – order ed pills
1win site Republica Moldova 1win site Republica Moldova
1win descarca app Moldova https://www.1win71038.help
http://novamenpharmacy.com/# NovaMen Pharmacy
CoreVital Pharmacy: CoreVital Pharmacy – CoreVital Pharmacy
I was skeptical, but after recently of cross-chain transfers, the reliable uptime convinced me.
http://corevitalpharmacy.com/# п»їcialis generic
мостбет официальный сайт http://mostbet05638.help/
ed prescriptions online: PrimeLine Pharmacy – where can i buy erectile dysfunction pills
Jogo do Tigrinho estratégia de sessão: 300 giros e stop – funciona?
https://iaslon.ru/nws/2538033/dinamo-vyshlo-v-final-puti-rpl-kubka-rossii.html
https://primelinepharmacy.shop/# cheap ed meds
cheap erection pills: ed pills pharmacy – erectile dysfunction pills for sale
NovaMen Pharmacy: Generic Viagra for sale – Sildenafil Citrate Tablets 100mg
Wild Bandito sticky wilds: o bandido mexicano tá roubando mais que o Tigrinho em 2026!
mostbet pul nə vaxt çıxır http://mostbet31847.help
1win bonus sloturi https://1win71038.help/
mostbet server xato mostbet73618.help
mostbet to‘lov keldi-mi mostbet to‘lov keldi-mi
mostbet скачать приложение на android http://mostbet05638.help/
мостбет букмекер http://www.mostbet05638.help
mostbet polska bukmacher mostbet2005.help
plinko mostbet aplikace mostbet2019.help
mostbet plinko zasady https://www.mostbet2005.help
melbet apk instalare melbet apk instalare
formular inregistrare melbet http://melbet63048.help/
mostbet верификация аккаунта https://mostbet05638.help/
http://primelinepharmacy.com/# cheap ed pills online
https://primelinepharmacy.com/# low cost ed medication
My wife and i have been thrilled when Michael could round up his survey by way of the precious recommendations he had through the weblog. It’s not at all simplistic to just always be releasing methods that other folks might have been making money from. And we all take into account we have the blog owner to be grateful to for this. The entire illustrations you’ve made, the simple website menu, the relationships you will make it possible to promote – it’s many terrific, and it’s letting our son in addition to our family imagine that that concept is satisfying, which is certainly unbelievably fundamental. Thanks for the whole thing!
Viagra Tablet price: NovaMen Pharmacy – NovaMen Pharmacy
https://novamenpharmacy.shop/# Sildenafil 100mg price
PG Soft 2026: Fortune Rabbit tá pagando mais que o Tigrinho? Vamos comparar odds reais
mostbet mirror mostbet mirror
mostbet bank kartı ilə çıxarış https://www.mostbet2013.help
1win oferta bun venit Moldova https://www.1win71038.help
erection pills online: ed pills pharmacy – cheap ed treatment
1win turneu mines 1win turneu mines
1win cum activez cod bonus https://www.1win71038.help
mostbet oficiální kasino http://mostbet2019.help/
erectile dysfunction medicine online: edmeds – ed medication online
https://corevitalpharmacy.shop/# CoreVital Pharmacy
https://playdoit.cat/
Playdoit es un contemporaneo casino en linea y tambien plataforma de apuestas creado especificamente para la audiencia de Mexico, que se maneja de forma legal y pone a disposicion una vivencia integral desde el dispositivo movil como a traves de la PC.
mostbet aktualny adres strony http://www.mostbet2005.help
mostbet android cz http://mostbet2019.help
https://novamenpharmacy.shop/# NovaMen Pharmacy
https://playcet.cat/
Playcet se presenta como un espacio online de apuestas y casino online operada por CET, una compania de origen argentino con una extensa experiencia en los establecimientos de juego tradicionales cordobeses, dandole asi un aval autentico y seguro durante 2026.
I got this website from my pal who informed me on the topic of this web page and now this time I am visiting this site and reading very informative articles or reviews here.
mostbet crash http://mostbet73618.help
mostbet azərbaycan dilində http://www.mostbet2013.help
https://primelinepharmacy.shop/# boner pills online
melbet problema site melbet problema site
mostbet apk download http://www.mostbet2005.help
NovaMen Pharmacy: cheap viagra – NovaMen Pharmacy
mostbet live blackjack mostbet2019.help
get ed meds online: PrimeLine Pharmacy – discount ed pills
https://primelinepharmacy.com/# ed medicine online
mostbet bonus powitalny 2026 http://mostbet2005.help
Puede contener recursos de Icon8 o Freepik o Flaticon o Canva Roobet is een populair online cryptocasino dat een breed scala aan spellen biedt, waaronder slots, tafelspellen en unieke minigames zoals Mission Uncrossable. Spelers kunnen inzetten met cryptocurrencies zoals Bitcoin, Ethereum en Litecoin, waardoor transacties snel en veilig verlopen. Het platform staat bekend om zijn moderne interface, een grote verscheidenheid aan casinospellen en regelmatige promoties. Roobet is vooral aantrekkelijk voor spelers die de voorkeur geven aan snelle uitbetalingen, anonimiteit en aantoonbaar eerlijk spel, wat zorgt voor transparante en betrouwbare uitkomsten. Puede consultar todo lo relacionado a la política de Cookies en el siguiente enlace gruposurbroker.es politica-de-cookies We willen je waarschuwen : het kansspel Mission Uncrossable is volledig gebaseerd op toeval en de toekomstige resultaten kunnen op geen enkele manier worden voorspeld. Geen enkele techniek of cheat-bot zal je winkansen in ons mini-spel Mission Uncrossable verhogen. Daarom vraagt het Roobet-team je om altijd alleen geld in te zetten dat je bereid bent te verliezen, en alleen voor plezier te spelen : als je denkt dat je de controle verliest, aarzel dan niet om contact op te nemen met onze klantenservice via Live Chat.
https://bgbn.co.za/2026/03/19/1-win-aviator-signals-review-van-1win-voor-nederlandse-spelers/
Een andere reden om Mission Uncrossable in de demomodus te spelen, is om je strategie te oefenen. Free slot laat je controleren of het voorgestelde algoritme bij je past, of om je eigen wedmethodologie te ontwikkelen. Een andere reden om Mission Uncrossable in de demomodus te spelen, is om je strategie te oefenen. Free slot laat je controleren of het voorgestelde algoritme bij je past, of om je eigen wedmethodologie te ontwikkelen. In het spel Mines komen spelers voornamelijk twee symbolen tegen: verborgen bommen en munten of sterren of soortgelijke andere symbolen. Elk vakje op het rooster vertegenwoordigt een potentieel risico of beloning; als je een bom ontdekt, eindigt het spel, terwijl het vinden van een munt betekent dat je nog steeds vrij bent en dat je winsten toenemen. De spanning van het spel zit hem in het maken van berekende beslissingen over welke vakjes je aanklikt, waarbij elke veilige ontdekking niet alleen een ramp voorkomt, maar ook je potentiële uitbetaling verhoogt. Dit eenvoudige maar effectieve symbolensysteem maakt Mines niet alleen makkelijk te begrijpen, maar ook intens boeiend, omdat elke klik de uitkomst drastisch kan veranderen.
mostbet əməliyyat tarixçəsi https://mostbet2013.help
mostbet az ödəniş üsulları mostbet az ödəniş üsulları
Normally I do not learn article on blogs, however I would like to say that this write-up very compelled me to take a look at and do so! Your writing style has been surprised me. Thanks, very great article.
mostbet android quraşmır mostbet android quraşmır
mostbet autoryzacja logowania mostbet2005.help
https://corevitalpharmacy.shop/# Generic Cialis price
NovaMen Pharmacy: Viagra generic over the counter – NovaMen Pharmacy
cod bonus melbet http://melbet63048.help/
mostbet aviator maksimal stavka https://mostbet73618.help
melbet Republica Moldova casino https://melbet63048.help
mostbet ilova ornatish http://www.mostbet73618.help
Chociaż początkowe ograniczenia wypłat dla początkujących mogą wydawać się restrykcyjne, Spinanga oferuje progresywny system poziomów, który obiecuje wyższe limity wypłat, gdy gracze awansują w rankingach. Nowi gracze mogą wypłacić do 31 500 PLN miesięcznie i 2 000 PLN dziennie, z możliwością wyższych limitów wypłat dla tych, którzy pozostaną na stronie. Przepraszamy, ten produkt jest niedostępny. Prosimy wybrać inną kombinację. Kościół Chrystusowy, 2019 Symbole starożytne od wieków stanowią fundament kulturowej tożsamości Europy i Polski. Bogowie, mity, architektura i nieśmiertelne motywy wciąż inspirują twórców, zarówno w sztuce, literaturze, jak i w rozrywce. Ich uniwersalne przesłanie i estetyka pozwalają na stworzenie wciągających narracji, które przekraczają granice epok.
https://garagedoorskauai.com/2026/03/19/aviator-aplikacja-z-najnowsza-wersja-recenzja-gry-spribe-dla-graczy-z-polski/
Stworzył wiele artefaktów o nadprzyrodzonej mocy:– Broń bogów: pioruny Zeusa, trójząb Posejdona, tarcza Achillesa (z grawerunkami przedstawiającymi cały świat) oraz łuk Erosa.– Automaty: złote roboty-służące, brązowe byki ziejące ogniem i samoporuszające się trójnogi na kołach.– Inne: sieć, która uwięziła Afrodytę i Aresa, oraz Pandorę – pierwszą kobietę, ulepaną z gliny Play’n GO jest deweloperem, który zawsze myśli nieszablonowo i stara się wprowadzać unikalne pomysły i innowacje do swoich gier. W Viking Runecraft deweloper zastosował nowy mechanizm wypłat klastrowych, co czyni ten slot bardzo ciekawym tytułem do obstawienia. Szeroka siatka gry składająca się z 7 bębnów i 7 rzędów powita Cię zaraz po otwarciu slotu i da Ci szansę na wylosowanie epickich zwycięskich combosów podczas Twojej podróży do Valhalli.
melbet creare cont https://melbet63048.help
jak ověřit účet na mostbet https://mostbet2019.help
mostbet oyun qaydaları mines https://mostbet31847.help
mostbet shikoyat mostbet shikoyat
With Powtoon, you can create explainer videos, marketing videos, internal communications, training videos, YouTube content, animated presentations, social media videos, and more – all in just a few clicks. You can choose from male or female human voices using our AI cartoon video generator, you can even select a language and an accent. Choose from a rich variety of animation styles: Japanese anime, Pixar-inspired, claymation, flat design, and more. Find the perfect aesthetic for your project. It also creates a voiceover for the submitted script, adds background music, and incorporates elements like transitions to match your prompt seamlessly. Appy Pie’s Animation Generator is an advanced generative AI-powered tool designed to create professional animations in a couple of clicks. Animation is a video-making method in which figures are manipulated to appear as moving images, such as an animated character. This form of art can be used in cartoons, movies, and video games to create the illusion of motion.
https://cttbeats.capetownthing.co.za/2026/03/11/casino-casiny-games-a-review-for-australian-players/
So, what’s new in Big Bass Bonanza Reel Action? Choose your stake and start fishing for winning combos across these reels. There are ten paylines on the Big Bass Bonanza slot, with wins paid out from left to right across them. Yes, Bigger Bass Bonanza is just as well suited to smartphones and tablets as it is to desktops and laptops However, if you’re looking to reel in the biggest payouts, keep your eyes peeled for the Fishing Float symbol — this is the highest-paying regular symbol in the game. Other high-paying symbols include the Fishing Rod, Dragonfly, Tackle Box and fish, while the lower-paying symbols are the standard Ace, King, Queen, Jack and Ten. Big Bass Bonanza rules are quite simple and straightforward. The game has 5 reels and a 10-payline setup. It’s a medium volatility game, which means you might see frequent wins on the smaller symbols but rare wins on the bigger symbols. If you keep your bet amount low, you can ride out the dry spell and enter the bonus round.
mostbet živé kasino https://mostbet2019.help
top 10 pharmacies in india: india pharmacy – indian pharmacies safe
1win изменить номер https://1win41825.help/
mexico online farmacia: MedicoBridge RX – medication from mexico
1вин отзывы 1вин отзывы
mostbet letöltési hiba http://www.mostbet2021.help
mostbet ios app https://mostbet2021.help
http://medbridgepharmacy.com/# canadian pharmacy online store
mostbet təhlükəsiz yükləmə http://mostbet31847.help
MedBridge Pharmacy: online pharmacy in turkey – gold pharmacy online
Excellent beat ! I would like to apprentice at the same time as you amend your web site, how could i subscribe for a weblog website? The account helped me a appropriate deal. I have been tiny bit acquainted of this your broadcast offered vivid clear idea
https://medbridgepharmacy.com/# MedBridge Pharmacy
мелбет ставки на баскетбол https://melbet27438.help/
melbet как играть в mines melbet как играть в mines
online pharmacy india: TrustRx India – indian pharmacy
mostbet hesab təhlükəsizliyi məsləhət http://mostbet31847.help/
mostbet Azərbaycan bonus http://mostbet31847.help
mostbet app açılmır https://mostbet31847.help/
MedicoBridge RX: MedicoBridge RX – MedicoBridge RX
iMovie is Apple’s native video editor, available for free on Macs, iPhones, and iPads. It’s a great entry-level option, and what it lacks in advanced editing capabilities, it makes up for with pure ease of use. With CapCut, you can upload the video you want to edit and change basic settings such as brightness, tone, and saturation of the clips you want to edit— all without paying a cent. This video editor also allows you to add endless stickers, filters, masks, sounds, and even copyrighted music without any problem thanks to its integrated gallery. The final output results in high-resolution videos of up to 4K HDR. It is not my goal to complicate the selection process for the best video editor for you any more than it already is so I have only included those ones I feel very confident in recommending.
https://alifbusinessgroup.com/2026/03/11/betting-lucky-numbers-on-oshi-casino-a-guide-for-australians/
Many UK casinos offer welcome bonuses and free spins as well as Drops & Wins tournaments, which will give you a chance to play this slot – and sometimes those free spins even apply directly to Big Bass Bonanza! Just make sure to check the T&Cs, because not all offers will be for specific slots. Everybody knows that fishing is a sport that is all about patience, with long periods where nothing much happens suddenly broken by a frenzy of activity. And the Big Bass Bonanza slot is very similar. The base game spins away, with the occasional line win. But when three or more of the leaping bass Scatters appear on the screen, the Free Spins kick in, and the action heats up. With a fishing theme, the Bigger Bass Bonanza slot is the second game from the popular Big Bass slot games series. Released by Pragmatic Play on the 16th of September 2021, you don’t head out to sea to cast your net and fish up a colossal catch.
crash мостбет https://mostbet38195.help/
1win как установить apk https://www.1win41825.help
mostbet élő chat http://www.mostbet2021.help
http://trustrxindia.com/# indianpharmacy com
melbet lucky jet киргизия melbet lucky jet киргизия
best online pharmacy india: best india pharmacy – online shopping pharmacy india
мелбет зеркало ош https://melbet27438.help
The gameplay on Gates of Olympus Pragmatic Play stacks up pretty well, even though the range of extra features is not enormous. The game offers plenty of excitement, thanks to the tumbling reels and bonus rounds, with opportunities for bumper payouts. We particularly love how Pragmatic Play makes the Gates of Olympus demo available to players. You may be required to sign up for an account at some casinos before playing the demo version, but most online casinos allow playing in guest mode. Land four or more scatter symbols to trigger the bonus game with 15 free spins. Here, each time a multiplier symbol lands on a winning spin or tumble, its value is added to a running total and applied to the win. New for Gates of Olympus 1000, there are five Multiplier symbols (green, blue, purple, red, and special). Each carries a random value between 2x and 1,000x. At the end of a tumble chain, all values combine and apply to the total win for that spin.
https://www.corsati.com/?p=175721
Our gaming platform is out of this world, much like the Gates of Olympus™ slot. You can enjoy frictionless gameplay with our powerful, lightweight client. The browser-based platform loads up quickly and smoothly. You can enjoy all the features of this top slot and other casino games at your convenience. You can play blackjack, roulette, and other themed slots on mobile. Claim your welcome bonus to get started. Our gaming platform is out of this world, much like the Gates of Olympus™ slot. You can enjoy frictionless gameplay with our powerful, lightweight client. The browser-based platform loads up quickly and smoothly. You can enjoy all the features of this top slot and other casino games at your convenience. You can play blackjack, roulette, and other themed slots on mobile. Claim your welcome bonus to get started.
мелбет официальный сайт регистрация https://melbet27438.help/
reputable indian pharmacies: indian pharmacy paypal – buy prescription drugs from india
mostbet скачать на iphone https://mostbet38195.help/
pin-up Humo pin-up Humo
Amazing! Its truly remarkable post, I have got much clear idea concerning from this post.
pin-up ios app store bormi pin-up ios app store bormi
An intriguing discussion is worth comment. I believe that you
need to publish more about this subject matter, it may not be a taboo subject but typically people
do not talk about these topics. To the next! All the best!!
1win plinko necə qazanmaq olar https://1win57196.help
mostbet kg https://mostbet38195.help/
1win oyun turniri 1win57196.help
melbet отмена вывода melbet отмена вывода
1win букмекер Ош http://1win41825.help/
краш 1win https://1win41825.help
mostbet ismeretlen források engedélyezése http://mostbet2021.help
mostbet bónusz kód https://www.mostbet2021.help
MedicoBridge RX: MedicoBridge RX – mexico medication
1вин официальный сайт Киргизия https://1win41825.help
melbet вывод odengi кыргызстан melbet вывод odengi кыргызстан
MedicoBridge RX can i buy meds from mexico online MedicoBridge RX
mostbet bejelentkezés android http://mostbet2021.help/
мостбет apk скачать на android http://www.mostbet38195.help
http://medbridgepharmacy.com/# MedBridge Pharmacy
top 10 pharmacies in india: indian pharmacy – indian pharmacy
farmacias online usa MedicoBridge RX mexico prescriptions
1win как вывести на Bakai Bank https://1win63197.help/
1win ставки на Valorant 1win ставки на Valorant
buy prescription drugs from india: TrustRx India – online pharmacy india
pin-up o‘yin demo https://pinup35741.help
1win giriş linki 1win giriş linki
mostbet кэшбэк https://www.mostbet38195.help
MedicoBridge RX: pharmacies in mexico – mexican pharmacies that ship
mostbet android приложение Кыргызстан mostbet android приложение Кыргызстан
MedicoBridge RX mexican medicine store mexico pharmacy price list
https://trustrxindia.com/# best india pharmacy
https://trustrxindia.shop/# buy medicines online in india
best online pharmacy india: mail order pharmacy india – india pharmacy mail order
foreign pharmacy no prescription: online pharmacy quick delivery – online pharmacy cialis
мелбет скачать приложение киргизия https://www.melbet84062.help
gana777 – https://gana777-mx.com
pin-up Click yechish Oʻzbekiston https://www.pinup35741.help
1win apk linki 1win apk linki
pinup aviator demo https://www.pinup35741.help
1win depozit et 1win57196.help
http://medicobridgerx.com/# MedicoBridge RX
MedBridge Pharmacy: canadian pharmacy antibiotics – overseas online pharmacy
pin-up login https://www.pinup35741.help
1win canlı mərc qaydaları [url=https://www.1win57196.help]https://www.1win57196.help[/url]
1win отзывы 1win отзывы
http://medicobridgerx.com/# pharmacies in mexico
mexico rx: MedicoBridge RX – MedicoBridge RX
If some one needs expert view concerning blogging and site-building then i propose him/her to pay a quick visit this webpage, Keep up the pleasant job.
india pharmacy TrustRx India mail order pharmacy india
https://medbridgepharmacy.shop/# MedBridge Pharmacy
1win lucky jet apk 1win03748.help
мостбет promo code мостбет promo code
1win hesab bloklanma səbəbi http://www.1win03748.help
мостбет промокод Киргизия 2026 https://mostbet42395.help/
online pharmacy india: indianpharmacy com – reputable indian pharmacies
melbet демо режим слоты melbet демо режим слоты
mostbet proxy http://mostbet2009.help
https://medicobridgerx.com/# mexico meds
1win вход по номеру 1win вход по номеру
https://trustrxindia.com/# top 10 online pharmacy in india
indian pharmacy: pharmacy website india – online shopping pharmacy india
1win промокод на фриспины 1win промокод на фриспины
farmacia online usa mexico pharmacy price list MedicoBridge RX
1win oficial http://1win19458.help
1win app скачать 1win app скачать
1win bono 1win bono
mostbet apk sigur http://mostbet2009.help
MedBridge Pharmacy: affordable pharmacy – MedBridge Pharmacy
mostbet instalare pe huawei mostbet instalare pe huawei
https://trustrxindia.com/# indian pharmacies safe
melbet сменить пароль https://www.melbet84062.help
mostbet blackjack http://mostbet07493.help/
mostbet promo code for deposit https://mostbet07493.help/
мелбет загрузить документы мелбет загрузить документы
mostbet accesare https://www.mostbet2009.help
MedicoBridge RX mexican rx mexico pharmacy list
мелбет вход без пароля мелбет вход без пароля
economy pharmacy: MedBridge Pharmacy – mexican pharmacy online
1win sürətli yüklə [url=http://1win03748.help/]1win sürətli yüklə[/url]
mostbet android Киргизия http://mostbet42395.help/
http://truehealthpharm.com/# True Health Pharm
1win depósito criptomonedas http://www.1win19458.help
http://truehealthpharm.com/# cheapest ed medication
mostbet notificări app http://www.mostbet2009.help
cum primesc bonus la mostbet https://www.mostbet2009.help
mostbet plinko game mostbet plinko game
1win registro con correo https://1win19458.help/
dog and cat medicine supply HappyPaws Pharmacy HappyPaws Pharmacy
canada rx pharmacy: buy Viagra online – online pharmacy prescription
1win таърихи шартҳо http://1win91403.help/
1win даромад бе мушкил 1win даромад бе мушкил
1win apk descargar Perú https://1win19458.help
https://happypawspharmacy.shop/# HappyPaws Pharmacy
мостбет в Киргизии http://mostbet42395.help/
1win email dəstək http://1win03748.help
mostbet скачать Кыргызстан http://mostbet42395.help/
1win aviator proqnoz https://www.1win03748.help
dog and cat medicine supply: pet meds for dogs – dog and cat medicine supply
1win registro gratis http://1win19458.help
1win etibarlıdırmı http://1win03748.help
mostbet сколько идет вывод https://mostbet42395.help
1win to‘lov tekshiruvi 1win to‘lov tekshiruvi
https://juegaenlinea.cat/
Juegaenlinea se posiciona en 2026 como una plataforma lider en el mercado colombiano, proporcionando un ambiente confiable y integral para casino online y apuestas deportivas en linea bajo licencia internacional avalada por Curazao.
Pensada especialmente dirigida a el audiencia de Latinoamerica, esta propuesta funciona en pesos colombianos y cuenta con una amplia variedad de entretenimiento respaldada por mas de 35 desarrolladores de software reconocidos mundialmente.
https://codere.cat/
Codere se presenta como un casino online que funciona con pleno cumplimiento normativo amparado por la autorizacion de la Secretaria de Gobernacion , brindando a los usuarios de Mexico un espacio digital con altos estandares de seguridad donde todos los depositos y retiros se manejan exclusivamente en pesos mexicanos (MXN) via SPEI, el sistema de pagos ampliamente utilizado en Mexico.
indian pharmacy online VitalCore Pharmacy online canadian pharmacy coupon
https://happypawspharmacy.com/# pet pharmacy USA
mostbet log in mostbet log in
mostbet secure site mostbet07493.help
There is noticeably a bundle to know about this. I assume you made certain nice points in features also.
mostbet download latest version mostbet download latest version
True Health Pharm: True Health Pharm – best online ed treatment
http://vitalcorepharmacy.com/# online pharmacy store
мостбет поддержка Кыргызстан https://www.mostbet83507.help
mostbet задержка вывода http://mostbet83507.help/
1вин android http://1win91403.help
True Health Pharm: True Health Pharm – True Health Pharm
southern pharmacy Generic Viagra online best canadian pharmacy no prescription
мостбет plinko стратегия http://mostbet21480.help/
http://vitalcorepharmacy.com/# medical pharmacy west
https://caliente.cat/
La plataforma de Caliente se posiciona como un referente en el ambito local en Mexico, proporcionando un ecosistema completo que fusiona pronosticos deportivos y tragamonedas y mesa con un completo catalogo de competiciones y lanzamientos. De este modo, la casa se posiciona como una alternativa solida para los jugadores que deseen experiencias de juego variadas y requisitos favorables en un unico sitio.
casino-met-neosurf
My page: winning, Amelia,
pet pharmacy USA: pet pharmacy USA – pet prescriptions online
http://truehealthpharm.com/# erectile dysfunction drugs online
воридшавӣ 1вин 1win91403.help
1win промокод барои бонуси хушомад 1win промокод барои бонуси хушомад
Simply wanna comment on few general things, The website style and design is perfect, the written content is rattling superb : D.
1win футбол шартгузорӣ http://1win91403.help/
pet antibiotics and care pet antibiotics and care pet meds for dogs
http://vitalcorepharmacy.com/# online pharmacy weight loss
online canadian pharmacy reviews: buy Viagra over the counter – canadadrugpharmacy com
мостбет Баткен мостбет Баткен
мостбет баланс http://www.mostbet21480.help
мостбет ios приложение скачать https://www.mostbet21480.help
melbet бонус код melbet бонус код
roulette-regel-null
my web-site … lucky
мелбет кз казино онлайн играть melbet72043.help
pin-up bepul tikish shartlari pin-up bepul tikish shartlari
canadian pharmacy without prescription: VitalCore Pharmacy – canadapharmacyonline
pin-up UZS depozit pin-up UZS depozit
Fees are useful analytics, and the execution is always smooth.
mostbet Oʻzbekiston sport stavka http://mostbet37150.help/
mostbet qo‘llab-quvvatlash mostbet37150.help
http://vitalcorepharmacy.com/# generic viagra online canadian pharmacy
peoples pharmacy VitalCore Pharmacy cheapest pharmacy
https://happypawspharmacy.com/# pet antibiotics and care
мелбет вход https://www.melbet42089.help
melbet личный кабинет melbet42089.help
mostbet казино слоты Кыргызстан https://www.mostbet21480.help
1win stavka strategiya http://www.1win5765.help
ordering drugs from canada: cheap viagra – rx pharmacy online
Hi there, i read your blog occasionally and i own a similar one and i was just curious if you get a lot of spam comments? If so how do you prevent it, any plugin or anything you can recommend? I get so much lately it’s driving me mad so any support is very much appreciated.
I personally find that the interface is low fees, and I enjoy using the mobile app here.
mostbet app mostbet app
мостбет белый экран https://mostbet83507.help
http://happypawspharmacy.com/# pet pharmacy USA
mostbet бонус Кыргызстан http://www.mostbet83507.help
canadian pharmacies online Sildenafil 100mg price us pharmacy
online pharmacy australia paypal: Viagra tablet online – canadian pharmacy levitra
melbet kz как зарегистрироваться http://www.melbet72043.help
http://happypawspharmacy.com/# HappyPaws Pharmacy
https://miamifightcard.com/
For MediaFightCard, the betting odds showcase a notable dynamic with belt-holders being the betting underdogs and contenders holding favorite status. In the marquee matchup for the open light heavyweight title, previous belt-holder Jiri Prochazka opened as a narrow -143 favorite over the in-form Carlos Ulberg, who comes in as a +116 underdog despite his nine-fight winning streak.
http://vitalcorepharmacy.com/# medstore online pharmacy
https://ufc327odds.com/
The upcoming UFC 327 light heavyweight championship bout in Miami presents a genuine pick’em for those placing wagers, as former titleholder Jiri Prochazka (-142) and hot-streaking knockout artist Carlos Ulberg (+120) gear up to square off for the vacant belt. The razor-thin odds are a testament to how evenly matched these two stand-up fighters really are, creating a scenario where a bet on either competitor hinges entirely on which explosive skillset you believe will emerge victorious.
мелбет ставки на тотал http://www.melbet72043.help
online canadian pharmacy: over the counter sildenafil – canadian pharmacy coupon code
gagnies-maximales-de-machines-à-sous
Also visit my homepage; jackpot
mostbet коэффициенты mostbet коэффициенты
jugar-tomb-raider-gratis
Feel free to visit my page … royal (Carroll)
pin-up cash out pin-up cash out
mostbet kg http://mostbet21480.help
dog and cat medicine supply dog and cat medicine supply pet antibiotics and care
pharmacy mall: VitalCore Pharmacy – best canadian pharmacy for viagra
mostbet maksimal yutuq mostbet37150.help
как вывести деньги с мелбет https://melbet72043.help
melbet приложение на русском melbet приложение на русском
online pharmacy in turkey: VitalCore Pharmacy – buy online pharmacy uk
https://truehealthpharm.shop/# best online ed medication
1win mirror yangi 2026 https://www.1win5765.help
melbet kz ставки на спорт https://melbet72043.help
1win-də necə qeydiyyatdan keçmək olar 1win-də necə qeydiyyatdan keçmək olar
1win depozit təsdiqi gecikir http://1win82430.help/
https://happypawspharmacy.shop/# pet antibiotics and care
pet pharmacy USA: pet pharmacy USA – pet antibiotics and care
best ed medication online True Health Pharm True Health Pharm
https://vitalcorepharmacy.shop/# mexican pharmacy online
pinup roʻyxatdan oʻtish https://pinup69053.help/
1win xush kelibsiz bonusi Oʻzbekiston https://1win5765.help
Real great visual appeal on this internet site, I’d value it 10 10.
dog medicine: dog and cat medicine supply – HappyPaws Pharmacy
pin-up aksiya kod pin-up aksiya kod
mostbet xavfsizlik https://mostbet37150.help
mostbet uzum bank mostbet uzum bank
pin-up android o‘rnatish https://www.pinup69053.help
мелбет регистрация киргизия http://melbet42089.help/
1win sms kod kelmayapti 1win5765.help
мелбет live ставки https://www.melbet42089.help
mostbet royxatdan otish uzbek https://mostbet37150.help
http://happypawspharmacy.com/# vet pharmacy online
1win Oʻzbekiston rasmiy domen https://1win5765.help/
melbet депозит элкарт melbet депозит элкарт
HappyPaws Pharmacy pet pharmacy USA pet pharmacy USA
https://truehealthpharm.com/# True Health Pharm
HappyPaws Pharmacy: dog and cat medicine supply – pet prescriptions online
мостбет барномаи android http://mostbet95163.help
1win android https://www.1win82430.help
https://vitalcorepharmacy.shop/# canadian family pharmacy
canadian pharmacy cialis reviews: cheapest viagra – what’s the best online pharmacy
мостбет apk последняя версия скачать мостбет apk последняя версия скачать
HappyPaws Pharmacy pet pharmacy pet pharmacy USA
мостбет вывод KGS на карту http://www.mostbet78063.help
mostbet güncel adres mostbet
1win bookmaker 1win bookmaker
mostbet resmi mostbet
1win cashout not working https://1win5523.ru/
1win depozit komissiya 1win82430.help
1win ehtiyat sayt 1win82430.help
mostbet casino mostbet
1win oyun siyahısı 1win82430.help
мелбет депозит бе комиссия Тоҷикистон https://melbet20856.help
mostbet güncel giriş: mostbet
As I website possessor I believe the written content here is very good, thankyou for your efforts.
mostbet.kg http://mostbet78063.help/
https://betwinner.cat/
Betwinner se ha posicionado en el sector de apuestas de Argentina para 2026 como una referencia principal en apuestas deportivas y juegos de casino, sobresaliendo por su adaptacion al jugador local con manejo de moneda local y bonos de bienvenida que ascienden hasta los $94.250 ARS.
https://betfun.cat/
Betfun brilla en el mercado argentino de apuestas como un operador todo-en-uno gestionada por Track Gaming Buenos Aires S.A., ofreciendo 500 opciones de casino y presencia de mas de 30 deportes. Permitiendo el uso de pesos argentinos (ARS), el sitio recibe a los clientes que se registran con un premio por sumarse de $15,000 ARS gratis al darse de alta, ademas de un 100% adicional en el primer deposito para aumentar al doble los fondos iniciales.
https://mostbettr.icu/# mostbet güncel giriş
1win promo code today 1win5523.ru
https://mostbetvipaz.buzz/# mostbet casino
1win turnee Moldova http://1win5808.help/
cum retrag cu Payeer de la 1win cum retrag cu Payeer de la 1win
мелбет маблағгузорӣ http://melbet20856.help/
melbet игры plinko http://melbet41682.help/
melbet слоты играть melbet41682.help
mostbet resmi giriş: mostbet
melbet даромад 2026 http://melbet20856.help
plinko on 1win plinko on 1win
sweet bonanza безкоштовні обертання за промокод http://sweet-bonanza54072.help
mostbet güncel giriş mostbet
світ бонанза Google Pay http://www.sweet-bonanza54072.help
https://mostbetpl.buzz/# mostbet resmi
mostbet giriş: mostbet
mostbet история платежей mostbet история платежей
how to use 1win cash out https://1win5523.ru/
мостбет приложение 2026 мостбет приложение 2026
мостбет ҳисоби ман ворид https://mostbet95163.help
crash дар melbet http://melbet20856.help
mostbet последняя версия apk http://www.mostbet78063.help
mostbet giris mostbet
1win bonus claim https://1win5523.ru/
I was wondering if you ever considered changing the structure of your website? Its very well written; I love what youve got to say. But maybe you could a little more in the way of content so people could connect with it better. Youve got an awful lot of text for only having one or two images. Maybe you could space it out better?
All’interno del nuovo breitling falsi Navitimer 36 batte il movimento automatico Breitling Calibro 17, certificato COSC, con una riserva di carica di circa 38 ore.
mostbet güncel: mostbet
mostbet güncel giriş: mostbet
crash pe 1win http://www.1win5808.help
mostbet casino mostbet
melbet установка apk melbet установка apk
світ бонанза sign in світ бонанза sign in
Do you mind if I quote a few of your posts as long as I provide credit and sources back to your site? My blog is in the exact same area of interest as yours and my visitors would genuinely benefit from a lot of the information you present here. Please let me know if this ok with you. Regards!
plinko скачать быстро https://plinko61038.help
плинко lucky jet Казахстан плинко lucky jet Казахстан
https://mostbetvipaz.buzz/# mostbet
мелбет дар Хуҷанд мелбет дар Хуҷанд
gluco6
Gluco6 is a natural, plant-based supplement designed to help maintain healthy blood sugar levels.
melbet free spins melbet free spins
https://mostbetvipaz.buzz/# mostbet
мостбет Тоҷикистон барои android мостбет Тоҷикистон барои android
mostbet kasyno: mostbet
**arialief**
Arialief is a carefully developed dietary supplement designed to naturally support individuals dealing with sciatic nerve discomfort while promoting overall nerve wellness.
**nitric boost ultra**
Nitric Boost Ultra is a daily wellness formula designed to enhance vitality and help support all-around performance.
prostavive
Maintaining prostate health is crucial for men’s overall wellness, especially as they grow older. Conditions like reduced urine flow, interrupted sleep
1win cupon bonus Moldova 1win cupon bonus Moldova
I wish to express my gratitude for your kindness supporting persons who really need guidance on that subject. Your special commitment to getting the solution around came to be exceptionally significant and have in every case empowered individuals much like me to get to their endeavors. Your entire warm and helpful publication entails this much a person like me and a whole lot more to my office colleagues. Many thanks; from each one of us.
actualizare 1win app https://www.1win5808.help
backbiome
Backbiome is a naturally crafted, research-backed daily supplement formulated to gently relieve back tension and soothe sciatic discomfort.
зайти на melbet в россии http://www.melbet41682.help
melbet партнерская программа бонусы игроку http://melbet41682.help
1win domeniu nou https://1win5808.help/
sweet bonanza сайт для телефону https://www.sweet-bonanza54072.help
світ бонанза офіційний сайт скачати світ бонанза офіційний сайт скачати
mostbet mostbet
игра crash melbet https://melbet41682.help
світ бонанза відповідальна гра світ бонанза відповідальна гра
mostbet mostbet
I’ve been using it for over two years for using the mobile app, and the quick deposits stands out. Definitely recommend to anyone in crypto.
мостбет craps мостбет craps
If you wish for to increase your experience only keep visiting this web page and be updated with the hottest information posted here.
https://betplay.cat/
BetPlay se consolida en 2026 como la plataforma lider en apuestas y casino digital en Colombia, totalmente licenciada por Coljuegos para operar de manera segura y legal en el pais.
мостбет android apk http://mostbet95163.help
https://mostbettr.icu/# mostbet güncel giriş
mostbet версияи мобилӣ mostbet версияи мобилӣ
I’ve read some good stuff here. Certainly worth bookmarking for revisiting. I surprise how much effort you put to create such a great informative site.
I switched from another service because of the reliable uptime and easy onboarding.
https://mostbetpl.buzz/# mostbet güncel adres
мелбет рабочая ссылка http://www.melbet36290.help
crash мелбет crash мелбет
vavada instalacja na telefon vavada instalacja na telefon
https://mostbettr.blog/# mostbet giris
It is perfect time to make some plans for the future and it’s time to be happy. I’ve read this post and if I could I desire to suggest you few interesting things or tips. Perhaps you could write next articles referring to this article. I want to read even more things about it!
mostbet giris: mostbet
плинко кіру https://plinko61038.help/
plinko авиатор игра https://www.plinko61038.help
плинко личный кабинет https://plinko61038.help/
sweet bonanza no me deja entrar https://sweet-bonanza18364.help/
of course like your web-site however you need to take a look at the spelling on several of your posts. A number of them are rife with spelling issues and I find it very bothersome to inform the reality on the other hand I’ll certainly come back again.
cómo entrar a sweet bonanza cómo entrar a sweet bonanza
mostbet slot o‘yinlar mostbet24618.help
melbet терминал пополнение https://melbet36290.help/
мостбет установка apk mostbet27541.help
мостбет ставки лайв Кыргызстан https://www.mostbet27541.help
I love looking through and I believe this website got some really useful stuff on it! .
1win ilova soʻnggi versiya http://1win5768.help/
1win slotlar Oʻzbekiston http://1win5768.help
sweet bonanza retirar a bbva México https://sweet-bonanza18364.help/
1win reopen account 1win reopen account
how to install 1win apk on android http://1win76138.help
PG Soft mobile vs desktop: onde você ganha mais em 2026?
PG Soft 2026: quem tá lucrando mais com cashback ou giros grátis?
Galaxyno Hit clusters explosivos: melhor que Jogo do Tigrinho pra quem ama grid grande?
Hi my family member! I wish to say that this article is awesome, great written and include approximately all vital infos. I’d like to look extra posts like this .
mostbet proxy mostbet proxy
mostbet ilova kirish muammo http://www.mostbet24618.help
sweet bonanza depósito mínimo méxico sweet-bonanza18364.help
I’m really impressed along with your writing abilities and also with the structure for your blog. Is that this a paid subject or did you modify it yourself? Anyway keep up the excellent quality writing, it is uncommon to see a nice weblog like this one nowadays..
melbet не приходит sms melbet36290.help
мелбет бонус на первый депозит melbet36290.help
melbet кэшбэк киргизия melbet кэшбэк киргизия
sweet bonanza espejo actual http://www.sweet-bonanza18364.help
vavada plinko opinie http://www.vavada56378.help
mostbet akkumulyator bonus mostbet akkumulyator bonus
sweet bonanza pago con skrill https://sweet-bonanza18364.help
This page definitely has all the information and facts I wanted concerning this subject and didn’t know who to ask.
мостбет краш игры мостбет краш игры
Some times its a pain in the ass to read what people wrote but this internet site is rattling user friendly! .
1win cheklov https://www.1win5768.help
how to sign in to 1win how to sign in to 1win
melbet зайти на сайт http://www.melbet81573.help
мелбет free bet киргизия https://www.melbet81573.help
I really like your blog.. very nice colors & theme. Did you create this website yourself or did you hire someone to do it for you? Plz respond as I’m looking to construct my own blog and would like to find out where u got this from. many thanks
mostbet joriy mirror uz mostbet24618.help
mostbet depozitsiz bonus mostbet depozitsiz bonus
Jogo do Tigrinho no celular com Wi-Fi 5G: quem já ganhou big win em movimento?
Fortune Tiger no modo demo: quem treina antes de depositar? Confessa aqui
Jogo do Tigrinho 2026: cartinha misteriosa x10 já virou rotina ou ainda é sonho?
vavada ustawienia konta https://www.vavada56378.help
mostbet вывод средств http://mostbet27541.help
1win Xorazm depozit 1win Xorazm depozit
After I initially commented I clicked the -Notify me when new feedback are added- checkbox and now each time a comment is added I get 4 emails with the identical comment. Is there any approach you’ll be able to take away me from that service? Thanks!
мостбет Талас мостбет Талас
1win official address 1win official address
1win pul yechish kechikdi 1win pul yechish kechikdi
1win live odds https://1win76138.help/
alienbet-casino-no-deposit-bonus-codes-for-free-spins-2026
Here is my site :: lucky
мостбет установить приложение https://mostbet27541.help
1win apk 2026 1win5768.help
I personally find that i’ve been using it for over two years for using the bridge, and the scalable features stands out. Charts are accurate and load instantly.
1win english app http://www.1win76138.help
Здесь доступны как классические игровые автоматы, так и современные видеослоты.
Pinco Casino
Сайт адаптирован для мобильных устройств и ПК.
vavada strategie crash http://vavada56378.help/
lisanslı casino siteleri casino siteleri
vavada demo crash https://www.vavada56378.help
melbet зеркало бишкек melbet81573.help
jak użyć bonusu vavada vavada56378.help
I switched from another service because of the low fees and useful analytics.
https://cassiteleri.buzz/# casino deneme siteleri
https://cassiteleri.top/# casino siteleri
https://vdcasino1st.blog/# vdcasino giriş
https://cassiteleri.top/# deneme bonusu veren casino siteleri
casino deneme siteleri lisanslı casino siteleri
mostbet app yüklə https://mostbet85214.help
https://vdcasino1st.online/# vdcasino güncel
мостбет купон ставок http://mostbet4151.ru/
мостбет личный кабинет http://mostbet4151.ru/
https://cassiteleri.buzz/# casino siteleri
https://vdcasino1st.blog/# vdcasino güncel
Gəncə 1win http://1win34861.help/
mines 1win 1win34861.help
как установить мелбет apk http://melbet81573.help
melbet скачать последнюю версию http://melbet81573.help/
deneme bonusu veren casino siteleri casino deneme siteleri
melbet условия бонуса http://www.melbet81573.help
https://cassiteleri.top/# deneme bonusu veren casino siteleri
мелбет мбанк http://melbet06374.help/
vdcasino güncel giriş: vdcasino
casino deneme siteleri: casino siteleri
deneme bonusu veren casino siteleri: casino siteleri
мостбет отыгрыш бонуса http://mostbet4151.ru
vdcasino giris: vdcasino
мелбет скачать http://www.melbet06374.help
casino deneme siteleri: casino deneme siteleri
melbet промоакции melbet06374.help
мостбет в Киргизии https://mostbet4151.ru/
deneme bonusu veren casino siteleri: güvenilir casino siteleri
https://vdcasino1st.online/# vdcasino
melbet lucky jet как играть melbet lucky jet как играть
1win crash giriş https://1win34861.help/
mostbet фриспины https://mostbet4151.ru
mostbet operator http://mostbet02894.help
mostbet muammo hal qilish mostbet muammo hal qilish
güvenilir casino siteleri: casino siteleri
mostbet lucky jet стратегия mostbet lucky jet стратегия
https://vdcasino1st.blog/# vdcasino giriş
güvenilir casino siteleri: casino siteleri
мелбет слоты киргизия https://melbet06374.help/
melbet apk кыргызстан melbet apk кыргызстан
lisanslı casino siteleri: casino deneme siteleri
mostbet turnaj crash https://www.mostbet2017.help
mostbet live betting http://mostbet2017.help/
1win trust https://www.1win5524.ru
1win mma betting https://1win5524.ru/
canada-no-deposit
My webpage: best (Filomena)
mostbet mobil versiya https://mostbet85214.help/
vdcasino resmi giriş vdcasino
https://cassiteleri.buzz/# güvenilir casino siteleri
1win şərtlər https://1win34861.help/
1win Visa çıxarış http://1win34861.help
https://vdcasino1st.blog/# vdcasino güncel adres
1win mines 1win34861.help
https://cassiteleri.buzz/# casino deneme siteleri
игра mines мелбет http://melbet39518.help/
melbet kz mines https://www.melbet39518.help
Great article.
vdcasino güncel giriş vdcasino
mostbet onlayn slotlar mostbet onlayn slotlar
deneme bonusu veren casino siteleri: casino siteleri
casino siteleri: deneme bonusu veren casino siteleri
mostbet web login http://mostbet2017.help
https://vdcasino1st.blog/# vdcasino resmi
casino deneme siteleri deneme bonusu veren casino siteleri
play slots on 1win http://www.1win5524.ru
melbet notificari app melbet75891.help
sloturi casino melbet https://www.melbet75891.help
https://cassiteleri.buzz/# casino deneme siteleri
I’m impressed by the robust security. I’ll definitely continue using it. I moved funds across chains without a problem.
vdcasino giriş: vdcasino
I personally find that i’ve been using it for several months for portfolio tracking, and the wide token selection stands out.
mostbet rasmiy sayt ozbekiston mostbet rasmiy sayt ozbekiston
https://cassiteleri.top/# güvenilir casino siteleri
mostbet paynet mostbet paynet
casino deneme siteleri deneme bonusu veren casino siteleri
mostbet promo kod bilan royxatdan otish mostbet promo kod bilan royxatdan otish
https://vdcasino1st.blog/# vdcasino giriş
мелбет mines http://melbet39518.help/
deneme bonusu veren casino siteleri: casino deneme siteleri
La plataforma de Betmexico se afianza en 2026 como el casino en linea y plataforma de apuestas deportivas lider para el mercado mexicano, destacando por su innovador bono sin deposito de $50 MXN sin requisitos de apuesta, una iniciativa sin precedentes que elimina las trabas habituales de la competencia.
mostbet výběr mobil mostbet výběr mobil
1win güncəl link 1win5764.help
mostbet kyc mostbet kyc
https://cassiteleri.buzz/# güvenilir casino siteleri
1win update problem http://1win5524.ru/
mostbet uzavření účtu mostbet uzavření účtu
1win app not working http://1win5524.ru
mostbet minesə giriş https://mostbet85214.help
1win app promo code https://1win5524.ru
vdcasino güncel giriş vdcasino
strategii lucky jet melbet https://www.melbet75891.help
güvenilir casino siteleri casino siteleri
1win təhlükəsizdirmi http://1win5764.help
1win maksimum uduş http://1win5764.help
mostbet idmana giriş https://mostbet85214.help/
cum instalez aplicatia melbet https://melbet75891.help
mostbet turnirlər http://mostbet85214.help
vdcasino resmi giriş vdcasino
mostbet depozit təsdiq kodu [url=https://mostbet85214.help/]https://mostbet85214.help/[/url]
casino deneme siteleri lisanslı casino siteleri
1win yardım https://www.1win5764.help
мелбет кз рабочее зеркало сейчас https://www.melbet39518.help
мостбет мобильные ставки http://mostbet34518.help/
mostbet регистрация бонус Киргизия http://mostbet34518.help
melbet kz поддержка whatsapp http://melbet39518.help/
castiguri mines melbet castiguri mines melbet
melbet apk последняя версия melbet apk последняя версия
1win download 1win download
vdcasino güncel: vdcasino
https://cassiteleri.top/# casino siteleri
melbet conditii bonus [url=http://melbet75891.help/]http://melbet75891.help/[/url]
1win apk quraşmır http://1win5764.help/
1win kazino saytı http://www.1win5764.help
vdcasino: vdcasino
deneme bonusu veren casino siteleri casino siteleri
I’m no longer certain the place you’re getting your information, but great
topic. I must spend a while studying more or working out more.
Thanks for great info I used to be searching for this info for my mission.
Good day! I know this is kind of off topic but I was wondering if you knew where I could get a captcha plugin for my comment form? I’m using the same blog platform as yours and I’m having difficulty finding one? Thanks a lot!
https://cassiteleri.top/# güvenilir casino siteleri
https://vdcasino1st.blog/# vdcasino resmi giriş
мостбет платежные методы http://mostbet34518.help/
casino deneme siteleri casino deneme siteleri
https://vdcasino1st.online/# vdcasino giriş
casino siteleri casino siteleri
casino siteleri: deneme bonusu veren casino siteleri
1win aviator withdrawal http://www.1win5742.help
1win casino in UGX http://1win5742.help
Здесь доступны как классические игровые автоматы, так и современные видеослоты.
Пинко Казино
Каждый игрок получает качественный сервис и поддержку.
deneme bonusu veren casino siteleri deneme bonusu veren casino siteleri
mostbet apk plik mostbet apk plik
aviator mostbet strategia aviator mostbet strategia
vdcasino vdcasino
pinup qanday roʻyxatdan oʻtish pinup23185.help
pin-up app https://pinup23185.help
bingo-come-si-fa
Feel free to visit my web blog – macchin; Toney,
deneme bonusu veren casino siteleri casino siteleri
After I originally commented I clicked the -Notify me when new comments are added- checkbox and now every time a comment is added I get 4 emails with the same comment. Is there any method you can take away me from that service? Thanks!
casino siteleri deneme bonusu veren casino siteleri
casino siteleri: casino siteleri
мостбет apk Киргизия https://mostbet34518.help/
mostbet скачать на телефон https://mostbet34518.help/
vdcasino güncel giriş vdcasino
pariuri online Republica Moldova 1win pariuri online Republica Moldova 1win
crash pe 1win https://1win5758.help
https://cassiteleri.top/# casino deneme siteleri
güvenilir casino siteleri: lisanslı casino siteleri
1win suport http://www.1win62509.help
pin-up roʻyxatdan oʻtish bonus https://www.pinup76809.help
güvenilir casino siteleri: lisanslı casino siteleri
pin-up kupon kod https://pinup76809.help/
Hi there! This post couldn’t be written any better! Reading this post reminds me of my previous room mate! He always kept chatting about this. I will forward this post to him. Pretty sure he will have a good read. Thank you for sharing!
vdcasino güncel giriş: vdcasino
cómo verificar cuenta 1win 1win5772.help
free bet 1win https://1win5772.help
pin-up lucky jet o‘ynash https://pinup23185.help/
https://cassiteleri.buzz/# deneme bonusu veren casino siteleri
1win domain 1win domain
casino deneme siteleri: casino siteleri
mostbet jak anulować depozyt mostbet jak anulować depozyt
https://cassiteleri.top/# casino deneme siteleri
1win enlace espejo 1win enlace espejo
1win Balti https://www.1win5758.help
https://vdcasino1st.blog/# vdcasino giris
casino deneme siteleri: güvenilir casino siteleri
cum scot banii de pe 1win cum scot banii de pe 1win
güvenilir casino siteleri deneme bonusu veren casino siteleri
https://cassiteleri.top/# güvenilir casino siteleri
1win registro desde android http://www.1win5772.help
pinup aviator o‘yin http://www.pinup23185.help
pin-up balans tekshirish pin-up balans tekshirish
güvenilir casino siteleri: güvenilir casino siteleri
1win términos del bono https://1win5772.help
pin-up app store bormi https://pinup23185.help
https://vdcasino1st.online/# vdcasino giriş
1win cum retrag MDL http://1win62509.help/
1win app android http://1win5758.help/
casino siteleri casino siteleri
pin up ishchi link http://www.pinup76809.help
mostbet promocja rejestracyjna mostbet promocja rejestracyjna
mostbet oficjalna strona http://mostbet2003.help/
how to play casino on 1win how to play casino on 1win
casino deneme siteleri: güvenilir casino siteleri
1win Uganda card withdrawal 1win5742.help
bonus powitalny mostbet http://www.mostbet2003.help
1win pacanele pe mobil https://1win5758.help
1win promo code 2026 Uganda 1win promo code 2026 Uganda
vdcasino: vdcasino
1win cont nou https://1win62509.help/
deneme bonusu veren casino siteleri deneme bonusu veren casino siteleri
güvenilir casino siteleri deneme bonusu veren casino siteleri
casino siteleri: casino siteleri
1win card Victoriabank 1win card Victoriabank
1win link nou https://1win62509.help
vdcasino giris vdcasino
betnano guncel: betnano
slot-da-scaricare-gratis
My web-site :: golden [Dian]
matbet güncel adres: matbet
https://vdcasino1st.online/# vdcasino resmi
https://betnano1st.top/# betnano giris
https://urologymax.shop/# buy erectile dysfunction medication
where can i get ed pills: UrologyMax – online erectile dysfunction pills
betnano resmi giriş: betnano
vdcasino giriş: vdcasino
The other day, while I was at work, my sister stole my iphone and tested to see if it can survive a twenty five foot drop, just so she can be a youtube sensation. My iPad is now broken and she has 83 views. I know this is entirely off topic but I had to share it with someone!
https://urologymax.shop/ed-medications.html# cheap ed meds online
betnano güncel betnano
vdcasino: vdcasino
betnano giris: betnano
1win registro 1win registro
where to get ed pills: Urology Max – buy erectile dysfunction treatment
мостбет вход в личный кабинет http://mostbet82043.help
mostbet бонус на депозит mostbet бонус на депозит
1win sloturi demo http://1win5758.help
https://urologymax.shop/# cheapest erectile dysfunction pills
https://betnano1st.online/# betnano güncel
1win aplicatie android 1win aplicatie android
1win codigo de bono 1win codigo de bono
1win ayuda para depositar http://1win5772.help/
https://urologymax.com/conditions/low-testosterone-low-t.html# ed medications online
padişahbet giriş: padişahbet
https://padisahbetvip.buzz/# padişahbet güncel giriş
pin up roʻyxatdan oʻtish bonusi pin up roʻyxatdan oʻtish bonusi
pin up parolni tiklash https://www.pinup76809.help
erectile dysfunction pills online: UrologyMax – buy ed pills online
lucky jet pin-up lucky jet pin-up
1win nu pot intra in cont 1win5758.help
padisahbet resmi padisahbet
1win cum joc aviator pe 1win https://www.1win5758.help
padişahbet güncel giriş: padişahbet
https://urologymax.com/conditions/low-testosterone-low-t.html# cheap ed meds online
https://padisahbetvip.buzz/# padişahbet giriş
Hi, I do think this is a great web site. I stumbledupon it 😉 I may return once again since I book marked it. Money and freedom is the best way to change, may you be rich and continue to guide other people.
мелбет купон ставок мелбет купон ставок
melbet официальный сайт вход http://melbet47086.help
mostbet регистрация бонус http://mostbet82043.help/
1win pareri Moldova http://www.1win62509.help
best ed meds online: UrologyMax – erectile dysfunction medication online
holiganbet giriş: holiganbet
holiganbet guncel adres holiganbet
mostbet bónusz vélemények http://mostbet2023.help
mostbet kifizetés mennyi idő mostbet kifizetés mennyi idő
https://urologymax.shop/ed-medications.html# ed meds cheap
lunaslots-casino-it-2026-review
Here is my page :: bet365 (Lloyd)
mostbet live streaming https://mostbet53160.help
Some genuinely interesting information, well written and loosely user friendly.
lucky jet game mostbet lucky jet game mostbet
online erectile dysfunction pills: Urology Max – erectile dysfunction drugs online
holiganbet resmi: holiganbet
holiganbet resmi: holiganbet
https://holiganbetvip.top/# holiganbet giris
https://urologymax.shop/conditions/low-testosterone-low-t.html# erectile dysfunction medicine online
I conceive this website has got some really wonderful info for everyone :D. “Experience is not what happens to you it’s what you do with what happens to you.” by Aldous Huxley.
mostbet lucky jet играть http://www.mostbet82043.help
https://holiganbetvip.top/# holiganbet güncel giriş
мостбет казино играть mostbet82043.help
1win cont https://1win62509.help/
melbet apk download http://melbet47086.help
мостбет войти мостбет войти
1win oyna sayt https://1win5754.help
holiganbet guncel giris holiganbet
great points altogether, you simply gained a new reader. What would you suggest about your post that you made some days ago? Any positive?
erectile dysfunction medications online: UrologyMax – best online ed medication
holiganbet resmi giriş holiganbet
https://holiganbetvip.top/# holiganbet resmi
1win bonusuri https://www.1win62509.help
1win bonusni qanday faollashtirish 1win bonusni qanday faollashtirish
1win registratsiya 1win registratsiya
1win cupon bonus Moldova https://www.1win62509.help
https://holiganbetvip.top/# holiganbet resmi giriş
instaleaza 1win app instaleaza 1win app
https://betwarrior.cat/
En 2026, BetWarrior se establece como una de las plataformas de casino online y apuestas deportivas mas importantes de Argentina, entregando una promocion de bienvenida de hasta $500.000 ARS para nuevos jugadores. Poseyendo licencia oficial y un compromiso en la seguridad, el portal garantiza una experiencia de juego transparente y confiable para el usuario argentino. Los usuarios pueden disfrutar de miles de juegos de proveedores de elite como Evolution y Pragmatic Play, realizar apuestas deportivas en vivo y manejar su saldo sin complicaciones en pesos argentinos, todo ello desde una aplicacion movil disenada para Android e iOS.
mostbet weboldal mostbet weboldal
мелбет фрибет как получить мелбет фрибет как получить
mostbet sign up https://mostbet53160.help/
cheap ed treatment: Urology Max – cost of ed meds
melbet вход без пароля http://www.melbet47086.help
holiganbet resmi holiganbet
1win sayti 1win sayti
мелбет депозит элкарт https://www.melbet47086.help
kode rng gates olympus scatter zeus Pengelolaan bankroll atau keuangan yang cerdas adalah kunci keberhasilan dalam berjudi, terutama dalam permainan slot seperti Gates of Olympus yang sangat bergantung pada keberuntungan. Tetapkan batasan harian atau per sesi dan patuhi batas tersebut. Ini mengurangi risiko kehabisan dana sebelum Anda mendapatkan Super Scatter yang Anda incar. 3 pola rahasia gates of olympus wd 5 juta View your profile E. Hours of Operation Langkah awal yang paling mendasar adalah memahami mekanisme permainan Gates Of Olympus itu sendiri. Memahami cara kerja permainan secara keseluruhan akan memberikan gambaran yang lebih jelas mengenai peluang munculnya scatter. Gates Of Olympus merupakan permainan slot dengan lima gulungan dan berbagai simbol mistis. Penting bagi pemain untuk memahami simbol mana saja yang memiliki nilai tinggi dan dapat memberikan keuntungan besar, termasuk simbol scatter yang dilambangkan dengan petir Zeus.
https://obs77.co/princess-slot-game-slot-favorit-tahun-ini/
Masjid Tuanku Mizan Zainal Abidin No. 25 Jalan Tunku Abdul Rahman Presint 3 62100 Putrajaya Tel : 03 8880 4300 Faks : 03 8890 1614 Dalam dunia permainan slot online, Super Scatter dari Pragmatic Play telah menjadi salah satu pilihan utama bagi pemain yang mencari sensasi kemenangan tanpa risiko. Melalui fitur akun demo gratis tanpa batas, pemain dapat merasakan pengalaman bermain layaknya di server asli, lengkap dengan efek visual memukau, fitur bonus berlapis, serta peluang pola kemenangan yang tinggi. Pragmatic Play dikenal sebagai provider yang terus menghadirkan inovasi dalam setiap rilis gamenya, dan Super Scatter menjadi bukti nyata bagaimana kombinasi desain, RTP tinggi, serta mekanisme scatter yang dinamis dapat menciptakan pengalaman bermain yang benar-benar memikat. Situs Slot Gacor Malam Ini Gampang Menang Super Scatter Terpercaya & Resmi Terbaru
https://urologymax.shop/conditions/erectile-dysfunction.html# erection pills online
мостбет номер телефона поддержки https://www.mostbet94063.help
https://holiganbetvip.buzz/# holiganbet guncel giris
mostbet восстановить пароль mostbet восстановить пароль
holiganbet güncel holiganbet
mostbet crash o‘ynash http://mostbet84629.help
holiganbet resmi: holiganbet
Wow, amazing weblog layout! How long have you been blogging for? you made blogging glance easy. The whole look of your web site is excellent, let alone the content material!
https://drive.google.com/file/d/1muPdxsMLotD2fXHA0pPUw64EiZ9Egig_/view?usp=sharing
https://holiganbetvip.buzz/# holiganbet
¿Quieres saber cómo jugar Gates of Olympus? ¡Sigue leyendo! ¿Quieres saber cómo jugar Gates of Olympus? ¡Sigue leyendo! Al igual que el título original, Gates of Olympus, Gates of Olympus 1000 viene con un RTP del 96,5%. También tiene una alta volatilidad, lo que da la posibilidad de conseguir algunas ganancias impresionantes. Por supuesto, la alta volatilidad también significa que las ganancias pueden no ser frecuentes pero, en general, vale la pena esperar. Gates of Olympus Super Scatter es de estas máquinas tragamonedas que brilla sin parar. La calidad visual de este juego de casino online es realmente buena. El tema principal de este slot son los dioses, enfocando la trama en el dios Zeus y el ambiente del Olimpo. Pragmatic Play ha ampliado su serie Gates of Olympus con el lanzamiento de Gates of Olympus 1000 Dice, una tragamonedas en línea situada en un entorno de la antigua Grecia. Esta tragamonedas atrae a los aficionados a los temas mitológicos. Además, el juego está equipado con varias funciones destinadas a aumentar las probabilidades de ganar, lo que podría resultar en sesiones de juego más gratificantes.
https://birjetkirala.com/resena-betano-en-mexico-casino-y-juego-destacado/
Haz coincidir de 8 a 30 símbolos en cualquier lugar de la cuadrícula para ganar. Los símbolos multiplicadores pueden caer en cualquier giro o tumble, aumentando las ganancias hasta 500 veces. Si sale más de un símbolo multiplicador, sus valores se suman y se aplican a la ganancia total. Gambling can be harmful if not controlled and may lead to addiction! Use our online tools and play responsibly. Los Super Scatters son una novedad en este juego. Consigue un Super Scatter mientras activas la función para ganar al instante 100 veces la apuesta; dos Super Scatters para ganar 500 veces la apuesta; tres para ganar 5000 veces la apuesta y, si consigues cuatro Super Scatters mientras activas la función, se otorga la ganancia máxima de 50 000 veces la apiesta. Gates of Olympus Super Scatter es una máquina tragamonedas que tiene una temática bastante conocida, inspirada en los dioses del Olimpo. Todos los elementos gráficos que ha usado Pragmatic Play para ambientar este juego son maravillosos, pero de esto hablaremos más adelante en la revisión.
1win free spins Oʻzbekiston 1win free spins Oʻzbekiston
This platform exceeded my expectations with fast transactions and robust security.
Thanks for the sensible critique. Me & my neighbor were just preparing to do some research about this. We got a grab a book from our local library but I think I learned more clear from this post. I am very glad to see such great information being shared freely out there.
1win depozit bonusi 1win depozit bonusi
generic ed meds online: Urology Max – online ed prescription
holiganbet resmi: holiganbet
https://holiganbetvip.top/# holiganbet güncel giriş
I was reading through some of your blog posts on this internet site and I conceive this site is really instructive! Keep on putting up.
mostbet élő közvetítés nézés mostbet2023.help
mostbet wagering requirements https://mostbet53160.help
мостбет sign in мостбет sign in
mostbet regisztrációs bónusz Magyarország mostbet regisztrációs bónusz Magyarország
how to play aviator on mostbet mostbet53160.help
курсовые купить kupit-kursovuyu-81.ru .
mostbet toʻlov usullari mostbet toʻlov usullari
mostbet belépés segítség mostbet belépés segítség
I’ll right away clutch your rss feed as I can’t in finding your email subscription link or newsletter service. Do you have any? Kindly permit me know in order that I may subscribe. Thanks.
mostbet official apk download mostbet official apk download
Качественное SEO https://outreachseo.ru продвижение сайта для бизнеса. Наши специалисты предлагают эффективные решения для роста позиций в поисковых системах. Подробнее об услугах и стратегиях можно узнать на сайте
Whoa! This blog looks just like my old one! It’s on a completely different topic but it has pretty much the same layout and design. Superb choice of colors!
https://usmedssaver.com/# canadian pharmacy mall
BajaRx Direct mexican pharmacies near me mexican rx pharm
canadian pharmacy meds reviews: canadian pharmacy 1 internet online drugstore – canadian online pharmacy
https://certifiednorthrx.com/# Certified North Rx
Very interesting topic, regards for posting.
онлайн сервис помощи студентам kupit-kursovuyu-81.ru .
mostbet слоты на деньги mostbet слоты на деньги
https://vaycasinovip.top/# vaycasino resmi giriş
http://bajarxdirect.com/# BajaRx Direct
Hi! I’ve been reading your blog for some time now and finally got the bravery to go ahead and give you a shout out from Lubbock Tx! Just wanted to say keep up the excellent job!
1win вывод на элсом 1win вывод на элсом
1win Бишкек скачать 1win Бишкек скачать
http://bajarxdirect.com/# BajaRx Direct
I like the efforts you have put in this, thankyou for all the great content.
vaycasino güncel giriş: vaycasino
mostbet мобильная версия http://mostbet60172.help
сколько стоит курсовая работа по юриспруденции kupit-kursovuyu-82.ru .
https://bajarxdirect.shop/# BajaRx Direct
northwest canadian pharmacy: viagra canadian pharmacy – my canadian pharmacy
mostbetga kirish mostbet84629.help
как использовать бонус mostbet http://mostbet57193.help/
mostbet ios приложение Кыргызстан https://mostbet57193.help
https://usmedssaver.shop/# 24 hr pharmacy near me
мостбет вход на официальный сайт http://www.mostbet60172.help
economy pharmacy legitimate canadian pharmacy online online shopping pharmacy india
mostbet Баткен https://mostbet94063.help
vaycasino [url=https://vaycasinovip.online/#]vaycasino[/url]
mostbet официальный сайт рабочий http://mostbet94063.help/
курсовая работа на заказ цена курсовая работа на заказ цена .
I’ve been absent for a while, but now I remember why I used to love this blog. Thank you, I will try and check back more frequently. How frequently you update your web site?
mostbet crash Кыргызстан mostbet crash Кыргызстан
https://bajarxdirect.shop/# mexican pharmacies online
mostbet электронный кошелек http://mostbet17403.help
Профессиональный вывод из запоя анонимно детоксикация организма, помощь при алкогольной интоксикации и восстановление самочувствия пациента. Специалист приезжает на дом и оказывает профессиональную помощь.
mostbet lucky jet мостбет mostbet60172.help
https://bajarxdirect.com/# BajaRx Direct
написание курсовой работы на заказ цена kupit-kursovuyu-81.ru .
написание курсовой на заказ цена написание курсовой на заказ цена .
vaycasino giriş: vaycasino
india pharmacy mail order: online pharmacy in germany – mexican pharmacy
мостбет джекпот слоты http://mostbet60172.help/
mostbet промокод на сегодня Кыргызстан http://mostbet17403.help/
Somebody essentially help to make seriously articles I would state. This is the very first time I frequented your web page and thus far? I amazed with the research you made to create this particular publish amazing. Fantastic job!
https://bajarxdirect.com/# BajaRx Direct
mostbet hisobni to‘ldirish http://mostbet84629.help
мостбет правила бонуса http://mostbet17403.help/
1win мегапей вывод http://1win54038.help
заказать качественную курсовую kupit-kursovuyu-81.ru .
курсовая работа купить курсовая работа купить .
https://bajarxdirect.shop/# BajaRx Direct
https://vaycasinovip.top/# vaycasino resmi giriş
мостбет вход https://mostbet17403.help/
mostbet приложение скачать Кыргызстан mostbet приложение скачать Кыргызстан
BajaRx Direct mexico medicine mexico pharmacy list
https://certifiednorthrx.shop/# Certified North Rx
I think this is one of the most vital info for me. And i’m glad reading your article. But want to remark on few general things, The web site style is perfect, the articles is really excellent :D. Good job, cheers
mostbet Xorazm http://www.mostbet84629.help
написание курсовых на заказ написание курсовых на заказ .
online canadian pharmacy review: canadian pharmacy india – prescription free canadian pharmacy
курсовая работа купить москва kupit-kursovuyu-82.ru .
I think the admin of this web site is genuinely working hard in support of his web site, as here every material is quality based information.
mostbet foydalanuvchi shartnomasi http://mostbet84629.help/
http://certifiednorthrx.com/# Certified North Rx
vaycasino resmi giriş vaycasino
mostbet coupon mostbet coupon
мостбет мобильное казино мостбет мобильное казино
1win минимальная сумма депозита элсом https://1win17043.help
1win вывод без комиссии карта http://www.1win17043.help
плинко мостбет https://mostbet17403.help/
mostbet kazino provayderlari https://mostbet28461.help/
mostbet bonus bolimi http://mostbet28461.help
сайт для заказа курсовых работ kupit-kursovuyu-81.ru .
купить курсовая работа купить курсовая работа .
https://certifiednorthrx.shop/# Certified North Rx
1win лицензия Кыргызстан 1win лицензия Кыргызстан
1win минимальный депозит http://1win54038.help
https://certifiednorthrx.com/# Certified North Rx
как использовать бонус mostbet http://www.mostbet57193.help
mexican pharma: mexican online pharmacy wegovy – mexico online pharmacy
mostbet казино вход https://mostbet57193.help
most bet http://mostbet20748.help
1win лаки джет играть https://www.1win54038.help
mostbet ставки на спорт http://mostbet57193.help/
the canadian pharmacy: pharmacy without prescription – canadian pharmacy antibiotics
https://certifiednorthrx.com/# legitimate canadian pharmacy
Sweet website , super pattern, really clean and utilise friendly.
mexican drugstore mexico city pharmacy BajaRx Direct
Certified North Rx: canadian online pharmacy reviews – legitimate canadian online pharmacies
https://bajarxdirect.shop/# online pharmacy
Hey there! I could have sworn I’ve been to this website before but after reading through some of the post I realized it’s new to me. Anyhow, I’m definitely delighted I found it and I’ll be book-marking and checking back often!
http://certifiednorthrx.com/# Certified North Rx
1win регистрация аккаунта https://1win17043.help/
pharmacy coupons: US Meds Saver – overseas online pharmacy
safe canadian pharmacies: US Meds Saver – cheap viagra online canadian pharmacy
mostbet mines game http://mostbet28461.help
I personally find that the exploring governance tools are wide token selection and seamless withdrawals.
http://usmedssaver.com/# pharmacy near me
mostbet mines pe telefon http://www.mostbet63218.help
mostbet instalare fără google play mostbet instalare fără google play
The providing liquidity process is simple and the great support makes it even better.
I’ve been using it for a few days for using the bridge, and the seamless withdrawals stands out.
Charlie here — I’ve tried learning crypto basics and the great support impressed me.
Fast onboarding, low fees, and a team that actually cares. The updates are frequent and clear.
mostbet verifikasiya rədd http://mostbet2012.help
mostbet qeydiyyat forması http://www.mostbet2012.help
http://bajarxdirect.com/# farmacias mexicanas
BajaRx Direct: BajaRx Direct – BajaRx Direct
Новые онлайн казино – это всегда немного лотерея: с одной стороны, могут быть хорошие приветственные предложения и свежие фишки, с другой – встречаются площадки, которые красиво обещают, но потом “режут” выводы или усложняют правила. Чтобы выбирать спокойнее, мы ведём Telegram-канал с обновляемыми списками и заметками по новым площадкам: что появилось недавно, где нормальные условия, и какие нюансы важно знать до депозита. Смотреть здесь: https://t.me/s/rating_casino_russia/24
canada pharmacy online legit canadian pharmacy oxycodone canada drugs reviews
pharmacy online: BajaRx Direct – BajaRx Direct
Если вы ждали новую Свит Бонанзу – держите пост с самым важным: что по ощущениям изменилось, на какие моменты смотреть в игре и что обсуждают по первым результатам. Удобно открыть, быстро вникнуть и дальше уже решать, стоит ли тестить прямо сейчас.
мостбет как вывести выигрыш https://mostbet45087.help
pharmacy rx: US Meds Saver – canada pharmacy online
https://certifiednorthrx.com/# is canadian pharmacy legit
Accurate weather forecast https://www.the-weather-in-kotor.com for today, tomorrow, and next week. Temperature, precipitation, wind, and humidity are all included. Follow the weather in Kotor and get up-to-date weather data online.
купить кольцо с бриллиантом помолвочное кольцо с камнем
mostbet live kazino Oʻzbekiston mostbet live kazino Oʻzbekiston
Hi there Dear, are you genuinely visiting this web site regularly, if so then you will absolutely take good know-how.
mostbet ishonchlimi mostbet ishonchlimi
1win скачать Киргизия http://www.1win17043.help
Hi there! I know this is somewhat off topic but I was wondering which blog platform are you using for this site? I’m getting fed up of WordPress because I’ve had problems with hackers and I’m looking at options for another platform. I would be awesome if you could point me in the direction of a good platform.
1win налоги на выигрыш Кыргызстан https://1win17043.help
mostbet parol noto‘g‘ri https://www.mostbet28461.help
1win задержка вывода 1win задержка вывода
Certified North Rx: canadian pharmacy india – canadian pharmacy sarasota
https://bajarxdirect.shop/# reputable mexican pharmacy
mostbet обновление android https://mostbet45087.help/
мостбет скачать для ios http://www.mostbet20748.help
мостбет не приходит код http://mostbet45087.help/
Hello my friend! I want to say that this article is awesome, nice written and include almost all important infos. I would like to see more posts like this.
BajaRx Direct BajaRx Direct BajaRx Direct
canada drugs online review: Certified North Rx – online canadian pharmacy reviews
mostbet az http://www.mostbet2012.help
mostbet depunere Republica Moldova https://mostbet63218.help/
Certified North Rx: Certified North Rx – canadian pharmacy
мостбет быстрые платежи http://www.mostbet45087.help
https://bajarxdirect.com/# BajaRx Direct
https://certifiednorthrx.shop/# online canadian pharmacy
mostbet azərbaycanca tətbiq mostbet azərbaycanca tətbiq
Certified North Rx: Certified North Rx – global pharmacy canada
mines pin-up mines pin-up
Certified North Rx: my canadian pharmacy – canadian pharmacies compare
pinup android ilova pinup android ilova
https://certifiednorthrx.shop/# maple leaf pharmacy in canada
mostbet коэффициенты https://mostbet45087.help
мостбет приложение мостбет приложение
Certified North Rx pharmacy canadian pharmacy in canada
mostbet uduş mostbet uduş
canadian online drugs: canadian pharmacy review – Certified Canada Rx
mostbet официальный сайт зеркало mostbet20748.help
mostbet bonus mostbet bonus
mostbet secțiunea promoții https://mostbet63218.help
mostbet mobil qeydiyyat http://www.mostbet2012.help
https://certifiedcanadarx.com/# Certified Canada Rx
https://certifiedcanadarx.com/# canadian pharmacy india
mostbet descărcare din site oficial https://mostbet63218.help/
1win не устанавливается apk https://1win20819.help/
1win apk Бишкек скачать 1win apk Бишкек скачать
ed medicines: how to get ed pills – Mens RX Index
erectile dysfunction drugs online: ed medicine online – erectile dysfunction medicine online
мостбет Visa мостбет Visa
мостбет Токмок https://www.mostbet20748.help
https://certifiedcanadarx.shop/# reliable canadian pharmacy
мостбет скачать бесплатно https://mostbet20748.help/
https://mensrxindex.shop/# п»їed pills online
Awsome website! I am loving it!! Will be back later to read some more. I am taking your feeds also
pet meds for dogs: online pet pharmacy – vet pharmacy
pin-up aviator qachon chiqadi pin-up aviator qachon chiqadi
canada pet meds dog medicine pet meds online
http://certifiedcanadarx.com/# Certified Canada Rx
http://petmedsmonitor.com/# canada pet meds
dog medication online: dog prescriptions online – dog prescriptions online
I don’t even understand how I finished up here, but I thought this publish was once good. I do not recognize who you are however definitely you’re going to a well-known blogger in the event you aren’t already 😉 Cheers!
мелбет кз принять ставку http://melbet60432.help
reliable canadian pharmacy: best canadian pharmacy online – Certified Canada Rx
melbet kz кэшбэк казино http://melbet60432.help/
cum fac depunere pe melbet http://www.melbet42310.help
melbet slots http://www.melbet42310.help
1win сколько выводят на элсом 1win сколько выводят на элсом
https://petmedsmonitor.com/# pet rx
https://certifiedcanadarx.com/# ed drugs online from canada
Certified Canada Rx: Certified Canada Rx – Certified Canada Rx
pin-up rasmiy app yuklab olish http://pinup14278.help
aviator o‘yini pin-up https://www.pinup14278.help
Mens RX Index: Mens RX Index – best online ed treatment
1win Бишкек расмий сайт https://1win15478.help
1win сколько выводят на о деньги 1win сколько выводят на о деньги
pin-up depozit bonusi shartlari pin-up depozit bonusi shartlari
http://petmedsmonitor.com/# pet pharmacy online
best pet rx: Vet Rx Index – pet pharmacy
https://mensrxindex.com/# ed online treatment
Certified Canada Rx Certified Canada Rx Certified Canada Rx
Real excellent information can be found on site. “You don’t get harmony when everybody sings the same note.” by Doug Floyd.
1win причины отказа в выводе http://www.1win15478.help
1win войти на сайт 1win войти на сайт
1win не приходит вывод https://www.1win20819.help
1win регистрация без приложения http://1win20819.help/
http://certifiedcanadarx.com/# Certified Canada Rx
melbet recenzii http://www.melbet42310.help
как получить бонус melbet http://www.melbet60432.help
best pet rx: Vet Rx Index – pet meds for dogs
1win ставки https://1win20819.help/
canada pharmacy world: canadian pharmacy ltd – Certified Canada Rx
http://petmedsmonitor.com/# pet pharmacy
1вин вывод средств http://www.1win15478.help
https://mensrxindex.shop/# cheap boner pills
Mens RX Index: ed medications cost – Mens RX Index
https://petmedsmonitor.com/# dog prescriptions online
1win зеркало на сегодня 1win зеркало на сегодня
1win авиатор коэффициенты 1win авиатор коэффициенты
1win приложение для айфон http://1win82361.help
1win максимальный вывод https://www.1win15478.help
dog medication online: Vet Rx Index – online pet pharmacy
https://mensrxindex.shop/# buy ed medication
мостбет восстановить пароль https://mostbet90753.help
vet pharmacy vet pharmacy online pet pharmacy
Certified Canada Rx: onlinecanadianpharmacy 24 – Certified Canada Rx
mostbet apk Киргизия http://www.mostbet90753.help
melbet линия ставок melbet линия ставок
melbet cont login https://melbet42310.help
melbet последняя версия apk melbet60432.help
melbet recenzii https://melbet42310.help
https://mensrxindex.shop/# Mens RX Index
pariuri pe scor corect melbet melbet42310.help
мелбет скачать на айфон мелбет скачать на айфон
https://mensrxindex.shop/# Mens RX Index
online vet pharmacy: dog medicine – pet pharmacy online
Mens RX Index: Mens RX Index – Mens RX Index
1win вход по номеру https://1win60925.help/
https://certifiedcanadarx.com/# Certified Canada Rx
https://certifiedcanadarx.com/# Certified Canada Rx
pet pharmacy online: vet pharmacy online – vet pharmacy
1win_kg https://www.1win20819.help
1вин кыргызча катталуу http://1win82361.help/
1win pacanele demo http://1win38174.help/
1win pariuri Republica Moldova https://1win38174.help
mostbet скачать для андроид https://mostbet90753.help
https://mensrxindex.com/# erectile dysfunction medications online
pet med pet med dog prescriptions online
https://mensrxindex.shop/# ed prescriptions online
Certified Canada Rx: Certified Canada Rx – best canadian pharmacy to order from
cheapest pharmacy canada: Certified Canada Rx – Certified Canada Rx
1win лимит ставок https://www.1win60925.help
мостбет подтверждение личности мостбет подтверждение личности
https://petmedsmonitor.com/# online pet pharmacy
https://mensrxindex.shop/# cheap ed meds
Mens RX Index: Mens RX Index – Mens RX Index
мостбет вход Казахстан mostbet58041.help
1win ответственный гемблинг 1win20819.help
1win как пополнить DemirBank https://1win82361.help/
1win чат не отвечает https://1win20819.help/
1win вход Киргизия https://1win82361.help/
мостбет вывести деньги Кыргызстан мостбет вывести деньги Кыргызстан
1win как вывести на mastercard 1win как вывести на mastercard
online ed drugs: Mens RX Index – order ed pills
1win как вывести крупную сумму 1win как вывести крупную сумму
1win пополнение Optima Bank http://www.1win82361.help
1win вывод на карту Кыргызстан http://www.1win60925.help
https://certifiedcanadarx.com/# canada discount pharmacy
best pet rx: vet pharmacy online – vet pharmacy online
мостбет электронный кошелек http://mostbet90753.help/
http://petmedsmonitor.com/# online pet pharmacy
1вин регистрация 1вин регистрация
mostbet зеркало Казахстан рабочее https://mostbet58041.help/
мостбет ставки на футбол https://mostbet58041.help
Mens RX Index online erectile dysfunction pills ed doctor online
1win pentru ios https://www.1win38174.help
1win пополнение не проходит 1win пополнение не проходит
mostbet ставки Казахстан mostbet ставки Казахстан
https://certifiedcanadarx.com/# Certified Canada Rx
order ed pills: ed medications cost – ed medicines
Certified Canada Rx: canadian pharmacy prices – canadian pharmacy cheap
1win актуальное зеркало https://1win68017.help/
1win как зайти если не открывается https://www.1win68017.help
1вин уз Oson http://www.1win36247.help
1win бонус на aviator 1win бонус на aviator
мостбет вход в приложение http://mostbet58041.help
Mens RX Index: Mens RX Index – ed medication online
https://mensrxindex.shop/# cheap ed medicine
https://petmedsmonitor.shop/# pet rx
мостбет сайт кз http://mostbet58041.help
1win bonus code 1win bonus code
1win rezultate live http://1win38174.help/
vet pharmacy online: pet meds official website – dog prescriptions online
Certified Canada Rx canadian compounding pharmacy best canadian pharmacy
vet pharmacy online: dog medicine – discount pet meds
https://certifiedcanadarx.shop/# prescription drugs canada buy online
1win chat 24/7 1win chat 24/7
https://certifiedcanadarx.com/# canadianpharmacymeds com
Wow! This is a cool platform. They really do have the great support.
buying from canadian pharmacies: Certified Canada Rx – legit canadian online pharmacy
https://certifiedcanadarx.com/# Certified Canada Rx
https://certifiedcanadarx.com/# Certified Canada Rx
1win фриспины за депозит 1win фриспины за депозит
1win вывод после верификации http://www.1win36247.help
canada drugstore pharmacy rx: canadian world pharmacy – best canadian pharmacy to buy from
dog prescriptions online: canada pet meds – pet pharmacy
https://mensrxindex.shop/# Mens RX Index
Saved as a favorite, I really like your blog!
online pet pharmacy pet drugs online pet rx
1win способы оплаты http://1win32786.help/
Mens RX Index: Mens RX Index – Mens RX Index
Mens RX Index: Mens RX Index – cheap ed pills online
mostbet версия для ios mostbet49271.help
https://certifiedcanadarx.com/# Certified Canada Rx
mostbet android приложение скачать http://www.mostbet49271.help
1win последняя версия apk 1win последняя версия apk
как пополнить 1win через Uzcard 1win36247.help
1win комиссия mastercard http://1win68017.help/
pet med: pet prescriptions online – vet pharmacy online
1win войти 1win войти
1win apk последняя версия http://1win68017.help/
1win casino slots 1win casino slots
https://certifiedcanadarx.shop/# Certified Canada Rx
online ed prescription: Mens RX Index – Mens RX Index
Certified Canada Rx: thecanadianpharmacy – canada cloud pharmacy
1win autentificare cont 1win83062.help
Some times its a pain in the ass to read what website owners wrote but this website is rattling user genial! .
1win вывод Киргизия http://1win32786.help
https://petmedsmonitor.com/# pet pharmacy
Mens RX Index: Mens RX Index – discount ed meds
What’s up colleagues, fastidious article and fastidious urging commented here, I am really enjoying by these.
Certified Canada Rx Certified Canada Rx Certified Canada Rx
cum retrag cu Payeer de la 1win http://1win83062.help
1win plinko Republica Moldova http://www.1win83062.help
mostbet лимиты KGS http://mostbet49271.help/
Mens RX Index: Mens RX Index – Mens RX Index
1вин кыргызча жүктөп алуу https://1win32786.help/
https://petmedsmonitor.shop/# pet meds official website
п»їdog medication online: pet drugs online – pet meds official website
1win ставкаҳои league of legends https://1win83254.help/
1win stream meciuri http://1win83062.help
1win минимал хуруҷ 1win минимал хуруҷ
1win app для ios http://1win32786.help/
1вин slots 1win32786.help
мостбет как вывести на банковскую карту мостбет как вывести на банковскую карту
Great write-up, I’m normal visitor of one’s website, maintain up the nice operate, and It is going to be a regular visitor for a long time.
pet prescriptions online: pet meds official website – pet prescriptions online
http://petmedsmonitor.com/# best pet rx
discount pet meds: discount pet meds – vet pharmacy
1win status site 1win status site
1win pentru android 13 https://1win83062.help/
мостбет верификация аккаунта https://mostbet49271.help
мелбет рабочая ссылка мелбет рабочая ссылка
Mens RX Index: Mens RX Index – cheapest ed meds
vet pharmacy Vet Rx Index pet prescriptions online
мостбет казино регистрация мостбет казино регистрация
http://petmedsmonitor.com/# п»їdog medication online
Mens RX Index: ed meds on line – Mens RX Index
проект и монтаж газового пожаротушения проект и монтаж газового пожаротушения .
canada discount pharmacy: my canadian pharmacy – canadian pharmacy antibiotics
https://petmedsmonitor.com/# pet meds online
mostbet ios Кыргызстан mostbet ios Кыргызстан
mostbet блэкджек http://mostbet15247.help/
mostbet служба поддержки Кыргызстан чат http://www.mostbet96810.help
mostbet отзывы Киргизия mostbet15247.help
боргирии 1win app http://www.1win83254.help
get ed meds online: online ed drugs – pills for ed online
medication canadian pharmacy: Certified Canada Rx – Certified Canada Rx
https://certifiedcanadarx.com/# canadian pharmacy service
Certified Canada Rx: pharmacies in canada that ship to the us – Certified Canada Rx
pet meds for dogs Vet Rx Index online vet pharmacy
Ищешь кран? кран шаровый под приварку для трубопроводов различного назначения. Надежная запорная арматура для систем водоснабжения, отопления, газа и промышленных магистралей. Высокая герметичность, долговечность и устойчивость к нагрузкам.
духи женские оригинал https://elicebeauty.com/parfyumeriya/filter/_m45_a170/
Нужен юрист? судебно арбитражный юрист представительство в арбитражном суде, защита интересов бизнеса, взыскание задолженности, споры по договорам и сопровождение судебных процессов для компаний и предпринимателей.
Проблемы с застройщиком? юрист по дду помощь юриста по долевому строительству, расчет неустойки, подготовка претензии и подача иска в суд. Защитим права дольщиков и поможем получить компенсацию.
Wonderful blog! I found it while browsing on Yahoo News. Do you have any suggestions on how to get listed in Yahoo News? I’ve been trying for a while but I never seem to get there! Many thanks
https://mensrxindex.com/# Mens RX Index
http://mensrxindex.com/# Mens RX Index
Found a bride? planning a proposal in Barcelona romantic scenarios, beautiful locations, photo shoots, decor, and surprises for the perfect declaration of love. Make your engagement in Barcelona an unforgettable moment in your story.
кп по продвижению сайта seo-kejsy13.ru .
Mens RX Index: low cost ed meds online – erectile dysfunction online
dog medication online: Vet Rx Index – pet drugs online
мелбет бонус http://melbet93640.help
1win депозит тавассути терминал 1win депозит тавассути терминал
1win коди промо http://1win83254.help/
https://certifiedcanadarx.shop/# medication canadian pharmacy
1вин бонуси сабти ном 1вин бонуси сабти ном
cheapest ed online: cheapest online ed meds – get ed meds online
успешные seo кейсы санкт петербург успешные seo кейсы санкт петербург .
мостбет казино вход https://mostbet15247.help/
mostbet apk последняя версия скачать https://mostbet96810.help
Certified Canada Rx canadian pharmacies that deliver to the us canadian pharmacy no scripts
melbet aviator melbet aviator
мелбет вывод odengi кыргызстан melbet28175.help
melbet кыргызстан https://www.melbet93640.help
http://certifiedcanadarx.com/# Certified Canada Rx
ed medication online: ed doctor online – Mens RX Index
Mens RX Index: cheap ed pills online – Mens RX Index
seo клиники наркологии seo клиники наркологии .
Thanks a lot for sharing this with all people you really recognize what you are talking approximately! Bookmarked. Kindly additionally discuss with my web site =). We could have a link exchange contract between us
melbet odengi вывод https://melbet93640.help/
https://petmedsmonitor.shop/# pet pharmacy
where to buy ed pills: online ed medicine – Mens RX Index
https://mensrxindex.com/# Mens RX Index
монтаж газового пожаротушения монтаж газового пожаротушения .
seo клиники наркологии seo клиники наркологии .
pet meds official website best pet rx pet prescriptions online
Certified Canada Rx: online canadian drugstore – Certified Canada Rx
мостбет promo code мостбет promo code
pet med: Vet Rx Index – п»їdog medication online
https://certifiedcanadarx.com/# canadian pharmacy in canada
casino-aanbieding
Look at my web page; demo
melbet бк скачать melbet бк скачать
mostbet как пройти kyc mostbet как пройти kyc
https://petmedsmonitor.com/# discount pet meds
мостбет вывести без верификации https://mostbet15247.help/
mostbet результаты матчей mostbet результаты матчей
мостбет aviator на деньги мостбет aviator на деньги
mostbet Киргизия https://mostbet96810.help/
мелбет играть онлайн http://melbet93640.help/
мостбет crash на деньги мостбет crash на деньги
mostbet пополнить счет Кыргызстан https://www.mostbet15247.help
стоимость монтажа газового пожаротушения montazh-gazovogo-pozharotusheniya-3.ru .
melbet crash melbet crash
Mens RX Index: Mens RX Index – erectile dysfunction medication online
кп по продвижению сайта seo-kejsy13.ru .
Hi my friend! I want to say that this post is amazing, nice written and include approximately all significant infos. I would like to see more posts like this.
Certified Canada Rx: my canadian pharmacy – canadian drug
ed meds by mail: Mens RX Index – ed medicines online
erectile dysfunction meds online cheapest online ed treatment Mens RX Index
оптимизация сайта франция prodvizhenie-sajtov-v-moskve9.ru .
croco-casino-no-deposit-bonus
Feel free to visit my site roulette
монтаж газового пожаротушения в офис montazh-gazovogo-pozharotusheniya-3.ru .
мелбет как получить бонус мелбет как получить бонус
создать сайт прогнозов на спорт в москве создать сайт прогнозов на спорт в москве .
melbet киргизия вход http://www.melbet28175.help
https://petmedsmonitor.com/# discount pet meds
Mens RX Index: Mens RX Index – buy erectile dysfunction treatment
мелбет чат кыргызстан https://melbet28175.help/
https://certifiedcanadarx.com/# canadian pharmacies that deliver to the us
mostbet задержка вывода http://www.mostbet76914.help
dog medicine: pet drugs online – best pet rx
pet pharmacy online: discount pet meds – pet prescriptions online
https://certifiedcanadarx.com/# Certified Canada Rx
online vet pharmacy Vet Rx Index dog prescriptions online
мостбет заморозили вывод мостбет заморозили вывод
mostbet бонус Кыргызстан http://www.mostbet85961.help
мостбет live линия https://www.mostbet85961.help
US Pharma Index: cheap online pharmacy – US Pharma Index
https://sildenafilpriceguide.shop/# viagra canada
I was wondering if you ever thought of changing the structure of your website? Its very well written; I love what youve got to say. But maybe you could a little more in the way of content so people could connect with it better. Youve got an awful lot of text for only having 1 or 2 images. Maybe you could space it out better?
super saver pharmacy: US Pharma Index – pharmacy today
http://uspharmaindex.com/# US Pharma Index
квартира після ремонту ремонт квартир Львів
mostbet правила вывода https://mostbet76914.help
Viagra generic over the counter: Sildenafil Price Guide – Viagra without a doctor prescription Canada
mostbet регистрация с промокодом mostbet регистрация с промокодом
мелбет aviator стратегия https://www.melbet51923.help
мелбет установить приложение http://www.melbet30926.help
https://uspharmaindex.shop/# canadapharmacyonline
сделать аудит сайта цена prodvizhenie-sajtov-v-moskve9.ru .
US Pharma Index: reputable indian online pharmacy – US Pharma Index
Ivermectin Access USA: ivermectin over the counter canada – buy stromectol uk
монтаж автоматической системы газового пожаротушения монтаж автоматической системы газового пожаротушения .
мелбет депозит элкарт https://melbet51923.help/
оптимизация и продвижение сайтов москва оптимизация и продвижение сайтов москва .
мелбет пополнение мбанк мелбет пополнение мбанк
http://ivermectinaccessusa.com/# stromectol cvs
Cheap Sildenafil 100mg Sildenafil Price Guide Cheap Viagra 100mg
http://sildenafilpriceguide.com/# best price for viagra 100mg
мостбет приложение скачать Кыргызстан https://www.mostbet85961.help
мелбет комиссия на депозит мелбет комиссия на депозит
buy stromectol canada: Ivermectin Access USA – ivermectin rx
установка автоматического газового пожаротушения montazh-gazovogo-pozharotusheniya-3.ru .
http://uspharmaindex.com/# legal online pharmacy
https://ivermectinaccessusa.shop/# Ivermectin Access USA
canadian family pharmacy: canadian pharmacy – US Pharma Index
Cheapest Sildenafil online: Sildenafil Price Guide – buy Viagra over the counter
авиатор melbet https://www.melbet51923.help
установка газового пожаротушения цена установка газового пожаротушения цена .
melbet android киргизия melbet android киргизия
интернет раскрутка prodvizhenie-sajtov-v-moskve9.ru .
http://ivermectinaccessusa.com/# Ivermectin Access USA
http://sildenafilpriceguide.com/# Viagra online price
Hmm it seems like your site ate my first comment (it was extremely long) so I guess I’ll just sum it up what I submitted and say, I’m thoroughly enjoying your blog. I too am an aspiring blog blogger but I’m still new to the whole thing. Do you have any tips and hints for first-time blog writers? I’d certainly appreciate it.
мостбет условия отыгрыша http://mostbet85961.help
US Pharma Index: US Pharma Index – cheapest pharmacy
монтаж газового пожаротушения для банка montazh-gazovogo-pozharotusheniya-1.ru .
mostbet рабочий сайт Кыргызстан mostbet рабочий сайт Кыргызстан
GELATIN TRICK RECIPE
Sildenafil Citrate Tablets 100mg Viagra generic over the counter viagra canada
продвижение по трафику продвижение по трафику .
PINK GELATIN TRICK
After study a few of the blog posts on your website now, and I truly like your way of blogging. I bookmarked it to my bookmark website list and will be checking back soon. Pls check out my web site as well and let me know what you think.
Order Viagra 50 mg online: sildenafil 50 mg price – buy Viagra over the counter
мостбет регистрация сегодня https://www.mostbet85961.help
GELATIN TRICK RECIPE
PINK GELATIN TRICK
GELATIN TRICK RECIPE
столбики ограждения столбики ограждения с цепочкой
купить кабель метрами провод купить в минске
GELATIN TRICK FOR WEIGHT LOSS
https://uspharmaindex.shop/# US Pharma Index
GELATIN TRICK FOR WEIGHT LOSS
https://ivermectinaccessusa.shop/# ivermectin stromectol
reputable online pharmacy uk: save on pharmacy – pharmacy orlando
лицензия на монтаж газового пожаротушения [url=https://montazh-gazovogo-pozharotusheniya-3.ru/]лицензия на монтаж газового пожаротушения[/url] .
GELATIN TRICK RECIPE
установка газового пожаротушения под ключ montazh-gazovogo-pozharotusheniya-1.ru .
PINK GELATIN TRICK
melbet вывести деньги без верификации http://www.melbet30926.help
net seo net seo .
GELATIN TRICK RECIPE
BARIATRIC GELATIN TRICK
GELATIN TRICK FOR WEIGHT LOSS
GELATIN TRICK RECIPE
http://sildenafilpriceguide.com/# Cheap Sildenafil 100mg
BARIATRIC GELATIN TRICK
BARIATRIC GELATIN TRICK
Ivermectin Access USA: ivermectin 250ml – ivermectin topical
https://uspharmaindex.shop/# US Pharma Index
US Pharma Index: pharmacies in canada that ship to the us – precription drugs from canada
GELATIN TRICK RECIPE
BARIATRIC GELATIN TRICK
GELATIN TRICK FOR WEIGHT LOSS
GELATIN TRICK
PINK GELATIN TRICK
GELATIN TRICK FOR WEIGHT LOSS
PINK GELATIN TRICK
купить большое свадебное платье каталог свадебных платьев 2026
Hello! I could have sworn I’ve been to this site before but after looking at a few of the posts I realized it’s new to me. Nonetheless, I’m definitely delighted I discovered it and I’ll be book-marking it and checking back frequently!
GELATIN TRICK RECIPE
интернет продвижение москва интернет продвижение москва .
melbet android http://www.melbet54187.help
GELATIN TRICK
https://uspharmaindex.com/# legal online pharmacy coupon code
мелбет скачать с зеркала мелбет скачать с зеркала
PINK GELATIN TRICK
BARIATRIC GELATIN TRICK
24 hr pharmacy near me US Pharma Index US Pharma Index
US Pharma Index: canadian prescription pharmacy – discount pharmacy
I would like to thank you for the efforts you’ve put in writing this website. I’m hoping the same high-grade web site post from you in the upcoming as well. In fact your creative writing skills has encouraged me to get my own website now. Really the blogging is spreading its wings rapidly. Your write up is a good example of it.
GELATIN TRICK
https://uspharmaindex.shop/# best canadian pharmacy to order from
GELATIN TRICK
мелбет как вывести на элкарт melbet30926.help
оптимизация сайта франция prodvizhenie-sajtov-v-moskve10.ru .
I personally find that fast onboarding, reliable uptime, and a team that actually cares.
Sildenafil 100mg price: Sildenafil Price Guide – Sildenafil 100mg price
PINK GELATIN TRICK
монтаж газового пожаротушения в офис montazh-gazovogo-pozharotusheniya-2.ru .
GELATIN TRICK FOR WEIGHT LOSS
GELATIN TRICK
мелбет скачать на андроид киргизия http://www.melbet76815.help
https://sildenafilpriceguide.com/# viagra canada
BARIATRIC GELATIN TRICK
PINK GELATIN TRICK
GELATIN TRICK FOR WEIGHT LOSS
buy stromectol online uk: Ivermectin Access USA – Ivermectin Access USA
PINK GELATIN TRICK
продвижение сайта франция prodvizhenie-sajtov-v-moskve10.ru .
http://uspharmaindex.com/# canada pharmacy not requiring prescription
GELATIN TRICK FOR WEIGHT LOSS
Looking for a yacht? yacht holidays in Cyprus for unforgettable sea adventures. Charter luxury yachts, catamarans, or motorboats with or without crew. Explore crystal-clear waters, secluded bays, and iconic coastal locations in first-class comfort onboard.
GELATIN TRICK FOR WEIGHT LOSS
melbet вывод мбанк кыргызстан http://www.melbet30926.help
GELATIN TRICK
PINK GELATIN TRICK
приварной кран кран приварной
монтаж газового пожаротушения в офис montazh-gazovogo-pozharotusheniya-2.ru .
PINK GELATIN TRICK
мелбет lucky jet как играть melbet30926.help
melbet подтверждение личности melbet подтверждение личности
https://ivermectinaccessusa.com/# Ivermectin Access USA
PINK GELATIN TRICK
GELATIN TRICK RECIPE
GELATIN TRICK FOR WEIGHT LOSS
мелбет kg официальный сайт мелбет kg официальный сайт
PINK GELATIN TRICK
мелбет слоты онлайн https://melbet30926.help/
GELATIN TRICK RECIPE
seo partner prodvizhenie-sajtov-v-moskve10.ru .
reliable canadian pharmacy: family pharmacy – canadian pharmacy cialis
melbet букмекерская контора киргизия melbet букмекерская контора киргизия
GELATIN TRICK FOR WEIGHT LOSS
GELATIN TRICK RECIPE
газоблок краснодар цена за штуку сколько стоит газоблок
GELATIN TRICK
US Pharma Index: all in one pharmacy – US Pharma Index
BARIATRIC GELATIN TRICK
GELATIN TRICK FOR WEIGHT LOSS
продвижение сайта франция prodvizhenie-sajtov-v-moskve9.ru .
https://sildenafilpriceguide.com/# order viagra
BARIATRIC GELATIN TRICK
GELATIN TRICK RECIPE
монтаж газового пожаротушения для музея montazh-gazovogo-pozharotusheniya-1.ru .
GELATIN TRICK RECIPE
melbet вывод на телефон https://www.melbet76815.help
BARIATRIC GELATIN TRICK
I’ve read several good stuff here. Definitely worth bookmarking for revisiting. I wonder how much effort you put to create such a wonderful informative site.
GELATIN TRICK FOR WEIGHT LOSS
монтаж газового пожаротушения монтаж газового пожаротушения .
BARIATRIC GELATIN TRICK
indian pharmacy online US Pharma Index canada drugs online
GELATIN TRICK RECIPE
PINK GELATIN TRICK
поисковое продвижение москва профессиональное продвижение сайтов prodvizhenie-sajtov-v-moskve10.ru .
https://sildenafilpriceguide.com/# Viagra online price
BARIATRIC GELATIN TRICK
1win mines на деньги http://1win91276.help
mostbet бонус Кыргызстан https://www.mostbet39081.help
мостбет официальный сайт в Кыргызстане https://www.mostbet39081.help
GELATIN TRICK FOR WEIGHT LOSS
Cheapest Sildenafil online: Sildenafil Price Guide – cheap viagra
мелбет терминал пополнение http://melbet54187.help
BARIATRIC GELATIN TRICK
монтаж системы газового пожаротушения спб montazh-gazovogo-pozharotusheniya-3.ru .
оптимизация и seo продвижение сайтов москва prodvizhenie-sajtov-v-moskve9.ru .
стоимость монтажа газового пожаротушения montazh-gazovogo-pozharotusheniya-1.ru .
https://ivermectinaccessusa.com/# stromectol for humans
установка модулей газового пожаротушения установка модулей газового пожаротушения .
поисковое продвижение сайта в интернете москва prodvizhenie-sajtov-v-moskve10.ru .
melbet рабочее зеркало https://melbet76815.help/
мелбет приложение для ставок https://www.melbet76815.help
https://ivermectinaccessusa.com/# Ivermectin Access USA
ivermectin brand: ivermectin 3 mg tablet dosage – ivermectin cream
order stromectol: ivermectin 12 – Ivermectin Access USA
It’s a shame you don’t have a donate button! I’d definitely donate to this superb blog! I guess for now i’ll settle for book-marking and adding your RSS feed to my Google account. I look forward to fresh updates and will share this website with my Facebook group. Chat soon!
мелбет скачать android киргизия https://melbet54187.help
Fantastic website. Plenty of useful info here. I am sending it to a few friends ans also sharing in delicious. And obviously, thanks for your sweat!
монтаж газового пожаротушения москва монтаж газового пожаротушения москва .
internetagentur seo prodvizhenie-sajtov-v-moskve9.ru .
расчет газового пожаротушения расчет газового пожаротушения .
монтаж газового пожаротушения под ключ монтаж газового пожаротушения под ключ .
http://uspharmaindex.com/# US Pharma Index
melbet киргизия android apk http://melbet54187.help/
http://ivermectinaccessusa.com/# Ivermectin Access USA
US Pharma Index: usa pharmacy online – canadian drug pharmacy
Awesome blog! Is your theme custom made or did you download it from somewhere? A design like yours with a few simple tweeks would really make my blog shine. Please let me know where you got your theme. Bless you
buy viagra here Sildenafil Price Guide Order Viagra 50 mg online
технического аудита сайта prodvizhenie-sajtov-v-moskve9.ru .
монтаж газового пожаротушения москва монтаж газового пожаротушения москва .
Ivermectin Access USA: Ivermectin Access USA – ivermectin tablets
монтаж газовой системы пожаротушения под ключ монтаж газовой системы пожаротушения под ключ .
цена монтажа системы газового пожаротушения montazh-gazovogo-pozharotusheniya-1.ru .
https://sildenafilpriceguide.shop/# generic sildenafil
https://sildenafilpriceguide.com/# Viagra Tablet price
Ivermectin Access USA: Ivermectin Access USA – Ivermectin Access USA
печать наклеек печать наклеек .
mostbet пополнить баланс https://mostbet39081.help/
https://ivermectinaccessusa.shop/# Ivermectin Access USA
cheap viagra: Viagra Tablet price – viagra canada
https://sildenafilpriceguide.com/# Generic Viagra online
canadian pharmacy 1 internet online drugstore: US Pharma Index – prescription free canadian pharmacy
1win лимит депозита 1win лимит депозита
печать стикеров москва печать стикеров москва .
Cheap Viagra 100mg: buy Viagra online – Viagra online price
http://uspharmaindex.com/# medical pharmacy west
https://sildenafilpriceguide.com/# Order Viagra 50 mg online
Cheap generic Viagra Viagra online price viagra without prescription
mostbet jocuri Republica Moldova http://mostbet96150.help
mostbet пополнить с карты https://mostbet39081.help
мостбет сколько идет вывод mostbet39081.help
мостбет лицензия https://mostbet39081.help/
печать стикеров москва печать стикеров москва .
Fortuna Sittard vs Excelsior – 2026 Eredivisie 19:00! Dutch football scores live – fireworks expected!
Ivermectin Access USA: Ivermectin Access USA – ivermectin topical
Generic Viagra online: Sildenafil Price Guide – viagra canada
https://ivermectinaccessusa.shop/# ivermectin pills
mostbet oglinda https://mostbet96150.help
https://sildenafilpriceguide.com/# sildenafil 50 mg price
mostbet confirmare cont mostbet confirmare cont
печать стикеров цена печать стикеров цена .
plinko 1вин https://1win91276.help
I personally find that the using the mobile app tools are low fees and useful analytics.
no prescription needed canadian pharmacy: canadian compounding pharmacy – US Pharma Index
mostbet sloturi pe telefon mostbet sloturi pe telefon
https://uspharmaindex.com/# US Pharma Index
http://uspharmaindex.com/# US Pharma Index
cheapest viagra: Cheapest Sildenafil online – Viagra online price
заказать печать наклеек pechat-nakleek-v-moskve.ru .
stromectol online canada stromectol ireland stromectol 6 mg tablet
1вин войти в аккаунт 1win91276.help
Cheap generic Viagra: Sildenafil Price Guide – Cheap Viagra 100mg
cum retrag de pe mostbet pe visa http://mostbet96150.help
https://sildenafilpriceguide.shop/# buy viagra here
1вин майнс https://www.1win91276.help
mostbet recenzii mostbet recenzii
mostbet az resmi http://mostbet13670.help/
mostbet futbol mərc https://www.mostbet13670.help
1win доступ к сайту https://1win91276.help
Si vous appréciez le style de Sugar Rush 1000, avec ses couleurs vives, son rythme en cascade et son système de multiplicateurs progressifs, plusieurs autres jeux de casino en ligne peuvent vous offrir une expérience proche. Que ce soit dans l’univers visuel ou dans les mécaniques de jeu, Pragmatic Play et d’autres éditeurs ont développé des titres qui misent sur l’adrénaline des enchaînements et la recherche de gros gains. Écran plus grand Avalon II – online slots by provider Microgaming – info about the bestseller, and up to 4-10 business days with other options. If there is a source of revenue in the gambling world then Playech have a division for it, you can change the overall spin bet. The Casino is fully regulated by the Malta Gaming Authority and games are made fair with RNG technology, so carefully check this before you proceed.
http://macomberproject.com/?p=58048
Ceci est une discussion sur Enfin les freerolls Blast remplacés par la promotion Millions superstorm sur 888, pour jouer gratuitement. Ji xiang yuan, Stake est en tête de liste avec une autre machine à sous originale. La sélection de jeux est facile à naviguer, casino crypto en gates of olympus créant une atmosphère incomparable qu’ils créent. Lucky7Bonus a comparé pour vous les meilleurs casinos en ligne francophones, ceux-ci vous permettent de jouer simplement et en toute sécurité à Gates of Olympus tout en profitant de bonus très intéressants : Gates of Olympus Dice vous offre une slot classique avec une touche originale. Nous avons conçu cette version pour encourager une approche tactique dans Gates of Olympus slot. Gates of Olympus Dice vous offre une slot classique avec une touche originale. Nous avons conçu cette version pour encourager une approche tactique dans Gates of Olympus slot.
https://sildenafilpriceguide.shop/# Viagra Tablet price
заказать печать наклеек москва pechat-nakleek-v-moskve.ru .
нарколог вывод из запоя в ростове vyvod-iz-zapoya-v-rostove-2.ru .
Viagra Tablet price: Sildenafil Price Guide – best price for viagra 100mg
Viagra Tablet price: Sildenafil Price Guide – Viagra generic over the counter
https://ivermectinaccessusa.shop/# ivermectin for humans
нарколог вывод из запоя в ростове vyvod-iz-zapoya-v-rostove-1.ru .
Looking for a yacht? trusted yacht rental company in Cyprus for unforgettable sea adventures. Charter luxury yachts, catamarans, or motorboats with or without crew. Explore crystal-clear waters, secluded bays, and iconic coastal locations in first-class comfort onboard.
https://ivermectinaccessusa.com/# Ivermectin Access USA
провод электрический купить купить проводку для дома цена в минске
вывод из запоя на дому нарколог в ростове вывод из запоя на дому нарколог в ростове .
расчет газового пожаротушения montazh-gazovogo-pozharotusheniya.ru .
свадебное платье цена свадебные платья купить каталог
Нужны столбики? столбик ограждения москва столбики для складов, парковок и общественных пространств. Прочные материалы, устойчивое основание и удобство перемещения обеспечивают безопасность и порядок.
1вин мегапей пополнение http://www.1win19643.help
нарколог на дом в ростове анонимно нарколог на дом в ростове анонимно .
вывод из запоя в клинике в ростове вывод из запоя в клинике в ростове .
best price for viagra 100mg: Generic Viagra for sale – generic sildenafil
вывод из запоя в стационаре в ростове-на-дону vyvod-iz-zapoya-v-rostove-2.ru .
нарколог на дом в ростове нарколог на дом в ростове .
вывод из запоя в ростове на дону вывод из запоя в ростове на дону .
https://uspharmaindex.com/# US Pharma Index
вывод из запоя в ростове-на-дону на дому vyvod-iz-zapoya-v-rostove-1.ru .
Buy Viagra online cheap Sildenafil Price Guide Viagra online price
вывод из запоя в стационаре в ростове на дону вывод из запоя в стационаре в ростове на дону .
установка газового пожаротушения под ключ montazh-gazovogo-pozharotusheniya.ru .
http://uspharmaindex.com/# US Pharma Index
mostbet pulsuz spin http://mostbet13670.help/
Sildenafil Citrate Tablets 100mg: Sildenafil Price Guide – Sildenafil Citrate Tablets 100mg
анонимный нарколог на дом в ростове анонимный нарколог на дом в ростове .
вывод из запоя в ростове-на-дону вывод из запоя в ростове-на-дону .
врач нарколог на дом в ростове врач нарколог на дом в ростове .
Cheap Viagra 100mg: Sildenafil Price Guide – Cheap Sildenafil 100mg
наркологическая клиника в ростове вывод из запоя vyvod-iz-zapoya-v-rostove-3.ru .
вывод из запоя клиника в ростове вывод из запоя клиника в ростове .
https://uspharmaindex.com/# trusted online pharmacy
вывод из запоя в стационаре в ростове на дону vyvod-iz-zapoya-v-rostove-1.ru .
монтаж газовой системы пожаротушения под ключ montazh-gazovogo-pozharotusheniya.ru .
вывод из запоя в стационаре в ростове-на-дону вывод из запоя в стационаре в ростове-на-дону .
mostbet ödəniş kartı əlavə et https://www.mostbet13670.help
нарколог вывод из запоя на дому в ростове vyvod-iz-zapoya-v-rostove-4.ru .
вызвать нарколога на дом ростов-на-дону вызвать нарколога на дом ростов-на-дону .
нарколог на дом недорого ростов нарколог на дом недорого ростов .
Drew here — I’ve tried trading and the fast transactions impressed me. Great for cross-chain swaps with minimal slippage.
вывод из запоя в клинике в ростове вывод из запоя в клинике в ростове .
https://sildenafilpriceguide.com/# Viagra without a doctor prescription Canada
Generic Viagra online: sildenafil online – Sildenafil 100mg price
pin-up Azərbaycan ios yüklə pin-up Azərbaycan ios yüklə
pin-up sürət https://pinup09715.help
вывод из запоя на дому в ростове вывод из запоя на дому в ростове .
https://sildenafilpriceguide.shop/# buy viagra here
анонимный нарколог на дом в ростове анонимный нарколог на дом в ростове .
best india pharmacy: canadian prescription pharmacy – reputable canadian online pharmacies
монтаж газового пожаротушения монтаж газового пожаротушения .
нарколог вывод из запоя на дому в ростове нарколог вывод из запоя на дому в ростове .
вывод из запоя на дому в ростове-на-дону vyvod-iz-zapoya-v-rostove-1.ru .
срочный вывод из запоя на дому в ростове vyvod-iz-zapoya-v-rostove-4.ru .
нарколог на дом недорого ростов нарколог на дом недорого ростов .
частный нарколог на дом в ростове частный нарколог на дом в ростове .
mostbet oyun təhlükəsizliyi https://www.mostbet13670.help
вывод из запоя в ростове цена vyvod-iz-zapoya-v-rostove-3.ru .
US Pharma Index: online pharmacy ordering – pharmacy drugs
https://uspharmaindex.shop/# US Pharma Index
mostbet azn çıxarış https://www.mostbet13670.help
нарколог на дом стоимость ростов-на-дону narkolog-na-dom-v-rostove-2.ru .
вывод из запоя с выездом в ростове vyvod-iz-zapoya-v-rostove-2.ru .
https://sildenafilpriceguide.com/# Order Viagra 50 mg online
ivermectin buy nz stromectol Ivermectin Access USA
pin-up app ligera android http://pinup37056.help
установка газового пожаротушения цена установка газового пожаротушения цена .
вывод из запоя на дому в ростове-на-дону вывод из запоя на дому в ростове-на-дону .
вывод из запоя на дому нарколог в ростове вывод из запоя на дому нарколог в ростове .
вывод из запоя клиника в ростове vyvod-iz-zapoya-v-rostove-1.ru .
анонимный нарколог на дом в ростове анонимный нарколог на дом в ростове .
наркологическая клиника в ростове вывод из запоя vyvod-iz-zapoya-v-rostove-3.ru .
нарколог на дом недорого ростов [url=https://narkolog-na-dom-v-rostove-4.ru/]нарколог на дом недорого ростов[/url] .
врач нарколог на дом в ростове narkolog-na-dom-v-rostove-1.ru .
medstore online pharmacy: US Pharma Index – US Pharma Index
нарколог на дом без постановки на учет ростов narkolog-na-dom-v-rostove-2.ru .
ivermectin cream 1%: Ivermectin Access USA – Ivermectin Access USA
http://sildenafilpriceguide.com/# Viagra without a doctor prescription Canada
монтаж системы газового пожаротушения спб montazh-gazovogo-pozharotusheniya.ru .
вывод из запоя в стационаре в ростове-на-дону vyvod-iz-zapoya-v-rostove-2.ru .
вывод из запоя цена в ростове вывод из запоя цена в ростове .
https://ivermectinaccessusa.shop/# Ivermectin Access USA
анонимный вывод из запоя в ростове анонимный вывод из запоя в ростове .
pin-up depósito con Visa pinup37056.help
круглосуточный вывод из запоя в ростове круглосуточный вывод из запоя в ростове .
вывод из запоя дома в ростове vyvod-iz-zapoya-v-rostove-1.ru .
сколько стоит нарколог на дом в ростове сколько стоит нарколог на дом в ростове .
нарколог на дом в ростове нарколог на дом в ростове .
I was skeptical, but after several months of using the mobile app, the scalable features convinced me.
pin-up Chile pinup37056.help
вызов нарколога на дом в ростове вызов нарколога на дом в ростове .
наркологическая помощь на дому ростов narkolog-na-dom-v-rostove.ru .
pin-up lucky jet mərc pin-up lucky jet mərc
нарколог на дом цена в ростове narkolog-na-dom-v-rostove-2.ru .
buy Viagra over the counter: Sildenafil Price Guide – Cheap Viagra 100mg
juego lucky jet pin-up juego lucky jet pin-up
https://sildenafilpriceguide.shop/# best price for viagra 100mg
нарколог выезд на дом ростов narkolog-na-dom-v-rostove.ru .
http://uspharmaindex.com/# US Pharma Index
срочный вызов нарколога на дом ростов narkolog-na-dom-v-rostove-1.ru .
нарколог на дом ночью ростов-на-дону narkolog-na-dom-v-rostove-2.ru .
stromectol usa: Ivermectin Access USA – ivermectin 9 mg
US Pharma Index US Pharma Index US Pharma Index
нарколог на дом ночью ростов-на-дону narkolog-na-dom-v-rostove.ru .
pharmacy drugs: canada pharmacy online – best online pharmacy
пинап pin-up пинап pin-up
выезд нарколога на дом ростов-на-дону narkolog-na-dom-v-rostove-1.ru .
pin-up lucky jet pinup37056.help
http://sildenafilpriceguide.com/# Viagra online price
вызвать нарколога на дом ростов-на-дону вызвать нарколога на дом ростов-на-дону .
https://uspharmaindex.com/# US Pharma Index
нарколог на дом ночью ростов-на-дону narkolog-na-dom-v-rostove.ru .
1win как пополнить с карты visa https://1win19643.help
pin-up canlı mərc bağlandı https://pinup09715.help/
pin-up uduş tarixi https://pinup09715.help/
нарколог на дом срочно ростов-на-дону narkolog-na-dom-v-rostove-1.ru .
Order Viagra 50 mg online: Sildenafil Price Guide – Buy generic 100mg Viagra online
нарколог на дом цена в ростове narkolog-na-dom-v-rostove.ru .
pin-up qeydiyyat olmur pin-up qeydiyyat olmur
https://sildenafilpriceguide.shop/# cheap viagra
https://sildenafilpriceguide.com/# best price for viagra 100mg
Ivermectin Access USA: Ivermectin Access USA – Ivermectin Access USA
1вин купон http://1win19643.help/
мелбет ошибка входа мелбет ошибка входа
нарколог на дом ночью ростов-на-дону narkolog-na-dom-v-rostove-1.ru .
Howdy! I could have sworn I’ve been to this blog before but after checking through some of the post I realized it’s new to me. Nonetheless, I’m definitely glad I found it and I’ll be book-marking and checking back frequently!
нарколог выезд на дом ростов narkolog-na-dom-v-rostove.ru .
melbet максимальная ставка https://melbet41263.help
Gates of Olympus catapults you into a world ruled by the mighty Zeus, where cascading reels and powerful multipliers drive the action. We’ll walk you through the key features of the slot, as well as its core mechanics and everything else you should know before your first spin. Plus, you’ll discover the best UK sites to play online and how to claim an eligible bonus. Gates of olympus exciting bonus features in the game they can land anywhere on the screen to give you 10 free games, which are 15 free spins with 243 ways. Some casinos offer native mobile applications for iOS and Android but many have already embraced the latest technological trends and run HTML5-based websites which can be accessed by a massive range of portable devices, ten free spins with 1,024 ways. In case you don’t, and you will want to withdraw if you win. You can read more about on the dedicated LeoSafePlay page, you can easily sign up with an account at an Android-friendly casino and play the games on offer in practice mode.
https://vietpro.org.vn/gates-of-olympus-50x-canadian-player-strategies/
Not only are we constantly updating our collection to bring players the hottest new releases, but we also make sure we provide a range to ensure there’s something for every kind of player. So, whether you’re a fan of popular slot games, Megaways slots, progressive jackpot slots, table games such as blackjack and roulette, or live casino games, you can find it here at Red Casino. Join Europe`s fastest growing casino on casumoaffiliates If a Player chooses to pay for Draw-Based Lottery Games Played Online using Direct Pay, they are not permitted to use Unutilized Funds to pay for any portion of the total purchase value. If a Player wishes to use Unutilized Funds in their Player Account to pay for any portion of any purchase, the Player must pay for the entirety of the purchase with Unutilized Funds and or Bonus Funds in accordance with this Agreement. In respect of subscriptions for Draw-Based Lottery Games Played Online, a Player may change the method of payment for Future Game Transactions between: (i) Direct Pay, and (ii) Unutilized Funds in their Player Account, in accordance with the Direct Pay Subscription Terms.
1win ссылка на скачивание http://www.1win19643.help
Buy generic 100mg Viagra online: over the counter sildenafil – Cheap Sildenafil 100mg
1win Кыргызстан http://1win19643.help/
24 hour pharmacy canadien pharmacies US Pharma Index
https://ivermectinaccessusa.shop/# Ivermectin Access USA
http://uspharmaindex.com/# US Pharma Index
No Deposit Online Bingo United Kingdom Basic Game Info Some information is missing Gates of Olympus™ slots is a work of art. It takes true genius to conjure up an otherworldly arena from whence the mighty Zeus reigns supreme. Once those golden gates open, things will never be the same. You’re about to experience a unique combination of features with tremendous reward potential. Behold the mighty Zeus Scatter symbols, the tunnel features, multipliers, free spins, and ante bets. The myth and legend-themed Gates of Olympus slot machine has a lot of online casino bonuses. With five extra features, the tumbling reels are the first to become active after each winning spin. Watch out for mystical orbs since they might also award free spins and multipliers. 0.4 ₾ – 250 000 ₾ Matched deposit bonuses — for example, a 100% match up to 1 BTC, doubling your first deposit.Free spins on popular slots like Sweet Bonanza, Gates of Olympus, or Book of Dead.Extra crypto credits in Bitcoin, Ethereum, or other supported coins.
https://madata.africa/power-up-casino-game-a-review-for-australian-players/
18+ | Terms apply At Mecca Games, we want you to enjoy every second that you play with us. Find tips on how to play safely, discover places to get support and get information on all the tools we have in place at: keepitfun.rankYour privacy and security is our number one priority here at Mecca Games. We protect your account with market-leading security technology so we’re one of the safest online casino sites to play on. We never sell or rent customer details. Bigger Bass Bonanza contains 12 potential paylines and matching up 3 of the same symbol along these paylines will trigger a win with winnings being calculated based on the symbols payout and the current bet level. The highest value symbol is the fishing boat and can create wins for as little as 2 symbols with the highest symbol payout being £192 for matching 5 (based on a £1 bet).
Viagra generic over the counter: Cheap Viagra 100mg – Cheap generic Viagra
US Pharma Index: US Pharma Index – prescription free canadian pharmacy
https://sildenafilpriceguide.shop/# Cheap generic Viagra online
https://uspharmaindex.shop/# online pharmacy reviews
melbet коэффициенты киргизия melbet коэффициенты киргизия
Viagra Tablet price: Sildenafil Price Guide – buy Viagra online
blackjack 1win blackjack 1win
melbet отзывы бишкек melbet отзывы бишкек
кухни на заказ в санкт-петербурге kuhni-spb-42.ru .
https://uspharmaindex.com/# US Pharma Index
заказать кухню в спб от производителя недорого kuhni-spb-43.ru .
https://ivermectinaccessusa.shop/# Ivermectin Access USA
кухня глория kuhni-spb-44.ru .
мелбет казино регистрация мелбет казино регистрация
Viagra online price: Sildenafil Price Guide – buy Viagra over the counter
1win descargar para apostar 1win descargar para apostar
Ivermectin Access USA Ivermectin Access USA ivermectin price comparison
Cheap generic Viagra: Sildenafil Price Guide – Viagra Tablet price
1win aplicación ios https://www.1win5771.help
I value the low fees and accurate charts. This site is reliable.
мелбет элсом киргизия https://www.melbet41263.help
изготовление кухни на заказ в спб kuhni-spb-42.ru .
Very nice post. I just stumbled upon your blog and wished to mention that I have truly enjoyed surfing around your weblog posts. After all I will be subscribing in your feed and I am hoping you write again very soon!
производство кухонь в спб на заказ производство кухонь в спб на заказ .
plinko мостбет mostbet52718.help
кухни на заказ санкт петербург кухни на заказ санкт петербург .
внедрение ерп 1с http://1s-erp-vnedrenie.ru .
cómo apostar en vivo en 1win http://www.1win5771.help
https://ivermectinaccessusa.com/# how much does ivermectin cost
http://sildenafilpriceguide.com/# viagra canada
US Pharma Index: US Pharma Index – canadian pharmacy levitra
производство кухонь в спб на заказ kuhni-spb-42.ru .
кухни на заказ в спб недорого кухни на заказ в спб недорого .
кухни на заказ в спб цены кухни на заказ в спб цены .
1с внедрение erp 1s-erp-vnedrenie.ru .
stromectol 3 mg tablet: stromectol tablets uk – Ivermectin Access USA
1win bono sin deposito 1win5771.help
https://sildenafilpriceguide.com/# sildenafil 50 mg price
1win registro con email 1win registro con email
https://sildenafilpriceguide.shop/# buy Viagra over the counter
заказать кухню спб заказать кухню спб .
большая кухня на заказ kuhni-spb-43.ru .
кухни на заказ спб каталог кухни на заказ спб каталог .
cheapest viagra: Sildenafil Price Guide – Viagra generic over the counter
внедрение ерп системы 1с http://1s-erp-vnedrenie.ru .
where to buy stromectol order stromectol ivermectin 12
купить кухню на заказ в спб kuhni-spb-42.ru .
https://sildenafilpriceguide.shop/# Cheap Sildenafil 100mg
мебель для кухни спб от производителя мебель для кухни спб от производителя .
кухни на заказ в спб недорого кухни на заказ в спб недорого .
https://sildenafilpriceguide.shop/# generic sildenafil
Journey into the realm of the gods in the Gates of Olympus slot by Pragmatic Play. Symbols pay in clusters after landing anywhere on the screen. Bonus buy and ante bet options can speed up bonus action and get you closer to the max 5,000x payout. The RTP for Gates of Olympus is 96.5%. This is the kind of RTP we would expect from a good video slot nowadays. What this means is that out of every dollar, $0.965 will go back to the players and the casino has a profit margin of $0.035. While playing with it, the situation has calmed down. By checking the terms and conditions of the site, gates of olympus best time to play for real money and the music only adds up to the already thrilling atmosphere. There is something there for every player to enjoy, with everything kept away from prying eyes. If you like Scatter Pays slots, Pragmatic Play released Gates of Olympus 1000 in December 2023. It has the same RTP rate but comes with Orb multipliers up to 1,000x and 15,000 times bet max wins (treble that of Gates of Olympus). There is also a Christmas version, Gates of Olympus Xmas 1000, which is the same as the other 1000 version.
https://lacasamoderna.fr/raging-bull-casino-crypto-payment-methods-in-australia-2/
Compatible with 64-bit versions of Windows 7, 8, 10+.Compatible with 32-bit versions of Windows 7, 8, 10+. XVideoStudio_PC.zip, XVideoStudio_PC-1.0.zip, XVideoStudio-1.0.apk 6. Enjoy playing VideoShow Video Editor, Video Maker, Photo Editor on PC with MEmu Thanks For Allowing us to Share Our Views In This Blog. Share PcsCrack With others.sony acid pro 7 free download full version with crackisumsoft-zip-password-refixer-registration-codeDllkeys A full version app for Android, by Internet Architects Consulting. VideoPad Video Editor Free Lets You Create and Share Videos with Friends Android application to download videos from the Internet for free VideoShow – this tool for working with video files will amaze you with its capabilities and wide functionality. The installation of this product is supported by high scores in the Google Play Market and the number of users who have downloaded it – more than three million. So, how can this program be useful, does it justify the hopes of users who have chosen it among numerous competitors?
Cheap Viagra 100mg: Sildenafil Price Guide – viagra canada
внедрение 1с ерп внедрение 1с ерп .
ivermectin 1 cream: Ivermectin Access USA – buy ivermectin canada
заказать кухню через интернет заказать кухню через интернет .
большая кухня на заказ kuhni-spb-42.ru .
изготовление кухонь на заказ в санкт петербурге kuhni-spb-44.ru .
заказать кухню в спб по индивидуальному проекту заказать кухню в спб по индивидуальному проекту .
перепланировка квартиры согласование sites.google.com/view/dokument-dlya-pereplan/главная-страница .
https://uspharmaindex.com/# canadadrugpharmacy com
заказать кухню каталог заказать кухню каталог .
заказать кухню цены zakazat-kuhnyu-3.ru .
внедрение 1с erp внедрение 1с erp .
http://sildenafilpriceguide.com/# viagra without prescription
ivermectin where to buy: Ivermectin Access USA – stromectol 6 mg tablet
заказать кухню в рассрочку zakazat-kuhnyu-1.ru .
1win aviator ko‘paytirgich 1win aviator ko‘paytirgich
1win shaxsiy kabinet depozit 1win shaxsiy kabinet depozit
печатное производство https://webyourself.eu/blogs/1805413/%D0%9E%D0%B1%D0%B7%D0%BE%D1%80-%D1%80%D1%8B%D0%BD%D0%BA%D0%B0-%D0%BF%D0%BE%D0%BB%D0%B8%D0%B3%D1%80%D0%B0%D1%84%D0%B8%D1%87%D0%B5%D1%81%D0%BA%D0%B8%D1%85-%D1%83%D1%81%D0%BB%D1%83%D0%B3-%D0%9C%D0%BE%D1%81%D0%BA%D0%B2%D1%8B-%D1%82%D1%80%D0%B5%D0%BD%D0%B4%D1%8B-%D0%B8-%D1%86%D0%B5%D0%BD%D1%8B .
купить кухню kuhni-spb-41.ru .
Real excellent visual appeal on this internet site, I’d value it 10 10.
внедрение erp на предприятии внедрение erp на предприятии .
https://uspharmaindex.shop/# canada drug pharmacy
ivermectin where to buy for humans: ivermectin 10 mg – Ivermectin Access USA
ivermectin pills cost of ivermectin cream Ivermectin Access USA
http://ivermectinaccessusa.com/# Ivermectin Access USA
US Pharma Index: low cost online pharmacy – canada pharmacy 24h
1win ios necə yükləmək olar http://1win5763.help/
1win Azərbaycan rəsmi sayt https://1win5763.help
печатные услуги https://www.esurveyspro.com/survey.aspx?id=f78408b3-d3a1-4359-9d90-644eb3ffe8ca .
заказать кухню по индивидуальным размерам zakazat-kuhnyu-1.ru .
сколько стоит заказать кухню сколько стоит заказать кухню .
кухни на заказ спб недорого с ценами kuhni-spb-41.ru .
перепланировка в москве sites.google.com/view/dokument-dlya-pereplan/главная-страница .
http://ivermectinaccessusa.com/# Ivermectin Access USA
1win retragere Visa Moldova http://www.1win5805.help
Ivermectin Access USA: Ivermectin Access USA – ivermectin humans
http://uspharmaindex.com/# US Pharma Index
I like this website very much so much excellent information.
московские типографии https://exchange.prx.org/series/60434 .
buy Viagra online: Sildenafil Price Guide – sildenafil 50 mg price
I was skeptical, but after half a year of exploring governance, the easy onboarding convinced me. I moved funds across chains without a problem.
https://uspharmaindex.shop/# US Pharma Index
US Pharma Index: costco online pharmacy – modafinil online pharmacy
заказать кухню по своим размерам заказать кухню по своим размерам .
согласование перепланировки согласование перепланировки .
заказ кухни заказ кухни .
http://sildenafilpriceguide.com/# generic sildenafil
stromectol for humans ivermectin generic cost of stromectol medication
1win setari autoexcludere https://1win5805.help/
заказать кухню по индивидуальным размерам zakazat-kuhnyu-1.ru .
Казино лучшее онлайн Казино лучшее онлайн .
Discord caiu caiu.site .
1win intrare alternativa 1win intrare alternativa
Казино лучшее онлайн Казино лучшее онлайн .
mostbet как пройти верификацию http://www.mostbet52718.help
Usually I don’t read post on blogs, but I wish to say that this write-up very forced me to try and do so! Your writing style has been amazed me. Thanks, very nice post.
проект перепланировки и переустройства квартиры проект перепланировки и переустройства квартиры .
полиграфия в МСК https://firesafety-vniipo.ru/forum/kak-vybrat-normalnuyu-tipografiyu-v-moskve/ .
заказать кухню с установкой zakazat-kuhnyu-2.ru .
Today, I went to the beach with my kids. I found a sea shell and gave it to my 4 year old daughter and said “You can hear the ocean if you put this to your ear.” She put the shell to her ear and screamed. There was a hermit crab inside and it pinched her ear. She never wants to go back! LoL I know this is totally off topic but I had to tell someone!
1win depozit Oʻzbekiston http://1win5767.help/
https://uspharmaindex.com/# US Pharma Index
stromectol otc: Ivermectin Access USA – Ivermectin Access USA
заказать кухню стоимость zakazat-kuhnyu-3.ru .
https://ivermectinaccessusa.com/# stromectol medicine
1win qeydiyyat bonusu Azərbaycan 1win5763.help
1win inregistrare cu google http://1win5805.help/
Ivermectin Access USA: Ivermectin Access USA – Ivermectin Access USA
заказать кухню каталог заказать кухню каталог .
согласование перепланировок согласование перепланировок .
кухни на заказ питер kuhni-spb-41.ru .
Useful information. Lucky me I found your site accidentally, and I am shocked why this twist of fate did not came about in advance! I bookmarked it.
Казино сол Казино сол .
Santander down caiu.site .
Онлайн казино без верификации и паспорта Онлайн казино без верификации и паспорта .
проект перепланировки квартиры для согласования проект перепланировки квартиры для согласования .
полиграфические услуги http://diafan.rusheat.ru/forum/gde-zakazat-kachestvennuyu-upakovku-dlya-nebolshog/ .
US Pharma Index: US Pharma Index – US Pharma Index
https://ivermectinaccessusa.shop/# Ivermectin Access USA
заказать кухню по индивидуальному заказу zakazat-kuhnyu-2.ru .
заказать кухню [url=https://zakazat-kuhnyu-1.ru/]заказать кухню[/url] .
заказать кухню цена zakazat-kuhnyu-3.ru .
1win kartdan çıxarış 1win kartdan çıxarış
https://uspharmaindex.com/# reliable canadian pharmacy reviews
Cheap Viagra 100mg cheap viagra Generic Viagra for sale
Казино 1win Казино 1win .
internet down caiu.site .
заказать кухню онлайн заказать кухню онлайн .
Казино фугу Казино фугу .
согласование перепланировок согласование перепланировок .
купить кухню в спб от производителя купить кухню в спб от производителя .
1win pariuri MD 1win pariuri MD
сделать проект перепланировки квартиры в москве teletype.in/@jorik11/proekt-dlya-pereplanirovki .
over the counter sildenafil: best price for viagra 100mg – best price for viagra 100mg
типография в Москве https://firesafety-vniipo.ru/forum/kak-vybrat-normalnuyu-tipografiyu-v-moskve/ .
1win sign in http://www.1win5805.help
order viagra: Sildenafil Price Guide – buy Viagra online
https://ivermectinaccessusa.shop/# Ivermectin Access USA
сколько стоит заказать кухню zakazat-kuhnyu-2.ru .
мостбет киберспорт ставки мостбет киберспорт ставки
http://uspharmaindex.com/# US Pharma Index
заказать кухню под размеры заказать кухню под размеры .
1win uduş verirmi 1win uduş verirmi
Рейтинг лучших онлайн казино Рейтинг лучших онлайн казино .
internet caiu caiu.site .
Казино Рокс Казино Рокс .
1win Apelsin depozit 1win Apelsin depozit
Ivermectin Access USA: Ivermectin Access USA – where to buy ivermectin
1win Namangan pul yechish http://www.1win5767.help
проект перепланировки москва проект перепланировки москва .
заказать кухню сайт zakazat-kuhnyu-1.ru .
перепланировка квартиры согласование sites.google.com/view/dokument-dlya-pereplan/главная-страница .
кухни под заказ kuhni-spb-41.ru .
заказать кухню каталог заказать кухню каталог .
1win apk necə yükləmək olar http://1win5763.help
1win rasmiy link Oʻzbekiston 1win rasmiy link Oʻzbekiston
https://sildenafilpriceguide.com/# cheap viagra
заказать кухню по индивидуальному заказу zakazat-kuhnyu-2.ru .
заказать кухню онлайн заказать кухню онлайн .
Appreciating the commitment you put into your blog and detailed information you provide. It’s great to come across a blog every once in a while that isn’t the same out of date rehashed information. Wonderful read! I’ve bookmarked your site and I’m adding your RSS feeds to my Google account.
Generic Viagra online: Sildenafil Price Guide – Buy Viagra online cheap
US Pharma Index: online pharmacy pain medicine – US Pharma Index
мостбет Джалал-Абад мостбет Джалал-Абад
Казино онлайн играть Казино онлайн играть .
Казино Рокс Казино Рокс .
99 down caiu.site .
заказать проект перепланировки заказать проект перепланировки .
http://sildenafilpriceguide.com/# Sildenafil Citrate Tablets 100mg
mostbet как пополнить с карты mostbet как пополнить с карты
мостбет бонус не начислили мостбет бонус не начислили
Deference to op, some excellent entropy.
I was just looking for this information for a while. After 6 hours of continuous Googleing, finally I got it in your web site. I wonder what’s the lack of Google strategy that don’t rank this kind of informative websites in top of the list. Normally the top sites are full of garbage.
заказать кухню цена zakazat-kuhnyu-1.ru .
http://certicanpharmacy.com/# CertiCanPharmacy
сколько стоит заказать кухню по размерам zakazat-kuhnyu-2.ru .
заказать кухню по размерам заказать кухню по размерам .
CertiCanPharmacy: CertiCanPharmacy – canadianpharmacyworld com
Казино Водка Казино Водка .
Рейтинг казино без верификации Рейтинг казино без верификации .
Discord down caiu.site .
проект перепланировки квартиры для согласования проект перепланировки квартиры для согласования .
Howdy! Someone in my Myspace group shared this website with us so I came to give it a look. I’m definitely loving the information. I’m bookmarking and will be tweeting this to my followers! Wonderful blog and terrific style and design.
Fees are accurate charts, and the execution is always smooth. I moved funds across chains without a problem.
http://vetfreemeds.com/# canada pet meds
I’m still learning from you, as I’m making my way to the top as well. I definitely enjoy reading everything that is written on your website.Keep the posts coming. I loved it!
mexican rx: mexico drug store online – mexican pharmacies that ship to us
http://mymexicanpharmacy.com/# My Mexican Pharmacy
canadian pharmacy 24h com: CertiCanPharmacy – canadapharmacyonline com
mexican medicine farmacia mexicana en chicago My Mexican Pharmacy
https://vetfreemeds.com/# pet rx
https://certicanpharmacy.shop/# canadian drug pharmacy
canada pharmacy online: CertiCanPharmacy – best canadian pharmacy online
Sam here — I’ve tried checking analytics and the responsive team impressed me. Support solved my issue in minutes.
My Mexican Pharmacy: My Mexican Pharmacy – mexico pharmacies
https://vetfreemeds.com/# online vet pharmacy
mexico meds: medicine from mexico – My Mexican Pharmacy
https://mymexicanpharmacy.shop/# My Mexican Pharmacy
ed drugs online from canada CertiCanPharmacy canadian pharmacy no rx needed
https://mymexicanpharmacy.com/# My Mexican Pharmacy
CertiCanPharmacy: CertiCanPharmacy – is canadian pharmacy legit
Hey, you used to write fantastic, but the last few posts have been kinda boring… I miss your great writings. Past several posts are just a little out of track! come on!
http://vetfreemeds.com/# discount pet meds
canadian online pharmacy: CertiCanPharmacy – safe canadian pharmacies
Valuable info. Lucky me I found your website by accident, and I am shocked why this accident did not happened earlier! I bookmarked it.
https://certicanpharmacy.com/# canada drugstore pharmacy rx
canada pet meds: VetFree Meds – discount pet meds
http://certicanpharmacy.com/# CertiCanPharmacy
dog medicine: VetFree Meds – discount pet meds
best virtual number service github.com/SMS-Activate-Alternatives .
https://certicanpharmacy.shop/# ed drugs online from canada
pet meds online: VetFree Meds – best pet rx
My Mexican Pharmacy My Mexican Pharmacy pharmacy mexico online
https://certicanpharmacy.shop/# CertiCanPharmacy
best sms activate service github.com/SMS-Activate-Alternatives .
mostbet регистрация бонус Киргизия https://www.mostbet61527.help
sms activate login sms activate login .
https://vetfreemeds.shop/# dog prescriptions online
online pet pharmacy: vet pharmacy online – pet pharmacy
melbet официальный сайт приложение https://melbet09342.help/
http://mymexicanpharmacy.com/# farmacia mexicana online
CertiCanPharmacy: CertiCanPharmacy – CertiCanPharmacy
перепланировка в москве sostav.ru/blogs/286398/77663 .
sms activator github.com/SMS-Activate-Alternatives .
sms activate service sms activate service .
CertiCanPharmacy: canadian pharmacy no scripts – CertiCanPharmacy
There is definately a great deal to learn about this issue. I like all of the points you’ve made.
http://certicanpharmacy.com/# CertiCanPharmacy
http://vetfreemeds.com/# canada pet meds
CertiCanPharmacy CertiCanPharmacy CertiCanPharmacy
My Mexican Pharmacy: My Mexican Pharmacy – pharmacy mexico
pet prescriptions online: VetFree Meds – dog medication online
https://mymexicanpharmacy.com/# My Mexican Pharmacy
http://certicanpharmacy.com/# CertiCanPharmacy
мостбет Баткен мостбет Баткен
smsactivate smsactivate .
pet pharmacy online: VetFree Meds – pet pharmacy
狙击蝴蝶2026 高清悬疑刑侦 海外华人高清在线 全球加速无缓冲
http://certicanpharmacy.com/# CertiCanPharmacy
best sms activation services github.com/SMS-Activate-Login .
http://certicanpharmacy.com/# canada drugs
mostbet free spins mostbet free spins
sms activate alternatives sms activate alternatives .
mexico pharmacy online: order from mexico – My Mexican Pharmacy
услуги по согласованию перепланировки услуги по согласованию перепланировки .
pet meds for dogs: discount pet meds – best pet rx
smsactivate smsactivate .
https://certicanpharmacy.com/# CertiCanPharmacy
https://vetfreemeds.shop/# canada pet meds
top sms activate services github.com/SMS-Activate-Service .
согласование перепланировки квартиры в москве согласование перепланировки квартиры в москве .
smsactivate smsactivate .
canada rx pharmacy world: canada drugstore pharmacy rx – CertiCanPharmacy
https://vetfreemeds.shop/# pet rx
pet prescriptions online: pet pharmacy – vet pharmacy online
http://mymexicanpharmacy.com/# reputable mexican pharmacy
top sms activate services http://www.linkedin.com/pulse/top-5-sms-activate-services-ultimate-guide-virtual-phone-mike-davis-gnhre/ .
sms activate service sms activate service .
имплантация зубов в современной стоматологической клинике это комплексный подход к здоровью полости рта с применением инновационных методик и проверенных клинических протоколов. Мы предлагаем первичный осмотр и составление плана лечения чтобы подобрать индивидуальное решение. Терапевтическое лечение кариеса проводится с учетом клинических показаний что позволяет предотвратить осложнения. При необходимости выполняется восстановление утраченных зубов имплантами которая обеспечивает комфорт при жевании и разговоре. Ортопедическое восстановление зубов позволяет восстановить эстетику улыбки с применением керамики и циркония. Мы уделяем внимание комфорту пациента во время приема создавая доброжелательную атмосферу. Комплексная профилактика заболеваний помогают избегать серьезных вмешательств в будущем. Наши специалисты обладают практическим опытом и профильным образованием что гарантирует точность диагностики. Использование цифровой рентгенографии позволяет сократить сроки лечения. Мы предлагаем гибкий график посещений и прозрачную систему ценообразования. Лечение зубов без боли достигаются благодаря деликатным технологиям. Обратившись к нам вы получаете персональный подход и возможность улучшить качество жизни.
https://doctor-propisal.ru/
top sms activate alternatives top sms activate alternatives .
перепланировка квартир перепланировка квартир .
canada drugs online review: CertiCanPharmacy – cross border pharmacy canada
best sms activation services github.com/SMS-Activate-Alternatives .
скважинное водопонижение vodoponizhenie-iglofiltrami-moskva.ru .
https://certicanpharmacy.shop/# ordering drugs from canada
sms activate alternatives sms activate alternatives .
sms activate sms activate .
https://vetfreemeds.shop/# pet meds online
1 вин официальный сайт 1 вин официальный сайт
best sms activation services github.com/SMS-Activate-Login .
проект на водопонижение xn—77-eddkgagrc5cdhbap.xn--p1ai .
mostbet слоты фриспины mostbet слоты фриспины
узаконить перепланировку москва sostav.ru/blogs/286398/77663 .
1win пополнение Киргизия 1win пополнение Киргизия
водопонижение на строительной площадке водопонижение на строительной площадке .
pet meds for dogs: VetFree Meds – discount pet meds
mexican pharmacy that ships to the us: My Mexican Pharmacy – mexico pharmacy
водопонизительная скважина vodoponizhenie-iglofiltrami-moskva.ru .
sms activator github.com/SMS-Activate-Alternatives .
sms activator http://www.linkedin.com/pulse/top-5-sms-activate-services-ultimate-guide-virtual-phone-mike-davis-gnhre/ .
ии анализ рекламы ии анализ рекламы .
http://certicanpharmacy.com/# canadian pharmacy service
sms activate alternatives sms activate alternatives .
sms activate login sms activate login .
https://vetfreemeds.com/# canada pet meds
согласование перепланировки квартиры в москве согласование перепланировки квартиры в москве .
проект водопонижения vodoponizhenie-moskva.ru .
устройство водопонижения xn—77-eddkgagrc5cdhbap.xn--p1ai .
pet pharmacy: pet drugs online – online vet pharmacy
краш 1win краш 1win
как установить мелбет apk melbet09342.help
Sam here — I’ve tried fiat on-ramp and the seamless withdrawals impressed me.
осушение котлованов осушение котлованов .
http://mymexicanpharmacy.com/# My Mexican Pharmacy
1win отзывы https://www.1win50742.help
мелбет вывод киргизия мелбет вывод киргизия
Reliable, precise, and insightful every time.
скважинное водопонижение vse-o-vodoponizhenii.ru .
My Mexican Pharmacy: My Mexican Pharmacy – My Mexican Pharmacy
https://mymexicanpharmacy.shop/# farmacia mexicana en chicago
worldwide pharmacy: online mexico pharmacy – mexicanrxpharm
lucky jet 1вин http://1win50742.help/
мостбет crash 2026 http://mostbet61527.help/
CertiCanPharmacy canadian pharmacy king canada drugs reviews
осушение котлованов осушение котлованов .
1win законно в Кыргызстане https://1win50742.help/
водопонижение иглофильтрами москва vodoponizhenie-msk.ru .
https://mymexicanpharmacy.com/# My Mexican Pharmacy
Giao diện 188v tối ưu cho cả PC và mobile – chơi slot mượt mà dù bạn đang dùng điện thoại hay máy tính bảng. TONY02-25O
бурение скважин обратной промывкой бурение скважин обратной промывкой .
мелбет вывод мбанк кыргызстан http://www.melbet09342.help
This is really interesting, You are a very skilled blogger. I’ve joined your rss feed and look forward to seeking more of your fantastic post. Also, I’ve shared your website in my social networks!
https://mymexicanpharmacy.shop/# My Mexican Pharmacy
устройство водопонижения устройство водопонижения .
ии анализ рекламы ии анализ рекламы .
грунтовое водопонижение vodoponizhenie-iglofiltrami-moskva.ru .
CertiCanPharmacy: canada drugstore pharmacy rx – canada drugs online
мелбет как использовать бонус https://melbet09342.help/
машинное обучение креативы reklamnyj-kreativ8.ru .
водопонижение строительных котлованов водопонижение строительных котлованов .
дистанционное образование дистанционное образование .
pet meds for dogs: VetFree Meds – dog medication online
система водопонижения иглофильтрами vse-o-vodoponizhenii.ru .
https://mymexicanpharmacy.shop/# My Mexican Pharmacy
mostbet free spins http://mostbet61527.help/
водопонижение скважинами водопонижение скважинами .
строительное водопонижение строительное водопонижение .
анализ наружной рекламы анализ наружной рекламы .
http://mymexicanpharmacy.com/# My Mexican Pharmacy
бурение скважин обратной промывкой vodoponizhenie-iglofiltrami-moskva.ru .
reliable canadian pharmacy reviews: canadian world pharmacy – CertiCanPharmacy
онлайн обучение с официальным аттестатом онлайн обучение с официальным аттестатом .
рекламный креатив рекламный креатив .
Hi! I’ve been reading your web site for some time now and finally got the bravery to go ahead and give you a shout out from Huffman Texas! Just wanted to say keep up the fantastic work!
бурение скважин обратной промывкой бурение скважин обратной промывкой .
понижение уровня грунтовых вод vodoponizhenie-msk.ru .
вакуумное водопонижение вакуумное водопонижение .
проект водопонижения vse-o-vodoponizhenii.ru .
canadian pharmacy cheap [url=https://certicanpharmacy.com/#]canadian pharmacies[/url] canadian pharmacy world reviews
https://certicanpharmacy.shop/# canadian pharmacies
сервис анализа креативов сервис анализа креативов .
система водопонижения xn—77-eddkgagrc5cdhbap.xn--p1ai .
мелбет поддержка мелбет поддержка
онлайн образование онлайн образование .
водопонижение скважинами водопонижение скважинами .
https://vetfreemeds.shop/# pet meds for dogs
I was skeptical, but after a few days of exploring governance, the quick deposits convinced me.
los algodones pharmacy online: best mexican pharmacy online – mexican meds
My Mexican Pharmacy: My Mexican Pharmacy – purple pharmacy online ordering
карточки товаров wildberries карточки товаров wildberries .
строительное водопонижение строительное водопонижение .
бурение скважин обратной промывкой vodoponizhenie-msk.ru .
водопонижение иглофильтрами грунтовых вод водопонижение иглофильтрами грунтовых вод .
откачка грунтовых вод откачка грунтовых вод .
a/b тест баннеров reklamnyj-kreativ9.ru .
http://certicanpharmacy.com/# CertiCanPharmacy
государственная аккредитация онлайн школы государственная аккредитация онлайн школы .
водопонижение грунтовых вод xn—77-eddkgagrc5cdhbap.xn--p1ai .
бурение водопонижение vodoponizhenie-iglofiltrami-moskva.ru .
https://vetfreemeds.shop/# pet prescriptions online
My Mexican Pharmacy: My Mexican Pharmacy – mexico farmacia
водопонижение строительных котлованов водопонижение строительных котлованов .
улучшение креативов улучшение креативов .
осушение котлованов осушение котлованов .
вакуумное водопонижение иглофильтрами вакуумное водопонижение иглофильтрами .
анализ карточек маркетплейс анализ карточек маркетплейс .
рейтинг 2026 онлайн школ best-schools-online.ru .
有罪之身2026 魏大勋孙千悬疑绑架矿难 海外华人免费高清陆剧 全球加速无广告
PAOK 1-2 Celta Vigo 2026 Europa League result! Spanish side edge thriller – latest match results keep Europa League wild and unpredictable!
Skycrown online casino 2026 top choice Australian players
https://vetfreemeds.shop/# discount pet meds
CertiCanPharmacy: canadian pharmacy king reviews – cross border pharmacy canada
canada pet meds VetFree Meds best pet rx
вакуумное водопонижение вакуумное водопонижение .
водопонижение скважинами водопонижение скважинами .
https://vetfreemeds.com/# dog prescriptions online
глубинное водопонижение глубинное водопонижение .
ии анализ рекламы ии анализ рекламы .
позиция карточки в выдаче позиция карточки в выдаче .
рейтинг онлайн-школ рейтинг онлайн-школ .
https://mymexicanpharmacy.com/# mexi pharmacy
My Mexican Pharmacy: online pharmacies – mexico online farmacia
https://mymexicanpharmacy.shop/# My Mexican Pharmacy
CertiCanPharmacy: canadian pharmacy – CertiCanPharmacy
http://vetfreemeds.com/# pet pharmacy online
pet drugs online: discount pet meds – dog medicine
https://vetfreemeds.shop/# online vet pharmacy
I’ve been using it for half a year for fiat on-ramp, and the clear transparency stands out. Charts are accurate and load instantly.
My Mexican Pharmacy mexico pharmacy mexican medicine
www canadianonlinepharmacy: canadian pharmacy ratings – legal canadian pharmacy online
pet pharmacy: vet pharmacy – pet rx
Keep up the fantastic work, I read few posts on this web site and I conceive that your web blog is real interesting and has got bands of good information.
http://vetfreemeds.com/# п»їdog medication online
Hello there, You have done a fantastic job. I’ll certainly digg it and for my part recommend to my friends. I’m confident they’ll be benefited from this website.
мелбет бк мелбет бк .
I enjoy reading and I conceive this website got some really utilitarian stuff on it! .
п»їdog medication online: online pet pharmacy – pet meds for dogs
http://vetfreemeds.com/# pet med
best pet rx VetFree Meds п»їdog medication online
The site is easy to use and the wide token selection keeps me coming back. I moved funds across chains without a problem.
мелбет скачать мелбет скачать .
online pharmacy mexico: My Mexican Pharmacy – online mexican pharmacies
http://vetfreemeds.com/# vet pharmacy online
My Mexican Pharmacy: farmacia pharmacy mexico – medication in mexico
https://certicanpharmacy.shop/# canadian pharmacy ed medications
мелбет фрибет за регистрацию мелбет фрибет за регистрацию .
http://mymexicanpharmacy.com/# medicine mexico
online mexico pharmacy: mexico pharmacy online – My Mexican Pharmacy
http://mymexicanpharmacy.com/# mexican pharmacy las vegas
CertiCanPharmacy: canadianpharmacymeds com – canadianpharmacyworld
My Mexican Pharmacy pharmacy mexico city My Mexican Pharmacy
certified canadian international pharmacy: canadian pharmacy king – canadian pharmacy in canada
melbet зеркало melbet зеркало .
https://certicanpharmacy.com/# recommended canadian pharmacies
http://vetfreemeds.com/# pet meds online
canadian drugs online: canada drugs online – canadian pharmacy 24h com safe
http://certicanpharmacy.com/# CertiCanPharmacy
pet drugs online: VetFree Meds – vet pharmacy online
https://vetfreemeds.com/# dog prescriptions online
My Mexican Pharmacy: pharmacy mexico city – My Mexican Pharmacy
pet pharmacy online VetFree Meds pet pharmacy online
https://vetfreemeds.com/# dog medicine
I am now not sure where you are getting your info, but good topic. I needs to spend a while studying more or figuring out more. Thank you for wonderful info I used to be searching for this info for my mission.
мелбет бонус за регистрацию мелбет бонус за регистрацию .
https://certicanpharmacy.com/# CertiCanPharmacy
My Mexican Pharmacy: order from mexico – My Mexican Pharmacy
I’m truly enjoying the design and layout of your blog. It’s a very easy on the eyes which makes it much more pleasant for me to come here and visit more often. Did you hire out a developer to create your theme? Excellent work!
pet pharmacy: pet pharmacy online – vet pharmacy online
https://certicanpharmacy.com/# canadian pharmacy scam
промокод для мелбет промокод для мелбет .
скачать мелбет на андроид скачать мелбет на андроид .
приложение melbet android приложение melbet android .
приложение мелбет на андроид приложение мелбет на андроид .
ставки на спорт мелбет официальный сайт ставки на спорт мелбет официальный сайт .
melbet скачать официальный сайт melbet скачать официальный сайт .
мелбет приложение на айфон мелбет приложение на айфон .
внедрение 1с на предприятии внедрение 1с на предприятии .
melbet зеркало рабочее на сегодня melbet зеркало рабочее на сегодня .
проект перепланировки квартиры проект перепланировки квартиры .
сколько стоит перепланировка квартиры сколько стоит перепланировка квартиры .
скачать приложение мелбет скачать приложение мелбет .
Thanx for the effort, keep up the good work Great work, I am going to start a small Blog Engine course work using your site I hope you enjoy blogging with the popular BlogEngine.net.Thethoughts you express are really awesome. Hope you will right some more posts.
I always was interested in this topic and still am, thanks for putting up.
мелбет апк мелбет апк .
внедрение 1с внедрение 1с .
мелбет официальный мелбет официальный .
проектная организация для перепланировки квартиры proekt-pereplanirovki-kvartiry22.ru .
melbet android melbet android .
стоимость узаконивания перепланировки skolko-stoit-uzakonit-pereplanirovku-8.ru .
мелбет приложение мелбет приложение .
внедрение 1с решений 1s-vnedrenie.ru .
melbet com официальный сайт melbet com официальный сайт .
проектная организация для перепланировки квартиры proekt-pereplanirovki-kvartiry22.ru .
мелбет ставки скачать мелбет ставки скачать .
стоимость согласования перепланировки стоимость согласования перепланировки .
ии для студентов ии для студентов .
нейросети для студентов нейросети для студентов .
внедрение 1с 8 3 внедрение 1с 8 3 .
проект на перепланировку квартиры заказать proekt-pereplanirovki-kvartiry22.ru .
казино мелбет скачать казино мелбет скачать .
сайт зеркало мелбет сайт зеркало мелбет .
сколько стоит перепланировка сколько стоит перепланировка .
Hello! Someone in my Facebook group shared this site with us so I came to give it a look. I’m definitely enjoying the information. I’m book-marking and will be tweeting this to my followers! Great blog and wonderful design.
нейросеть реферат нейросеть реферат .
нейросеть генерации текстов для студентов nejroset-dlya-ucheby-6.ru .
генерация nejroset-dlya-ucheby-5.ru .
внедрение 1с решений 1s-vnedrenie.ru .
I’ve recently started a web site, the information you provide on this website has helped me greatly. Thanks for all of your time & work.
реферат через нейросеть реферат через нейросеть .
мелбет бесплатно мелбет бесплатно .
проект перепланировки квартиры для согласования проект перепланировки квартиры для согласования .
официальный сайт мелбет официальный сайт мелбет .
сколько стоит оформить перепланировку квартиры skolko-stoit-uzakonit-pereplanirovku-8.ru .
ии для студентов ии для студентов .
комплексное внедрение 1с 1s-vnedrenie.ru .
нейросеть студент бот нейросеть студент бот .
ии для учебы студентов nejroset-dlya-ucheby-5.ru .
перепланировка квартиры цена перепланировка квартиры цена .
проектная организация для перепланировки квартиры proekt-pereplanirovki-kvartiry22.ru .
согласование перепланировки квартиры москва согласование перепланировки квартиры москва .
нейросеть пишет реферат нейросеть пишет реферат .
лучшая нейросеть для учебы nejroset-dlya-ucheby-8.ru .
нейросеть студент бот нейросеть студент бот .
ии для учебы студентов ии для учебы студентов .
согласование перепланировки москва согласование перепланировки москва .
нейросеть для студентов нейросеть для студентов .
генерация генерация .
сделать реферат сделать реферат .
реферат через нейросеть реферат через нейросеть .
нейросеть пишет реферат nejroset-dlya-ucheby-5.ru .
перепланировка москва pereplanirovka-kvartir9.ru .
нейросеть для школьников и студентов нейросеть для школьников и студентов .
сделать реферат сделать реферат .
ии для учебы студентов ии для учебы студентов .
чат нейросеть для учебы nejroset-dlya-ucheby-8.ru .
нейросеть для учебы онлайн nejroset-dlya-ucheby-5.ru .
перепланировка услуги перепланировка услуги .
ии для школьников и студентов ии для школьников и студентов .
нейросеть для школьников и студентов nejroset-dlya-ucheby-6.ru .
сделать реферат сделать реферат .
I’ve been active for several months, mostly for providing liquidity, and it’s always clear transparency.
нейросеть студент бот нейросеть студент бот .
нейросеть реферат онлайн нейросеть реферат онлайн .
нейросеть реферат онлайн нейросеть реферат онлайн .
перепланировка квартиры москва pereplanirovka-kvartir9.ru .
сайт для рефератов [url=https://nejroset-dlya-ucheby-9.ru/]сайт для рефератов[/url] .
ии для школьников и студентов nejroset-dlya-ucheby-5.ru .
нейросеть текст для учебы nejroset-dlya-ucheby-6.ru .
нейросети для студентов нейросети для студентов .
ии для студентов nejroset-dlya-ucheby-7.ru .
нейросеть для рефератов нейросеть для рефератов .
нейросеть для учебы нейросеть для учебы .
перепланировка услуги перепланировка услуги .
нейросеть для школьников и студентов нейросеть для школьников и студентов .
генерация генерация .
нейросеть реферат онлайн nejroset-dlya-ucheby-5.ru .
генерация nejroset-dlya-ucheby-6.ru .
ии для школьников и студентов ии для школьников и студентов .
лучшая нейросеть для учебы лучшая нейросеть для учебы .
I was skeptical, but after almost a year of providing liquidity, the intuitive UI convinced me.
I was skeptical, but after a month of testing new tokens, the quick deposits convinced me.
Mksportsbet is my platform for sports bets. Quick to register and easy to use. I have had a great experience there. mksportsbet
Hey guys, been checking ketqua.nét for the latest results. Pretty reliable and quick updates. A solid resource for all things lottery! Find it here: ketqua.nét
Just cruised through et365. Looks like a decent spot for sports betting. I’m tempted to place a wager on the game tonight. Check it out at et365.
It’s really a nice and useful piece of information. I am glad that you just shared this useful information with us. Please stay us up to date like this. Thanks for sharing.
Jordan here — I’ve tried testing new tokens and the quick deposits impressed me.
ORANGE PEEL TRICK RECIPE
The interface is easy onboarding, and I enjoy swapping tokens here. The updates are frequent and clear.
ORANGE PEEL TRICK FOR WEIGHT LOSS
2026 football news: Forest’s 3-0 masterclass in Europa League sets tone – latest match results show Premier League clubs dominating Europe!
桑乔85m曼联梦碎?2026转会新闻爆料,他考虑重返德甲,曼联损失惨重,足球比分圈炸锅了!
ORANGE PEEL TRICK
小城大事2026 赵丽颖黄晓明 高清农民造城励志 海外华人免费热播 全球加速
hello!,I like your writing so much! share we communicate more about your post on AOL? I need a specialist on this area to solve my problem. May be that’s you! Looking forward to see you.
ORANGE PEEL TRICK TO LOSE WEIGHT
ORANGE PEEL TRICK
ORANGE PEEL TRICK RECIPE
I like the efforts you have put in this, regards for all the great blog posts.
ORANGE PEEL TRICK RECIPE
Pretty portion of content. I simply stumbled upon your site and in accession capital to claim that I get actually enjoyed account your blog posts. Any way I will be subscribing on your augment or even I success you get entry to persistently fast.
ORANGE PEEL TRICK FOR WEIGHT LOSS
Neuro Relief USA: neurontin 300 mg mexico – Neuro Relief USA
I’m not sure exactly why but this web site is loading extremely slow for me. Is anyone else having this issue or is it a issue on my end? I’ll check back later on and see if the problem still exists.
https://neuroreliefusa.shop/# Neuro Relief USA
ORANGE PEEL TRICK
http://ivertherapeutics.com/# Iver Therapeutics
zoloft without dr prescription zoloft pill order zoloft
ORANGE PEEL TRICK RECIPE
Neuro Relief USA: Neuro Relief USA – Neuro Relief USA
ORANGE PEEL TRICK TO LOSE WEIGHT
foreign online pharmacy: super pharmacy – Smart GenRx USA
ORANGE PEEL TRICK FOR WEIGHT LOSS
ORANGE PEEL TRICK RECIPE
https://sertralineusa.com/# zoloft without rx
Thanks for the good writeup. It actually was once a enjoyment account it. Glance complex to more brought agreeable from you! However, how could we keep in touch?
ORANGE PEEL TRICK TO LOSE WEIGHT
ORANGE PEEL TRICK TO LOSE WEIGHT
ORANGE PEEL TRICK TO LOSE WEIGHT
neurontin 300 mg cost: cost of neurontin 100mg – neurontin 200 mg price
ORANGE PEEL TRICK RECIPE
generic zoloft: zoloft no prescription – sertraline
https://neuroreliefusa.com/# buy cheap neurontin
ORANGE PEEL TRICK FOR WEIGHT LOSS
I genuinely enjoy studying on this site, it has great posts. “Never fight an inanimate object.” by P. J. O’Rourke.
ORANGE PEEL TRICK FOR WEIGHT LOSS
ORANGE PEEL TRICK RECIPE
ORANGE PEEL TRICK
http://sertralineusa.com/# sertraline zoloft
ORANGE PEEL TRICK FOR WEIGHT LOSS
http://ivertherapeutics.com/# Iver Therapeutics
Iver Therapeutics: Iver Therapeutics – Iver Therapeutics
sertraline: zoloft pill – zoloft medication
zoloft pill zoloft cheap zoloft without rx
http://neuroreliefusa.com/# neurontin capsules 300mg
stromectol prices: buy stromectol canada – Iver Therapeutics
超人和露易斯第三季高清完整官方版,海外华人可免费观看最新热播剧集。
online pharmacy india: pharmacy in canada – mexico pharmacy order online
https://sertralineusa.shop/# buy zoloft
The best choice I made for using the API. Smooth and robust security. Support solved my issue in minutes.
Neuro Relief USA: generic neurontin 600 mg – Neuro Relief USA
ORANGE PEEL TRICK FOR WEIGHT LOSS
ORANGE PEEL TRICK FOR WEIGHT LOSS
https://neuroreliefusa.shop/# Neuro Relief USA
ORANGE PEEL TRICK RECIPE
ORANGE PEEL TRICK FOR WEIGHT LOSS
https://neuroreliefusa.shop/# neurontin price
ORANGE PEEL TRICK TO LOSE WEIGHT
ORANGE PEEL TRICK RECIPE
ORANGE PEEL TRICK FOR WEIGHT LOSS
ORANGE PEEL TRICK RECIPE
Smart GenRx USA: cheapest pharmacy to get prescriptions filled – international pharmacy no prescription
ORANGE PEEL TRICK
Iver Therapeutics Iver Therapeutics cost of ivermectin 1% cream
online pharmacy prescription: canada drugs online – best canadian pharmacy
https://neuroreliefusa.shop/# Neuro Relief USA
zoloft generic: zoloft cheap – zoloft without rx
sertraline: zoloft medication – sertraline generic
Good article and right to the point. I don’t know if this is in fact the best place to ask but do you people have any thoughts on where to get some professional writers? Thanks in advance 🙂
https://sertralineusa.com/# Sertraline USA
https://smartgenrxusa.com/# canadian pharmacy 24 com
canadian compounding pharmacy: Smart GenRx USA – rx pharmacy online
http://ivertherapeutics.com/# Iver Therapeutics
zoloft pill: order zoloft – Sertraline USA
Smart GenRx USA canada pharmacy not requiring prescription foreign online pharmacy
Wow! This is a cool platform. They really do have the great support. The dashboard gives a complete view of my holdings.
Iver Therapeutics: stromectol price us – Iver Therapeutics
https://neuroreliefusa.com/# Neuro Relief USA
I value the trustworthy service and fast transactions. This site is reliable.
https://neuroreliefusa.com/# neurontin capsules 300mg
neurontin 400: buy cheap neurontin – neurontin 800 mg tablets
The portfolio tracking process is simple and the robust security makes it even better. Great for cross-chain swaps with minimal slippage.
http://neuroreliefusa.com/# Neuro Relief USA
order zoloft: zoloft cheap – generic for zoloft
Fees are low fees, and the execution is always smooth. Definitely recommend to anyone in crypto.
https://sertralineusa.com/# sertraline zoloft
Smart GenRx USA: escrow pharmacy canada – canadian pharmacy sildenafil
sertraline: zoloft no prescription – zoloft without rx
cost of ivermectin cream generic stromectol ivermectin price usa
Fast onboarding, reliable uptime, and a team that actually cares. The mobile app makes daily use simple.
https://smartgenrxusa.com/# Smart GenRx USA
http://ivertherapeutics.com/# Iver Therapeutics
Neuro Relief USA: neurontin 300 mg tablet – Neuro Relief USA
neurontin 50mg tablets: Neuro Relief USA – drug neurontin
https://ivertherapeutics.com/# cost of stromectol medication
Looking for pkr98gamedownload. Is the download safe? Seen some shady stuff online, wanna make sure it’s clean before i download. Lemme know folks! pkr98gamedownload
Alright folks, mexvip12 is on my radar. Heard some buzz about it, gonna give it a try. Anyone else already a member? Let me know your experience! mexvip12
Gotta say, gigabetoriginal has got the authentic feel. If you’re looking for a more exclusive betting experience, this might be it. Check it out gigabetoriginal
stromectol ivermectin 3 mg: Iver Therapeutics – Iver Therapeutics
http://sertralineusa.com/# Sertraline USA
Neuro Relief USA: neurontin 214 – Neuro Relief USA
canadian pharmacy world Smart GenRx USA best pharmacy
https://neuroreliefusa.shop/# neurontin 100mg tablet
zoloft generic: zoloft without dr prescription – Sertraline USA
https://sertralineusa.com/# zoloft cheap
buy ivermectin pills: Iver Therapeutics – Iver Therapeutics
ivermectin pills canada: generic stromectol – ivermectin 3mg tablets price
https://neuroreliefusa.com/# Neuro Relief USA
超人和露易斯第四季高清完整版,海外华人可免费观看最新热播剧集。
ivermectin humans: Iver Therapeutics – ivermectin 1mg
https://ivertherapeutics.shop/# Iver Therapeutics
buy brand neurontin: Neuro Relief USA – neurontin 300mg caps
http://ivertherapeutics.com/# ivermectin 3mg
cheapest pharmacy canadian pharmacy online store pharmacy canadian superstore
禁忌第一季高清完整版结合大数据AI分析,海外华人可免费观看最新热播剧集。
neurontin discount: buy gabapentin – cost of neurontin 600mg
https://smartgenrxusa.shop/# Smart GenRx USA
Smart GenRx USA: Smart GenRx USA – pharmacy com canada
https://sertralineusa.shop/# zoloft without dr prescription
Smart GenRx USA: Smart GenRx USA – online pharmacy india
http://neuroreliefusa.com/# 32 neurontin
多瑙高清完整官方版,海外华人可免费观看最新热播剧集。
爱一帆下载海外版,专为华人打造的高清视频平台运用AI智能推荐算法,支持全球加速观看。
online pharmacy: Smart GenRx USA – best rated canadian pharmacy
Iver Therapeutics how much does ivermectin cost Iver Therapeutics
http://smartgenrxusa.com/# Smart GenRx USA
Iver Therapeutics: Iver Therapeutics – stromectol 3mg cost
Fees are seamless withdrawals, and the execution is always smooth.
http://neuroreliefusa.com/# Neuro Relief USA
buy stromectol uk: Iver Therapeutics – Iver Therapeutics
neurontin 800 mg price: neurontin 300mg tablet cost – Neuro Relief USA
范德沃克高清完整官方版,海外华人可免费观看最新热播剧集。
http://ivertherapeutics.com/# how much is ivermectin
https://neuroreliefusa.shop/# neurontin 800 mg pill
800mg neurontin: neurontin 100mg capsule price – Neuro Relief USA
I switched from another service because of the seamless withdrawals and scalable features. Support solved my issue in minutes.
generic for zoloft: zoloft medication – zoloft no prescription
ivermectin otc stromectol 3 mg dosage Iver Therapeutics
https://smartgenrxusa.shop/# Smart GenRx USA
online pharmacy europe: Smart GenRx USA – Smart GenRx USA
Pat here — I’ve tried using the API and the useful analytics impressed me.
http://ivertherapeutics.com/# ivermectin 6mg dosage
https://smartgenrxusa.shop/# Smart GenRx USA
Neuro Relief USA: Neuro Relief USA – neurontin 900
This platform exceeded my expectations with trustworthy service and responsive team. Definitely recommend to anyone in crypto.
neurontin 400 mg: Neuro Relief USA – Neuro Relief USA
The cross-chain transfers tools are trustworthy service and robust security.
http://neuroreliefusa.com/# Neuro Relief USA
Smart GenRx USA: reputable online pharmacy uk – Smart GenRx USA
Great blog! Is your theme custom made or did you download it from somewhere? A design like yours with a few simple adjustements would really make my blog jump out. Please let me know where you got your theme. Thank you
Neuro Relief USA neurontin 100mg tablets Neuro Relief USA
Iver Therapeutics: Iver Therapeutics – Iver Therapeutics
https://ivertherapeutics.shop/# ivermectin 1mg
внедрение ерп 1с 1s-erp-vnedrenie.ru .
Iver Therapeutics: Iver Therapeutics – ivermectin 10 ml
https://neuroreliefusa.shop/# Neuro Relief USA
https://smartgenrxusa.shop/# best online foreign pharmacies
I really like your writing style, superb information, thanks for putting up :D. “In university they don’t tell you that the greater part of the law is learning to tolerate fools.” by Doris Lessing.
zoloft no prescription: zoloft pill – sertraline generic
baking soda trick recipe
BLUE CELTIC SALT TRICK
baking soda trick recipe
medication neurontin 300 mg: Neuro Relief USA – Neuro Relief USA
http://neuroreliefusa.com/# neurontin 800 mg capsules
BLUE CELTIC SALT TRICK
BAKING SODA TRICK FOR MEN
blue celtic salt trick FOR MEN
blue celtic salt trick FOR MEN
BLUE CELTIC SALT TRICK
GELATIN TRICK RECIPE
Smart GenRx USA Smart GenRx USA Smart GenRx USA
blue celtic salt trick FOR MEN
BLUE CELTIC SALT TRICK
GELATIN TRICK RECIPE
GELATIN TRICK RECIPE
https://sertralineusa.com/# buy zoloft
GELATIN TRICK RECIPE
PINK GELATIN TRICK RECIPE
Neuro Relief USA: where can i buy neurontin online – Neuro Relief USA
Iver Therapeutics: stromectol 3mg tablets – Iver Therapeutics
baking soda trick recipe
BAKING SODA TRICK FOR MEN
baking soda trick recipe
baking soda trick recipe
внедрение 1с erp внедрение 1с erp .
BAKING SODA TRICK FOR MEN
https://sertralineusa.shop/# zoloft without rx
BAKING SODA TRICK FOR MEN
baking soda trick recipe
baking soda trick recipe
usa pharmacy: Smart GenRx USA – Smart GenRx USA
BLUE CELTIC SALT TRICK
blue celtic salt trick FOR MEN
BAKING SODA TRICK FOR MEN
BLUE CELTIC SALT TRICK
BLUE CELTIC SALT TRICK
legitimate canadian mail order pharmacy: Smart GenRx USA – Smart GenRx USA
blue celtic salt trick FOR MEN
GELATIN TRICK RECIPE
https://sertralineusa.com/# zoloft without dr prescription
Iver Therapeutics stromectol tablets buy online ivermectin 500ml
neurontin 600 mg coupon: Neuro Relief USA – neurontin generic cost
http://smartgenrxusa.com/# maple leaf pharmacy in canada
PINK GELATIN TRICK
Iver Therapeutics: ivermectin 12 mg – ivermectin 200mg
stromectol 6 mg dosage: Iver Therapeutics – ivermectin 4000 mcg
PINK GELATIN TRICK
https://ivertherapeutics.shop/# Iver Therapeutics
PINK GELATIN TRICK
Web Sitesi’ni ziyaret ettiğinizde şu bilgiler toplanabilir: Mystic Mirror Demo Slot Oynayın Starlight Princess Oyna, sadece bilgilendirme amaçlıdır, kumar veya bahis hizmeti sunmaz. 2025 © Starlight Princess Oyna Son Güncelleme: 18.03.2025 Polobet’e Giriş Tıklayın! Polobet starlight princess yüksek kazanç sağlayabileceğiniz bir oyundur. Bir dizi dönen makara içinde farklı farklı semboller bulunur. Oyuncuların hedefi makaralardan dönen sembollerin birleşmesini sağlamaktır. Ayrıca tamamen şans üzerine kurulu olan oyunların bilinen hiçbir hilesi yoktur. Fakat makaralardaki sembolleri belli bir kombinasyon içerisinde yakalarsanız ödül alırsınız. Kazançlarınız kurallara ve çarpanlara bağlıdır. 2025 © Starlight Princess Oyna Web Sitesi’ni kullanarak, aşağıdaki şartları kabul ettiğinizi beyan edersiniz.
https://www.isgegitimkurumu.com/pinco-online-casino-oyunu-incelemesi-turkiyedeki-oyuncular-icin-rehber/
Starlight Princess Pachi Demo, eğlenceli ve büyülü bir slot oyunudur. Oyun, renkli grafikleri, benzersiz ses efektleri ve heyecan verici oyun mekaniğiyle dikkat çekiyor. Oyuncular, Pachi’nin sihirli dünyasına dalacak ve büyük ödüller kazanmak için şanslarını deneyecekler. Diğer Yararlı Makaleler; Bu slot, kazançları küme ödemeleri mekaniği aracılığıyla verdiği için 6 makara ve 5 sıra ile daha büyük bir düzende oynayacaksınız. Tumble mekaniği her kazancı daha etkili hale getirmek için vardır. Ayrıca, Çarpan sembolleri bu slotta önemli bir rol oynar, daha önce piyasaya sürülen benzer slotları oynadıysanız bunu zaten biliyor olabilirsiniz. iGaming endüstrisinin önde gelen içerik sağlayıcılarından Pragmatic Play, slotlarını Supersport.hr ile canlı yaptıktan sonra Hırvatistan’daki ayak izini daha da büyüttü.
GELATIN TRICK RECIPE
PINK GELATIN TRICK
neurontin cap: drug neurontin 20 mg – neurontin 200 mg capsules
ivermectin price usa: ivermectin tablets uk – stromectol pills
https://ivertherapeutics.com/# Iver Therapeutics
сыроедные рецепты rawrussia.ru .
zoloft no prescription order zoloft zoloft tablet
generic zoloft: sertraline zoloft – zoloft without rx
http://ivertherapeutics.com/# ivermectin drug
Smart GenRx USA: Smart GenRx USA – best no prescription pharmacy
сыроедение для женщин https://rawrussia.ru .
Smart GenRx USA: Smart GenRx USA – Smart GenRx USA
https://ivertherapeutics.shop/# Iver Therapeutics
Iver Therapeutics: Iver Therapeutics – stromectol online pharmacy
zoloft buy: zoloft tablet – zoloft without dr prescription
cost of ivermectin 1% cream Iver Therapeutics Iver Therapeutics
сыроедческие хлебцы в дегидраторе http://rawrussia.ru/ .
https://sertralineusa.shop/# Sertraline USA
Neuro Relief USA: generic neurontin – purchase neurontin online
https://smartgenrxusa.com/# good pharmacy
generic for zoloft: zoloft pill – zoloft medication
http://ivertherapeutics.com/# ivermectin 50
neurontin price india: neurontin 100mg capsule price – Neuro Relief USA
PINK GELATIN TRICK
https://neuroreliefusa.com/# drug neurontin
We’re a gaggle of volunteers and opening a brand new scheme in our community. Your website provided us with useful info to work on. You’ve performed a formidable activity and our whole neighborhood will be thankful to you.
cheapest prescription pharmacy: Smart GenRx USA – Smart GenRx USA
Smart GenRx USA Smart GenRx USA online pharmacy pain
爱一帆会员多少钱海外版,专为华人打造的高清视频官方认证平台,支持全球加速观看。
Neuro Relief USA: gabapentin – Neuro Relief USA
官方授权的捕风追影下载官方下载,第一时间海外华人专用,第一时间支持高速下载和离线观看。
https://sertralineusa.com/# generic for zoloft
https://neuroreliefusa.shop/# neurontin 100mg cap
Smart GenRx USA: best online pharmacy – Smart GenRx USA
stromectol cvs: Iver Therapeutics – ivermectin 250ml
http://ivertherapeutics.com/# ivermectin 50ml
超人和露易斯第二季高清完整官方版,海外华人可免费观看最新热播剧集。
Smart GenRx USA: Smart GenRx USA – pharmacy open near me
Good write-up, I am normal visitor of one’s web site, maintain up the nice operate, and It’s going to be a regular visitor for a long time.
PINK GELATIN TRICK RECIPE
PINK GELATIN TRICK RECIPE
GELATIN TRICK RECIPE
https://neuroreliefusa.shop/# neurontin 600 mg tablet
PINK GELATIN TRICK RECIPE
PINK GELATIN TRICK RECIPE
zoloft pill sertraline zoloft cheap
ivermectin 400 mg brands: ivermectin generic cream – Iver Therapeutics
Smart GenRx USA: Smart GenRx USA – mexican pharmacies online drugs
PINK GELATIN TRICK RECIPE
PINK GELATIN TRICK RECIPE
https://neuroreliefusa.shop/# neurontin prices generic
https://smartgenrxusa.com/# legitimate online pharmacy usa
PINK GELATIN TRICK RECIPE
PINK GELATIN TRICK
Neuro Relief USA: neurontin 800 – Neuro Relief USA
GELATIN TRICK RECIPE
GELATIN TRICK RECIPE
GELATIN TRICK RECIPE
PINK GELATIN TRICK
PINK GELATIN TRICK RECIPE
GELATIN TRICK RECIPE
Smart GenRx USA: which pharmacy is cheaper – Smart GenRx USA
GELATIN TRICK RECIPE
https://neuroreliefusa.shop/# neurontin 900
PINK GELATIN TRICK
PINK GELATIN TRICK
GELATIN TRICK RECIPE
zoloft generic: zoloft pill – sertraline generic
GELATIN TRICK RECIPE
GELATIN TRICK RECIPE
GELATIN TRICK RECIPE
https://neuroreliefusa.com/# Neuro Relief USA
Neuro Relief USA 32 neurontin Neuro Relief USA
zoloft generic: generic zoloft – generic for zoloft
neurontin 400 mg cost: Neuro Relief USA – neurontin 600
http://ivertherapeutics.com/# Iver Therapeutics
I have been absent for a while, but now I remember why I used to love this web site. Thank you, I?¦ll try and check back more frequently. How frequently you update your site?
https://smartgenrxusa.com/# canadian world pharmacy
neurontin 50 mg: canada neurontin 100mg lowest price – drug neurontin
Iver Therapeutics: buy ivermectin canada – ivermectin drug
http://neuroreliefusa.com/# neurontin rx
Neuro Relief USA: cheap neurontin – neurontin 100 mg
sertraline generic zoloft without dr prescription zoloft without rx
http://ivertherapeutics.com/# buy stromectol online uk
zoloft cheap: zoloft generic – zoloft without dr prescription
https://ivertherapeutics.shop/# ivermectin brand name
Neuro Relief USA: Neuro Relief USA – buy neurontin 100 mg canada
https://sertralineusa.shop/# buy zoloft
zoloft tablet: zoloft no prescription – generic for zoloft
http://sertralineusa.com/# generic zoloft
zoloft without rx: sertraline zoloft – sertraline generic
Neuro Relief USA neurontin discount Neuro Relief USA
https://sertralineusa.com/# generic zoloft
sertraline generic: sertraline – Sertraline USA
I value the fast transactions and low fees. This site is reliable.
https://ivertherapeutics.com/# price of ivermectin
buy zoloft: generic zoloft – zoloft cheap
https://ivertherapeutics.com/# Iver Therapeutics
Iver Therapeutics: Iver Therapeutics – stromectol 3mg tablets
https://ivertherapeutics.com/# Iver Therapeutics
Smart GenRx USA: canadian family pharmacy – online canadian pharmacy review
zoloft medication: zoloft no prescription – order zoloft
brand name neurontin neurontin 100mg neurontin 100mg cap
I personally find that i’ve been using it for over two years for cross-chain transfers, and the clear transparency stands out.
medical mall pharmacy: global pharmacy – Smart GenRx USA
Iver Therapeutics: Iver Therapeutics – Iver Therapeutics
http://ivertherapeutics.com/# stromectol 15 mg
http://smartgenrxusa.com/# best canadian pharmacy online
Neuro Relief USA: medicine neurontin – neurontin 800
https://neuroreliefusa.com/# neurontin 400 mg capsule
Customer support was excellent, which gave me confidence to continue. Definitely recommend to anyone in crypto.
This platform exceeded my expectations with trustworthy service and responsive team.
https://neuroreliefusa.com/# Neuro Relief USA
Smart GenRx USA: mexican pharmacies online drugs – drugs from canada
Iver Therapeutics: Iver Therapeutics – stromectol online canada
generic for zoloft zoloft without rx generic zoloft
http://neuroreliefusa.com/# Neuro Relief USA
http://ivertherapeutics.com/# buy stromectol
Thankyou for this marvelous post, I am glad I discovered this internet site on yahoo.
sertraline zoloft: generic for zoloft – Sertraline USA
Neuro Relief USA: neurontin rx – Neuro Relief USA
https://smartgenrxusa.com/# Smart GenRx USA
Up to €10,000 450 Free Spins * New Players. 100% match casino bonus based Aloha! Cluster Pays is the thrilling online slot machine that guarantees a truly unique gaming experience. The Cluster Pays mechanic makes for an engaging base game, while the guaranteed wins in the Free Spins Bonus are a nice addition. The fun and light-hearted theme is impossible not to like – it’s easy to see why this game has spawned several sequel slots since its release in 2016. If you’re looking for a slot that offers something a little bit different, you’ve definitely come to the right place! Karolis Matulis is an SEO Content Editor at Casinos with more than 6 years of experience in the online gambling industry. Karolis has written and edited dozens of slot and casino reviews and has played and tested thousands of online slot games. So if there’s a new slot title coming out soon, you better know it – Karolis has already tried it.
http://smartwebmedia.rs/oshi-casino-game-review-for-australian-players/
The Martingale system essentially instructs you to wager the base stake amount every time you win. If you lose, you keep doubling your stake until you win. With the increased stake amount, you compensate for your previous losses. Then you go back to the base unit. As you can see, this is a simple enough strategy. However, you need to remember that the Martingale strategy only works for even money bets like Red Black, Even Odd, and High Low bets. Below, you can find a diagram that helps explain the strategy: If at first you don’t succeed – don’t chase your losses. If you find yourself playing to try to recoup any money you’ve lost – stop and take a break. This can be one warning sign of an addiction. Even if your bankroll is substantial enough to weather a losing streak, who will you find to take your action? $50k on one football game, OK. But what about those dog days of August when MLB is the only game in town? Stepping up to the betting window and declaring “I’ll take the Marlins moneyline for $2.4 million” is just not going to fly. If your bankroll is this big, hopefully you’ll find other ways to pass your time than to experiment with some centuries old betting scheme that can be picked apart by a clever mathematician in a matter of minutes.
https://neuroreliefusa.shop/# prescription drug neurontin
Smart GenRx USA: Smart GenRx USA – pharmacy express
https://ivertherapeutics.com/# Iver Therapeutics
http://neuroreliefusa.com/# gabapentin 300mg
peoples pharmacy: Smart GenRx USA – mexican pharmacy online
sertraline generic zoloft cheap zoloft buy
neurontin 500 mg: neurontin 600 mg cost – neurontin 400 mg tablets
http://sertralineusa.com/# zoloft medication
Hi, just required you to know I he added your site to my Google bookmarks due to your layout. But seriously, I believe your internet site has 1 in the freshest theme I??ve came across. It extremely helps make reading your blog significantly easier.
http://sertralineusa.com/# sertraline zoloft
Iver Therapeutics: Iver Therapeutics – stromectol canada
https://smartgenrxusa.com/# Smart GenRx USA
zoloft generic: zoloft no prescription – zoloft without rx
zoloft pill: Sertraline USA – sertraline zoloft
https://neuroreliefusa.shop/# Neuro Relief USA
Smart GenRx USA canadian drug pharmacy online pharmacies that use paypal
https://sertralineusa.com/# generic zoloft
Hmm is anyone else encountering problems with the pictures on this blog loading? I’m trying to determine if its a problem on my end or if it’s the blog. Any suggestions would be greatly appreciated.
Iver Therapeutics: Iver Therapeutics – ivermectin 10 mg
stromectol price in india: Iver Therapeutics – order stromectol online
http://ivertherapeutics.com/# stromectol online canada
walmart pharmacy online: safe online pharmacies in canada – Smart GenRx USA
Lovely just what I was searching for.Thanks to the author for taking his time on this one.
http://ivertherapeutics.com/# ivermectin cream 5%
https://neuroreliefusa.com/# neurontin 204
If you choose non-gambling purposes, youll climb to the top of the leaderboard. And we will start with software providers and games, Where is DraftKings legal. You can also book a telephone call back on the site, you have set 3 security questions to which you will know the answers. The symbols are cartoonish and represent a futuristic space travel, Player Select. Big Bass Bonanza, Pragmatic Play’s popular fishing slot series, has gone from humble beginnings in 2020 to an iconic casino brand with 17 different versions in less than 5 years. But which should you play? We’ve reviewed every game in full before putting together this comprehensive guide so you can browse and compare before putting your waders on and spinning for the best prizes on the right game for you. The iGaming industry constantly releases new online slots for real money that combine immersive themes with innovative mechanics. Slots online with high RTP or bonus-focused features are popular among players at best real money casinos, providing opportunities to win real money slots while enjoying cutting-edge visuals and gameplay.
https://curriculofacil.com.br/?p=222204
The low-paying symbols of Bigger Bass Bonanza are those of the ace-ten cards, which makes sense given how often fishermen can play cards to pass the time. The higher-paying catches are, in order, a tackle box, a lure, a rod, and finally the boat on which you set sail. A fish symbol can also appear; this offers a randomised amount of money each round. Here we have Big Bass Bonanza’s first seasonal release. Other than a jolly Christmas makeover, the Christmas Big Bass Bonanza slot has a very similar gameplay to the previous games and was merely designed as a seasonal special. Fishin’ Frenzy Megaways approaches the theme from a different angle. It uses the Megaways system with variable reel heights and a dynamic number of ways to pay each spin instead of fixed paylines. Free spins include a fisherman who collects fish-credit symbols, echoing the core idea, but without the same progression-and-multiplier structure seen in Bigger Bass Bonanza. This makes Fishin’ Frenzy Megaways feel more about reel expansion and line variety, while Bigger Bass Bonanza feels more about building momentum in the feature through wild collection and level-ups. If you want the collection mechanic embedded in a constantly changing ways-to-win format, the Megaways variant offers that contrast.
hello there and thank you for your information – I have definitely picked up something new from right here. I did however expertise several technical issues using this site, since I experienced to reload the site lots of times previous to I could get it to load properly. I had been wondering if your web host is OK? Not that I’m complaining, but slow loading instances times will sometimes affect your placement in google and can damage your high quality score if advertising and marketing with Adwords. Anyway I’m adding this RSS to my email and could look out for a lot more of your respective interesting content. Ensure that you update this again very soon..
cheapest online pharmacy india: Smart GenRx USA – Smart GenRx USA
brazilian pharmacy online: pharmacy store – discount pharmacy
zoloft without dr prescription generic zoloft sertraline generic
I used to be very pleased to find this web-site.I wanted to thanks to your time for this wonderful read!! I positively having fun with every little bit of it and I’ve you bookmarked to check out new stuff you blog post.
http://sertralineusa.com/# order zoloft
I was skeptical, but after several months of using the API, the responsive team convinced me.
https://sertralineusa.shop/# generic zoloft
The staking process is simple and the wide token selection makes it even better.
I personally find that fast onboarding, scalable features, and a team that actually cares. Great for cross-chain swaps with minimal slippage.
The best choice I made for using the API. Smooth and easy onboarding.
zoloft cheap: zoloft cheap – zoloft without dr prescription
http://sertralineusa.com/# zoloft buy
gabapentin 300mg: neurontin online pharmacy – Neuro Relief USA
http://sertralineusa.com/# sertraline
Smart GenRx USA: buying prescription drugs from canada – global pharmacy canada
https://sertralineusa.com/# zoloft no prescription
ivermectin where to buy ivermectin 3mg tablets stromectol tab price
http://smartgenrxusa.com/# Smart GenRx USA
I have to express my affection for your generosity in support of folks that actually need help with this important area of interest. Your personal dedication to getting the solution all-around ended up being exceptionally interesting and has in every case enabled associates much like me to attain their objectives. This interesting guidelines signifies a great deal to me and even more to my office colleagues. Thanks a lot; from everyone of us.
sertraline zoloft: zoloft buy – zoloft buy
online pharmacy india: canadian pharmacy king reviews – Smart GenRx USA
https://sertralineusa.com/# sertraline zoloft
This design is wicked! You most certainly know how to keep a reader amused. Between your wit and your videos, I was almost moved to start my own blog (well, almost…HaHa!) Wonderful job. I really enjoyed what you had to say, and more than that, how you presented it. Too cool!
http://ivertherapeutics.com/# Iver Therapeutics
Very well written post. It will be supportive to anyone who usess it, including me. Keep up the good work – looking forward to more posts.
I personally find that the best choice I made for staking. Smooth and quick deposits. The mobile app makes daily use simple.
The best choice I made for using the bridge. Smooth and fast transactions.
zoloft tablet: sertraline – zoloft tablet
I’ve been absent for a while, but now I remember why I used to love this web site. Thank you, I’ll try and check back more frequently. How frequently you update your web site?
I have been exploring for a little bit for any high-quality articles or blog posts on this kind of area . Exploring in Yahoo I at last stumbled upon this web site. Reading this info So i am happy to convey that I’ve an incredibly good uncanny feeling I discovered just what I needed. I most certainly will make certain to don’t forget this web site and give it a glance on a constant basis.
Have you ever considered writing an e-book or guest authoring on other sites?
I have a blog based upon on the same topics you discuss and would really like to have you share some
stories/information. I know my subscribers would appreciate your
work. If you’re even remotely interested, feel free to shoot me an e-mail.
https://neuroreliefusa.shop/# Neuro Relief USA
https://neuroreliefusa.com/# how to get neurontin cheap
neurontin 100mg tablet: neurontin 800mg – neurontin 202
I’ve recently started a blog, the information you offer on this website has helped me tremendously. Thanks for all of your time & work. “Character is much easier kept than recovered.” by Thomas Paine.
Useful info. Lucky me I found your site by accident, and I am shocked why this accident didn’t took place earlier! I bookmarked it.
Iver Therapeutics ivermectin 12 mg ivermectin where to buy for humans
Neuro Relief USA: neurontin 2018 – Neuro Relief USA
https://neuroreliefusa.shop/# neurontin tablets 100mg
https://sertralineusa.com/# Sertraline USA
Hello just wanted to give you a quick heads up. The words in your content seem to be running off the screen in Internet explorer. I’m not sure if this is a format issue or something to do with internet browser compatibility but I figured I’d post to let you know. The style and design look great though! Hope you get the issue fixed soon. Many thanks
Iver Therapeutics: ivermectin 10 ml – Iver Therapeutics
I’ll immediately clutch your rss feed as I can not find your e-mail subscription link or e-newsletter service.
Do you’ve any? Please allow me know so that I may just subscribe.
Thanks.
Absolutely composed subject matter, Really enjoyed studying.
where to buy stromectol: Iver Therapeutics – Iver Therapeutics
https://ivertherapeutics.shop/# Iver Therapeutics
https://sertralineusa.shop/# zoloft without dr prescription
Wonderful blog! I found it while browsing on Yahoo News. Do you have any tips on how to get listed in Yahoo News? I’ve been trying for a while but I never seem to get there! Cheers
Iver Therapeutics: stromectol cvs – stromectol how much it cost
Smart GenRx USA Smart GenRx USA Smart GenRx USA
https://smartgenrxusa.com/# canadianpharmacyworld com
https://sertralineusa.com/# sertraline
Iver Therapeutics: buy ivermectin canada – cost of ivermectin pill
Iver Therapeutics: stromectol buy – stromectol otc
https://ivertherapeutics.com/# how much does ivermectin cost
https://smartgenrxusa.shop/# top 10 pharmacy websites
I am glad to be a visitor of this stark website! , thankyou for this rare information! .
stromectol liquid: ivermectin uk – Iver Therapeutics
buy ivermectin canada: stromectol online – ivermectin 250ml
https://sertralineusa.com/# zoloft without dr prescription
canadian pharmacy reviews compare pharmacy prices Smart GenRx USA
I like assembling utile information , this post has got me even more info! .
Iver Therapeutics: ivermectin 3mg tablets price – Iver Therapeutics
http://sertralineusa.com/# zoloft generic
Very interesting info!Perfect just what I was looking for!
Iver Therapeutics: stromectol ivermectin 3 mg – Iver Therapeutics
https://smartgenrxusa.com/# best online canadian pharmacy
sertraline: sertraline generic – zoloft cheap
can i buy neurontin over the counter Neuro Relief USA purchase neurontin canada
http://smartgenrxusa.com/# online pharmacy without scripts
I enjoy looking through an article that will make people think. Also, thanks for allowing me to comment!
Neuro Relief USA: neurontin – neurontin 600 mg tablet
https://ivertherapeutics.shop/# stromectol oral
Neuro Relief USA: neurontin 200 mg tablets – neurontin 300 mg tablets
https://sertralineusa.shop/# sertraline zoloft
zoloft pill generic zoloft generic for zoloft
https://sertralineusa.com/# Sertraline USA
I’ve been active for a year, mostly for checking analytics, and it’s always accurate charts. Perfect for both new and experienced traders.
This platform exceeded my expectations with reliable uptime and robust security. The dashboard gives a complete view of my holdings.
Iver Therapeutics: Iver Therapeutics – stromectol 3mg
generic for zoloft: buy zoloft – order zoloft
I personally find that the best choice I made for checking analytics. Smooth and reliable uptime.
http://neuroreliefusa.com/# Neuro Relief USA
https://sertralineusa.shop/# zoloft medication
Iver Therapeutics: stromectol prices – oral ivermectin cost
Neuro Relief USA Neuro Relief USA Neuro Relief USA
Neuro Relief USA: 300 mg neurontin – Neuro Relief USA
https://neuroreliefusa.shop/# Neuro Relief USA
reputable indian online pharmacy: top 10 online pharmacy in india – indian pharmacy
Aloha! slot has 6 reels and 5 rows. And how many paylines are there? Today, they have released top-rated games like Aloha! Cluster Pays as well as hundreds of slot games spanning different themes and modes of gameplay. If you enjoy playing slots, you will enjoy NetEnt slots. There is definitely something for everyone. Something about NetEnt slots makes them stand out, but we’re guessing you’ll find out after a few spins on their top slots: Aloha Cluster Pays has the potential for some significant wins. The highest possible payout in the game is achieved by forming a cluster of 30 Red Tiki Totem symbols. This cluster will reward you with 10,000 coins. However, it’s important to note that your actual winnings will depend on your bet size. Smaller clusters of symbols can also yield substantial rewards, and the game’s unique mechanics can lead to multiple wins in a single spin.
https://www.thrinder.top/how-to-use-melbet-bonus-tips-for-uk-players/
These are the cross – which destroys symbols in a vertical and horizontal line – a Horizontal Destroyer, 3-row slot with 10 flashing win lines and having certain symbols become animated when theyre part of a win as well. Based on all of the information mentioned in this review, you can be sure that any Intouch Games slot is fair to the player and to the casino on which it appears. Aloha Cluster Pays is developed by Net Ent. To check out other fun themed formats, try their Egyptian themed game Pyramid Quest for Immortality. When it comes to default stake per spin, it stands at mere 10 coins, but you can increase it to 100 credits using bet level. Meanwhile, coin value ranges from $0.01 to $2, with Max Bet, Auto Play and Quick Spin options supported as well. Maximum cash out is $200,000 or 100,000 coins, while overall return to player stands above 96%. The fact that the pay lines are replaced by clusters in this game, makes every swirl a potential gain and increases your overall bounty.
Dakota here — I’ve tried cross-chain transfers and the trustworthy service impressed me.
I was skeptical, but after almost a year of staking, the clear transparency convinced me.
Online medicine home delivery: Indo-Generic Export – top 10 pharmacies in india
http://indogenericexport.com/# best online pharmacy india
https://bajameddirect.com/# BajaMed Direct
BajaMed Direct mexican pharmacies online mexican pharmacy
I was skeptical, but after since launch of testing new tokens, the responsive team convinced me.
https://indogenericexport.shop/# methocarbamol dosing
pharmacy order online: express pharmacy – US Meds Outlet
Taylor here — I’ve tried swapping tokens and the easy onboarding impressed me.
pharmacy website india: indian pharmacy – indianpharmacy com
https://bajameddirect.com/# mexico pharmacy
https://bajameddirect.com/# progreso, mexico pharmacy online
buy medicines online in india: Indo-Generic Export – best india pharmacy
BajaMed Direct BajaMed Direct BajaMed Direct
https://usmedsoutlet.shop/# US Meds Outlet
medication from mexico: is mexipharmacy legit – mexico pharmacy
indian pharmacy online: Indo-Generic Export – online pharmacy india
https://indogenericexport.com/# cheapest online pharmacy india
http://usmedsoutlet.com/# best online canadian pharmacy
online pharmacy india: indian pharmacy online – buy medicines online in india
indianpharmacy com: legitimate online pharmacies india – buy prescription drugs from india
https://usmedsoutlet.shop/# US Meds Outlet
http://usmedsoutlet.com/# US Meds Outlet
best online pharmacy india indian pharmacy online п»їlegitimate online pharmacies india
US Meds Outlet: US Meds Outlet – US Meds Outlet
Wow! Thank you! I continuously needed to write on my site something like that. Can I include a fragment of your post to my site?
https://usmedsoutlet.shop/# online pharmacies that use paypal
BajaMed Direct: BajaMed Direct – BajaMed Direct
medication from mexico: BajaMed Direct – BajaMed Direct
http://usmedsoutlet.com/# US Meds Outlet
https://bajameddirect.shop/# buying prescription drugs in mexico
mexipharmacy reviews: order medication from mexico – mexico pharmacy online
La tecnologia di Beintoo si basa su un SDK proprietario che raccoglie segnali di geolocalizzazione anonimi, da utenti che hanno previamente esplicitato il loro consenso. zafartools Gates-Of-Olympus main hujan lebat buruh pabrik menang 151 juta gates of olympus Siamo promotori di esperienze mobile memorabili che non risultino invasive per l’utente. Camera “deluxe” situata al secondo piano del corpo centrale con vista lago. digitaleyeofindia slot-depo-10k Altri servizi”Kinesis Personal”, vasca idromassaggio con cromoterapia, cabina doccia multifunzionale, bagno turco, soffione doccia, bocchette a getti verticali per massaggio, cromoterapia e impianto hi-fi, connessione per PC portatili e device mobili Il nostro team di specialisti è formato da professionisti altamente competenti e adatti a prendersi cura della tua salute.Per svolgere il loro lavoro al meglio si avvalgono di strumenti moderni ed efficienti, utili ad una diagnosi più chiara e puntuale.
https://temkarma.temkadisto.com/recensione-di-pir%d0%bets-di-elk-studios-unavventura-pirata-nei-casino-online-italiani/
Gates of Olympus 1000 si conferma come una delle slot più emozionanti del 2025, perfezionando la formula vincente dell’originale con un potenziale di vincita decuplicato. La combinazione di meccaniche innovative, RTP elevato e tema coinvolgente la rende una scelta eccellente per gli appassionati di slot ad alta volatilità. In generale, la colonna sonora e le animazioni di Gates of Olympus 1000 creano un attraente universo legato alla mitologia greca. Se si preferisce giocare su Gates of Olympus 1000 con denaro reale occorre prima registrarsi su uno o più siti online che offrono questa e altre slot machine. Per procedere all’apertura del conto gioco bisogna essere maggiorenni e, va da sé, accertarsi che l’operatore ADM abbia regolare licenza ADM. Si ricordi che le macchinette online rientrano nella categoria dei giochi di fortuna: questo vuol dire che la vincita potenziale prescinde dalle abilità personali e che ci si espone al rischio sì di accrescere ma anche di perdere il denaro puntato.
top 10 online pharmacy in india online pharmacy india top 10 pharmacies in india
Are you another Big Bass “fan”? Für unseren Casino Online Test haben wir ausgiebig NetBet Casino online Erfahrungen gesammelt. Das Fazit unseres Expertenteams lautet: Die Online Spielbank von NetBet bietet ein umfassendes Angebot, das rundum überzeugen kann. Die Bewertung fällt absolut positiv aus. Das Spielangebot spricht Fans von Echtgeld Casino Spielen besonders an. Sehr gut gelungen ist dabei die Instant Play Umsetzung. Können deutsche Spieler im NetBet Casino spielen? Für unseren Casino Online Test haben wir ausgiebig NetBet Casino online Erfahrungen gesammelt. Das Fazit unseres Expertenteams lautet: Die Online Spielbank von NetBet bietet ein umfassendes Angebot, das rundum überzeugen kann. Die Bewertung fällt absolut positiv aus. Das Spielangebot spricht Fans von Echtgeld Casino Spielen besonders an. Sehr gut gelungen ist dabei die Instant Play Umsetzung.
https://www.goodsun.be/1xbet-casino-review-das-online-casino-fur-deutsche-spieler/
mycasino is a brand of Grand Casino Luzern and a Swiss online casino with an official concession, based on the additional concession no. 2023-A-12-E dated 29 11 2023 granted by the Swiss Federal Council for the online operation of casino games. VERANTWORTUNGSBEWUSSTES SPIEL: Bei pirots-3 legen wir großen Wert auf verantwortungsbewusstes Spielen, sowohl für unsere Partner als auch für unsere Spieler. Wir sind der Meinung, dass das Spielen in einem Online-Casino immer angenehm sein und Spaß machen sollte. Lassen Sie sich nicht von Geldverlusten stressen – wenn Sie sich aufregen, machen Sie eine Pause. Um Ihnen zu helfen, die Kontrolle über Ihr Spielerlebnis zu behalten, bieten wir verschiedene Methoden an, die sicherstellen, dass Sie verantwortungsvoll spielen. Achten Sie auf die Umsatzbedingungen, die zeitlichen Beschränkungen und die zulässigen Spiele. Indem Sie Boni effektiv nutzen, können Sie Ihre Gewinnchancen erhöhen und das Beste aus Ihrem Pirots 3 Erlebnis machen.
top online pharmacy india: reputable indian online pharmacy – pharmacy website india
http://bajameddirect.com/# BajaMed Direct
best india pharmacy: indian pharmacy paypal – Online medicine order
http://indogenericexport.com/# pharmacy website india
The transparency around quick deposits is refreshing and builds trust. Support solved my issue in minutes.
The best choice I made for staking. Smooth and fast transactions.
Hi, just required you to know I he added your site to my Google bookmarks due to your layout. But seriously, I believe your internet site has 1 in the freshest theme I??ve came across. It extremely helps make reading your blog significantly easier.
https://indogenericexport.com/# zanaflex medication
BajaMed Direct: pharmacies in mexico – mexico online farmacia
indian pharmacy online: Indo-Generic Export – indianpharmacy com
https://indogenericexport.com/# Online medicine home delivery
US Meds Outlet US Meds Outlet rx pharmacy coupons
http://bajameddirect.com/# mexican drug store
BajaMed Direct: purple pharmacy mexico – mexican pharmacy ship to usa
Your style is so unique compared to many other people. Thank you for publishing when you have the opportunity,Guess I will just make this bookmarked.2
http://indogenericexport.com/# muscle relaxers over the counter
US Meds Outlet: canadian neighbor pharmacy – pharmacy com
certified canadian pharmacy: canadian pharmacy prices – cialis canadian pharmacy
http://bajameddirect.com/# mexico city pharmacy
Lovely just what I was looking for.Thanks to the author for taking his clock time on this one.
If you’d like to test the action before wagering real money, the Gates of Olympus Super Scatter demo is the perfect option. With virtual credits, you can explore all the features of the game risk-free – including tumbling wins, random multipliers, and the powerful new Super Scatter mechanic. It’s also a great way to see why this title stands out among popular bitcoin video slots. The Super scatter feature adds an extra layer of excitement to the game by increasing the initial payout from the Bonus round being triggered. If a Super scatter lands along side enough regular scatter symbols to trigger the bonus round, an increased initial payout will be awarded as well as the bonus round being triggered. Before we dive into the Super Scatter feature, let’s take a look at some key aspects of Gates of Olympus:
https://www.gregor-adv.com/?p=95410
PRAGMATIC PLAY adds to its award-winning Greek mythology franchise with Gates of Olympus 1000. Gates of Olympus 1000 transports players to the majestic realm of Mount Olympus, where the mighty Zeus rules. The game’s aesthetics are enchanting, featuring a vibrant and richly detailed backdrop of Olympus, adorned with grandiose pillars and mythical symbols. The visual appeal is complemented by a soundtrack that evokes a sense of epic adventure and divine intervention. Multiplier symbols are present on all reels in all phases of play. When a multiplier symbol hits, it gets a random value of x2 to x1,000. When a tumble sequence ends, the values of any multiplier symbols in view are added together and used to multiply the total win of the sequence. Whether you are an experienced player or just starting with slot games, Gates of Olympus 1000 will amaze you. The spectacular visuals will make you feel like you are on Olympus. The effects and visuals take you to unforgettable realms of ancient Greece.
https://indogenericexport.com/# robaxin medication
BajaMed Direct: mexican mail order pharmacy – BajaMed Direct
The Return to Player (RTP) percentage is 96.50%, and while we’ve seen better, this is actually a little above average. Gates of Olympus Super Scatter is a highly volatile game, so you can expect some pretty big wins, although they might not be as regular as you’d like. Betting flexibility supports a range of bankrolls, and the math profile is unapologetically high volatility—dry spells happen, but the upside is significant. For pacing, consider short, budgeted sessions with clear stop-loss and take-profit rules to ride momentum without overexposure. On mobile, swipe-friendly controls and clean iconography keep the action readable, even during rapid-fire tumbles. At Mostbet, quick deposit options, adjustable autospins, and round histories help you lock in a rhythm while tracking results. If you enjoy risk-forward play with explosive bonus potential, this mythic arena is a natural fit.
https://gta188.org/big-bass-bonanza-review-the-ultimate-uk-online-casino-fishing-slot/
To start enjoying online slots at Goldrush, you simply need to register an account with us by following the simple instructions. Once you have registered an account, you will receive a Welcome Offer & Bonus that will give you a head start in your Goldrush journey. (1) What makes Gates of Olympus Super Scatter different from the original? Physical address: 66 Ontdekkers & Ruhama Rd | Roodepoort | South Africa | PO BOX 7383, Westgate, 1734 About So what are you waiting for? SpinBet is your ticket to a world of non-stop casino thrills, right from the comfort of your own home. Come on in and see what all the fuss is about! Care instructions Although Portapa 2 (Pty) Ltd t a SUPABETS ® and its proprietors make every effort to keep the information supplied on its website current and in accordance with gambling legislation and guidelines, it does not accept any liability for any damages, gambling addictions, side effects, adverse effects, medical complications, injury or death arising from the use of any information available on its website. By making use of the facilities on this site, the user warrants that he she is older than 18 Years.
BajaMed Direct farmacia online usa BajaMed Direct
US Meds Outlet: online pharmacy search – US Meds Outlet
I really like your writing style, excellent information, appreciate it for putting up : D.
https://bajameddirect.shop/# tijuana pharmacy online
US Meds Outlet: best rated canadian pharmacy – US Meds Outlet
by | Jul 22, 2025 | Uncategorized Secret of the Stones It comes down with high volatility, a return-to-player (RTP) from 96.28percent, and a max earn out of 3000x. The fresh high investing icons are graphics out of characters and you may stuff of the new story book. They have been an excellent watering can be, a keen axe, an excellent goat, a-two-going monster, and you can Jack themselves. Unique symbols were a jewel boobs, the video game image, and you may a key. Should gambling be allowed that is a bit disconcerting for operators, whose current regime dates from 1931. It will also display an information bubble giving the exact address with latitude and longitude, fun. So if you choose a 12-month plan, and original ways to liven up their social media. Ten US states have made online gambling altogether illegal, accusing them of deceptive practices that encourage gambling addiction. I constantly think of what I’d like to buy should I profit, PlayAmo features some special games with close to zero house edge. If you win, while Man City stay in second on 66 points and they are now 23 points behind Premier League champions Liverpool.
http://dev5.wabisabi.co.mz/mr-pacho-casino-an-engaging-casino-game-experience-for-australian-players/
Yes, Kapwing supports collaborative video editing by allowing users to create free, shared workspaces they can invite team members to join. 100+ collaborative video editing tools to streamline the creative process are also available in the online video editor. Teams can also upload a Brand Kit to their workspace or set one up together in real-time, helping ensure that assets are readily available and organized. “Separate tracks for each guest give me freedom in editing. And you haveto see the incredible AI generated captions that can be easily edited” Absolutely, free video editor can be installed on Windows laptops. Check the system requirements to make sure your laptop meets them (including OS version). We update the software on a regular basis to introduce new features and keep it bug-free. Please check the Video Editor changelog for more information.
https://bajameddirect.shop/# pharmacy delivery
best rated canadian pharmacy: US Meds Outlet – US Meds Outlet
US Meds Outlet: canada discount pharmacy – cheapest pharmacy to get prescriptions filled
http://indogenericexport.com/# buy methocarbamol without prescription
india pharmacy mail order: US Meds Outlet – US Meds Outlet
mexico farmacia BajaMed Direct purple pharmacy online ordering
mexicanrxpharm: BajaMed Direct – BajaMed Direct
http://indogenericexport.com/# methocarbamol medication
reputable indian pharmacies: buy medicines online in india – п»їlegitimate online pharmacies india
http://bajameddirect.com/# purple pharmacy
best online pharmacy india: Indo-Generic Export – best india pharmacy
BajaMed Direct: BajaMed Direct – los algodones pharmacy online
mail order pharmacy india world pharmacy india indian pharmacy paypal
https://usmedsoutlet.shop/# top 10 online pharmacy in india
mexican pharmacy las vegas: online pharmacy in mexico – BajaMed Direct
http://usmedsoutlet.com/# pharmacy online uae
US Meds Outlet: cheap viagra online canadian pharmacy – US Meds Outlet
Australia Fast Payouts And Vip Baccarat
US Meds Outlet: US Meds Outlet – california pharmacy
http://indogenericexport.com/# tizanidine hydrochloride
Online medicine home delivery: indianpharmacy com – india online pharmacy
I think other web site proprietors should take this site as an model, very clean and great user friendly style and design, let alone the content. You’re an expert in this topic!
good value pharmacy: canadian pharmacy viagra – canadian pharmacy phone number
Real Money Pokies Win Big Australia Wake Up Richer
indian pharmacies safe Indo-Generic Export india online pharmacy
https://indogenericexport.com/# muscle relaxers over the counter
costco online pharmacy: canadian pharmacy viagra 50 mg – best online pharmacy india
Thank you for sharing with us, I believe this website really stands out : D.
pharmacies in mexico: BajaMed Direct – mexico meds
online pharmacies BajaMed Direct BajaMed Direct
I genuinely enjoy looking at on this internet site, it contains great articles. “We find comfort among those who agree with us–growth among those who don’t.” by Frank A. Clark.
https://bajameddirect.com/# BajaMed Direct
Hiya, I am really glad I have found this info. Nowadays bloggers publish only about gossips and net and this is actually irritating. A good website with interesting content, that’s what I need. Thank you for keeping this website, I will be visiting it. Do you do newsletters? Can not find it.
BajaMed Direct: pharmacy in mexico – mexican pharmacy
http://usmedsoutlet.com/# US Meds Outlet
Real money online casino Australia – best bonuses and high RTP pokies
It’s actually a great and useful piece of info. I’m glad that you shared this useful information with us. Please keep us informed like this. Thanks for sharing.
https://bajameddirect.shop/# BajaMed Direct
I got what you mean , thankyou for putting up.Woh I am delighted to find this website through google. “Delay is preferable to error.” by Thomas Jefferson.
Real Money Bonus No Deposit Australia Feel The Glory Now
http://indogenericexport.com/# antispasmodic medication
online shopping pharmacy india: Indo-Generic Export – online pharmacy india
canadianpharmacymeds com [url=http://usmedsoutlet.com/#]US Meds Outlet[/url] reliable rx pharmacy
https://bajameddirect.com/# BajaMed Direct
https://bajameddirect.shop/# BajaMed Direct
Best Real Money Online Casino Australia Your Real Big Moment Now
rxpharmacycoupons: US Meds Outlet – canadian pharmacy antibiotics
hey there and thank you to your information – I have certainly picked up something new from right here. I did alternatively experience some technical points using this website, since I skilled to reload the site lots of occasions previous to I may just get it to load properly. I have been brooding about if your web host is OK? Now not that I am complaining, however sluggish loading cases times will sometimes affect your placement in google and can harm your high-quality ranking if advertising and ***********|advertising|advertising|advertising and *********** with Adwords. Anyway I am including this RSS to my email and can glance out for much more of your respective fascinating content. Ensure that you update this again soon..
Online Casino Australia Real Money Feel Real Unstoppable Tonight
buy tizanidine without prescription: buy tizanidine without prescription – methocarbamol medication
Best Real Money Casino Pokies Australia Your Story Changes
We are a group of volunteers and starting a new scheme in our community. Your web site provided us with valuable information to work on. You have done an impressive job and our entire community will be grateful to you.
https://indogenericexport.shop/# п»їbest muscle relaxer
US Meds Outlet US Meds Outlet canadian pharmacy cialis 20mg
Real Money Wins Casino Australia Real Feeling Of Million Cashouts
https://indogenericexport.com/# п»їlegitimate online pharmacies india
Online medicine order: Indo-Generic Export – indianpharmacy com
https://gastrohealthmonitor.com/# Gastro Health Monitor
Hiya, I am really glad I have found this information. Today bloggers publish just about gossips and internet and this is really annoying. A good website with interesting content, this is what I need. Thanks for keeping this web-site, I will be visiting it. Do you do newsletters? Can not find it.
Real Money Casino Australia Feel The Power Of Winning Big
buy zofran: Nausea Care US – buy zofran online
Wow, amazing blog structure! How long have you ever been running a blog for? you make blogging glance easy. The full glance of your site is magnificent, as well as the content!
https://nauseacareus.com/# Nausea Care US
http://spasmreliefprotocols.com/# buy methocarbamol without prescription
methocarbamol medication Spasm Relief Protocols п»їbest muscle relaxer
methocarbamol dosing: robaxin – methocarbamol dosing
https://nauseacareus.com/# zofran medication
Best Real Money Pokies Australia Break Free From Routine
https://spasmreliefprotocols.com/# methocarbamol dosing
prilosec otc: prilosec generic – Gastro Health Monitor
F*ckin’ amazing things here. I am very glad to see your article. Thanks a lot and i’m looking forward to contact you. Will you please drop me a mail?
https://nauseacareus.shop/# generic for zofran
tizanidine muscle relaxer: Spasm Relief Protocols – п»їbest muscle relaxer
Nausea Care US zofran dosage ondansetron zofran
http://spasmreliefprotocols.com/# robaxin medication
over the counter muscle relaxers that work: Spasm Relief Protocols – otc muscle relaxer
As a Newbie, I am continuously exploring online for articles that can aid me. Thank you
I got what you intend, appreciate it for posting.Woh I am thankful to find this website through google. “I would rather be a coward than brave because people hurt you when you are brave.” by E. M. Forster.
https://spasmreliefprotocols.shop/# methocarbamol medication
I like this web site very much so much fantastic information.
ondansetron medication: zofran dosage – ondestranon zofran
https://nauseacareus.shop/# Nausea Care US
It’s hard to find knowledgeable people on this topic, but you sound like you know what you’re talking about! Thanks
Gastro Health Monitor Gastro Health Monitor prilosec otc
Wonderful beat ! I wish to apprentice while you amend your site, how could i subscribe for a blog website? The account helped me a acceptable deal. I had been a little bit acquainted of this your broadcast provided bright clear concept
tizanidine hcl: Spasm Relief Protocols – tizanidine medication
https://spasmreliefprotocols.shop/# antispasmodic medication
Loan watch, players on temporary deals and their performances tracked
Superb blog! Do you have any recommendations for aspiring writers? I’m hoping to start my own site soon but I’m a little lost on everything. Would you suggest starting with a free platform like WordPress or go for a paid option? There are so many options out there that I’m completely overwhelmed .. Any suggestions? Appreciate it!
https://gastrohealthmonitor.shop/# Gastro Health Monitor
п»їomeprazole prilosec: Gastro Health Monitor – prilosec omeprazole
I really like your writing style, fantastic information, regards for putting up :D. “I hate mankind, for I think myself one of the best of them, and I know how bad I am.” by Joseph Baretti.
월드카지노
I value the useful analytics and scalable features. This site is reliable.
Gastro Health Monitor prilosec generic Gastro Health Monitor
https://gastrohealthmonitor.shop/# Gastro Health Monitor
ondansetron medication: Nausea Care US – generic zofran
https://nauseacareus.shop/# ondansetron
I¦ll immediately seize your rss feed as I can not to find your email subscription hyperlink or newsletter service. Do you’ve any? Please allow me realize in order that I may subscribe. Thanks.
omeprazole brand name: Gastro Health Monitor – Gastro Health Monitor
https://gastrohealthmonitor.com/# Gastro Health Monitor
Nausea Care US zofran over the counter ondestranon zofran
https://spasmreliefprotocols.com/# over the counter muscle relaxers that work
Gastro Health Monitor: omeprazole brand name – omeprazole over the counter
manta bridge protocol
моней х моней х .
Greetings, if you are looking for a trusted drugstore to purchase health products securely. I found MagMaxHealth: buspar. Stocking a wide range of meds at the best prices. Hope this helps.
Hi, I recently found side effects info about various medications, I found this online directory. It covers how to take meds very well. Source: https://magmaxhealth.com/Methotrexate. Good info.
regarding the dosage guidelines, you can consult the official information page at: https://magmaxhealth.com/toradol.html to ensure clinical details.
To understand the side effects and interactions, data is available at the detailed guide on: https://magmaxhealth.com/lipitor.html to ensure correct administration.
моней х моней х .
Hi all, I recently found dosage instructions regarding prescription drugs, I recommend this online directory. You can read about usage and risks clearly. See details: https://magmaxhealth.com/Naltrexone. Very informative.
Greetings, I recently found a useful article regarding various medications, I found this useful resource. It covers usage and risks clearly. Read more here: https://magmaxhealth.com/Allopurinol. Good info.
I personally find that i’ve been active for a year, mostly for portfolio tracking, and it’s always seamless withdrawals. Perfect for both new and experienced traders.
Hi, if you need a great health store to order pills online. Check out this pharmacy: lamictal. Stocking a wide range of meds at the best prices. Best regards.
Hey everyone, for those searching for detailed information about common medicines, check out this medical reference. It explains safety protocols very well. Link: https://magmaxhealth.com/Lamictal. Good info.
I personally find that i’ve been active for over two years, mostly for portfolio tracking, and it’s always clear transparency. I moved funds across chains without a problem.
I’ve been active for almost a year, mostly for using the API, and it’s always trustworthy service.
моней икс моней икс .
Thank you for any other informative site. Where else may just I am getting that type of info written in such a perfect way? I’ve a project that I am just now running on, and I have been on the look out for such info.
In terms of side effects and interactions, please review this resource: https://magmaxhealth.com/buspar.html for clinical details.
NEUROCEPT
NEUROCEPT REVIEW
NEUROCEPT REVIEWS
Yay google is my king aided me to find this outstanding internet site! .
Hello, if anyone needs a useful article regarding common medicines, take a look at this drug database. It explains how to take meds clearly. See details: https://magmaxhealth.com/Lipitor. Thanks.
NEUROCEPT
NEUROCEPT
NEUROCEPT REVIEW
NEUROCEPT REVIEW
NEUROCEPT
Hi guys, I wanted to share an affordable drugstore to buy health products cheaply. Check out MagMaxHealth: meclizine. Selling high quality drugs at the best prices. Cheers.
NEUROCEPT REVIEW
NEUROCEPT REVIEW
NEUROCEPT
NEUROCEPT REVIEWS
NEUROCEPT REVIEW
NEUROCEPT REVIEW
Hi, if you are looking for a useful article about health treatments, check out this drug database. You can read about drug interactions very well. See details: https://magmaxhealth.com/Buspar. Good info.
NEUROCEPT REVIEWS
NEUROCEPT
NEUROCEPT
For a complete overview of safety protocols, it is recommended to check the detailed guide on: https://magmaxhealth.com/lamictal.html for safe treatment.
NEUROCEPT
After examine a couple of of the weblog posts in your web site now, and I actually like your approach of blogging. I bookmarked it to my bookmark website list and can be checking again soon. Pls check out my web site as well and let me know what you think.
Hey everyone, anyone searching for an affordable online pharmacy to purchase prescription drugs securely. Check out this site: naltrexone. Selling high quality drugs and huge discounts. Cheers.
Excellent weblog right here! Additionally your website loads up very fast! What host are you the use of? Can I get your affiliate hyperlink for your host? I desire my site loaded up as fast as yours lol
Hi, for those searching for dosage instructions on health treatments, I found this drug database. It explains how to take meds in detail. Reference: https://magmaxhealth.com/Methotrexate. Good info.
Hello, for those searching for dosage instructions regarding various medications, take a look at this medical reference. It covers how to take meds clearly. Read more here: https://magmaxhealth.com/Rosuvastatin. Good info.
I regard something truly special in this website.
Hey everyone, anyone searching for a great online pharmacy to order pills hassle-free. I found this site: clomid. Stocking generic tablets at the best prices. Hope this helps.
Youre so cool! I dont suppose Ive read something like this before. So good to seek out any individual with some authentic ideas on this subject. realy thank you for beginning this up. this web site is one thing that’s wanted on the net, someone with slightly originality. helpful job for bringing something new to the internet!
Greetings, I wanted to share an affordable online pharmacy to order medicines cheaply. Take a look at this site: clomid. Stocking generic tablets with fast shipping. Best regards.
The following time I read a weblog, I hope that it doesnt disappoint me as much as this one. I mean, I do know it was my choice to learn, however I truly thought youd have one thing fascinating to say. All I hear is a bunch of whining about one thing that you can fix when you werent too busy in search of attention.
Hello, for those searching for side effects info regarding prescription drugs, take a look at this drug database. It covers drug interactions very well. Reference: https://magmaxhealth.com/Celebrex. Good info.
Hey everyone, for those searching for a medical guide regarding common medicines, I found this health wiki. You can read about usage and risks clearly. Source: https://magmaxhealth.com/Clomid. Thanks.
Elavil Amitriptyline Generic Elavil
Great post. I am facing a couple of these problems.
真实的人类第二季高清完整版运用AI智能推荐算法,海外华人可免费观看最新热播剧集。
https://amitrip.us.com/# Elavil
cost of generic propecia tablets: Follicle Insight – Follicle Insight
https://follicle.us.com/# propecia tablets
Hello There. I found your blog using msn. This is a very well written article. I’ll make sure to bookmark it and return to read more of your useful info. Thanks for the post. I’ll definitely return.
cost of clomid: can i buy cheap clomid online – fertility pct guide
It’s really a great and helpful piece of info. I am satisfied that you shared this helpful information with us. Please stay us up to date like this. Thanks for sharing.
一饭封神在线免费在线观看,海外华人专属平台,高清无广告体验。
https://iver.us.com/# ivermectin australia
Amitriptyline: buy Elavil – Amitriptyline
AmiTrip Relief Store: AmiTrip – Generic Elavil
https://fertilitypctguide.us.com/# where to buy generic clomid tablets
generic clomid without insurance can you buy cheap clomid no prescription fertility pct guide
Very interesting topic, regards for posting.
https://follicle.us.com/# Follicle Insight
where to get generic clomid price: fertility pct guide – fertility pct guide
AmiTrip: buy Elavil – Amitriptyline
https://follicle.us.com/# cost generic propecia price
https://iver.us.com/# stromectol generic name
Amitriptyline: AmiTrip Relief Store – Generic Elavil
Iver Protocols Guide: Iver Protocols Guide – ivermectin 3mg tablets price
I’m still learning from you, while I’m improving myself. I absolutely enjoy reading everything that is written on your website.Keep the aarticles coming. I liked it!
https://amitrip.us.com/# AmiTrip Relief Store
how to get clomid fertility pct guide fertility pct guide
The cross-chain transfers tools are responsive team and clear transparency.
I was skeptical, but after several months of cross-chain transfers, the clear transparency convinced me. Support solved my issue in minutes.
Follicle Insight: Follicle Insight – Follicle Insight
clomid medication: generic clomid without dr prescription – fertility pct guide
https://fertilitypctguide.us.com/# buy clomid
EREFORCE REVIEW
EREFORCE REVIEW
EREFORCE REVIEW
https://fertilitypctguide.us.com/# can you buy clomid without prescription
EREFORCE REVIEWS
EREFORCE
EREFORCE REVIEW
EREFORCE
fertility pct guide: fertility pct guide – can you get generic clomid without rx
EREFORCE
EREFORCE REVIEWS
EREFORCE
AmiTrip: Generic Elavil – Generic Elavil
EREFORCE REVIEWS
EREFORCE REVIEWS
EREFORCE
NuStar Online Casino Login and Register pages are designed to guide users through account access and registration processes. These pages typically focus on clear instructions, secure access, and step-by-step guidance to help users understand how to create or access an account efficiently.
I was looking through some of your blog posts on this site and I think this web site is very instructive! Keep posting.
EREFORCE
https://iver.us.com/# ivermectin 5 mg price
Referee decisions, official calls and controversial moments documented
EREFORCE
https://fertilitypctguide.us.com/# fertility pct guide
Iver Protocols Guide: ivermectin 2% – ivermectin 500mg
ivermectin 4000 mcg Iver Protocols Guide ivermectin cream cost
EREFORCE REVIEWS
EREFORCE REVIEWS
EREFORCE
I am thankful that I observed this blog, just the right information that I was looking for! .
Follicle Insight: propecia prices – cost of propecia without prescription
EREFORCE
EREFORCE
EREFORCE REVIEW
EREFORCE
EREFORCE
EREFORCE REVIEWS
EREFORCE
EREFORCE REVIEW
https://follicle.us.com/# Follicle Insight
I enjoy the efforts you have put in this, thankyou for all the great blog posts.
EREFORCE
EREFORCE REVIEW
Amitriptyline: AmiTrip – AmiTrip Relief Store
Hello, you used to write excellent, but the last few posts have been kinda boring… I miss your great writings. Past several posts are just a bit out of track! come on!
buy Elavil: AmiTrip – Generic Elavil
Valuable information. Lucky me I found your web site by accident, and I’m shocked why this accident didn’t happened earlier! I bookmarked it.
https://follicle.us.com/# Follicle Insight
BLUE CELTIC SALT TRICK
https://follicle.us.com/# Follicle Insight
I have recently started a blog, the information you offer on this site has helped me greatly. Thank you for all of your time & work.
BLUE SALT TRICK FOR MEN
BLUE SALT TRICK FOR MEN
Hi there all, here every person is sharing these kinds of familiarity, therefore it’s fastidious to read this website, and I used to pay a quick visit this website everyday.
byueuropaviagraonline
where can i get clomid without prescription: fertility pct guide – fertility pct guide
Iver Protocols Guide buy stromectol online Iver Protocols Guide
Follicle Insight: Follicle Insight – buying cheap propecia online
you’ve an amazing weblog here! would you prefer to make some invite posts on my weblog?
https://iver.us.com/# Iver Protocols Guide
Pretty! This was a really wonderful post. Thank you for your provided information.
https://amitrip.us.com/# AmiTrip Relief Store
order cheap clomid for sale: fertility pct guide – where buy clomid without dr prescription
AmiTrip: buy Elavil – AmiTrip Relief Store
https://amitrip.us.com/# Amitriptyline
USA Flights 24 — search engine helps you compare prices from hundreds of airlines and travel sites in seconds — so you can find cheap flights fast. Whether you’re planning a weekend getaway, a cross-country adventure, or an international vacation, we make it easy to fly for less.
Amitriptyline: AmiTrip – Amitriptyline
AmiTrip Relief Store Generic Elavil Amitriptyline
https://iver.us.com/# ivermectin purchase
Iver Protocols Guide: stromectol uk buy – can you buy stromectol over the counter
https://follicle.us.com/# cheap propecia prices
Very interesting subject , thanks for posting.
Iver Protocols Guide: ivermectin rx – Iver Protocols Guide
GELATIN TRICK RECIPE
GELATIN TRICK RECIPE
https://amitrip.us.com/# AmiTrip
cost cheap propecia tablets: Follicle Insight – get generic propecia pill
Can I just say what a relief to find someone who actually knows what theyre talking about on the internet. You definitely know how to bring an issue to light and make it important. More people need to read this and understand this side of the story. I cant believe youre not more popular because you definitely have the gift.
PINK GELATIN TRICK
https://iver.us.com/# stromectol tablets uk
Iver Protocols Guide: п»їorder stromectol online – Iver Protocols Guide
GELATIN TRICK RECIPE
GELATIN TRICK
PINK GELATIN TRICK
GELATIN TRICK
fertility pct guide fertility pct guide can i get cheap clomid online
https://follicle.us.com/# Follicle Insight
GELATIN TRICK
cost propecia without prescription: get propecia – Follicle Insight
Amitriptyline: Generic Elavil – Elavil
GELATIN TRICK RECIPE
GELATIN TRICK
Way cool, some valid points! I appreciate you making this article available, the rest of the site is also high quality. Have a fun.
GELATIN TRICK
PINK GELATIN TRICK
https://iver.us.com/# ivermectin 1 cream
I was suggested this web site by my cousin. I’m not sure whether this post is written by him as nobody else know such detailed about my trouble. You are incredible! Thanks!
PINK GELATIN TRICK
https://iver.us.com/# Iver Protocols Guide
PINK GELATIN TRICK
Chao c? nha, bac nao mu?n tim nha cai uy tin d? cay cu?c N? Hu thi vao ngay ch? nay. T?c d? ban th?: Game bai d?i thu?ng. Chi?n th?ng nhe.
GELATIN TRICK
Hi các bác, người anh em nào cần nhà cái uy tín để gỡ gạc Nổ Hũ thì tham khảo địa chỉ này. Nạp rút 1-1: Dola789. Về bờ thành công.
PINK GELATIN TRICK
奥美迦奥特曼高清完整官方版,海外华人可免费观看最新热播剧集。
Hello mọi người, ai đang tìm chỗ nạp rút nhanh để giải trí Casino thì xem thử chỗ này. Uy tín luôn: https://pacebhadrak.org.in/#. Chúc anh em may mắn.
GELATIN TRICK
GELATIN TRICK
I found your blog website on google and examine just a few of your early posts. Continue to keep up the superb operate. I simply additional up your RSS feed to my MSN Information Reader. Looking for forward to studying extra from you in a while!…
Hello m?i ngu?i, ai dang tim san choi d?ng c?p d? gi?i tri Da Ga thi xem th? ch? nay. Khong lo l?a d?o: Nha cai Dola789. V? b? thanh cong.
PINK GELATIN TRICK
GELATIN TRICK RECIPE
GELATIN TRICK RECIPE
Chao c? nha, n?u anh em dang ki?m c?ng game khong b? ch?n d? cay cu?c Da Ga thi vao ngay ch? nay. Dang co khuy?n mai: Nha cai Dola789. Chi?n th?ng nhe.
Hi, I do believe this is an excellent web site. I stumbledupon it 😉 I am going to return once again since I book marked it.
Money and freedom is the best way to change, may you be rich and continue to help
other people.
GELATIN TRICK
Chào anh em, nếu anh em đang kiếm sân chơi đẳng cấp để giải trí Đá Gà thì vào ngay trang này nhé. Đang có khuyến mãi: Sunwin web. Chúc các bác rực rỡ.
GELATIN TRICK
Chào cả nhà, ai đang tìm sân chơi đẳng cấp để giải trí Tài Xỉu thì xem thử chỗ này. Đang có khuyến mãi: Tải Sunwin. Về bờ thành công.
GELATIN TRICK RECIPE
PINK GELATIN TRICK
GELATIN TRICK RECIPE
PINK GELATIN TRICK
Xin chào 500 anh em, nếu anh em đang kiếm chỗ nạp rút nhanh để cày cuốc Tài Xỉu thì tham khảo trang này nhé. Đang có khuyến mãi: Tải app Dola789. Chúc các bác rực rỡ.
PINK GELATIN TRICK
Xin chao 500 anh em, n?u anh em dang ki?m nha cai uy tin d? choi Casino d?ng b? qua trang nay nhe. N?p rut 1-1: https://gramodayalawcollege.org.in/#. Chuc cac bac r?c r?.
Hello mọi người, bác nào muốn tìm nhà cái uy tín để giải trí Đá Gà thì vào ngay con hàng này. Tốc độ bàn thờ: https://pacebhadrak.org.in/#. Chúc anh em may mắn.
Hi các bác, người anh em nào cần nhà cái uy tín để cày cuốc Game bài thì tham khảo trang này nhé. Không lo lừa đảo: https://pacebhadrak.org.in/#. Chúc anh em may mắn.
BAKING SODA TRICK FOR MEN
Xin chao 500 anh em, ai dang tim san choi d?ng c?p d? cay cu?c Tai X?u thi xem th? con hang nay. Uy tin luon: bj88. Chuc anh em may m?n.
SALT TRICK FOR MEN
Hello m?i ngu?i, n?u anh em dang ki?m trang choi xanh chin d? cay cu?c Tai X?u thi tham kh?o d?a ch? nay. Khong lo l?a d?o: Link khong b? ch?n. Hup l?c d?y nha.
Hi các bác, người anh em nào cần trang chơi xanh chín để cày cuốc Game bài thì xem thử trang này nhé. Tốc độ bàn thờ: Tải app Dola789. Húp lộc đầy nhà.
BLUE SALT TRICK FOR MEN
Hi các bác, người anh em nào cần trang chơi xanh chín để gỡ gạc Nổ Hũ đừng bỏ qua địa chỉ này. Không lo lừa đảo: Sunwin web. Về bờ thành công.
BLUE SALT TRICK FOR MEN
Chào cả nhà, người anh em nào cần nhà cái uy tín để cày cuốc Game bài thì tham khảo trang này nhé. Đang có khuyến mãi: https://pacebhadrak.org.in/#. Chúc anh em may mắn.
BLUE SALT TRICK FOR MEN
I conceive you have mentioned some very interesting details, appreciate it for the post.
BLUE SALT TRICK FOR MEN
Hello m?i ngu?i, ai dang tim nha cai uy tin d? g? g?c Casino thi vao ngay d?a ch? nay. T?c d? ban th?: bj88. Chuc anh em may m?n.
BAKING SODA TRICK FOR MEN
BLUE SALT TRICK FOR MEN
Xin chào 500 anh em, bác nào muốn tìm trang chơi xanh chín để giải trí Tài Xỉu thì xem thử trang này nhé. Đang có khuyến mãi: https://gramodayalawcollege.org.in/#. Về bờ thành công.
I really like assembling useful information , this post has got me even more info! .
BLUE SALT TRICK FOR MEN
Hi các bác, người anh em nào cần nhà cái uy tín để chơi Tài Xỉu đừng bỏ qua con hàng này. Đang có khuyến mãi: Đăng nhập BJ88. Về bờ thành công.
SALT TRICK FOR MEN
BLUE SALT TRICK FOR MEN
Chào cả nhà, người anh em nào cần nhà cái uy tín để chơi Tài Xỉu đừng bỏ qua địa chỉ này. Uy tín luôn: Tải app BJ88. Húp lộc đầy nhà.
Hello m?i ngu?i, ai dang tim trang choi xanh chin d? choi Game bai thi xem th? ch? nay. N?p rut 1-1: Link vao BJ88. V? b? thanh cong.
Very interesting information!Perfect just what I was looking for!
Hi các bác, người anh em nào cần chỗ nạp rút nhanh để chơi Game bài thì tham khảo chỗ này. Không lo lừa đảo: Link vào BJ88. Húp lộc đầy nhà.
Hi cac bac, n?u anh em dang ki?m nha cai uy tin d? cay cu?c Game bai thi vao ngay d?a ch? nay. Dang co khuy?n mai: Sunwin web. Chi?n th?ng nhe.
Hello mọi người, người anh em nào cần nhà cái uy tín để chơi Tài Xỉu thì tham khảo trang này nhé. Không lo lừa đảo: Link tải Sunwin. Húp lộc đầy nhà.
Hi cac bac, n?u anh em dang ki?m san choi d?ng c?p d? choi Game bai thi xem th? d?a ch? nay. T?c d? ban th?: BJ88. Hup l?c d?y nha.
Xin chào 500 anh em, bác nào muốn tìm trang chơi xanh chín để giải trí Tài Xỉu thì tham khảo trang này nhé. Không lo lừa đảo: Link không bị chặn. Chiến thắng nhé.
Hello mọi người, bác nào muốn tìm chỗ nạp rút nhanh để gỡ gạc Nổ Hũ thì xem thử con hàng này. Tốc độ bàn thờ: Link vào BJ88. Chiến thắng nhé.
Chào cả nhà, ai đang tìm chỗ nạp rút nhanh để gỡ gạc Casino thì tham khảo trang này nhé. Không lo lừa đảo: bj88. Về bờ thành công.
Simply a smiling visitant here to share the love (:, btw outstanding design and style.
Hello m?i ngu?i, n?u anh em dang ki?m ch? n?p rut nhanh d? g? g?c Tai X?u thi tham kh?o trang nay nhe. Uy tin luon: sun win. V? b? thanh cong.
Xin chào 500 anh em, người anh em nào cần chỗ nạp rút nhanh để cày cuốc Game bài thì tham khảo chỗ này. Nạp rút 1-1: https://homemaker.org.in/#. Chúc anh em may mắn.
Just wanna comment on few general things, The website style and design is perfect, the content is rattling fantastic. “In business school classrooms they construct wonderful models of a nonworld.” by Peter Drucker.
Hello mọi người, nếu anh em đang kiếm trang chơi xanh chín để giải trí Game bài thì vào ngay chỗ này. Đang có khuyến mãi: https://pacebhadrak.org.in/#. Húp lộc đầy nhà.
BLUE SALT TRICK FOR MEN
Hello mọi người, bác nào muốn tìm sân chơi đẳng cấp để giải trí Game bài thì xem thử con hàng này. Đang có khuyến mãi: sun win. Chúc anh em may mắn.
Chao anh em, n?u anh em dang ki?m ch? n?p rut nhanh d? g? g?c Tai X?u d?ng b? qua d?a ch? nay. Dang co khuy?n mai: https://homemaker.org.in/#. Chi?n th?ng nhe.
SALT TRICK FOR MEN
I am often to blogging and i really appreciate your content. The article has really peaks my interest. I am going to bookmark your site and keep checking for new information.
BLUE SALT TRICK FOR MEN
Chao c? nha, n?u anh em dang ki?m nha cai uy tin d? choi Game bai thi vao ngay trang nay nhe. N?p rut 1-1: Sunwin web. Chuc cac bac r?c r?.
BLUE SALT TRICK FOR MEN
SALT TRICK FOR MEN
Hi các bác, nếu anh em đang kiếm nhà cái uy tín để cày cuốc Tài Xỉu thì vào ngay con hàng này. Không lo lừa đảo: Nhà cái Dola789. Chiến thắng nhé.
SALT TRICK FOR MEN
I have been exploring for a little bit for any high quality articles or weblog posts in this kind of area . Exploring in Yahoo I ultimately stumbled upon this site. Studying this info So i¦m satisfied to show that I’ve a very good uncanny feeling I came upon exactly what I needed. I so much for sure will make sure to don¦t fail to remember this site and provides it a look regularly.
BAKING SODA TRICK FOR MEN
Hello mọi người, bác nào muốn tìm sân chơi đẳng cấp để giải trí Game bài thì vào ngay địa chỉ này. Đang có khuyến mãi: Link tải Sunwin. Chúc các bác rực rỡ.
Hello m?i ngu?i, ai dang tim trang choi xanh chin d? g? g?c Game bai thi vao ngay d?a ch? nay. T?c d? ban th?: Link khong b? ch?n. Chuc cac bac r?c r?.
Chào anh em, bác nào muốn tìm cổng game không bị chặn để gỡ gạc Casino thì vào ngay địa chỉ này. Đang có khuyến mãi: https://homemaker.org.in/#. Chiến thắng nhé.
Xin chào 500 anh em, nếu anh em đang kiếm nhà cái uy tín để gỡ gạc Nổ Hũ thì tham khảo chỗ này. Uy tín luôn: Dola789. Về bờ thành công.
Dead composed articles, appreciate it for information. “The last time I saw him he was walking down Lover’s Lane holding his own hand.” by Fred Allen.
When you win, the cluster will remain in place while the reels spin again to give you a chance of winning for a second time. Should the same cluster grow, you’ll get to spin yet again! Dig out the ukulele, because you’re going to want to celebrate. Play Aloha! Cluster Pays at MrQ today. Aloha! Cluster Pays: A tropical NetEnt slot with unique mechanics and big wins! Online casinos supporting this gamble may offer extra features and or bonus rounds. You can click the “play now” button to see all of the offers. You can check out all the latest Aloha! Cluster Pays and other slot machine offers in our special offer & bonus promotion page. Email:[email protected] You can email the site owner to let them know you were blocked. Please include what you were doing when this page came up and the Cloudflare Ray ID found at the bottom of this page.
https://plinetpi.sites.sch.gr/wild-card-city-casino-review-a-thrilling-experience-for-australian-players/
The sheer size of the Slotnite Casino games library plays a huge part in the site’s success. There are over 1,500 casino games in total from world-class software developers. With helpful tabs to help you filter between “New” titles, “Must Go Jackpots”, “Drops & Wins”, and all your favourite slots, table games, and live dealer titles, there is something for everyone at Slotnite Casino. Here’s a look at the main gaming categories in a little more detail. I have enriched natural remedies and medicine since my childhood. In 2019 I have made a decision to deepen my knowledge and took on master herbalist course, then acupuncture and other studies. However, to succeed and achieve wellness I endeavor to discover best natural supplements and vitamins, which you can find in this store.
Hello m?i ngu?i, ngu?i anh em nao c?n nha cai uy tin d? cay cu?c Game bai thi tham kh?o trang nay nhe. T?c d? ban th?: Link t?i Sunwin. Chuc anh em may m?n.
Hello m?i ngu?i, n?u anh em dang ki?m trang choi xanh chin d? gi?i tri Casino d?ng b? qua con hang nay. Dang co khuy?n mai: Dang nh?p BJ88. Hup l?c d?y nha.
Chào cả nhà, ai đang tìm cổng game không bị chặn để gỡ gạc Casino thì xem thử con hàng này. Đang có khuyến mãi: Sunwin web. Húp lộc đầy nhà.
Hello mọi người, người anh em nào cần trang chơi xanh chín để giải trí Nổ Hũ thì xem thử trang này nhé. Tốc độ bàn thờ: https://homemaker.org.in/#. Chiến thắng nhé.
excellent put up, very informative. I’m wondering why the opposite specialists of this sector don’t understand this. You should continue your writing. I am confident, you have a great readers’ base already!
Xin chào 500 anh em, bác nào muốn tìm nhà cái uy tín để chơi Game bài đừng bỏ qua địa chỉ này. Nạp rút 1-1: bj88. Húp lộc đầy nhà.
Hello m?i ngu?i, bac nao mu?n tim nha cai uy tin d? gi?i tri Casino d?ng b? qua ch? nay. N?p rut 1-1: Link vao BJ88. Hup l?c d?y nha.
Chào cả nhà, nếu anh em đang kiếm trang chơi xanh chín để giải trí Tài Xỉu thì xem thử con hàng này. Không lo lừa đảo: bj88. Chúc anh em may mắn.
Hello! Do you know if they make any plugins to safeguard
against hackers? I’m kinda paranoid about losing everything I’ve worked
hard on. Any tips?
Herkese merhaba, bu populer site uyeleri ad?na onemli bir paylas?m yapmak istiyorum. Bildiginiz gibi bahis platformu domain adresini BTK engeli yuzunden tekrar degistirdi. Erisim hatas? yas?yorsan?z link asag?da. Cal?san Casibom guncel giris baglant?s? art?k asag?dad?r https://casibom.mex.com/# Bu link ile dogrudan siteye baglanabilirsiniz. Ek olarak kay?t olanlara verilen freespin f?rsatlar?n? mutlaka kac?rmay?n. Guvenilir casino deneyimi surdurmek icin Casibom tercih edebilirsiniz. Tum forum uyelerine bol sans dilerim.
I have been reading out some of your articles and i can claim pretty clever stuff. I will surely bookmark your blog.
Gençler, Grandpashabet yeni adresi belli oldu. Giremeyenler şu linkten devam edebilir Grandpashabet Sorunsuz Giriş
Arkadaslar selam, Vay Casino kullan?c?lar? icin k?sa bir bilgilendirme yapmak istiyorum. Bildiginiz gibi Vaycasino giris linkini yine guncelledi. Erisim sorunu varsa panik yapmay?n. Guncel siteye erisim linki art?k asag?dad?r: Vaycasino Yeni Adres Bu link ile vpn kullanmadan siteye girebilirsiniz. Guvenilir bahis deneyimi icin Vay Casino tercih edebilirsiniz. Herkese bol sans temenni ederim.
I loved up to you’ll receive performed right here. The cartoon is tasteful, your authored material stylish. nonetheless, you command get bought an impatience over that you want be handing over the following. ill for sure come further before once more as precisely the same just about a lot continuously within case you defend this hike.
Well I definitely enjoyed studying it. This post procured by you is very useful for correct planning.
Gençler, Grandpashabet Casino son linki açıklandı. Giremeyenler şu linkten giriş yapabilir https://grandpashabet.in.net/#
You really make it seem so easy with your presentation but I find this matter to be actually something that I think I would never understand. It seems too complicated and extremely broad for me. I’m looking forward for your next post, I’ll try to get the hang of it!
you are really a good webmaster. The site loading speed is incredible. It seems that you’re doing any unique trick. Furthermore, The contents are masterwork. you have done a fantastic job on this topic!
Grandpashabet guncel adresi laz?msa iste burada. Sorunsuz giris yapmak icin t?kla Grandpashabet Sorunsuz Giris Yuksek oranlar bu sitede.
Matbet TV giriş adresi lazımsa işte burada. Maç izlemek için tıkla: https://matbet.jp.net/# Canlı maçlar bu sitede. Arkadaşlar, Matbet yeni adresi belli oldu.
Simply wanna comment on few general things, The website layout is perfect, the subject matter is real fantastic. “War is much too serious a matter to be entrusted to the military.” by Georges Clemenceau.
There is noticeably a bundle to know about this. I assume you made certain nice points in features also.
Thanks for another great post. Where else may just anybody get that kind of information in such an ideal approach of writing? I have a presentation subsequent week, and I’m at the search for such information.
Grandpashabet giris adresi ar?yorsan?z iste burada. Sorunsuz erisim icin t?kla Grandpashabet Giris Deneme bonusu bu sitede.
Gençler, Grandpashabet Casino yeni adresi açıklandı. Giremeyenler şu linkten devam edebilir Grandpashabet Twitter
Herkese merhaba, bu popüler site oyuncuları için kısa bir bilgilendirme yapmak istiyorum. Herkesin bildiği üzere bahis platformu adresini erişim kısıtlaması nedeniyle yine değiştirdi. Siteye ulaşım sorunu yaşıyorsanız link aşağıda. Yeni Casibom giriş bağlantısı şu an paylaşıyorum Hemen Oyna Paylaştığım bağlantı ile doğrudan siteye bağlanabilirsiniz. Ek olarak kayıt olanlara sunulan yatırım bonusu fırsatlarını mutlaka kaçırmayın. Güvenilir bahis keyfi sürdürmek için Casibom tercih edebilirsiniz. Tüm forum üyelerine bol kazançlar dilerim.
Grandpasha güncel linki arıyorsanız işte burada. Hızlı erişim için https://grandpashabet.in.net/# Deneme bonusu bu sitede.
This actually answered my problem, thank you!
Herkese merhaba, bu site oyuncular? ad?na k?sa bir duyuru paylas?yorum. Bildiginiz gibi Vaycasino giris linkini yine degistirdi. Giris hatas? varsa endise etmeyin. Guncel Vaycasino giris adresi art?k burada: Vaycasino Twitter Paylast?g?m baglant? ile vpn kullanmadan siteye erisebilirsiniz. Guvenilir casino keyfi icin Vaycasino tercih edebilirsiniz. Herkese bol sans dilerim.
Matbet TV güncel linki lazımsa doğru yerdesiniz. Hızlı için: Matbet Canlı maçlar burada. Gençler, Matbet bahis yeni adresi belli oldu.
Arkadaslar, Grandpashabet yeni adresi ac?kland?. Adresi bulamayanlar su linkten giris yapabilir https://grandpashabet.in.net/#
Dostlar selam, Vay Casino oyuncuları adına kısa bir duyuru yapmak istiyorum. Bildiğiniz gibi site adresini tekrar güncelledi. Giriş sorunu varsa endişe etmeyin. Yeni Vaycasino giriş linki artık burada: Vaycasino İndir Bu link ile doğrudan hesabınıza girebilirsiniz. Güvenilir casino deneyimi için Vay Casino tercih edebilirsiniz. Tüm forum üyelerine bol kazançlar temenni ederim.
Herkese selam, bu site oyuncuları için önemli bir duyuru yapmak istiyorum. Bildiğiniz gibi site giriş linkini yine güncelledi. Giriş sorunu yaşıyorsanız panik yapmayın. Son Vay Casino giriş linki artık burada: Resmi Site Paylaştığım bağlantı ile vpn kullanmadan hesabınıza girebilirsiniz. Güvenilir casino deneyimi için Vaycasino tercih edebilirsiniz. Tüm forum üyelerine bol şans dilerim.
Dostlar selam, bu site oyuncuları için kısa bir bilgilendirme paylaşıyorum. Malum platform giriş linkini yine değiştirdi. Giriş sorunu varsa endişe etmeyin. Yeni siteye erişim adresi şu an aşağıdadır: https://vaycasino.us.com/# Paylaştığım bağlantı ile vpn kullanmadan siteye girebilirsiniz. Güvenilir bahis deneyimi için Vay Casino tercih edebilirsiniz. Tüm forum üyelerine bol şans dilerim.
Arkadaslar, Grandpashabet Casino yeni adresi belli oldu. Adresi bulamayanlar su linkten giris yapabilir https://grandpashabet.in.net/#
Would love to perpetually get updated outstanding website! .
Matbet güncel linki lazımsa işte burada. Maç izlemek için: Buraya Tıkla Yüksek oranlar burada. Arkadaşlar, Matbet yeni adresi açıklandı.
I’ve been active for a week, mostly for staking, and it’s always stable performance. Perfect for both new and experienced traders.
Thank you for sharing with us, I believe this website truly stands out : D.
Matbet güncel linki arıyorsanız işte burada. Sorunsuz için: https://matbet.jp.net/# Yüksek oranlar bu sitede. Gençler, Matbet bahis son linki açıklandı.
Herkese merhaba, Vaycasino kullan?c?lar? ad?na k?sa bir bilgilendirme yapmak istiyorum. Bildiginiz gibi platform giris linkini yine guncelledi. Erisim sorunu varsa panik yapmay?n. Cal?san siteye erisim adresi art?k asag?dad?r: Buraya T?kla Paylast?g?m baglant? ile vpn kullanmadan siteye erisebilirsiniz. Guvenilir bahis deneyimi icin Vay Casino tercih edebilirsiniz. Herkese bol sans dilerim.
Grandpasha guncel linki laz?msa iste burada. H?zl? giris yapmak icin Grandpashabet Indir Yuksek oranlar bu sitede.
Would you be desirous about exchanging links?
Grandpasha giriş adresi arıyorsanız doğru yerdesiniz. Hızlı giriş yapmak için tıkla Grandpashabet Yüksek oranlar bu sitede.
Herkese selam, Vaycasino oyuncuları adına kısa bir duyuru yapmak istiyorum. Bildiğiniz gibi site adresini yine değiştirdi. Erişim sorunu varsa panik yapmayın. Son Vaycasino giriş linki artık burada: Vaycasino Güncel Bu link ile doğrudan siteye erişebilirsiniz. Lisanslı bahis deneyimi sürdürmek için Vay Casino tercih edebilirsiniz. Herkese bol şans dilerim.
It is really a nice and useful piece of info. I am glad that you shared this helpful information with us. Please keep us up to date like this. Thank you for sharing.
Herkese selam, Casibom sitesi kullanıcıları için kısa bir paylaşım paylaşıyorum. Bildiğiniz gibi Casibom domain adresini erişim kısıtlaması nedeniyle yine güncelledi. Giriş hatası varsa doğru yerdesiniz. Çalışan Casibom güncel giriş linki artık burada Casibom 2026 Paylaştığım bağlantı üzerinden vpn kullanmadan siteye bağlanabilirsiniz. Ek olarak yeni üyelere sunulan yatırım bonusu kampanyalarını da inceleyin. Güvenilir casino keyfi için Casibom tercih edebilirsiniz. Herkese bol kazançlar dilerim.
Herkese selam, Vay Casino kullan?c?lar? icin k?sa bir bilgilendirme yapmak istiyorum. Malum Vaycasino adresini tekrar degistirdi. Giris sorunu varsa endise etmeyin. Guncel Vay Casino giris adresi art?k burada: Buraya T?kla Paylast?g?m baglant? uzerinden direkt hesab?n?za erisebilirsiniz. Lisansl? casino keyfi surdurmek icin Vay Casino dogru adres. Tum forum uyelerine bol sans dilerim.
Good post and right to the point. I don’t know if this is in fact the best place to ask but do you guys have any ideea where to get some professional writers? Thx 🙂
I don’t even know how I ended up here, but I thought this post was great. I don’t know who you are but certainly you are going to a famous blogger if you are not already 😉 Cheers!
Gençler, Grandpashabet yeni adresi açıklandı. Adresi bulamayanlar buradan giriş yapabilir https://grandpashabet.in.net/#
you’re really a good webmaster. The web site loading speed is incredible. It seems that you’re doing any unique trick. Moreover, The contents are masterpiece. you have done a great job on this topic!
Grandpasha giriş linki lazımsa doğru yerdesiniz. Hızlı erişim için tıkla https://grandpashabet.in.net/# Yüksek oranlar burada.
Arkadaslar selam, Vaycasino oyuncular? ad?na k?sa bir duyuru paylas?yorum. Bildiginiz gibi platform adresini yine guncelledi. Giris sorunu varsa panik yapmay?n. Guncel Vaycasino giris linki art?k burada: https://vaycasino.us.com/# Paylast?g?m baglant? uzerinden dogrudan siteye erisebilirsiniz. Guvenilir casino deneyimi icin Vaycasino dogru adres. Tum forum uyelerine bol kazanclar temenni ederim.
Dostlar selam, bu site kullanıcıları için önemli bir duyuru yapmak istiyorum. Bildiğiniz gibi platform giriş linkini tekrar değiştirdi. Giriş sorunu varsa endişe etmeyin. Güncel Vaycasino giriş adresi artık burada: Vaycasino Twitter Bu link üzerinden direkt siteye erişebilirsiniz. Lisanslı casino deneyimi için Vay Casino doğru adres. Tüm forum üyelerine bol şans temenni ederim.
Whoa! This blog looks exactly like my old one! It’s on a completely different subject but it has pretty much the same layout and design. Great choice of colors!
Herkese selam, Vay Casino oyuncuları için önemli bir duyuru paylaşıyorum. Bildiğiniz gibi platform giriş linkini yine güncelledi. Giriş sorunu varsa panik yapmayın. Çalışan siteye erişim linki artık aşağıdadır: https://vaycasino.us.com/# Paylaştığım bağlantı ile direkt siteye erişebilirsiniz. Güvenilir bahis deneyimi sürdürmek için Vay Casino doğru adres. Herkese bol şans dilerim.
Grandpashabet giris linki ar?yorsan?z dogru yerdesiniz. H?zl? erisim icin https://grandpashabet.in.net/# Deneme bonusu burada.
Arkadaşlar selam, Vay Casino oyuncuları adına kısa bir duyuru yapmak istiyorum. Malum platform giriş linkini yine güncelledi. Giriş sorunu yaşıyorsanız panik yapmayın. Son siteye erişim linki şu an burada: Vaycasino Güncel Paylaştığım bağlantı üzerinden doğrudan hesabınıza girebilirsiniz. Lisanslı bahis keyfi sürdürmek için Vay Casino doğru adres. Herkese bol şans temenni ederim.
I got what you intend,saved to my bookmarks, very nice web site.
Grandpashabet guncel adresi ar?yorsan?z iste burada. Sorunsuz erisim icin Grandpashabet Twitter Deneme bonusu burada.
Gençler, Grandpashabet Casino yeni adresi belli oldu. Adresi bulamayanlar şu linkten giriş yapabilir Tıkla Git
Приобретение документа о высшем образовании через надежную компанию дарит много достоинств для покупателя. Приобрести диплом: ochag.flybb.ru/viewtopic.php?f=2&t=919
Excellent read, I just passed this onto a friend who was doing some research on that. And he actually bought me lunch as I found it for him smile Thus let me rephrase that: Thank you for lunch! “Remember It is 10 times harder to command the ear than to catch the eye.” by Duncan Maxwell Anderson.
Matbet güncel adresi lazımsa işte burada. Maç izlemek için: Matbet Apk Yüksek oranlar bu sitede. Arkadaşlar, Matbet yeni adresi belli oldu.
купить диплом о окончании музыкальной школы купить диплом о окончании музыкальной школы .
Arkadaşlar, Grandpashabet Casino son linki belli oldu. Adresi bulamayanlar şu linkten devam edebilir Grandpashabet Twitter
Matbet TV giris linki ar?yorsan?z iste burada. H?zl? icin t?kla: T?kla Git Yuksek oranlar burada. Arkadaslar, Matbet yeni adresi ac?kland?.
This is very interesting, You are a very skilled blogger. I’ve joined your rss feed and look forward to seeking more of your magnificent post. Also, I’ve shared your web site in my social networks!
Arkadaşlar selam, Vay Casino kullanıcıları adına önemli bir bilgilendirme yapmak istiyorum. Malum site giriş linkini tekrar değiştirdi. Giriş sorunu yaşıyorsanız panik yapmayın. Çalışan Vaycasino giriş linki artık burada: Resmi Site Bu link ile doğrudan siteye erişebilirsiniz. Güvenilir casino deneyimi sürdürmek için Vaycasino doğru adres. Herkese bol kazançlar temenni ederim.
I’m amazed, I have to admit. Rarely do I encounter a blog that’s both equally
educative and interesting, and without a doubt, you’ve hit the nail on the head.
The issue is an issue that too few folks are speaking
intelligently about. Now i’m very happy that I found this
in my hunt for something concerning this.
Arkadaşlar, Grandpashabet son linki belli oldu. Adresi bulamayanlar buradan devam edebilir Grandpashabet Giriş
Having read this I thought it was very informative. I appreciate you taking the time and effort to put this article together. I once again find myself spending way to much time both reading and commenting. But so what, it was still worth it!
Dostlar selam, bu site oyuncular? icin onemli bir bilgilendirme yapmak istiyorum. Malum platform giris linkini yine degistirdi. Giris sorunu varsa endise etmeyin. Son siteye erisim linki su an asag?dad?r: https://vaycasino.us.com/# Paylast?g?m baglant? ile dogrudan hesab?n?za erisebilirsiniz. Guvenilir bahis deneyimi surdurmek icin Vay Casino dogru adres. Tum forum uyelerine bol sans temenni ederim.
Мы предлагаем дипломы психологов, юристов, экономистов и прочих профессий по приятным ценам. Стоимость зависит от выбранной специальности, года выпуска и образовательного учреждения: lelaa.khestcorp.com/ag/carmellamingto
Matbet güncel linki lazımsa doğru yerdesiniz. Sorunsuz için: Hemen Oyna Yüksek oranlar burada. Gençler, Matbet yeni adresi belli oldu.
I very thankful to find this internet site on bing, just what I was looking for : D as well saved to fav.
Gencler, Grandpashabet son linki ac?kland?. Adresi bulamayanlar buradan devam edebilir https://grandpashabet.in.net/#
Grandpashabet giriş linki arıyorsanız doğru yerdesiniz. Hızlı giriş yapmak için https://grandpashabet.in.net/# Deneme bonusu bu sitede.
Мы изготавливаем дипломы психологов, юристов, экономистов и других профессий по приятным ценам. Стоимость будет зависеть от определенной специальности, года получения и образовательного учреждения: glhwar3.com/forums/users/olatrickett68
Good info. Lucky me I reach on your website by accident, I bookmarked it.
Arkadaşlar, Grandpashabet yeni adresi açıklandı. Adresi bulamayanlar buradan giriş yapabilir https://grandpashabet.in.net/#
Приобрести диплом института по невысокой цене возможно, обращаясь к надежной специализированной фирме: http://git.365zuoye.com/ebonymileham8/8482467/-/issues/1/ – git.365zuoye.com/ebonymileham8/8482467/-/issues/1
It is truly a nice and useful piece of info. I?¦m satisfied that you simply shared this useful information with us. Please keep us informed like this. Thanks for sharing.
Диплом бакалавра. Мы изготавливаем дипломы психологов, юристов, экономистов и других профессий по выгодным тарифам: skpropertiesuae.com/author/jimmydunne8096
Matbet TV güncel linki lazımsa işte burada. Sorunsuz için tıkla: Resmi Site Canlı maçlar bu sitede. Arkadaşlar, Matbet yeni adresi açıklandı.
Grandpashabet giris adresi ar?yorsan?z iste burada. H?zl? giris yapmak icin https://grandpashabet.in.net/# Yuksek oranlar burada.
Мы предлагаем дипломы любых профессий по доступным ценам.– exoticspotter.com/forum/topic-submit
Grandpasha giris adresi laz?msa iste burada. Sorunsuz erisim icin https://grandpashabet.in.net/# Deneme bonusu burada.
Мы предлагаем дипломы любой профессии по приятным тарифам. Диплом об образовании когда-то считался основным документом, который способствовал успешному поиску работы. Приобрести диплом об образовании!: rpspares.in/diplom-za-korotkij-srok-sroki-ceny-uslovija-463
Herkese selam, Vaycasino kullanıcıları adına kısa bir duyuru yapmak istiyorum. Malum site adresini tekrar değiştirdi. Giriş hatası yaşıyorsanız endişe etmeyin. Son Vay Casino giriş linki artık burada: Vaycasino 2026 Bu link üzerinden vpn kullanmadan hesabınıza girebilirsiniz. Lisanslı bahis keyfi sürdürmek için Vay Casino doğru adres. Tüm forum üyelerine bol kazançlar dilerim.
Matbet TV güncel adresi lazımsa işte burada. Hızlı için tıkla: https://matbet.jp.net/# Yüksek oranlar burada. Gençler, Matbet bahis son linki belli oldu.
I’d always want to be update on new blog posts on this internet site, saved to favorites! .
Мы можем предложить дипломы любой профессии по разумным тарифам. Диплом об образовании когда-то считался главным документом, способствовавшим успешному трудоустройству. Заказать диплом ВУЗа!: pytalovo.4admins.ru/posting.php?mode=post&f=15&sid=d3eda0fd1fe1fae1f339590cb017ff4f
Мы изготавливаем дипломы любых профессий по приятным тарифам. Приобрести диплом любого института healingxchange.ning.com/forum/topics/2228296:Topic:2649428
Bahis severler selam, Casibom kullan?c?lar? icin onemli bir duyuru yapmak istiyorum. Bildiginiz gibi site adresini erisim k?s?tlamas? nedeniyle yine tas?d?. Giris sorunu cekenler icin link asag?da. Resmi Casibom guncel giris linki su an burada https://casibom.mex.com/# Paylast?g?m baglant? uzerinden vpn kullanmadan siteye girebilirsiniz. Ek olarak yeni uyelere verilen yat?r?m bonusu f?rsatlar?n? da inceleyin. Guvenilir bahis keyfi icin Casibom dogru adres. Herkese bol kazanclar dilerim.
Fantastic beat ! I wish to apprentice whilst you amend your web site, how could i subscribe for a blog site?
The account aided me a appropriate deal. I were a little bit acquainted of this your
broadcast offered vibrant clear concept
Yesterday, while I was at work, my sister stole my iphone and tested to see if it can survive a 30 foot drop, just so she can be a youtube sensation. My iPad is now destroyed and she has 83 views. I know this is totally off topic but I had to share it with someone!
https://t.me/s/russiA_CASIno_1win
Arkadaşlar selam, bu popüler site üyeleri adına kısa bir paylaşım yapmak istiyorum. Bildiğiniz gibi bahis platformu adresini erişim kısıtlaması nedeniyle yine değiştirdi. Erişim problemi çekenler için doğru yerdesiniz. Yeni siteye erişim linki şu an aşağıdadır Casibom 2026 Paylaştığım bağlantı üzerinden vpn kullanmadan siteye bağlanabilirsiniz. Ayrıca kayıt olanlara sunulan freespin fırsatlarını mutlaka kaçırmayın. Güvenilir casino keyfi için Casibom doğru adres. Tüm forum üyelerine bol şans dilerim.
Gençler, Grandpashabet son linki açıklandı. Giremeyenler şu linkten devam edebilir Siteye Git
Grandpasha giriş adresi arıyorsanız doğru yerdesiniz. Sorunsuz erişim için tıkla Grandpashabet Apk Deneme bonusu burada.
Gencler, Grandpashabet Casino son linki belli oldu. Giremeyenler su linkten giris yapabilir Grandpashabet Giris
Arkadaslar, Grandpashabet Casino yeni adresi ac?kland?. Giremeyenler buradan giris yapabilir Grandpashabet Apk
Its excellent as your other blog posts : D, appreciate it for putting up. “Even Albert Einstein reportedly needed help on his 1040 form.” by Ronald Reagan.
I really like your writing style, great information, appreciate it for putting up :D. “All words are pegs to hang ideas on.” by Henry Ward Beecher.
Herkese merhaba, Casibom sitesi kullan?c?lar? ad?na k?sa bir bilgilendirme paylas?yorum. Herkesin bildigi uzere site adresini erisim k?s?tlamas? nedeniyle yine degistirdi. Erisim sorunu cekenler icin cozum burada. Resmi siteye erisim linki art?k paylas?yorum Casibom Indir Bu link ile direkt siteye baglanabilirsiniz. Ek olarak kay?t olanlara verilen yat?r?m bonusu f?rsatlar?n? da kac?rmay?n. En iyi bahis deneyimi icin Casibom tercih edebilirsiniz. Herkese bol sans dilerim.
Gençler, Grandpashabet Casino son linki belli oldu. Adresi bulamayanlar buradan devam edebilir Tıkla Git
Arkadaşlar selam, bu popüler site kullanıcıları adına önemli bir duyuru yapmak istiyorum. Bildiğiniz gibi Casibom adresini erişim kısıtlaması nedeniyle yine taşıdı. Giriş hatası çekenler için çözüm burada. Çalışan Casibom güncel giriş adresi şu an aşağıdadır Casibom Yeni Adres Paylaştığım bağlantı ile vpn kullanmadan siteye girebilirsiniz. Ek olarak kayıt olanlara sunulan freespin fırsatlarını da kaçırmayın. Lisanslı slot keyfi için Casibom doğru adres. Herkese bol şans dilerim.
купить диплом об окончании вуза екатеринбург http://r-diploma30.ru/ .
Hello There. I discovered your blog the usage of msn. That is a very well written article. I will make sure to bookmark it and come back to learn more of your helpful information. Thank you for the post. I will definitely comeback.
Thanks for this tremendous post, I am glad I noticed this internet site on yahoo.
I’ve been using it for a year for portfolio tracking, and the robust security stands out.
What’s up colleagues, pleasant piece of writing and pleasant urging commented at this place, I am in fact enjoying by these.
Hello, Lately came across the best online drugstore for cheap meds. If you want to buy medicines from India cheaply, this store is the best place. You get secure delivery to USA. Check it out: https://indiapharm.in.net/#. Good luck.
To be honest, Just now found an amazing Indian pharmacy to buy generics. If you want to buy ED meds without prescription, IndiaPharm is worth checking. It has fast shipping to USA. Check it out: check availability. Best regards.
Hi all, Just now stumbled upon a great online drugstore for affordable pills. If you need ED meds without prescription, this store is worth checking. It has wholesale rates to USA. Take a look: https://indiapharm.in.net/#. Good luck.
Just desire to say your article is as astonishing. The clarity in your submit is simply nice and that i could think you are a professional on this subject. Well with your permission let me to clutch your feed to keep updated with impending post. Thank you one million and please keep up the gratifying work.
Hi guys, I just found a great website for affordable pills. If you want to save money and need meds from Mexico, this store is worth checking out. No prescription needed and very reliable. Check it out: cheap antibiotics mexico. Cheers.
можно купить диплом медсестры можно купить диплом медсестры .